EW21: Lesson 1: FreeRTOS + CapSense

Embedded World 2021 - Infineon ModusToolbox PSoC 6 Drone 


Summary

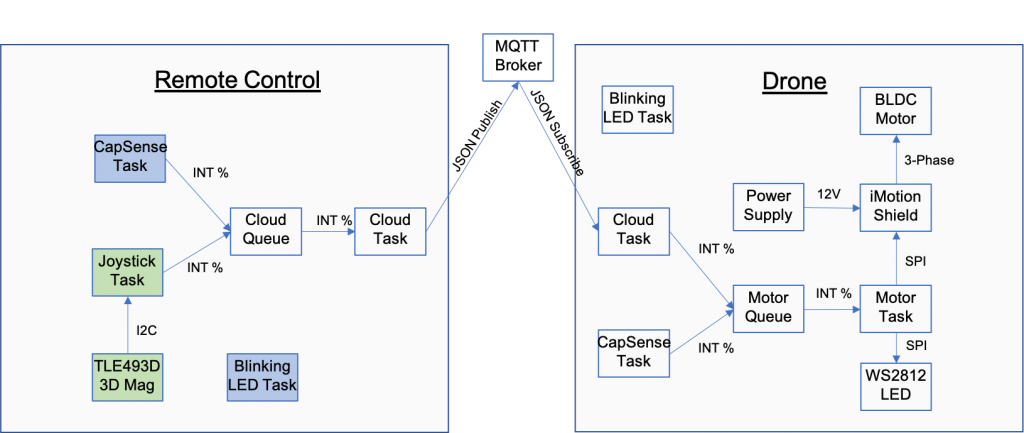
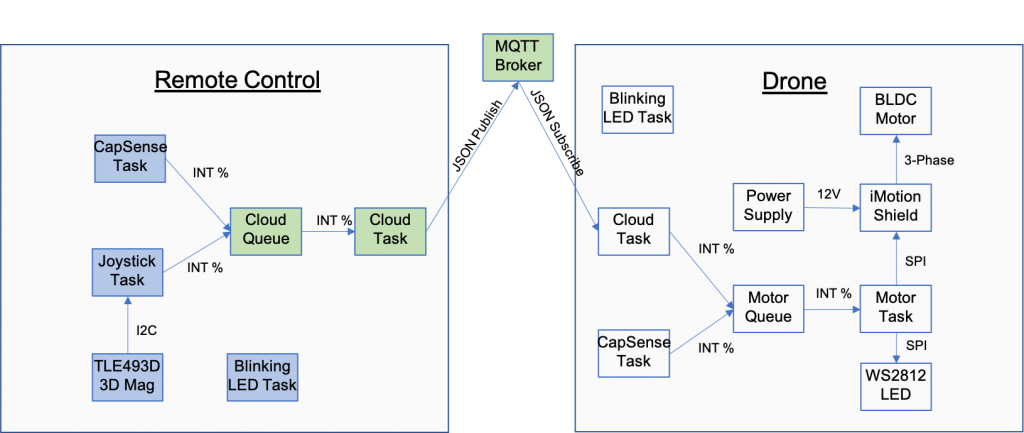
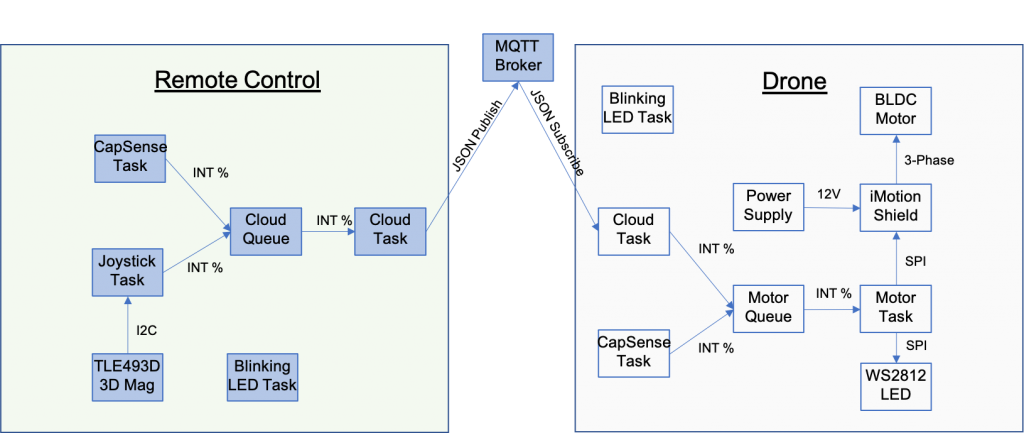
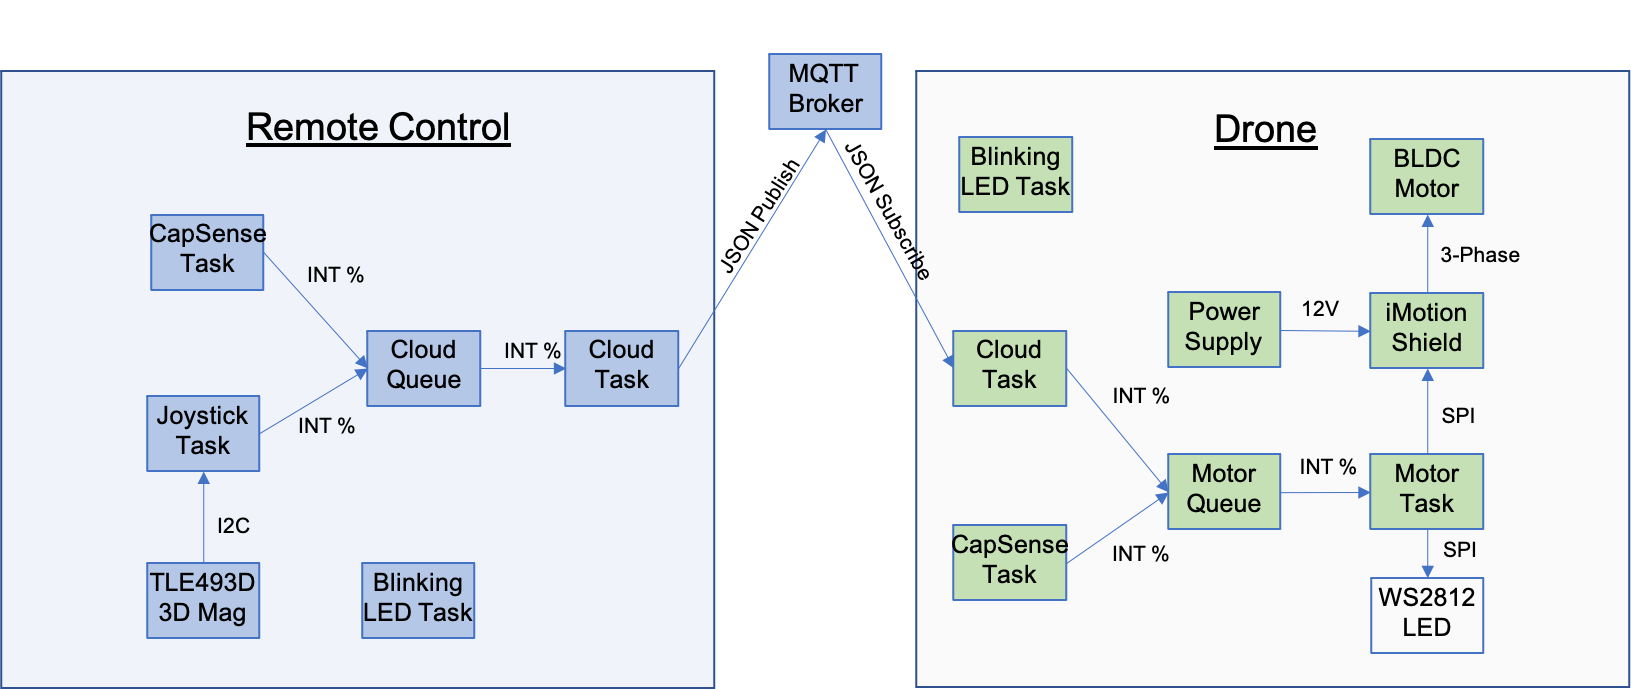
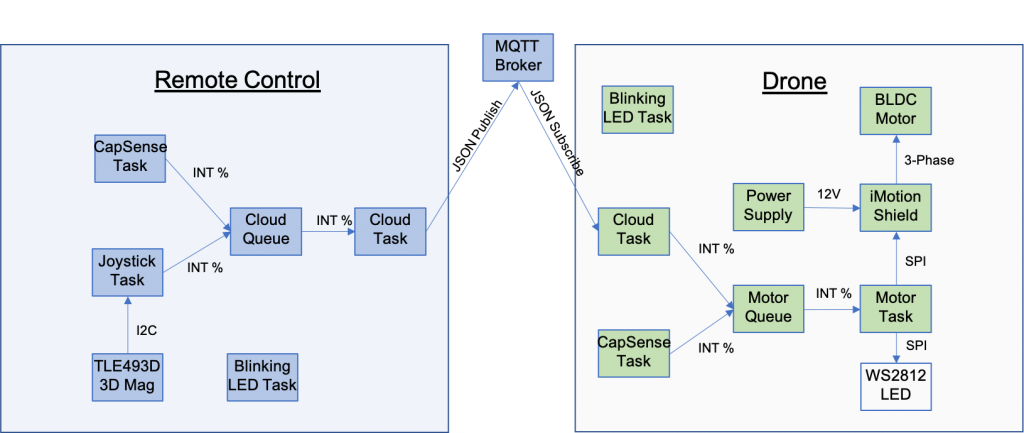
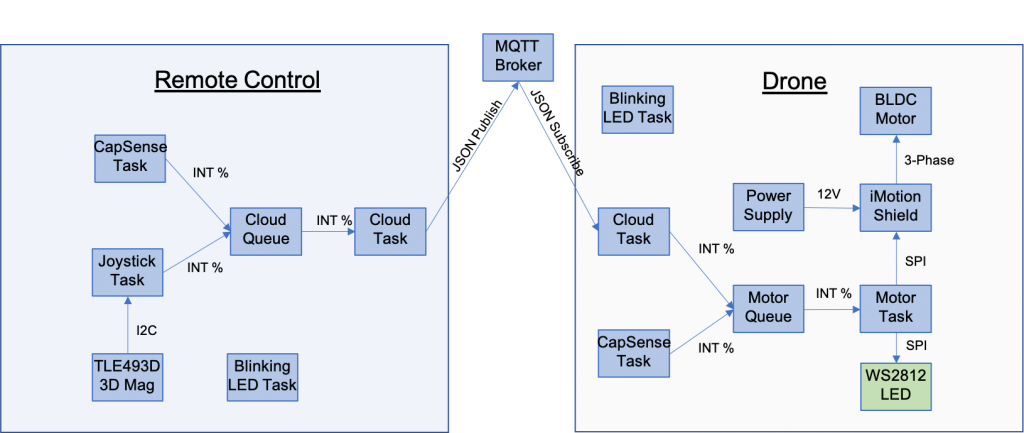
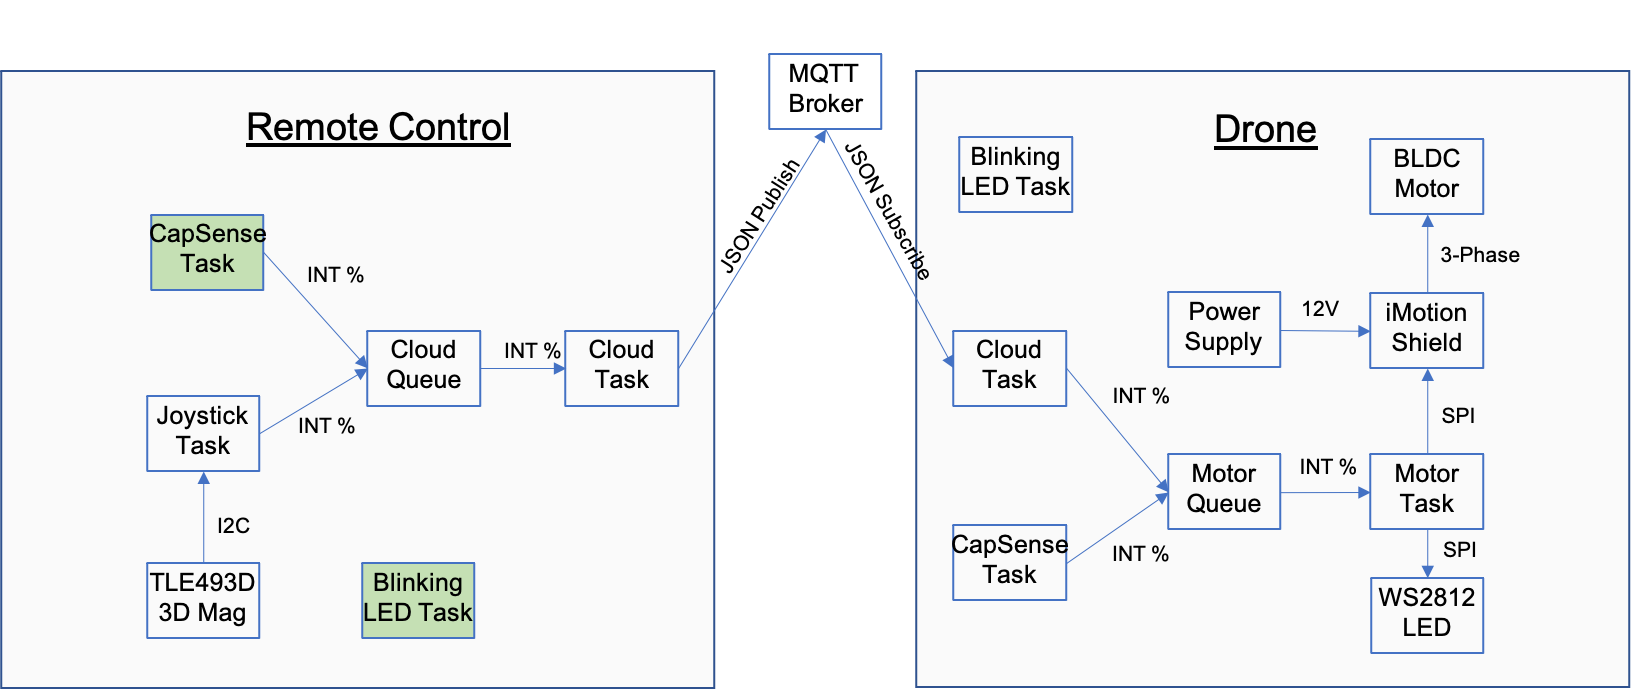
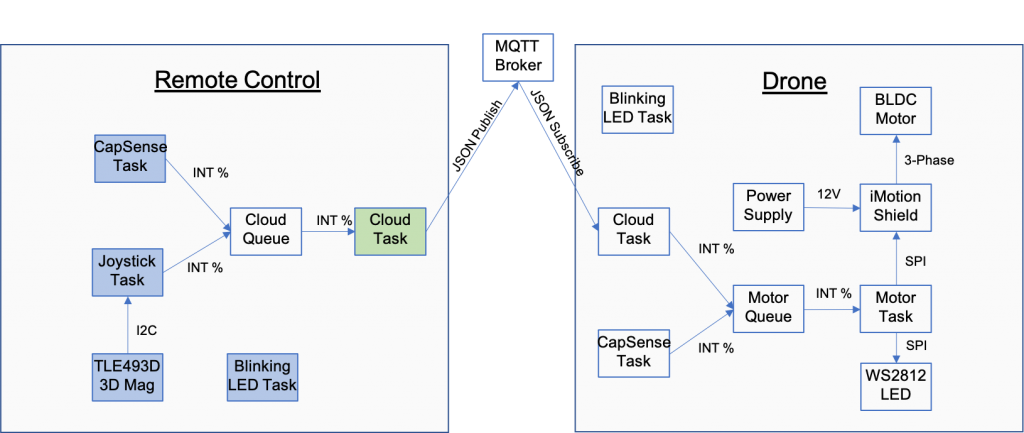
In lesson 1 we will create our first project, which like every good embedded project, will start with the blinking LED.  Then I will show you how to add a CapSense slider and two buttons.  At the end of lesson one you will have the “CapSense Task” colored green.  Here is the architecture:

Learning Objectives

By the end of this lesson I would like you to know about:

  1. Creating and building your first ModusToolbox PSoC 6 MCU Project
  2. The organization of a ModusToolbox project
  3. An introduction to CapSense

Procedure

We will follow these steps:

  1. Update manifest.loc
  2. Create the new project
  3. A Tour of your project
  4. Test the basic project
  5. Add a CapSense task header file
  6. Add a CapSense task dot-c file
  7. Update main.c
  8. Test the CapSense

    1. Update the manifest.loc

    After you install ModusToolbox, there is a subdirectory in your home directory called “.modustoolbox”.  You will almost never need to look in this directory.  However, it contains two interesting things:

    1. A cache of the libraries (more on this later)
    2. A file called “manifest.loc” which will allow you to extend the functionality of Modus Toolbox.

    By adding a URL to the manifest.loc you can add in new

    1. Middleware
    2. Board Support Packages
    3. Example Projects

    To make the Embedded World easier, I have extended ModusToolbox to give you access to some example projects and libraries that I created.  To get access you need to add the line “https://github.com/iotexpert/mtb2-iotexpert-manifests/raw/master/iotexpert-super-manifest.xml” into the manifest.loc file.  You can do that with any editor.  Here is how it looks on my Mac.

    arh ~ $ cd .modustoolbox/
    arh .modustoolbox $ ls
    cache		manifest.loc	manifest.loc~
    arh .modustoolbox $ more manifest.loc
    https://github.com/iotexpert/mtb2-iotexpert-manifests/raw/master/iotexpert-super-manifest.xml
    

    2. Create the new project

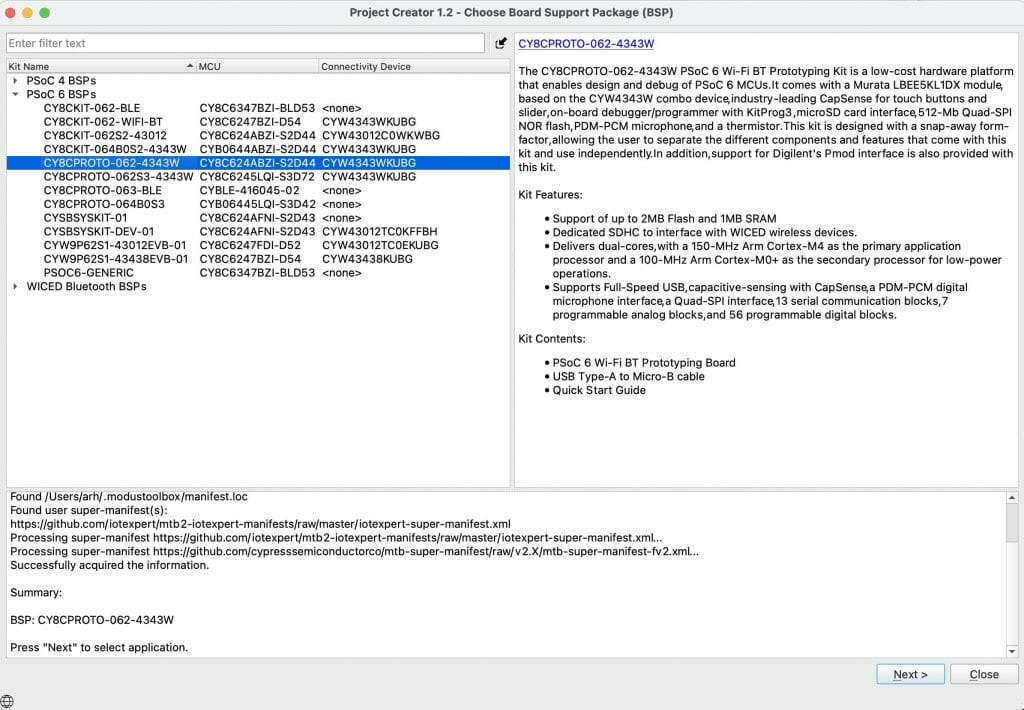
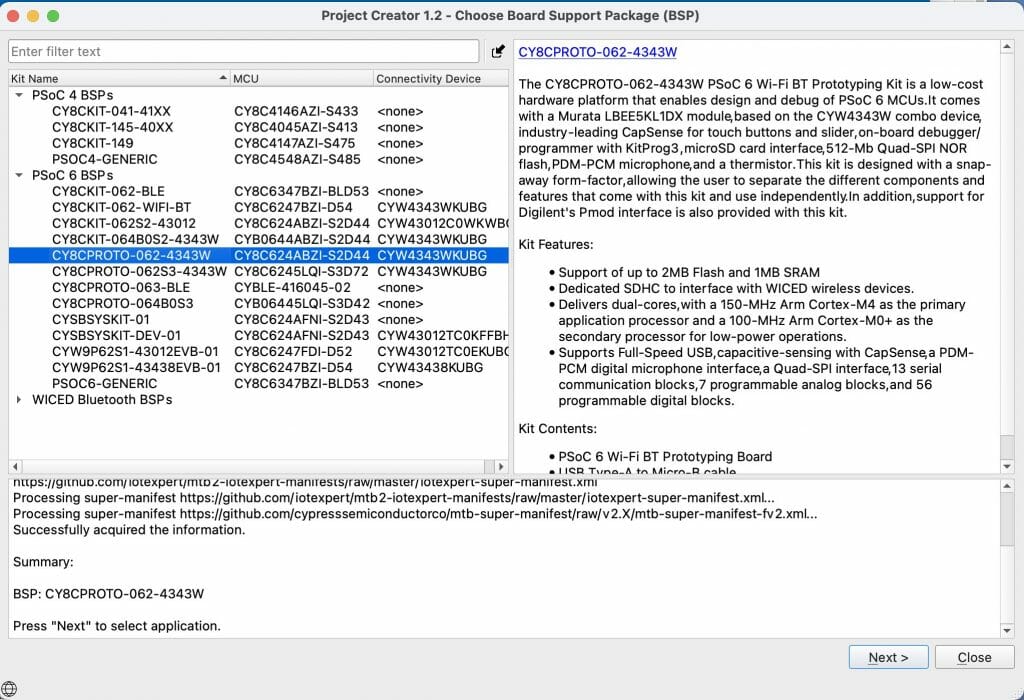
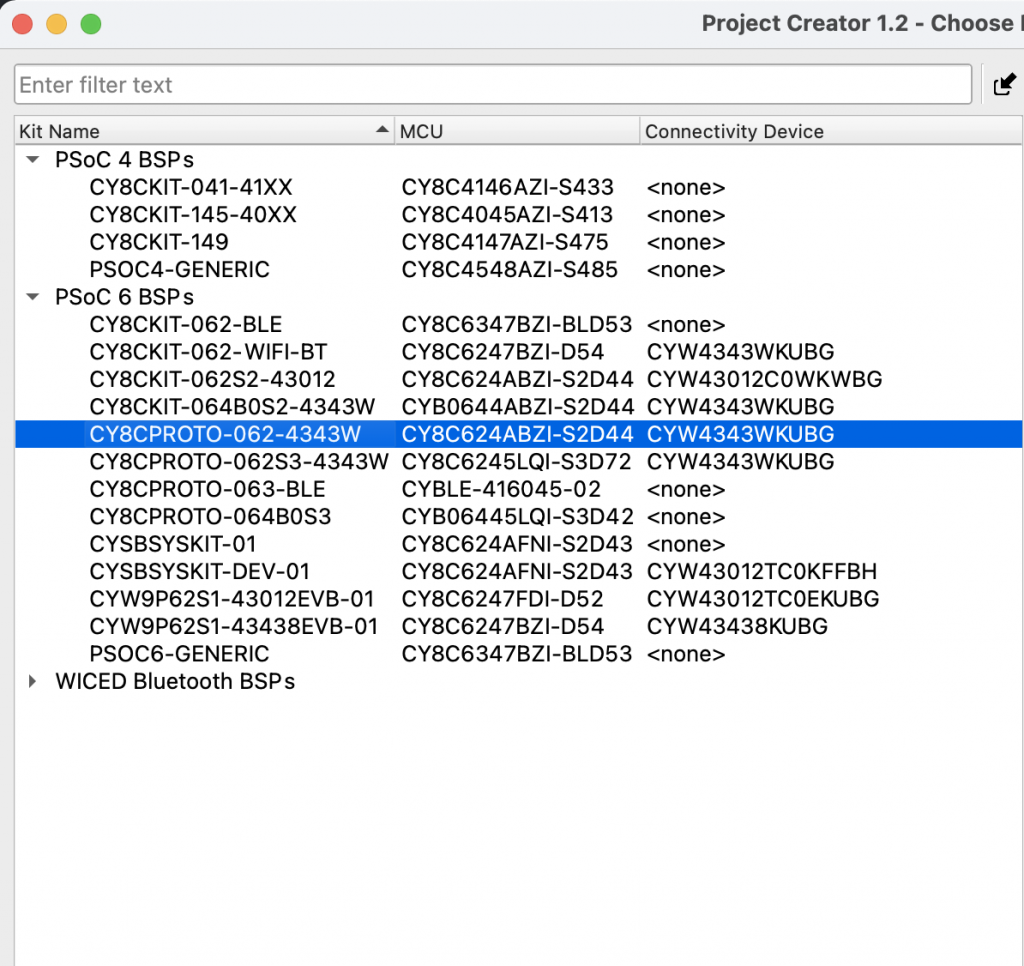
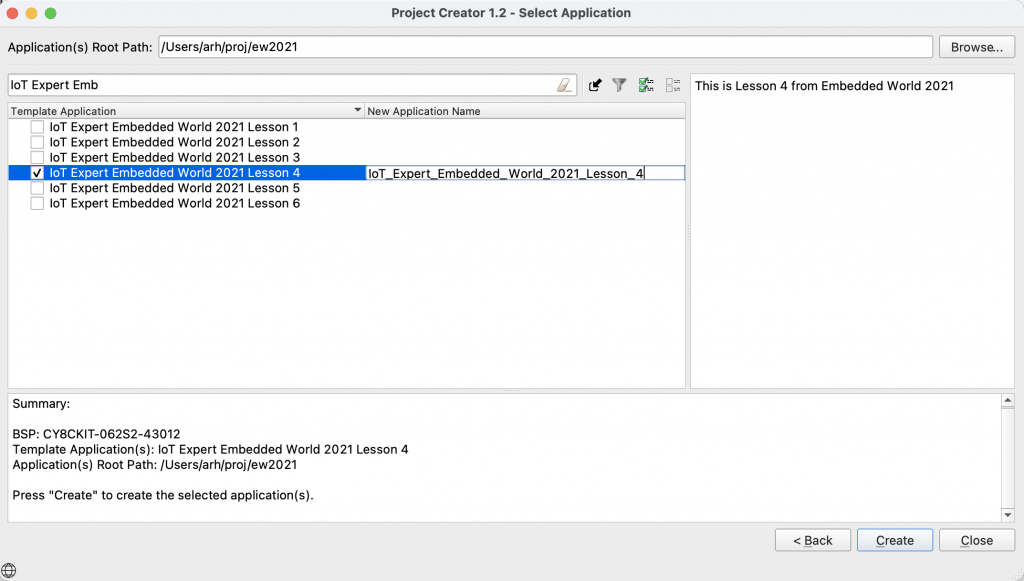
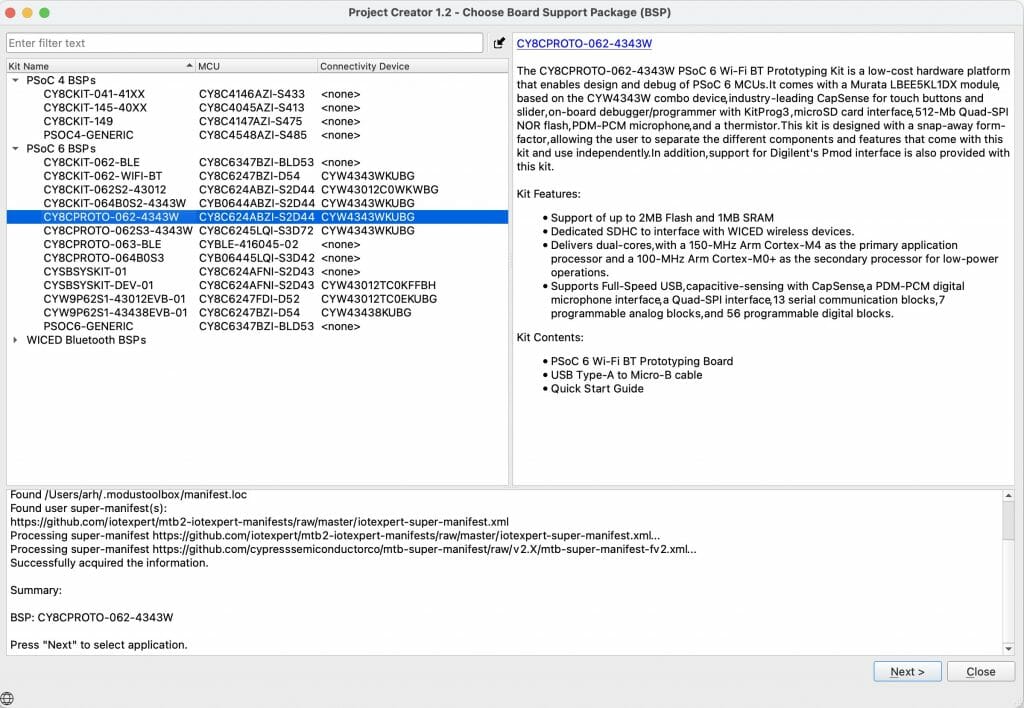
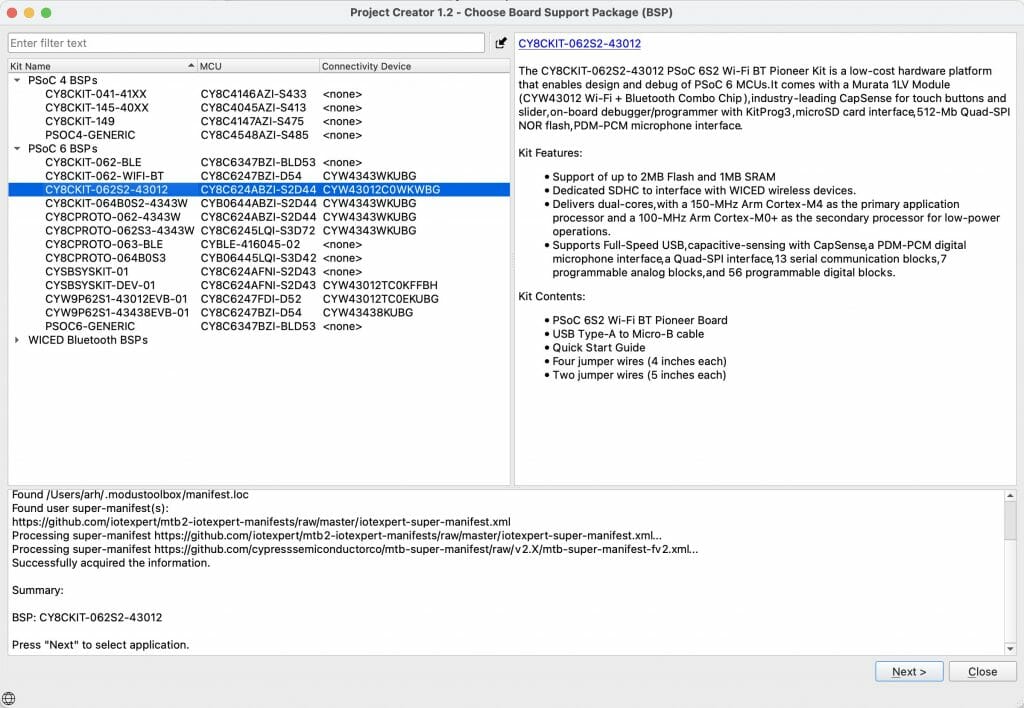
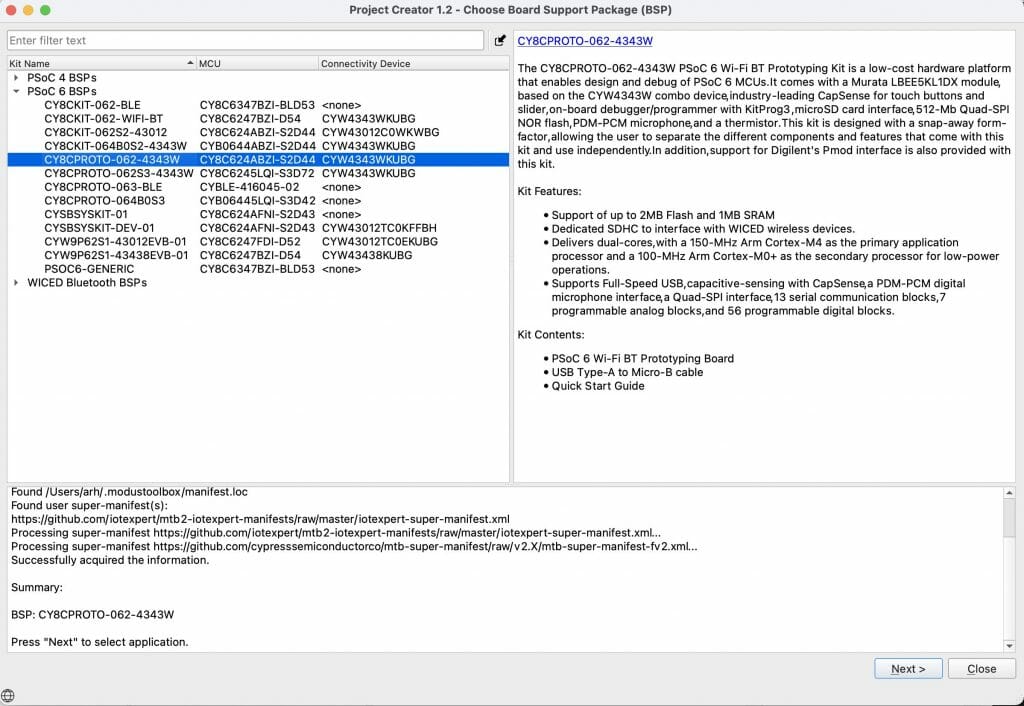
    Now I start the new project creator from the start menu.  Our first project will be using the CY8CPROTO-062-4343W, pick it and press next.

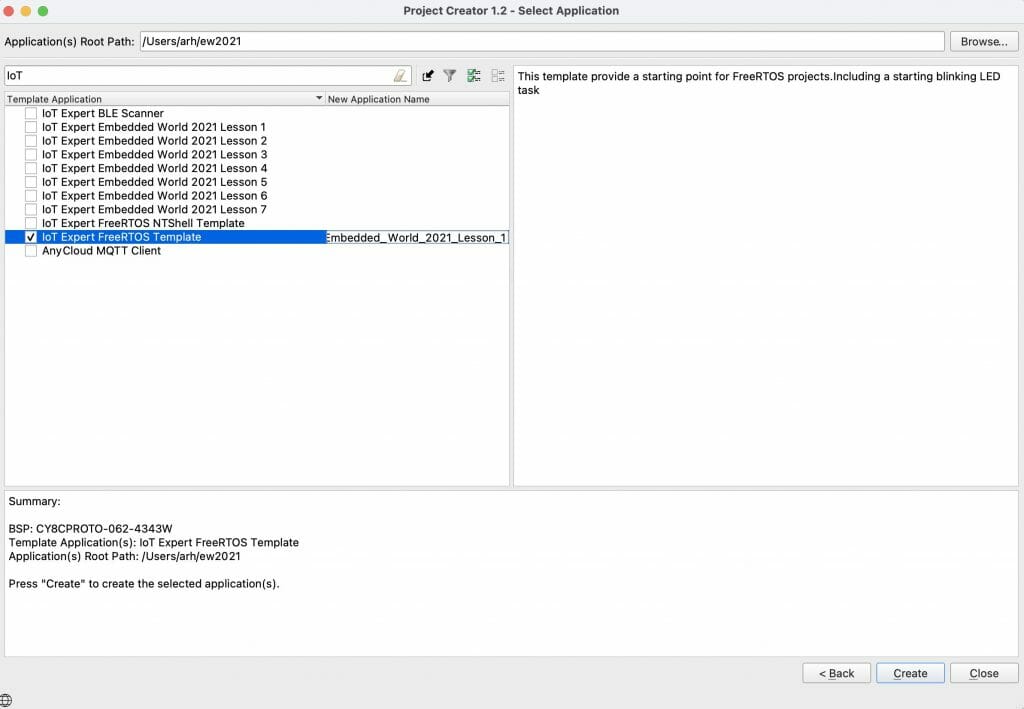
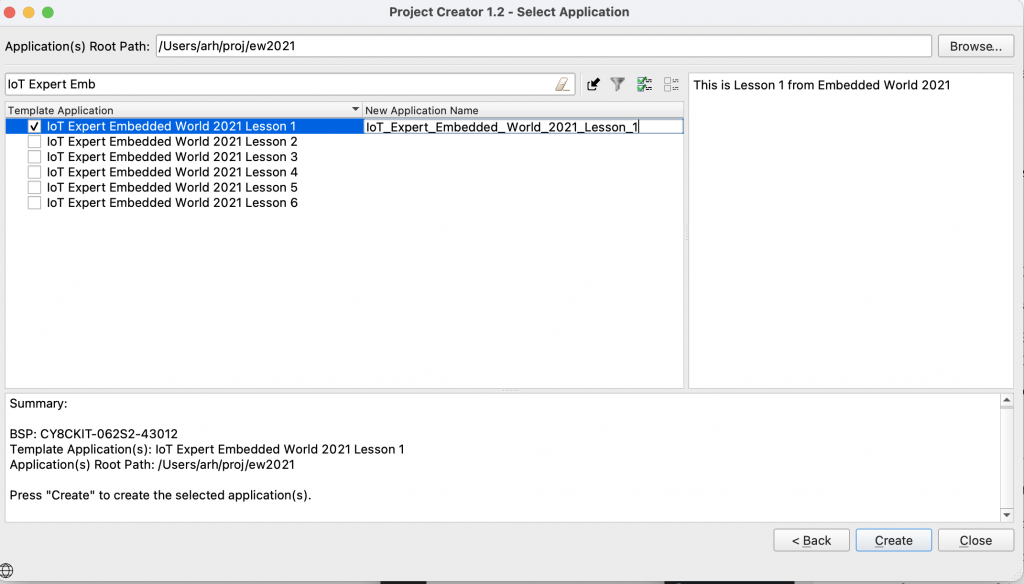
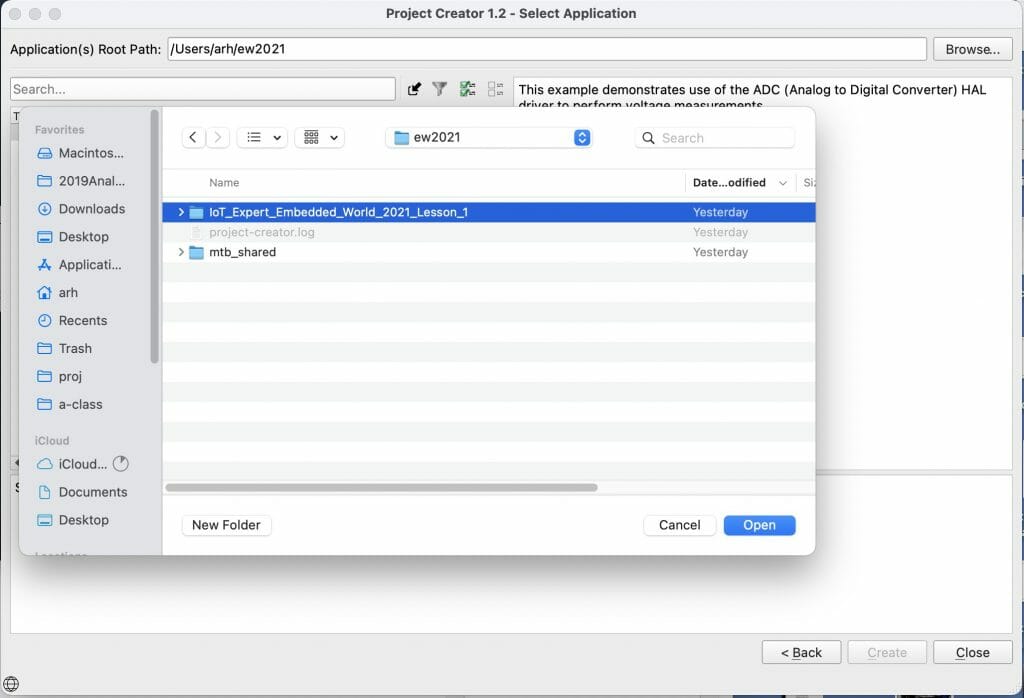
    In the filter box type “IoT” which will filter to my template projects.  To start with we will use the “IoT Expert FreeRTOS Template” which is a basic project I created that gives you a blinking LED, a UART console and FreeRTOS.  Pick that and give it a sensible name.

    After a bit of processing you will have a new application, press close.

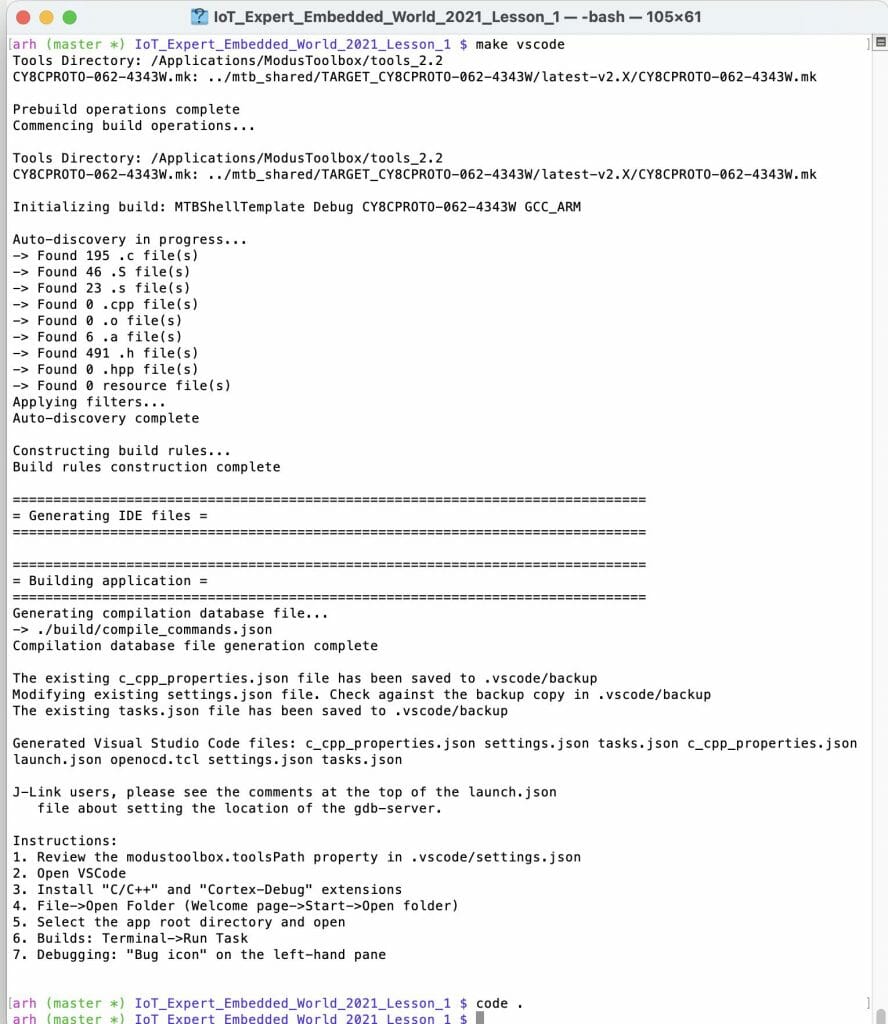
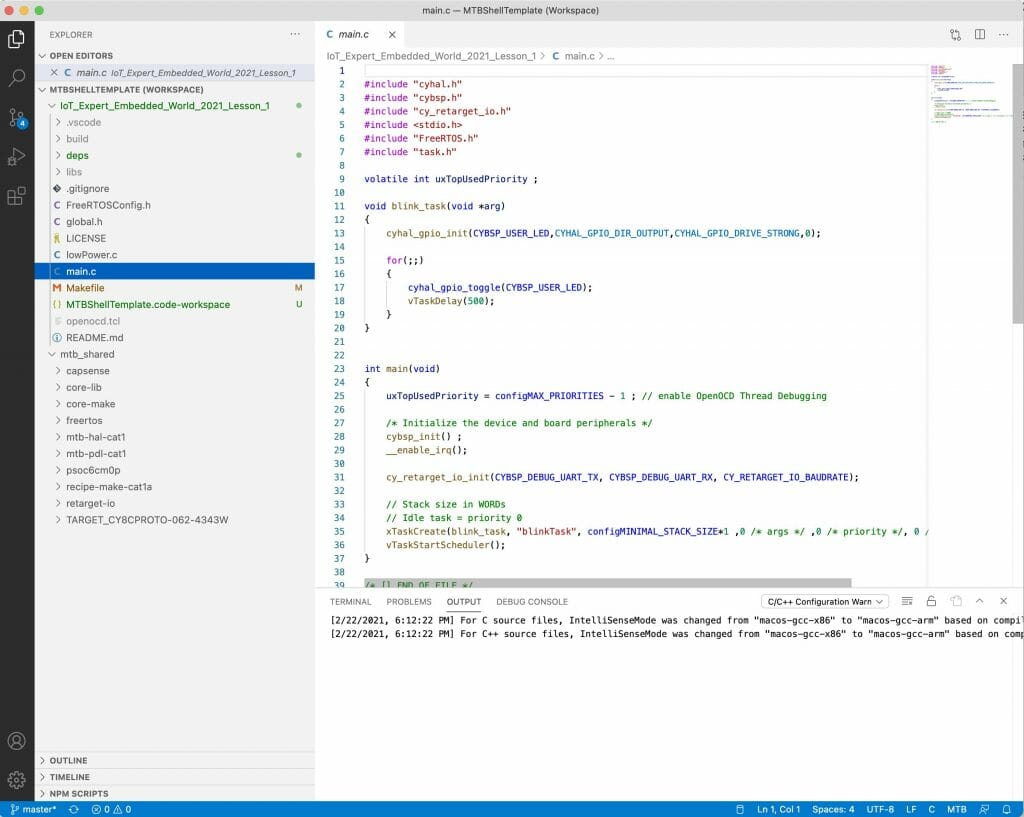
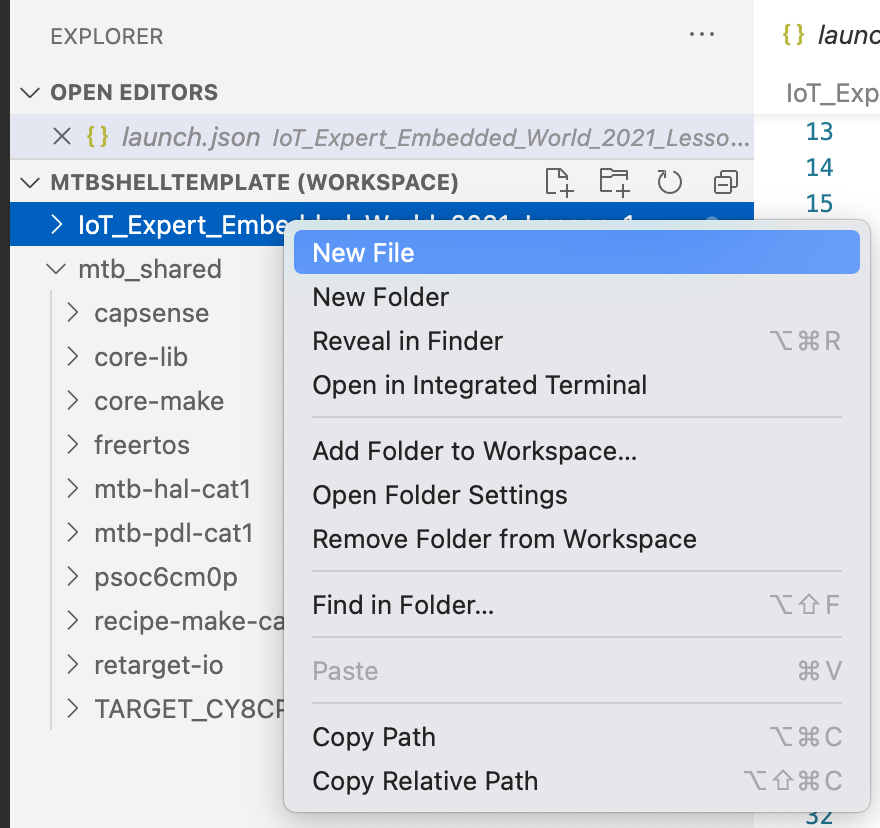
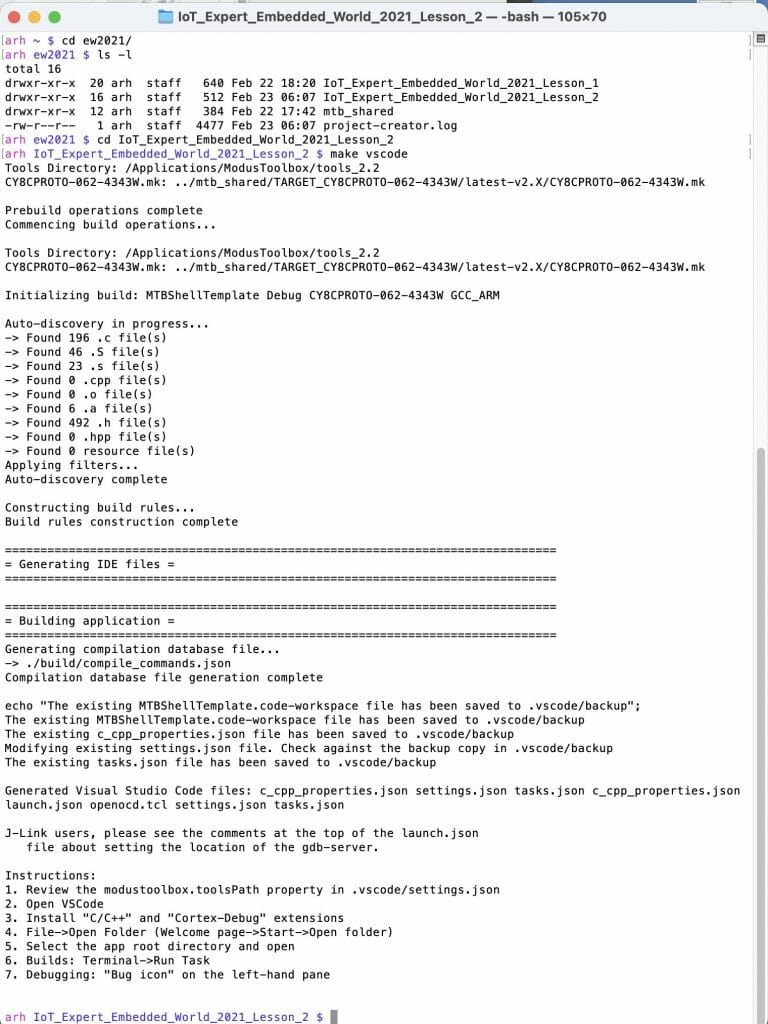
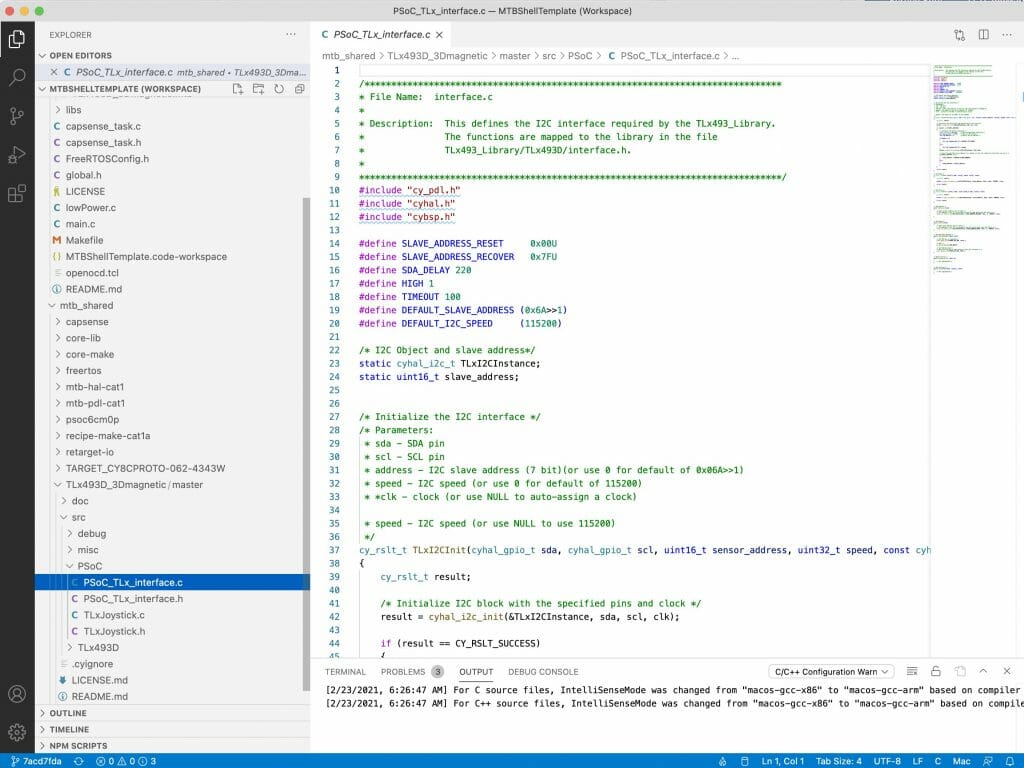
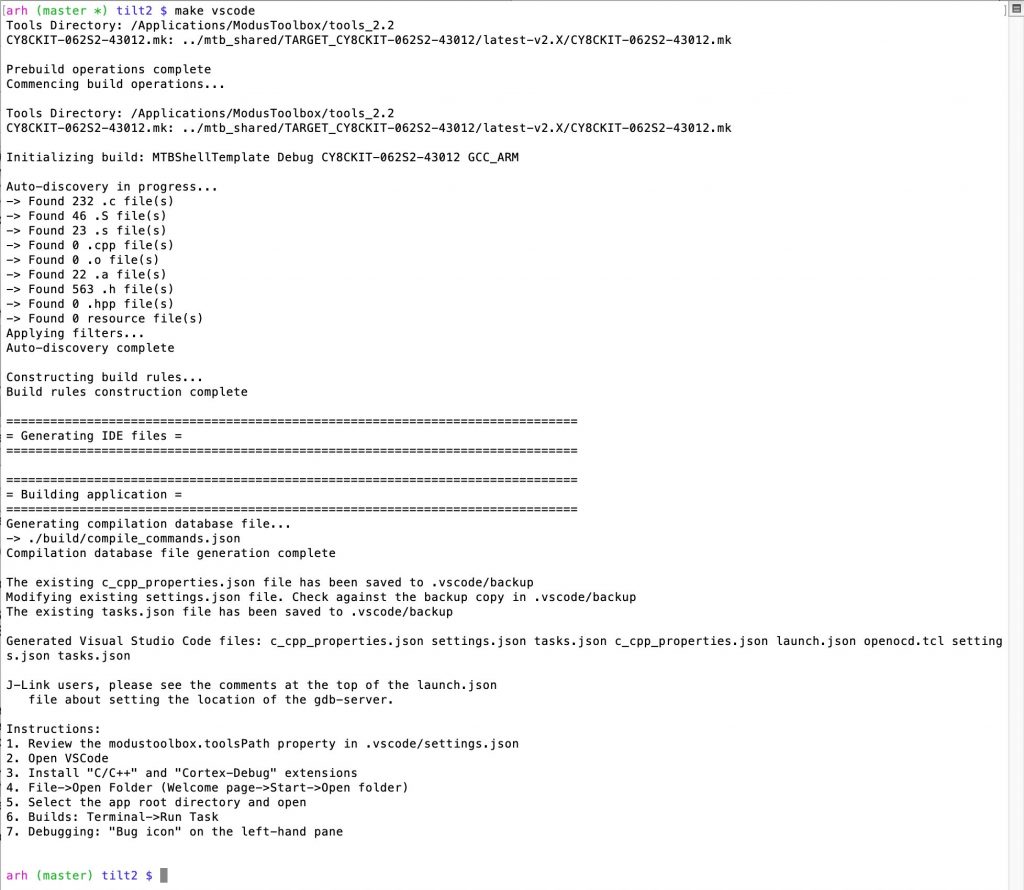
    For this class I am going to use Visual Studio Code.  ModusToolbox also has an Eclipse IDE which you can use, or you can use the command line, IAR, or MicroVision – it’s entirely up to you.  To tell Visual Studio code about my project I will run “make vscode” which will build a vscode project.  Then I run vscode with “code .”

    The make vscode will build all of the files you need including a workspace.  Click”Open Workspace”

    3. A Tour of your Project

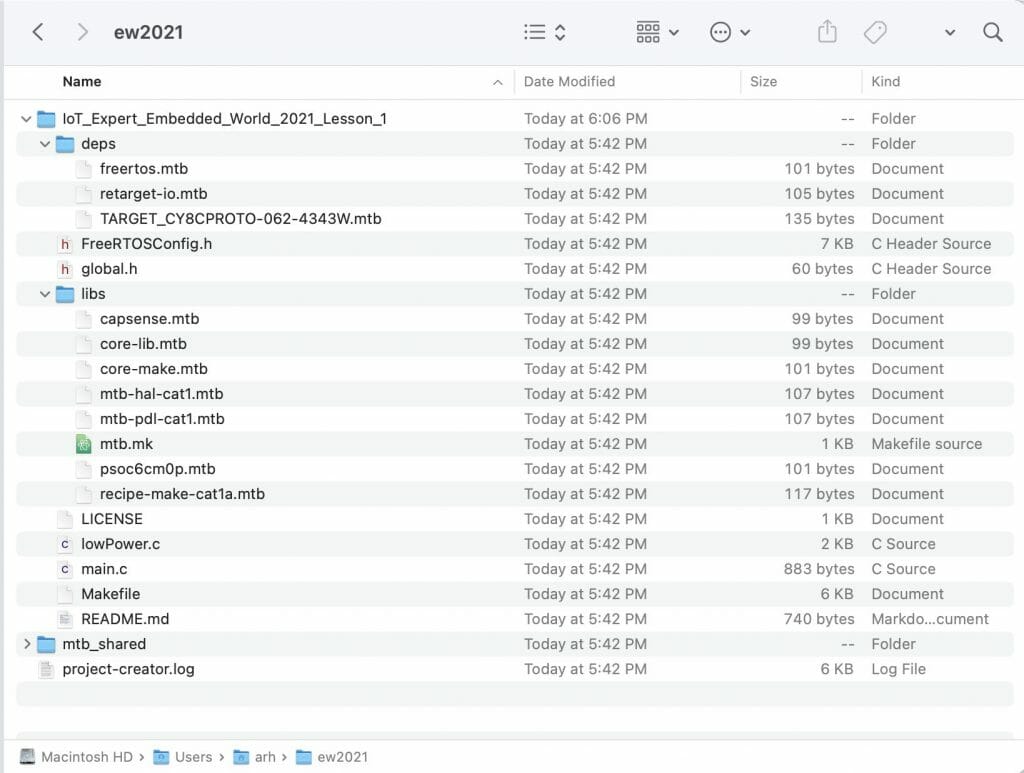
    Start a file browser and look around inside your project.

    You can also see these in Visual Studio Code.

    4. Test the basic project

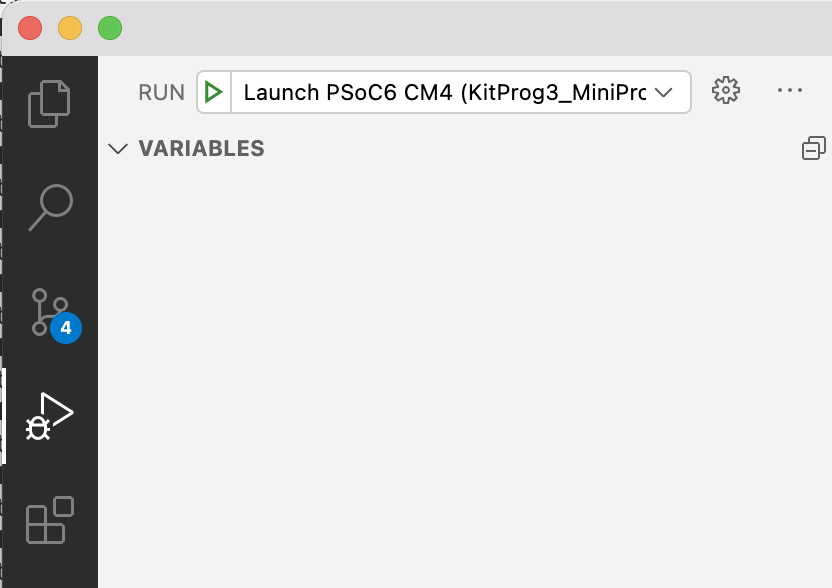
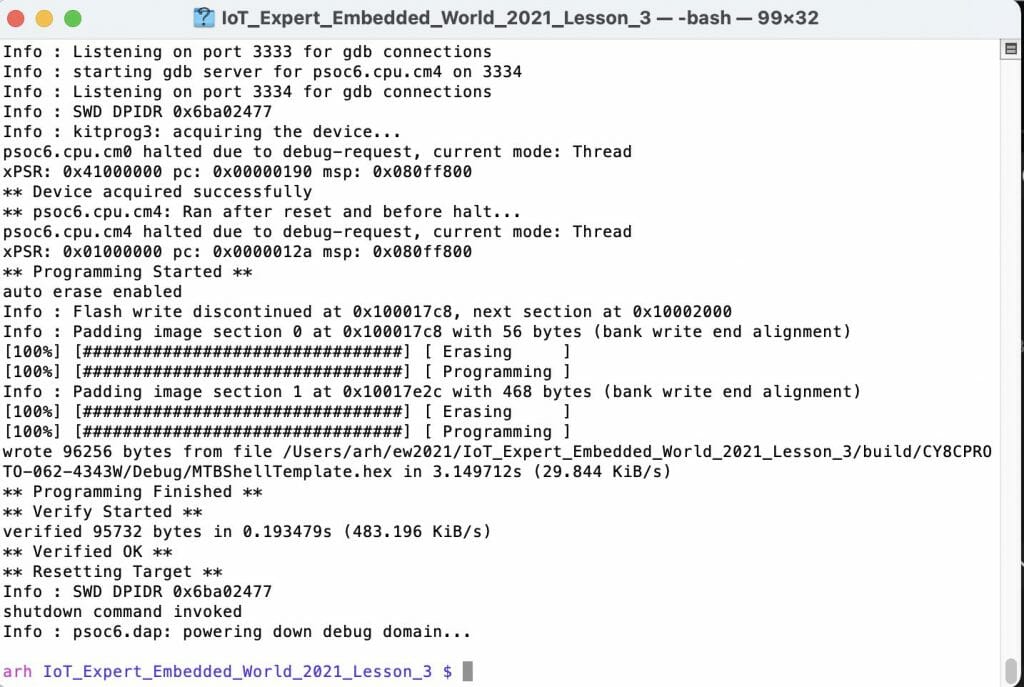
    Now click the debug icon along the left and click the play button to build the project, program it and launch the debugger.

    (You can use the drop-down menu to select “Program (KitProg3_MiniProg4)” and then click the play button if you just want to build and program without launching the debugger.)

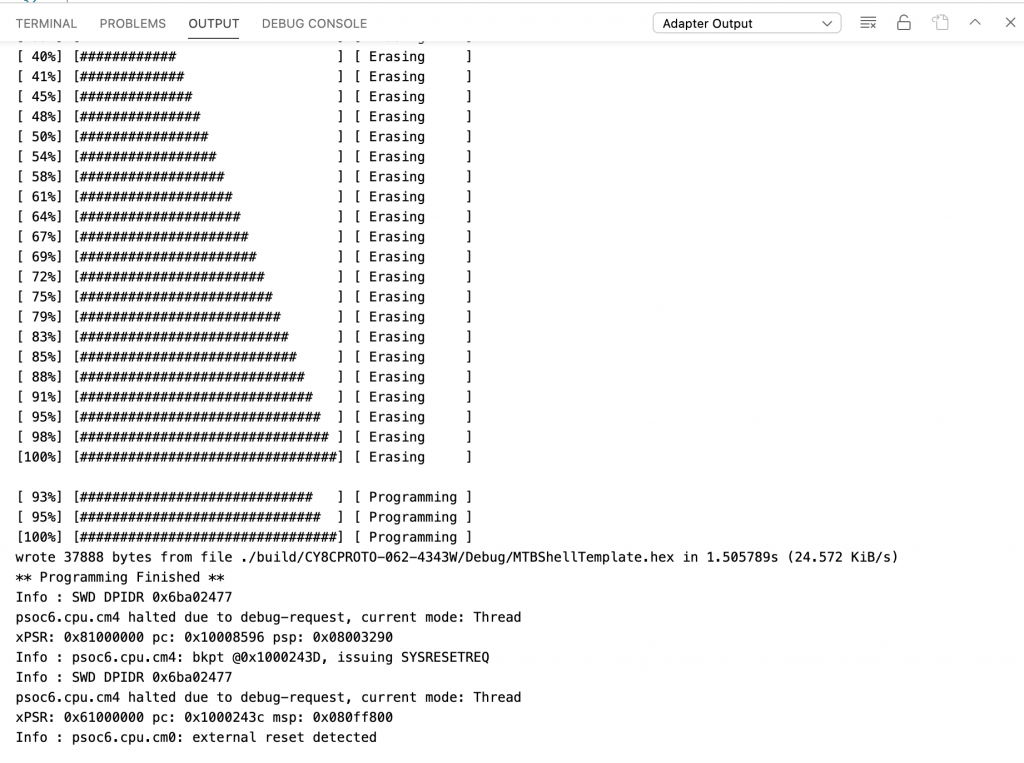
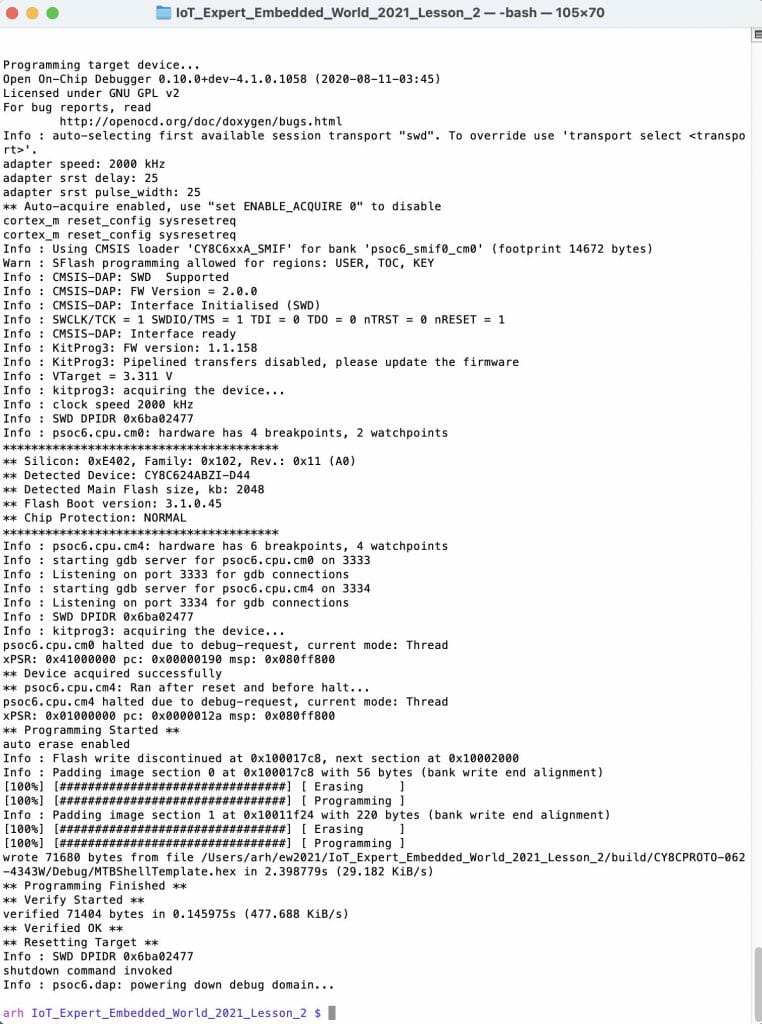
    Notice on the console a bunch of stuff comes ripping out… then it programs your development board.

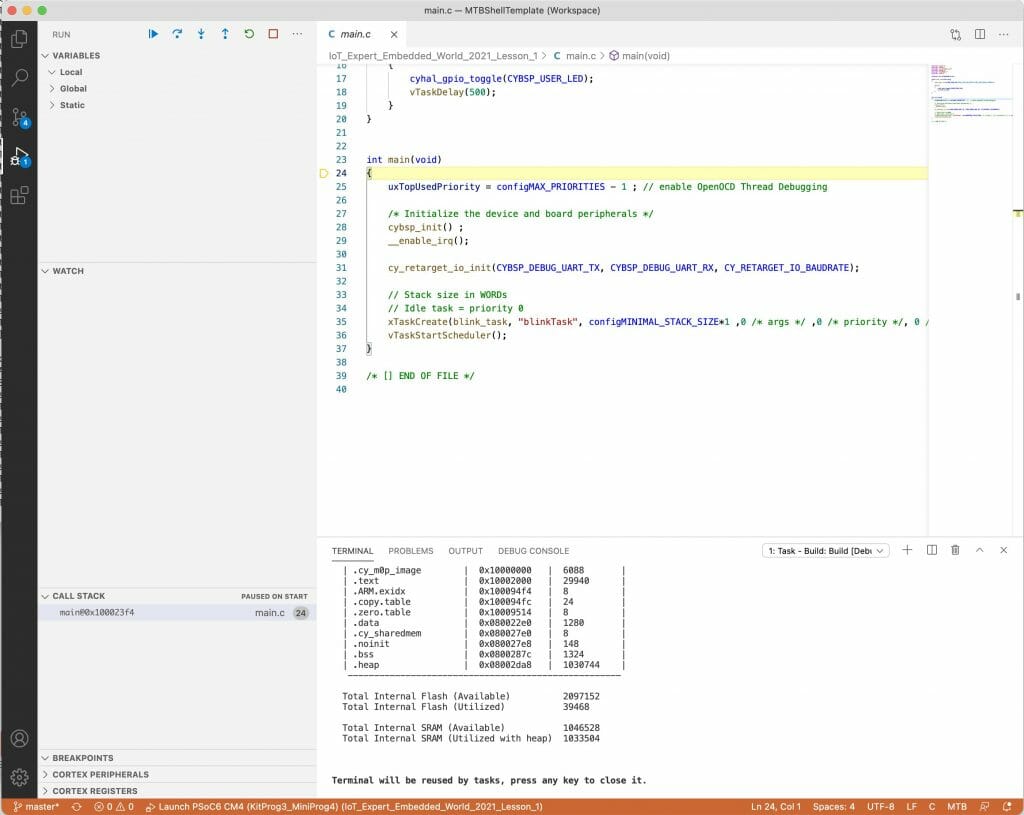
    Once that is done the debugger starts and runs until the start of main.  Press play to get things going.

    5. Add a CapSense task header file

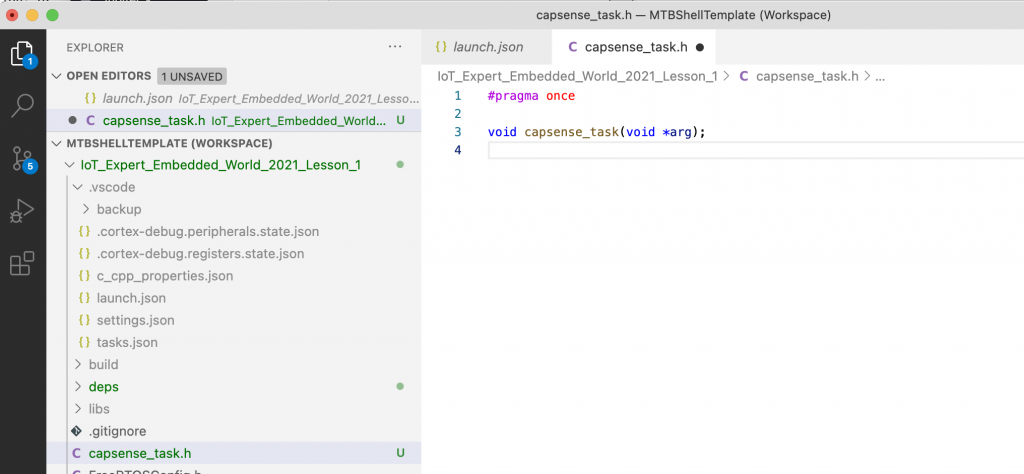
    Now that we have a functioning blinking LED project, let’s add CapSense.  Remember from the architecture picture above that I am going to have a task just for CapSense.  Start by making the public header file called “capsense_task.h”

    In that file there will only be the definition of the task.

    6. Add a CapSense task dot-c file

    Now we will create capsense_task.c.  In that file, you will need some includes to bring in the Infineon drivers.  After the includes I will define several functions

    1. capsense_init: Starts up the CapSense block
    2. process_touch: Figures out what is being touched on the buttons and slider
    3. capsense_isr: Used by the CapSense middleware to process the CapSense interrupt
    4. capsense_end_of_scan_callback: Tells your application when the scanning is done
    5. capsense_register_deepsleep: This allows the CPU to know when it can go to Deep Sleep without interfering with CapSense

    Finally I will define a semaphore to use to block my task until the CapSense scanning is done.

    #include <stdio.h>
    
    #include "cybsp.h"
    #include "cyhal.h"
    #include "cycfg.h"
    #include "cycfg_capsense.h"
    
    #include "FreeRTOS.h"
    #include "task.h"
    #include "semphr.h"
    
    #include "capsense_task.h"
    
    static void capsense_init(void);
    static void process_touch(void);
    static void capsense_isr(void);
    static void capsense_end_of_scan_callback(cy_stc_active_scan_sns_t* active_scan_sns_ptr);
    static void capsense_register_deepsleep(void);
    static QueueHandle_t capsense_done; // Semaphore set in Capsense Callback End of Scan

    The capsense_task function is called by FreeRTOS when it starts up.  This function does what it says

    1. Sets up a sempahore
    2. Initializes the CapSense
    3. Starts scanning
    4. Waits for a scan to complete using a semaphore
    5. Process the widgets
    6. Looks at the touches
    7. Starts another scan
    8. Waits, then loops back
    /*******************************************************************************
    * Function Name: task_capsense
    ********************************************************************************
    * Summary:
    *  Task that initializes the CapSense block and processes the touch input.
    *
    * Parameters:
    *  void *param : Task parameter defined during task creation (unused)
    *
    *******************************************************************************/
    void capsense_task(void* param)
    {
        (void)param;
    
        capsense_done = xQueueCreateCountingSemaphore(1,0);
    
        capsense_init();
    
        Cy_CapSense_ScanAllWidgets(&cy_capsense_context);
    
        for(;;)
        {
            xSemaphoreTake(capsense_done,portMAX_DELAY);
    
            Cy_CapSense_ProcessAllWidgets(&cy_capsense_context);
            process_touch();
            Cy_CapSense_ScanAllWidgets(&cy_capsense_context);
            vTaskDelay(50); // ~20hz update
        }
    }
    

    To initialize the CapSense you need to

    1. Initialize the  CapSense block
    2. Setup the CapSense interrupt
    3. Register the DeepSleep function
    4. Ask to be called back when a scan finishes
    5. Enable the CapSense block
    /*******************************************************************************
    * Function Name: capsense_init
    ********************************************************************************
    * Summary:
    *  This function initializes the CSD HW block, and configures the CapSense
    *  interrupt.
    *******************************************************************************/
    static void capsense_init(void)
    {
        Cy_CapSense_Init(&cy_capsense_context);
        
        static const cy_stc_sysint_t capSense_intr_config =
        {
            .intrSrc = csd_interrupt_IRQn,
            .intrPriority = 7,
        };
    
        /* Initialize CapSense interrupt */
        Cy_SysInt_Init(&capSense_intr_config, &capsense_isr);
        NVIC_ClearPendingIRQ(capSense_intr_config.intrSrc);
        NVIC_EnableIRQ(capSense_intr_config.intrSrc);
    
        capsense_register_deepsleep();
        Cy_CapSense_RegisterCallback(CY_CAPSENSE_END_OF_SCAN_E,
                                                  capsense_end_of_scan_callback, &cy_capsense_context);
        
        Cy_CapSense_Enable(&cy_capsense_context);
    }
    

    Infineon provides the ISR which is part of the CapSense scanning engine

    /*******************************************************************************
    * Function Name: capsense_isr
    ********************************************************************************
    * Summary:
    *  Wrapper function for handling interrupts from CSD block.
    *
    *******************************************************************************/
    static void capsense_isr(void)
    {
        Cy_CapSense_InterruptHandler(CYBSP_CSD_HW, &cy_capsense_context);
    }

    When a scan is done we want to unlock the capsense_task by giving the semaphore.

    /*******************************************************************************
    * Function Name: capsense_end_of_scan_callback
    ********************************************************************************
    * Summary:
    *  CapSense end of scan callback function. This function sends a command to
    *  CapSense task to process scan.
    *
    * Parameters:
    *  cy_stc_active_scan_sns_t * active_scan_sns_ptr (unused)
    *
    *******************************************************************************/
    static void capsense_end_of_scan_callback(cy_stc_active_scan_sns_t* active_scan_sns_ptr)
    {
        BaseType_t xYieldRequired;
    
        (void)active_scan_sns_ptr;
        xYieldRequired = xSemaphoreGiveFromISR(capsense_done,&xYieldRequired);
    
        portYIELD_FROM_ISR(xYieldRequired);
    }

    The DeepSleep registration function looks like this:

    /*******************************************************************************
    * Function Name: capsense_register_deepsleep
    ********************************************************************************
    * Summary:
    *  Wrapper function for setting up the Deep Sleep callback for CapSense.
    *  This is necessary so that a transition from active to Deep Sleep does not
    *  occur during a CapSense scan.
    *
    *  See the "MTB CAT1 Peripheral driver library documentation > PDL API Reference > SysPM"
    *  link in the Quick Panel Documentation for information on setting up the SysPm callbacks
    *******************************************************************************/
    static void capsense_register_deepsleep(void)
    {
        static cy_stc_syspm_callback_params_t callback_params =
        {
            .base       = CYBSP_CSD_HW,
            .context    = &cy_capsense_context
        };
    
        static cy_stc_syspm_callback_t capsense_deep_sleep_cb =
        {
            Cy_CapSense_DeepSleepCallback,
            CY_SYSPM_DEEPSLEEP,
            0,
            &callback_params,
            NULL,
            NULL
        };
    
        Cy_SysPm_RegisterCallback(&capsense_deep_sleep_cb);
    }
    The last bit of magic is the processing of the touches.  We will

    1. Look at the buttons
    2. If they are pressed do a print out
    3. Look a the slider (which gives you a value between 0 and 300).
    4. If the slider is being pressed, print out the value
    5. Save the current state of the buttons and slider for next time around.
    /*******************************************************************************
    * Function Name: process_touch
    *******************************************************************************/
    static void process_touch(void)
    {
        /* Variables used to store previous touch information */
        static uint32_t button0_status_prev = 0;
        static uint32_t button1_status_prev = 0;
        static uint16_t slider_pos_prev = 0;
    
        uint32_t button0_status = 0;
        uint32_t button1_status = 0;
        uint16_t slider_pos = 0;
        uint8_t slider_touched = 0;
        cy_stc_capsense_touch_t *slider_touch;
    
    // Process the buttons
    
        button0_status = Cy_CapSense_IsWidgetActive(CY_CAPSENSE_BUTTON0_WDGT_ID,&cy_capsense_context);
        button1_status = Cy_CapSense_IsSensorActive( CY_CAPSENSE_BUTTON1_WDGT_ID, CY_CAPSENSE_BUTTON1_SNS0_ID, &cy_capsense_context);
    
        if((0u != button0_status) && (0u == button0_status_prev))
        {
            printf("Button 0 pressed\n");
        }
    
        if((0u != button1_status) && (0u == button1_status_prev))
        {
            printf("Button 1 pressed\n");
        }
    
    // Process the slider
        slider_touch = Cy_CapSense_GetTouchInfo( CY_CAPSENSE_LINEARSLIDER0_WDGT_ID, &cy_capsense_context);
        slider_pos = (slider_touch->ptrPosition->x / 3); // Transform 0-300 into 0-100
        slider_touched = slider_touch->numPosition;
    
        if((0u != slider_touched) && (slider_pos_prev != slider_pos ))
        {
            printf("Slider position %d\n",slider_pos);
        }
    
        button0_status_prev = button0_status;
        button1_status_prev = button1_status;
        slider_pos_prev = slider_pos;
    }

    7. Update main.c

    In main.c we need to include the capsense_task header file

    #include "capsense_task.h"
    

    And startup the capsense_task

    xTaskCreate(capsense_task, "CapSense", configMINIMAL_STACK_SIZE*4, NULL, 1, 0 );
    

    8. Test the CapSense

    Program your kit and you will be able to press the buttons and slider.

    Resources for Project

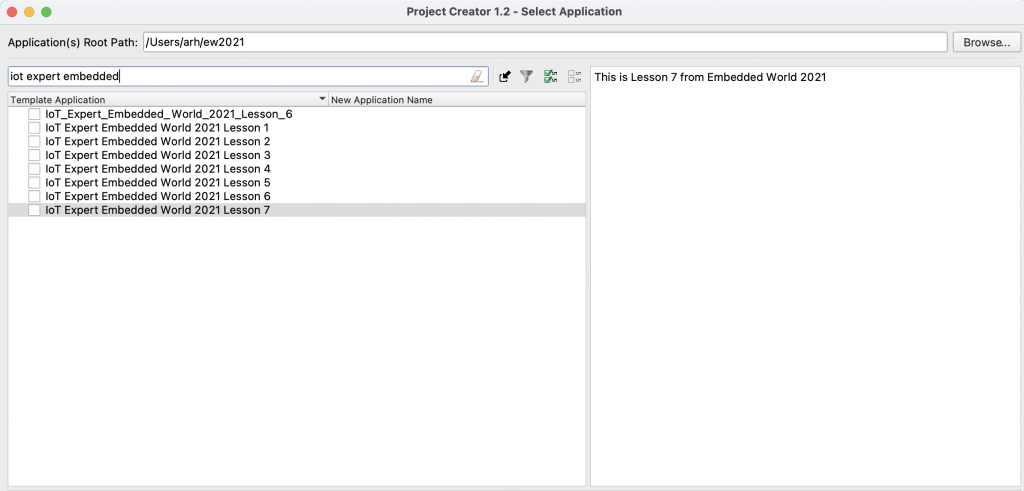
    Remember above when I started the project creator there was a list of projects.  This exact completed project is available to you as “IoT Expert Embedded World 2021 Lesson1”

    You can also clone this project from git@github.com:iotexpert/ew21-lesson1.git or https://github.com/iotexpert/ew21-lesson1.git

    For reference, here is the whole capsense_task.c file in one chunk
    #include <stdio.h>
    
    #include "cybsp.h"
    #include "cyhal.h"
    #include "cycfg.h"
    #include "cycfg_capsense.h"
    
    #include "FreeRTOS.h"
    #include "task.h"
    #include "semphr.h"
    
    #include "capsense_task.h"
    
    static void capsense_init(void);
    static void process_touch(void);
    static void capsense_isr(void);
    static void capsense_end_of_scan_callback(cy_stc_active_scan_sns_t* active_scan_sns_ptr);
    static void capsense_register_deepsleep(void);
    
    static QueueHandle_t capsense_done; // Semaphore set in Capsense Callback End of Scan
    
    /*******************************************************************************
    * Function Name: task_capsense
    ********************************************************************************
    * Summary:
    *  Task that initializes the CapSense block and processes the touch input.
    *
    * Parameters:
    *  void *param : Task parameter defined during task creation (unused)
    *
    *******************************************************************************/
    void capsense_task(void* param)
    {
        (void)param;
    
        capsense_done = xQueueCreateCountingSemaphore(1,0);
    
        capsense_init();
    
        Cy_CapSense_ScanAllWidgets(&cy_capsense_context);
    
        for(;;)
        {
            xSemaphoreTake(capsense_done,portMAX_DELAY);
    
            Cy_CapSense_ProcessAllWidgets(&cy_capsense_context);
            process_touch();
            Cy_CapSense_ScanAllWidgets(&cy_capsense_context);
            vTaskDelay(50); // ~20hz update
        }
    }
    
    /*******************************************************************************
    * Function Name: process_touch
    *******************************************************************************/
    static void process_touch(void)
    {
        /* Variables used to store previous touch information */
        static uint32_t button0_status_prev = 0;
        static uint32_t button1_status_prev = 0;
        static uint16_t slider_pos_prev = 0;
    
        uint32_t button0_status = 0;
        uint32_t button1_status = 0;
        uint16_t slider_pos = 0;
        uint8_t slider_touched = 0;
        cy_stc_capsense_touch_t *slider_touch;
    
    // Process the buttons
    
        button0_status = Cy_CapSense_IsWidgetActive(CY_CAPSENSE_BUTTON0_WDGT_ID,&cy_capsense_context);
        button1_status = Cy_CapSense_IsSensorActive( CY_CAPSENSE_BUTTON1_WDGT_ID, CY_CAPSENSE_BUTTON1_SNS0_ID, &cy_capsense_context);
    
        if((0u != button0_status) && (0u == button0_status_prev))
        {
            printf("Button 0 pressed\n");
        }
    
        if((0u != button1_status) && (0u == button1_status_prev))
        {
            printf("Button 1 pressed\n");
        }
    
    // Process the slider
        slider_touch = Cy_CapSense_GetTouchInfo( CY_CAPSENSE_LINEARSLIDER0_WDGT_ID, &cy_capsense_context);
        slider_pos = (slider_touch->ptrPosition->x / 3); // Transform 0-300 into 0-100
        slider_touched = slider_touch->numPosition;
    
        if((0u != slider_touched) && (slider_pos_prev != slider_pos ))
        {
            printf("Slider position %d\n",slider_pos);
        }
    
        button0_status_prev = button0_status;
        button1_status_prev = button1_status;
        slider_pos_prev = slider_pos;
    }
    
    
    /*******************************************************************************
    * Function Name: capsense_init
    ********************************************************************************
    * Summary:
    *  This function initializes the CSD HW block, and configures the CapSense
    *  interrupt.
    *******************************************************************************/
    static void capsense_init(void)
    {
        Cy_CapSense_Init(&cy_capsense_context);
        
        static const cy_stc_sysint_t capSense_intr_config =
        {
            .intrSrc = csd_interrupt_IRQn,
            .intrPriority = 7,
        };
    
        /* Initialize CapSense interrupt */
        Cy_SysInt_Init(&capSense_intr_config, &capsense_isr);
        NVIC_ClearPendingIRQ(capSense_intr_config.intrSrc);
        NVIC_EnableIRQ(capSense_intr_config.intrSrc);
    
        capsense_register_deepsleep();
    
        Cy_CapSense_RegisterCallback(CY_CAPSENSE_END_OF_SCAN_E,
                                                  capsense_end_of_scan_callback, &cy_capsense_context);
        
        Cy_CapSense_Enable(&cy_capsense_context);
    }
    
    /*******************************************************************************
    * Function Name: capsense_end_of_scan_callback
    ********************************************************************************
    * Summary:
    *  CapSense end of scan callback function. This function sends a command to
    *  CapSense task to process scan.
    *
    * Parameters:
    *  cy_stc_active_scan_sns_t * active_scan_sns_ptr (unused)
    *
    *******************************************************************************/
    static void capsense_end_of_scan_callback(cy_stc_active_scan_sns_t* active_scan_sns_ptr)
    {
        BaseType_t xYieldRequired;
    
        (void)active_scan_sns_ptr;
        xYieldRequired = xSemaphoreGiveFromISR(capsense_done,&xYieldRequired);
    
        portYIELD_FROM_ISR(xYieldRequired);
    }
    
    /*******************************************************************************
    * Function Name: capsense_isr
    ********************************************************************************
    * Summary:
    *  Wrapper function for handling interrupts from CSD block.
    *
    *******************************************************************************/
    static void capsense_isr(void)
    {
        Cy_CapSense_InterruptHandler(CYBSP_CSD_HW, &cy_capsense_context);
    }
    
    /*******************************************************************************
    * Function Name: capsense_register_deepsleep
    ********************************************************************************
    * Summary:
    *  Wrapper function for setting up the Deep Sleep callback for CapSense.
    *  This is necessary so that a transition from active to Deep Sleep does not
    *  occur during a CapSense scan.
    *
    *  See the "MTB CAT1 Peripheral driver library documentation > PDL API Reference > SysPM"
    *  link in the Quick Panel Documentation for information on setting up the SysPm callbacks
    *******************************************************************************/
    static void capsense_register_deepsleep(void)
    {
        static cy_stc_syspm_callback_params_t callback_params =
        {
            .base       = CYBSP_CSD_HW,
            .context    = &cy_capsense_context
        };
    
        static cy_stc_syspm_callback_t capsense_deep_sleep_cb =
        {
            Cy_CapSense_DeepSleepCallback,
            CY_SYSPM_DEEPSLEEP,
            0,
            &callback_params,
            NULL,
            NULL
        };
    
        Cy_SysPm_RegisterCallback(&capsense_deep_sleep_cb);
    }
    

    EW21: Lesson 2: Joystick

    Embedded World 2021 - Infineon ModusToolbox PSoC 6 Drone 


    Summary

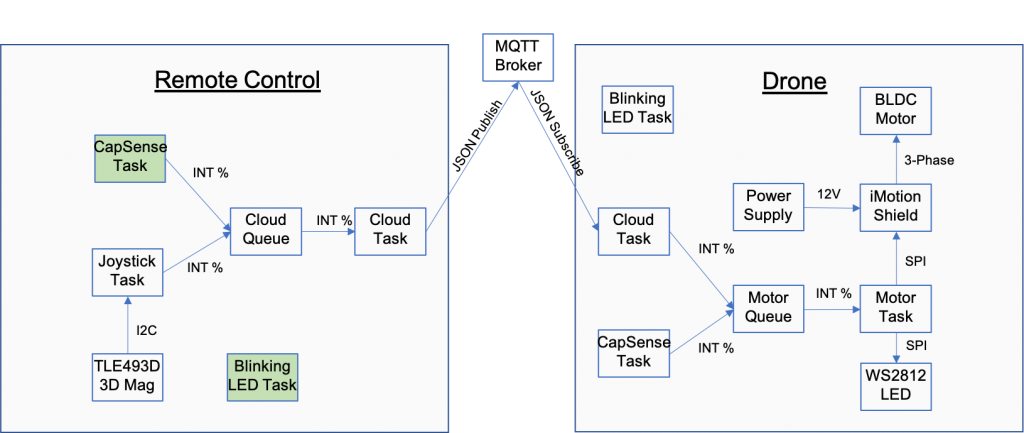
    In lesson 2 we will add the Infineon XENSIV 3-D Magnetic Sensor with a Joystick to the project .  At the end of lesson two you will have the “JoyStick Task” colored green.  Here is the architecture:

    Learning Objectives

    In this lesson I will teach you about

    1. Libraries & the Library Manager
    2. Multiple RTOS Tasks
    3. XENSIV 3-D Magnetic JoyStick

    Procedure

    I am going to follow these steps:

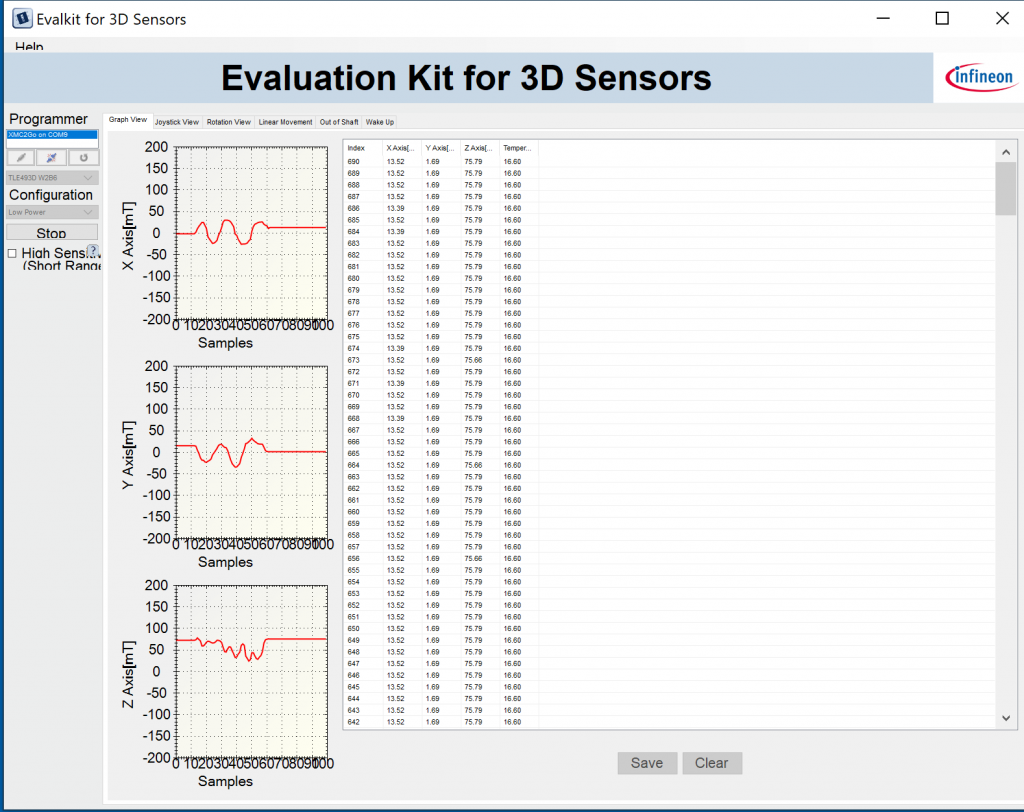
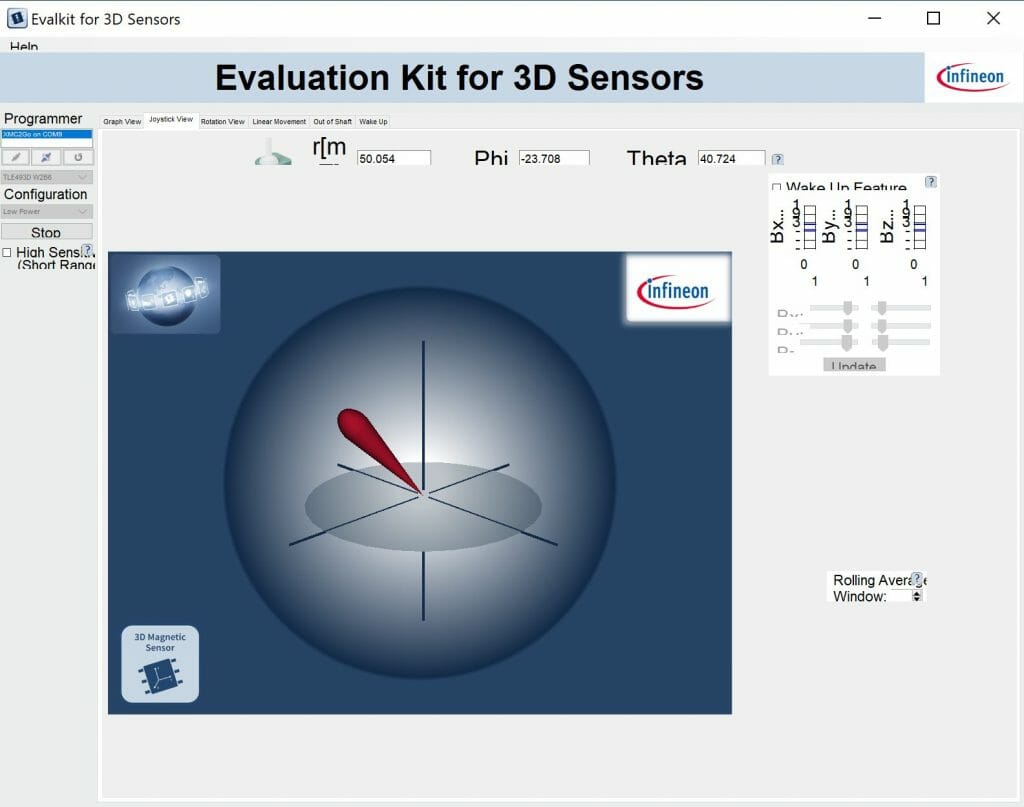
    1. Look at the Sensor GUI
    2. Start a new project
    3. Add the TLx493D library
    4. Create the joystick_task public header
    5. Create the joystick_task implementation file
    6. Test

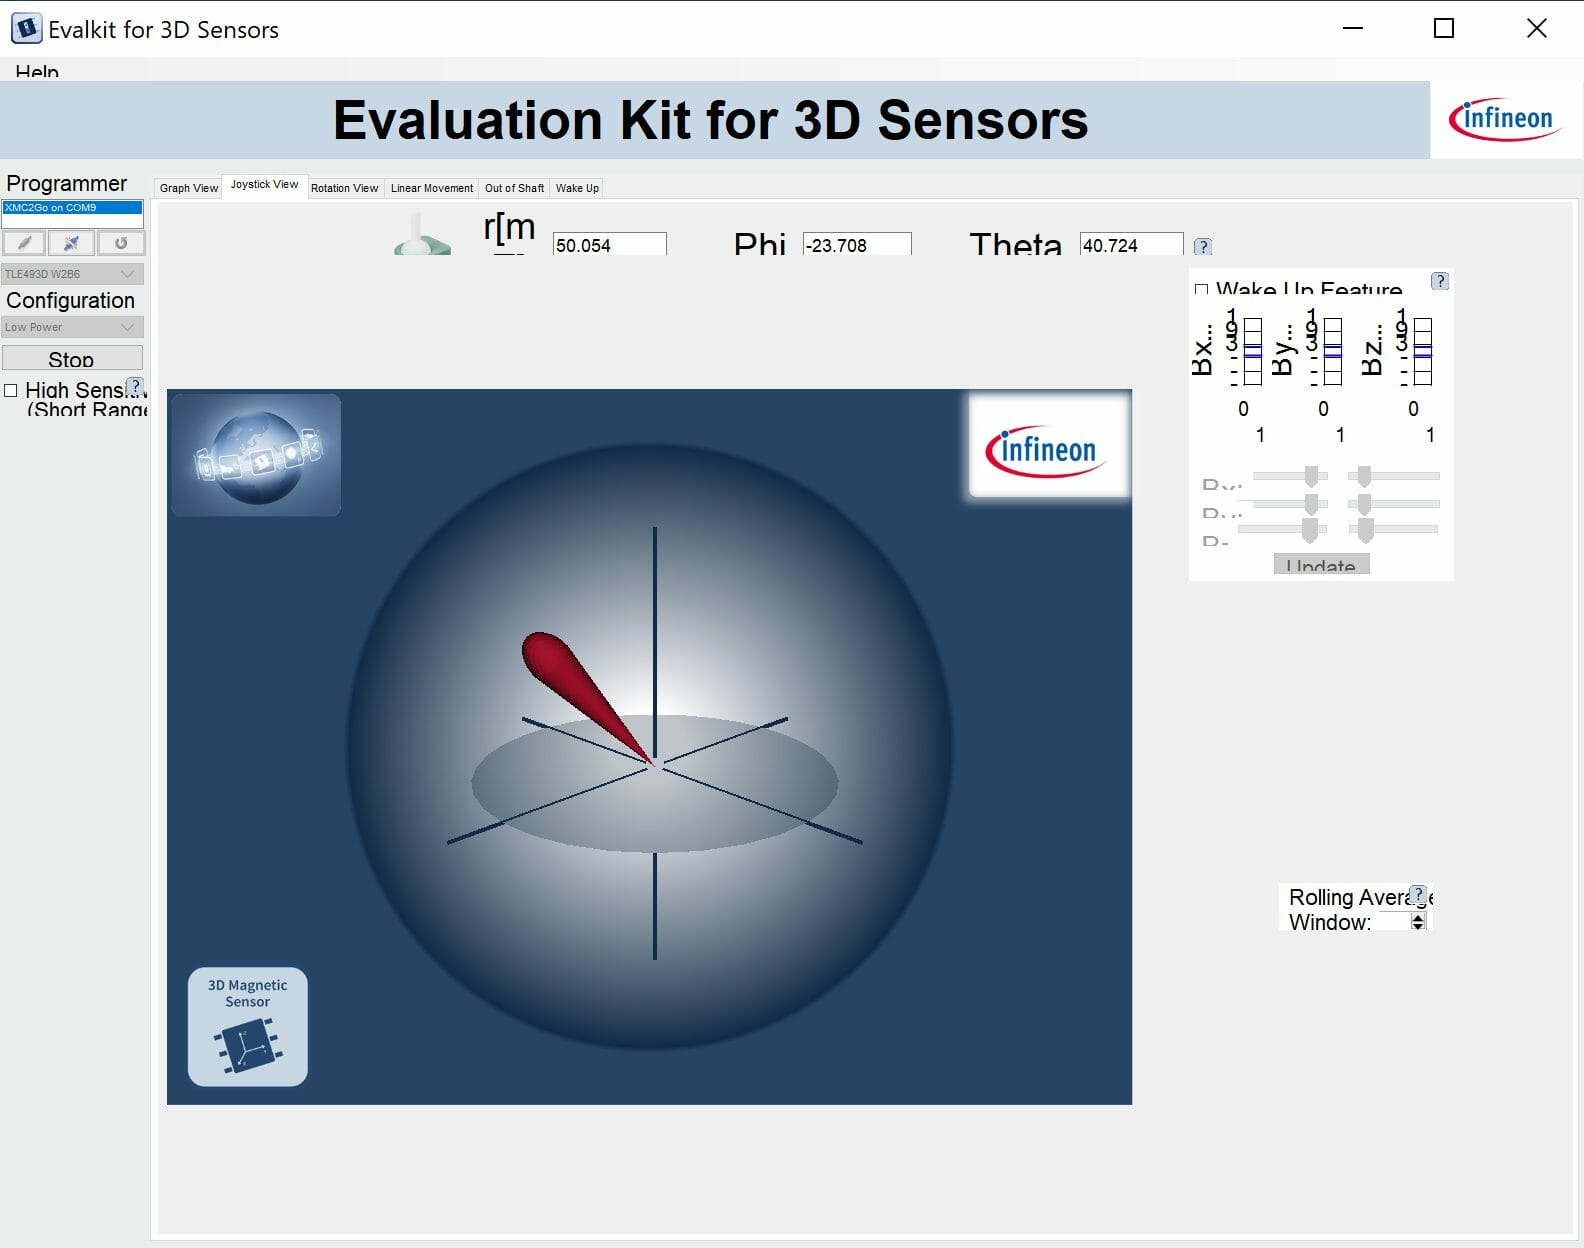
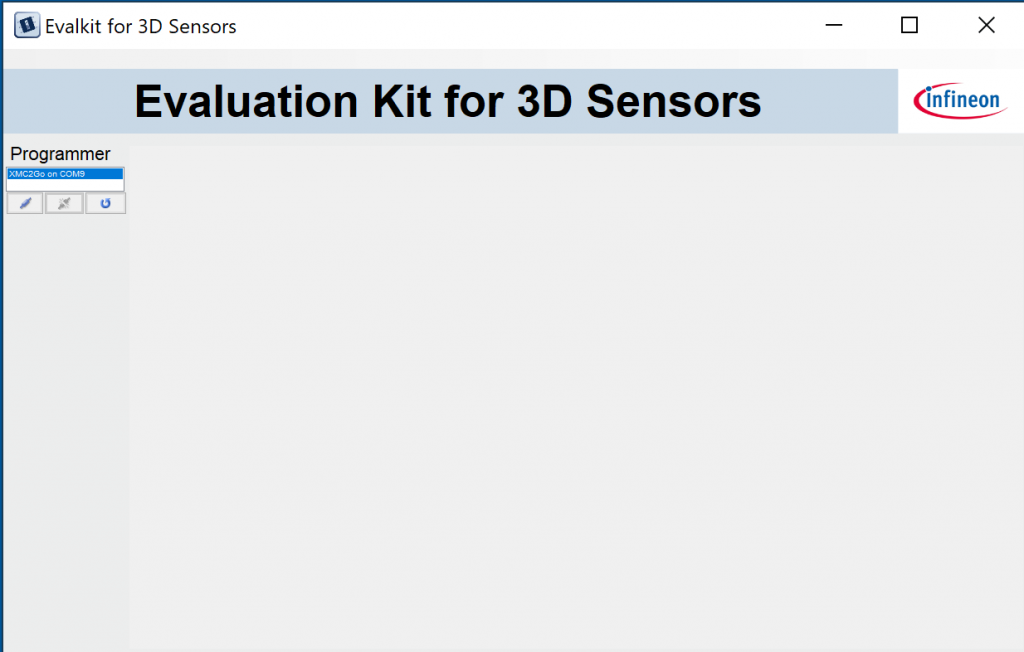
    1.Look at the Sensor GUI

    Start the GUI and click the connect button.

    Press start and you will now see x,y,z values.

    Click on the joystick view to see how it looks as a joystick.

    2. Start a new project

    Start the new project creator and pick out “CY8CPROTO-062-4343W”

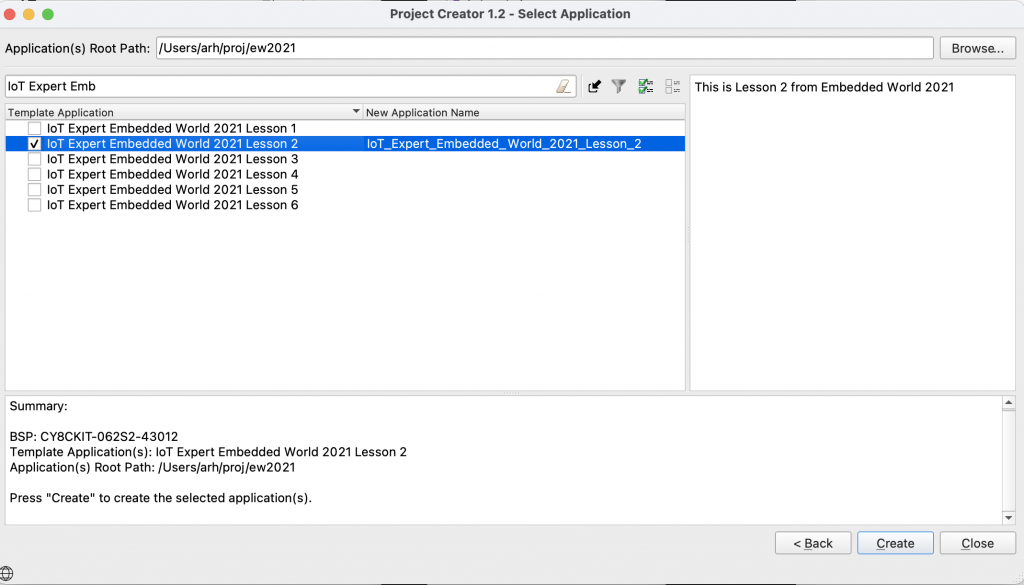
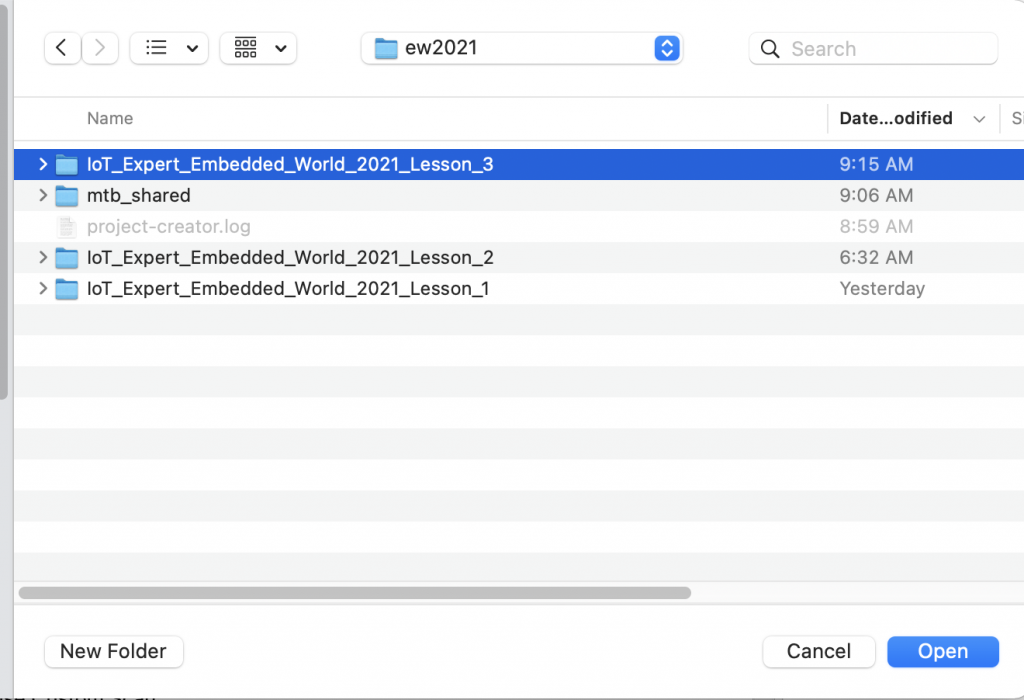
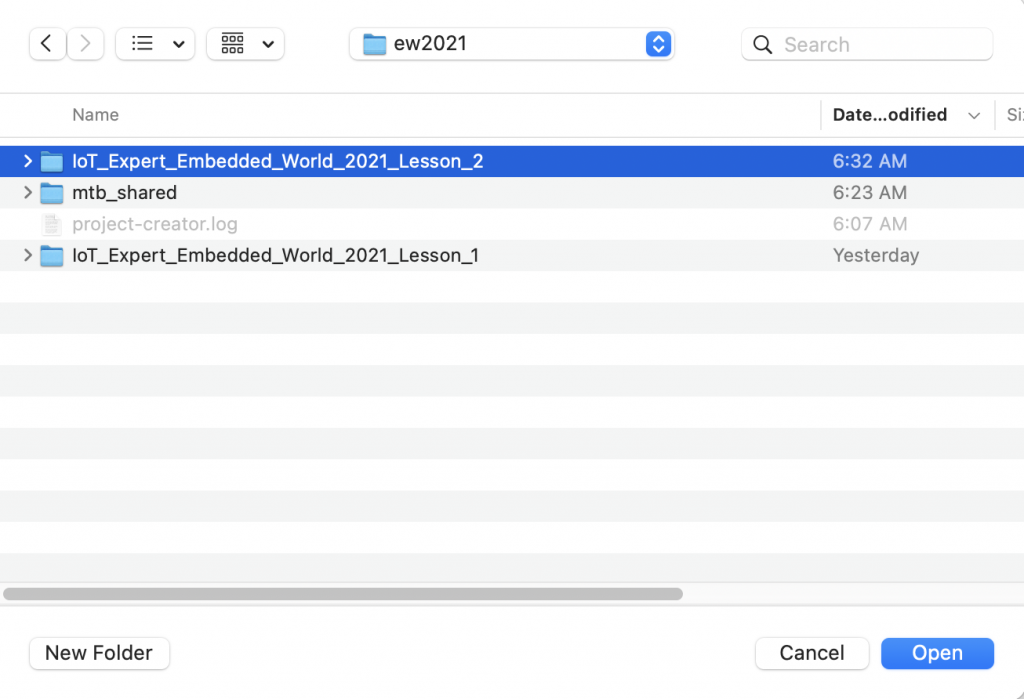
    This time I will start from the previous project.  Press the “Import” button and select your old project to open.

    Give your project a new name (notice that we are starting from 1 as the template)

    Open up the command line and make vscode.

    Do a command line build/program by running “make -j program”.

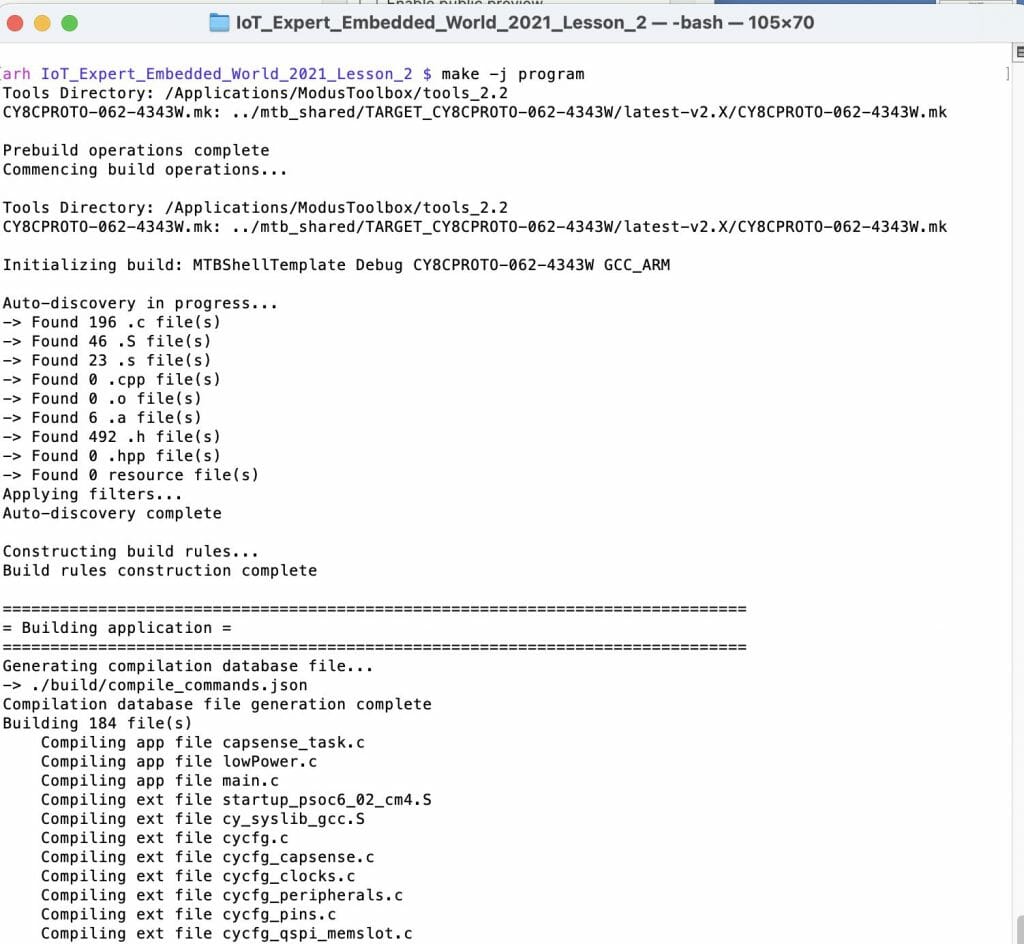
    It will finish compiling and then program your board.

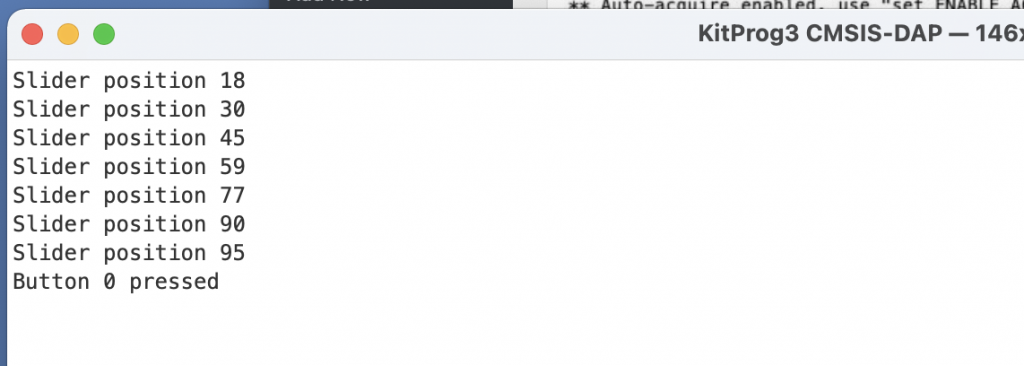
    Now look at the serial terminal and make sure that the CapSense is still working

    3. Add the TLx493D library

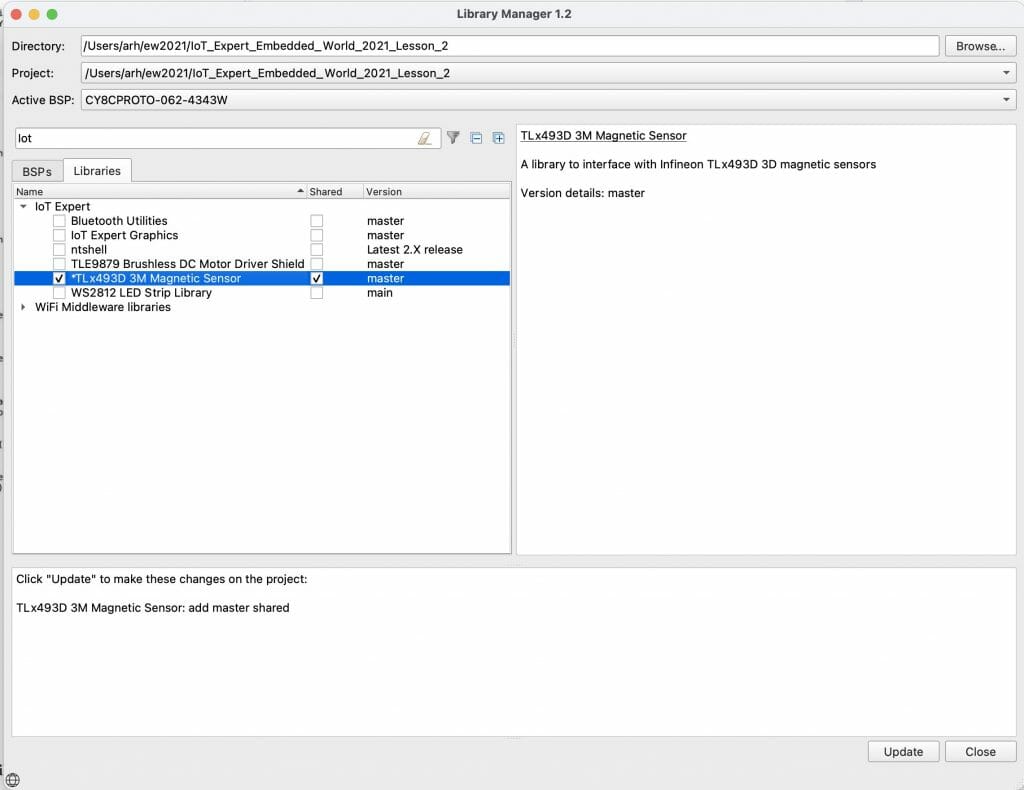
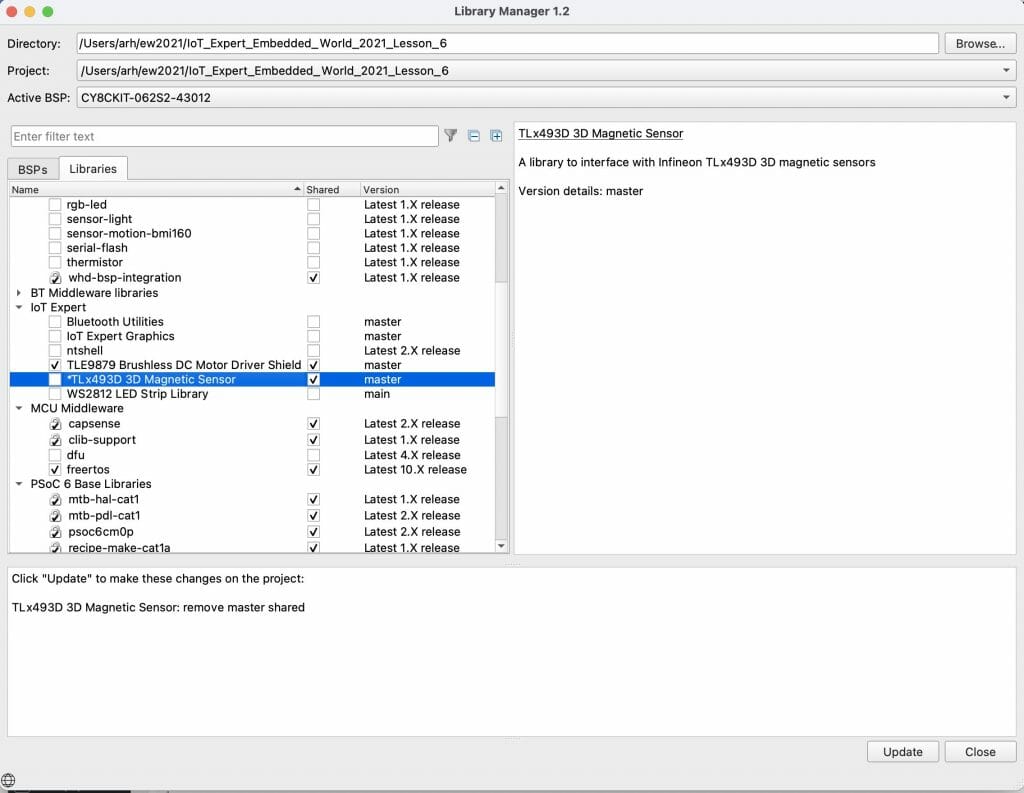
    In order to interact with the TLx493D it would be much simpler if you had a library.  Well, I have just the solution for that.  Start the library browser and filter for IoT.  Notice that one of your choices is the TLx493D 3D Magnetic Sensor library.  Check the box, then press Update. Once the update finishes, press Close.

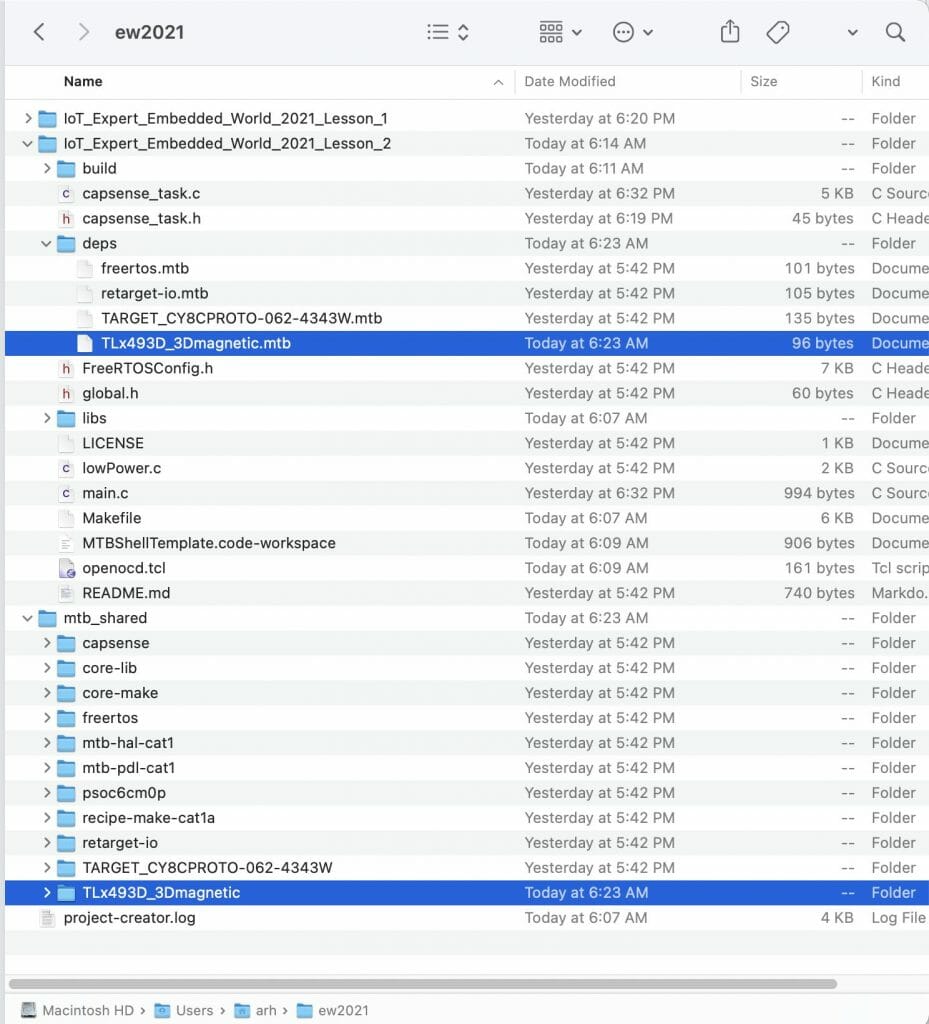
    After running the update you will notice some new stuff.  First there is a file in your “deps” directory.  We will look at that in a second.  Also notice that there is a new directory in the mtb_shared directory.

    When you look at the dot-MTB file you will see that it is just a

    1. URL to GitHub
    2. A branch name = “master”
    3. A location to put it = mtb_shared/TLx493D_3Dmagnetic/master

    This is JUST A SIMPLE GIT REPOSITORY.

    When you open vscode and look in the repository you will see normal c-code.

    4. Create the Joystick_task public header

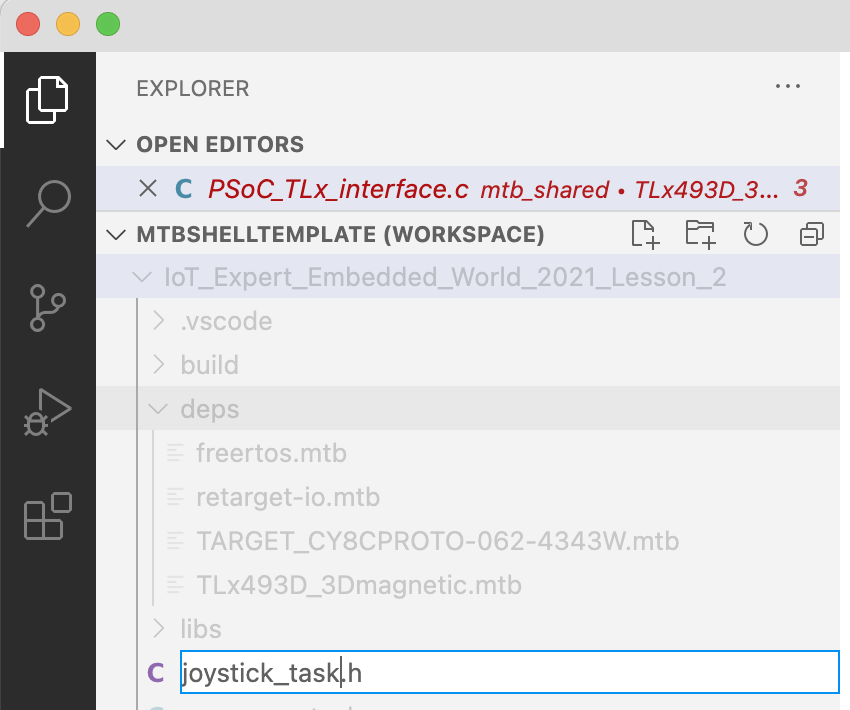
    We want to have a task called “joystick_task”.  So create the public header file for that task.

    Then add the long and extensive code.  Just a function prototype for the joystick task.

    #pragma once
    
    void joystick_task(void *param);
    

    5. Create the joystick_task implementation file

    Now the actual code for the joystick is straight forward

    1. Some includes
    2. The task definition
    3. Initialize the interface to the joystick with TLxI2CInit
    4. Initialize the library with TLx493xInit
    5. Loop repeatedly
    6. Read one frame from the joystick sensor
    7. Convert the frame to x-y coordinates
    8. If there is a new position print it.
    9. Save the old data
    10. Wait a bit
    11. Loop back to the start
    #include "cybsp.h"
    #include "FreeRTOS.h"
    #include "task.h"
    #include <stdio.h>
    
    #include "joystick_task.h"
    
    #include "PSoC_TLx_interface.h"
    #include "TLxJoystick.h"
    
    #define JOYSTICK_INTERVAL_MS    (100)   /* in milliseconds*/
    #define JOYSTICK_HYSTERESIS		(1)
    
    /*******************************************************************************
    * Function Name: task_joystick
    ********************************************************************************
    * Summary:
    *  Task that initializes the Joystick block and processes the input.
    *
    * Parameters:
    *  void *param : Task parameter defined during task creation (unused)
    *
    *******************************************************************************/
    void joystick_task(void* param)
    {
        (void)param;
    
        cy_rslt_t result;
    
        TLx493D_data_frame_t frame;
        TLxJoyStickXY_t joystick_curr;
        TLxJoyStickXY_t joystick_prev;
    
        /* Initialize I2C interface to talk to the TLx493D sensor */
        TLxI2CInit(CYBSP_I2C_SDA,
                            CYBSP_I2C_SCL,
                            0 /* Use Default Sensor Address */,
                            0 /* Use Default Speed */,
                            NULL /* Use Auto-assigned clock */);
    
    
        /* Configure the TLx493D sensor */
        result = TLx493D_init();
        if (result != CY_RSLT_SUCCESS)
        {
        	printf("Joystick not detected. Exiting Joystick task.\n");
        	vTaskDelete(NULL);
        }
        
        /* Set Sensor to Master Control Mode */
        TLx493D_set_operation_mode(TLx493D_OP_MODE_MCM);
    
        /* Repeatedly running part of the task */
        for(;;)
        {
            TLx493D_read_frame(&frame);
    
            TLxJoystickCovertXY(&frame,&joystick_curr);
    
            /* Only update/print new value if it has changed by more than the hysteresis value */
            if((joystick_curr.x > (joystick_prev.x + JOYSTICK_HYSTERESIS)) || (joystick_curr.x < (joystick_prev.x - JOYSTICK_HYSTERESIS)))
            {
                printf("Joystick Position: %d\n", joystick_curr.x);
    
                joystick_prev.x = joystick_curr.x;
                joystick_prev.y = joystick_curr.y;
            }
            vTaskDelay(JOYSTICK_INTERVAL_MS);
        }
    }
    

    6. Edit main.c

    In main.c you need to include the joystick_task.h and then start the task

    #include "cyhal.h"
    #include "cybsp.h"
    #include "cy_retarget_io.h"
    #include <stdio.h>
    #include "FreeRTOS.h"
    #include "task.h"
    #include "capsense_task.h"
    #include "joystick_task.h"
    
    volatile int uxTopUsedPriority ;
    
    void blink_task(void *arg)
    {
        cyhal_gpio_init(CYBSP_USER_LED,CYHAL_GPIO_DIR_OUTPUT,CYHAL_GPIO_DRIVE_STRONG,0);
    
        for(;;)
        {
        	cyhal_gpio_toggle(CYBSP_USER_LED);
        	vTaskDelay(500);
        }
    }
    
    
    int main(void)
    {
        uxTopUsedPriority = configMAX_PRIORITIES - 1 ; // enable OpenOCD Thread Debugging
    
        /* Initialize the device and board peripherals */
        cybsp_init() ;
        __enable_irq();
    
        cy_retarget_io_init(CYBSP_DEBUG_UART_TX, CYBSP_DEBUG_UART_RX, CY_RETARGET_IO_BAUDRATE);
    
        // Stack size in WORDs
        // Idle task = priority 0
        xTaskCreate(blink_task,    "blink"     ,configMINIMAL_STACK_SIZE*1  ,0 /* args */ ,0 /* priority */, 0 /* handle */);
        xTaskCreate(capsense_task, "CapSense"  ,configMINIMAL_STACK_SIZE*4  , NULL, 1, 0);
        xTaskCreate(joystick_task, "Joystick"  ,configMINIMAL_STACK_SIZE*4  , NULL, 1, 0);
    
        vTaskStartScheduler();
    }
    7. Test

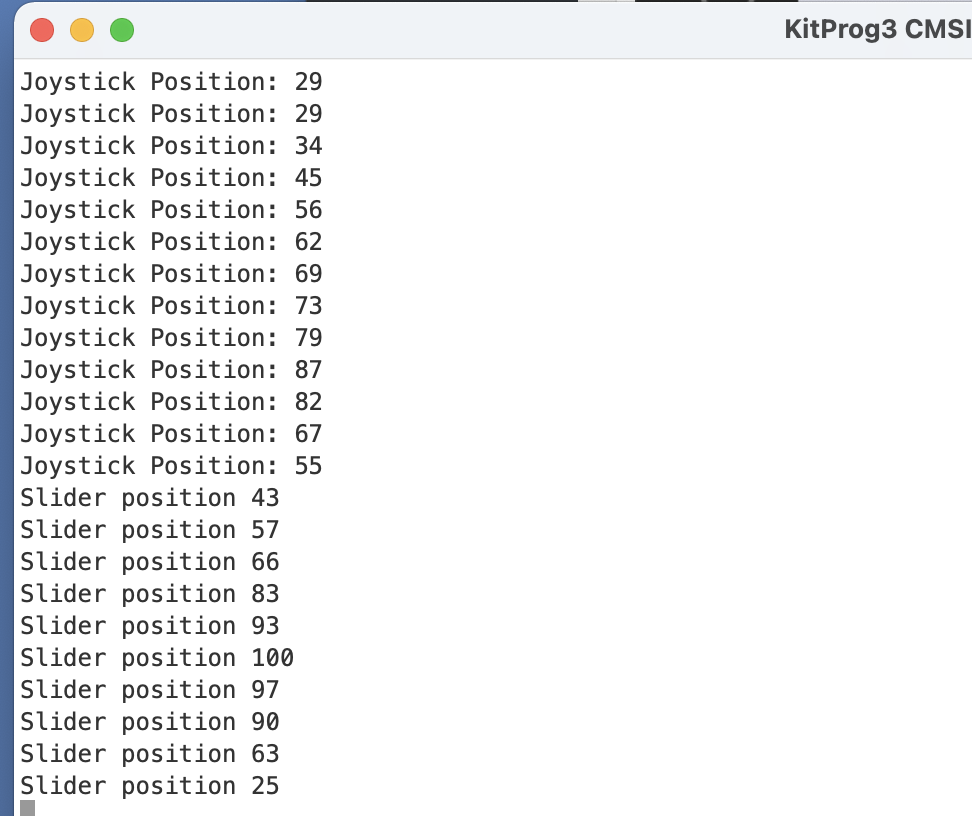
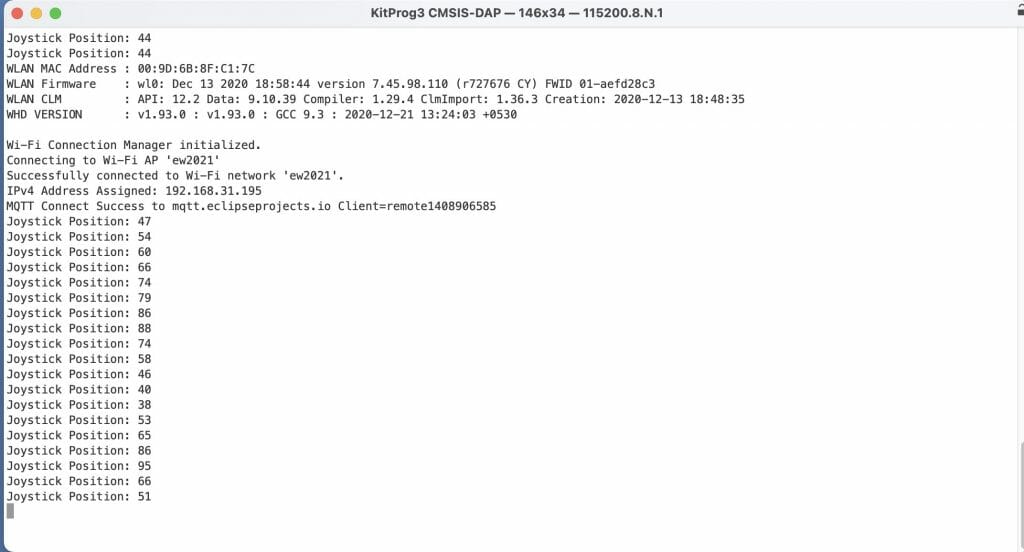
    When you test, you will see that the joystick moves around and prints new values.  Plus the CapSense still works.

    Resources for Project

    You can find this completed project in your project creator dialog by filtering for “IoT Expert Embedded”.  This is lesson2

    You can also clone this project at git@github.com:iotexpert/ew21-lesson2.git or https://github.com/iotexpert/ew21-lesson2

    EW21: Lesson 3: WiFi

    Embedded World 2021 - Infineon ModusToolbox PSoC 6 Drone 


    Summary

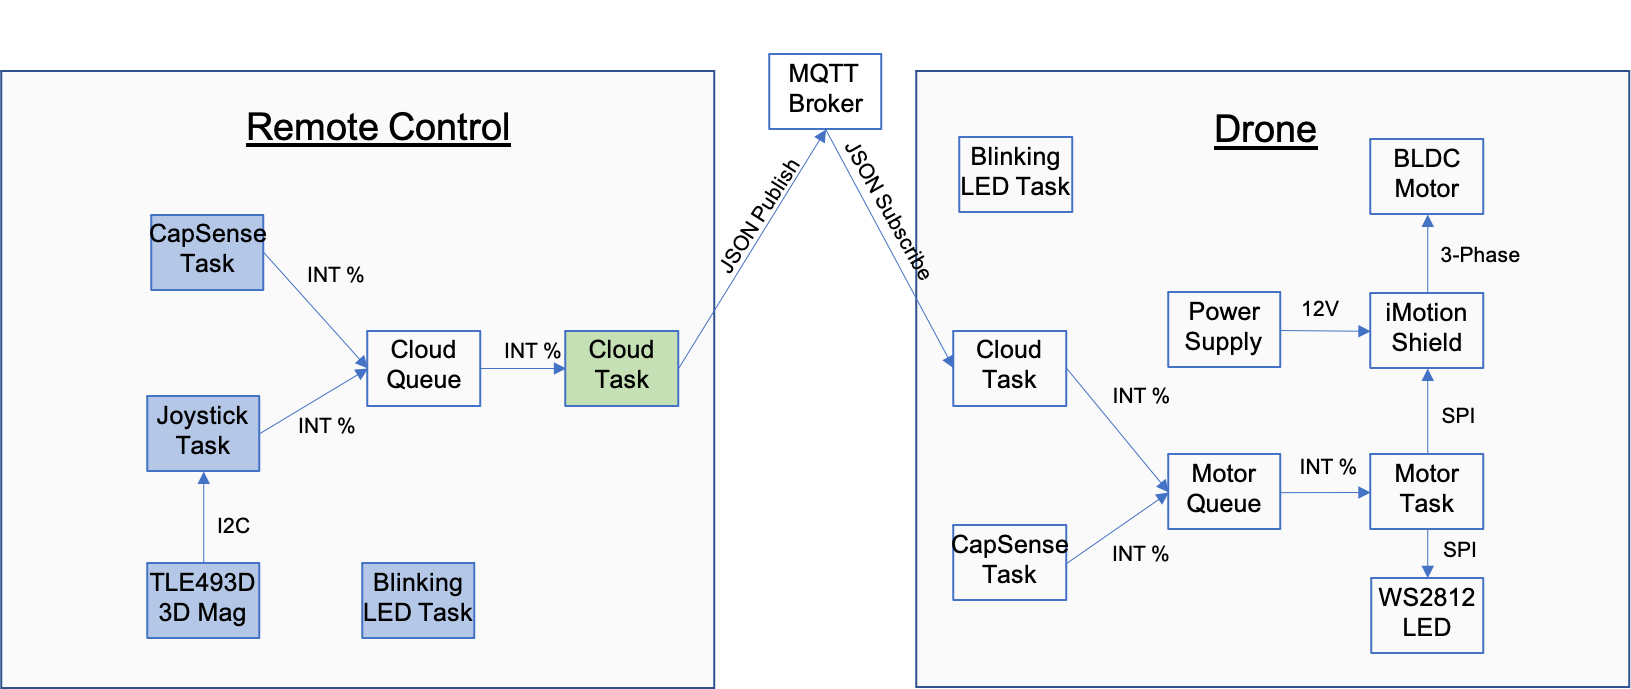
    In lesson 3 we will add a task to manage the “Cloud”, this is IoT after all.  We will start by adding the connection to the WiFi network using the AnyCloud Wireless Connection Manager within ModusToolbox.  At the end of lesson three you will have the “Cloud Task” colored green – well actually partially green.  Here is the architecture:

    Learning Objectives

    1. AnyCloud Wireless Libraries
    2. Architecture of the PSoC 6 + 43xxxx WiFi Combo
    3. Wireless Connection Manager

    Procedure

    In this lesson we will follow these steps:

    1. Create a new project by copying lesson 2
    2. Add the WiFi Libraries
    3. Copy the wireless configuration templates files into your project
    4. Look at the Wireless Library Documentation
    5. Update the Makefile
    6. Add cloud_task.h
    7. Add cloud_task.c
    8. Update main.c
    9. Test

    1. Create a new project by copying lesson 2

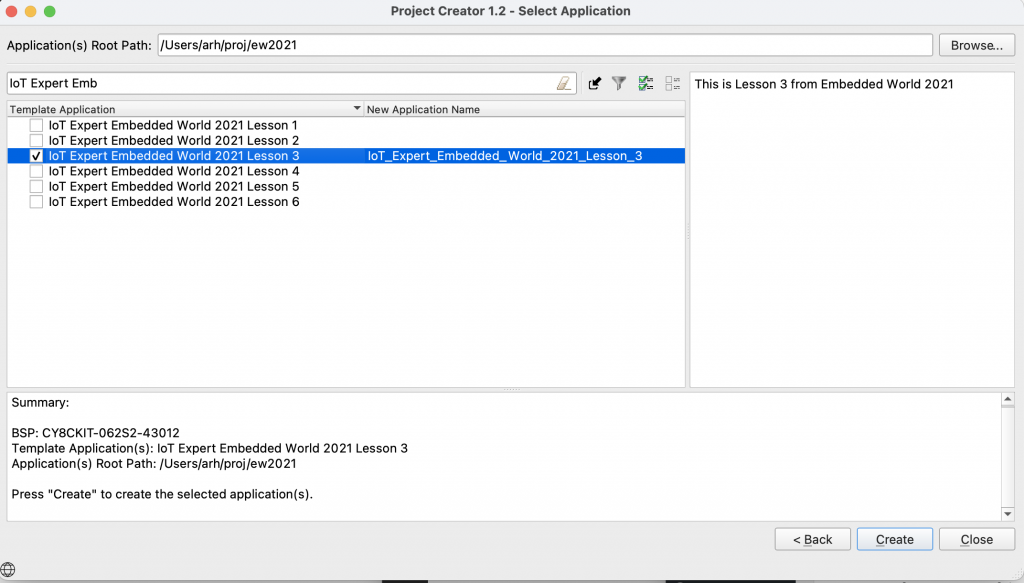
    Start the new project creator and select the CY8CPROTO-062-4343W

    Click the import button.  Then select your previous project and press open.

    Select your new template and give it a reasonable name.

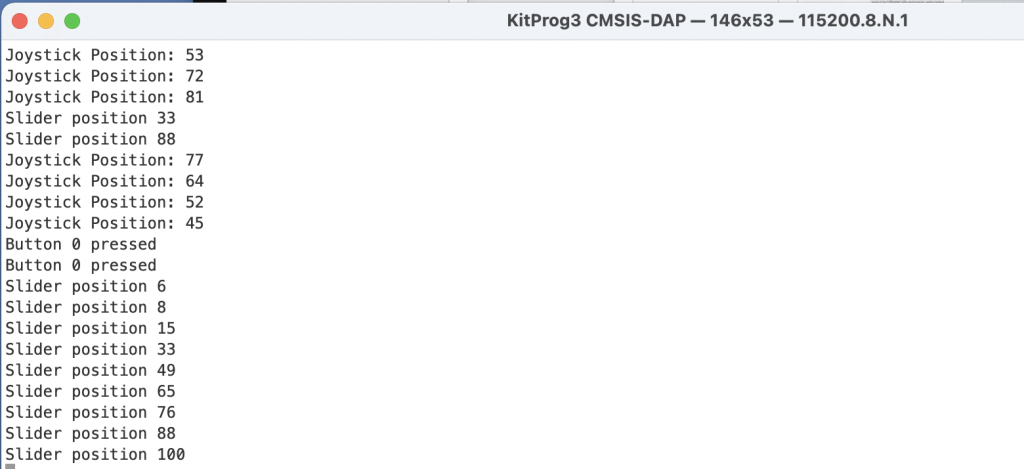
    Now program your project to make sure that things are still working.

    Here is the serial terminal.

    2. Add the WiFi Libraries

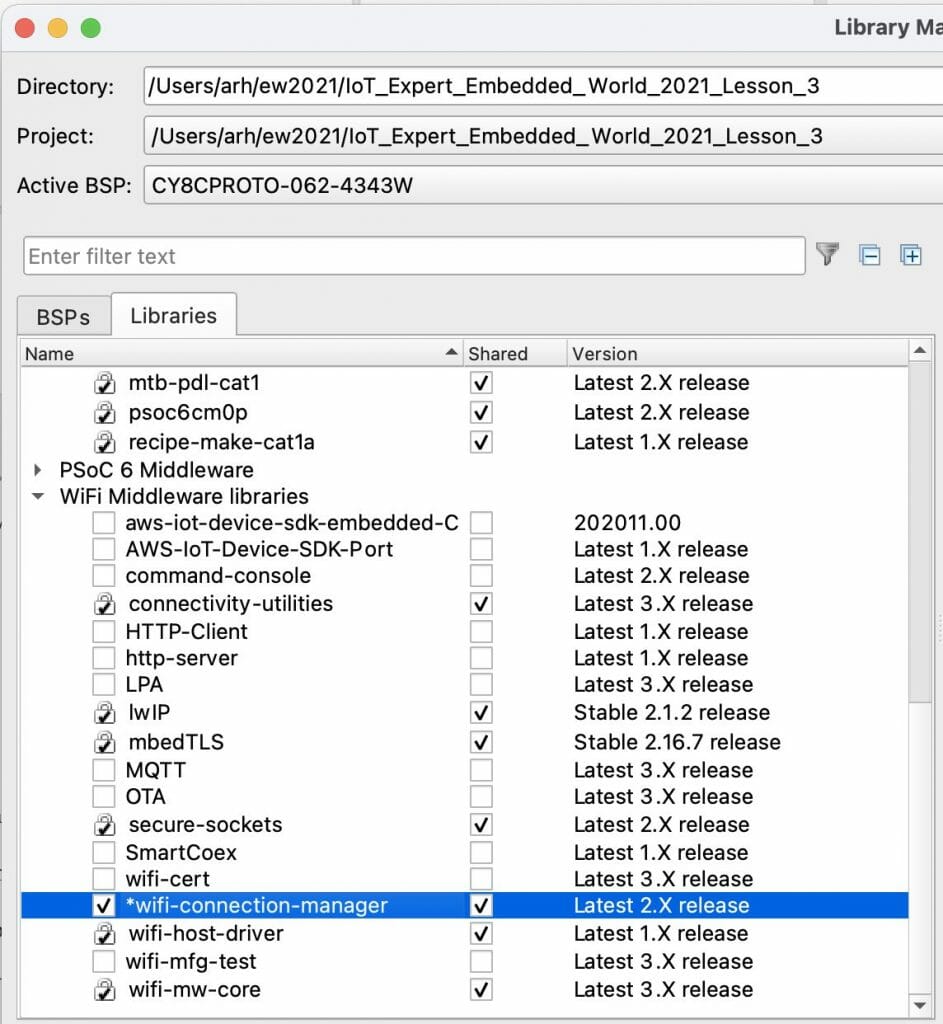
    Start up the library manager and go to the Libraries tab.  Click on wireless connection manager.  Notice that it will bring in a bunch of other libraries that it depends on.

    3. Copy the wireless configuration templates into your project

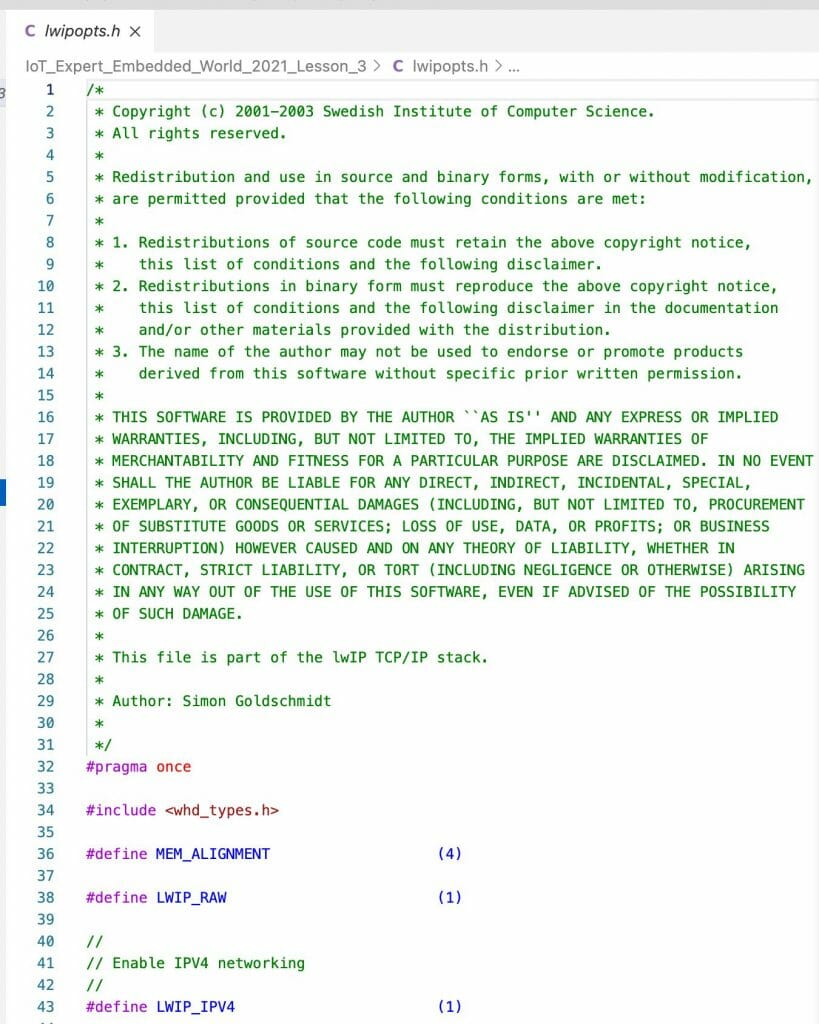
    MBED TLS and LWIP have about a billion options.  We provide a template for those options which you will need to copy into your project.  The templates are located in the wifi-mw-core library in the “config” directory.  Copy and paste them into your project.

    Here is a clip of the lwip configuration options.  I wouldn’t recommend changing anything unless you are sure you know what you are doing.

    4. Look at the Wireless Library Documentation

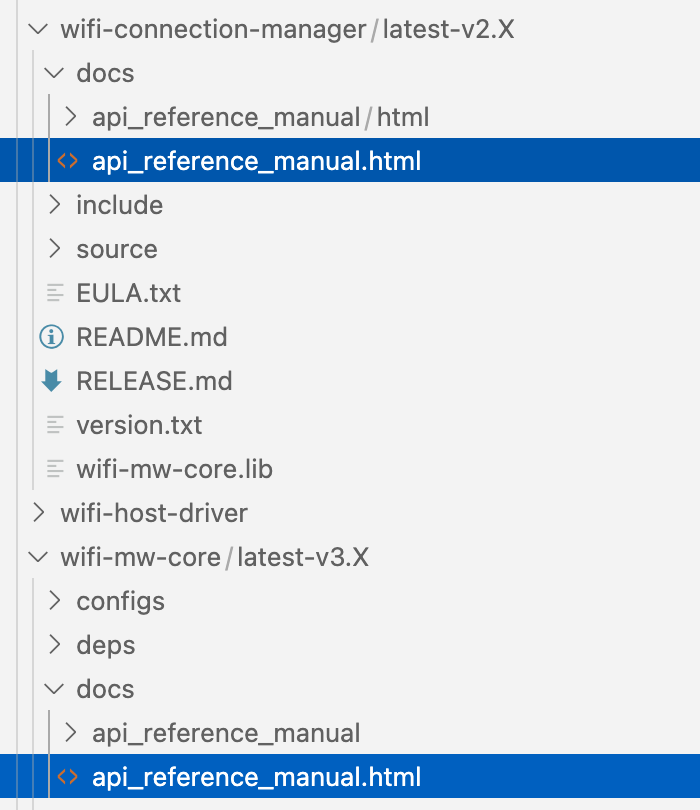
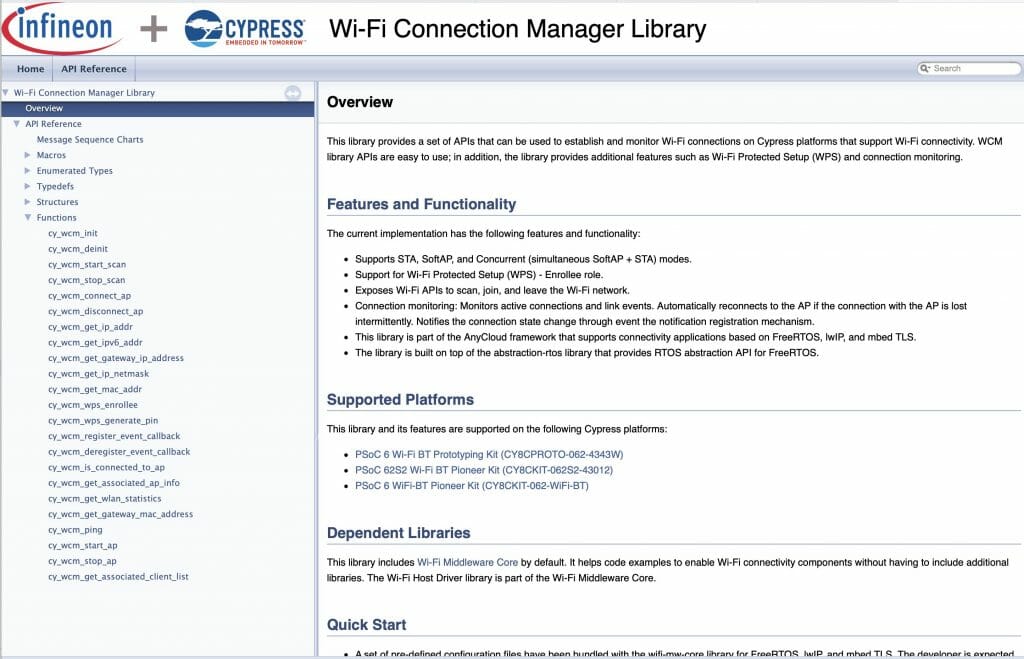
    All of the Infineon libraries will have a directory called “doc” and inside of that directory there will be a file called api_reference_manual.html

    When you open the file you will  see our doxygen generated documentation.  Here the WiFi connection manager documentation.

    5. Update the Makefile

    The makefile controls all of the libraries.  To enable these libraries you need to add the following “components” to the list if they aren’t already there. (Note that all of this information is in the Quick Start section of the library’s documentation).

    COMPONENTS= FREERTOS LWIP MBEDTLS

    And you need to tell the system about the configuration.

    DEFINES+= MBEDTLS_USER_CONFIG_FILE='"mbedtls_user_config.h"' 
    DEFINES+=CYBSP_WIFI_CAPABLE
    DEFINES+=CY_RTOS_AWARE

    6. Add the cloud_task.h

    Just like the other lessons you will need to create a public header file for the cloud task.

    Inside of that file there will be only one function prototype for the task.

    #pragma once
    
    void cloud_task(void *param);

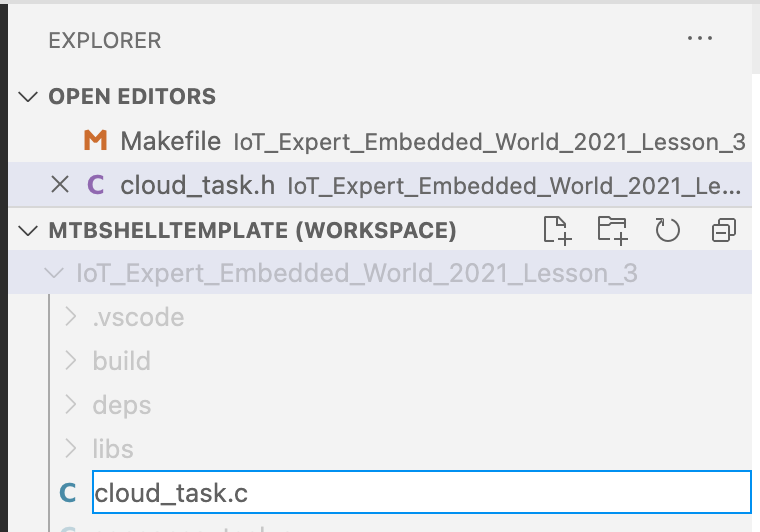
    7. Add the cloud_task.c

    Make the cloud_task.c file to add the cloud infrastructure to your project.

    At the top of the file we will have some includes.  And I will define some macros that tell WiFi which AP to attach to. When you do this on your own, you will need to update those to match your WiFi AP SSID and password. The task itself is really simple for now, just connect to WiFi and then do nothing.

    #include <stdio.h>
    
    #include "FreeRTOS.h"
    #include "task.h"
    
    #include "cy_wcm.h"
    
    #include "cloud_task.h"
    
    #define CLOUD_WIFI_AP        "ew2021"
    #define CLOUD_WIFI_PW        "ew2021ap"
    #define CLOUD_WIFI_SECURITY  CY_WCM_SECURITY_WPA2_MIXED_PSK
    #define CLOUD_WIFI_BAND      CY_WCM_WIFI_BAND_ANY
    
    static void cloud_connectWifi();
    
    void cloud_task(void* param)
    {
        (void)param;
    
        cloud_connectWifi();
    
        while(1)
        {
            vTaskDelay(1);
    
        }
    }
    The connect to WiFi function will

    1. Setup the Access Point information
    2. Initialize the wireless connection manager
    3. Then go into a loop that will attempt to connect until there is success.
    4. Once a connection is made, it will print out the IP information.
    static void cloud_connectWifi()
    {
        cy_rslt_t result;
    
        cy_wcm_connect_params_t connect_param = {
            .ap_credentials.SSID = CLOUD_WIFI_AP,
            .ap_credentials.password = CLOUD_WIFI_PW,
            .ap_credentials.security = CLOUD_WIFI_SECURITY,
            .BSSID = {0},
            .band = CLOUD_WIFI_BAND,
        };
        cy_wcm_config_t config = {.interface = CY_WCM_INTERFACE_TYPE_STA}; // We are a station (not a Access Point)
    
        cy_wcm_init(&config); // Initialize the connection manager
    
        printf("\nWi-Fi Connection Manager initialized.\n");
    
        do
        {
            cy_wcm_ip_address_t ip_address;
    
            printf("Connecting to Wi-Fi AP '%s'\n", connect_param.ap_credentials.SSID);
            result = cy_wcm_connect_ap(&connect_param, &ip_address);
    
            if (result == CY_RSLT_SUCCESS)
            {
                printf("Successfully connected to Wi-Fi network '%s'.\n",
                        connect_param.ap_credentials.SSID);
    
                // Print IP Address
                if (ip_address.version == CY_WCM_IP_VER_V4)
                {
                    printf("IPv4 Address Assigned: %d.%d.%d.%d\n", (uint8_t)ip_address.ip.v4,
                            (uint8_t)(ip_address.ip.v4 >> 8), (uint8_t)(ip_address.ip.v4 >> 16),
                            (uint8_t)(ip_address.ip.v4 >> 24));
                }
                else if (ip_address.version == CY_WCM_IP_VER_V6)
                {
                    printf("IPv6 Address Assigned: %0X:%0X:%0X:%0X\n", (unsigned int)ip_address.ip.v6[0],
                            (unsigned int)ip_address.ip.v6[1], (unsigned int)ip_address.ip.v6[2],
                            (unsigned int)ip_address.ip.v6[3]);
                }
                break; /* Exit the for loop once the connection has been made */
            }
            else
            {
                printf("WiFi Connect Failed Retrying\n");
                vTaskDelay(2000); // wait 2 seconds and try again;
            }
    
        } while (result != CY_RSLT_SUCCESS);
    }
    

    8. Update main.c

    In main.c you need to include the cloud task

    #include "cloud_task.h"

    Then start the cloud task.

    xTaskCreate(cloud_task,    "Cloud"     ,configMINIMAL_STACK_SIZE*8  , NULL, 2, 0);  
    

    9. Test

    Program your project and make sure that it connects, and the CapSense and joystick still work.

    Resources for Project

    You can find this projects in your project creator dialog by filtering for “IoT Expert Embedded”.  This is lesson3

    You can also clone this project at git@github.com:iotexpert/ew21-lesson3.git or https://github.com/iotexpert/ew21-lesson3

    EW21: Lesson 4: MQTT

    Embedded World 2021 - Infineon ModusToolbox PSoC 6 Drone 


    Summary

    In lesson 4 we will finish the cloud task by adding a connection to the MQTT broker.  Then I will make a very minor update to the CapSense and Joystick tasks to send their data to the Cloud.  At the end of this lesson you will have the Cloud truly colored green.  Here is the architecture:

    Learning Objectives

    1. MQTT
    2. AnyCloud use of AWS libraries

    Procedure

    1. Create a new project by copying lesson 3
    2. Add the MQTT Library
    3. Copy the core MQTT configuration
    4. Update the Makefile
    5. Update the cloud_task.h
    6. Update the cloud_task.c
    7. Update joystick_task.c
    8. Update capsense_task.c
    9. Test (using an MQTT Client)
    10. Test (using our C++/Qt GUI)

    1. Create a new project by copying lesson 3

    Start the new project creator.  Pick the CY8CPROTO-062-4343W and press next.

    Click on the import button

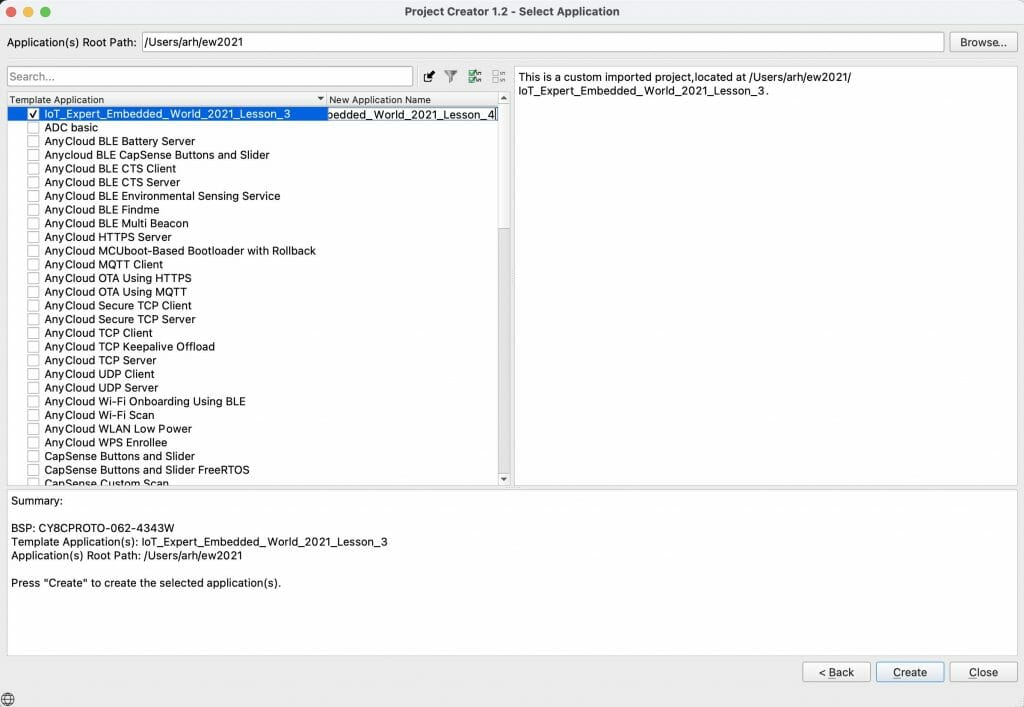
    And select project three to start from.

    Give it a sensible name

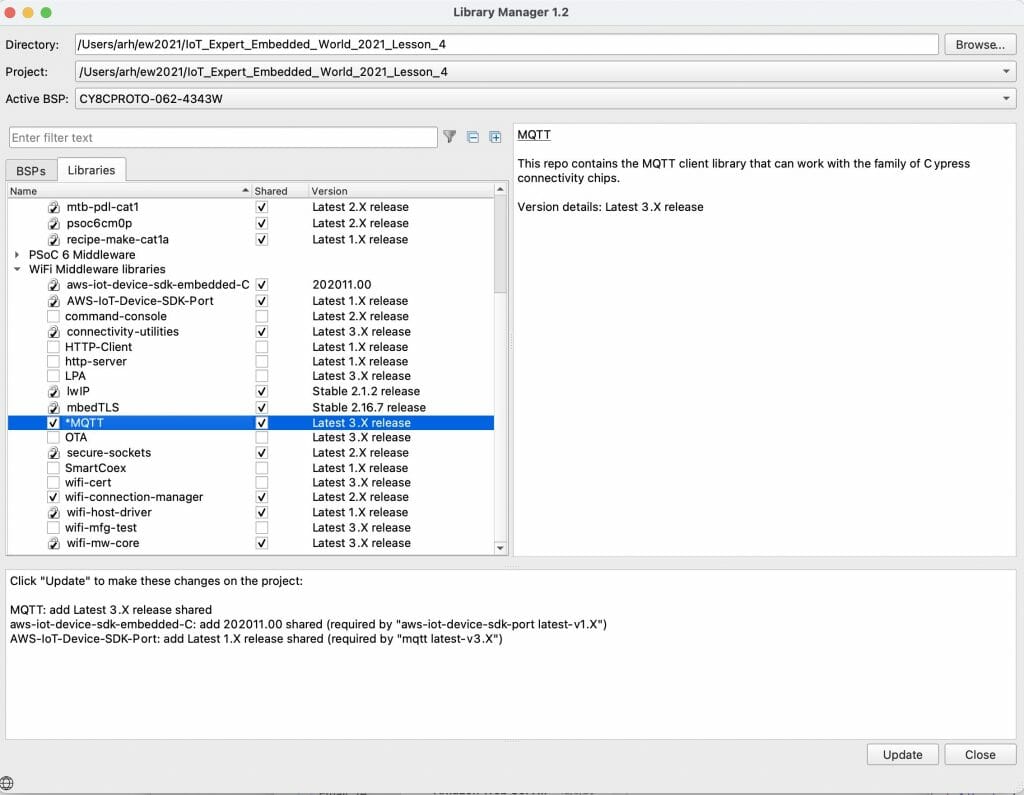
    2. Add the MQTT Library

    Start the library browser and pick out the MQTT library.  Notice that it brings in a bunch of other libraries including the AWS libraries.

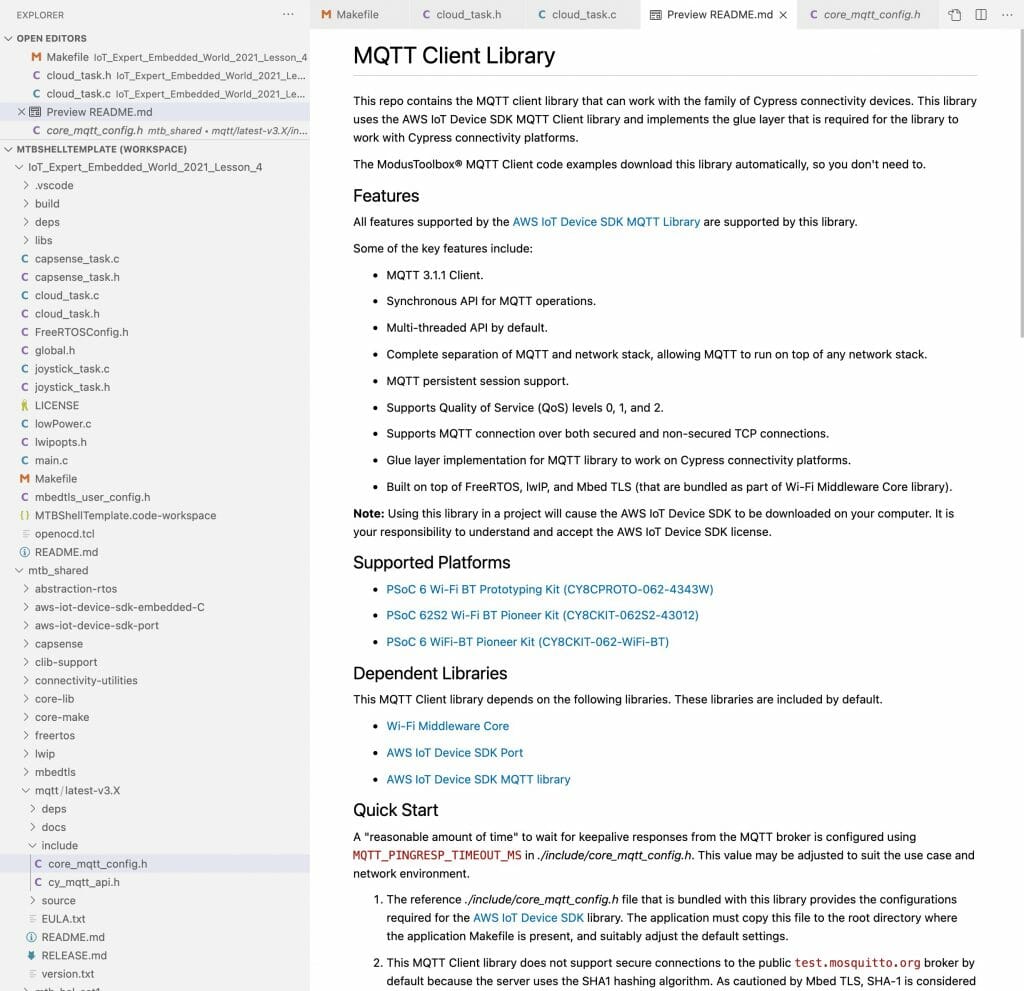
    3. Copy the core MQTT configuration

    When you look at the README for the MQTT it tells you to copy the file core_mqtt_config.h into your project.  Do so.

    4. Update the Makefile

    For this to work you need to make two changes to your Makefile.  First enable the secure sockets.

    COMPONENTS= FREERTOS LWIP MBEDTLS SECURE_SOCKETS

    Then ignore a few files from the AWS library.

    CY_IGNORE+=$(SEARCH_aws-iot-device-sdk-embedded-C)/libraries/standard/coreHTTP
    CY_IGNORE+=libs/aws-iot-device-sdk-embedded-C/libraries/standard/coreHTTP
    

    5. Update the cloud_task.h

    In order for other tasks to send a message I will create a function where they can send a “speed” also known as a percent 0-100.  This function will be called from both the CapSense task as well as the JoyStick task.

    void cloud_sendMotorSpeed(int speed);
    

    6. Update the cloud_task.c

    In the previous lesson we created the cloud task which connects to the WiFI network.  In this lesson we add MQTT.  Start by adding the includes for the MQTT and the RTOS queue.

    #include "cy_mqtt_api.h"
    #include "queue.h"

    Rather than have magic numbers (or values) hidden in my code I provide #defines for:

    1. The MQTT broker
    2. My Client ID
    3. The Topic to broadcast to
    4. The JSON key for the motor speed

    For other tasks to talk to this task they will push a value of the speed into a queue.  So I need to define that queue.  I will also use a static local variable to hold the handle of the MQTT connection.

    I then define functions to

    1. Connect to MQTT
    2. Start MQTT
    3. Publish to MQTT
    #define CLOUD_MQTT_BROKER        "mqtt.eclipseprojects.io"
    
    
    #define CLOUD_MQTT_CLIENT_PREFIX "remote"
    #define CLOUD_MQTT_TOPIC         "motor_speed"
    
    #define MOTOR_KEY                "motor"
    
    static QueueHandle_t motor_value_q;
    static cy_mqtt_t mqtthandle;
    
    static void cloud_connectWifi();
    static void cloud_startMQTT();
    static void cloud_mqtt_event_cb( cy_mqtt_t mqtt_handle, cy_mqtt_event_t event, void *user_data);
    
    static void cloud_publishMessage(char *topic,char *message);

    The updates to the cloud task are:

    1. Start WiFi
    2. Start MQTT
    3. Start the queue
    4. In the main loop, wait for a message, then publish it.
    void cloud_task(void* param)
    {
        (void)param;
    
        cloud_connectWifi();
        cloud_startMQTT();
    
        motor_value_q = xQueueCreate(1,sizeof(uint32_t));
    
        for(;;)
        {
            int motorSpeed;
            char message[32];
    
        	xQueueReceive(motor_value_q, &motorSpeed, portMAX_DELAY);
            snprintf(message, sizeof(message)-1, "{\"%s\":%d}",MOTOR_KEY,motorSpeed);
            cloud_publishMessage(CLOUD_MQTT_TOPIC,message);
        }
    }
    

    This function is used in other tasks to send the motor speed into the queue.

    void cloud_sendMotorSpeed(int speed)
    {
        if(motor_value_q)
            xQueueOverwrite(motor_value_q,&speed);
    }
    

    To start MQTT you need to

    1. Define the MQTT broker structure
    2. Create the MQTT system
    3. Define your connection information
    4. Create a random clientID (so there are no duplicated clients on the MQTT broker)
    5. Make the connection
    static void cloud_startMQTT()
    {
        static cy_mqtt_connect_info_t    	connect_info;
        static cy_mqtt_broker_info_t     	broker_info;
        static uint8_t buffer[1024];
    
        cy_rslt_t result;
    
        result = cy_mqtt_init();
        broker_info.hostname = CLOUD_MQTT_BROKER;
        broker_info.hostname_len = strlen(broker_info.hostname);
        broker_info.port = 1883;
    
        result = cy_mqtt_create( buffer, sizeof(buffer),
                                  NULL, &broker_info,
                                  cloud_mqtt_event_cb, NULL,
                                  &mqtthandle );
    
        CY_ASSERT(result == CY_RSLT_SUCCESS);
    
        static char clientId[32];
        srand(xTaskGetTickCount());
        snprintf(clientId,sizeof(clientId),"%s%6d",CLOUD_MQTT_CLIENT_PREFIX,rand());
        memset( &connect_info, 0, sizeof( cy_mqtt_connect_info_t ) );
        connect_info.client_id      = clientId;
        connect_info.client_id_len  = strlen(connect_info.client_id);
        connect_info.keep_alive_sec = 60;
        connect_info.will_info      = 0;
        connect_info.clean_session = true;
    
    
        result = cy_mqtt_connect( mqtthandle, &connect_info );
        CY_ASSERT(result == CY_RSLT_SUCCESS);
        printf("MQTT Connect Success to %s Client=%s\n",CLOUD_MQTT_BROKER,clientId);
    
    }

    You need an MQTT callback.  This is unused in this lesson but we will modify it for the drone.  Just copy it into your project

    static void cloud_mqtt_event_cb( cy_mqtt_t mqtt_handle, cy_mqtt_event_t event, void *user_data )
    {
        cy_mqtt_publish_info_t *received_msg;
        printf( "\nMQTT App callback with handle : %p \n", mqtt_handle );
        (void)user_data;
        switch( event.type )
        {
            case CY_MQTT_EVENT_TYPE_DISCONNECT :
                if( event.data.reason == CY_MQTT_DISCONN_TYPE_BROKER_DOWN )
                {
                    printf( "\nCY_MQTT_DISCONN_TYPE_BROKER_DOWN .....\n" );
                }
                else
                {
                    printf( "\nCY_MQTT_DISCONN_REASON_NETWORK_DISCONNECTION .....\n" );
                }
                break;
            case CY_MQTT_EVENT_TYPE_PUBLISH_RECEIVE :
                received_msg = &(event.data.pub_msg.received_message);
                printf( "Incoming Publish Topic Name: %.*s\n", received_msg->topic_len, received_msg->topic );
                printf( "Incoming Publish message Packet Id is %u.\n", event.data.pub_msg.packet_id );
                printf( "Incoming Publish Message : %.*s.\n\n", ( int )received_msg->payload_len, ( const char * )received_msg->payload );
                break;
            default :
                printf( "\nUNKNOWN EVENT .....\n" );
                break;
        }
    }

    To publish a message you

    1. Create the message
    2. Send the publish
    static void cloud_publishMessage(char *topic,char *message)
    {
        cy_mqtt_publish_info_t  pub_msg;
            
        pub_msg.qos = CY_MQTT_QOS0;
        pub_msg.topic = topic;
        pub_msg.topic_len = strlen(pub_msg.topic);
        pub_msg.payload = message;
        pub_msg.payload_len = strlen(message);
        
        cy_mqtt_publish( mqtthandle, &pub_msg );
        printf("Published to Topic=%s Message=%s\n",topic,message);
        
    }
    

    7. Update joystick_task.c

    We want the joystick task to be able to send joystick positions.  Include the cloud_task.h so that it gets access to the function to send messages.

    #include "cloud_task.h"

    Update the joystick function to call the send message function.

    /* Only update/print new value if it has changed by more than the hysteresis value */
    if((joystick_curr.x > (joystick_prev.x + JOYSTICK_HYSTERESIS)) || (joystick_curr.x < (joystick_prev.x - JOYSTICK_HYSTERESIS)))
    {
        printf("Joystick Position: %d\n", joystick_curr.x);
        cloud_sendMotorSpeed(joystick_curr.x); 
    
    }

    8. Update capsense_task.c

    We want the CapSense task to be able to send CapSense positions.  Include the cloud_task.h so that it gets access to the function to send messages.

    #include "cloud_task.h"

    Update the button code to send either 0 or 75 (0=STOP!!!#*##&&#) (75=take off)

    if((0u != button0_status) && (0u == button0_status_prev))
    {
        printf("Button 0 pressed\n");
        cloud_sendMotorSpeed(0); // Stop the Motor
    }
    
    if((0u != button1_status) && (0u == button1_status_prev))
    {
        printf("Button 1 pressed\n");
        cloud_sendMotorSpeed(75); // Set the motor to 75%
    }

    The slider just sends the current position.

    if((0u != slider_touched) && (slider_pos_prev != slider_pos ))
    {
        printf("Slider position %d\n",slider_pos);
        cloud_sendMotorSpeed(slider_pos);
    }

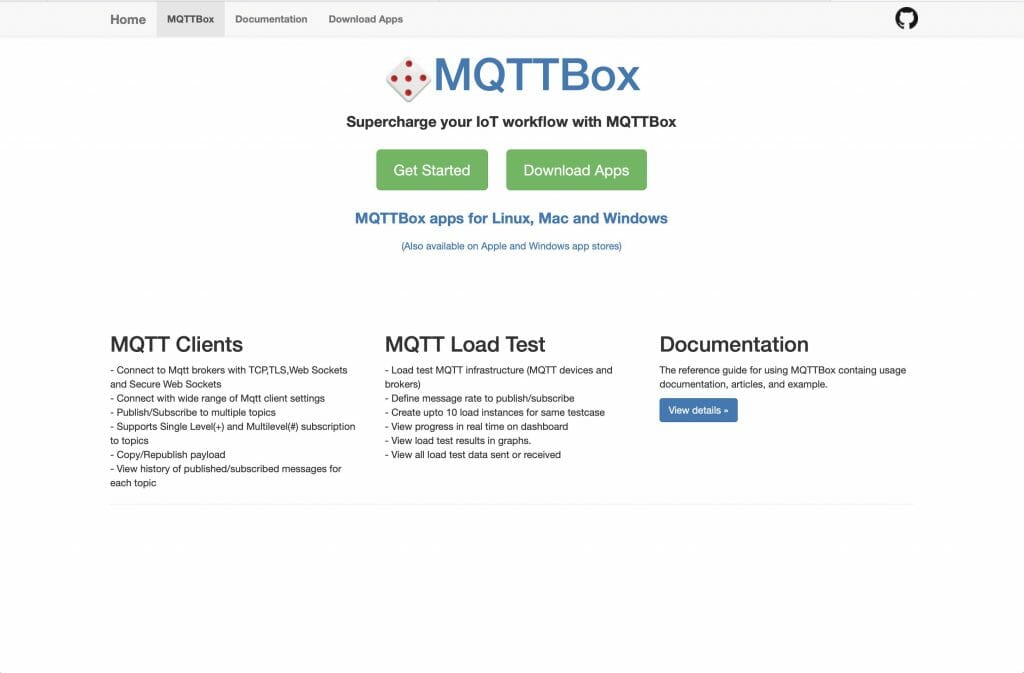
    9. Test (using an MQTT Client)

    You can download/install MQTTBox from here  This is a Mac/Linux/Windows MQTT client.  This will enable you to attach to the MQTT broker and then subscribe to the motor speed topic.

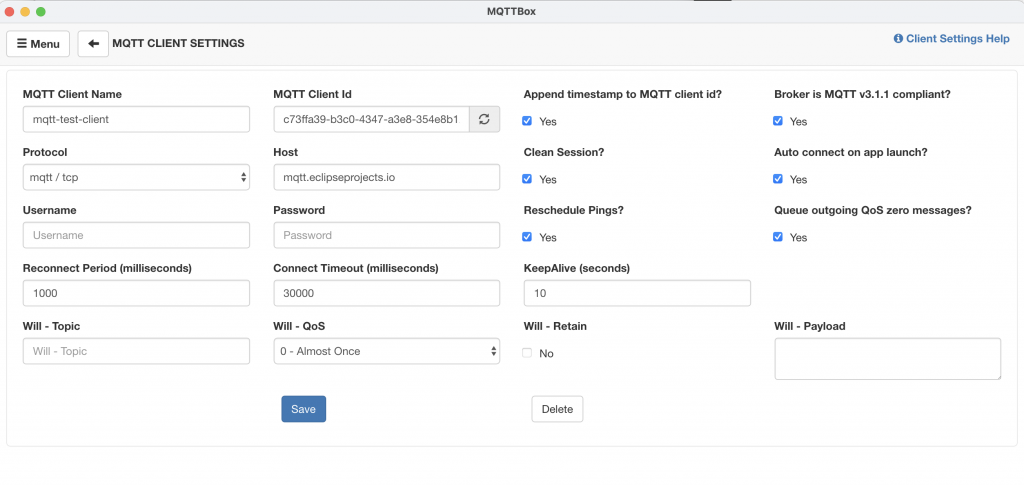
    Setup the configuration for the MQTT broker by pressing the gear button

    Then program your remote control and send some joystick and CapSense values.

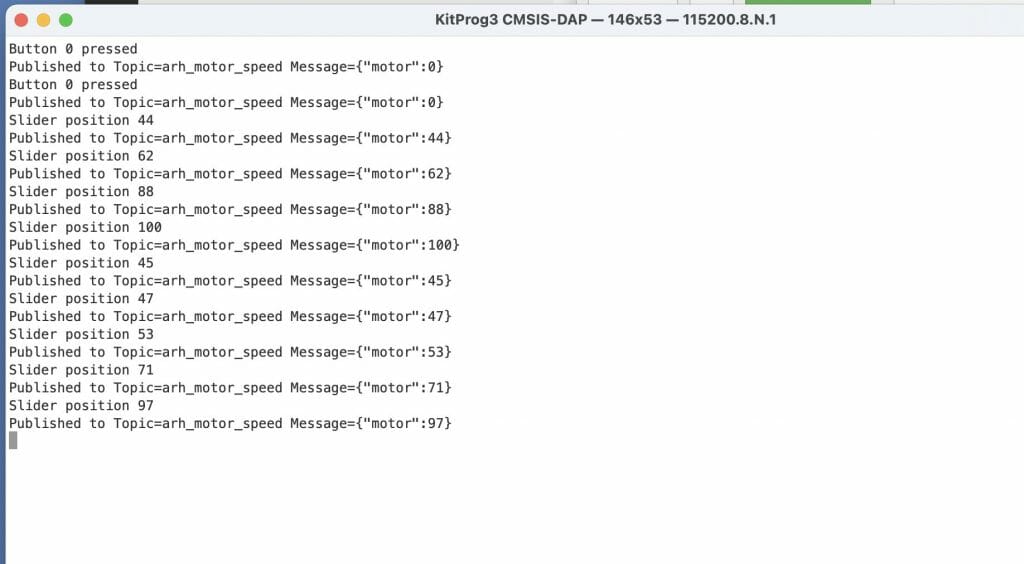
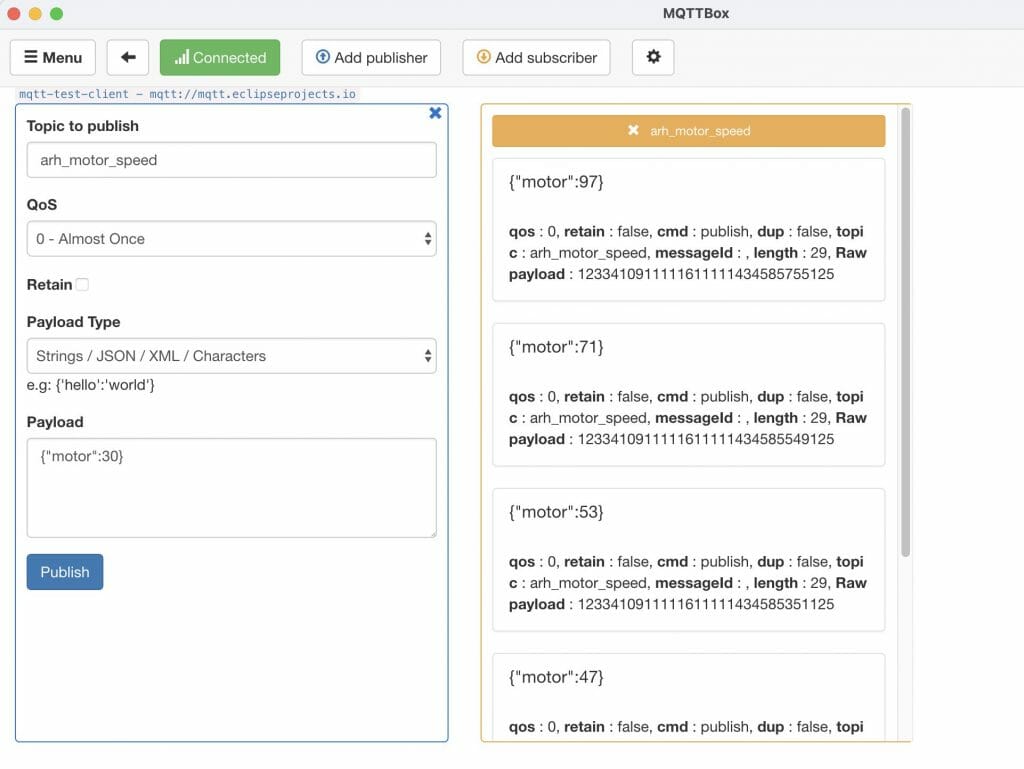
    And you will see them coming out on the MQTTBox client

    10. Test (using our C++/Qt GUI)

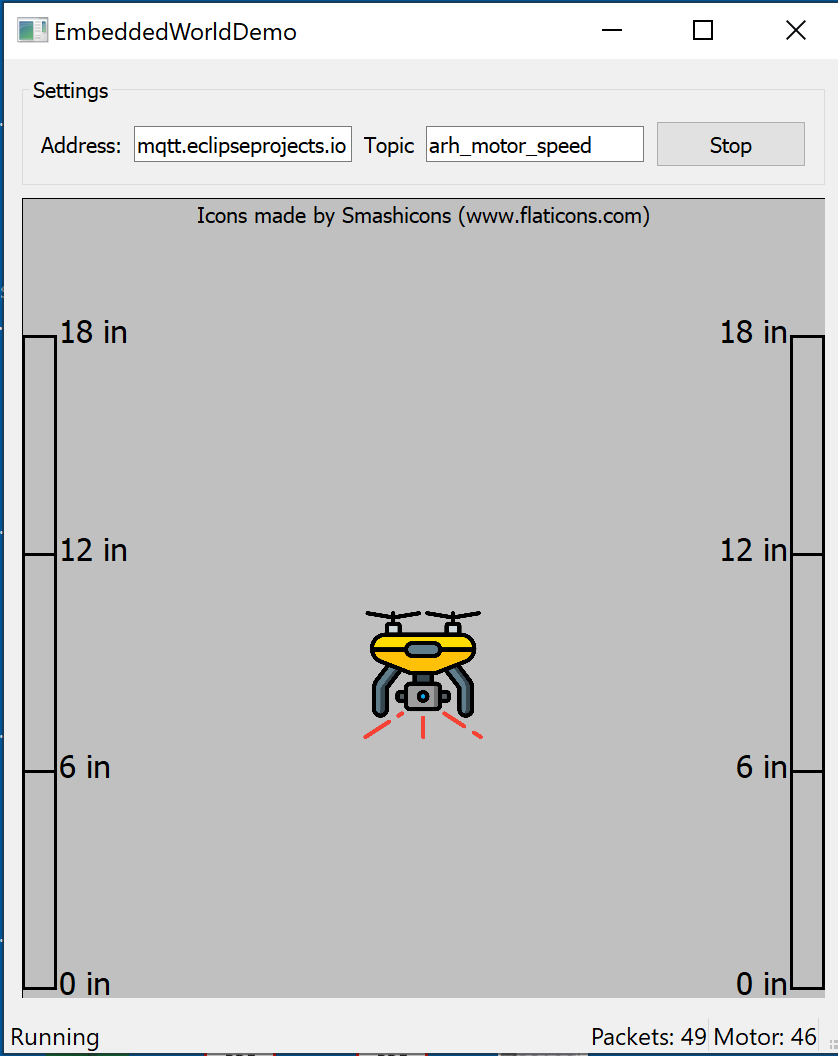
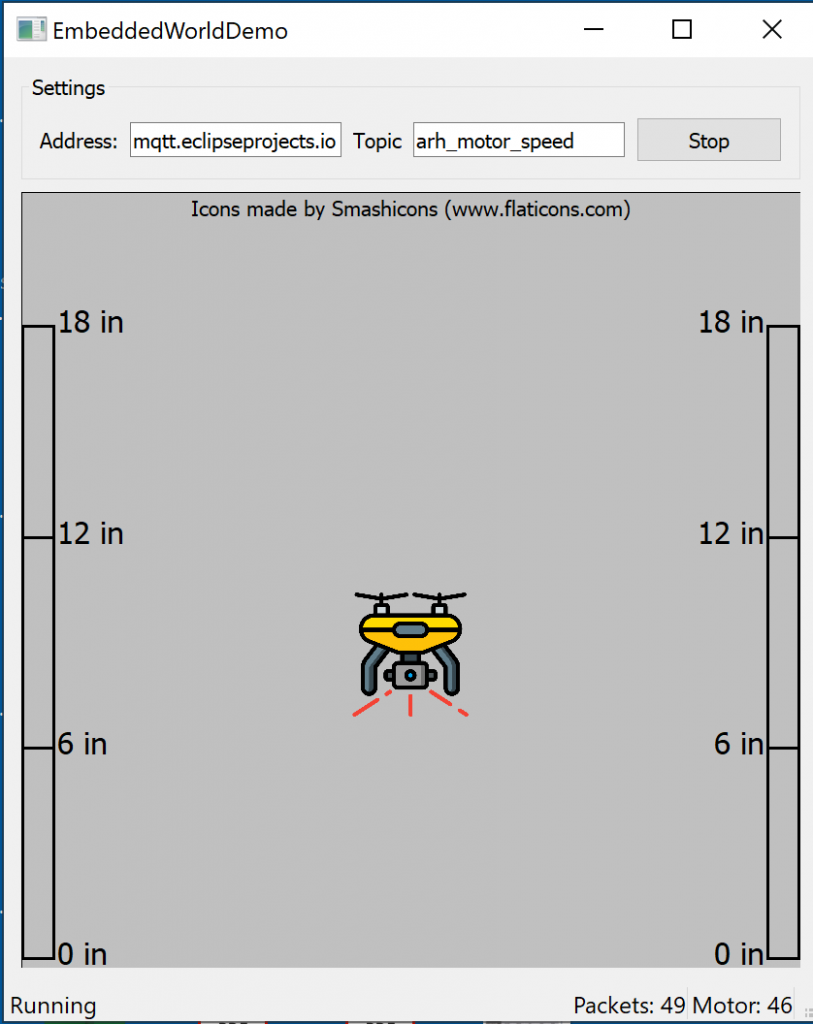
    My friend Butch created a C++/Qt GUI to “simulate” the drone.  You can find it in the “simulator” directory of project 4.  Here is what it looks like.  You will need to put in

    1. Which broker you are using
    2. The name of your Topic

    Resources for Project

    You can find this completed project in your project creator dialog by filtering for “IoT Expert Embedded”.  This is lesson 4

    You can also clone this project at git@github.com:iotexpert/ew21-lesson4.git or https://github.com/iotexpert/ew21-lesson4

    Here is the final cloud_task.c

    #include <stdio.h>
    
    #include "FreeRTOS.h"
    #include "task.h"
    #include "queue.h"
    
    #include "cy_wcm.h"
    #include "cy_mqtt_api.h"
    
    #include "cloud_task.h"
    
    
    #define CLOUD_WIFI_AP        "ew2021"
    #define CLOUD_WIFI_PW        "ew2021ap"
    #define CLOUD_WIFI_SECURITY  CY_WCM_SECURITY_WPA2_AES_PSK
    #define CLOUD_WIFI_BAND      CY_WCM_WIFI_BAND_ANY
    
    #define CLOUD_MQTT_BROKER        "mqtt.eclipseprojects.io"
    
    
    #define CLOUD_MQTT_CLIENT_PREFIX "remote"
    #define CLOUD_MQTT_TOPIC         "motor_speed"
    
    #define MOTOR_KEY                "motor"
    
    static QueueHandle_t motor_value_q;
    static cy_mqtt_t mqtthandle;
    
    static void cloud_connectWifi();
    static void cloud_startMQTT();
    static void cloud_mqtt_event_cb( cy_mqtt_t mqtt_handle, cy_mqtt_event_t event, void *user_data);
    
    static void cloud_publishMessage(char *topic,char *message);
    
    void cloud_task(void* param)
    {
        (void)param;
    
        cloud_connectWifi();
        cloud_startMQTT();
    
        motor_value_q = xQueueCreate(1,sizeof(uint32_t));
    
        for(;;)
        {
            int motorSpeed;
            char message[32];
    
        	xQueueReceive(motor_value_q, &motorSpeed, portMAX_DELAY);
            snprintf(message, sizeof(message)-1, "{\"%s\":%d}",MOTOR_KEY,motorSpeed);
            cloud_publishMessage(CLOUD_MQTT_TOPIC,message);
        }
    }
    
    void cloud_sendMotorSpeed(int speed)
    {
        if(motor_value_q)
            xQueueSend(motor_value_q,&speed,0);
    }
    
    static void cloud_connectWifi()
    {
        cy_rslt_t result;
    
        cy_wcm_connect_params_t connect_param = {
            .ap_credentials.SSID = CLOUD_WIFI_AP,
            .ap_credentials.password = CLOUD_WIFI_PW,
            .ap_credentials.security = CLOUD_WIFI_SECURITY,
        	.static_ip_settings = 0,
            .BSSID = {0},
            .band = CLOUD_WIFI_BAND,
        };
        cy_wcm_config_t config = {.interface = CY_WCM_INTERFACE_TYPE_STA}; // We are a station (not a Access Point)
    
        cy_wcm_init(&config); // Initialize the connection manager
    
        printf("\nWi-Fi Connection Manager initialized.\n");
    
        do
        {
            cy_wcm_ip_address_t ip_address;
    
            printf("Connecting to Wi-Fi AP '%s'\n", connect_param.ap_credentials.SSID);
            result = cy_wcm_connect_ap(&connect_param, &ip_address);
    
            if (result == CY_RSLT_SUCCESS)
            {
                printf("Successfully connected to Wi-Fi network '%s'.\n",
                        connect_param.ap_credentials.SSID);
    
                // Print IP Address
                if (ip_address.version == CY_WCM_IP_VER_V4)
                {
                    printf("IPv4 Address Assigned: %d.%d.%d.%d\n", (uint8_t)ip_address.ip.v4,
                            (uint8_t)(ip_address.ip.v4 >> 8), (uint8_t)(ip_address.ip.v4 >> 16),
                            (uint8_t)(ip_address.ip.v4 >> 24));
                }
                else if (ip_address.version == CY_WCM_IP_VER_V6)
                {
                    printf("IPv6 Address Assigned: %0X:%0X:%0X:%0X\n", (unsigned int)ip_address.ip.v6[0],
                            (unsigned int)ip_address.ip.v6[1], (unsigned int)ip_address.ip.v6[2],
                            (unsigned int)ip_address.ip.v6[3]);
                }
                break; /* Exit the for loop once the connection has been made */
            }
            else
            {
                printf("WiFi Connect Failed Retrying\n");
                vTaskDelay(2000); // wait 2 seconds and try again;
            }
    
        } while (result != CY_RSLT_SUCCESS);
    
    }
    
    static void cloud_startMQTT()
    {
        static cy_mqtt_connect_info_t    	connect_info;
        static cy_mqtt_broker_info_t     	broker_info;
        static uint8_t buffer[1024];
    
        cy_rslt_t result;
    
        result = cy_mqtt_init();
        broker_info.hostname = CLOUD_MQTT_BROKER;
        broker_info.hostname_len = strlen(broker_info.hostname);
        broker_info.port = 1883;
    
        result = cy_mqtt_create( buffer, sizeof(buffer),
                                  NULL, &broker_info,
                                  cloud_mqtt_event_cb, NULL,
                                  &mqtthandle );
    
        CY_ASSERT(result == CY_RSLT_SUCCESS);
    
        static char clientId[32];
        srand(xTaskGetTickCount());
        snprintf(clientId,sizeof(clientId),"%s%6d",CLOUD_MQTT_CLIENT_PREFIX,rand());
        memset( &connect_info, 0, sizeof( cy_mqtt_connect_info_t ) );
        connect_info.client_id      = clientId;
        connect_info.client_id_len  = strlen(connect_info.client_id);
        connect_info.keep_alive_sec = 60;
        connect_info.will_info      = 0;
        connect_info.clean_session = true;
    
    
        result = cy_mqtt_connect( mqtthandle, &connect_info );
        CY_ASSERT(result == CY_RSLT_SUCCESS);
        printf("MQTT Connect Success to %s Client=%s\n",CLOUD_MQTT_BROKER,clientId);
    
    }
    
    static void cloud_mqtt_event_cb( cy_mqtt_t mqtt_handle, cy_mqtt_event_t event, void *user_data )
    {
        cy_mqtt_publish_info_t *received_msg;
        printf( "\nMQTT App callback with handle : %p \n", mqtt_handle );
        (void)user_data;
        switch( event.type )
        {
            case CY_MQTT_EVENT_TYPE_DISCONNECT :
                if( event.data.reason == CY_MQTT_DISCONN_TYPE_BROKER_DOWN )
                {
                    printf( "\nCY_MQTT_DISCONN_TYPE_BROKER_DOWN .....\n" );
                }
                else
                {
                    printf( "\nCY_MQTT_DISCONN_REASON_NETWORK_DISCONNECTION .....\n" );
                }
                break;
            case CY_MQTT_EVENT_TYPE_PUBLISH_RECEIVE :
                received_msg = &(event.data.pub_msg.received_message);
                printf( "Incoming Publish Topic Name: %.*s\n", received_msg->topic_len, received_msg->topic );
                printf( "Incoming Publish message Packet Id is %u.\n", event.data.pub_msg.packet_id );
                printf( "Incoming Publish Message : %.*s.\n\n", ( int )received_msg->payload_len, ( const char * )received_msg->payload );
                break;
            default :
                printf( "\nUNKNOWN EVENT .....\n" );
                break;
        }
    }
    
    static void cloud_publishMessage(char *topic,char *message)
    {
        cy_mqtt_publish_info_t  pub_msg;
            
        pub_msg.qos = CY_MQTT_QOS0;
        pub_msg.topic = topic;
        pub_msg.topic_len = strlen(pub_msg.topic);
        pub_msg.payload = message;
        pub_msg.payload_len = strlen(message);
        
        cy_mqtt_publish( mqtthandle, &pub_msg );
        printf("Published to Topic=%s Message=%s\n",topic,message);
        
    }
    

    EW21: Lesson 5: Low Power

    Embedded World 2021 - Infineon ModusToolbox PSoC 6 Drone 


    Summary

    The FreeRTOS template we started with already enables low power mode transitions such as Sleep and Deep Sleep. In lesson 5 we will update our remote control project to have even lower power as remote controls are almost always driven by batteries.  We will do this by using lower power regulators, slowing down clocks, and by offloading some functionality to the WiFi chip. This will be the final lesson on the remote control.  Here is the architecture:

    Learning Objectives

    This lesson will show you two important features of Modus Toolbox.

    1. How to reduce system power using the Low Power Assistant
    2. How to create a custom board support package

    Procedure

    1. Create your project
    2. Create a custom Board Support Package
    3. Modify the Makefile to use the new BSP
    4. Add the Low Power Assistant to the project
    5. Use the Configurator to setup Low Power
    6. Examine FreeRTOSConfig.h
    7. Test the project

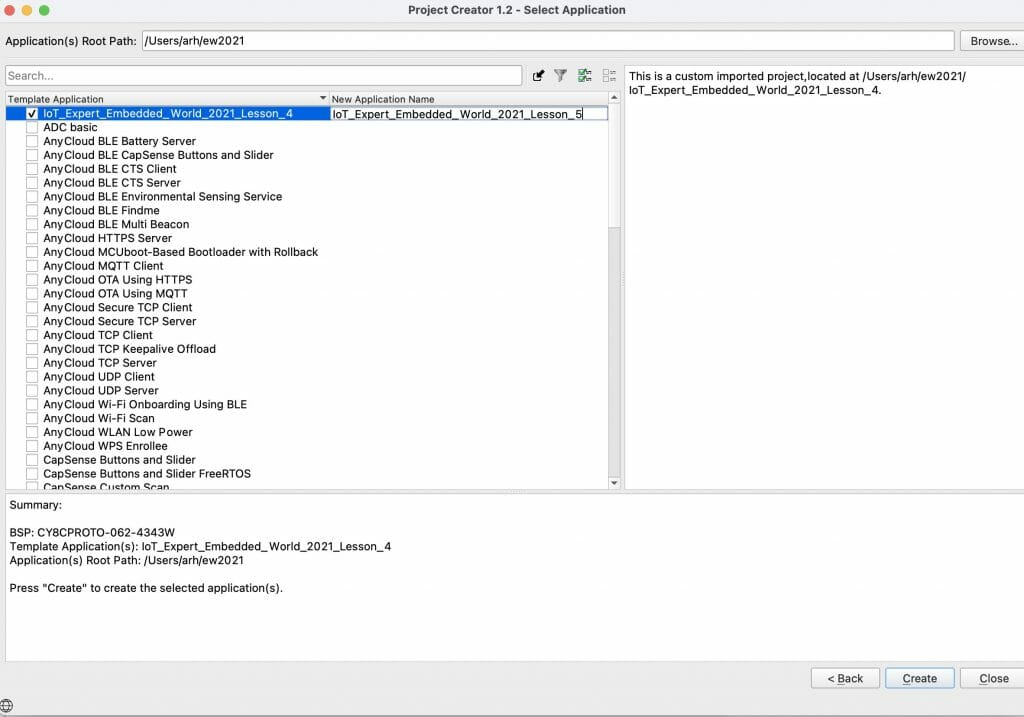
    1. Create the project

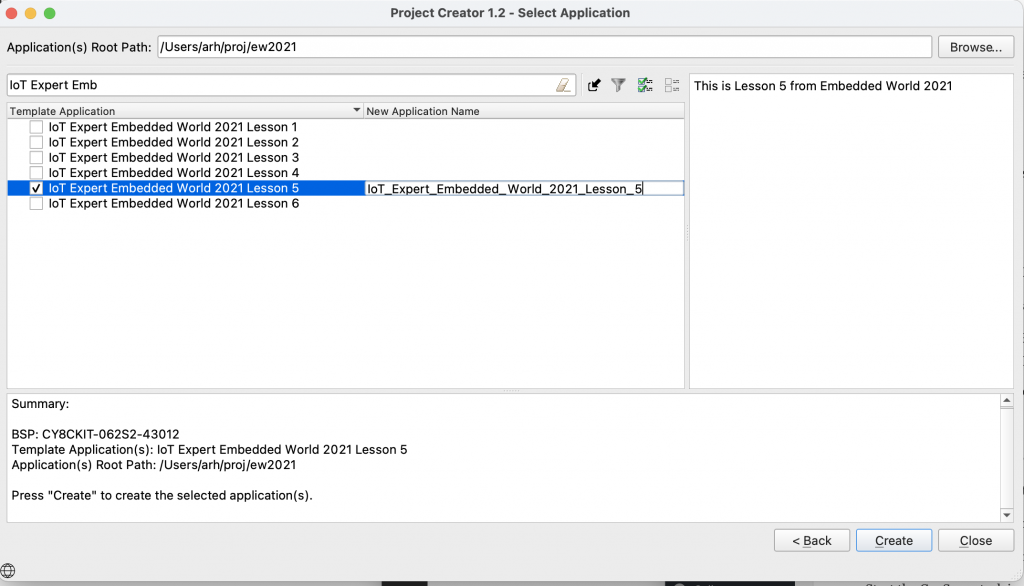
    Start the project creator and make a copy of your 4th project.

    Call it Lesson_5

    2. Override the BSP Configuration

    Make a directory called “COMPONENT_CUSTOM_DESIGN_MODUS” to contain the configuration files that will override the configuration from the BSP.  This will be brought into the project automatically by the build system.

    Note: You can also create a complete custom BSP which allows changing things like linker scripts, startup code, etc. See the ModusToolbox User Guide for details on how to do that.

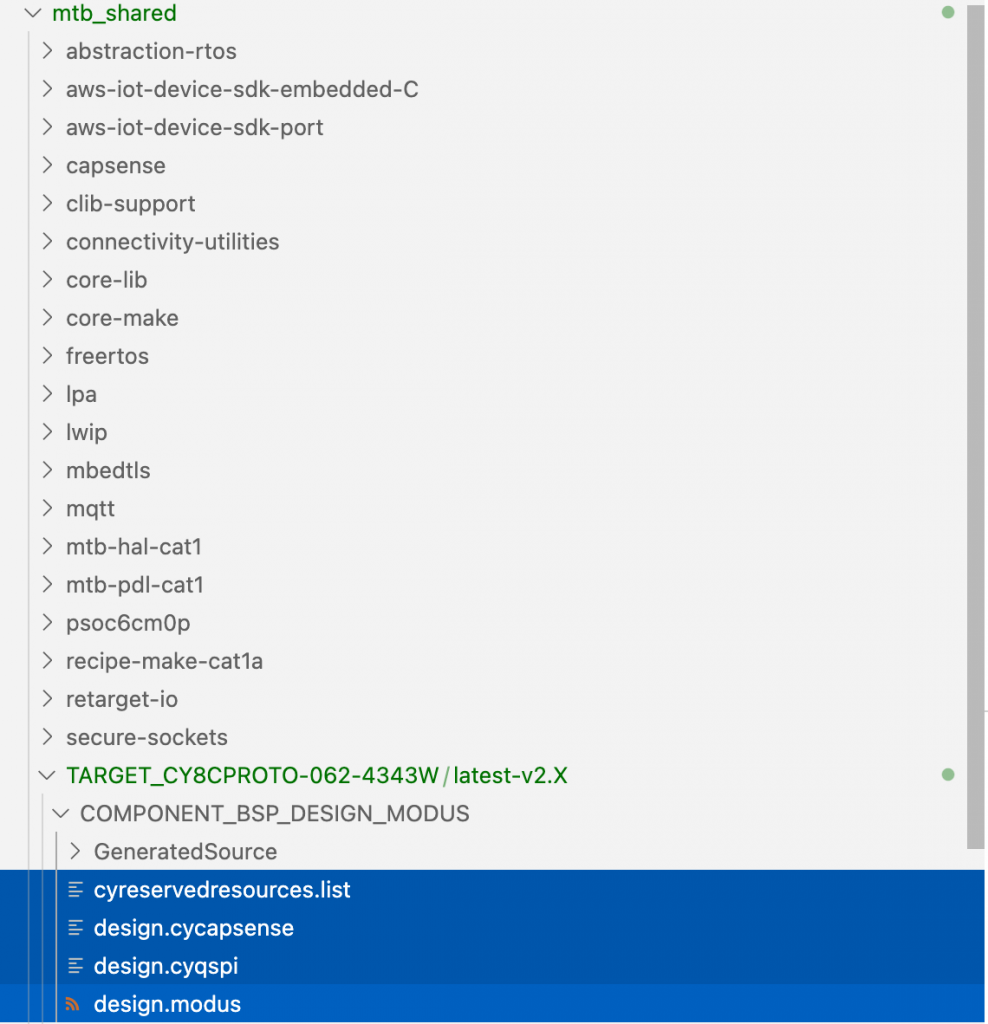
    Make a directory called “TARGET_CY8CPROTO-062-4343W” in your project.  This directory will hold the custom BSP files.

    Copy and paste the configuration files from the Modus Toolbox BSP directly into your project.

    Now your project should have these files:

    3. Modify the Makefile

    You need to

    1. Enable your new BSP
    2. Disable the existing BSP

    Do this by adding to the COMPONENTS and DISABLE_COMPONENTS line in the Makefile

    COMPONENTS= FREERTOS LWIP MBEDTLS SECURE_SOCKETS CUSTOM_DESIGN_MODUS WCM
    DISABLE_COMPONENTS=BSP_DESIGN_MODUS

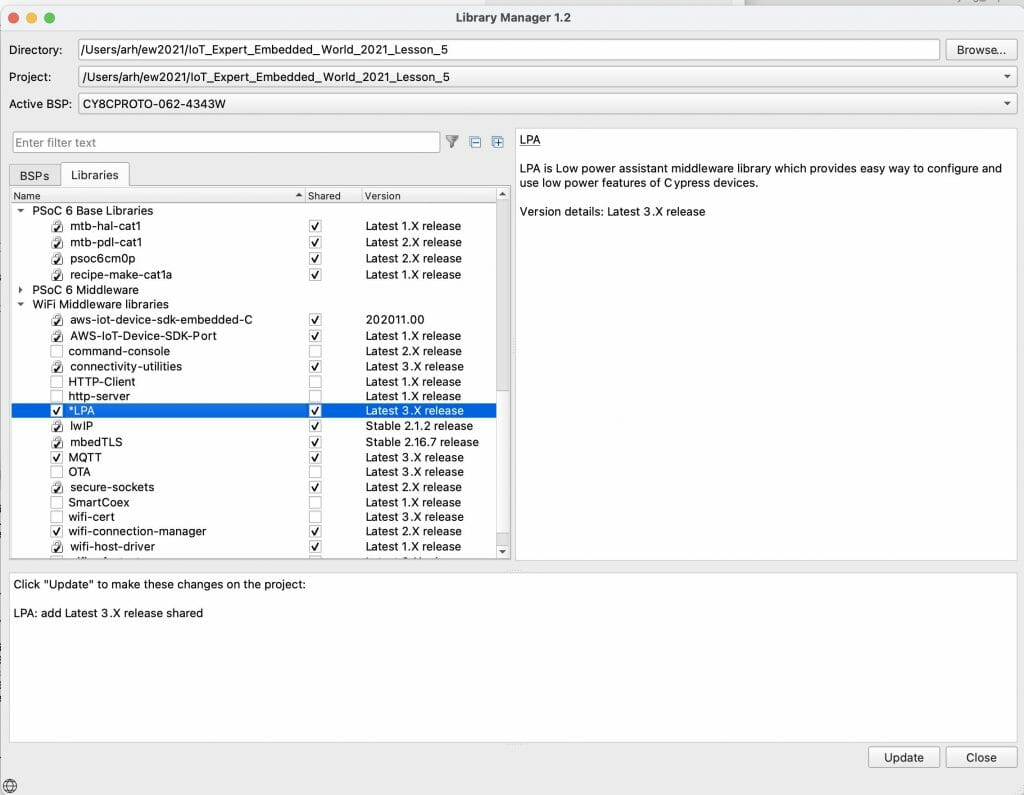
    4. Add the Low Power Assistant to the project

    Start the Library Manager and add the LPA (Low Power Assistant) library to your project

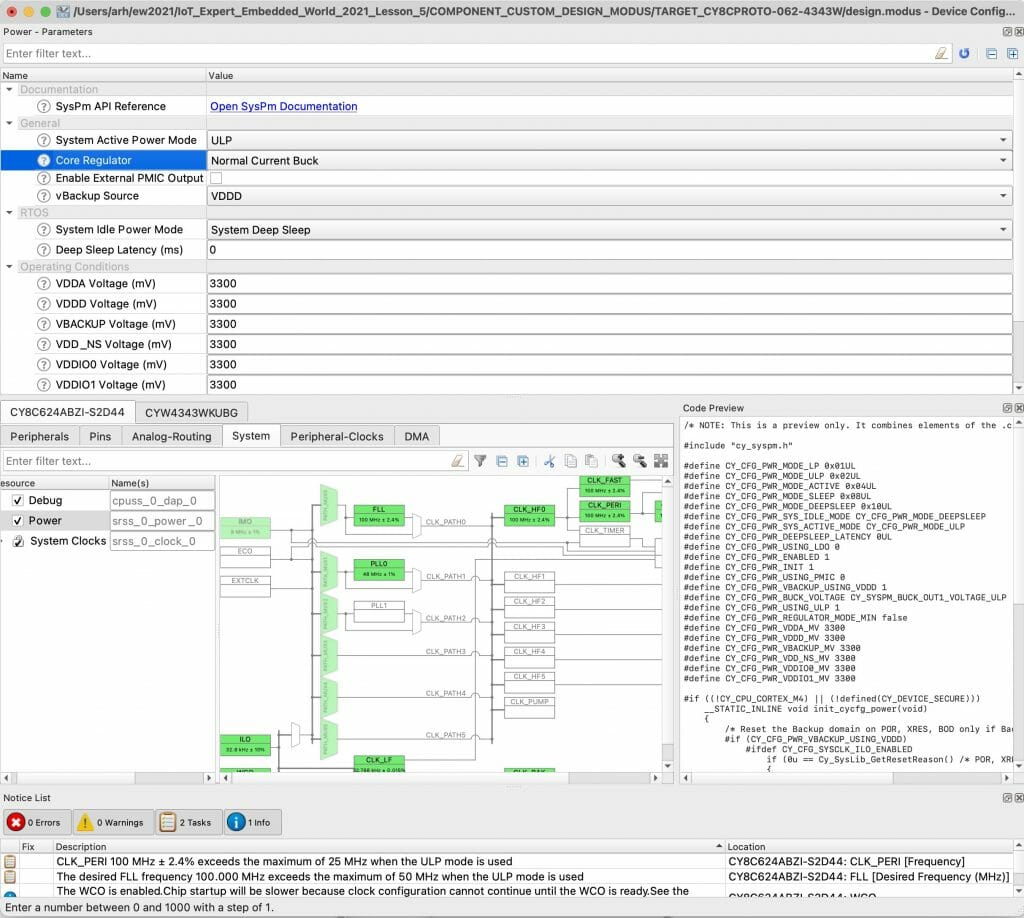
    5. Use the configurator to Setup for Low Power

    Set the System Active Power Mode to ULP and enable the “Normal Current Buck”.

    Notice that the System Idle Power Mode is already set to System Deep Sleep. This means that when the RTOS is not busy, it will attempt to enter Deep Sleep mode.

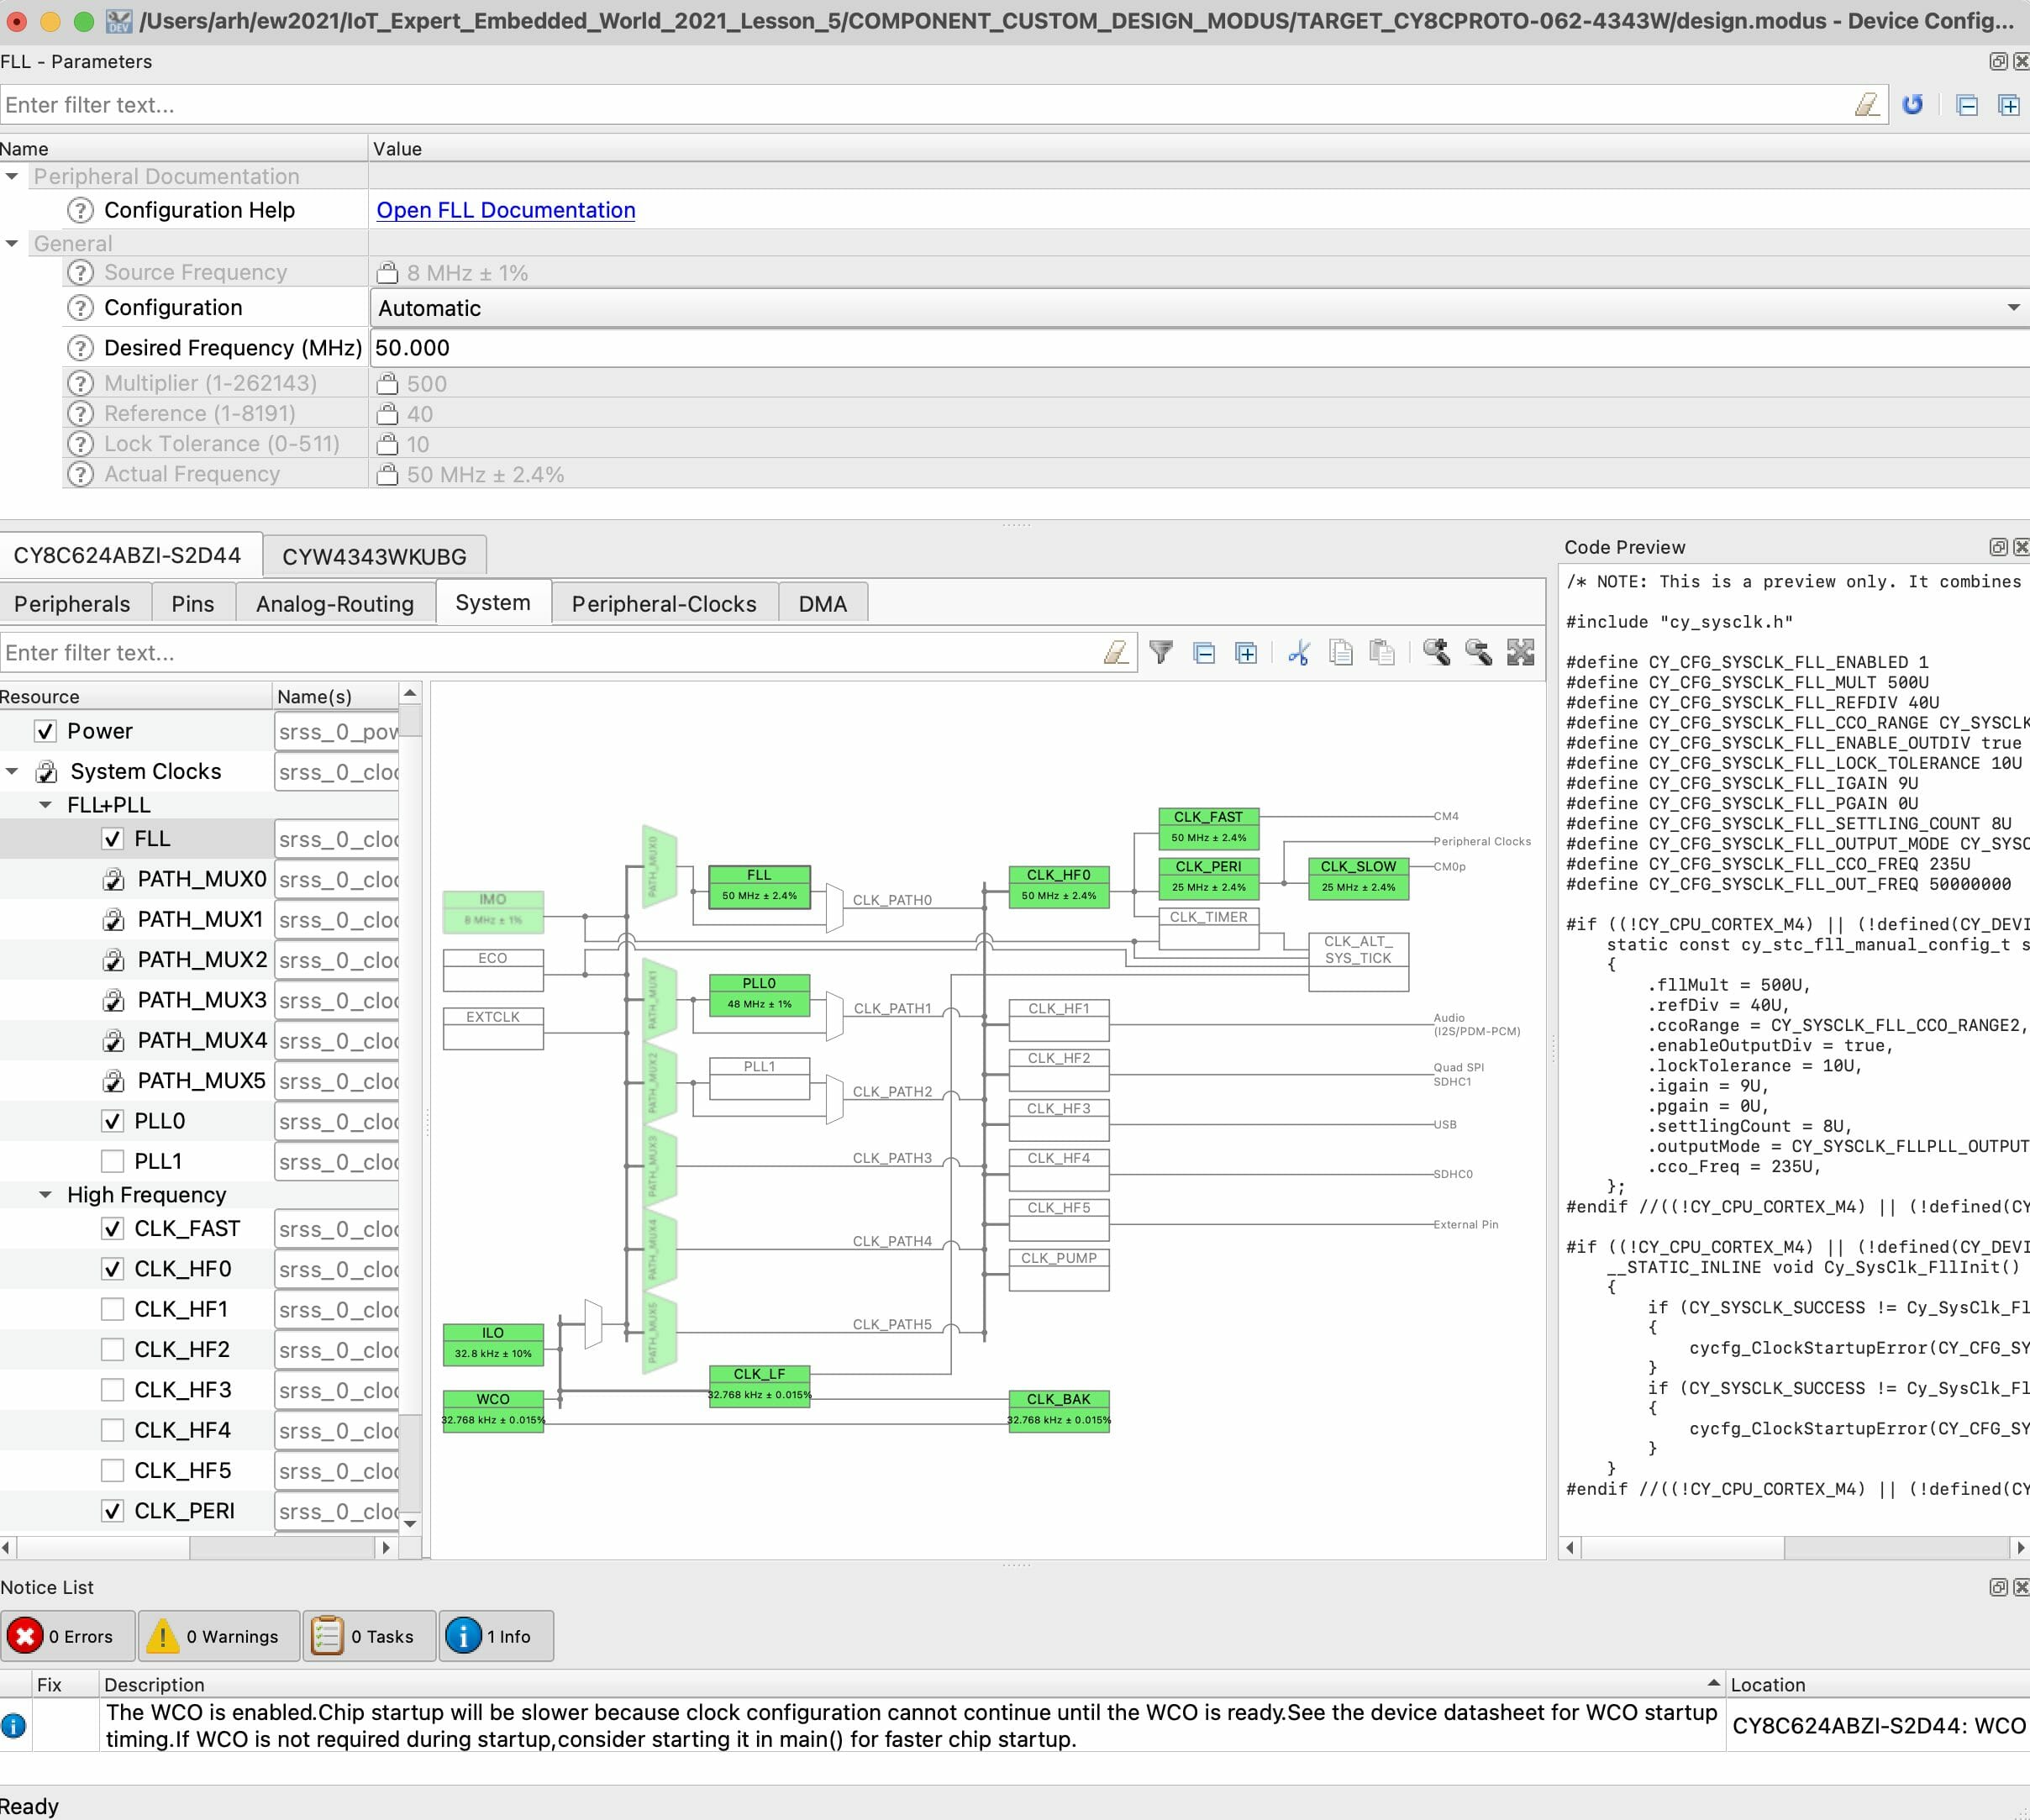
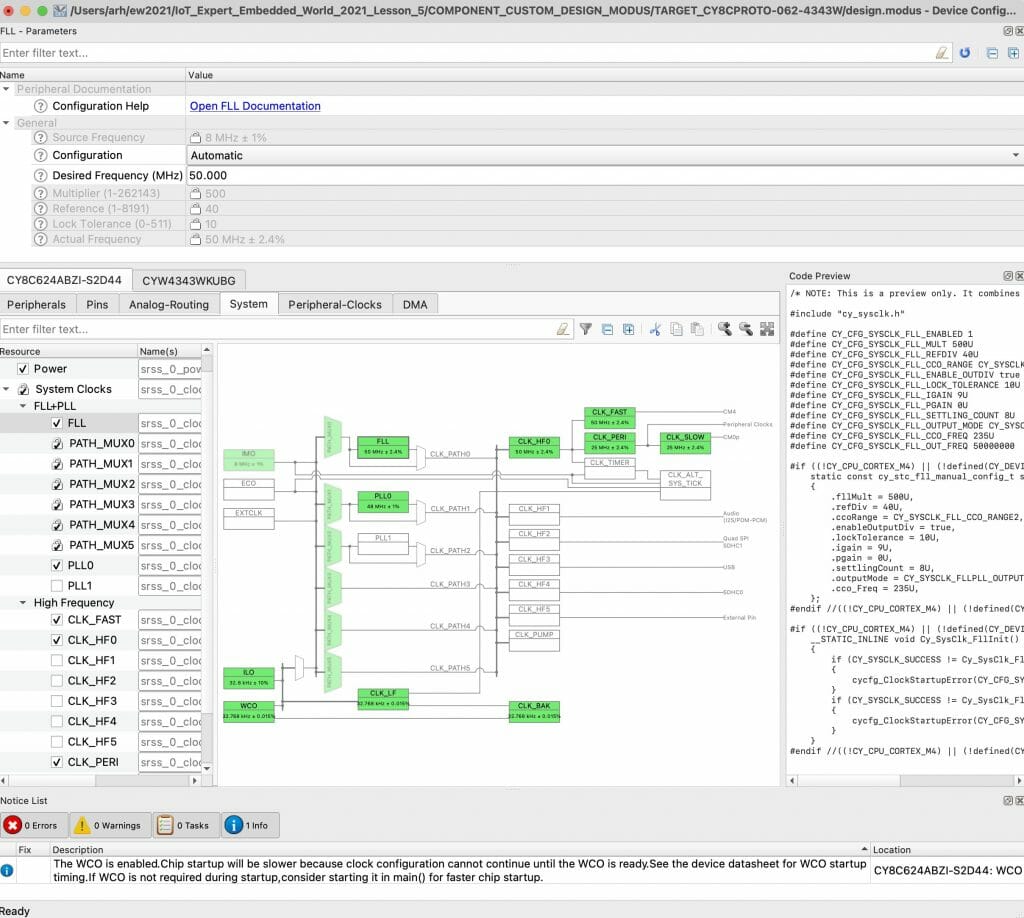
    Turn down the FLL to 50 Mhz

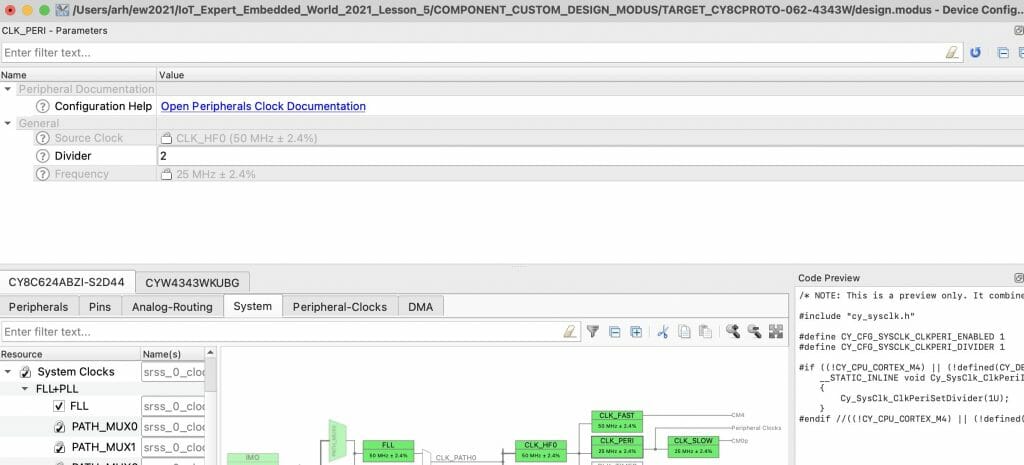
    Lower the frequency of the peripherals by cutting the divider in half.

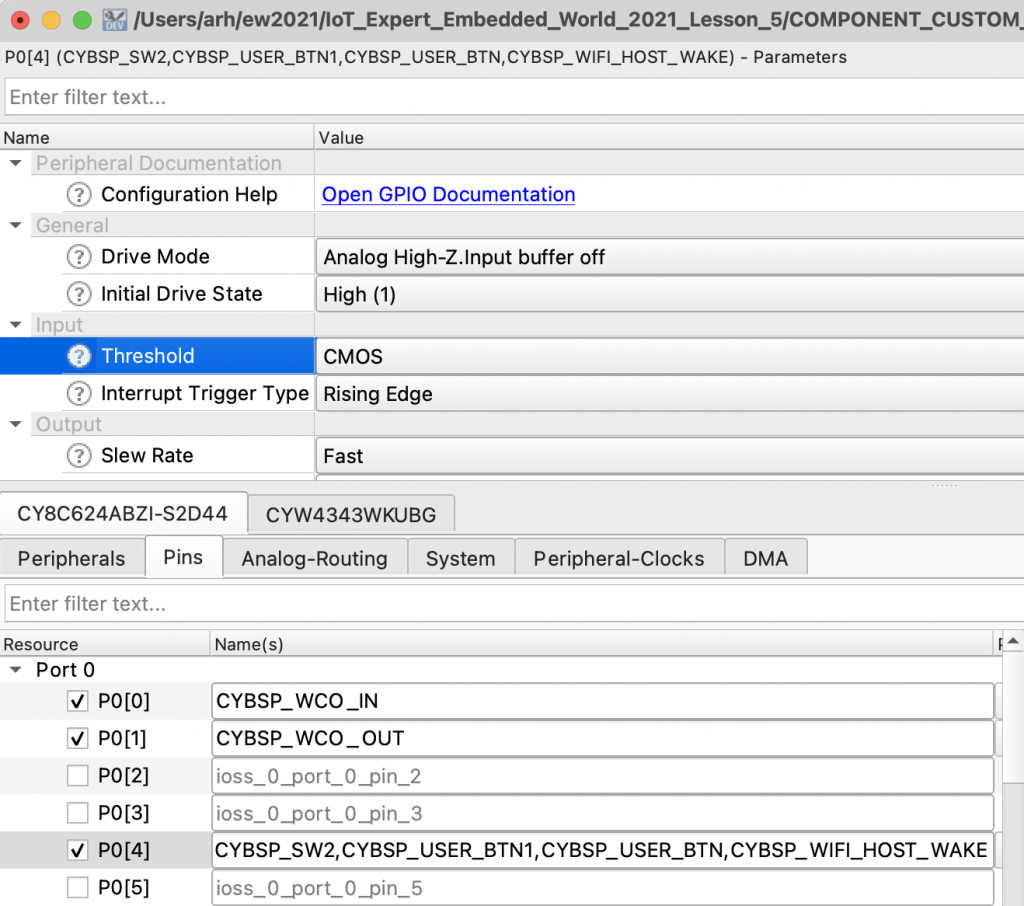
    In order to save power the host can sleep and wait for WiFi packets.  The WiFi chip needs to be able to wakeup the host PSoC.  Enable P0[4] as the wakeup pin and turn on the interrupt.


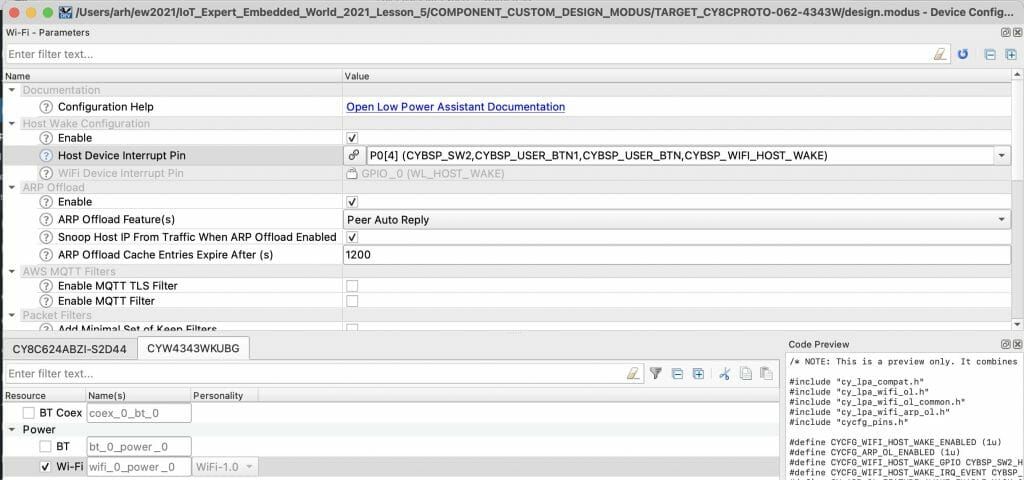
    Click on the CYW4343WKUGB tab.  Enable the host wakeup option.  Set the pin to P0[4].  Enable ARP off loads.  You can also look through the other low power offload filters.

    6. Examine FreeRTOSConfig.h

    Along with the System Idle Power Mode in the Configurator, this block of code tells FreeRTOS that when the system is idle that it should go to sleep.

    The function vApplicationSleep is in the abstraction-rtos library and it allows the system to go to sleep and wake up cleanly in the context of FreeRTOS.

    #if CY_CFG_PWR_SYS_IDLE_MODE == CY_CFG_PWR_MODE_SLEEP || CY_CFG_PWR_SYS_IDLE_MODE == CY_CFG_PWR_MODE_DEEPSLEEP
    extern void vApplicationSleep( uint32_t xExpectedIdleTime );
    #define portSUPPRESS_TICKS_AND_SLEEP( xIdleTime ) vApplicationSleep( xIdleTime )
    #define configUSE_TICKLESS_IDLE  2
    #endif
    
    #if CY_CFG_PWR_DEEPSLEEP_LATENCY>0
    #define configEXPECTED_IDLE_TIME_BEFORE_SLEEP CY_CFG_PWR_DEEPSLEEP_LATENCY
    #endif
    

    7. Test

    Program and test to make sure that things still work.  If you have a DMM plug it in and find out how much power you saved.

    Resources for Project

    You can find the completed project in your project creator dialog by filtering for “IoT Expert Embedded”.  This is lesson5

    You can also clone this project at git@github.com:iotexpert/ew21-lesson5.git or https://github.com/iotexpert/ew21-lesson5

    EW21: Lesson 6: Motor Control

    Embedded World 2021 - Infineon ModusToolbox PSoC 6 Drone 


    Summary

    In lesson 6 we will turn our attention to the drone. Everything on the drone side is almost exactly the same as remote control, so I will copy all of that code to start with then add the motor controller.  At the end of lesson one you will have the functioning drone controller.  Here is the architecture:

    Learning Objectives

    1. Retargeting a project to a different board
    2. Using the Infineon BLDC Motor Controller
    3. Subscribing to a MQTT topic

    Procedure

    1. Make a new project
    2. Rip out the joystick_task.c/h and fix main.c
    3. Add the motor driver library
    4. Create motor_task.h
    5. Create motor_task.c
    6. Update the CapSense task to submit to the motor_task
    7. Fix the Cloud Task to perform MQTT subscribe instead of publish
    8. Fix main.c to start the motor task
    9. Test

    1. Make a new project

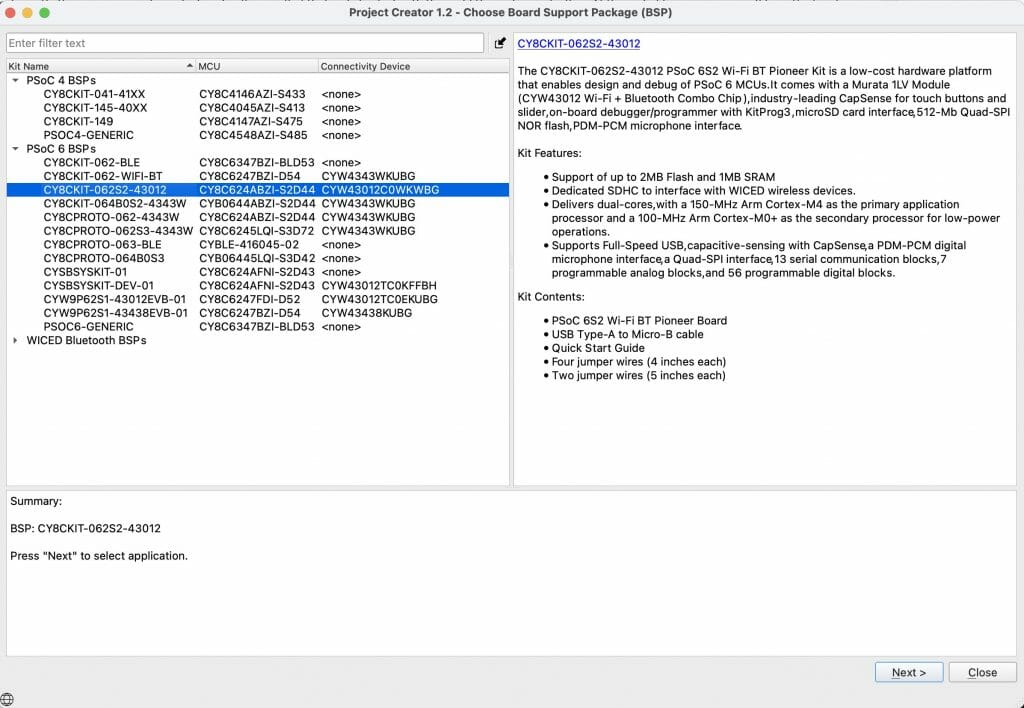
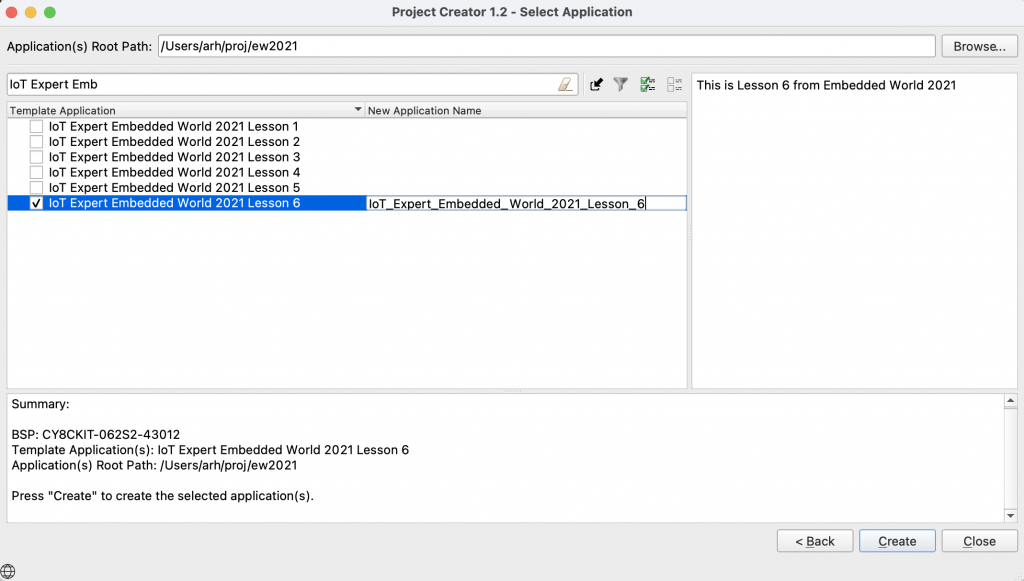
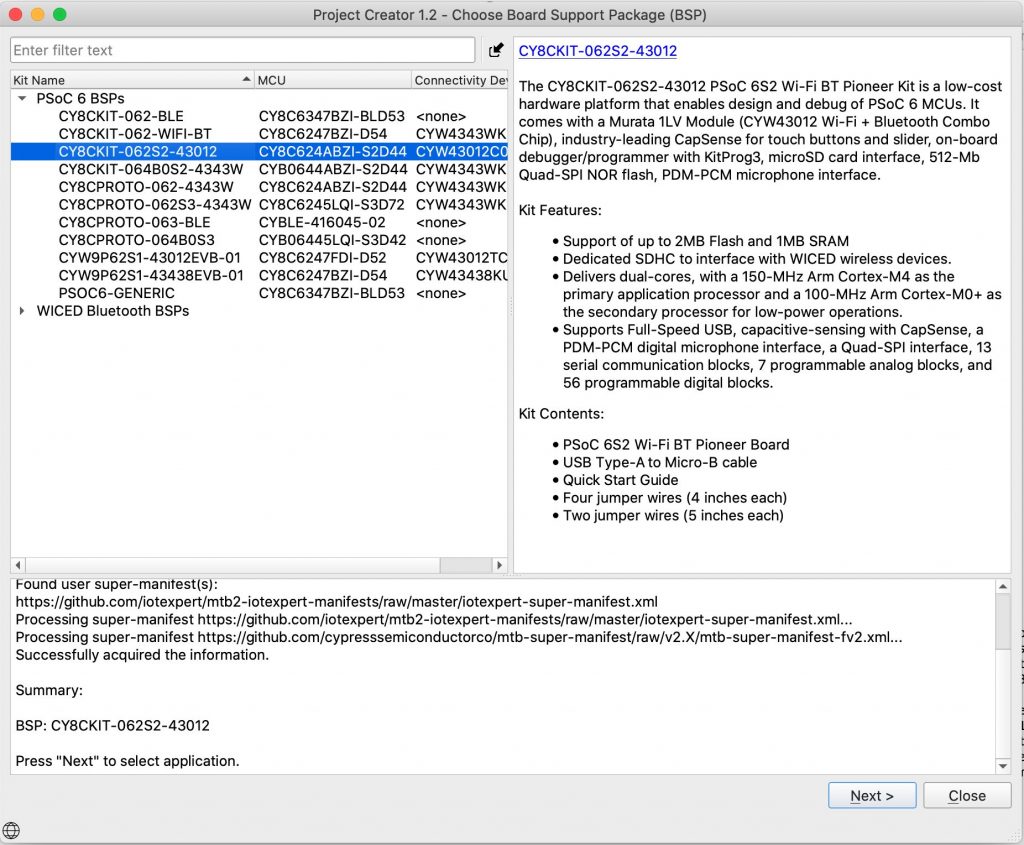
    In order to control the BLDC motor I am going to a development kit that has Arduino headers, the CY8CKIT-062S2-43012.  Start your project from that BSP.

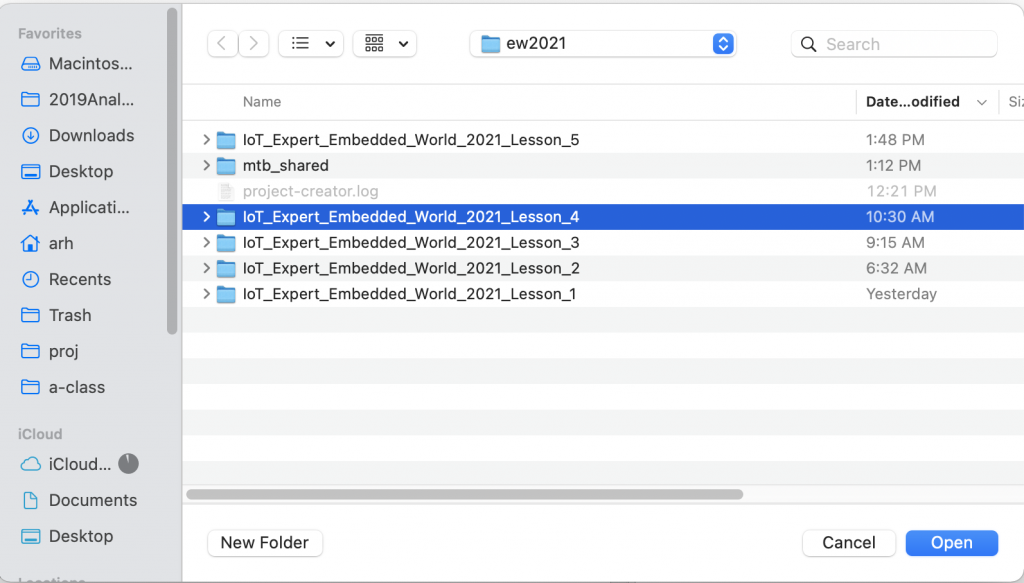
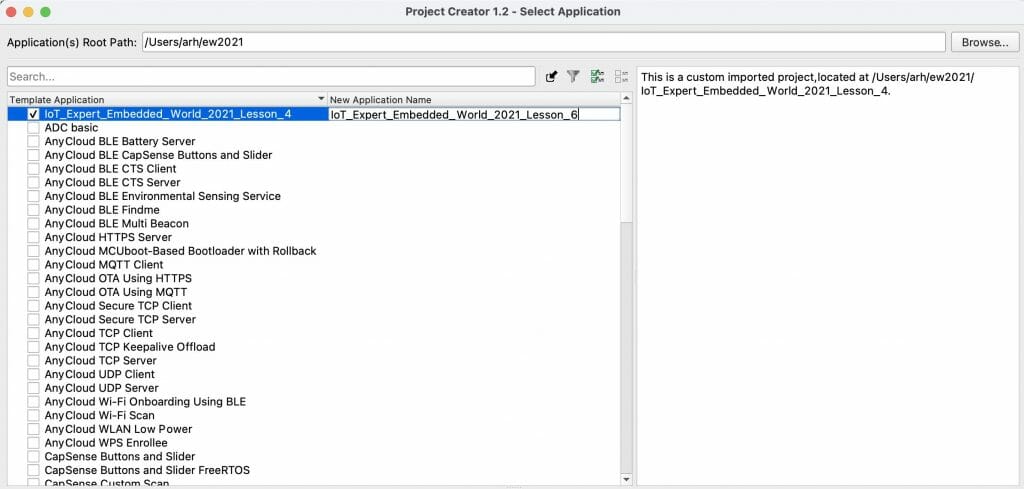
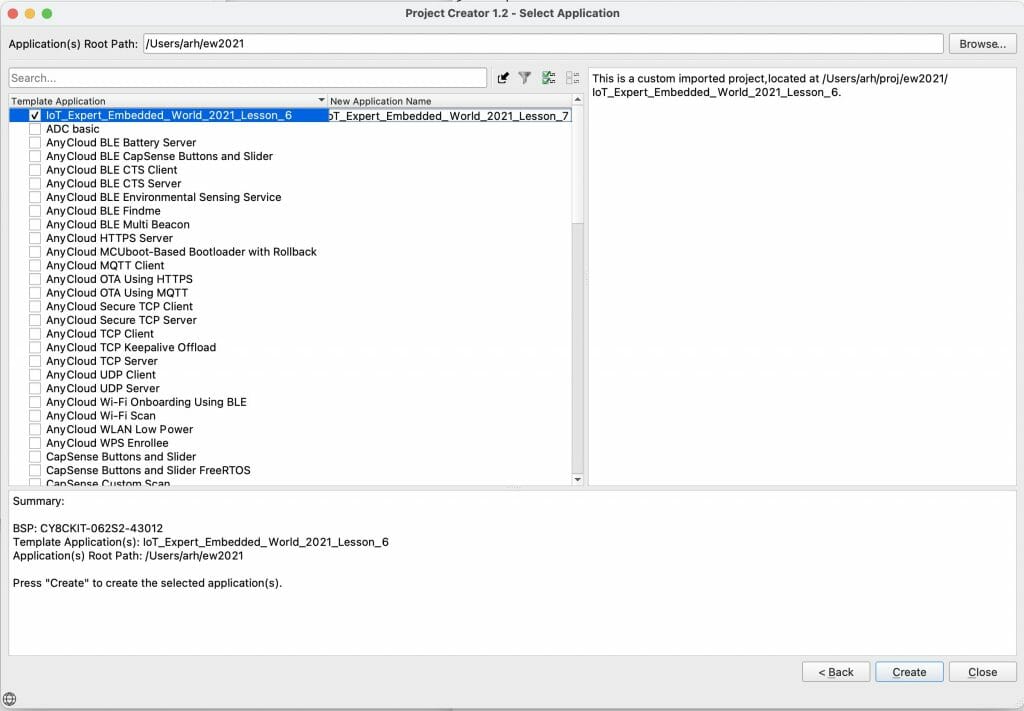
    Our project is basically the same as Lesson4, so import that as a template.

    Don’t sully your project’s name, pick something good.

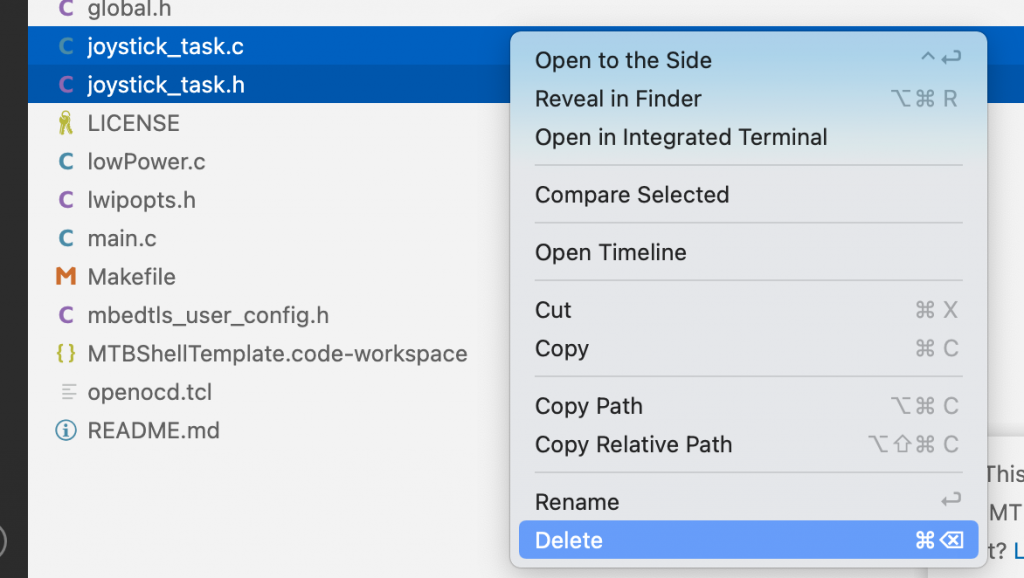
    2. Rip out the joystick_task

    This project will not have the joystick task.  Nuke it! Don’t forget to remove the task start from main.c

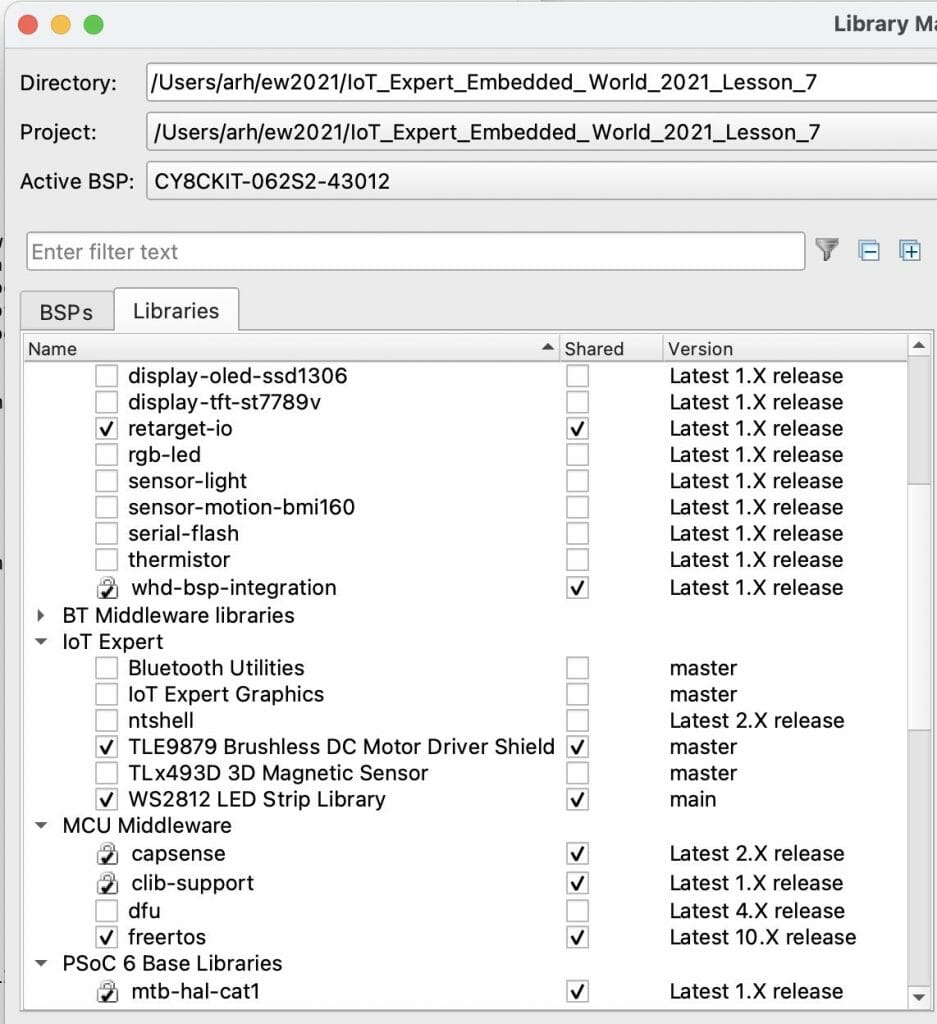
    3. Add the Motor Driver Library and Remove the Magnetic Sensor

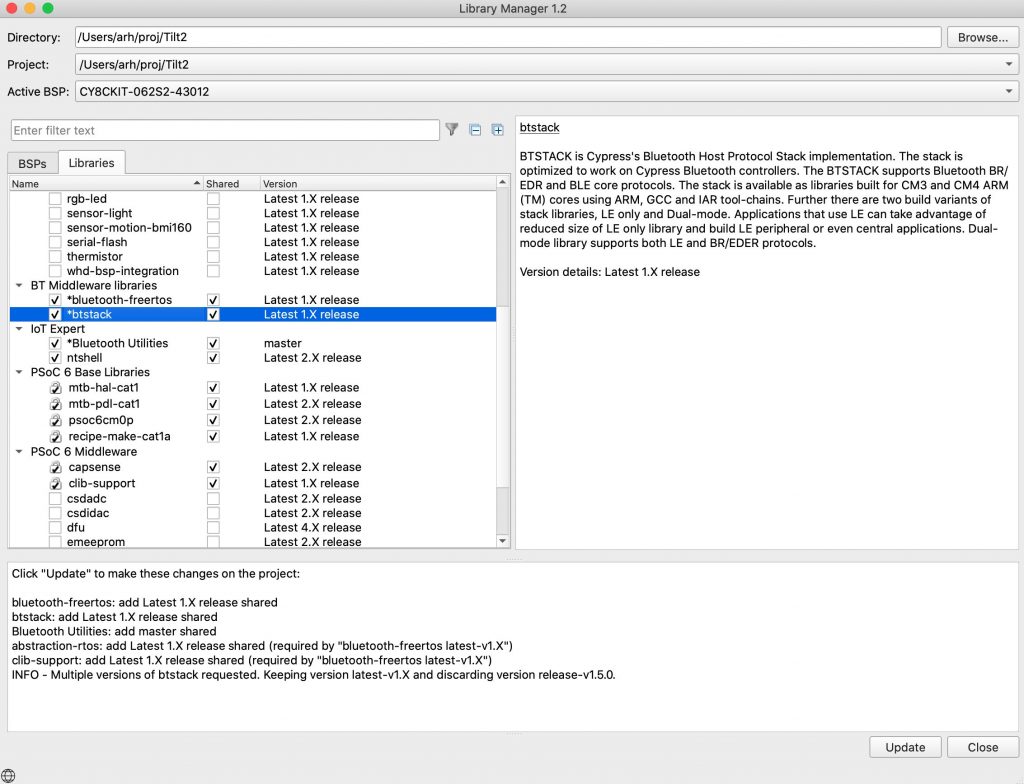
    For this project we will be talking to the TLE9879 BLDC motor shield.  I provide you a driver library for that.  And we won’t need the 3-D Magnetic sensing library any more.

    4. Create motor_task.h

    Create a motor_task.h  This will have the definition of the task, plus a function to set the motor speed by submitting to a queue.

    #pragma once
    
    void motor_task(void* param);
    
    void motor_update(int speed);
    

    5. Create motor_task.c

    The motor task needs some include files.  This task will also use a queue to manage other tasks (cloud and CapSense) that will submitting data to change the speed of the motor.

    #include "cybsp.h"
    #include "cyhal.h"
    #include "cycfg.h"
    #include "FreeRTOS.h"
    #include "task.h"
    #include "queue.h"
    #include <stdio.h>
    #include <stdlib.h>
    #include <math.h>
    
    #include "motor_task.h"
    
    #include "tle9879_system.h"
    
    static QueueHandle_t motor_value_q;

    I will define a few constants that will help me map 0-100% into 0-5500 RPM (the max for this motor). The motor needs to run at a decent speed to start up properly so we will map 10% to 1000 RPM. Below 10%, the motor will be off.

    /*******************************************************************************
    * Global constants
    *******************************************************************************/
    #define		RPM_CHANGE_INTERVAL		(100)
    #define		RPM_CHANGE_RATE			(10)
    #define		RPM_PERCENT_MIN			(10)
    
    #define  	RPM_MAX 				5500.0
    #define  	RPM_MIN 				1000.0
    

    The task is pretty simple, but with one trick.  Apparently you ramp changes in motor speed, so I use a timeout in the message queue to give me a periodic change.  The task is

    1. Start the shield
    2. Then wait for a new value in the queue (or the timeout)
    3. If it is a new value then change the desired value
    4. If the current value is not the same as the desired value then take a step towards the desired value
    void motor_task(void* param)
    {
        (void)param;
    
        tle9879_sys_t tle9879_sys;
    
        uint8_t numberOfBoards = 1;
        BaseType_t rtos_api_result;
    
        motor_value_q = xQueueCreate(1,sizeof(int));
    
        /* Initialize and configure the motor driver */
        tle9879sys_init(&tle9879_sys,
        					CYBSP_D11,
                            CYBSP_D12,
                            CYBSP_D13,
                            NULL,
                            CYBSP_D4,
                            CYBSP_D5,
                            CYBSP_D6,
                            CYBSP_D7,
                            &numberOfBoards);
        if (tle9879_sys.board_count == 0)
        {
            printf("Motor board not detected. Exiting Motor task.\n");
            vTaskDelete(NULL);
        }
    
        tle9879sys_setMode(&tle9879_sys, FOC, 1, false);
        
        bool motorState=false;
        int currentPercentage=0;
        int desiredPercentage=0;
    
        while(1)
        {
        	rtos_api_result = xQueueReceive(motor_value_q, &desiredPercentage, RPM_CHANGE_INTERVAL);
    
           	/* Value has been received from the queue (i.e. not a timeout) */
            if(rtos_api_result == pdTRUE)
            {
                if(desiredPercentage < RPM_PERCENT_MIN) /* Any value less than 10% will result in stopping the motor */
                    desiredPercentage = 0;
            
                if(desiredPercentage>100)
                    desiredPercentage = 100;
            }
    
            if(currentPercentage != desiredPercentage)
            {
                if(abs(currentPercentage-desiredPercentage) < RPM_CHANGE_RATE)
                    currentPercentage = desiredPercentage;
    
                if (currentPercentage < desiredPercentage)
                    currentPercentage = currentPercentage + RPM_CHANGE_RATE;
                if (currentPercentage > desiredPercentage)
                    currentPercentage = currentPercentage - RPM_CHANGE_RATE;
    
                if(currentPercentage>0 && motorState==false)
                {
                    tle9879sys_setMotorMode(&tle9879_sys, START_MOTOR, 1);
                    motorState = true;
                }
                if(currentPercentage == 0 && motorState==true)
                {
                    tle9879sys_setMotorMode(&tle9879_sys, STOP_MOTOR, 1);
                    motorState = false;
                }
    
                float motorSpeed = ((float)(currentPercentage-RPM_PERCENT_MIN))/(float)(100.0-RPM_PERCENT_MIN) * (RPM_MAX - RPM_MIN) + RPM_MIN;
    
                tle9879sys_setMotorSpeed(&tle9879_sys, motorSpeed, 1);
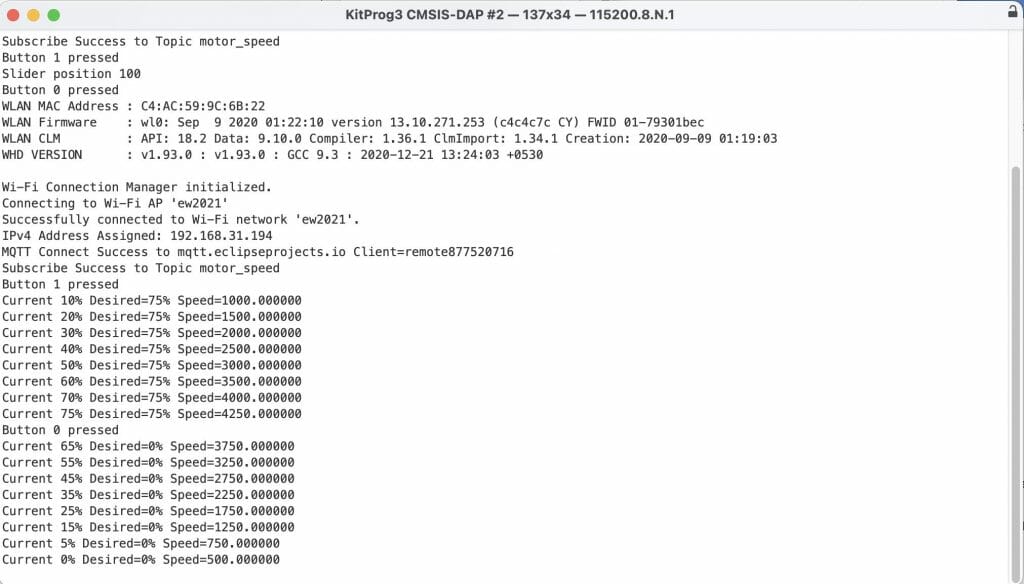
                printf("Current %d%% Desired=%d%% Speed=%f\n",currentPercentage,desiredPercentage,motorSpeed);
            }
        }
    }

    In order to simplify the CapSense and cloud tasks I provide a function to submit a new percent to the queue.

    void motor_update(int speed)
    {
        if(motor_value_q)
            xQueueOverwrite(motor_value_q,&speed);
    }
    

    6. Update the CapSense task to submit to the motor_task

    Lets fix the CapSense task to submit to the motor queue.  First fix the include.

    #include "motor_task.h"

    Then update the buttons to use the submit function

    if((0u != button0_status) && (0u == button0_status_prev))
    {
        printf("Button 0 pressed\n");
        motor_update(0); // Stop the Motor
    }
    
    if((0u != button1_status) && (0u == button1_status_prev))
    {
        printf("Button 1 pressed\n");
        motor_update(75); // Set the motor to 75%
    }
    

    Fix the slider to use the submit function as well.

    if((0u != slider_touched) && (slider_pos_prev != slider_pos ))
    {
        printf("Slider position %d\n",slider_pos);
        motor_update(slider_pos);
    }
    

    7. Fix the Cloud Task

    Remember that we copied our cloud task from the remote control.  It publishes MQTT messages.  We need to fix the cloud task to subscribe instead of publish.   If you recall from Lesson 4 we submit the messages as JSON.  To decode the JSON I will use a JSON parser.

    #include "cy_json_parser.h"

    The function prototypes are almost the same, except for a subscribe instead of publish, plus a JSON callback

    static void cloud_connectWifi();
    static void cloud_startMQTT();
    static void cloud_subscribeMQTT();
    static void cloud_mqtt_event_cb( cy_mqtt_t mqtt_handle, cy_mqtt_event_t event, void *user_data);
    static cy_rslt_t json_cb(cy_JSON_object_t *json_object, void *arg);
    

    The cloud task is much simpler this time.  connect, start, subscribe and then wait for some action.

    void cloud_task(void* param)
    {
        (void)param;
    
        cloud_connectWifi();
        cloud_startMQTT();
        cloud_subscribeMQTT();
    
        for(;;)
        {
            vTaskSuspend(NULL);
        }
    }

    To subscribe you just setup a subscribe info structure.  Then call the subscribe.  You also need to configure the JSON parser.

    static void cloud_subscribeMQTT()
    {
    
        cy_rslt_t result;
    
        cy_mqtt_subscribe_info_t    sub_msg[1];
    
        /* Subscribe to motor speed MQTT messages */
        sub_msg[0].qos = 0;
        sub_msg[0].topic = CLOUD_MQTT_TOPIC;
        sub_msg[0].topic_len = strlen(sub_msg[0].topic);
    
        result = cy_mqtt_subscribe( mqtthandle, sub_msg, 1 );
        CY_ASSERT(result == CY_RSLT_SUCCESS);
        printf("Subscribe Success to Topic %s\n",CLOUD_MQTT_TOPIC);
    
        /* Register JSON callback function */
        cy_JSON_parser_register_callback(json_cb, NULL);
    
    }
    

    When you get a callback from the MQTT, you will look and see which topic.  If it matches the motor topic then call the JSON parser.

    static void cloud_mqtt_event_cb( cy_mqtt_t mqtt_handle, cy_mqtt_event_t event, void *user_data )
    {
        cy_mqtt_publish_info_t *received_msg;
        printf( "\nMQTT App callback with handle : %p \n", mqtt_handle );
        (void)user_data;
        switch( event.type )
        {
            case CY_MQTT_EVENT_TYPE_DISCONNECT :
                if( event.data.reason == CY_MQTT_DISCONN_TYPE_BROKER_DOWN )
                {
                    printf( "\nCY_MQTT_DISCONN_TYPE_BROKER_DOWN .....\n" );
                }
                else
                {
                    printf( "\nCY_MQTT_DISCONN_REASON_NETWORK_DISCONNECTION .....\n" );
                }
                break;
            case CY_MQTT_EVENT_TYPE_PUBLISH_RECEIVE :
                received_msg = &(event.data.pub_msg.received_message);
                printf( "Incoming Publish Topic Name: %.*s\n", received_msg->topic_len, received_msg->topic );
                printf( "Incoming Publish message Packet Id is %u.\n", event.data.pub_msg.packet_id );
                printf( "Incoming Publish Message : %.*s.\n\n", ( int )received_msg->payload_len, ( const char * )received_msg->payload );
                if(memcmp(received_msg->topic, CLOUD_MQTT_TOPIC, strlen(CLOUD_MQTT_TOPIC)) == 0) /* Topic matches the motor speed topic */
                {
                        cy_JSON_parser(received_msg->payload, received_msg->payload_len);
                }
                
                break;
            default :
                printf( "\nUNKNOWN EVENT .....\n" );
                break;
        }
    }

    If the JSON parser matches, you call the motor_update function with the new requested speed.

    /* This is the callback from the cy_JSON_parser function. It is called whenever
     * the parser finds a JSON object. */
    static cy_rslt_t json_cb(cy_JSON_object_t *json_object, void *arg)
    {
        int motorSpeed;
    
        if(memcmp(json_object->object_string, MOTOR_KEY, json_object->object_string_length) == 0)
        {
            if(json_object->value_type == JSON_NUMBER_TYPE)
            {
                /* Add null termination to the value and then convert to a number */
                char resultString[json_object->value_length + 1];
                memcpy(resultString, json_object->value, json_object->value_length);
                resultString[json_object->value_length] = 0;
                motorSpeed = (uint8_t) atoi(resultString);
                printf("Received speed value from cloud: %d\n", motorSpeed);
                motor_update(motorSpeed);
            }
        }
        return CY_RSLT_SUCCESS;
    }
    

    8. Fix main.c to start the motor task

    In main.c you need to “do the needful” starting with an include.

    #include "motor_task.h"

    Then starting the motor task.

    xTaskCreate(motor_task,    "Motor"     ,configMINIMAL_STACK_SIZE*8  , NULL, 1, 0);
    

    9. Test

    Resources for Project

    You can find the completed project in your project creator dialog by filtering for “IoT Expert Embedded”.  This is lesson6

    You can also clone this project at git@github.com:iotexpert/ew21-lesson6.git or https://github.com/iotexpert/ew21-lesson6

    EW21: Lesson 7: WS2812 LED Strip

    Embedded World 2021 - Infineon ModusToolbox PSoC 6 Drone 


    Summary

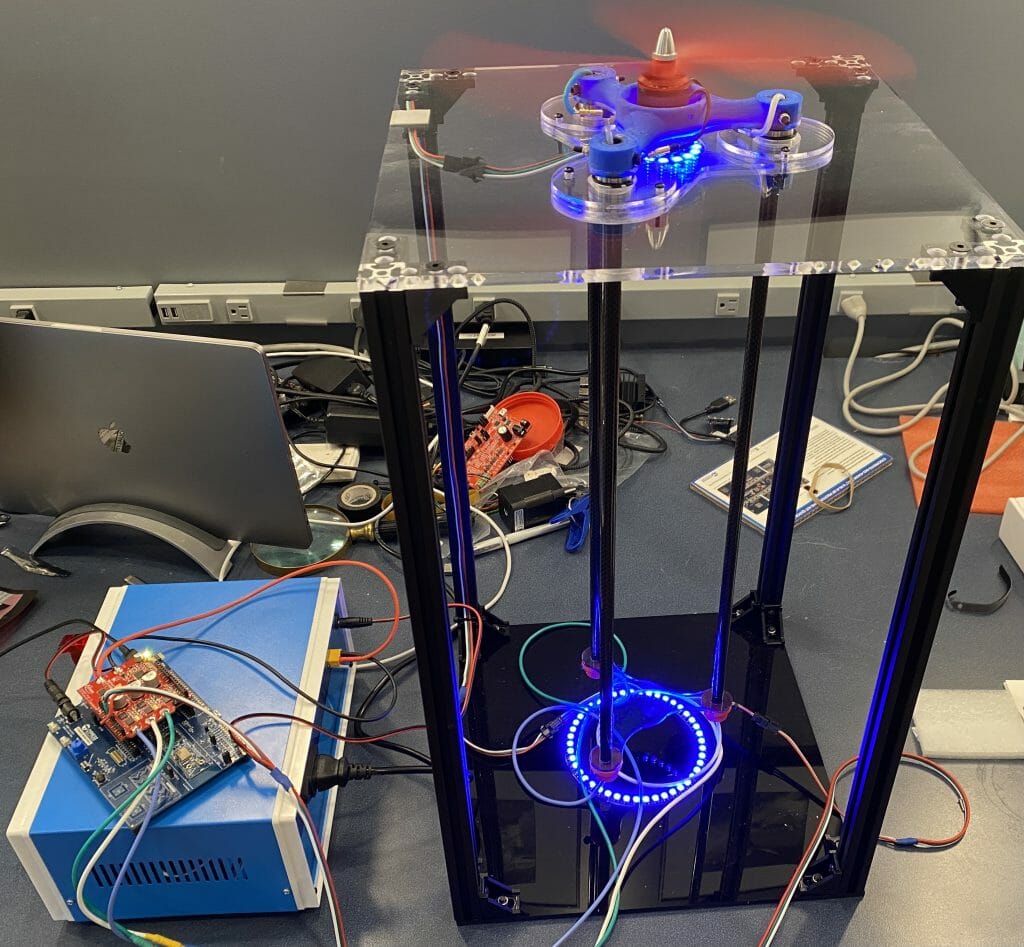
    In lesson 7 we will finish this Frankenstein drone setup by adding WS2812 Strip LEDs.  At the end of lesson one you will have the “WS2812 LED” block colored green.  Here is the architecture:

    Learning Objectives

    1. Have fun by adding another cool library – WS2812

    Procedure

    1. Create a new project
    2. Add the IoT Expert WS2812 Library
    3. Modify motor_task.c
    4. Test

    1. Create a new project

    Start from the CY8CKIT-062S2-43012

    Give the project a sensible name.  In this case IoT_Expert_Embedded_World_2021_Lesson7

    2. Add the IoT Expert WS2812 Library

    You need to find the IoT Expert WS2812 library and include it into your project.

    3. Modify motor_task.c

    Include the header file for the library.

    #include "ws2812.h"

    The number of LEDs in our system

    #define		NUM_LEDS				(61)

    Define some colors to use and initialize the LED strip

    /* LED color array - 7 different colors each with RGB values */
    uint8_t ledColors[7][3] = {
            { 0,  0,  0},	// Off
            {20,  0, 30},	// Violet
            { 0,  0, 50},	// Blue
            { 0, 50,  0},	// Green
            {30, 20,  0},	// Yellow
            {42,  8,  0},	// Orange
            {50,  0,  0},	// Red
    };
    
     uint8_t ledColorRow = 0;
     uint8_t ledColorRowPrev = 0;
    /* Initialize LED strips */
    ws2812_init(NUM_LEDS, P10_0, P10_1, P10_2);
    

    A bit of code to send updates to the LED strip based on the status of the motor.

    /* Calculate LED color and update if it has changed */
                if(motorState == false)
                {
                    /* Turn off LEDs */
                    ws2812_setMultiRGB(0, NUM_LEDS-1, 0, 0, 0);
                    ws2812_update();
                    ledColorRowPrev = 0;
                }
                else
                {
                    ledColorRow = 1 + (uint8_t)((( (uint16_t)motorSpeed - (uint16_t)RPM_MIN ) * 5) / ((uint16_t)RPM_MAX - (uint16_t)RPM_MIN)); /* Determine row to use */
                    if(ledColorRowPrev != ledColorRow)
                    {
                        ws2812_setMultiRGB(0, NUM_LEDS-1, ledColors[ledColorRow][0], ledColors[ledColorRow][1], ledColors[ledColorRow][2]);
                        ws2812_update();
                        ledColorRowPrev = ledColorRow;
                    }
                }

    4. Test

    Let it rip tater chip

    Here it is with the LED strips on…

    Resources for Project

    You can find the completed project in your project creator dialog by filtering for “IoT Expert Embedded”.  This is lesson 7

    You can also clone this project at git@github.com:iotexpert/ew21-lesson2.git or https://github.com/iotexpert/ew21-lesson2

    Tilt Hydrometer (Part 7) Advertising Database

    Summary

    In part7 of the Tilt Hydrometer series I will create a new task called the “Tilt Data Manager” which will manage the current state of all of the Tilt Hydrometers.

    Story

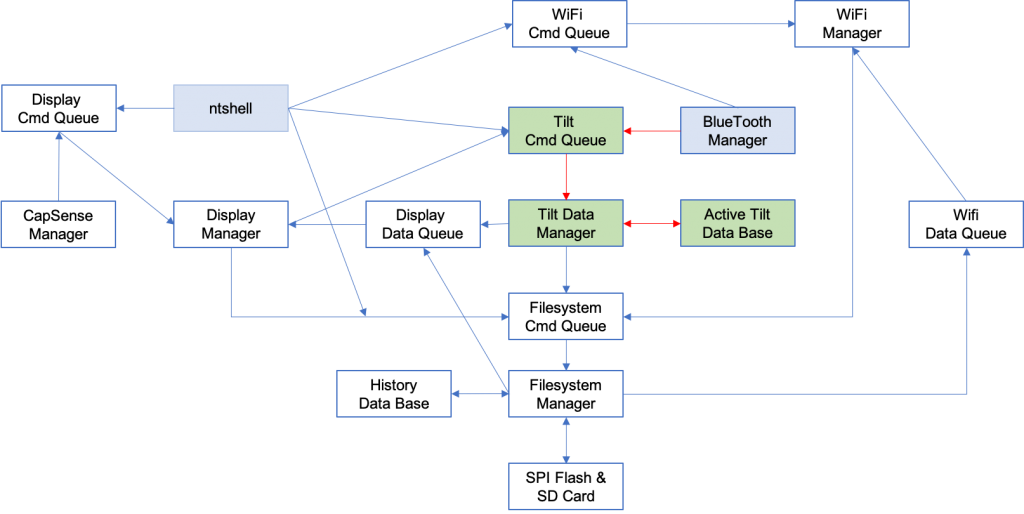
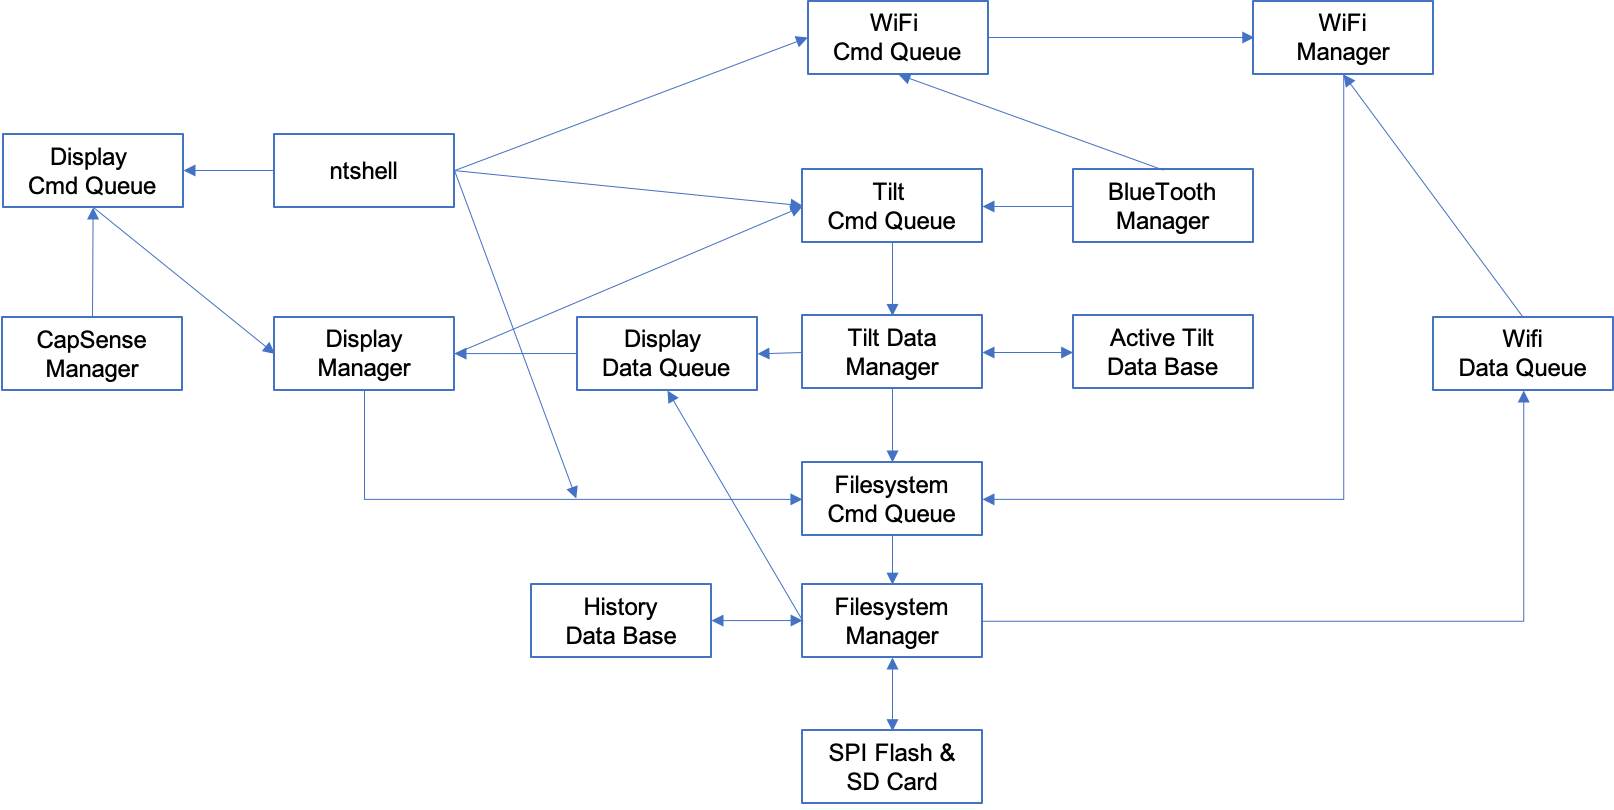
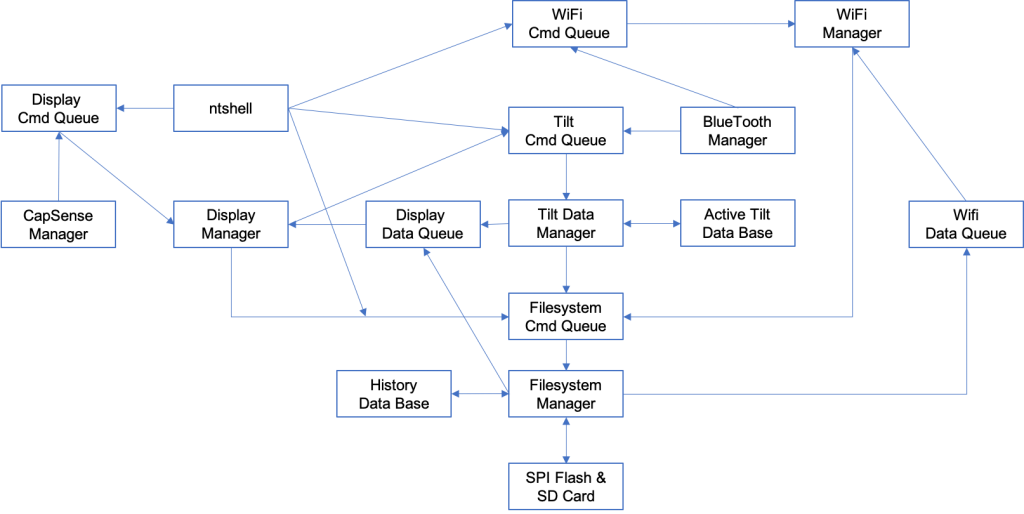
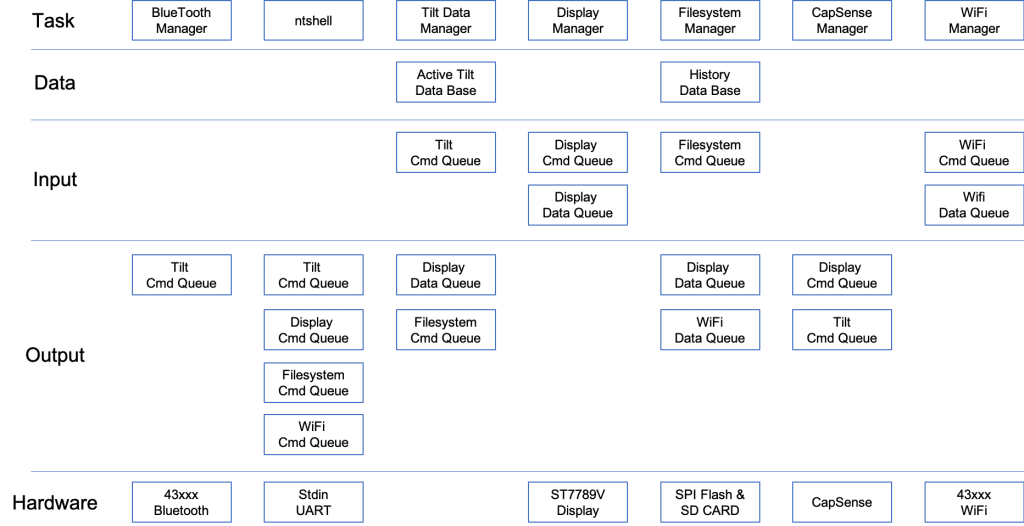
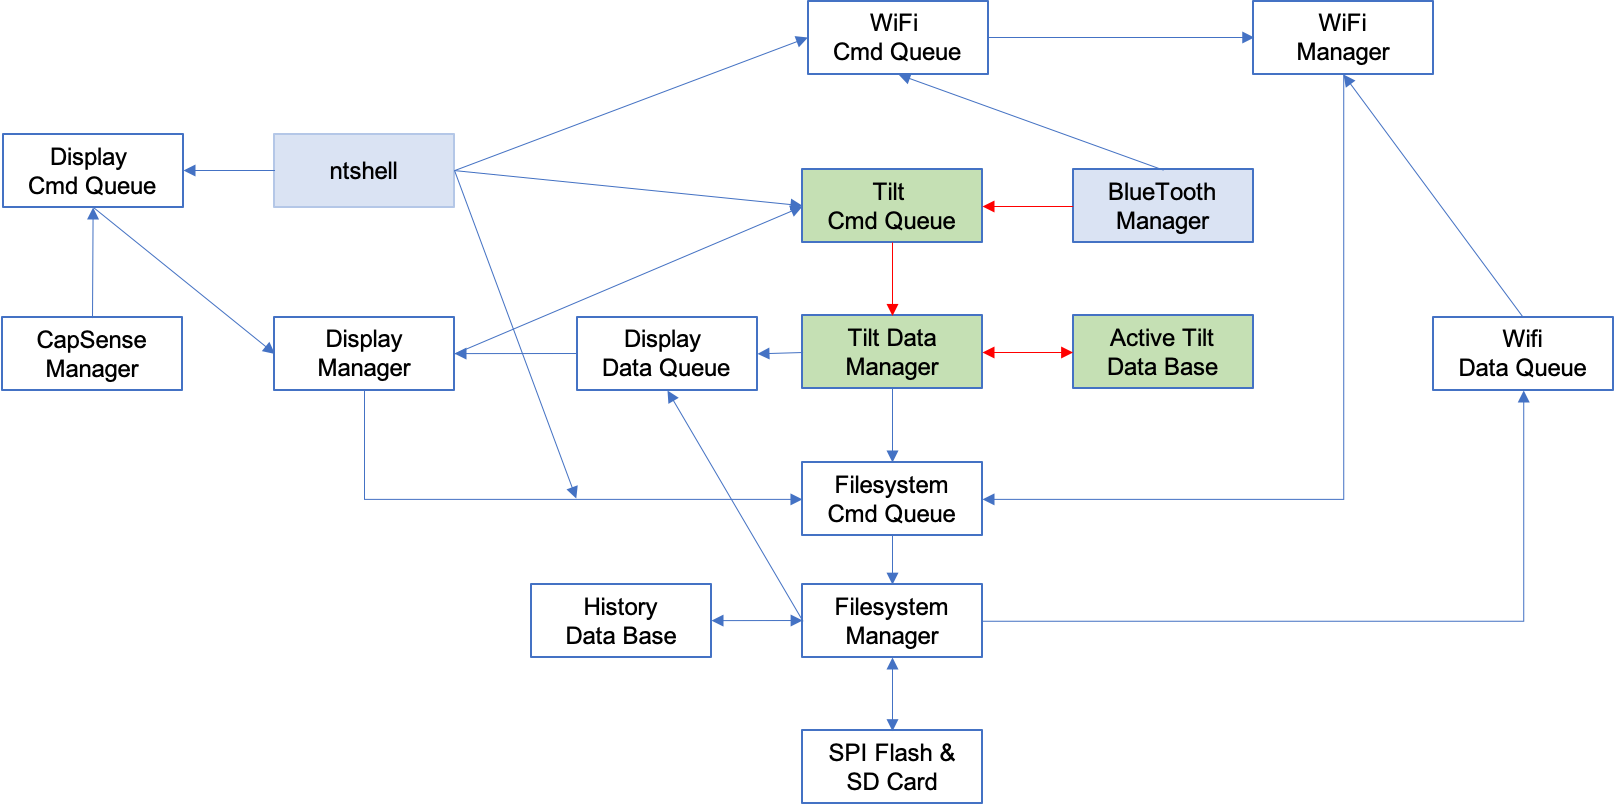
    In the design of my system I want the Bluetooth Manager to get a high priority so that it can react to all of the advertising reports without dropping data.  In addition I want other tasks in the system to be able to find out about the state of “Tilts” without distracting the Bluetooth subsystem from its job, collecting data.  To that end I will create a new task called the “Tilt Data Manager” which have a command queue where the Bluetooth Manager can submit advertising reports and other tasks can ask for data. For example the future Display Manager task can ask for the current state of the Pink Tilt.  In addition this task will filter down the blast of data to a more reasonable amount.  In the picture below, you can see the current state of the architecture in blue, and the new updates in green.


    This series is broken up into the following 12 articles with a few additional possible articles. 

    Tilt Hydrometer (Part 1) Overview & Out-of-Box

    Tilt Hydrometer (Part 2) Architecture

    Tilt Hydrometer (Part 3) Advertising Scanner

    Tilt Hydrometer (Part 4) Advertising Packet Error?

    Tilt Hydrometer (Part 5) Tilt Simulator & Multi Advertising iBeacons

    Tilt Hydrometer (Part 6) Tilt Simulator an Upgrade

    Tilt Hydrometer (Part 7) Advertising Database

    Tilt Hydrometer (Part 8) Read the Database

    Tilt Hydrometer (Part 9) An LCD Display

    Tilt Hydrometer (Part 10) The Display State Machine

    Tilt Hydrometer (Part 11) Draw the Display Screens

    Tilt Hydrometer (Part 12) CapSense

    Tilt Hydrometer: LittleFS & SPI Flash (Part ?)

    Tilt Hydrometer: WiFi Introducer (Part ?)

    Tilt Hydrometer: WebServer (Part ?)

    Tilt Hydrometer: Amazon MQTT (Part ?)

    Tilt Hydrometer: Printed Circuit Board (Part ?)

    You can get the source code from git@github.com:iotexpert/Tilt2.git  This repository has tags for each of the articles which can be accessed with "git checkout part12"  You can find the Tilt Simulator at  git@github.com:iotexpert/TiltSimulator.git.


    Tilt Database

    The first step is to build the data structures that will represent the database.  The question is, what do I want to save and how do I want to save it?  The answer to the first question is:

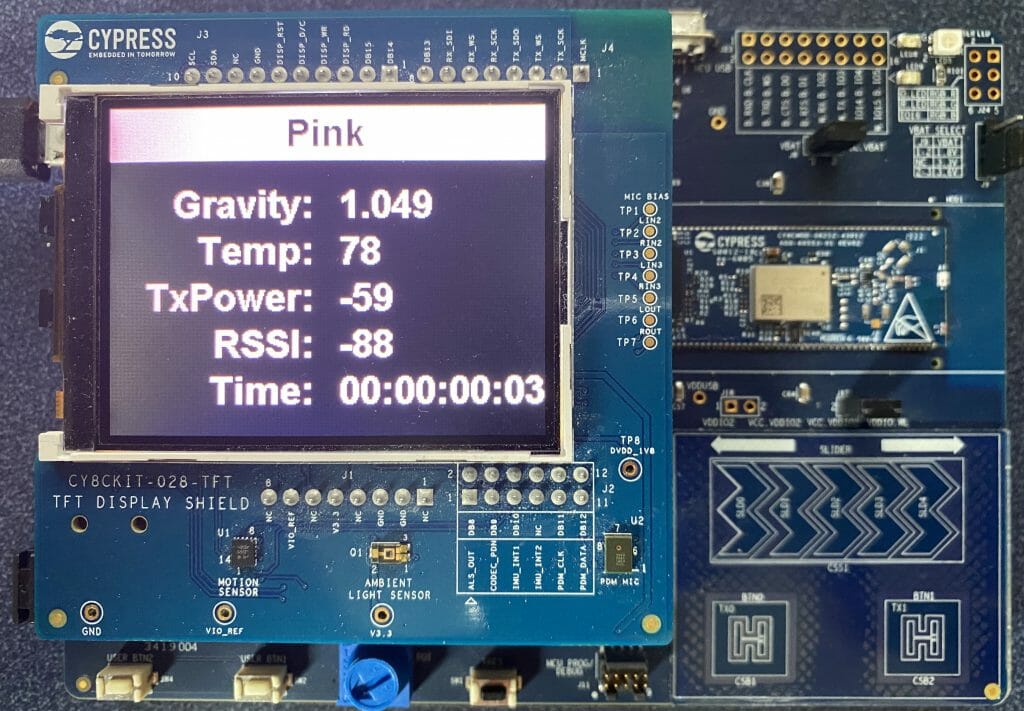
    1. Gravity
    2. Temperature
    3. RSSI
    4. TxPower
    5. Time (when the report was made)

    The answer to how is, a “struct” that represents one data point with the current data, and a pointer which can be used to make a linked list.  In future articles I will send this data structure around to the other tasks (like the display or filesystem) so I will put this structure into the public interface file “tiltDataManager.h”

    #pragma once
    
    #include <stdint.h>
    #include "FreeRTOS.h"
    #include "queue.h"
    #include "wiced_bt_ble.h"
    
    typedef struct {
        float gravity;
        int temperature;
        int8_t rssi;
        int8_t txPower;
    	uint32_t time;
        struct tdm_tiltData_t *next;
    } tdm_tiltData_t;
    

    You might recall from the previous article that I have an array of structures that hold information about the Tilts, one for Red, Green, Black, etc. I decided that rather than other tasks asking for a “int” that they should ask for a handle which is an alias for that int.  So, I define that next.

    typedef int tdm_tiltHandle_t;

    The next step in building the database is to yank the struct and array out of the BluetoothManager.c and put it where it belongs, in the tiltDataManager.c.  In the list of devices I add a pointer to the “data” which is just a list of the datapoint defined in the structure tdb_tiltData_t.  In addition I add “numDataPoints” because I am going to implement a running average.  And a “numDataSeen” which is the total number that I have ever seen.  Here is the data structure:

    #define TILT_IBEACON_HEADER_LEN 20
    #define TILT_IBEACON_DATA_LEN 5
    #define TILT_IBEACON_LEN (TILT_IBEACON_HEADER_LEN + TILT_IBEACON_DATA_LEN)
    typedef struct  {
        char *colorName;
        uint8_t uuid[TILT_IBEACON_HEADER_LEN];
        tdm_tiltData_t *data;
        int numDataPoints;
        int numDataSeen;
    } tilt_t;
    
    #define IBEACON_HEADER 0x4C,0x00,0x02,0x15
    
    static tilt_t tiltDB [] =
    {
        {"Red",      {IBEACON_HEADER,0xA4,0x95,0xBB,0x10,0xC5,0xB1,0x4B,0x44,0xB5,0x12,0x13,0x70,0xF0,0x2D,0x74,0xDE},0,0,0},
        {"Green" ,   {IBEACON_HEADER,0xA4,0x95,0xBB,0x20,0xC5,0xB1,0x4B,0x44,0xB5,0x12,0x13,0x70,0xF0,0x2D,0x74,0xDE},0,0,0},
        {"Black" ,   {IBEACON_HEADER,0xA4,0x95,0xBB,0x30,0xC5,0xB1,0x4B,0x44,0xB5,0x12,0x13,0x70,0xF0,0x2D,0x74,0xDE},0,0,0},
        {"Purple",   {IBEACON_HEADER,0xA4,0x95,0xBB,0x40,0xC5,0xB1,0x4B,0x44,0xB5,0x12,0x13,0x70,0xF0,0x2D,0x74,0xDE},0,0,0},
        {"Orange",   {IBEACON_HEADER,0xA4,0x95,0xBB,0x50,0xC5,0xB1,0x4B,0x44,0xB5,0x12,0x13,0x70,0xF0,0x2D,0x74,0xDE},0,0,0},
        {"Blue"  ,   {IBEACON_HEADER,0xA4,0x95,0xBB,0x60,0xC5,0xB1,0x4B,0x44,0xB5,0x12,0x13,0x70,0xF0,0x2D,0x74,0xDE},0,0,0},
        {"Yellow",   {IBEACON_HEADER,0xA4,0x95,0xBB,0x70,0xC5,0xB1,0x4B,0x44,0xB5,0x12,0x13,0x70,0xF0,0x2D,0x74,0xDE},0,0,0},
        {"Pink"  ,   {IBEACON_HEADER,0xA4,0x95,0xBB,0x80,0xC5,0xB1,0x4B,0x44,0xB5,0x12,0x13,0x70,0xF0,0x2D,0x74,0xDE},0,0,0},
    };
    #define NUM_TILT (sizeof(tiltDB)/sizeof(tilt_t))

    Update the Public Interface to the tiltDataManager

    Back in the tiltDataManager.h I will add two public function definitions

    1. The task (so that it can be started in main)
    2. A function tdm_processIbeacon which the BluetoothManager can call to consume a datapoint
    void tdm_task(void *arg);
    void tdm_processIbeacon(uint8_t *mfgAdvField,int len,wiced_bt_ble_scan_results_t *p_scan_result);
    

    Modify the Bluetooth Manager to Submit

    The next step is to yank out the old scanning callback in the Bluetooth Manager and replace it with a call to the new public interface to the tiltDataManager.  I spent a good bit of time thinking about where exactly I wanted the partition to exist between the Bluetooth Manager and the Tilt Data Manager.  I decided that the Tilt Data Manager would need to know how to decode the advertising packet, but only in that one function.

    case BTM_ENABLED_EVT:
                if (WICED_BT_SUCCESS == p_event_data->enabled.status)
                {
    				wiced_bt_ble_observe(WICED_TRUE, 0,tdm_processIbeacon);
                }

    Build the Command Queue

    The Tilt Data Manager will just “sit on a queue”, specifically a command queue.  When it receives messages from various sources it will do the needful.  For now there are two messages, TDM_CMD_ADD_DATA_POINT and TDM_CMD_PROCESS_DATA.  The message is a structure with

    1. What is the command
    2. Which Tilt are we talking about
    3. A generic void pointer
    typedef enum {
        TDM_CMD_ADD_DATAPOINT,
        TDM_CMD_PROCESS_DATA,
    } tdm_cmd_t;
    
    typedef struct {
        tdm_cmd_t cmd;
        tdm_tiltHandle_t tilt;
        void *msg;
    } tdm_cmdMsg_t;
    
    static QueueHandle_t tdm_cmdQueue;

    Process the Command Queue & tdm_task

    The main Tilt Data Manager task has two things going on

    1. A queue where messages can be sent
    2. A periodic timer which will insert the message “TDM_CMD_PROCESS_DATA”

    The main tasks just waits for messages to be pushed into the command queue.

    void tdm_task(void *arg)
    {
        tdm_cmdQueue = xQueueCreate(10,sizeof(tdm_cmdMsg_t));
        tdm_cmdMsg_t msg;
    
        TimerHandle_t tdm_processDataTimer;
    
        // Call the process data function once per hour to filter the input data
        tdm_processDataTimer=xTimerCreate("process",1000*30,pdTRUE,0,tdm_submitProcessData);
        xTimerStart(tdm_processDataTimer,0);
    
        while(1)
        {
            xQueueReceive(tdm_cmdQueue,&msg,portMAX_DELAY);
            switch(msg.cmd)
            {
                case TDM_CMD_ADD_DATAPOINT:
                    tdm_addData(msg.tilt,msg.msg);
                break;
    
                case TDM_CMD_PROCESS_DATA:
                    tdm_processData();
                break;
            }
        }
    }

    Process the Data

    Every 30 seconds a Process Data message is pushed into the command queue.  When that happens it calls the function tdm_processData which will:

    1. Iterate through the list of tilts
    2. If there is data
    3. Calculate the running average
    4. Print out the current value
    // There is a bunch of data coming out of the tilts... every second on 3 channels
    // So you may endup with a boatload of data
    // This function will take an average of all of the data that has been saved
    
    static void tdm_processData()
    {
        for(int i=0;i<NUM_TILT;i++)
        {
            if(tiltDB[i].data == 0)
            {
                continue;
            }
    
            tiltDB[i].data->gravity /= tiltDB[i].numDataPoints;
            tiltDB[i].data->temperature /= tiltDB[i].numDataPoints;
            tiltDB[i].numDataPoints = 1;
            printf("Tilt %s Temperature = %d Gravity =%f\n",tiltDB[i].colorName,tiltDB[i].data->temperature,tiltDB[i].data->gravity);
        }
    }

    Add Data

    The add data function is called when a data point is submitted into the command queue.  When this happens there are two possible scenarios

    1. There is no history, in which case just setup the data pointer to this message
    2. There is history, in which case just add to the running total.
    static void tdm_addData(tdm_tiltHandle_t handle, tdm_tiltData_t *data)
    {
        if(tiltDB[handle].data == 0)
        {
            tiltDB[handle].data = data; 
            tiltDB[handle].numDataPoints = 1;
            tiltDB[handle].data->next=0;
        }
        else
        {
            tiltDB[handle].data->gravity     += data->gravity;
            tiltDB[handle].data->temperature += data->temperature;
            tiltDB[handle].numDataPoints += 1;
    
            free(data);
        }
    
        tiltDB[handle].numDataSeen += 1;
        tiltDB[handle].data->time    = data->time;
        tiltDB[handle].data->rssi    = data->rssi;
        tiltDB[handle].data->txPower = data->txPower;
    }

    Process the iBeacon

    The process iBeacon function is actually called in the context of the Bluetooth Manager.  But, if that is true, why did I put it into the Tilt Data Manager file?  Answer: because it needs to know all about what Tilts look like.  This function is essentially the same as the one from the previous article.  It looks for an iBeacon in the manufacturer specific data.  If it find it, then it decodes the Gravity, Temperature and txPower.  Then puts that data into a structure and submits it to the Tilt Data Manager command queue.

    //
    // This function is called in the Bluetooth Manager Context
    // Specifically it is the advertising observer callback
    //
    void tdm_processIbeacon(wiced_bt_ble_scan_results_t *p_scan_result,uint8_t *p_adv_data)
    {
    
    	uint8_t mfgFieldLen;
    	uint8_t *mfgAdvField;
    	mfgAdvField = wiced_bt_ble_check_advertising_data(p_adv_data,BTM_BLE_ADVERT_TYPE_MANUFACTURER,&mfgFieldLen);
        
    	if(!mfgAdvField)
            return;
    
        if(mfgFieldLen != TILT_IBEACON_LEN)
            return;
    
        for(int i=0;i<NUM_TILT;i++)
        {
            if(memcmp(mfgAdvField,tiltDB[i].uuid,TILT_IBEACON_HEADER_LEN) == 0)
            {
                uint32_t timerTime = xTaskGetTickCount() / 1000;
    		    int8_t txPower = mfgAdvField[24];
    		    float gravity = ((float)((uint16_t)mfgAdvField[22] << 8 | (uint16_t)mfgAdvField[23]))/1000;
    		    int temperature = mfgAdvField[20] << 8 | mfgAdvField[21];
    
                // The tilt repeater will send out 0's if it hasnt heard anything ... and they send out some crazy stuff
                // when they first startup 
                if(gravity>2.0 || gravity<0.95 || temperature > 110 || gravity == 0 || temperature == 0)
                    return;
    
                tdm_tiltData_t *data;
                data = malloc(sizeof(tdm_tiltData_t));
                    
                data->gravity     = gravity;
                data->temperature = temperature;
                data->txPower     = txPower;
                data->time        = timerTime;
                data->rssi        = p_scan_result->rssi;
    
                tdm_submitNewData(i,data);
                
            }
        }
    }
    

    Submit Commands

    To simply submitting commands, I create two helper functions:

    void tdm_submitNewData(tdm_tiltHandle_t handle,tdm_tiltData_t *data)
    {
        tdm_cmdMsg_t msg;
        msg.msg = data;
        msg.tilt = handle;
        msg.cmd =  TDM_CMD_ADD_DATAPOINT;
        if(xQueueSend(tdm_cmdQueue,&msg,0) != pdTRUE)
        {
            printf("Failed to send to dmQueue\n");
            free(data);
        }
    }
    
    static void tdm_submitProcessData()
    {
        tdm_cmdMsg_t msg;
        msg.cmd = TDM_CMD_PROCESS_DATA;
        xQueueSend(tdm_cmdQueue,&msg,0);
    }
    

    Update main.c

    In main.c I need to start the tdm_task

        xTaskCreate(tdm_task, "Tilt Data Manager", configMINIMAL_STACK_SIZE*2,0 /* args */ ,0 /* priority */, 0);
    

    Program and Test

    Now lets test this thing and see if I have it working.  Now I am glad that I did the work to build a Tilt Simulator.  You can see the window on top is the simulator.  I tell it to start broadcasting “Red” with Temperature of 70, Gravity of 1010 and TxPower of 99.  Then on the bottom window you can see that is what is coming out of the system every 30 seconds.

    In the next article I will add the LCD display.

    tiltDataManager.h

    #pragma once
    
    #include <stdint.h>
    #include "FreeRTOS.h"
    #include "queue.h"
    #include "wiced_bt_ble.h"
    
    typedef struct {
        float gravity;
        int temperature;
        int8_t rssi;
        int8_t txPower;
    	uint32_t time;
        struct tdm_tiltData_t *next;
    } tdm_tiltData_t;
    
    typedef int tdm_tiltHandle_t;
    
    void tdm_task(void *arg);
    void tdm_processIbeacon(wiced_bt_ble_scan_results_t *p_scan_result,uint8_t *p_adv_data);
    

    tiltDataManager.c

    #include <stdio.h>
    #include <stdlib.h>
    #include <string.h>
    
    #include "wiced_bt_ble.h"
    
    #include "FreeRTOS.h"
    #include "task.h"
    #include "queue.h"
    #include "timers.h"
    #include "tiltDataManager.h"
    
    
    /*********************************************************************************
    *
    * Tilt Database Definition
    * 
    *********************************************************************************/
    
    #define TILT_IBEACON_HEADER_LEN 20
    #define TILT_IBEACON_DATA_LEN 5
    #define TILT_IBEACON_LEN (TILT_IBEACON_HEADER_LEN + TILT_IBEACON_DATA_LEN)
    typedef struct  {
        char *colorName;
        uint8_t uuid[TILT_IBEACON_HEADER_LEN];
        tdm_tiltData_t *data;
        int numDataPoints;
        int numDataSeen;
    } tilt_t;
    
    #define IBEACON_HEADER 0x4C,0x00,0x02,0x15
    
    static tilt_t tiltDB [] =
    {
        {"Red",      {IBEACON_HEADER,0xA4,0x95,0xBB,0x10,0xC5,0xB1,0x4B,0x44,0xB5,0x12,0x13,0x70,0xF0,0x2D,0x74,0xDE},0,0,0},
        {"Green" ,   {IBEACON_HEADER,0xA4,0x95,0xBB,0x20,0xC5,0xB1,0x4B,0x44,0xB5,0x12,0x13,0x70,0xF0,0x2D,0x74,0xDE},0,0,0},
        {"Black" ,   {IBEACON_HEADER,0xA4,0x95,0xBB,0x30,0xC5,0xB1,0x4B,0x44,0xB5,0x12,0x13,0x70,0xF0,0x2D,0x74,0xDE},0,0,0},
        {"Purple",   {IBEACON_HEADER,0xA4,0x95,0xBB,0x40,0xC5,0xB1,0x4B,0x44,0xB5,0x12,0x13,0x70,0xF0,0x2D,0x74,0xDE},0,0,0},
        {"Orange",   {IBEACON_HEADER,0xA4,0x95,0xBB,0x50,0xC5,0xB1,0x4B,0x44,0xB5,0x12,0x13,0x70,0xF0,0x2D,0x74,0xDE},0,0,0},
        {"Blue"  ,   {IBEACON_HEADER,0xA4,0x95,0xBB,0x60,0xC5,0xB1,0x4B,0x44,0xB5,0x12,0x13,0x70,0xF0,0x2D,0x74,0xDE},0,0,0},
        {"Yellow",   {IBEACON_HEADER,0xA4,0x95,0xBB,0x70,0xC5,0xB1,0x4B,0x44,0xB5,0x12,0x13,0x70,0xF0,0x2D,0x74,0xDE},0,0,0},
        {"Pink"  ,   {IBEACON_HEADER,0xA4,0x95,0xBB,0x80,0xC5,0xB1,0x4B,0x44,0xB5,0x12,0x13,0x70,0xF0,0x2D,0x74,0xDE},0,0,0},
    };
    #define NUM_TILT (sizeof(tiltDB)/sizeof(tilt_t))
    
    /*********************************************************************************
    * 
    * Tilt Data Manager External Interface Queue
    *
    *********************************************************************************/
    typedef enum {
        TDM_CMD_ADD_DATAPOINT,
        TDM_CMD_PROCESS_DATA,
    } tdm_cmd_t;
    
    typedef struct {
        tdm_cmd_t cmd;
        tdm_tiltHandle_t tilt;
        void *msg;
    } tdm_cmdMsg_t;
    
    static QueueHandle_t tdm_cmdQueue;
    
    static void tdm_submitProcessData();


    // There is a bunch of data coming out of the tilts... every second on 3 channels
    // So you may endup with a boatload of data
    // This function will take an average of all of the data that has been saved
    
    static void tdm_processData()
    {
        for(int i=0;i<NUM_TILT;i++)
        {
            if(tiltDB[i].data == 0)
            {
                continue;
            }
    
            tiltDB[i].data->gravity /= tiltDB[i].numDataPoints;
            tiltDB[i].data->temperature /= tiltDB[i].numDataPoints;
            tiltDB[i].numDataPoints = 1;
            printf("Tilt %s Temperature = %d Gravity =%f\n",tiltDB[i].colorName,tiltDB[i].data->temperature,tiltDB[i].data->gravity);
        }
    }
    
    
    // This function will
    // insert new data for that tilt if none has ever been seen
    // or it will add the data to the current count
    static void tdm_addData(tdm_tiltHandle_t handle, tdm_tiltData_t *data)
    {
        if(tiltDB[handle].data == 0)
        {
            tiltDB[handle].data = data; 
            tiltDB[handle].numDataPoints = 1;
            tiltDB[handle].data->next=0;
        }
        else
        {
            tiltDB[handle].data->gravity     += data->gravity;
            tiltDB[handle].data->temperature += data->temperature;
            tiltDB[handle].numDataPoints += 1;
    
            free(data);
        }
    
        tiltDB[handle].numDataSeen += 1;
        tiltDB[handle].data->time    = data->time;
        tiltDB[handle].data->rssi    = data->rssi;
        tiltDB[handle].data->txPower = data->txPower;
    }
    
    
    ////////////////////////////////////////////////////////////////////////////////////////////////////////
    //
    // Public Functions
    // 
    ////////////////////////////////////////////////////////////////////////////////////////////////////////
    
    void tdm_task(void *arg)
    {
        tdm_cmdQueue = xQueueCreate(10,sizeof(tdm_cmdMsg_t));
        tdm_cmdMsg_t msg;
    
        TimerHandle_t tdm_processDataTimer;
    
        // Call the process data function once per hour to filter the input data
        tdm_processDataTimer=xTimerCreate("process",1000*30,pdTRUE,0,tdm_submitProcessData);
        xTimerStart(tdm_processDataTimer,0);
    
        while(1)
        {
            xQueueReceive(tdm_cmdQueue,&msg,portMAX_DELAY);
            switch(msg.cmd)
            {
                case TDM_CMD_ADD_DATAPOINT:
                    tdm_addData(msg.tilt,msg.msg);
                break;
    
                case TDM_CMD_PROCESS_DATA:
                    tdm_processData();
                break;
            }
        }
    }
    
    ////////////////////////////////////////////////////////////////////////////////////////////////////////
    //
    // These functions submit commands to main command queue: tdm_cmdQueue
    // 
    ////////////////////////////////////////////////////////////////////////////////////////////////////////
    
    void tdm_submitNewData(tdm_tiltHandle_t handle,tdm_tiltData_t *data)
    {
        tdm_cmdMsg_t msg;
        msg.msg = data;
        msg.tilt = handle;
        msg.cmd =  TDM_CMD_ADD_DATAPOINT;
        if(xQueueSend(tdm_cmdQueue,&msg,0) != pdTRUE)
        {
            printf("Failed to send to dmQueue\n");
            free(data);
        }
    }
    
    static void tdm_submitProcessData()
    {
        tdm_cmdMsg_t msg;
        msg.cmd = TDM_CMD_PROCESS_DATA;
        xQueueSend(tdm_cmdQueue,&msg,0);
    }
    
    
    //
    // This function is called in the Bluetooth Manager Context
    // Specifically it is the advertising observer callback
    //
    void tdm_processIbeacon(wiced_bt_ble_scan_results_t *p_scan_result,uint8_t *p_adv_data)
    {
    
    	uint8_t mfgFieldLen;
    	uint8_t *mfgAdvField;
    	mfgAdvField = wiced_bt_ble_check_advertising_data(p_adv_data,BTM_BLE_ADVERT_TYPE_MANUFACTURER,&mfgFieldLen);
        
    	if(!mfgAdvField)
            return;
    
        if(mfgFieldLen != TILT_IBEACON_LEN)
            return;
    
        for(int i=0;i<NUM_TILT;i++)
        {
            if(memcmp(mfgAdvField,tiltDB[i].uuid,TILT_IBEACON_HEADER_LEN) == 0)
            {
                uint32_t timerTime = xTaskGetTickCount() / 1000;
    		    int8_t txPower = mfgAdvField[24];
    		    float gravity = ((float)((uint16_t)mfgAdvField[22] << 8 | (uint16_t)mfgAdvField[23]))/1000;
    		    int temperature = mfgAdvField[20] << 8 | mfgAdvField[21];
    
                // The tilt repeater will send out 0's if it hasnt heard anything ... and they send out some crazy stuff
                // when they first startup 
                if(gravity>2.0 || gravity<0.95 || temperature > 110 || gravity == 0 || temperature == 0)
                    return;
    
                tdm_tiltData_t *data;
                data = malloc(sizeof(tdm_tiltData_t));
                    
                data->gravity     = gravity;
                data->temperature = temperature;
                data->txPower     = txPower;
                data->time        = timerTime;
                data->rssi        = p_scan_result->rssi;
    
                tdm_submitNewData(i,data);
                
            }
        }
    }


    Tilt Hydrometer (Part 6) Tilt Simulator an Upgrade

    Summary

    An update to the Tilt Hydrometer Simulator to allow individual advertising packets to be turned on & off using the Multi-Advertising Capability of PSoC & CYW43012

    Story

    After I finished the last article I was sure that I was done with the Tilt Simulator.  But, when I walked away I started thinking about what I had done, and I decided that I needed to make one more update.  Specifically I wanted to add two more commands, “enable” and “disable”.  I also realized that I had the wrong idea about the implementation of multi-adv.  I thought that you had to have all of the slots from 1 to n active at the same time.  The more I thought about it the more I realized that was wrong.  This is really cool for my situation as there are 8 different color Tilts and the are at least 8 slots.  So, I can assign each Tilt to its own slot in the controller.

    This series is broken up into the following 12 articles with a few additional possible articles. 

    Tilt Hydrometer (Part 1) Overview & Out-of-Box

    Tilt Hydrometer (Part 2) Architecture

    Tilt Hydrometer (Part 3) Advertising Scanner

    Tilt Hydrometer (Part 4) Advertising Packet Error?

    Tilt Hydrometer (Part 5) Tilt Simulator & Multi Advertising iBeacons

    Tilt Hydrometer (Part 6) Tilt Simulator an Upgrade

    Tilt Hydrometer (Part 7) Advertising Database

    Tilt Hydrometer (Part 8) Read the Database

    Tilt Hydrometer (Part 9) An LCD Display

    Tilt Hydrometer (Part 10) The Display State Machine

    Tilt Hydrometer (Part 11) Draw the Display Screens

    Tilt Hydrometer (Part 12) CapSense

    Tilt Hydrometer: LittleFS & SPI Flash (Part ?)

    Tilt Hydrometer: WiFi Introducer (Part ?)

    Tilt Hydrometer: WebServer (Part ?)

    Tilt Hydrometer: Amazon MQTT (Part ?)

    Tilt Hydrometer: Printed Circuit Board (Part ?)

    You can get the source code from git@github.com:iotexpert/Tilt2.git  This repository has tags for each of the articles which can be accessed with "git checkout part12"  You can find the Tilt Simulator at  git@github.com:iotexpert/TiltSimulator.git.


    Change the Database

    Remember that my database is just an array of tilt_t structures.  That array goes from 0 to NUM_TILT and that the multi advertising capability goes from 1-a bunch.  So my algorithm for assigning tilts is just to put i+1, in other words the first Tilt is 0 and it will go in slot 1 etc.  Here is the original structure.

    typedef struct  {
        char *colorName;    // The color string
        int slot;           // Which Bluetooth ADV Slot this Tilt is using
        bool dirty;         // A flag to tell if there has been a change since the adv was last written
        int rate;           // rate in ms
        int tempUpdate;     // The update rate for temperature
        int gravUpdate;     // The update rate for gravity
        uint8_t advData[TILT_IBEACON_LEN];
    } tilt_t;

    To make this work, I will

    1. Get rid of slot
    2. Add a boolean field called “enable”
    typedef struct  {
        char *colorName;    // The color string
        bool enable;
        bool dirty;         // A flag to tell if there has been a change since the adv was last written
        int rate;           // rate in ms
        int tempUpdate;     // The update rate for temperature
        int gravUpdate;     // The update rate for gravity
        uint8_t advData[TILT_IBEACON_LEN];
    } tilt_t;

    Add an Initialization Function

    Instead of re-initializing each advertising slot each time, I realized that I could initialize them all at once.  So, I create a function to do just that.

    void btm_initialize()
    {
        static wiced_bt_ble_multi_adv_params_t myParams = {
        .adv_int_min       = BTM_BLE_ADVERT_INTERVAL_MIN,
        .adv_int_max       = 96,
        .adv_type          = MULTI_ADVERT_NONCONNECTABLE_EVENT,
        .channel_map       = BTM_BLE_ADVERT_CHNL_37 | BTM_BLE_ADVERT_CHNL_38 | BTM_BLE_ADVERT_CHNL_39,
        .adv_filter_policy = BTM_BLE_ADVERT_FILTER_ALL_CONNECTION_REQ_ALL_SCAN_REQ,
        .adv_tx_power      = MULTI_ADV_TX_POWER_MAX_INDEX,
        .peer_bd_addr      = {0},
        .peer_addr_type    = BLE_ADDR_PUBLIC,
        .own_bd_addr       = {0},
        .own_addr_type     = BLE_ADDR_PUBLIC,
        };
    
        for(int i=0;i<NUM_TILT;i++)
        {
            wiced_set_multi_advertisement_data(tiltDB[i].advData,sizeof(tiltDB[i].advData),i+1);
            wiced_set_multi_advertisement_params(i+1,&myParams);
            wiced_start_multi_advertisements( MULTI_ADVERT_STOP, i+1);
        }
    }
    

    Then I updated the stack startup event to call the initialize function.

            case BTM_ENABLED_EVT:
                printf("Started BT Stack Succesfully\n");
                btm_initialize();
                btm_cmdQueue = xQueueCreate(10,sizeof(btm_cmdMsg_t));
                wiced_init_timer_ext(&btm_processDataTimer,btm_processCmdQueue,0,WICED_TRUE);
                wiced_start_timer_ext(&btm_processDataTimer,BTM_QUEUE_RATE);
            break;

    Update the Function btm_setAdvPacket

    When it is time to update the advertising packets, I just loop through the database

    1. If the tilt is dirty
    2. Then update the data
    3. And either turn on/off the advertisements for the tilt based on the state of the enable flag
    void btm_setAdvPacket()
    {
        for(int i=0;i<NUM_TILT;i++)
        {
            if(tiltDB[i].dirty)
            {   
                tiltDB[i].dirty = false;
                wiced_set_multi_advertisement_data(tiltDB[i].advData,sizeof(tiltDB[i].advData),i+1);
            
                if(tiltDB[i].enable)
                    wiced_start_multi_advertisements( MULTI_ADVERT_START, i+1 );
                else
                    wiced_start_multi_advertisements( MULTI_ADVERT_STOP, i+1 );
            }
        }
    }

    Add New Commands

    Now I need to add two new commands, BTM_CMD_ENABLE and BTM_CMD_DISABLE

    typedef enum {
        BTM_CMD_SET_DATA,
        BTM_CMD_PRINT_TABLE,
        BTM_CMD_SET_UPDATE,
        BTM_CMD_ENABLE,
        BTM_CMD_DISABLE,
    } btm_cmd_t;

    The code for enable is just to turn the enable flag on then turn on the advertising

                case BTM_CMD_ENABLE:
                    tiltDB[msg.num].enable = true;
                    wiced_start_multi_advertisements( MULTI_ADVERT_START, msg.num+1 );
                break;
    

    A function for usrcmd is just to queue the message to enable

    void btm_updateEnable(int num)
    {
        if(btm_cmdQueue == 0 || num<0 || num>=NUM_TILT)
        {
            return;
        }
        btm_cmdMsg_t msg;
        msg.cmd =    BTM_CMD_ENABLE;
        msg.num = num;
        xQueueSend(btm_cmdQueue,&msg,0);
    }

    The command for disable just disables the flag and the advertising

                case BTM_CMD_DISABLE:
                    tiltDB[msg.num].enable = false;
                    wiced_start_multi_advertisements( MULTI_ADVERT_STOP, msg.num+1 );
                break;

    And the usrcmd function just queues the message.

    void btm_updateDisable(int num)
    {
        if(btm_cmdQueue == 0 || num<0 || num>=NUM_TILT)
            return;
        btm_cmdMsg_t msg;
        msg.cmd =    BTM_CMD_DISABLE;
        msg.num = num;
        xQueueSend(btm_cmdQueue,&msg,0);
    }

    Update the Printing

    Fix the print out to show the state of enabling instead of the “slot”

    void btm_printTable()
    {
        printf("\n# Color   E   Rate T  UpT Grav UpG TxP\n");
    
        for(int i=0;i<NUM_TILT;i++)
        {
            printf("%d %6s  %d %5d %3d %2d %4d %2d %3d\n",i,
                tiltDB[i].colorName,tiltDB[i].enable,
                tiltDB[i].rate*BTM_QUEUE_RATE,
                btm_getTemperature(i),tiltDB[i].tempUpdate,
                btm_getGravity(i),tiltDB[i].gravUpdate,
                tiltDB[i].advData[29]);
        }
    }

    Program and Test

    When I program the board I can

    1. set
    2. print
    3. enable
    4. print
    5. disable
    6. print

    And see with the Tilt app on my phone that everything is working

    Tilt Hydrometer (Part 5) Tilt Simulator & Multi Advertising iBeacons

    Summary

    Using the PSoC 6 AnyCloud Bluetooth Stack to send out “multi-adv” Bluetooth advertising packets with a PSoC 6 and CYW43012.  Multi-adv means sending out multiple different simultaneous Bluetooth Advertising packets.  This includes building a project to simulate a Tilt Hydrometer.

    Story

    As I worked on the Tilt project I came to realize that what I really needed what a Tilt Simulator.  That is, a PSoC programmed with a command line interface that could send out the iBeacon messages that looked like the ones that the Tilt actually sent out.  Why?  Simple, all three of my Tilts are busy doing their day job measuring beer and they don’t have time to fool around being test subjects for my IoT Expert Articles.

    The CYW43012 controller that I am using is capable of automatically rotating through a list of at least 8 beacons (maybe more, but I don’t know the exact number. I suppose I should figure it out).  In other words I can simultaneously simulate 8 Tilts at one time with one PSoC.

    For this project, I want the project to be able to

    1. Simultaneously broadcast 0-8 of the Tilt iBeacon messages
    2. Have a command line interface to control the Tilt iBeacons
    3. Be able to set a ramp rate for Temperature and Gravity on a per Tilt basis

    The commands will be:

    1. print – print out the table of the information about the Tilt iBeacons
    2. set – set the temperature, gravity and txPower e.g. “set 0 77 1020 99” would turn on beacon 1 with the temperature set to 77 and the gravity set to 1020 and the txPower set to 99
    3. update – configure the update rate for temperature and gravity e.g. “update 6 1000 0 -1” would set tilt 6 with an update to happen once per 1000ms with a +0 temperature per update and a -1 gravity points per update

    Here is an example of the display.

    This series is broken up into the following 12 articles with a few additional possible articles. 

    Tilt Hydrometer (Part 1) Overview & Out-of-Box

    Tilt Hydrometer (Part 2) Architecture

    Tilt Hydrometer (Part 3) Advertising Scanner

    Tilt Hydrometer (Part 4) Advertising Packet Error?

    Tilt Hydrometer (Part 5) Tilt Simulator & Multi Advertising iBeacons

    Tilt Hydrometer (Part 6) Tilt Simulator an Upgrade

    Tilt Hydrometer (Part 7) Advertising Database

    Tilt Hydrometer (Part 8) Read the Database

    Tilt Hydrometer (Part 9) An LCD Display

    Tilt Hydrometer (Part 10) The Display State Machine

    Tilt Hydrometer (Part 11) Draw the Display Screens

    Tilt Hydrometer (Part 12) CapSense

    Tilt Hydrometer: LittleFS & SPI Flash (Part ?)

    Tilt Hydrometer: WiFi Introducer (Part ?)

    Tilt Hydrometer: WebServer (Part ?)

    Tilt Hydrometer: Amazon MQTT (Part ?)

    Tilt Hydrometer: Printed Circuit Board (Part ?)

    You can get the source code from git@github.com:iotexpert/Tilt2.git  This repository has tags for each of the articles which can be accessed with "git checkout part12"  You can find the Tilt Simulator at  git@github.com:iotexpert/TiltSimulator.git.


    Build the Basic Project

    Create a new project using the FreeRTOS NT Shell Template called Tilt Simulator

    Enable the bluetooth-freertos and btstack libraries.  Also enable the IoT Expert BT Utilities library.

    In the command line copy the template bluetoothManager.* into the project

    Start the Bluetooth configurator with “make config_bt” on the command line.  Press the new project file (the blank paper)

    Select the P6 connectivity device

    Press save and call your file “TiltSimulator” (it actually doesn’t matter what you call it).  This will generate the configuration structures you need.

    In command line run “make vscode”.  Then edit the Makefile to include these components.

    COMPONENTS=FREERTOS WICED_BLE

    You should run a build/program right now as you will have a basic project with a blinking led, the Bluetooth stack running and a command line.

    Multiadv

    The CYW43012 has the ability to automatically rotate through a list of advertising packets.  Each packet can have different data including a different Bluetooth address (how crazy is that?)  Each packet can also be advertised at a different and configurable rate.  It does this all with no intervention by the host.

    This functionality is documented in the Bluetooth Stack section called “MutiAdv” under Device Management.

    Build the Database

    The database is just an array of structures.  There are only 8 entries in the database, one for each color Tilt.  In addition to a string representing the name, the database will have

    1. Which advertising slot that this tilt is using (0 means that it isn’t active)
    2. If the data is “dirty” meaning it has changed in this table but has not yet been copied to the controller for broadcast
    3. rate = how often to update the data in the that row
    4. tempUPDATE = how much to change the data by each time an update is called
    5. gravUPDATE = how much to change the gravity by each time an update is called
    6. The actual bytes of the advertising packet
    /*********************************************************************************
    *
    * Tilt Database Definition
    * 
    *********************************************************************************/
    
    #define TILT_IBEACON_HEADER_LEN 25
    #define TILT_IBEACON_DATA_LEN 5
    #define TILT_IBEACON_LEN (TILT_IBEACON_HEADER_LEN + TILT_IBEACON_DATA_LEN)
    
    typedef struct  {
        char *colorName;    // The color string
        int slot;           // Which Bluetooth ADV Slot this Tilt is using
        bool dirty;         // A flag to tell if there has been a change since the adv was last written
        int rate;           // rate in ms
        int tempUpdate;     // The update rate for temperature
        int gravUpdate;     // The update rate for gravity
        uint8_t advData[TILT_IBEACON_LEN];
    } tilt_t;
    
    // 02 01 04 = Flags
    // 0x1A 0xFF = Manufacturer specific data
    // 0x4c 0x00 = Apple
    // 0x02 = iBeacon
    // 0x15 = remaining data length
    #define IBEACON_HEADER 0x02,0x01,0x04,0x1A,0xFF,0x4C,0x00,0x02,0x15
    
    static tilt_t tiltDB [] =
    {
        {"Red",    0, true, 0,0,0, {IBEACON_HEADER,0xA4,0x95,0xBB,0x10,0xC5,0xB1,0x4B,0x44,0xB5,0x12,0x13,0x70,0xF0,0x2D,0x74,0xDE, 0x00,0x00,0x00,0x00,0x00}},
        {"Green" , 0, true, 0,0,0, {IBEACON_HEADER,0xA4,0x95,0xBB,0x20,0xC5,0xB1,0x4B,0x44,0xB5,0x12,0x13,0x70,0xF0,0x2D,0x74,0xDE, 0x00,0x00,0x00,0x00,0x00}},
        {"Black" , 0, true, 0,0,0, {IBEACON_HEADER,0xA4,0x95,0xBB,0x30,0xC5,0xB1,0x4B,0x44,0xB5,0x12,0x13,0x70,0xF0,0x2D,0x74,0xDE, 0x00,0x00,0x00,0x00,0x00}},
        {"Purple", 0, true, 0,0,0, {IBEACON_HEADER,0xA4,0x95,0xBB,0x40,0xC5,0xB1,0x4B,0x44,0xB5,0x12,0x13,0x70,0xF0,0x2D,0x74,0xDE, 0x00,0x00,0x00,0x00,0x00}},
        {"Orange", 0, true, 0,0,0, {IBEACON_HEADER,0xA4,0x95,0xBB,0x50,0xC5,0xB1,0x4B,0x44,0xB5,0x12,0x13,0x70,0xF0,0x2D,0x74,0xDE, 0x00,0x00,0x00,0x00,0x00}},
        {"Blue"  , 0, true, 0,0,0, {IBEACON_HEADER,0xA4,0x95,0xBB,0x60,0xC5,0xB1,0x4B,0x44,0xB5,0x12,0x13,0x70,0xF0,0x2D,0x74,0xDE, 0x00,0x00,0x00,0x00,0x00}},
        {"Yellow", 0, true, 0,0,0, {IBEACON_HEADER,0xA4,0x95,0xBB,0x70,0xC5,0xB1,0x4B,0x44,0xB5,0x12,0x13,0x70,0xF0,0x2D,0x74,0xDE, 0x00,0x00,0x00,0x00,0x00}},
        {"Pink"  , 0, true, 0,0,0, {IBEACON_HEADER,0xA4,0x95,0xBB,0x80,0xC5,0xB1,0x4B,0x44,0xB5,0x12,0x13,0x70,0xF0,0x2D,0x74,0xDE, 0x00,0x00,0x00,0x00,0x00}},
    };
    #define NUM_TILT (sizeof(tiltDB)/sizeof(tilt_t))
    
    #define IBEACON_TEMP_HI (25)
    #define IBEACON_TEMP_LO (26)
    #define IBEACON_GRAV_HI (27)
    #define IBEACON_GRAV_LO (28)
    #define IBEACON_TXPOWER (29)

    Now I will make “getters and setters”.  These functions will set the correct bytes in the adverting packets, and can retrieve the current values in those bytes.  Remember in the Apple iBeacon format there are 5 “user” bytes

    1. Major byte 0 and byte 1
    2. Minor byte 0 and bytes 1
    3. txPower

    Apple didnt specify what you stored in the major/minor.  In fact they also didnt specify the endianness.  The Tilt guys decided that the would store BIG endian – oh well.

    1. Major = Temperature in degrees F
    2. Minor = Gravity points i.e. 1050 means 1.050

    If you look in my code the “set” of temperature and gravity they will “wrap around”.  If you set a value BELOW the minimum it will set the highest value and if you set a value ABOVE the maximum it will set it to the lowest.  This allows my automatic update code to just count one direction.

    int btm_getTemperature(int num)
    {
        return (uint16_t)tiltDB[num].advData[IBEACON_TEMP_HI] << 8 | tiltDB[num].advData[IBEACON_TEMP_LO];
    }
    
    void btm_setTemperature(int num,uint16_t temperature)
    {
        if(temperature > 150)
            temperature = 10;
        if(temperature<10)
            temperature = 150;
    
        int oldtemp = btm_getTemperature(num);
    
        tiltDB[num].advData[IBEACON_TEMP_HI] = (temperature & 0xFF00) >> 8;    
        tiltDB[num].advData[IBEACON_TEMP_LO] = temperature & 0xFF;
        if(temperature != oldtemp)
            tiltDB[num].dirty = true;    
    }
    
    int btm_getGravity(int num)
    {
        return (uint16_t)tiltDB[num].advData[IBEACON_GRAV_HI] << 8 | tiltDB[num].advData[IBEACON_GRAV_LO];
    }
    
    void btm_setGravity(int num,uint16_t gravity)
    {
        // These if's cause the gravity to "wrap around" at 1200 and 900
        if(gravity>1200)
            gravity = 900;
        if(gravity <900)
            gravity = 1200;
    
        int oldgrav = btm_getGravity(num);
        tiltDB[num].advData[IBEACON_GRAV_HI] = (uint8_t)((gravity & 0xFF00) >> 8);
        tiltDB[num].advData[IBEACON_GRAV_LO] = (uint8_t)(gravity & 0xFF);
        if(oldgrav != gravity)
            tiltDB[num].dirty = true;
    }
    
    void btm_setTxPower(int num, int8_t txPower)
    {
        tiltDB[num].advData[IBEACON_TXPOWER] = txPower;
        tiltDB[num].dirty = true;
    }

    Transfer Database to Bluetooth Controller

    The next two functions are used to bridge between the database and the controller.  The first function “btm_setAdvPacket” probably should have been called “btm_setAdvPackets” because its function is to copy the database bytes into the controller for actual broadcast.  This function is simply a loop that looks at each of the Tilts in the database.

    1. If they are in a “slot”
    2. AND they are dirty (something has been changed since the last time this was called)
    3. Then copy the data into the controller
    4. Set the parameters
    5. Start it advertising
    // btm_setAdvPacket
    //
    // This function updates what the advertising packets and the state of the BT controller:
    // It will loop through the table of iBeacons... then if they are in a slot & they are dirty
    // it will move them to the contoller and enable advertisements on that slot
    
    void btm_setAdvPacket()
    {
        static wiced_bt_ble_multi_adv_params_t myParams = {
        .adv_int_min       = BTM_BLE_ADVERT_INTERVAL_MIN,
        .adv_int_max       = 96,
        .adv_type          = MULTI_ADVERT_NONCONNECTABLE_EVENT,
        .channel_map       = BTM_BLE_ADVERT_CHNL_37 | BTM_BLE_ADVERT_CHNL_38 | BTM_BLE_ADVERT_CHNL_39,
        .adv_filter_policy = BTM_BLE_ADVERT_FILTER_ALL_CONNECTION_REQ_ALL_SCAN_REQ,
        .adv_tx_power      = MULTI_ADV_TX_POWER_MAX_INDEX,
        .peer_bd_addr      = {0},
        .peer_addr_type    = BLE_ADDR_PUBLIC,
        .own_bd_addr       = {0},
        .own_addr_type     = BLE_ADDR_PUBLIC,
        };
    
        for(int i=0;i<NUM_TILT;i++)
        {
            if(tiltDB[i].slot && tiltDB[i].dirty)
            {   
                tiltDB[i].dirty = false;
                wiced_set_multi_advertisement_data(tiltDB[i].advData,sizeof(tiltDB[i].advData),tiltDB[i].slot);
                wiced_set_multi_advertisement_params(tiltDB[i].slot,&myParams);
                wiced_start_multi_advertisements( MULTI_ADVERT_START, tiltDB[i].slot );
            }
        }
    }

    In order to “activate” a row in the database you need to assign it to a slot.  I do this by keeping track of the number of times I have assigned an entry in “btm_active” which is static to this function.  Now, shocker, I check to make sure that the caller didn’t accidentally call this before.  Finally I assign it to a slot and mark it as dirty (so that when the btm_setAdvPacket function is called the data will be put into the controller.

    /* btm_activate
    *
    * This function will put the tilt in the database entry num
    * into the next available advertising slot
    *
    */
    void btm_activate(int num)
    {
        // Keep track of the number of currently active iBeacons
        static int  btm_active=0;
        
        CY_ASSERT(num<NUM_TILT);
        if(tiltDB[num].slot == 0) // Make sure that it is not already in a slow
        {
            btm_active += 1;
            tiltDB[num].slot = btm_active;
            tiltDB[num].dirty = true;
        }
    }

    Command Queue

    The command queue is used by the command line interface to submit changes to the Tilt database.  Specifically set, update and print.  The message is just the values for set & update.

    /*********************************************************************************
    * 
    * Tilt Data Manager External Interface Queue
    *
    *********************************************************************************/
    typedef enum {
        BTM_CMD_SET_DATA,
        BTM_CMD_PRINT_TABLE,
        BTM_CMD_SET_UPDATE,
    } btm_cmd_t;
    
    typedef struct {
        btm_cmd_t cmd;
        int num;
        int temperature;
        int gravity;
        int txPower;
    } btm_cmdMsg_t;
    
    static QueueHandle_t btm_cmdQueue=0;
    static wiced_timer_ext_t btm_processDataTimer;

    The function to process the command queue has two functions in the systems

    1. Process commands from the command line
    2. Cause the data to be updated (as configured by the command line)

    This function is run by a timer that is started when the Bluetooth stack turns on.  I have it set to run every 200ms.  Each time it runs it will read all of the messages in the queue and process them.  Once that is complete it will check to see if the Tilts need to be updated.

    In my system there is a “base rate” which is set by the frequency of this function.  In other words the “count” variable counts the number of times this function has been called.  This is about “BTM_QUEUE_RATE”

    /* btm_processCmdQueue
    *
    *  This function is called by a timer every BTM_QUEUE_RATE ms (around 200ms)
    *  It processes commands from the GUI
    *  It also updates the adverting packets if they are being updated at a rate
    *
    */
    void btm_processCmdQueue( wiced_timer_callback_arg_t cb_params )
    {
        static int count = 0; // This counts the numbers of times the callback has happend
    
        btm_cmdMsg_t msg;
        while(xQueueReceive(btm_cmdQueue,&msg,0) == pdTRUE)
        {
            switch(msg.cmd)
            {
                case BTM_CMD_SET_DATA:
                    btm_setGravity(msg.num,msg.gravity);
                    btm_setTemperature(msg.num,msg.temperature);
                    btm_setTxPower(msg.num,msg.txPower);
                    btm_activate(msg.num);
                break;
    
                case BTM_CMD_PRINT_TABLE:
                    btm_printTable();
                break;
    
                case BTM_CMD_SET_UPDATE:
                    tiltDB[msg.num].tempUpdate = msg.temperature;
                    tiltDB[msg.num].gravUpdate = msg.gravity;
                    tiltDB[msg.num].rate = msg.txPower / BTM_QUEUE_RATE;
                break;
            }
        }
        count = count + 1;
    
        // This block of code updates the current values with the update rate
        for(int i=0;i<NUM_TILT;i++)
        {
            // If the slot active
            // and the update rate says that it is time
            if(tiltDB[i].slot && count % tiltDB[i].rate  == 0)
            {
                btm_setTemperature(i,btm_getTemperature(i) + tiltDB[i].tempUpdate);
                btm_setGravity(i,btm_getGravity(i) + tiltDB[i].gravUpdate);
            }
        }
        btm_setAdvPacket();
    }

    Bluetooth Management

    When the Bluetooth Stack is turned on I need to do two things

    1. Initialize the command queue
    2. Initialize a periodic timer that calls the “btm_processCmdQueue”

    Notice that every time something changes in the advertising packets the management callback is called with the event type “BTM_MULTI_ADVERT_RESP_EVENT”… to which I do NOTHING.  I suppose that I should check and make sure that whatever I did succeed.

    wiced_result_t app_bt_management_callback(wiced_bt_management_evt_t event, wiced_bt_management_evt_data_t *p_event_data)
    {
        wiced_result_t result = WICED_BT_SUCCESS;
    
        switch (event)
        {
            case BTM_ENABLED_EVT:
                printf("Started BT Stack Succesfully\n");
                btm_cmdQueue = xQueueCreate(10,sizeof(btm_cmdMsg_t));
                wiced_init_timer_ext(&btm_processDataTimer,btm_processCmdQueue,0,WICED_TRUE);
                wiced_start_timer_ext(&btm_processDataTimer,BTM_QUEUE_RATE);
            break;
    
            case BTM_MULTI_ADVERT_RESP_EVENT: // Do nothing...
            break;
    
            default:
                printf("Unhandled Bluetooth Management Event: %s\n", btutil_getBTEventName( event));
            break;
        }
    
        return result;
    }

    Public Functions

    In the command line I want the ability to

    1. Print
    2. Configure the data in Tilt advertising packet
    3. Set the update rate

    That is what these three functions do.  Notice that I check that the command queue has been initialized.

    void btm_printTableCmd()
    {
        if(btm_cmdQueue == 0)
            return;
        
        btm_cmdMsg_t msg;
        msg.cmd =    BTM_CMD_PRINT_TABLE;
        xQueueSend(btm_cmdQueue,&msg,0);
    }
    
    void btm_setDataCmd(int num,int temperature,int gravity,int txPower)
    {
        if(btm_cmdQueue == 0)
            return;
    
        btm_cmdMsg_t msg;
        msg.cmd =    BTM_CMD_SET_DATA;
        msg.num = num;
        msg.temperature = temperature;
        msg.gravity = gravity;
        msg.txPower = txPower;
        xQueueSend(btm_cmdQueue,&msg,0);
    }
    
    
    void btm_updateDataCmd(int num,int rate ,int temperature,int gravity )
    {
        if(btm_cmdQueue == 0)
            return;
        btm_cmdMsg_t msg;
        msg.cmd =    BTM_CMD_SET_UPDATE;
        msg.num = num;
        msg.temperature = temperature;
        msg.gravity = gravity;
        msg.txPower = rate;
        xQueueSend(btm_cmdQueue,&msg,0);
    }
    

    Update the Command Line

    In usrcmd.c I need the three functions which the command line will call.

    1. usrcmd_print … to print out the table
    2. usrcmd_set to set the values in the Tilt database
    3. usrcmd_update to set the update rate
    static int usrcmd_print(int argc, char **argv)
    {
        btm_printTableCmd();
        return 0;
    }
    
    static int usrcmd_set(int argc, char **argv)
    {
        int gravity;
        int temperature;
        int txPower;
        int num;
        if(argc == 5)
        {
            sscanf(argv[1],"%d",&num);
            sscanf(argv[2],"%d",&temperature);
            sscanf(argv[3],"%d",&gravity);
            sscanf(argv[4],"%d",&txPower);
    
            btm_setDataCmd(num,temperature,gravity,txPower);
        }
        return 0;
    }
    
    static int usrcmd_update(int argc, char **argv)
    {
        int gravity;
        int temperature;
        int rate;
        int num;
        if(argc == 5)
        {
            sscanf(argv[1],"%d",&num);
            sscanf(argv[2],"%d",&rate);
            sscanf(argv[3],"%d",&temperature);
            sscanf(argv[4],"%d",&gravity);
    
            btm_updateDataCmd(num,rate,temperature,gravity);
        }
        return 0;
    }

    And once you have those functions you need to turn them on in the command line

    static const cmd_table_t cmdlist[] = {
        { "help", "This is a description text string for help command.", usrcmd_help },
        { "info", "This is a description text string for info command.", usrcmd_info },
        { "clear", "Clear the screen", usrcmd_clear },
        { "pargs","print the list of arguments", usrcmd_pargs},
    #ifdef configUSE_TRACE_FACILITY 
    #if configUSE_STATS_FORMATTING_FUNCTIONS ==1
        { "tasks","print the list of RTOS Tasks", usrcmd_list},
    #endif
    #endif
        { "print", "Print table", usrcmd_print },
        { "set", "set num temperature gravity txpower", usrcmd_set },
        { "update", "update num rate temperature gravity", usrcmd_update },
    };

    In the next article I will be back to the “client” end of my system and will build a database.

    Full Functions

    Here are the full functions & files.  You can also “git” this at git@github.com:iotexpert/TiltSimulator.git

    1. bluetoothManager.h
    2. bluetoothManager.c
    3. main.c
    4. usrcmd.c

    bluetoothManager.h

    #pragma once
    #include "wiced_bt_stack.h"
    #include "wiced_bt_dev.h"
    
    wiced_result_t app_bt_management_callback(wiced_bt_management_evt_t event, wiced_bt_management_evt_data_t *p_event_data);
    void btm_printTable();
    
    void btm_printTableCmd();
    void btm_setDataCmd(int num,int temperature,int gravity,int txPower);
    void btm_updateDataCmd(int num,int rate ,int temperature,int gravity );
    

    bluetoothManager.c

    #include <stdio.h>
    #include <stdlib.h>
    #include "cybsp.h"
    #include "FreeRTOS.h"
    #include "bluetoothManager.h"
    #include "wiced_bt_stack.h"
    #include "wiced_bt_dev.h"
    #include "wiced_bt_trace.h"
    #include "wiced_timer.h"
    #include "queue.h"
    #include "btutil.h"
    // Read the queue
    #define BTM_QUEUE_RATE 200
    /*********************************************************************************
    *
    * Tilt Database Definition
    * 
    *********************************************************************************/
    #define TILT_IBEACON_HEADER_LEN 25
    #define TILT_IBEACON_DATA_LEN 5
    #define TILT_IBEACON_LEN (TILT_IBEACON_HEADER_LEN + TILT_IBEACON_DATA_LEN)
    typedef struct  {
    char *colorName;    // The color string
    int slot;           // Which Bluetooth ADV Slot this Tilt is using
    bool dirty;         // A flag to tell if there has been a change since the adv was last written
    int rate;           // rate in ms
    int tempUpdate;     // The update rate for temperature
    int gravUpdate;     // The update rate for gravity
    uint8_t advData[TILT_IBEACON_LEN];
    } tilt_t;
    // 02 01 04 = Flags
    // 0x1A 0xFF = Manufacturer specific data
    // 0x4c 0x00 = Apple
    // 0x02 = iBeacon
    // 0x15 = remaining data length
    #define IBEACON_HEADER 0x02,0x01,0x04,0x1A,0xFF,0x4C,0x00,0x02,0x15
    static tilt_t tiltDB [] =
    {
    {"Red",    0, true, 0,0,0, {IBEACON_HEADER,0xA4,0x95,0xBB,0x10,0xC5,0xB1,0x4B,0x44,0xB5,0x12,0x13,0x70,0xF0,0x2D,0x74,0xDE, 0x00,0x00,0x00,0x00,0x00}},
    {"Green" , 0, true, 0,0,0, {IBEACON_HEADER,0xA4,0x95,0xBB,0x20,0xC5,0xB1,0x4B,0x44,0xB5,0x12,0x13,0x70,0xF0,0x2D,0x74,0xDE, 0x00,0x00,0x00,0x00,0x00}},
    {"Black" , 0, true, 0,0,0, {IBEACON_HEADER,0xA4,0x95,0xBB,0x30,0xC5,0xB1,0x4B,0x44,0xB5,0x12,0x13,0x70,0xF0,0x2D,0x74,0xDE, 0x00,0x00,0x00,0x00,0x00}},
    {"Purple", 0, true, 0,0,0, {IBEACON_HEADER,0xA4,0x95,0xBB,0x40,0xC5,0xB1,0x4B,0x44,0xB5,0x12,0x13,0x70,0xF0,0x2D,0x74,0xDE, 0x00,0x00,0x00,0x00,0x00}},
    {"Orange", 0, true, 0,0,0, {IBEACON_HEADER,0xA4,0x95,0xBB,0x50,0xC5,0xB1,0x4B,0x44,0xB5,0x12,0x13,0x70,0xF0,0x2D,0x74,0xDE, 0x00,0x00,0x00,0x00,0x00}},
    {"Blue"  , 0, true, 0,0,0, {IBEACON_HEADER,0xA4,0x95,0xBB,0x60,0xC5,0xB1,0x4B,0x44,0xB5,0x12,0x13,0x70,0xF0,0x2D,0x74,0xDE, 0x00,0x00,0x00,0x00,0x00}},
    {"Yellow", 0, true, 0,0,0, {IBEACON_HEADER,0xA4,0x95,0xBB,0x70,0xC5,0xB1,0x4B,0x44,0xB5,0x12,0x13,0x70,0xF0,0x2D,0x74,0xDE, 0x00,0x00,0x00,0x00,0x00}},
    {"Pink"  , 0, true, 0,0,0, {IBEACON_HEADER,0xA4,0x95,0xBB,0x80,0xC5,0xB1,0x4B,0x44,0xB5,0x12,0x13,0x70,0xF0,0x2D,0x74,0xDE, 0x00,0x00,0x00,0x00,0x00}},
    };
    #define NUM_TILT (sizeof(tiltDB)/sizeof(tilt_t))
    #define IBEACON_TEMP_HI (25)
    #define IBEACON_TEMP_LO (26)
    #define IBEACON_GRAV_HI (27)
    #define IBEACON_GRAV_LO (28)
    #define IBEACON_TXPOWER (29)
    /*********************************************************************************
    * 
    * Tilt Data Manager External Interface Queue
    *
    *********************************************************************************/
    typedef enum {
    BTM_CMD_SET_DATA,
    BTM_CMD_PRINT_TABLE,
    BTM_CMD_SET_UPDATE,
    } btm_cmd_t;
    typedef struct {
    btm_cmd_t cmd;
    int num;
    int temperature;
    int gravity;
    int txPower;
    } btm_cmdMsg_t;
    static QueueHandle_t btm_cmdQueue=0;
    static wiced_timer_ext_t btm_processDataTimer;
    /*********************************************************************************
    * 
    * These functions are used to interact with the Bluetooth Advertising Controller
    *
    *********************************************************************************/
    // btm_setAdvPacket
    //
    // This function updates what the advertising packets and the state of the BT controller:
    // It will loop through the table of iBeacons... then if they are in a slot & they are dirty
    // it will move them to the contoller and enable advertisements on that slot
    void btm_setAdvPacket()
    {
    static wiced_bt_ble_multi_adv_params_t myParams = {
    .adv_int_min       = BTM_BLE_ADVERT_INTERVAL_MIN,
    .adv_int_max       = 96,
    .adv_type          = MULTI_ADVERT_NONCONNECTABLE_EVENT,
    .channel_map       = BTM_BLE_ADVERT_CHNL_37 | BTM_BLE_ADVERT_CHNL_38 | BTM_BLE_ADVERT_CHNL_39,
    .adv_filter_policy = BTM_BLE_ADVERT_FILTER_ALL_CONNECTION_REQ_ALL_SCAN_REQ,
    .adv_tx_power      = MULTI_ADV_TX_POWER_MAX_INDEX,
    .peer_bd_addr      = {0},
    .peer_addr_type    = BLE_ADDR_PUBLIC,
    .own_bd_addr       = {0},
    .own_addr_type     = BLE_ADDR_PUBLIC,
    };
    for(int i=0;i<NUM_TILT;i++)
    {
    if(tiltDB[i].slot && tiltDB[i].dirty)
    {   
    tiltDB[i].dirty = false;
    wiced_set_multi_advertisement_data(tiltDB[i].advData,sizeof(tiltDB[i].advData),tiltDB[i].slot);
    wiced_set_multi_advertisement_params(tiltDB[i].slot,&myParams);
    wiced_start_multi_advertisements( MULTI_ADVERT_START, tiltDB[i].slot );
    }
    }
    }
    /* btm_activate
    *
    * This function will put the tilt in the database entry num
    * into the next available advertising slot
    *
    */
    void btm_activate(int num)
    {
    // Keep track of the number of currently active iBeacons
    static int  btm_active=0;
    CY_ASSERT(num<NUM_TILT);
    if(tiltDB[num].slot == 0) // Make sure that it is not already in a slow
    {
    btm_active += 1;
    tiltDB[num].slot = btm_active;
    tiltDB[num].dirty = true;
    }
    }
    /*********************************************************************************
    * 
    * This next set of functions is the API to the database
    *
    *********************************************************************************/
    int btm_getTemperature(int num)
    {
    return (uint16_t)tiltDB[num].advData[IBEACON_TEMP_HI] << 8 | tiltDB[num].advData[IBEACON_TEMP_LO];
    }
    void btm_setTemperature(int num,uint16_t temperature)
    {
    if(temperature > 150)
    temperature = 10;
    if(temperature<10)
    temperature = 150;
    int oldtemp = btm_getTemperature(num);
    tiltDB[num].advData[IBEACON_TEMP_HI] = (temperature & 0xFF00) >> 8;    
    tiltDB[num].advData[IBEACON_TEMP_LO] = temperature & 0xFF;
    if(temperature != oldtemp)
    tiltDB[num].dirty = true;    
    }
    int btm_getGravity(int num)
    {
    return (uint16_t)tiltDB[num].advData[IBEACON_GRAV_HI] << 8 | tiltDB[num].advData[IBEACON_GRAV_LO];
    }
    void btm_setGravity(int num,uint16_t gravity)
    {
    // These if's cause the gravity to "wrap around" at 1200 and 900
    if(gravity>1200)
    gravity = 900;
    if(gravity <900)
    gravity = 1200;
    int oldgrav = btm_getGravity(num);
    tiltDB[num].advData[IBEACON_GRAV_HI] = (uint8_t)((gravity & 0xFF00) >> 8);
    tiltDB[num].advData[IBEACON_GRAV_LO] = (uint8_t)(gravity & 0xFF);
    if(oldgrav != gravity)
    tiltDB[num].dirty = true;
    }
    void btm_setTxPower(int num, int8_t txPower)
    {
    tiltDB[num].advData[IBEACON_TXPOWER] = txPower;
    tiltDB[num].dirty = true;
    }
    void btm_printTable()
    {
    printf("\n# Color   S   Rate T  UpT Grav UpG TxP\n");
    for(int i=0;i<NUM_TILT;i++)
    {
    printf("%d %6s  %d %5d %3d %2d %4d %2d %3d\n",i,
    tiltDB[i].colorName,tiltDB[i].slot,
    tiltDB[i].rate*BTM_QUEUE_RATE,
    btm_getTemperature(i),tiltDB[i].tempUpdate,
    btm_getGravity(i),tiltDB[i].gravUpdate,
    tiltDB[i].advData[29]);
    }
    }
    /* btm_processCmdQueue
    *
    *  This function is called by a timer every BTM_QUEUE_RATE ms (around 200ms)
    *  It processes commands from the GUI
    *  It also updates the adverting packets if they are being updated at a rate
    *
    */
    void btm_processCmdQueue( wiced_timer_callback_arg_t cb_params )
    {
    static int count = 0; // This counts the numbers of times the callback has happend
    btm_cmdMsg_t msg;
    while(xQueueReceive(btm_cmdQueue,&msg,0) == pdTRUE)
    {
    switch(msg.cmd)
    {
    case BTM_CMD_SET_DATA:
    btm_setGravity(msg.num,msg.gravity);
    btm_setTemperature(msg.num,msg.temperature);
    btm_setTxPower(msg.num,msg.txPower);
    btm_activate(msg.num);
    break;
    case BTM_CMD_PRINT_TABLE:
    btm_printTable();
    break;
    case BTM_CMD_SET_UPDATE:
    tiltDB[msg.num].tempUpdate = msg.temperature;
    tiltDB[msg.num].gravUpdate = msg.gravity;
    tiltDB[msg.num].rate = msg.txPower / BTM_QUEUE_RATE;
    break;
    }
    }
    count = count + 1;
    // This block of code updates the current values with the update rate
    for(int i=0;i<NUM_TILT;i++)
    {
    // If the slot active
    // and the update rate says that it is time
    if(tiltDB[i].slot && count % tiltDB[i].rate  == 0)
    {
    btm_setTemperature(i,btm_getTemperature(i) + tiltDB[i].tempUpdate);
    btm_setGravity(i,btm_getGravity(i) + tiltDB[i].gravUpdate);
    }
    }
    btm_setAdvPacket();
    }
    /**************************************************************************************************
    * Function Name: app_bt_management_callback()
    ***************************************************************************************************
    * Summary:
    *   This is a Bluetooth stack event handler function to receive management events from
    *   the BLE stack and process as per the application.
    *
    * Parameters:
    *   wiced_bt_management_evt_t event             : BLE event code of one byte length
    *   wiced_bt_management_evt_data_t *p_event_data: Pointer to BLE management event structures
    *
    * Return:
    *  wiced_result_t: Error code from WICED_RESULT_LIST or BT_RESULT_LIST
    *
    *************************************************************************************************/
    wiced_result_t app_bt_management_callback(wiced_bt_management_evt_t event, wiced_bt_management_evt_data_t *p_event_data)
    {
    wiced_result_t result = WICED_BT_SUCCESS;
    switch (event)
    {
    case BTM_ENABLED_EVT:
    printf("Started BT Stack Succesfully\n");
    btm_cmdQueue = xQueueCreate(10,sizeof(btm_cmdMsg_t));
    wiced_init_timer_ext(&btm_processDataTimer,btm_processCmdQueue,0,WICED_TRUE);
    wiced_start_timer_ext(&btm_processDataTimer,BTM_QUEUE_RATE);
    break;
    case BTM_MULTI_ADVERT_RESP_EVENT: // Do nothing...
    break;
    default:
    printf("Unhandled Bluetooth Management Event: %s\n", btutil_getBTEventName( event));
    break;
    }
    return result;
    }
    /*********************************************************************************
    * 
    * These are publicly callable functions to cause actions by the bluetooth manager
    * These are called by the GUI
    *
    *********************************************************************************/
    void btm_printTableCmd()
    {
    if(btm_cmdQueue == 0)
    return;
    btm_cmdMsg_t msg;
    msg.cmd =    BTM_CMD_PRINT_TABLE;
    xQueueSend(btm_cmdQueue,&msg,0);
    }
    void btm_setDataCmd(int num,int temperature,int gravity,int txPower)
    {
    if(btm_cmdQueue == 0)
    return;
    btm_cmdMsg_t msg;
    msg.cmd =    BTM_CMD_SET_DATA;
    msg.num = num;
    msg.temperature = temperature;
    msg.gravity = gravity;
    msg.txPower = txPower;
    xQueueSend(btm_cmdQueue,&msg,0);
    }
    void btm_updateDataCmd(int num,int rate ,int temperature,int gravity )
    {
    if(btm_cmdQueue == 0)
    return;
    btm_cmdMsg_t msg;
    msg.cmd =    BTM_CMD_SET_UPDATE;
    msg.num = num;
    msg.temperature = temperature;
    msg.gravity = gravity;
    msg.txPower = rate;
    xQueueSend(btm_cmdQueue,&msg,0);
    }


    main.c

    #include "cyhal.h"
    #include "cybsp.h"
    #include "cy_retarget_io.h"
    #include <stdio.h>
    #include "FreeRTOS.h"
    #include "task.h"
    #include "usrcmd.h"
    #include "bluetoothManager.h"
    #include "cycfg_bt_settings.h"
    #include "bt_platform_cfg_settings.h"
    volatile int uxTopUsedPriority ;
    TaskHandle_t blinkTaskHandle;
    void blink_task(void *arg)
    {
    cyhal_gpio_init(CYBSP_USER_LED,CYHAL_GPIO_DIR_OUTPUT,CYHAL_GPIO_DRIVE_STRONG,0);
    for(;;)
    {
    cyhal_gpio_toggle(CYBSP_USER_LED);
    vTaskDelay(500);
    }
    }
    int main(void)
    {
    uxTopUsedPriority = configMAX_PRIORITIES - 1 ; // enable OpenOCD Thread Debugging
    /* Initialize the device and board peripherals */
    cybsp_init() ;
    __enable_irq();
    cy_retarget_io_init(CYBSP_DEBUG_UART_TX, CYBSP_DEBUG_UART_RX, CY_RETARGET_IO_BAUDRATE);
    cybt_platform_config_init(&bt_platform_cfg_settings);
    wiced_bt_stack_init (app_bt_management_callback, &wiced_bt_cfg_settings);
    // Stack size in WORDs
    // Idle task = priority 0
    xTaskCreate(blink_task, "blinkTask", configMINIMAL_STACK_SIZE,0 /* args */ ,0 /* priority */, &blinkTaskHandle);
    xTaskCreate(usrcmd_task, "usrcmd_task", configMINIMAL_STACK_SIZE*4,0 /* args */ ,0 /* priority */, 0);
    vTaskStartScheduler();
    }
    /* [] END OF FILE */


    usrcmd.c

    /**
    * @file usrcmd.c
    * @author CuBeatSystems
    * @author Shinichiro Nakamura
    * @copyright
    * ===============================================================
    * Natural Tiny Shell (NT-Shell) Version 0.3.1
    * ===============================================================
    * Copyright (c) 2010-2016 Shinichiro Nakamura
    *
    * Permission is hereby granted, free of charge, to any person
    * obtaining a copy of this software and associated documentation
    * files (the "Software"), to deal in the Software without
    * restriction, including without limitation the rights to use,
    * copy, modify, merge, publish, distribute, sublicense, and/or
    * sell copies of the Software, and to permit persons to whom the
    * Software is furnished to do so, subject to the following
    * conditions:
    *
    * The above copyright notice and this permission notice shall be
    * included in all copies or substantial portions of the Software.
    *
    * THE SOFTWARE IS PROVIDED "AS IS", WITHOUT WARRANTY OF ANY KIND,
    * EXPRESS OR IMPLIED, INCLUDING BUT NOT LIMITED TO THE WARRANTIES
    * OF MERCHANTABILITY, FITNESS FOR A PARTICULAR PURPOSE AND
    * NONINFRINGEMENT. IN NO EVENT SHALL THE AUTHORS OR COPYRIGHT
    * HOLDERS BE LIABLE FOR ANY CLAIM, DAMAGES OR OTHER LIABILITY,
    * WHETHER IN AN ACTION OF CONTRACT, TORT OR OTHERWISE, ARISING
    * FROM, OUT OF OR IN CONNECTION WITH THE SOFTWARE OR THE USE OR
    * OTHER DEALINGS IN THE SOFTWARE.
    */
    #include "ntopt.h"
    #include "ntlibc.h"
    #include "ntshell.h"
    #include <stdio.h>
    #include "ntshell.h"
    #include "ntlibc.h"
    #include "psoc6_ntshell_port.h"
    #include "FreeRTOS.h"
    #include "task.h"
    #include "bluetoothManager.h"
    static ntshell_t ntshell;
    typedef int (*USRCMDFUNC)(int argc, char **argv);
    static int usrcmd_ntopt_callback(int argc, char **argv, void *extobj);
    static int usrcmd_help(int argc, char **argv);
    static int usrcmd_info(int argc, char **argv);
    static int usrcmd_clear(int argc, char **argv);
    static int usrcmd_pargs(int argc, char **argv);
    #ifdef configUSE_TRACE_FACILITY
    #if configUSE_STATS_FORMATTING_FUNCTIONS ==1
    static int usrcmd_list(int argc, char **argv);
    #endif
    #endif
    static int usrcmd_print(int argc, char **argv);
    static int usrcmd_set(int argc, char **argv);
    static int usrcmd_update(int argc, char **argv);
    typedef struct {
    char *cmd;
    char *desc;
    USRCMDFUNC func;
    } cmd_table_t;
    static const cmd_table_t cmdlist[] = {
    { "help", "This is a description text string for help command.", usrcmd_help },
    { "info", "This is a description text string for info command.", usrcmd_info },
    { "clear", "Clear the screen", usrcmd_clear },
    { "pargs","print the list of arguments", usrcmd_pargs},
    #ifdef configUSE_TRACE_FACILITY 
    #if configUSE_STATS_FORMATTING_FUNCTIONS ==1
    { "tasks","print the list of RTOS Tasks", usrcmd_list},
    #endif
    #endif
    { "print", "Print table", usrcmd_print },
    { "set", "set num temperature gravity txpower", usrcmd_set },
    { "update", "update num temperature gravity", usrcmd_update },
    };
    void usrcmd_task()
    {
    setvbuf(stdin, NULL, _IONBF, 0);
    printf("Started user command task with NT Shell\n");
    ntshell_init(
    &ntshell,
    ntshell_read,
    ntshell_write,
    ntshell_callback,
    (void *)&ntshell);
    ntshell_set_prompt(&ntshell, "AnyCloud> ");
    vtsend_erase_display(&ntshell.vtsend);
    ntshell_execute(&ntshell);
    }
    int usrcmd_execute(const char *text)
    {
    return ntopt_parse(text, usrcmd_ntopt_callback, 0);
    }
    static int usrcmd_ntopt_callback(int argc, char **argv, void *extobj)
    {
    if (argc == 0) {
    return 0;
    }
    const cmd_table_t *p = &cmdlist[0];
    for (unsigned int i = 0; i < sizeof(cmdlist) / sizeof(cmdlist[0]); i++) {
    if (ntlibc_strcmp((const char *)argv[0], p->cmd) == 0) {
    return p->func(argc, argv);
    }
    p++;
    }
    printf("%s","Unknown command found.\n");
    return 0;
    }
    static int usrcmd_help(int argc, char **argv)
    {
    const cmd_table_t *p = &cmdlist[0];
    for (unsigned int i = 0; i < sizeof(cmdlist) / sizeof(cmdlist[0]); i++) {
    printf("%s",p->cmd);
    printf("%s","\t:");
    printf("%s",p->desc);
    printf("%s","\n");
    p++;
    }
    return 0;
    }
    static int usrcmd_info(int argc, char **argv)
    {
    if (argc != 2) {
    printf("%s","info sys\n");
    printf("%s","info ver\n");
    return 0;
    }
    if (ntlibc_strcmp(argv[1], "sys") == 0) {
    printf("%s","PSoC 6 MBED Monitor\n");
    return 0;
    }
    if (ntlibc_strcmp(argv[1], "ver") == 0) {
    printf("%s","Version 0.0.0\n");
    return 0;
    }
    printf("%s","Unknown sub command found\n");
    return -1;
    }
    static int usrcmd_clear(int argc, char **argv)
    {
    vtsend_erase_display_home(&ntshell.vtsend);
    return 0;
    }
    static int usrcmd_pargs(int argc, char **argv)
    {
    printf("ARGC = %d\n",argc);
    for(int i =0;i<argc;i++)
    {
    printf("argv[%d] = %s\n",i,argv[i]);
    }
    return 0;
    }
    #ifdef configUSE_TRACE_FACILITY
    #if configUSE_STATS_FORMATTING_FUNCTIONS ==1
    static int usrcmd_list(int argc,char **argv)
    {
    // 40 bytes/task + some margin
    char buff[40*10 + 100];
    vTaskList( buff );
    printf("Name          State Priority   Stack  Num\n");
    printf("------------------------------------------\n");
    printf("%s",buff);
    printf("‘B’ – Blocked\n‘R’ – Ready\n‘D’ – Deleted (waiting clean up)\n‘S’ – Suspended, or Blocked without a timeout\n");
    printf("Stack = bytes free at highwater\n");
    return 0;
    }
    #endif
    #endif
    static int usrcmd_print(int argc, char **argv)
    {
    btm_printTableCmd();
    return 0;
    }
    static int usrcmd_set(int argc, char **argv)
    {
    int gravity;
    int temperature;
    int txPower;
    int num;
    if(argc == 5)
    {
    sscanf(argv[1],"%d",&num);
    sscanf(argv[2],"%d",&temperature);
    sscanf(argv[3],"%d",&gravity);
    sscanf(argv[4],"%d",&txPower);
    btm_setDataCmd(num,temperature,gravity,txPower);
    }
    return 0;
    }
    static int usrcmd_update(int argc, char **argv)
    {
    int gravity;
    int temperature;
    int rate;
    int num;
    if(argc == 5)
    {
    sscanf(argv[1],"%d",&num);
    sscanf(argv[2],"%d",&rate);
    sscanf(argv[3],"%d",&temperature);
    sscanf(argv[4],"%d",&gravity);
    btm_updateDataCmd(num,rate,temperature,gravity);
    }
    return 0;
    }


    Tilt Hydrometer (Part 4) Advertising Packet Error?

    Summary

    This article discusses a detailed Bluetooth Capture using Linux and a Frontline Bluetooth Scanner.  With those tools I discover the cause of my bug.

    This series is broken up into the following 12 articles with a few additional possible articles. 

    Tilt Hydrometer (Part 1) Overview & Out-of-Box

    Tilt Hydrometer (Part 2) Architecture

    Tilt Hydrometer (Part 3) Advertising Scanner

    Tilt Hydrometer (Part 4) Advertising Packet Error?

    Tilt Hydrometer (Part 5) Tilt Simulator & Multi Advertising iBeacons

    Tilt Hydrometer (Part 6) Tilt Simulator an Upgrade

    Tilt Hydrometer (Part 7) Advertising Database

    Tilt Hydrometer (Part 8) Read the Database

    Tilt Hydrometer (Part 9) An LCD Display

    Tilt Hydrometer (Part 10) The Display State Machine

    Tilt Hydrometer (Part 11) Draw the Display Screens

    Tilt Hydrometer (Part 12) CapSense

    Tilt Hydrometer: LittleFS & SPI Flash (Part ?)

    Tilt Hydrometer: WiFi Introducer (Part ?)

    Tilt Hydrometer: WebServer (Part ?)

    Tilt Hydrometer: Amazon MQTT (Part ?)

    Tilt Hydrometer: Printed Circuit Board (Part ?)

    You can get the source code from git@github.com:iotexpert/Tilt2.git  This repository has tags for each of the articles which can be accessed with "git checkout part12"  You can find the Tilt Simulator at  git@github.com:iotexpert/TiltSimulator.git.


    Where is the Tilt?

    As I was trying to get the program running, I was faced with a problem that sent me down a serious serious rabbit hole.  The problem was that I could see the Tilts on the iPhone App, but they were not printing out on the screen.  But why?

    I ran Light Blue, but there are so many Bluetooth Devices in range that I couldn’t see a way to sort it out.

    What in the world is “hcidump”

    On Karl’s blog he writes that you should use hcitool and hcidump to view what is going on.  Well, I am mostly an embedded guys, but OK.

    I first install Linux on a Raspberry Pi 3B+ which has a Cypress CYW43455 WiFi Bluetooth Combo device onboard.  In this configuration the Bluetooth framework is split into a controller running on the CYW43455 and a Host Stack running on the Raspberry Pi Linux chip BCM2837B0.  The Host and the Controller communicate with each other through a UART.  The protocol that is used on that UART is called “HCI”

    Specifically, what Karl told you to do is:

    1. In one window tell the Bluetooth Controller to start looking for advertising packets “lesscan”
    2. In another windows, start snooping on the HCI bus and printing out the packets in hex

    In the picture below you can see that I first run “hcitool dev” to get a list of the Bluetooth Devices.  It turns on out the Raspberry Pi configuration that I have there is only one bluetooth device and it is called “hci0”.  Then I use “hcitool -i hci0 lescan” to send a command to the controller to start BLE scanning.  The hcitool command will report just the MAC address and possibly the name (if it happens to be in the advertising packet).  Its too bad that hcitool lescan doesn’t have a switch to display the advertising packets.

    In another window I run “sudo hcidump -R > out.txt”.  The hcidump command will “snoop” on the HCI uart and will print out all of the raw packets going between the host and the controller.   After a while, I open on the out.txt and start looking through the raw data to find my Tilt.  I recognize the Tilt by looking for the UUID in the iBeacon which is “A4 95 BB …”

    But what is all of the other stuff on that line?  For that answer we will need to dig through the Bluetooth core spec.  If you look in Volume 4 (HCI), Part A (UART Transport Layer), Chapter 1 (General) it starts with a nice picture of the system.

    Then in Chapter 2 (Protocol) it says:

    So, first byte, the 0x04 means that this is an “HCI Event Packet”, meaning this is something that happened on the controller which is going back to the Host.  In fact if you look at the log above you will see that the lines are preceded by a “>” which means packets coming into the Host.  Now we know that there is an event packet, so we follow further down into the spec in Part “E” which describes the event packet.

    The first byte, the “0x3E” is an event code and the 0x2A is the length of the packet (count from the 0x02 through to the end)

    Keep digging further down into the spec to find out what the “event code 0x3E” and you will find that it is a “LE Meta event”.

    OK so that means that the “02” is the “Subevent_Code”.  OK keep digging and you will find that the 02 Subevven_Code is “HCI_LE_Advertising_Report”.  Then it gives you a list of what data will follow.

    So, the 02 is an advertising report.  The 01 says that there is only 1 advertising report.  Q: Why is this a parameter?  A: Because the controller can save a few bytes by clubbing multiple advertising reports into 1 HCI packet.  Which it did not do in this case.

    Next is the 03 which is the “Event_Type[i]”.  In this case it says that this thing is non connectable undirected advertising. (more on this later)

    OK what about 01 …


    The 01 says that it is a random address and then the next 6 bytes is the MAC address.

    Now the 0x1E is the length of the data in the advertising packet

    The actual advertising pack is next.

    Recall the format from section 11.

    The 02 01 04 is the first field of the advertising packet and it represents

    • 02 – length of the field
    • 01 – «Flags»
    • 04 – flags

    You can find the 01 from the “Assigned numbers and GAP

    Then when you look in the Core Specification Supplement Part A section 1.3 you will find that the “4” means “BR/EDR not supported”

    The next field is 0x1A in length and a field type of “0xFF” – Ah…. manufacture specific data

    The 4C 00 is Apples Company Identifier Code.

    Which you can find on the Bluetooth Sig Company Identifiers page.

    From the previous article we know the rest is an iBeacon

    • 02 – iBeacon subtype
    • 0x15 – length
    • Then the A4…. is UUID which maps to a “Pink” Tilt

    Then we get the Temperature 0x004F (BIG ENDIAN!!!!) also known as 79 Degrees F (see Imperial… my people)

    Then the gravity 0x03FD also known as 1.021 – NOTICE THIS IS BIG ENDIAN!!!!

    Then transmit power C5 (also known as -59)

    Finally the RSSI 0xA5 which is also known as -91 (2’s complement 1 byte)

    Debugging the Linux Bluetooth

    I had a few problems getting this going which led me to the door of some interesting questions (which I won’t answer here).  But, here are the problems and solutions.

    Q1 When I “hcidump -R” I only get this:

    A1 You need to be root to see the raw data.  Run “sudo hcidump -R”

    Q2: I don’t see my device?

    A2: If you start the scan before your run the hcidump you might miss the device.  When you scan try running “hcitool lescan –duplicates” which will turn off duplicate filtering.

    Q3: I get “Set scan parameters failed: Input/output error”

    A3: I am not totally sure I have this right because I was not able to recreate the problem (which I had in spades when I started).  But, try doing a “sudo hciconfig hci0 down” followed by a “hciconfig hci0 up”

    Q4: I read that “hcitool” and “hcidump” are deprecated.

    A4: I read the same thing.  If you don’t have them try “sudo apt-get install bluez-tools”.  I would like to know the “real” answer to this question

    Q5: How does hcidump get the packets from the HCI?

    A5: I have no idea.  But I would like to know that answer to this question

    Q6: I tried “btmon”.  Does that work?

    A6: Yes

    Q7: What is the bluetoothd?

    A7: I dont know.

    Q8: Do hcidump and hcitools talk to the BluetoothD or do they talk to dbus or do they talk to the kernel through a socket?

    A8: I don’t know

    Q9: Why can’t I see the Tilt in my advertising scanner

    A9: Keep reading 🙂

    Frontline Bluetooth Scanner

    I can see the Tilt in the Linux and on the iPhone,  but I still can’t see it in my AnyCloud project.  Why?  The next thing that I did was get a Frontline Bluetooth Sniffer.  When I started capturing packets I could see the device.  Here is the “Tilt”

    And here is the “Tilt Repeater”

    Fix the Advertising Scanner

    After more digging I figured it out.  Remember from earlier that the Tilt advertises as “Non connectable”.  Well it turns out that when I built the advertising scanner I used the function “wiced_bt_ble_scan”.  This function was put into WICED to use for the connection procedure.  In other words it FILTERS devices that are non connectable.  In order to see those devices you need to call “wiced_bt_ble_observe”.  Wow that was a long article to explain that one little bug.  Oh well it was a fun learning experience.

    Tilt Hydrometer (Part 3) Advertising Scanner

    Summary

    In this article I will build the basic project and then add the scanner code to look for Tilt Hydrometers that are broadcasting the iBeacon.  It will decode the data and print out Gravity and Temperature.

    This series is broken up into the following 12 articles with a few additional possible articles. 

    Tilt Hydrometer (Part 1) Overview & Out-of-Box

    Tilt Hydrometer (Part 2) Architecture

    Tilt Hydrometer (Part 3) Advertising Scanner

    Tilt Hydrometer (Part 4) Advertising Packet Error?

    Tilt Hydrometer (Part 5) Tilt Simulator & Multi Advertising iBeacons

    Tilt Hydrometer (Part 6) Tilt Simulator an Upgrade

    Tilt Hydrometer (Part 7) Advertising Database

    Tilt Hydrometer (Part 8) Read the Database

    Tilt Hydrometer (Part 9) An LCD Display

    Tilt Hydrometer (Part 10) The Display State Machine

    Tilt Hydrometer (Part 11) Draw the Display Screens

    Tilt Hydrometer (Part 12) CapSense

    Tilt Hydrometer: LittleFS & SPI Flash (Part ?)

    Tilt Hydrometer: WiFi Introducer (Part ?)

    Tilt Hydrometer: WebServer (Part ?)

    Tilt Hydrometer: Amazon MQTT (Part ?)

    Tilt Hydrometer: Printed Circuit Board (Part ?)

    You can get the source code from git@github.com:iotexpert/Tilt2.git  This repository has tags for each of the articles which can be accessed with "git checkout part12"  You can find the Tilt Simulator at  git@github.com:iotexpert/TiltSimulator.git.


    Build the Basic Project

    Start by making a new project using the CY8CKIT-062S2-43012.  I chose this kit because that was the one sitting on my desk at the time.  Any of the kits with the Arduino headers where I can plug in the TFT will work.

    I typically start from the IoT Expert FreeRTOS NTShell Template.  Ill do that here as well.  Notice that I call the project Tilt2.  You can find this project on GitHub.  git@github.com:iotexpert/Tilt2.git .  I will also be putting in tags for each article so you can look at the code for each article.  To see the tags do “git tags”

    After the project is made run “make modlibs” so that you can add some libraries.  Specifically the bluetooth-freertos and btstack libraries.

    Now that I have all of the libraries I need, run “make vscode” to build the project files for vscode.

    If you remember from the architecture diagram, I will have a task to manage the bluetooth world.  Inside of the btutil library I have a template to start with.  It also includes the stuff you need in main.c to start the stack.

    You need to make two changes to the Makefile.  Well you dont have to change the name of the App … but I typically do.  You do need to add the FREERTOS and WICED_BLE components to your project.

    APPNAME=Tilt2
    ....
    COMPONENTS=FREERTOS WICED_BLE

    Now, edit main.c to include some stuff.

    #include "bluetoothManager.h"
    #include "cycfg_bt_settings.h"
    #include "bt_platform_cfg_settings.h"

    And start the bluetooth stack.

        cybt_platform_config_init(&bt_platform_cfg_settings);
    wiced_bt_stack_init (app_bt_management_callback, &wiced_bt_cfg_settings);

    You need to get the bluetooth configuration files.  To do that run the Bluetooth Configurator by running “make config_bt”.  Click the paper to make a new configuration.

    Pick out the PSoC6 MCU with 43xxxx Connectivity.

    Go to the GAP Settings tab and add the Observer configuration

    Then set the low duty scan parameters to 60ms and turn off the timeout.

    Save your configuration.  Notice that I call it tilt2.

    Make sure that everything works with a build it and program.  You will have a working shell, blinking LED and the Bluetooth Task started.  Here is what the output looks like.

    iBeacon Packet Format

    On the Tilt Hydrometer FAQ they give you a link to Karl Urdevics blog where he describes the way that the Tilt works.  Pretty simple, each Tilt Hydrometer is hardcoded to a color.  Each “color” sends out an iBeacon with the Temperature, Gravity and Transmit Power.  iBeacon is just an Apple specified format for a BLE advertising packet.  You can read about the format of the BLE advertising packet here.  But, in summary, a BLE device can advertise up to 31 bytes of data.  That data is divided into fields of the following form:

    There are a bunch of specific format types.  However, the one that we are looking for is the iBeacon format.  This format was defined by Apple and is implemented as data in the “«Manufacturer Specific Data»” which has the field code 0xFF.  The Manufacturer Specific Data field type is divided into

    • 16-bit Manufacturers ID
    • Data

    For the iBeacon the Manufacturer ID is 0X004C – which is Apple’s ID.  They further subdivided the data.  Here is the complete format of that data.

    Bytes Data Name Comment
    1 0xFF Manufacturer Data Bluetooth GAP Assigned Number
    1 0x1A Length of Field
    2 0×04 0x0C Manufacturers' UUID Apples Bluetooth Manufacturer ID
    1 02 Apple defined 0x02=Subtype iBeacon
    1 0×15 Length Apple defined length
    16 ???? UUID The universally unique identifier for the data type of the iBeacon (these are defined by Tilt)
    2 ???? Major Value Gravity in 1/1000 of SG
    2 ???? Minor Value Temperature in degrees F (yup, Imperial!)
    1 ?? Signal Power dBm Transmit Power as measured at 1m

    It turns out that Tilt “hardcodes” the UUID during manufacturing for the color of the Tilt (remember each Tilt is one of 8 colors)

    Red:    A495BB10C5B14B44B5121370F02D74DE
    Green:  A495BB20C5B14B44B5121370F02D74DE
    Black:  A495BB30C5B14B44B5121370F02D74DE
    Purple: A495BB40C5B14B44B5121370F02D74DE
    Orange: A495BB50C5B14B44B5121370F02D74DE
    Blue:   A495BB60C5B14B44B5121370F02D74DE
    Yellow: A495BB70C5B14B44B5121370F02D74DE
    Pink:   A495BB80C5B14B44B5121370F02D74DE

    Add Advertising Observer

    Now that we have a working project template, and we know what we are looking for in the BLE advertising land, I’ll setup some data structures to map of the colors and UUIDs.

    #define TILT_IBEACON_HEADER_LEN 20
    #define TILT_IBEACON_DATA_LEN 5
    typedef struct  {
    char *colorName;
    uint8_t uuid[TILT_IBEACON_HEADER_LEN];
    } tilt_t;
    // Apple Bluetooth Company Code 0x004C
    // iBeacon Subtype = 0x02
    // Length = 0x15
    #define IBEACON_HEADER 0x4C,0x00,0x02,0x15
    static tilt_t tiltDB [] =
    {
    {"Red",    {IBEACON_HEADER,0xA4,0x95,0xBB,0x10,0xC5,0xB1,0x4B,0x44,0xB5,0x12,0x13,0x70,0xF0,0x2D,0x74,0xDE}},
    {"Green" , {IBEACON_HEADER,0xA4,0x95,0xBB,0x20,0xC5,0xB1,0x4B,0x44,0xB5,0x12,0x13,0x70,0xF0,0x2D,0x74,0xDE}},
    {"Black" , {IBEACON_HEADER,0xA4,0x95,0xBB,0x30,0xC5,0xB1,0x4B,0x44,0xB5,0x12,0x13,0x70,0xF0,0x2D,0x74,0xDE}},
    {"Purple", {IBEACON_HEADER,0xA4,0x95,0xBB,0x40,0xC5,0xB1,0x4B,0x44,0xB5,0x12,0x13,0x70,0xF0,0x2D,0x74,0xDE}},
    {"Orange", {IBEACON_HEADER,0xA4,0x95,0xBB,0x50,0xC5,0xB1,0x4B,0x44,0xB5,0x12,0x13,0x70,0xF0,0x2D,0x74,0xDE}},
    {"Blue"  , {IBEACON_HEADER,0xA4,0x95,0xBB,0x60,0xC5,0xB1,0x4B,0x44,0xB5,0x12,0x13,0x70,0xF0,0x2D,0x74,0xDE}},
    {"Yellow", {IBEACON_HEADER,0xA4,0x95,0xBB,0x70,0xC5,0xB1,0x4B,0x44,0xB5,0x12,0x13,0x70,0xF0,0x2D,0x74,0xDE}},
    {"Pink"  , {IBEACON_HEADER,0xA4,0x95,0xBB,0x80,0xC5,0xB1,0x4B,0x44,0xB5,0x12,0x13,0x70,0xF0,0x2D,0x74,0xDE}},
    };
    #define NUM_TILT (sizeof(tiltDB)/sizeof(tilt_t))

    Then I will create and advertising callback that will

    • Look for the manufacturer specific data field in the advertising packet
    • If the length of that field is 25 then we have found a possible iBeacon
    • Loop through the different possible Tilt’s
    • Compare the data in the advertising packet against the data + UUID in the packet
    • If it matches then decode the Gravity, txPower and Temperature and print it
    static void btm_advScanResultCback(wiced_bt_ble_scan_results_t *p_scan_result, uint8_t *p_adv_data )
    {
    if (p_scan_result == 0)
    return;
    uint8_t mfgFieldLen;
    uint8_t *mfgFieldData;
    mfgFieldData = wiced_bt_ble_check_advertising_data(p_adv_data,BTM_BLE_ADVERT_TYPE_MANUFACTURER,&mfgFieldLen);
    if(mfgFieldData && mfgFieldLen == TILT_IBEACON_HEADER_LEN + TILT_IBEACON_DATA_LEN)
    {
    for(int i=0;i<NUM_TILT;i++)
    {
    if(memcmp(mfgFieldData,tiltDB[i].uuid,TILT_IBEACON_HEADER_LEN)==0)
    {
    float gravity = ((float)((uint16_t)mfgFieldData[22] << 8 | (uint16_t)mfgFieldData[23]))/1000;
    int temperature = mfgFieldData[20] << 8 | mfgFieldData[21];
    int8_t txPower = mfgFieldData[24];
    printf("Found Color=%s Gravity=%f Temperature = %d txPower=%d\n",tiltDB[i].colorName,gravity,temperature,txPower);
    break;
    }
    }
    }
    }

    In the Bluetooth Management callback I want to turn on scanning (actually observing).

            case BTM_ENABLED_EVT:
    if (WICED_BT_SUCCESS == p_event_data->enabled.status)
    {
    wiced_bt_ble_observe(WICED_TRUE, 0,btm_advScanResultCback);
    }
    else
    {
    printf("Error enabling BTM_ENABLED_EVENT\n");
    }

    To test this thing I brought a black tilt into my office.  As soon as the PSoC saw it, packets starting coming out on the screen about once per second.  The first thing to notice is that they broadcast some crazy data at the start.  That means I should be careful with the error checks (something which if you are a reader you know that I am not always perfect 🙂 .  It is also interesting to see that they broadcast 5 packets at 5dBm, then 5 at -59dBm.

    Now that we have data coming out, in the next article Ill address a couple of funky things that I noticed.

    Tilt Hydrometer (Part 2) Architecture

    Summary

    This article is a walk through of the architecture of the PSoC 6 – AnyCloud firmware which I will implement for my Tilt Hydrometer IoT application

    This series is broken up into the following 12 articles with a few additional possible articles. 

    Tilt Hydrometer (Part 1) Overview & Out-of-Box

    Tilt Hydrometer (Part 2) Architecture

    Tilt Hydrometer (Part 3) Advertising Scanner

    Tilt Hydrometer (Part 4) Advertising Packet Error?

    Tilt Hydrometer (Part 5) Tilt Simulator & Multi Advertising iBeacons

    Tilt Hydrometer (Part 6) Tilt Simulator an Upgrade

    Tilt Hydrometer (Part 7) Advertising Database

    Tilt Hydrometer (Part 8) Read the Database

    Tilt Hydrometer (Part 9) An LCD Display

    Tilt Hydrometer (Part 10) The Display State Machine

    Tilt Hydrometer (Part 11) Draw the Display Screens

    Tilt Hydrometer (Part 12) CapSense

    Tilt Hydrometer: LittleFS & SPI Flash (Part ?)

    Tilt Hydrometer: WiFi Introducer (Part ?)

    Tilt Hydrometer: WebServer (Part ?)

    Tilt Hydrometer: Amazon MQTT (Part ?)

    Tilt Hydrometer: Printed Circuit Board (Part ?)

    You can get the source code from git@github.com:iotexpert/Tilt2.git  This repository has tags for each of the articles which can be accessed with "git checkout part12"  You can find the Tilt Simulator at  git@github.com:iotexpert/TiltSimulator.git.


    Story

    I started this whole thing by just writing some code without really thinking about the architecture too much.   I had been wanting to try the Bluetooth SDK inside of AnyCloud and I was just focused on how that worked inside of the PSoC 6.  As I wrote the code, I naturally implemented with a common design pattern of

    1. Individual tasks have responsibility for a specific hardware block
    2. Each task has a command queue to which other tasks can send commands
    3. Tasks that need to have data fed to them by other tasks have a data queue

    As I worked on the code and things started to get a bit more involved I decided that I had better draw a picture of the system.  This picture served two main purposes.

    1. It kept me on track
    2. I knew that I was going to need it for this series of articles

    Here is the architecture of what I have implemented for this series of articles.  As of this writing I have not started started not the wifi or the file system part of the implementation but I think that my design will work.

    The system has 7 tasks:

    Task Role
    Bluetooth Manager Listens for advertising packets in the correct format.  When it finds them it submits the data to the Tilt Data Manager
    Tilt Data Manager A database of all of the "Tilt" data
    NTShell A serial command line to control the system
    Display Manager A task to handle all of the ST7789V display functions
    CapSense Manager Responsibility for reading capsense buttons and the slider and sending commands to the display task
    File System Manager Responsibility for writing data to the SD Card and possibly the SPI flash
    WiFi Manager An MQTT interface to the internet (maybe)

    There are two places in the picture above where my lines have to cross, something that I really hate.  So I decided to try a different picture to explain the system.  The picture below describes the tasks, what data they own, what hardware they own, what the inputs are and what the outputs are.

    In the next article Ill start the basic project and create an advertising observer.

    Tilt Hydrometer (Part 1) Overview & Out-of-Box

    Summary

    A discussion of a new series of articles about using the PSoC 6 + 43XXXX Wifi/Bluetooth combo chips to implement a data collection system for the Tilt2 Hydrometer.  Even if you aren’t specifically interested in hydrometers, this is a general purpose discussion of the design of an IoT device.

    Story

    In the middle of the Covid lockdown my 21-year-old daughter suggested that we start brewing beer.  This was always something that I have been interested in so I said “Sure!”.  What does this have to do with IoT you might ask?  I am an engineer and I love data.  Two of the key pieces of data that you are interested in while fermenting beer are:

    • The gravity of the beer
    • The temperature of the beer

    If you don’t know anything about brewing beer, it is simple (people have been doing it a long time… even with no IoT)

    1. Start with grain
    2. Mill the grain
    3. Heat the grain with water to turn it into sugar water (called wort)
    4. Add yeast
    5. Wait while the yeast converts the sugar in the wort into alcohol and carbon dioxide
    6. Bottle the beer (or keg)
    7. Drink

    Back to the metrics.  The “specific gravity” or just “gravity” is just the ratio of the density of your solution to plain water.  This is an indication of sugar in the wort solution.  At the start of the fermentation you will have “lots” of sugar, and no alcohol.  By the end you will have “lots” of alcohol and not much sugar.  You can tell how things are going by monitoring the gravity of the beer, which is a proxy metric for how much sugar has been converted to alcohol.

    There are two common ways to measure the gravity:

    • A float hydrometer – sugar water is denser then water, so a “float” will float lower in the solution as the sugar gets converted to alcohol.
    • A refractometer – the index of refraction of the solution changes as the sugar concentration changes (this is an amazing old-school technology

    As I was learning about this whole process I found the tilt hydrometer.  This device has

    As the gravity of the beer changes, the device floats at a different angle (because it floats lower/higher).  They use the accelerometer to measure the apparent angle of gravity to calculate the angle of the device.  This angle is then used to calculate the density of the solution it is floating in.  They then broadcast the calculated gravity and temperature in Apple Bluetooth iBeacon format.

    When I saw this, I thought “perfect” I know what to do with that.  I should build a device that can collect all of the data, display it, save it to an SPI flash and put it into the cloud.  It should look something like this: (each Tilt is identified by 1 of 8 colors… pink in this case).

    Yes, I know they have an iPhone app, but I want to build a single device that sits in my brewery all of the time.  And yes I know they have a Raspberry Pi app, but that isn’t the point.

    My device will have the following characteristics:

    A Display with:

    • A Splash Screen
    • A Table of all Tilts, Gravity and Temperature
    • Single: One screen per tilt with the specific data including debugging
    • Single: A graph of the active data for one specific tilt
    • Single: A table of all of the recordings from that specific tilt
    • The WiFi Status
    • The Bluetooth Status

    Bluetooth System that can:

    • Record tilt data as broadcast in iBeacon advertising packets
    • Repeat tilt data (maybe)
    • Introducer WiFi (probably)

    CapSense button GUI to:

    • Next Screen
    • Auto Mode
    • Reset current
    • Dump recorded data to the SD Card

    Command Line

    • A UART based command line to debug & learn

    USB

    • Mass Storage to see files
    • USB <-> UART Bridge

    Power Supply via USB Port

    • Plug in Type-C using Cypress BCR

    WiFi

    • MQTT Publish to AWS
    • NTP – to find the time
    • Local webserver
    • MDNS

    RTC

    • Keep Track of current Time

    SPI NOR Flash

    • Record the data

    SD CARD

    • Dump the fixed SPI Flash  recordings to a removable SD CARD & remove data from the SPI Flash

    Here is another picture of what I am thinking (well actually what I implemented for this series of articles)

    Un-boxing

    To get this show on the road, I ordered three tilts and two repeaters from Baron Brew Equipment.

    It included a neat little quick start picture showing how to get going.

    Then the box of goodies.

    There are 8-possible tilts, Red, Green, Orange, Blue, Black, Yellow, Purpose and Pink (each Tilt his “hardcoded” to identify itself as a specific color)

    Tilt Hydrometer

    Here is a picture of the “blue” one (notice I put the wrong box in the picture)

    The tilt comes in a plastic tube.  Which has a label to remind you to take it out of the tube (my experience is that you should be embarrassed to have to read most warning labels 🙂 )

    It is about 100mm long (about 4 inches).  The bluetooth module is at the top, U3 is the temperature sensor and U2 (which is under the black 3-d printed plastic) is the accelerometer.

    Repeater

    If you put a Bluetooth device floating in a bunch of beer, surrounded by a metal fermentation container, you will not be able to hear the Bluetooth signal.  To solve this problem the Tilt people made a repeater which can rest on the top of the fermenter.  It listens for the weak signal, then rebroadcasts with a higher gain antenna.

    Here is a picture of the repeater.  Notice that it uses the BMD-301 which has an external SMA antenna.

    It also comes in a nice plastic tube.

    The repeater can only re-broadcast one color at a time.  The button to switches between the 8 colors and off.

    Each time you press the button the 3-color LED lights up with the color that represents which tilt color that it is repeating. Red->Green->… Pink->Off

    It also has a huge rechargeable battery.

    The Plan

    Here is a list of the articles that I plan to write

    This series is broken up into the following 12 articles with a few additional possible articles. 

    Tilt Hydrometer (Part 1) Overview & Out-of-Box

    Tilt Hydrometer (Part 2) Architecture

    Tilt Hydrometer (Part 3) Advertising Scanner

    Tilt Hydrometer (Part 4) Advertising Packet Error?

    Tilt Hydrometer (Part 5) Tilt Simulator & Multi Advertising iBeacons

    Tilt Hydrometer (Part 6) Tilt Simulator an Upgrade

    Tilt Hydrometer (Part 7) Advertising Database

    Tilt Hydrometer (Part 8) Read the Database

    Tilt Hydrometer (Part 9) An LCD Display

    Tilt Hydrometer (Part 10) The Display State Machine

    Tilt Hydrometer (Part 11) Draw the Display Screens

    Tilt Hydrometer (Part 12) CapSense

    Tilt Hydrometer: LittleFS & SPI Flash (Part ?)

    Tilt Hydrometer: WiFi Introducer (Part ?)

    Tilt Hydrometer: WebServer (Part ?)

    Tilt Hydrometer: Amazon MQTT (Part ?)

    Tilt Hydrometer: Printed Circuit Board (Part ?)

    You can get the source code from git@github.com:iotexpert/Tilt2.git  This repository has tags for each of the articles which can be accessed with "git checkout part12"  You can find the Tilt Simulator at  git@github.com:iotexpert/TiltSimulator.git.


    AnyCloud Bluetooth Advertising Scanner (Part 10)

    Summary

    We have finally reached the end of the AnyCloud Bluetooth Advertising Scanner.  In this article I will add the ability to sort the database.  In addition I will add the ability to purge a device.  And finally, truly finally, a bit of commentary.

    Story

    I originally built this program to help me learn about the AnyCloud Bluetooth SDK.  Well, originally I built this functionality to try to find and talk to a specific device (in an upcoming series).  The problem is that there are so many devices at my house that are blasting out so much data it is hard to see what I am looking for.  What I realized would help is add the ability to sort the devices from newest to oldest.  In addition I noticed that occasionally my database would fill up… and it would be nice to purge out old entries.  So that is what we are going to do.

    There are

    Article Topic
    AnyCloud Bluetooth Advertising Scanner (Part 1) Introduction to AnyCloud Bluetooth Advertising
    AnyCloud Bluetooth Advertising Scanner (Part 2) Creating an AnyCloud Bluetooth project
    AnyCloud Bluetooth Advertising Scanner (Part 3) Adding Observing functionality to the project
    AnyCloud Bluetooth Utilities Library A set of APIs for enhancement of the AnyCloud Library
    AnyCloud Bluetooth Advertising Scanner (Part 4) Adding a command line to the scanner
    AnyCloud Bluetooth Advertising Scanner (Part 5) Adding a history database to the scanner
    AnyCloud Bluetooth Advertising Scanner (Part 6) Decoding advertising packets
    AnyCloud Bluetooth Advertising Scanner (Part 7) Adding recording commands to the command line
    AnyCloud Bluetooth Advertising Scanner (Part 8) Adding filtering to the scanner
    AnyCloud Bluetooth Advertising Scanner (Part 9) Improve the print and add packet age
    AnyCloud Bluetooth Advertising Scanner (Part 10) Sort the database

    All of the code can be found at git@github.com:iotexpert/AnyCloudBLEScanner.git and https://github.com/iotexpert/AnyCloudBLEScanner.git

    There are git tags in place starting at part 5 so that you can look at just that version of the code.  "git tag" to list the tags.  And "git checkout part6" to look at the part 6 version of the code.

    You can also create a new project with this is a template if you have the IoT Expert Manifest Files installed

    Fix the Database Data Structure

    You might remember that the database was built as an array of structures.  This mean that any moving around of the data would be a require a replacement of the whole structure.

    static adb_adv_t adb_database[ADB_MAX_SIZE];

    To fix this problem I moved the database to a an array of pointers.

    static adb_adv_t *adb_database[ADB_MAX_SIZE];

    To support this, when I see a new device I malloc a block of memory to hold the actual structure.

        // If it is NOT found && you have room
    if(entry == -1)
    {
    adb_database[adb_db_count] = malloc(sizeof(adb_adv_t));

    Then I had to fix all of the references to the structure.  And there were a bunch (actually 43 of them).  But the replacement was pretty simple

    adb_database[…].xxx is replaced by adb_database[…]-> …. here are the three different cases

    case 1: adb_database[adb_db_count].

    case 2: adb_database[entry].

    case 1: adb_database[i].

    That was actually way less painful that I thought it was going to be.  Probably what would actually be best is a library of these data structures with an API that would not have changed when the key changed, but that I suppose, is for another day.

    Add Two New Commands

    Now I add the sort and purge commands to my command list.

    typedef enum {
    ADB_ADD,
    ADB_PRINT_RAW,
    ADB_PRINT_DECODE,
    ADB_WATCH,
    ADB_ERASE,
    ADB_RECORD,
    ADB_FILTER,
    ADB_SORT,
    ADB_PURGE,
    } adb_cmd_t;
    

    Create the Sort Functionality

    To sort, I will use the c-standard library function qsort.  It requires a function that compares two entries a/b and returns

    1. a negative number of a<b
    2. 0 if a=b
    3. a positive number if a>b

    Here is the function.  Hey Hassane you like those pointers?

    static int adb_sort_cmpfunc(const void * a, const void * b) 
    {
    adb_adv_t *p1 = *((adb_adv_t **)a);
    adb_adv_t *p2 = *((adb_adv_t **)b);
    return p2->lastSeen - p1->lastSeen;
    }

    The sort is actually really simple now.  Just a call to sort (then I decided to print out the table)

                    case ADB_SORT:
    qsort(adb_database, adb_db_count, sizeof(adb_adv_t *), adb_sort_cmpfunc);
    adb_db_print(ADB_PRINT_METHOD_BYTES,true,-1);
    break;

    Now instead of this….

    I get this…

    Create the Purge Functionality

    The purge function needs to do two things

    1. Free all of the memory from an entry
    2. Move the pointers so that the “purged” entry is gone.

    First I erase all of the data in the linked list with the adb_eraseEntry function.

    Then I free the head of the list

    Then I free the actual structure

    Then I move all of the pointers to squeeze the able.

    static void adb_purgeEntry(int entry)
    {
    adb_eraseEntry(entry);
    free(adb_database[entry]->list);
    free(adb_database[entry]->result);
    free(adb_database[entry]);
    adb_db_count -= 1;
    for(int i=entry;i<adb_db_count;i++)
    {
    adb_database[i] = adb_database[i+1];
    }
    }
    

    And you need to add the actual command.

                    case ADB_PURGE:
    if((int)msg.data0<0 || (int)msg.data0>=adb_db_count)
    {
    printf("Purge error %d\n",(int)msg.data0);
    break;
    }   
    adb_purgeEntry((int)msg.data0);
    break;

    The End & Commentary

    I would like to add and maybe will one day:

    1. A connect function with a GATT browser
    2. A smarter way to deal with the fact that device change addresses

    Finally a couple of comments about this

    1. You might notice that I don’t check very many possible errors.  I do this in the interest of simpler to read code.  This is a tradeoff that I make for “teaching” code.  I hope that you understand that if you want to do something like this in a real product that you need to be much more careful.
    2. I don’t have unit testing.  This falls into the same category as the error checking.  Really this is a bad idea as code without unit testing is obsolete the second it comes out of your fingers.  But, it is easier to read.
    3. I don’t have many comments.  This is something that my colleagues bitch about all of the time with me.  And I know that it must be a personality defect.
    4. I use malloc/free all over the place.  This is a religious war.  You can make a static allocation scheme, but it would be really complicated in this case.  I personally think that the tradeoff of using a battle worn and tested malloc/free is totally worthwhile against the complexity of custom static memory allocation schemes.