Summary
This article updates the display system in my Tilt Hydrometer project to actually display useful information.
This series is broken up into the following 12 articles with a few additional possible articles.
Tilt Hydrometer (Part 1) Overview & Out-of-Box
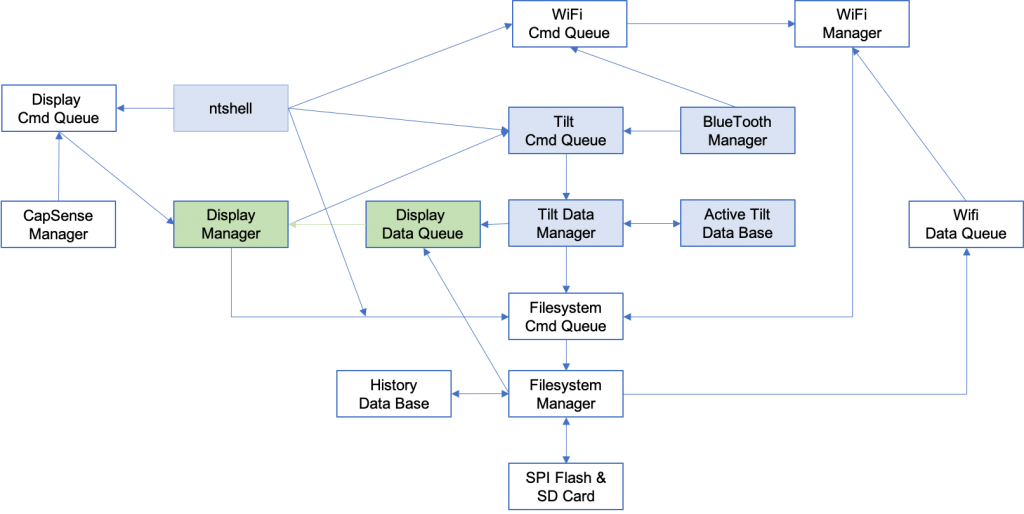
Tilt Hydrometer (Part 2) Architecture
Tilt Hydrometer (Part 3) Advertising Scanner
Tilt Hydrometer (Part 4) Advertising Packet Error?
Tilt Hydrometer (Part 5) Tilt Simulator & Multi Advertising iBeacons
Tilt Hydrometer (Part 6) Tilt Simulator an Upgrade
Tilt Hydrometer (Part 7) Advertising Database
Tilt Hydrometer (Part 8) Read the Database
Tilt Hydrometer (Part 9) An LCD Display
Tilt Hydrometer (Part 10) The Display State Machine
Tilt Hydrometer (Part 11) Draw the Display Screens
Tilt Hydrometer (Part 12) CapSense
Tilt Hydrometer: LittleFS & SPI Flash (Part ?)
Tilt Hydrometer: WiFi Introducer (Part ?)
Tilt Hydrometer: WebServer (Part ?)
Tilt Hydrometer: Amazon MQTT (Part ?)
Tilt Hydrometer: Printed Circuit Board (Part ?)
You can get the source code from git@github.com:iotexpert/Tilt2.git This repository has tags for each of the articles which can be accessed with "git checkout part12" You can find the Tilt Simulator at git@github.com:iotexpert/TiltSimulator.git.
This article will continue to edit the display manager task
Story
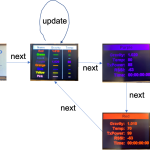
In the last article I built all of the infrastructure to make the state machine work. Now it is time to draw some actual graphics and get this puppy displaying some data. Remember that I want three screens
- The Splash Screen with the IoT Expert Logo

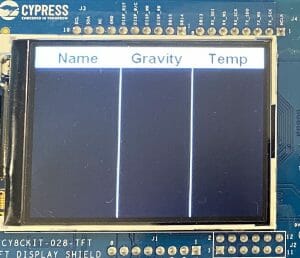
2. The Table Screen with a table of Gravity and Temperature for the 8 Tilts

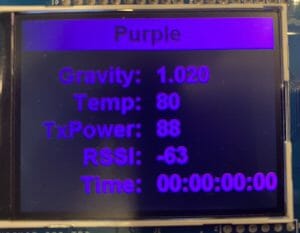
3. A detail screen. One per Tilt with more information drawn in the same color as the Tilt.
From the last post you might remember that you need to write 4 functions to implement a new screen
- precheck – returns true if it is legal to come to that screen
- init – draw the initial data (like the table outline)
- update – to update the data on the screen
- sequence – up move to the next subscreen e.g. purple –> red
Splash Screen
First the splash screen. The pre-check function returns true because you are always allowed to “go” to this screen. The initialization function draws all of the screen (as it is static). Basically sets the background to white, clears the screen (which actually turns it white) then draws the bitmap. There is nothing to do in the update or the sequence functions.
////////////////////////////////////////////////////////////////////////////////
//
// Splash
//
////////////////////////////////////////////////////////////////////////////////
static bool dm_displayScreenSplashPre()
{
    return true;
}

static void dm_displayScreenSplashInit()
{
    GUI_SetBkColor(GUI_WHITE);
    GUI_Clear();
    GUI_DrawBitmap(&bmIOTexpert_Logo_Vertical320x240,0,17);

}
static void dm_displayScreenSplashUpdate()
{
}

static bool dm_displayScreenSplashSeq()
{
    return true;
}
Table Screen
The table screen precheck and sequence functions say “true”, meaning it is always OK to come to this screen and it is always OK to leave this screen.
static bool dm_displayScreenTablePre()
{
    return true;
}

static bool dm_displayScreenTableSeq()
{
    return true;
}
The initialization function draws the header and the two lines.
First of all it sets the location of the graphics with #defines. The actual function goes on to use that information and draw the picture. Self explanatory.
#define TABLE_FONT (GUI_FONT_24B_ASCII)
#define TABLE_BGCOLOR (GUI_BLACK)
#define TABLE_HEAD_BGCOLOR (GUI_WHITE)

#define TABLE_NAME_LEFT_X (0)
#define TABLE_GRAV_LEFT_X (120)
#define TABLE_TEMP_LEFT_X (220)

#define TABLE_NAME_RIGHT_X (119)
#define TABLE_GRAV_RIGHT_X (219)
#define TABLE_TEMP_RIGHT_X (319)

#define TABLE_NAME_CENTER_X (TABLE_NAME_LEFT_X+(TABLE_NAME_RIGHT_X-TABLE_NAME_LEFT_X)/2)
#define TABLE_GRAV_CENTER_X (TABLE_GRAV_LEFT_X+(TABLE_GRAV_RIGHT_X-TABLE_GRAV_LEFT_X)/2)
#define TABLE_TEMP_CENTER_X (TABLE_TEMP_LEFT_X+(TABLE_TEMP_RIGHT_X-TABLE_TEMP_LEFT_X)/2)

static void dm_displayScreenTableInit()
{
    GUI_SetColor(TABLE_HEAD_BGCOLOR);
    GUI_SetBkColor(TABLE_BGCOLOR);
    GUI_SetFont(TABLE_FONT);
    GUI_Clear();

    GUI_FillRect(0,0,320,GUI_GetFontSizeY()+ TOP_MARGIN);

    GUI_SetTextMode(GUI_TM_REV);
    GUI_SetTextAlign(GUI_TA_CENTER);
    GUI_DispStringHCenterAt("Name",TABLE_NAME_CENTER_X,TOP_MARGIN);
    GUI_DispStringHCenterAt("Gravity",TABLE_GRAV_CENTER_X,TOP_MARGIN);
    GUI_DispStringHCenterAt("Temp",TABLE_TEMP_CENTER_X,TOP_MARGIN);

    GUI_DrawLine(TABLE_NAME_RIGHT_X,0,TABLE_NAME_RIGHT_X,240);
    GUI_DrawLine(TABLE_GRAV_RIGHT_X,0,TABLE_GRAV_RIGHT_X,240);
}
The update will:
- set the graphics configuration
- iterate through the list of Tilts
- If it is active then it will get the data
- sprintf it into a buffer than display it.
- If it is not active then display a “–“
static void dm_displayScreenTableUpdate()
{

    uint32_t activeTilts =tdm_getActiveTiltMask();

    char buff[64];

    GUI_SetColor(TABLE_HEAD_BGCOLOR);
    GUI_SetBkColor(TABLE_BGCOLOR);

    GUI_SetFont(TABLE_FONT);
    GUI_SetTextMode(GUI_TEXTMODE_NORMAL);
    GUI_SetTextAlign(GUI_TA_CENTER);

    int row;
    for(int i=0;i<tdm_getNumTilt();i++)
    {
        row = i+1;

        GUI_SetColor(tdm_colorGUI(i));
        GUI_DispStringHCenterAt(tdm_getColorString(i), TABLE_NAME_CENTER_X, ROW_Y(row));

        if(1<<i & activeTilts)
        {

            tdm_tiltData_t *response = tdm_getTiltData(i);

            sprintf(buff,"%1.3f",response->gravity);
            GUI_DispStringHCenterAt(buff, TABLE_GRAV_CENTER_X, ROW_Y(row));
            sprintf(buff,"%02d",response->temperature);
            GUI_DispStringHCenterAt(buff, TABLE_TEMP_CENTER_X, ROW_Y(row));

            free(response);
        }
        else
        {
            GUI_DispStringHCenterAt("-----", TABLE_GRAV_CENTER_X, ROW_Y(row));
            GUI_DispStringHCenterAt("--", TABLE_TEMP_CENTER_X, ROW_Y(row));

        }
    }
}
The only little bit of trickiness is that I defined a macro to calculate the y position on the screen. Specifically I divided the screen into “rows” starting at 0 based on the height of the font plus the margin between the rows plus whatever the offset at the top of the screen (the top margin)
#define TOP_MARGIN (4)
#define LINE_MARGIN (2)
#define ROW_Y(row) (TOP_MARGIN + (row)*(LINE_MARGIN+GUI_GetFontSizeY()))
Single Screen
The single screen is a bit more interesting. First of all you are only allowed to go to this screen if there is at least one Tilt that is active. The next thing is that I want the first time you go to this screen to go to the first active tilt.
static tdm_tiltHandle_t currentSingle = 0xFF;

static bool dm_displaySinglePre()
{
    uint32_t activeTilts =tdm_getActiveTiltMask();
    if(activeTilts == 0)
        return false;

    for(int i=0;i<tdm_getNumTilt();i++)
    {
        if(1<<i & activeTilts)
        {
            currentSingle = i;
            break;
        }
    }

    return true;
}
The initialization function
- Clears the screen
- Asks for the color of the current Tilt (so that all of the text is drawn using that color)
- Draws the header
- Draws the labels
static void dm_displaySingleInit()
{
    GUI_SetBkColor(GUI_BLACK);
    GUI_SetFont(GUI_FONT_32B_ASCII);
    GUI_Clear();

    GUI_SetColor(tdm_colorGUI(currentSingle));

    GUI_FillRect(0,0,320,ROW_Y(1));

    GUI_SetTextAlign(GUI_TA_LEFT);
    GUI_SetTextMode(GUI_TM_REV);
    GUI_DispStringHCenterAt(tdm_getColorString(currentSingle), CENTER_X,ROW_Y(0) );

    GUI_SetTextMode(GUI_TM_NORMAL);
    GUI_SetTextAlign(GUI_TA_RIGHT | GUI_TA_VCENTER);

    GUI_DispStringAt("Gravity: ", SINGLE_LABEL_X,ROW_Y(SINGLE_GRAV_ROW) );
    GUI_SetTextAlign(GUI_TA_RIGHT | GUI_TA_VCENTER);
    GUI_DispStringAt("Temp: ",    SINGLE_LABEL_X,ROW_Y(SINGLE_TEMP_ROW) );
    GUI_SetTextAlign(GUI_TA_RIGHT | GUI_TA_VCENTER);
    GUI_DispStringAt("TxPower: ", SINGLE_LABEL_X,ROW_Y(SINGLE_TXPOWER_ROW) );
    GUI_SetTextAlign(GUI_TA_RIGHT | GUI_TA_VCENTER);
    GUI_DispStringAt("RSSI: ",    SINGLE_LABEL_X,ROW_Y(SINGLE_RSSI_ROW) );
    GUI_SetTextAlign(GUI_TA_RIGHT | GUI_TA_VCENTER);
    GUI_DispStringAt("Time: ",    SINGLE_LABEL_X,ROW_Y(SINGLE_TIME_ROW) );

}
The update function basically sets the font and color (just to make sure) then it gets the data, formats it into a string and displays it. When I wrote this function originally I wasn’t sure if this would ever be called in a situation where there is no data, so I handled that with the “—-“, but I don’t think that branch is actually ever used.
static void dm_displaySingleUpdate()
{

    uint32_t activeTilts =tdm_getActiveTiltMask();

    char gravString[10];
    char tempString[10];
    char txPowerString[10];
    char rssiString[10];
    char timeString[64];

    GUI_SetBkColor(GUI_BLACK);
    GUI_SetFont(GUI_FONT_32B_ASCII);
    GUI_SetColor(tdm_colorGUI(currentSingle));

    if(1<<currentSingle & activeTilts)
    {
        tdm_tiltData_t *response = tdm_getTiltData(currentSingle);
        sprintf(gravString,"%1.3f",response->gravity);
        sprintf(tempString,"%02d",response->temperature);
        sprintf(txPowerString,"%d",response->txPower);
        sprintf(rssiString,"%2d",response->rssi);

        int seconds = (xTaskGetTickCount()/1000- response->time);
        int days = seconds/(24*60*60);
        seconds = seconds - days*(24*60*60);
        int hours = seconds/(60*60);
        seconds = seconds - hours*(60*60);
        int minutes = seconds/60;
        seconds = seconds - (minutes * 60);

        sprintf(timeString,"%02d:%02d:%02d:%02d",days,hours,minutes,seconds);
        free(response);
    }

    else
    {
        sprintf(gravString,"-----");
        sprintf(tempString,"--");
        sprintf(txPowerString,"---");
        sprintf(rssiString,"--");
        sprintf(timeString,"---");
    }

    GUI_DispStringAtCEOL(gravString, SINGLE_VALUE_X,ROW_Y(SINGLE_GRAV_ROW) );
    GUI_SetTextAlign(GUI_TA_LEFT | GUI_TA_VCENTER);
    GUI_DispStringAtCEOL(tempString,    SINGLE_VALUE_X,ROW_Y(SINGLE_TEMP_ROW) );
    GUI_SetTextAlign(GUI_TA_LEFT | GUI_TA_VCENTER);
    GUI_DispStringAtCEOL(txPowerString, SINGLE_VALUE_X,ROW_Y(SINGLE_TXPOWER_ROW) );
    GUI_SetTextAlign(GUI_TA_LEFT | GUI_TA_VCENTER);
    GUI_DispStringAtCEOL(rssiString,    SINGLE_VALUE_X,ROW_Y(SINGLE_RSSI_ROW) );
    GUI_SetTextAlign(GUI_TA_LEFT | GUI_TA_VCENTER);
    GUI_DispStringAtCEOL(timeString,    SINGLE_VALUE_X,ROW_Y(SINGLE_TIME_ROW) );
}
The last bit of code is the sequence which will either
- Go to the next screen by returning True (if there are no active Tilts)
- Move to the next Tilt (if there are more active)
- Go to the next screen by returning True
static bool dm_displaySingleSeq()
{
    uint32_t activeTilts =tdm_getActiveTiltMask();
    if(activeTilts == 0)
        return true;

    for(int i=currentSingle+1;i<tdm_getNumTilt();i++)
    {
        if(1<<i & activeTilts)
        {
            currentSingle = i;
            dm_displaySingleInit();
            return false;
        }
    }
    return true;
}
That’s it for the display. In the next article Ill add the User Input of the GUI by adding CapSense.


No comment yet, add your voice below!