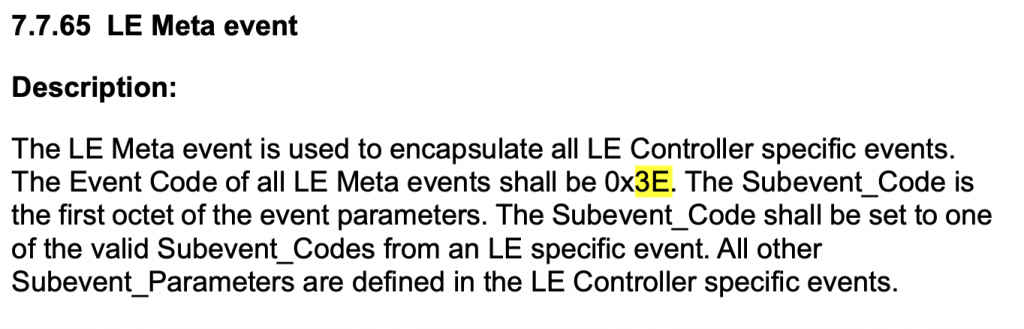
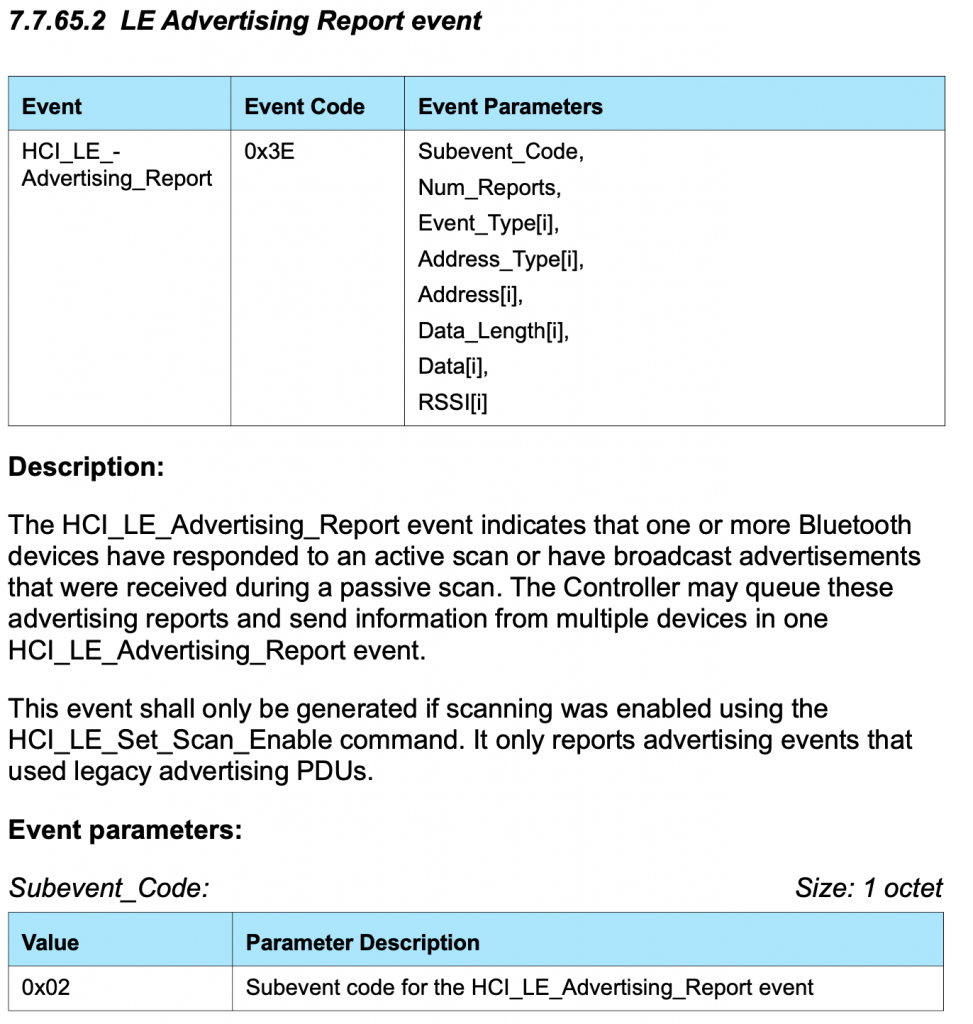
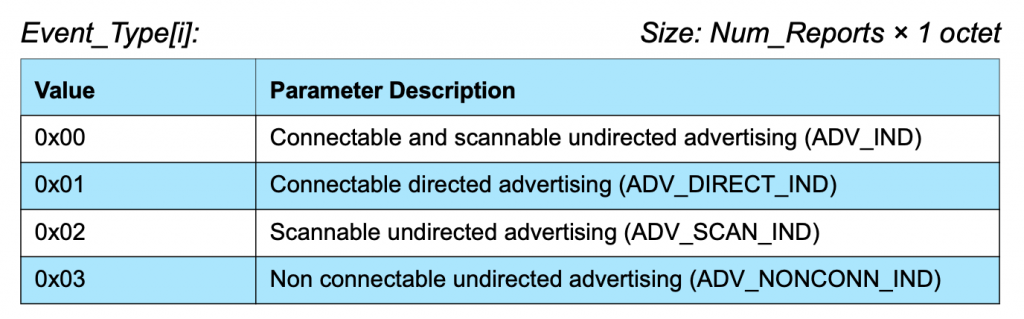
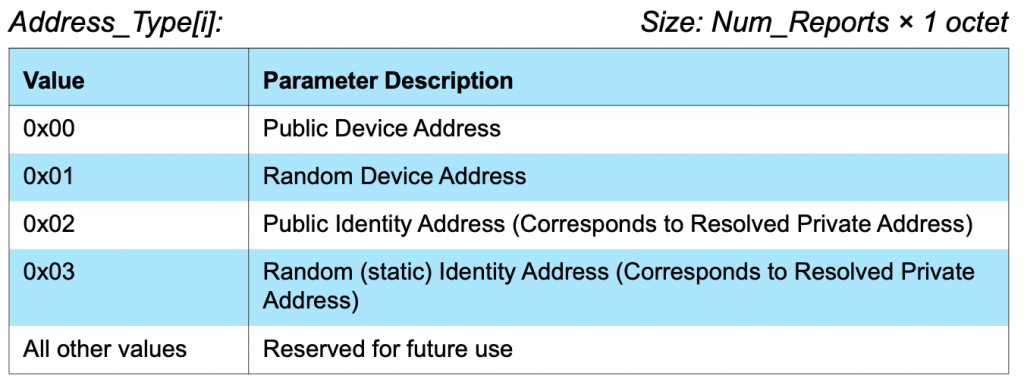
Summary
Using the PSoC 6 AnyCloud Bluetooth Stack to send out “multi-adv” Bluetooth advertising packets with a PSoC 6 and CYW43012. Multi-adv means sending out multiple different simultaneous Bluetooth Advertising packets. This includes building a project to simulate a Tilt Hydrometer.
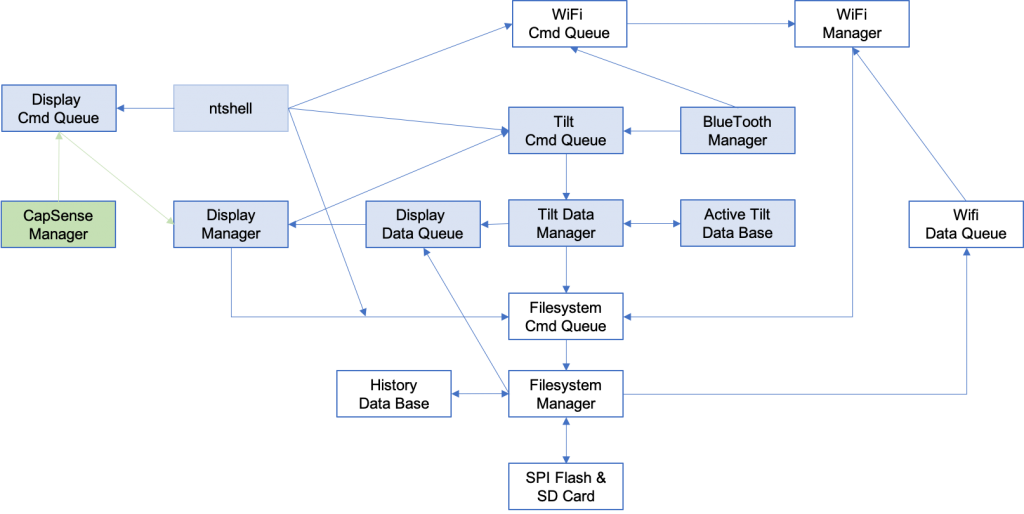
Story
As I worked on the Tilt project I came to realize that what I really needed what a Tilt Simulator. That is, a PSoC programmed with a command line interface that could send out the iBeacon messages that looked like the ones that the Tilt actually sent out. Why? Simple, all three of my Tilts are busy doing their day job measuring beer and they don’t have time to fool around being test subjects for my IoT Expert Articles.
The CYW43012 controller that I am using is capable of automatically rotating through a list of at least 8 beacons (maybe more, but I don’t know the exact number. I suppose I should figure it out). In other words I can simultaneously simulate 8 Tilts at one time with one PSoC.
For this project, I want the project to be able to
- Simultaneously broadcast 0-8 of the Tilt iBeacon messages
- Have a command line interface to control the Tilt iBeacons
- Be able to set a ramp rate for Temperature and Gravity on a per Tilt basis
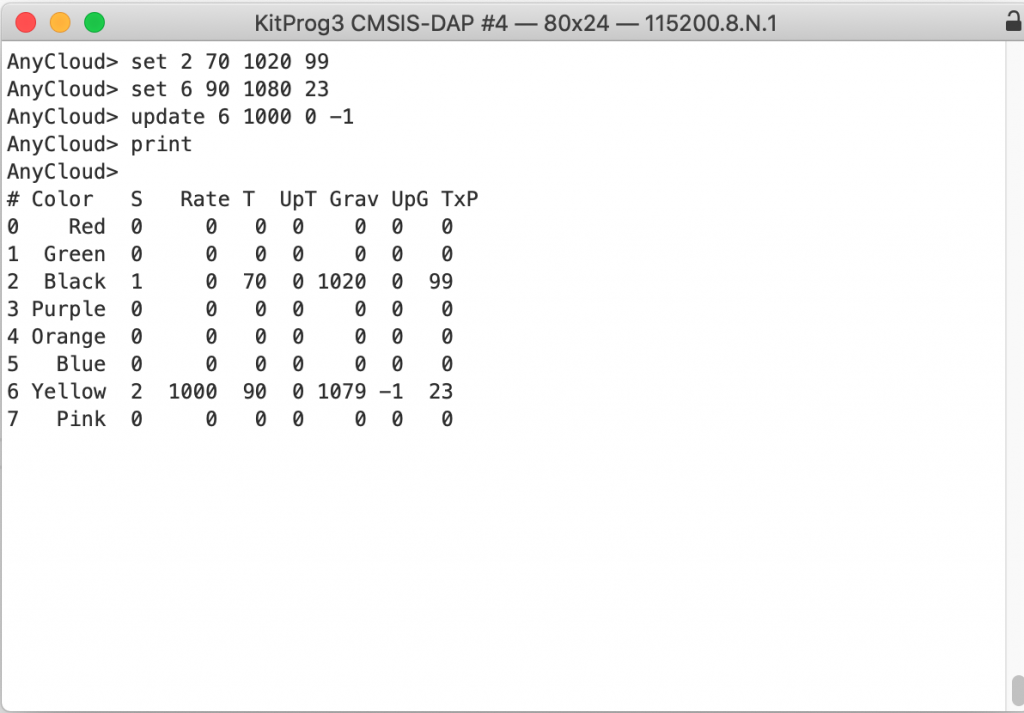
The commands will be:
- print – print out the table of the information about the Tilt iBeacons
- set – set the temperature, gravity and txPower e.g. “set 0 77 1020 99” would turn on beacon 1 with the temperature set to 77 and the gravity set to 1020 and the txPower set to 99
- update – configure the update rate for temperature and gravity e.g. “update 6 1000 0 -1” would set tilt 6 with an update to happen once per 1000ms with a +0 temperature per update and a -1 gravity points per update
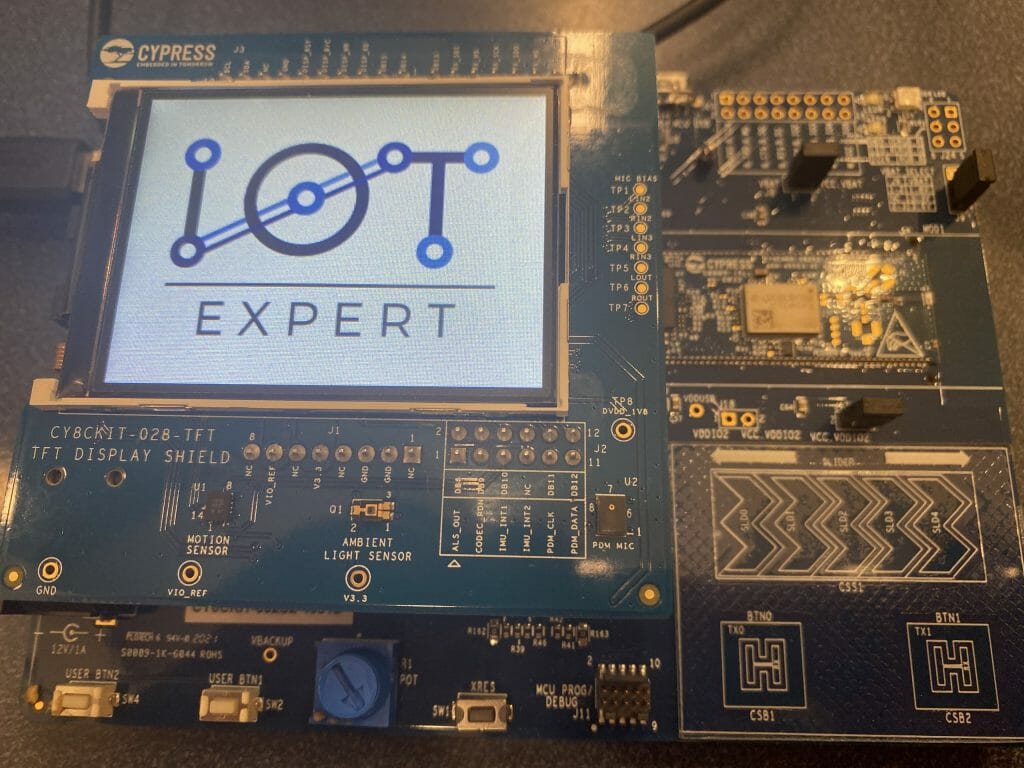
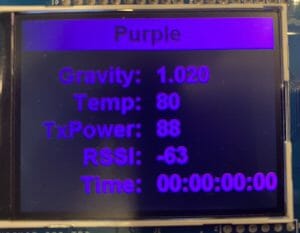
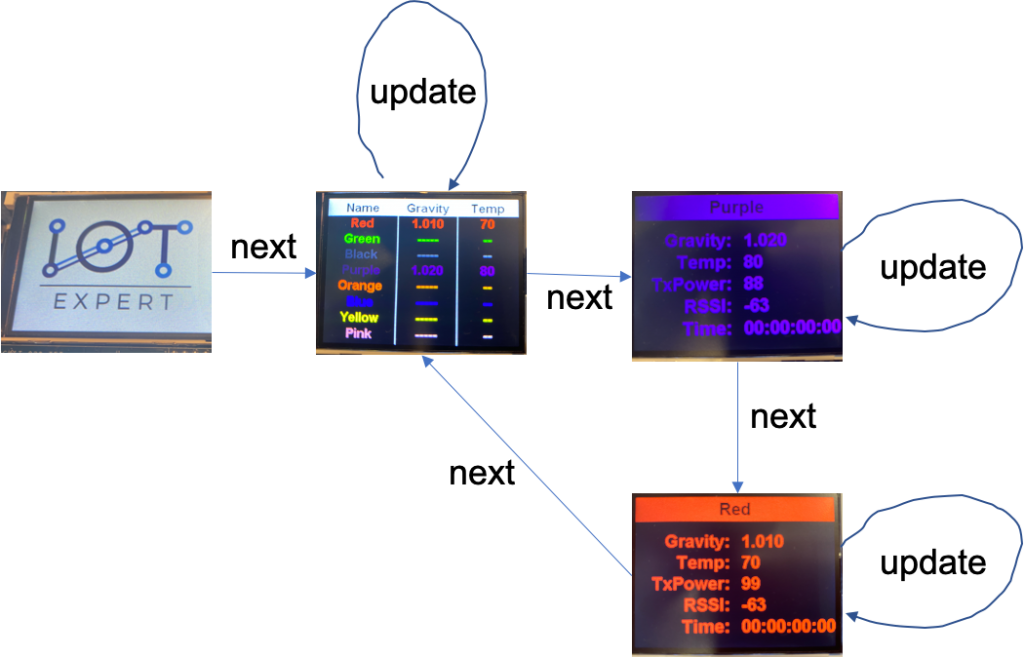
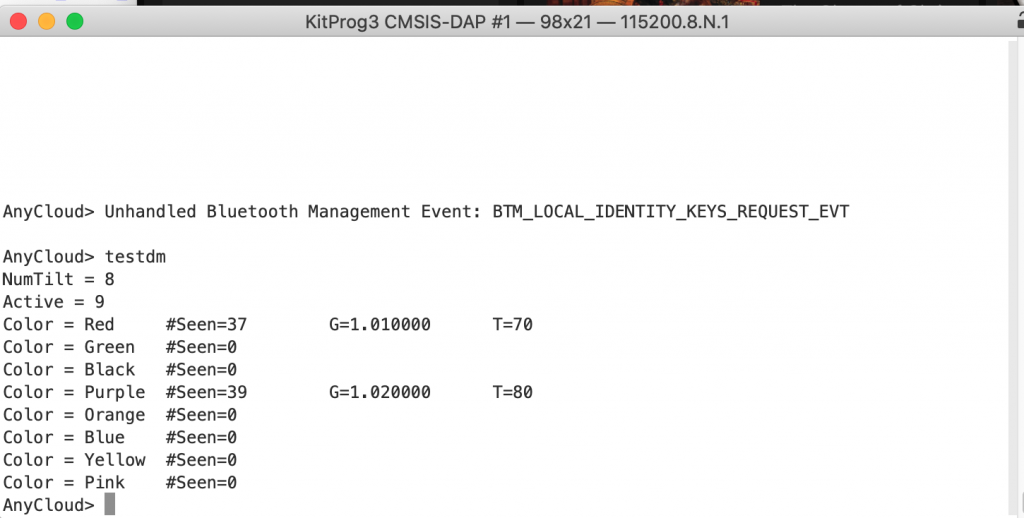
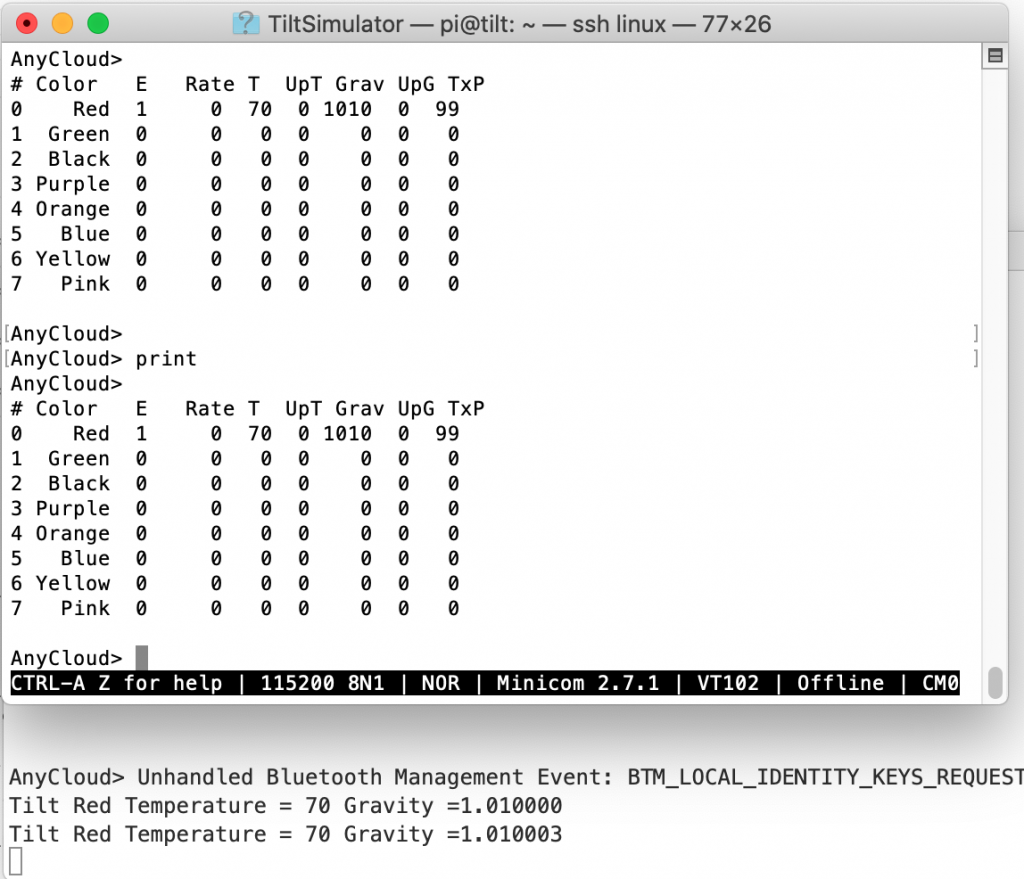
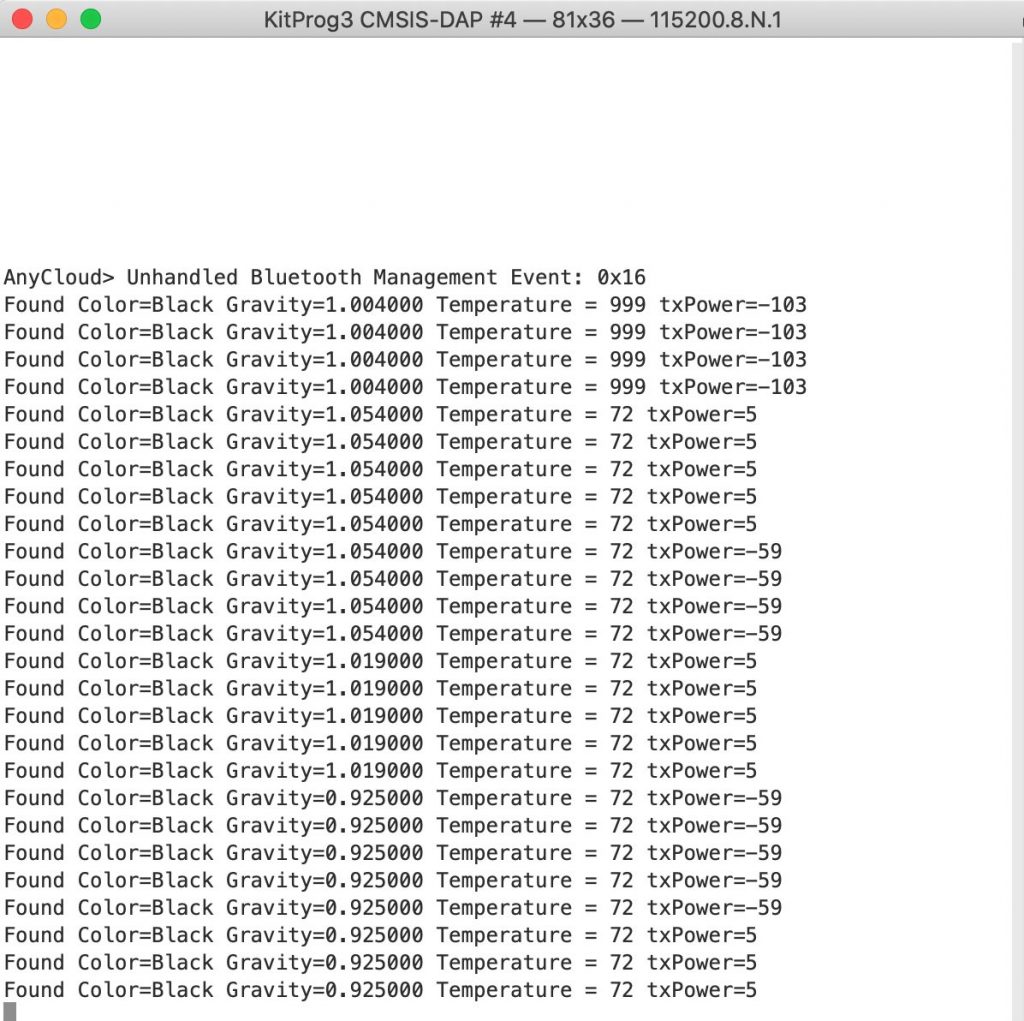
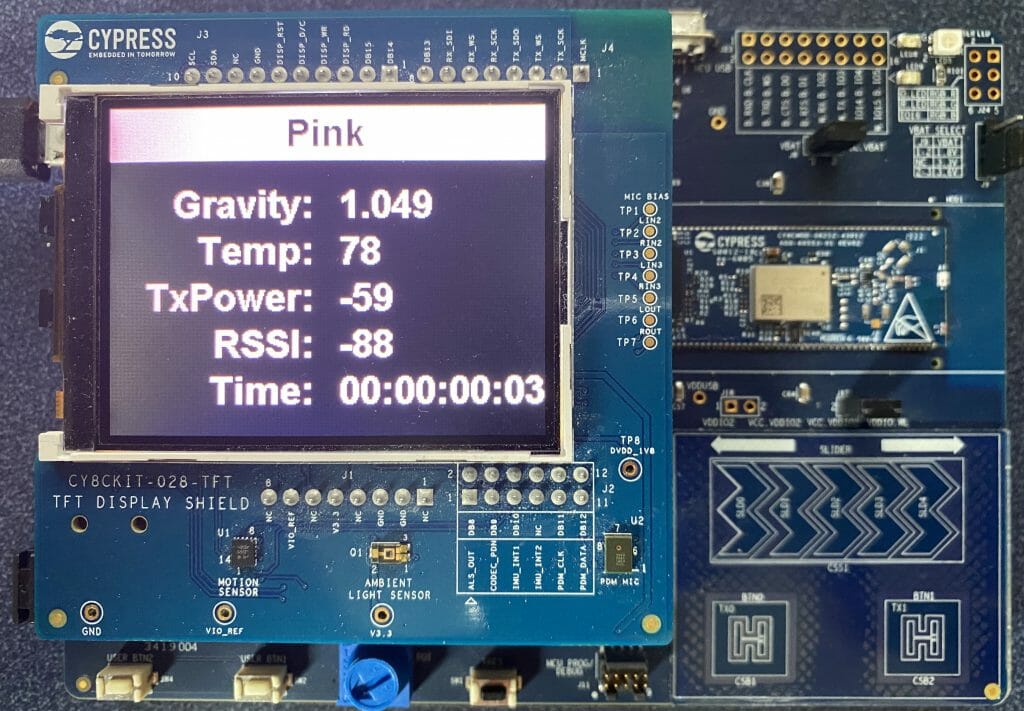
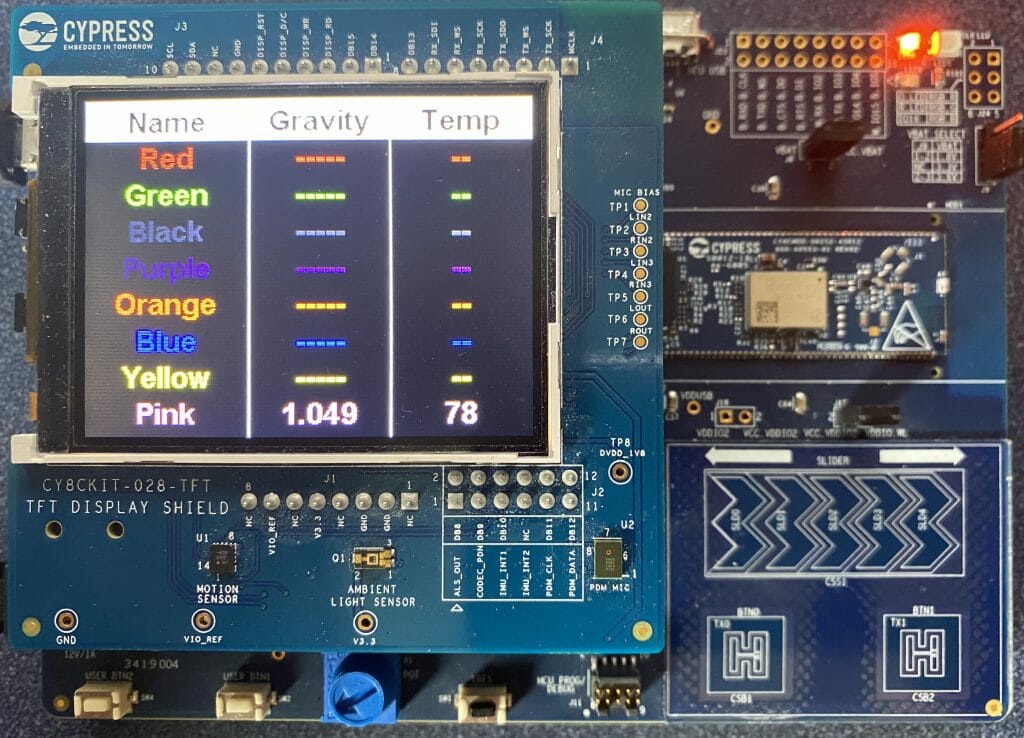
Here is an example of the display.
This series is broken up into the following 12 articles with a few additional possible articles.
Tilt Hydrometer (Part 1) Overview & Out-of-Box
Tilt Hydrometer (Part 2) Architecture
Tilt Hydrometer (Part 3) Advertising Scanner
Tilt Hydrometer (Part 4) Advertising Packet Error?
Tilt Hydrometer (Part 5) Tilt Simulator & Multi Advertising iBeacons
Tilt Hydrometer (Part 6) Tilt Simulator an Upgrade
Tilt Hydrometer (Part 7) Advertising Database
Tilt Hydrometer (Part 8) Read the Database
Tilt Hydrometer (Part 9) An LCD Display
Tilt Hydrometer (Part 10) The Display State Machine
Tilt Hydrometer (Part 11) Draw the Display Screens
Tilt Hydrometer (Part 12) CapSense
Tilt Hydrometer: LittleFS & SPI Flash (Part ?)
Tilt Hydrometer: WiFi Introducer (Part ?)
Tilt Hydrometer: WebServer (Part ?)
Tilt Hydrometer: Amazon MQTT (Part ?)
Tilt Hydrometer: Printed Circuit Board (Part ?)
You can get the source code from git@github.com:iotexpert/Tilt2.git This repository has tags for each of the articles which can be accessed with "git checkout part12" You can find the Tilt Simulator at git@github.com:iotexpert/TiltSimulator.git.
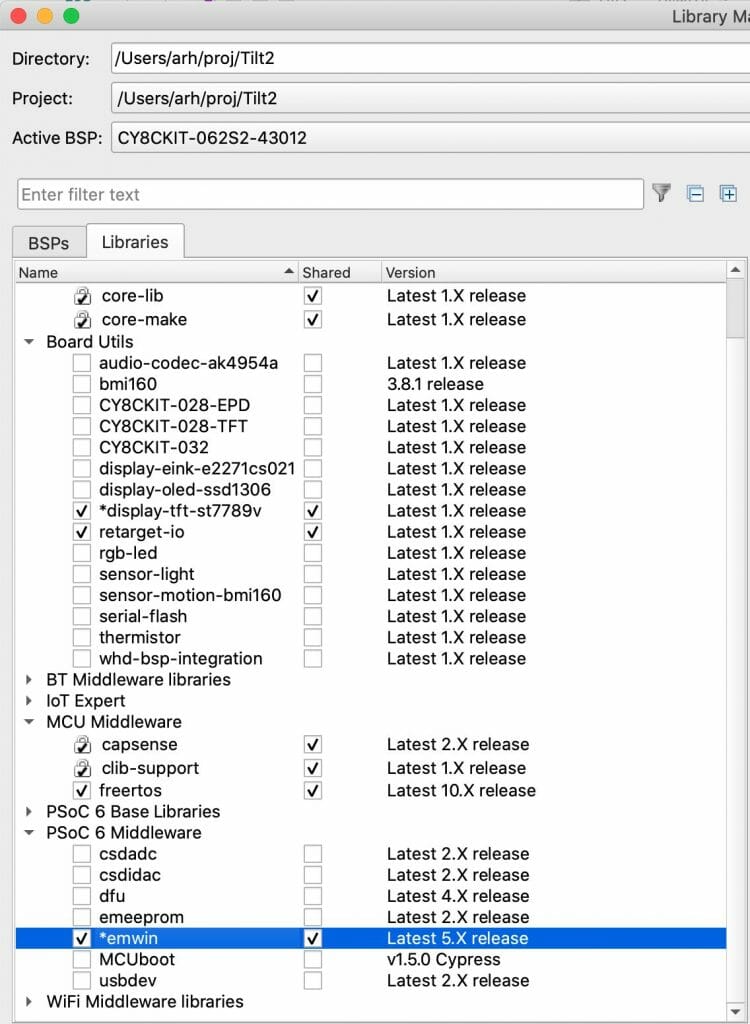
Build the Basic Project
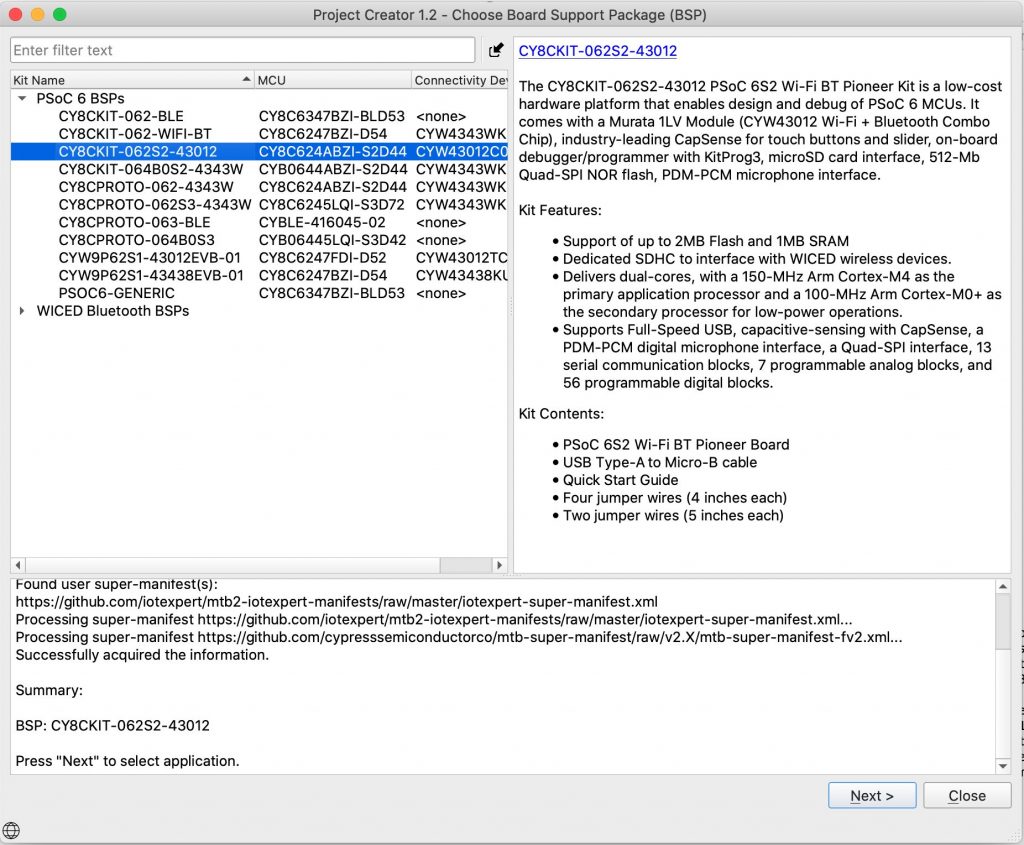
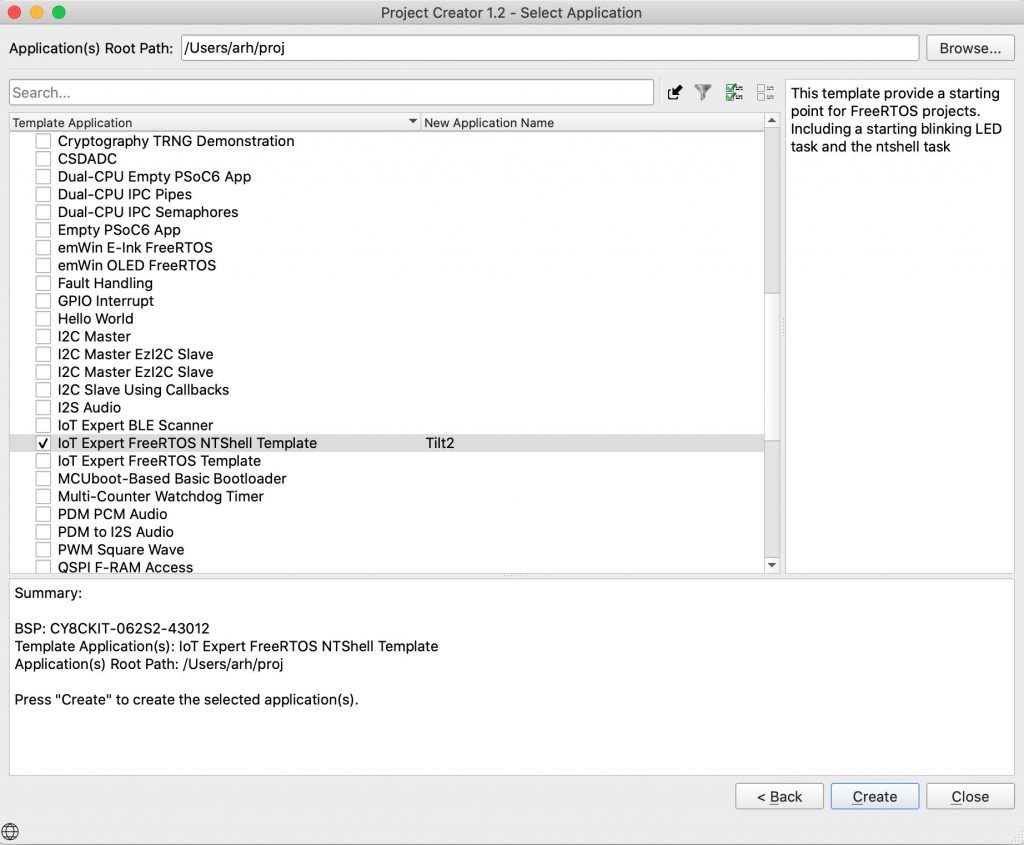
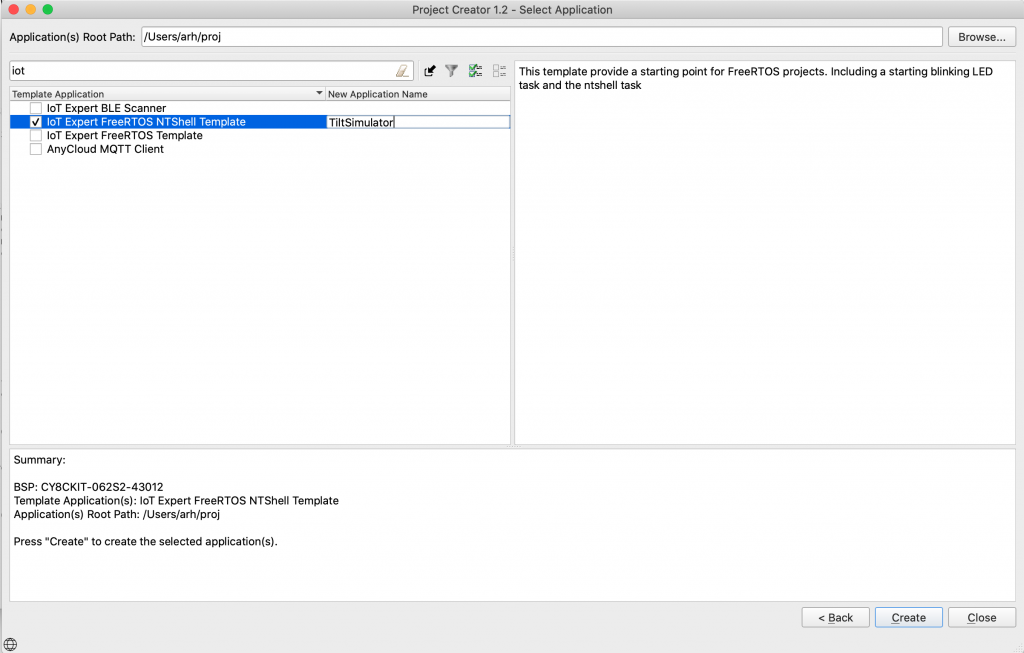
Create a new project using the FreeRTOS NT Shell Template called Tilt Simulator
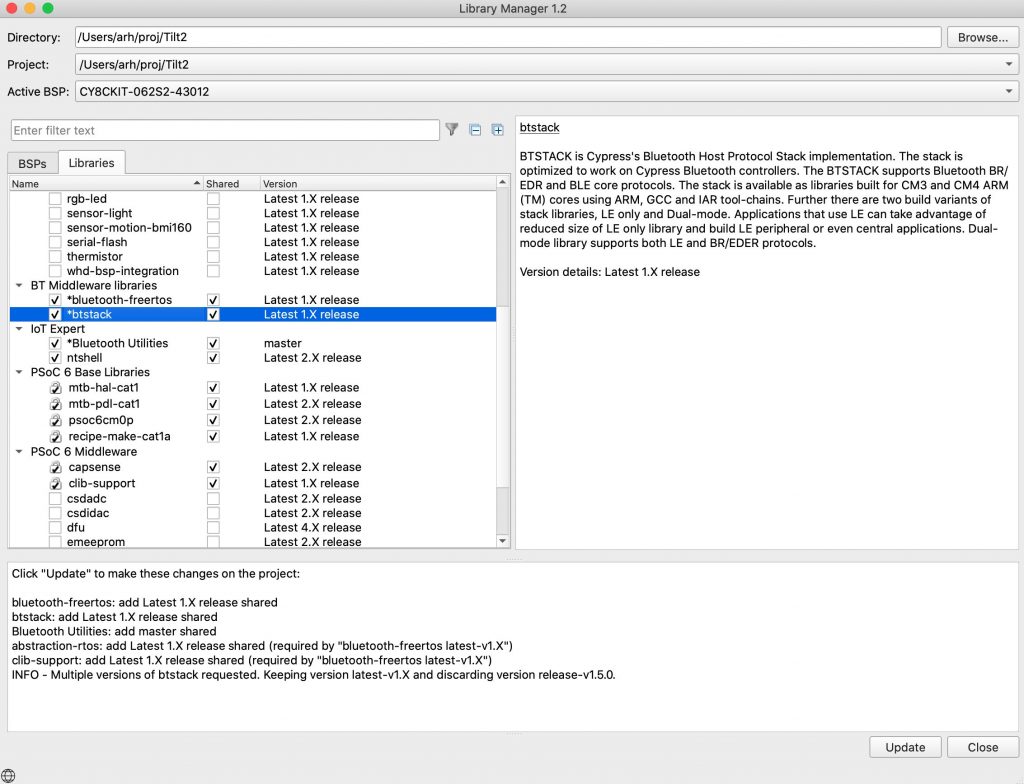
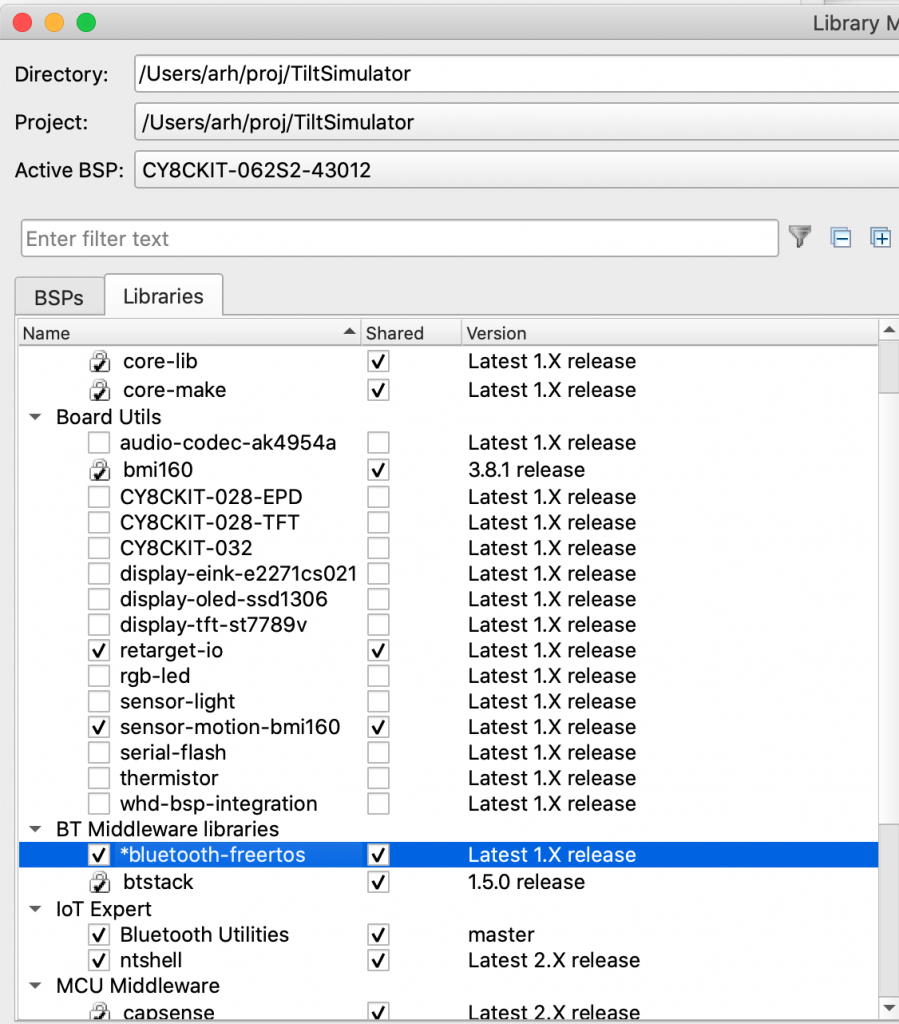
Enable the bluetooth-freertos and btstack libraries. Also enable the IoT Expert BT Utilities library.
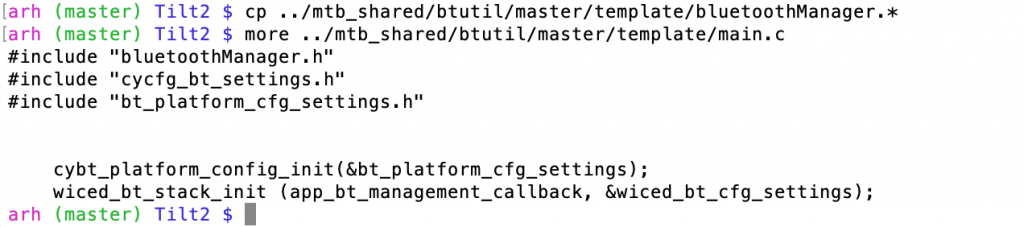
In the command line copy the template bluetoothManager.* into the project

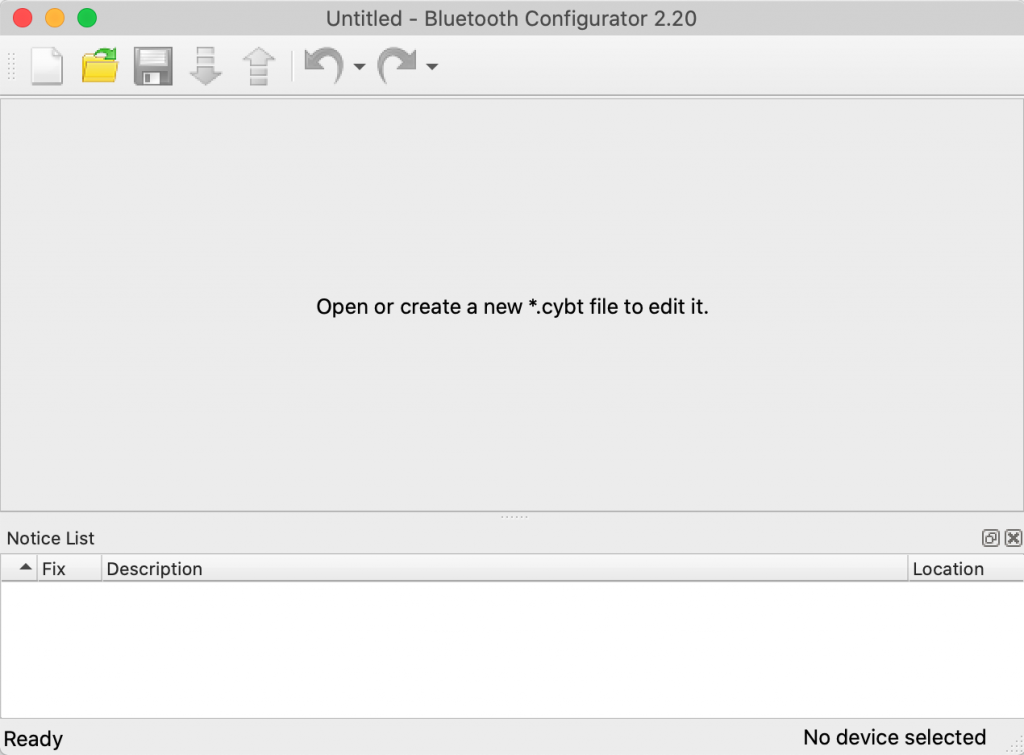
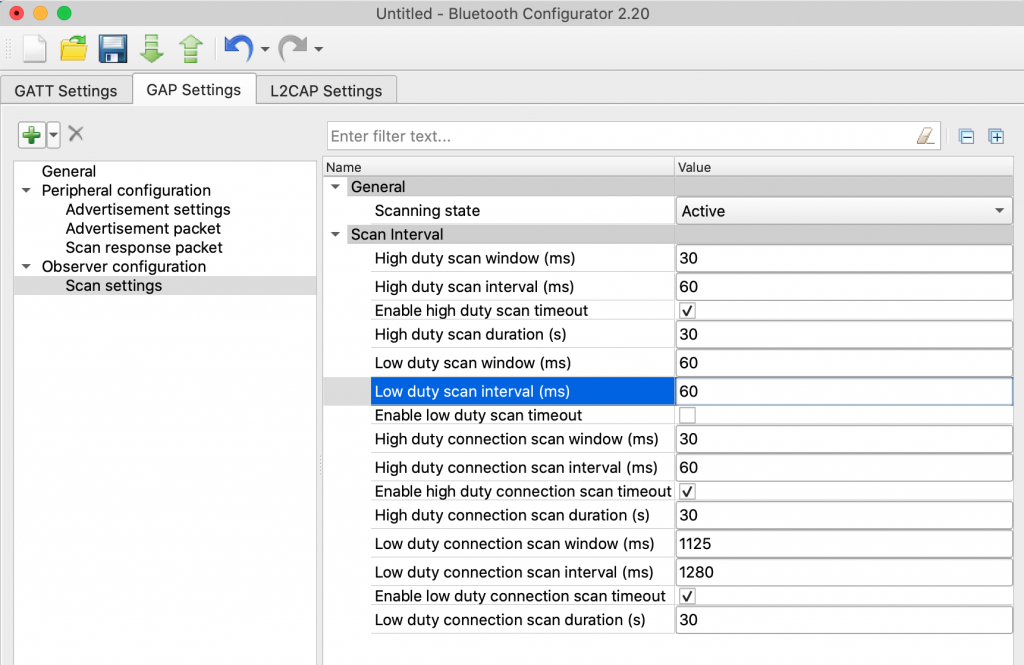
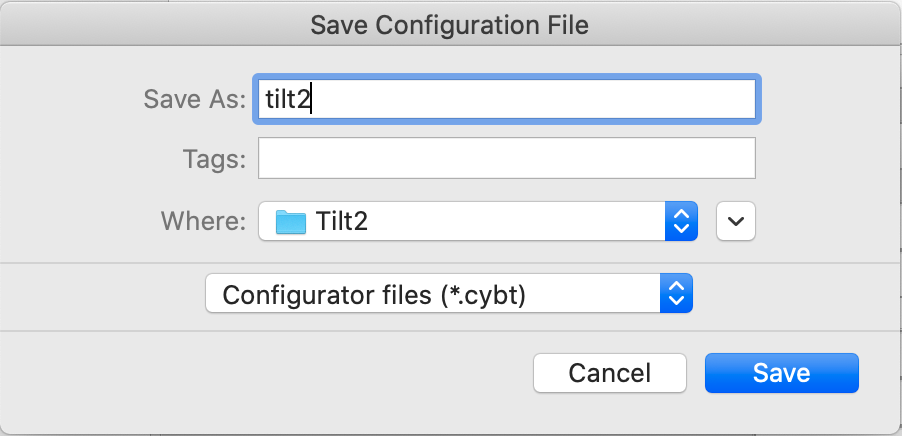
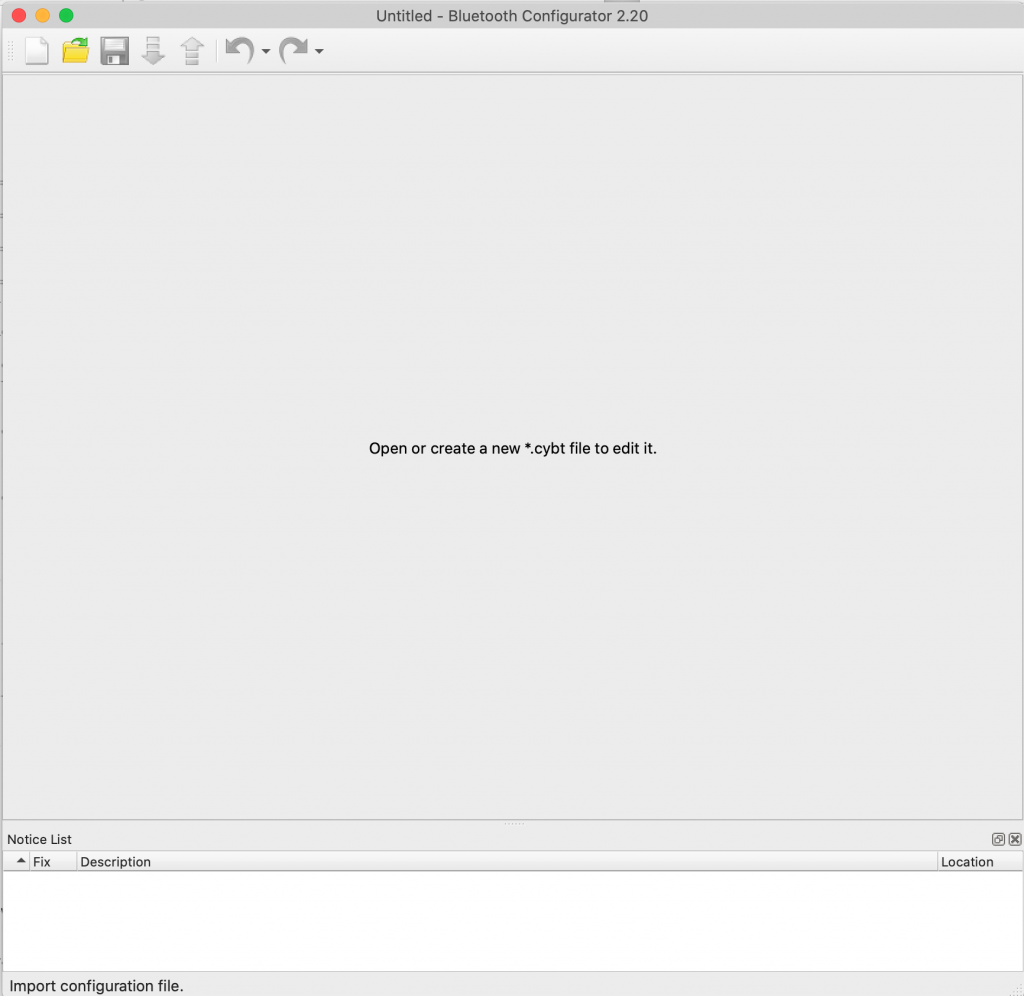
Start the Bluetooth configurator with “make config_bt” on the command line. Press the new project file (the blank paper)
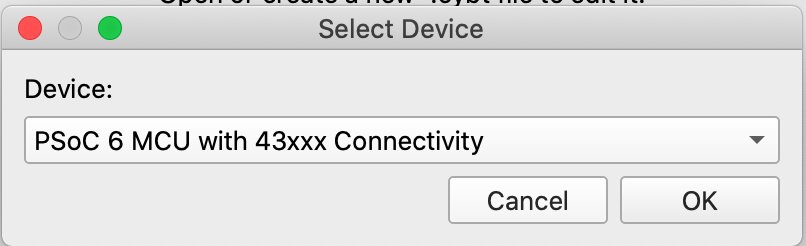
Select the P6 connectivity device
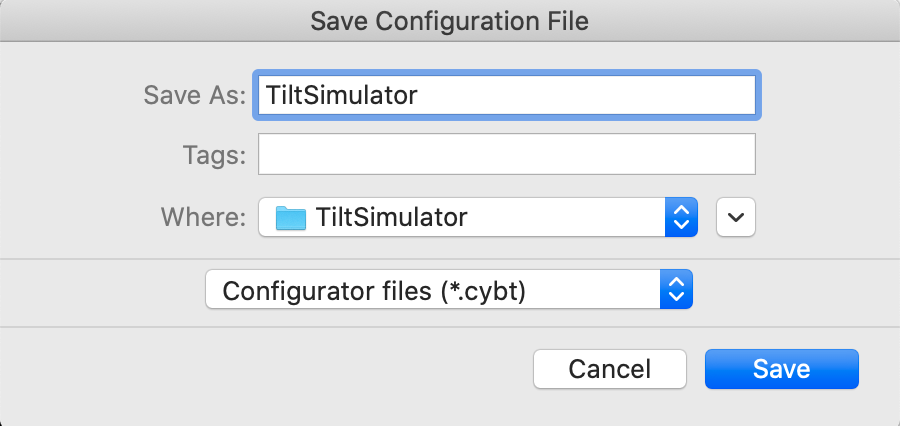
Press save and call your file “TiltSimulator” (it actually doesn’t matter what you call it). This will generate the configuration structures you need.
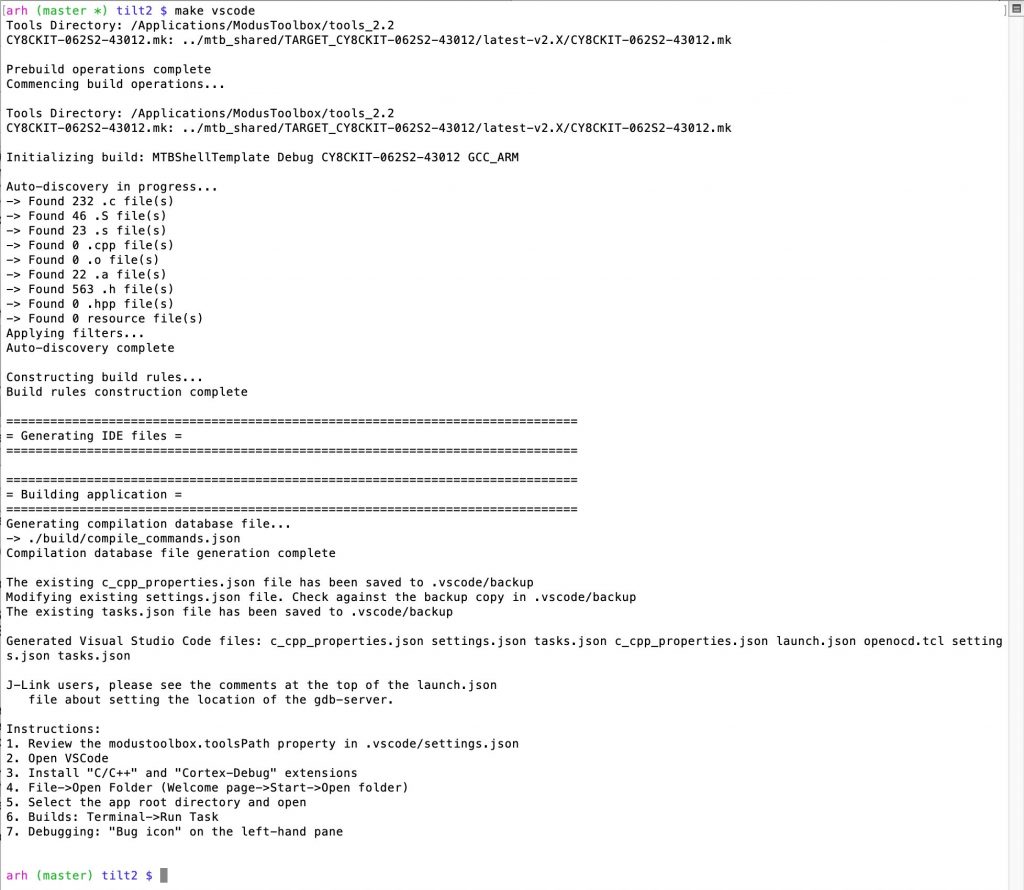
In command line run “make vscode”. Then edit the Makefile to include these components.
COMPONENTS=FREERTOS WICED_BLE
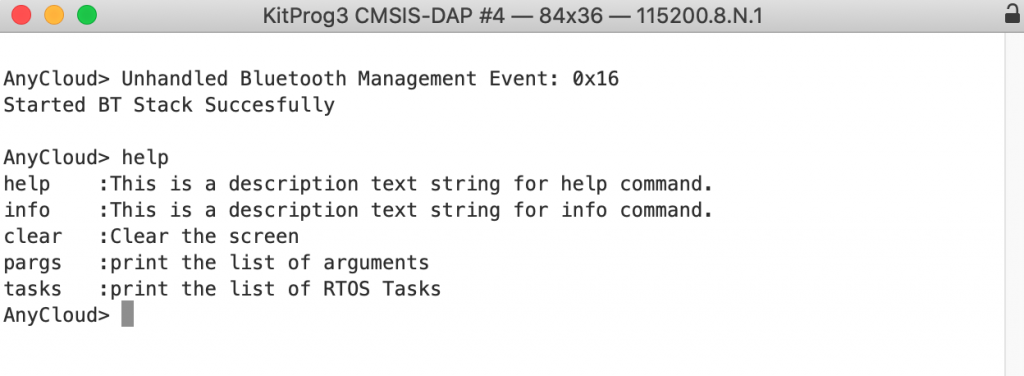
You should run a build/program right now as you will have a basic project with a blinking led, the Bluetooth stack running and a command line.
Multiadv
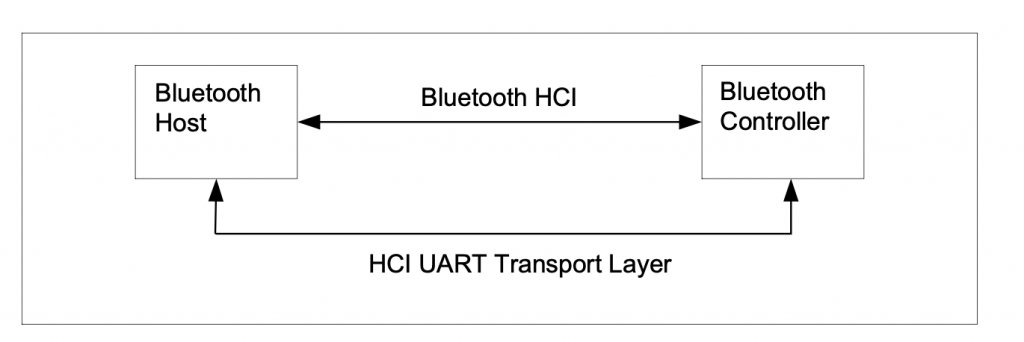
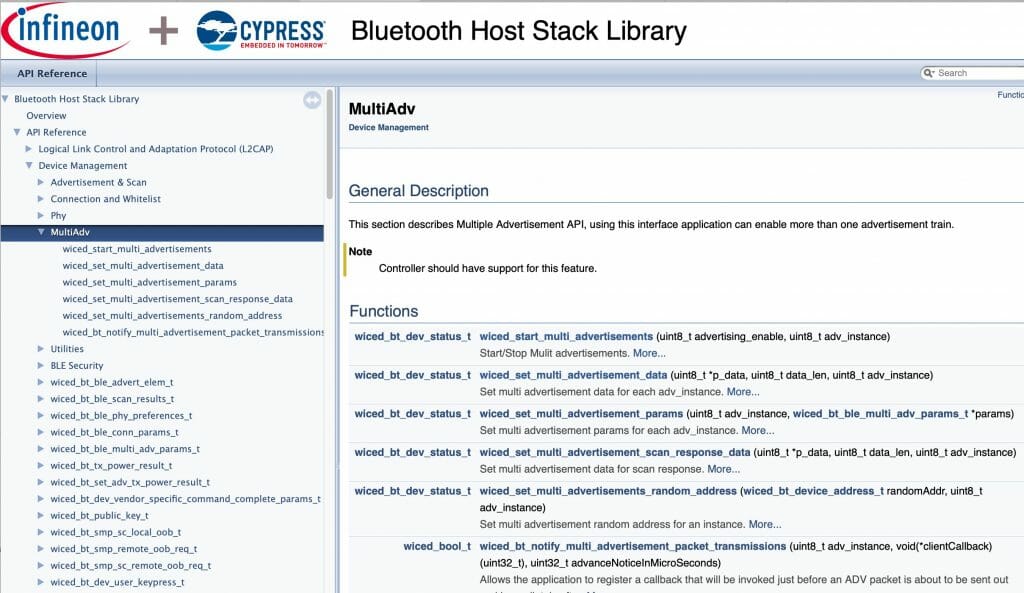
The CYW43012 has the ability to automatically rotate through a list of advertising packets. Each packet can have different data including a different Bluetooth address (how crazy is that?) Each packet can also be advertised at a different and configurable rate. It does this all with no intervention by the host.
This functionality is documented in the Bluetooth Stack section called “MutiAdv” under Device Management.
Build the Database
The database is just an array of structures. There are only 8 entries in the database, one for each color Tilt. In addition to a string representing the name, the database will have
- Which advertising slot that this tilt is using (0 means that it isn’t active)
- If the data is “dirty” meaning it has changed in this table but has not yet been copied to the controller for broadcast
- rate = how often to update the data in the that row
- tempUPDATE = how much to change the data by each time an update is called
- gravUPDATE = how much to change the gravity by each time an update is called
- The actual bytes of the advertising packet
/*********************************************************************************
*
* Tilt Database Definition
*
*********************************************************************************/
#define TILT_IBEACON_HEADER_LEN 25
#define TILT_IBEACON_DATA_LEN 5
#define TILT_IBEACON_LEN (TILT_IBEACON_HEADER_LEN + TILT_IBEACON_DATA_LEN)
typedef struct  {
    char *colorName;    // The color string
    int slot;           // Which Bluetooth ADV Slot this Tilt is using
    bool dirty;         // A flag to tell if there has been a change since the adv was last written
    int rate;           // rate in ms
    int tempUpdate;     // The update rate for temperature
    int gravUpdate;     // The update rate for gravity
    uint8_t advData[TILT_IBEACON_LEN];
} tilt_t;
// 02 01 04 = Flags
// 0x1A 0xFF = Manufacturer specific data
// 0x4c 0x00 = Apple
// 0x02 = iBeacon
// 0x15 = remaining data length
#define IBEACON_HEADER 0x02,0x01,0x04,0x1A,0xFF,0x4C,0x00,0x02,0x15
static tilt_t tiltDB [] =
{
{"Red", 0, true, 0,0,0, {IBEACON_HEADER,0xA4,0x95,0xBB,0x10,0xC5,0xB1,0x4B,0x44,0xB5,0x12,0x13,0x70,0xF0,0x2D,0x74,0xDE, 0x00,0x00,0x00,0x00,0x00}},
{"Green" , 0, true, 0,0,0, {IBEACON_HEADER,0xA4,0x95,0xBB,0x20,0xC5,0xB1,0x4B,0x44,0xB5,0x12,0x13,0x70,0xF0,0x2D,0x74,0xDE, 0x00,0x00,0x00,0x00,0x00}},
{"Black" , 0, true, 0,0,0, {IBEACON_HEADER,0xA4,0x95,0xBB,0x30,0xC5,0xB1,0x4B,0x44,0xB5,0x12,0x13,0x70,0xF0,0x2D,0x74,0xDE, 0x00,0x00,0x00,0x00,0x00}},
{"Purple", 0, true, 0,0,0, {IBEACON_HEADER,0xA4,0x95,0xBB,0x40,0xC5,0xB1,0x4B,0x44,0xB5,0x12,0x13,0x70,0xF0,0x2D,0x74,0xDE, 0x00,0x00,0x00,0x00,0x00}},
{"Orange", 0, true, 0,0,0, {IBEACON_HEADER,0xA4,0x95,0xBB,0x50,0xC5,0xB1,0x4B,0x44,0xB5,0x12,0x13,0x70,0xF0,0x2D,0x74,0xDE, 0x00,0x00,0x00,0x00,0x00}},
{"Blue" , 0, true, 0,0,0, {IBEACON_HEADER,0xA4,0x95,0xBB,0x60,0xC5,0xB1,0x4B,0x44,0xB5,0x12,0x13,0x70,0xF0,0x2D,0x74,0xDE, 0x00,0x00,0x00,0x00,0x00}},
{"Yellow", 0, true, 0,0,0, {IBEACON_HEADER,0xA4,0x95,0xBB,0x70,0xC5,0xB1,0x4B,0x44,0xB5,0x12,0x13,0x70,0xF0,0x2D,0x74,0xDE, 0x00,0x00,0x00,0x00,0x00}},
{"Pink" , 0, true, 0,0,0, {IBEACON_HEADER,0xA4,0x95,0xBB,0x80,0xC5,0xB1,0x4B,0x44,0xB5,0x12,0x13,0x70,0xF0,0x2D,0x74,0xDE, 0x00,0x00,0x00,0x00,0x00}},
};
#define NUM_TILT (sizeof(tiltDB)/sizeof(tilt_t))
#define IBEACON_TEMP_HI (25)
#define IBEACON_TEMP_LO (26)
#define IBEACON_GRAV_HI (27)
#define IBEACON_GRAV_LO (28)
#define IBEACON_TXPOWER (29)
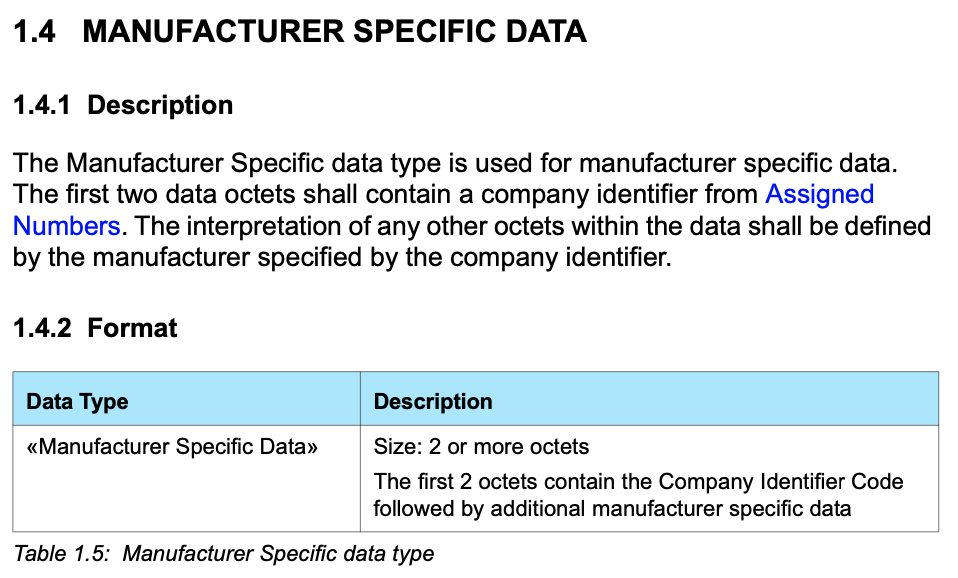
Now I will make “getters and setters”. These functions will set the correct bytes in the adverting packets, and can retrieve the current values in those bytes. Remember in the Apple iBeacon format there are 5 “user” bytes
- Major byte 0 and byte 1
- Minor byte 0 and bytes 1
- txPower
Apple didnt specify what you stored in the major/minor. In fact they also didnt specify the endianness. The Tilt guys decided that the would store BIG endian – oh well.
- Major = Temperature in degrees F
- Minor = Gravity points i.e. 1050 means 1.050
If you look in my code the “set” of temperature and gravity they will “wrap around”. If you set a value BELOW the minimum it will set the highest value and if you set a value ABOVE the maximum it will set it to the lowest. This allows my automatic update code to just count one direction.
int btm_getTemperature(int num)
{
return (uint16_t)tiltDB[num].advData[IBEACON_TEMP_HI] << 8 | tiltDB[num].advData[IBEACON_TEMP_LO];
}
void btm_setTemperature(int num,uint16_t temperature)
{
if(temperature > 150)
temperature = 10;
if(temperature<10)
temperature = 150;
int oldtemp = btm_getTemperature(num);
tiltDB[num].advData[IBEACON_TEMP_HI] = (temperature & 0xFF00) >> 8;
tiltDB[num].advData[IBEACON_TEMP_LO] = temperature & 0xFF;
if(temperature != oldtemp)
tiltDB[num].dirty = true;
}
int btm_getGravity(int num)
{
return (uint16_t)tiltDB[num].advData[IBEACON_GRAV_HI] << 8 | tiltDB[num].advData[IBEACON_GRAV_LO];
}
void btm_setGravity(int num,uint16_t gravity)
{
// These if's cause the gravity to "wrap around" at 1200 and 900
if(gravity>1200)
gravity = 900;
if(gravity <900)
gravity = 1200;
int oldgrav = btm_getGravity(num);
tiltDB[num].advData[IBEACON_GRAV_HI] = (uint8_t)((gravity & 0xFF00) >> 8);
tiltDB[num].advData[IBEACON_GRAV_LO] = (uint8_t)(gravity & 0xFF);
if(oldgrav != gravity)
tiltDB[num].dirty = true;
}
void btm_setTxPower(int num, int8_t txPower)
{
tiltDB[num].advData[IBEACON_TXPOWER] = txPower;
tiltDB[num].dirty = true;
}
Transfer Database to Bluetooth Controller
The next two functions are used to bridge between the database and the controller. The first function “btm_setAdvPacket” probably should have been called “btm_setAdvPackets” because its function is to copy the database bytes into the controller for actual broadcast. This function is simply a loop that looks at each of the Tilts in the database.
- If they are in a “slot”
- AND they are dirty (something has been changed since the last time this was called)
- Then copy the data into the controller
- Set the parameters
- Start it advertising
// btm_setAdvPacket
//
// This function updates what the advertising packets and the state of the BT controller:
// It will loop through the table of iBeacons... then if they are in a slot & they are dirty
// it will move them to the contoller and enable advertisements on that slot
void btm_setAdvPacket()
{
static wiced_bt_ble_multi_adv_params_t myParams = {
.adv_int_min = BTM_BLE_ADVERT_INTERVAL_MIN,
.adv_int_max = 96,
.adv_type = MULTI_ADVERT_NONCONNECTABLE_EVENT,
.channel_map = BTM_BLE_ADVERT_CHNL_37 | BTM_BLE_ADVERT_CHNL_38 | BTM_BLE_ADVERT_CHNL_39,
.adv_filter_policy = BTM_BLE_ADVERT_FILTER_ALL_CONNECTION_REQ_ALL_SCAN_REQ,
.adv_tx_power = MULTI_ADV_TX_POWER_MAX_INDEX,
.peer_bd_addr = {0},
.peer_addr_type = BLE_ADDR_PUBLIC,
.own_bd_addr = {0},
.own_addr_type = BLE_ADDR_PUBLIC,
};
for(int i=0;i<NUM_TILT;i++)
{
if(tiltDB[i].slot && tiltDB[i].dirty)
{
tiltDB[i].dirty = false;
wiced_set_multi_advertisement_data(tiltDB[i].advData,sizeof(tiltDB[i].advData),tiltDB[i].slot);
wiced_set_multi_advertisement_params(tiltDB[i].slot,&myParams);
wiced_start_multi_advertisements( MULTI_ADVERT_START, tiltDB[i].slot );
}
}
}
In order to “activate” a row in the database you need to assign it to a slot. I do this by keeping track of the number of times I have assigned an entry in “btm_active” which is static to this function. Now, shocker, I check to make sure that the caller didn’t accidentally call this before. Finally I assign it to a slot and mark it as dirty (so that when the btm_setAdvPacket function is called the data will be put into the controller.
/* btm_activate
*
* This function will put the tilt in the database entry num
* into the next available advertising slot
*
*/
void btm_activate(int num)
{
// Keep track of the number of currently active iBeacons
static int btm_active=0;
CY_ASSERT(num<NUM_TILT);
if(tiltDB[num].slot == 0) // Make sure that it is not already in a slow
{
btm_active += 1;
tiltDB[num].slot = btm_active;
tiltDB[num].dirty = true;
}
}
Command Queue
The command queue is used by the command line interface to submit changes to the Tilt database. Specifically set, update and print. The message is just the values for set & update.
/*********************************************************************************
*
* Tilt Data Manager External Interface Queue
*
*********************************************************************************/
typedef enum {
BTM_CMD_SET_DATA,
BTM_CMD_PRINT_TABLE,
BTM_CMD_SET_UPDATE,
} btm_cmd_t;
typedef struct {
btm_cmd_t cmd;
int num;
int temperature;
int gravity;
int txPower;
} btm_cmdMsg_t;
static QueueHandle_t btm_cmdQueue=0;
static wiced_timer_ext_t btm_processDataTimer;
The function to process the command queue has two functions in the systems
- Process commands from the command line
- Cause the data to be updated (as configured by the command line)
This function is run by a timer that is started when the Bluetooth stack turns on. I have it set to run every 200ms. Each time it runs it will read all of the messages in the queue and process them. Once that is complete it will check to see if the Tilts need to be updated.
In my system there is a “base rate” which is set by the frequency of this function. In other words the “count” variable counts the number of times this function has been called. This is about “BTM_QUEUE_RATE”
/* btm_processCmdQueue
*
* This function is called by a timer every BTM_QUEUE_RATE ms (around 200ms)
* It processes commands from the GUI
* It also updates the adverting packets if they are being updated at a rate
*
*/
void btm_processCmdQueue( wiced_timer_callback_arg_t cb_params )
{
static int count = 0; // This counts the numbers of times the callback has happend
btm_cmdMsg_t msg;
while(xQueueReceive(btm_cmdQueue,&msg,0) == pdTRUE)
{
switch(msg.cmd)
{
case BTM_CMD_SET_DATA:
btm_setGravity(msg.num,msg.gravity);
btm_setTemperature(msg.num,msg.temperature);
btm_setTxPower(msg.num,msg.txPower);
btm_activate(msg.num);
break;
case BTM_CMD_PRINT_TABLE:
btm_printTable();
break;
case BTM_CMD_SET_UPDATE:
tiltDB[msg.num].tempUpdate = msg.temperature;
tiltDB[msg.num].gravUpdate = msg.gravity;
tiltDB[msg.num].rate = msg.txPower / BTM_QUEUE_RATE;
break;
}
}
count = count + 1;
// This block of code updates the current values with the update rate
for(int i=0;i<NUM_TILT;i++)
{
// If the slot active
// and the update rate says that it is time
if(tiltDB[i].slot && count % tiltDB[i].rate == 0)
{
btm_setTemperature(i,btm_getTemperature(i) + tiltDB[i].tempUpdate);
btm_setGravity(i,btm_getGravity(i) + tiltDB[i].gravUpdate);
}
}
btm_setAdvPacket();
}
Bluetooth Management
When the Bluetooth Stack is turned on I need to do two things
- Initialize the command queue
- Initialize a periodic timer that calls the “btm_processCmdQueue”
Notice that every time something changes in the advertising packets the management callback is called with the event type “BTM_MULTI_ADVERT_RESP_EVENT”… to which I do NOTHING. I suppose that I should check and make sure that whatever I did succeed.
wiced_result_t app_bt_management_callback(wiced_bt_management_evt_t event, wiced_bt_management_evt_data_t *p_event_data)
{
wiced_result_t result = WICED_BT_SUCCESS;
switch (event)
{
case BTM_ENABLED_EVT:
printf("Started BT Stack Succesfully\n");
btm_cmdQueue = xQueueCreate(10,sizeof(btm_cmdMsg_t));
wiced_init_timer_ext(&btm_processDataTimer,btm_processCmdQueue,0,WICED_TRUE);
wiced_start_timer_ext(&btm_processDataTimer,BTM_QUEUE_RATE);
break;
case BTM_MULTI_ADVERT_RESP_EVENT: // Do nothing...
break;
default:
printf("Unhandled Bluetooth Management Event: %s\n", btutil_getBTEventName( event));
break;
}
return result;
}
Public Functions
In the command line I want the ability to
- Print
- Configure the data in Tilt advertising packet
- Set the update rate
That is what these three functions do. Notice that I check that the command queue has been initialized.
void btm_printTableCmd()
{
if(btm_cmdQueue == 0)
return;
btm_cmdMsg_t msg;
msg.cmd = BTM_CMD_PRINT_TABLE;
xQueueSend(btm_cmdQueue,&msg,0);
}
void btm_setDataCmd(int num,int temperature,int gravity,int txPower)
{
if(btm_cmdQueue == 0)
return;
btm_cmdMsg_t msg;
msg.cmd = BTM_CMD_SET_DATA;
msg.num = num;
msg.temperature = temperature;
msg.gravity = gravity;
msg.txPower = txPower;
xQueueSend(btm_cmdQueue,&msg,0);
}
void btm_updateDataCmd(int num,int rate ,int temperature,int gravity )
{
if(btm_cmdQueue == 0)
return;
btm_cmdMsg_t msg;
msg.cmd = BTM_CMD_SET_UPDATE;
msg.num = num;
msg.temperature = temperature;
msg.gravity = gravity;
msg.txPower = rate;
xQueueSend(btm_cmdQueue,&msg,0);
}
Update the Command Line
In usrcmd.c I need the three functions which the command line will call.
- usrcmd_print … to print out the table
- usrcmd_set to set the values in the Tilt database
- usrcmd_update to set the update rate
static int usrcmd_print(int argc, char **argv)
{
btm_printTableCmd();
return 0;
}
static int usrcmd_set(int argc, char **argv)
{
int gravity;
int temperature;
int txPower;
int num;
if(argc == 5)
{
sscanf(argv[1],"%d",&num);
sscanf(argv[2],"%d",&temperature);
sscanf(argv[3],"%d",&gravity);
sscanf(argv[4],"%d",&txPower);
btm_setDataCmd(num,temperature,gravity,txPower);
}
return 0;
}
static int usrcmd_update(int argc, char **argv)
{
int gravity;
int temperature;
int rate;
int num;
if(argc == 5)
{
sscanf(argv[1],"%d",&num);
sscanf(argv[2],"%d",&rate);
sscanf(argv[3],"%d",&temperature);
sscanf(argv[4],"%d",&gravity);
btm_updateDataCmd(num,rate,temperature,gravity);
}
return 0;
}
And once you have those functions you need to turn them on in the command line
static const cmd_table_t cmdlist[] = {
{ "help", "This is a description text string for help command.", usrcmd_help },
{ "info", "This is a description text string for info command.", usrcmd_info },
{ "clear", "Clear the screen", usrcmd_clear },
{ "pargs","print the list of arguments", usrcmd_pargs},
#ifdef configUSE_TRACE_FACILITY
#if configUSE_STATS_FORMATTING_FUNCTIONS ==1
{ "tasks","print the list of RTOS Tasks", usrcmd_list},
#endif
#endif
{ "print", "Print table", usrcmd_print },
{ "set", "set num temperature gravity txpower", usrcmd_set },
{ "update", "update num rate temperature gravity", usrcmd_update },
};
In the next article I will be back to the “client” end of my system and will build a database.
Full Functions
Here are the full functions & files. You can also “git” this at git@github.com:iotexpert/TiltSimulator.git
- bluetoothManager.h
- bluetoothManager.c
- main.c
- usrcmd.c
bluetoothManager.h
#pragma once
#include "wiced_bt_stack.h"
#include "wiced_bt_dev.h"
wiced_result_t app_bt_management_callback(wiced_bt_management_evt_t event, wiced_bt_management_evt_data_t *p_event_data);
void btm_printTable();
void btm_printTableCmd();
void btm_setDataCmd(int num,int temperature,int gravity,int txPower);
void btm_updateDataCmd(int num,int rate ,int temperature,int gravity );
bluetoothManager.c
#include <stdio.h>
#include <stdlib.h>
#include "cybsp.h"
#include "FreeRTOS.h"
#include "bluetoothManager.h"
#include "wiced_bt_stack.h"
#include "wiced_bt_dev.h"
#include "wiced_bt_trace.h"
#include "wiced_timer.h"
#include "queue.h"
#include "btutil.h"
// Read the queue
#define BTM_QUEUE_RATE 200
/*********************************************************************************
*
* Tilt Database Definition
*
*********************************************************************************/

#define TILT_IBEACON_HEADER_LEN 25
#define TILT_IBEACON_DATA_LEN 5
#define TILT_IBEACON_LEN (TILT_IBEACON_HEADER_LEN + TILT_IBEACON_DATA_LEN)

typedef struct  {
    char *colorName;    // The color string
    int slot;           // Which Bluetooth ADV Slot this Tilt is using
    bool dirty;         // A flag to tell if there has been a change since the adv was last written
    int rate;           // rate in ms
    int tempUpdate;     // The update rate for temperature
    int gravUpdate;     // The update rate for gravity
    uint8_t advData[TILT_IBEACON_LEN];
} tilt_t;

// 02 01 04 = Flags
// 0x1A 0xFF = Manufacturer specific data
// 0x4c 0x00 = Apple
// 0x02 = iBeacon
// 0x15 = remaining data length
#define IBEACON_HEADER 0x02,0x01,0x04,0x1A,0xFF,0x4C,0x00,0x02,0x15

static tilt_t tiltDB [] =
{
    {"Red",    0, true, 0,0,0, {IBEACON_HEADER,0xA4,0x95,0xBB,0x10,0xC5,0xB1,0x4B,0x44,0xB5,0x12,0x13,0x70,0xF0,0x2D,0x74,0xDE, 0x00,0x00,0x00,0x00,0x00}},
    {"Green" , 0, true, 0,0,0, {IBEACON_HEADER,0xA4,0x95,0xBB,0x20,0xC5,0xB1,0x4B,0x44,0xB5,0x12,0x13,0x70,0xF0,0x2D,0x74,0xDE, 0x00,0x00,0x00,0x00,0x00}},
    {"Black" , 0, true, 0,0,0, {IBEACON_HEADER,0xA4,0x95,0xBB,0x30,0xC5,0xB1,0x4B,0x44,0xB5,0x12,0x13,0x70,0xF0,0x2D,0x74,0xDE, 0x00,0x00,0x00,0x00,0x00}},
    {"Purple", 0, true, 0,0,0, {IBEACON_HEADER,0xA4,0x95,0xBB,0x40,0xC5,0xB1,0x4B,0x44,0xB5,0x12,0x13,0x70,0xF0,0x2D,0x74,0xDE, 0x00,0x00,0x00,0x00,0x00}},
    {"Orange", 0, true, 0,0,0, {IBEACON_HEADER,0xA4,0x95,0xBB,0x50,0xC5,0xB1,0x4B,0x44,0xB5,0x12,0x13,0x70,0xF0,0x2D,0x74,0xDE, 0x00,0x00,0x00,0x00,0x00}},
    {"Blue"  , 0, true, 0,0,0, {IBEACON_HEADER,0xA4,0x95,0xBB,0x60,0xC5,0xB1,0x4B,0x44,0xB5,0x12,0x13,0x70,0xF0,0x2D,0x74,0xDE, 0x00,0x00,0x00,0x00,0x00}},
    {"Yellow", 0, true, 0,0,0, {IBEACON_HEADER,0xA4,0x95,0xBB,0x70,0xC5,0xB1,0x4B,0x44,0xB5,0x12,0x13,0x70,0xF0,0x2D,0x74,0xDE, 0x00,0x00,0x00,0x00,0x00}},
    {"Pink"  , 0, true, 0,0,0, {IBEACON_HEADER,0xA4,0x95,0xBB,0x80,0xC5,0xB1,0x4B,0x44,0xB5,0x12,0x13,0x70,0xF0,0x2D,0x74,0xDE, 0x00,0x00,0x00,0x00,0x00}},
};
#define NUM_TILT (sizeof(tiltDB)/sizeof(tilt_t))

#define IBEACON_TEMP_HI (25)
#define IBEACON_TEMP_LO (26)
#define IBEACON_GRAV_HI (27)
#define IBEACON_GRAV_LO (28)
#define IBEACON_TXPOWER (29)
/*********************************************************************************
*
* Tilt Data Manager External Interface Queue
*
*********************************************************************************/
typedef enum {
BTM_CMD_SET_DATA,
BTM_CMD_PRINT_TABLE,
BTM_CMD_SET_UPDATE,
} btm_cmd_t;
typedef struct {
btm_cmd_t cmd;
int num;
int temperature;
int gravity;
int txPower;
} btm_cmdMsg_t;
static QueueHandle_t btm_cmdQueue=0;
static wiced_timer_ext_t btm_processDataTimer;
/*********************************************************************************
*
* These functions are used to interact with the Bluetooth Advertising Controller
*
*********************************************************************************/
// btm_setAdvPacket
//
// This function updates what the advertising packets and the state of the BT controller:
// It will loop through the table of iBeacons... then if they are in a slot & they are dirty
// it will move them to the contoller and enable advertisements on that slot
void btm_setAdvPacket()
{
static wiced_bt_ble_multi_adv_params_t myParams = {
.adv_int_min = BTM_BLE_ADVERT_INTERVAL_MIN,
.adv_int_max = 96,
.adv_type = MULTI_ADVERT_NONCONNECTABLE_EVENT,
.channel_map = BTM_BLE_ADVERT_CHNL_37 | BTM_BLE_ADVERT_CHNL_38 | BTM_BLE_ADVERT_CHNL_39,
.adv_filter_policy = BTM_BLE_ADVERT_FILTER_ALL_CONNECTION_REQ_ALL_SCAN_REQ,
.adv_tx_power = MULTI_ADV_TX_POWER_MAX_INDEX,
.peer_bd_addr = {0},
.peer_addr_type = BLE_ADDR_PUBLIC,
.own_bd_addr = {0},
.own_addr_type = BLE_ADDR_PUBLIC,
};
for(int i=0;i<NUM_TILT;i++)
{
if(tiltDB[i].slot && tiltDB[i].dirty)
{
tiltDB[i].dirty = false;
wiced_set_multi_advertisement_data(tiltDB[i].advData,sizeof(tiltDB[i].advData),tiltDB[i].slot);
wiced_set_multi_advertisement_params(tiltDB[i].slot,&myParams);
wiced_start_multi_advertisements( MULTI_ADVERT_START, tiltDB[i].slot );
}
}
}
/* btm_activate
*
* This function will put the tilt in the database entry num
* into the next available advertising slot
*
*/
void btm_activate(int num)
{
// Keep track of the number of currently active iBeacons
static int btm_active=0;
CY_ASSERT(num<NUM_TILT);
if(tiltDB[num].slot == 0) // Make sure that it is not already in a slow
{
btm_active += 1;
tiltDB[num].slot = btm_active;
tiltDB[num].dirty = true;
}
}
/*********************************************************************************
*
* This next set of functions is the API to the database
*
*********************************************************************************/
int btm_getTemperature(int num)
{
    return (uint16_t)tiltDB[num].advData[IBEACON_TEMP_HI] << 8 | tiltDB[num].advData[IBEACON_TEMP_LO];
}

void btm_setTemperature(int num,uint16_t temperature)
{
    if(temperature > 150)
        temperature = 10;
    if(temperature<10)
        temperature = 150;

    int oldtemp = btm_getTemperature(num);

    tiltDB[num].advData[IBEACON_TEMP_HI] = (temperature & 0xFF00) >> 8;
    tiltDB[num].advData[IBEACON_TEMP_LO] = temperature & 0xFF;
    if(temperature != oldtemp)
        tiltDB[num].dirty = true;
}

int btm_getGravity(int num)
{
    return (uint16_t)tiltDB[num].advData[IBEACON_GRAV_HI] << 8 | tiltDB[num].advData[IBEACON_GRAV_LO];
}

void btm_setGravity(int num,uint16_t gravity)
{
    // These if's cause the gravity to "wrap around" at 1200 and 900
    if(gravity>1200)
        gravity = 900;
    if(gravity <900)
        gravity = 1200;

    int oldgrav = btm_getGravity(num);
    tiltDB[num].advData[IBEACON_GRAV_HI] = (uint8_t)((gravity & 0xFF00) >> 8);
    tiltDB[num].advData[IBEACON_GRAV_LO] = (uint8_t)(gravity & 0xFF);
    if(oldgrav != gravity)
        tiltDB[num].dirty = true;
}

void btm_setTxPower(int num, int8_t txPower)
{
    tiltDB[num].advData[IBEACON_TXPOWER] = txPower;
    tiltDB[num].dirty = true;
}
void btm_printTable()
{
printf("\n# Color S Rate T UpT Grav UpG TxP\n");
for(int i=0;i<NUM_TILT;i++)
{
printf("%d %6s %d %5d %3d %2d %4d %2d %3d\n",i,
tiltDB[i].colorName,tiltDB[i].slot,
tiltDB[i].rate*BTM_QUEUE_RATE,
btm_getTemperature(i),tiltDB[i].tempUpdate,
btm_getGravity(i),tiltDB[i].gravUpdate,
tiltDB[i].advData[29]);
}
}
/* btm_processCmdQueue
*
*  This function is called by a timer every BTM_QUEUE_RATE ms (around 200ms)
*  It processes commands from the GUI
*  It also updates the adverting packets if they are being updated at a rate
*
*/
void btm_processCmdQueue( wiced_timer_callback_arg_t cb_params )
{
    static int count = 0; // This counts the numbers of times the callback has happend

    btm_cmdMsg_t msg;
    while(xQueueReceive(btm_cmdQueue,&msg,0) == pdTRUE)
    {
        switch(msg.cmd)
        {
            case BTM_CMD_SET_DATA:
                btm_setGravity(msg.num,msg.gravity);
                btm_setTemperature(msg.num,msg.temperature);
                btm_setTxPower(msg.num,msg.txPower);
                btm_activate(msg.num);
            break;

            case BTM_CMD_PRINT_TABLE:
                btm_printTable();
            break;

            case BTM_CMD_SET_UPDATE:
                tiltDB[msg.num].tempUpdate = msg.temperature;
                tiltDB[msg.num].gravUpdate = msg.gravity;
                tiltDB[msg.num].rate = msg.txPower / BTM_QUEUE_RATE;
            break;
        }
    }
    count = count + 1;

    // This block of code updates the current values with the update rate
    for(int i=0;i<NUM_TILT;i++)
    {
        // If the slot active
        // and the update rate says that it is time
        if(tiltDB[i].slot && count % tiltDB[i].rate  == 0)
        {
            btm_setTemperature(i,btm_getTemperature(i) + tiltDB[i].tempUpdate);
            btm_setGravity(i,btm_getGravity(i) + tiltDB[i].gravUpdate);
        }
    }
    btm_setAdvPacket();
}
/**************************************************************************************************
* Function Name: app_bt_management_callback()
***************************************************************************************************
* Summary:
* This is a Bluetooth stack event handler function to receive management events from
* the BLE stack and process as per the application.
*
* Parameters:
* wiced_bt_management_evt_t event : BLE event code of one byte length
* wiced_bt_management_evt_data_t *p_event_data: Pointer to BLE management event structures
*
* Return:
* wiced_result_t: Error code from WICED_RESULT_LIST or BT_RESULT_LIST
*
*************************************************************************************************/
wiced_result_t app_bt_management_callback(wiced_bt_management_evt_t event, wiced_bt_management_evt_data_t *p_event_data)
{
    wiced_result_t result = WICED_BT_SUCCESS;

    switch (event)
    {
        case BTM_ENABLED_EVT:
            printf("Started BT Stack Succesfully\n");
            btm_cmdQueue = xQueueCreate(10,sizeof(btm_cmdMsg_t));
            wiced_init_timer_ext(&btm_processDataTimer,btm_processCmdQueue,0,WICED_TRUE);
            wiced_start_timer_ext(&btm_processDataTimer,BTM_QUEUE_RATE);
        break;

        case BTM_MULTI_ADVERT_RESP_EVENT: // Do nothing...
        break;

        default:
            printf("Unhandled Bluetooth Management Event: %s\n", btutil_getBTEventName( event));
        break;
    }

    return result;
}
/*********************************************************************************
*
* These are publicly callable functions to cause actions by the bluetooth manager
* These are called by the GUI
*
*********************************************************************************/
void btm_printTableCmd()
{
    if(btm_cmdQueue == 0)
        return;

    btm_cmdMsg_t msg;
    msg.cmd =    BTM_CMD_PRINT_TABLE;
    xQueueSend(btm_cmdQueue,&msg,0);
}

void btm_setDataCmd(int num,int temperature,int gravity,int txPower)
{
    if(btm_cmdQueue == 0)
        return;

    btm_cmdMsg_t msg;
    msg.cmd =    BTM_CMD_SET_DATA;
    msg.num = num;
    msg.temperature = temperature;
    msg.gravity = gravity;
    msg.txPower = txPower;
    xQueueSend(btm_cmdQueue,&msg,0);
}


void btm_updateDataCmd(int num,int rate ,int temperature,int gravity )
{
    if(btm_cmdQueue == 0)
        return;
    btm_cmdMsg_t msg;
    msg.cmd =    BTM_CMD_SET_UPDATE;
    msg.num = num;
    msg.temperature = temperature;
    msg.gravity = gravity;
    msg.txPower = rate;
    xQueueSend(btm_cmdQueue,&msg,0);
}
main.c
#include "cyhal.h"
#include "cybsp.h"
#include "cy_retarget_io.h"
#include <stdio.h>
#include "FreeRTOS.h"
#include "task.h"
#include "usrcmd.h"
#include "bluetoothManager.h"
#include "cycfg_bt_settings.h"
#include "bt_platform_cfg_settings.h"
volatile int uxTopUsedPriority ;
TaskHandle_t blinkTaskHandle;
void blink_task(void *arg)
{
cyhal_gpio_init(CYBSP_USER_LED,CYHAL_GPIO_DIR_OUTPUT,CYHAL_GPIO_DRIVE_STRONG,0);
for(;;)
{
cyhal_gpio_toggle(CYBSP_USER_LED);
vTaskDelay(500);
}
}
int main(void)
{
uxTopUsedPriority = configMAX_PRIORITIES - 1 ; // enable OpenOCD Thread Debugging
/* Initialize the device and board peripherals */
cybsp_init() ;
__enable_irq();
cy_retarget_io_init(CYBSP_DEBUG_UART_TX, CYBSP_DEBUG_UART_RX, CY_RETARGET_IO_BAUDRATE);
cybt_platform_config_init(&bt_platform_cfg_settings);
wiced_bt_stack_init (app_bt_management_callback, &wiced_bt_cfg_settings);
// Stack size in WORDs
// Idle task = priority 0
xTaskCreate(blink_task, "blinkTask", configMINIMAL_STACK_SIZE,0 /* args */ ,0 /* priority */, &blinkTaskHandle);
xTaskCreate(usrcmd_task, "usrcmd_task", configMINIMAL_STACK_SIZE*4,0 /* args */ ,0 /* priority */, 0);
vTaskStartScheduler();
}
/* [] END OF FILE */
usrcmd.c
/**
* @file usrcmd.c
* @author CuBeatSystems
* @author Shinichiro Nakamura
* @copyright
* ===============================================================
* Natural Tiny Shell (NT-Shell) Version 0.3.1
* ===============================================================
* Copyright (c) 2010-2016 Shinichiro Nakamura
*
* Permission is hereby granted, free of charge, to any person
* obtaining a copy of this software and associated documentation
* files (the "Software"), to deal in the Software without
* restriction, including without limitation the rights to use,
* copy, modify, merge, publish, distribute, sublicense, and/or
* sell copies of the Software, and to permit persons to whom the
* Software is furnished to do so, subject to the following
* conditions:
*
* The above copyright notice and this permission notice shall be
* included in all copies or substantial portions of the Software.
*
* THE SOFTWARE IS PROVIDED "AS IS", WITHOUT WARRANTY OF ANY KIND,
* EXPRESS OR IMPLIED, INCLUDING BUT NOT LIMITED TO THE WARRANTIES
* OF MERCHANTABILITY, FITNESS FOR A PARTICULAR PURPOSE AND
* NONINFRINGEMENT. IN NO EVENT SHALL THE AUTHORS OR COPYRIGHT
* HOLDERS BE LIABLE FOR ANY CLAIM, DAMAGES OR OTHER LIABILITY,
* WHETHER IN AN ACTION OF CONTRACT, TORT OR OTHERWISE, ARISING
* FROM, OUT OF OR IN CONNECTION WITH THE SOFTWARE OR THE USE OR
* OTHER DEALINGS IN THE SOFTWARE.
*/
#include "ntopt.h"
#include "ntlibc.h"
#include "ntshell.h"
#include <stdio.h>
#include "ntshell.h"
#include "ntlibc.h"
#include "psoc6_ntshell_port.h"
#include "FreeRTOS.h"
#include "task.h"
#include "bluetoothManager.h"
static ntshell_t ntshell;
typedef int (*USRCMDFUNC)(int argc, char **argv);
static int usrcmd_ntopt_callback(int argc, char **argv, void *extobj);
static int usrcmd_help(int argc, char **argv);
static int usrcmd_info(int argc, char **argv);
static int usrcmd_clear(int argc, char **argv);
static int usrcmd_pargs(int argc, char **argv);
#ifdef configUSE_TRACE_FACILITY
#if configUSE_STATS_FORMATTING_FUNCTIONS ==1
static int usrcmd_list(int argc, char **argv);
#endif
#endif
static int usrcmd_print(int argc, char **argv);
static int usrcmd_set(int argc, char **argv);
static int usrcmd_update(int argc, char **argv);
typedef struct {
char *cmd;
char *desc;
USRCMDFUNC func;
} cmd_table_t;
static const cmd_table_t cmdlist[] = {
{ "help", "This is a description text string for help command.", usrcmd_help },
{ "info", "This is a description text string for info command.", usrcmd_info },
{ "clear", "Clear the screen", usrcmd_clear },
{ "pargs","print the list of arguments", usrcmd_pargs},
#ifdef configUSE_TRACE_FACILITY
#if configUSE_STATS_FORMATTING_FUNCTIONS ==1
{ "tasks","print the list of RTOS Tasks", usrcmd_list},
#endif
#endif
{ "print", "Print table", usrcmd_print },
{ "set", "set num temperature gravity txpower", usrcmd_set },
{ "update", "update num temperature gravity", usrcmd_update },
};
void usrcmd_task()
{
setvbuf(stdin, NULL, _IONBF, 0);
printf("Started user command task with NT Shell\n");
ntshell_init(
&ntshell,
ntshell_read,
ntshell_write,
ntshell_callback,
(void *)&ntshell);
ntshell_set_prompt(&ntshell, "AnyCloud> ");
vtsend_erase_display(&ntshell.vtsend);
ntshell_execute(&ntshell);
}
int usrcmd_execute(const char *text)
{
return ntopt_parse(text, usrcmd_ntopt_callback, 0);
}
static int usrcmd_ntopt_callback(int argc, char **argv, void *extobj)
{
if (argc == 0) {
return 0;
}
const cmd_table_t *p = &cmdlist[0];
for (unsigned int i = 0; i < sizeof(cmdlist) / sizeof(cmdlist[0]); i++) {
if (ntlibc_strcmp((const char *)argv[0], p->cmd) == 0) {
return p->func(argc, argv);
}
p++;
}
printf("%s","Unknown command found.\n");
return 0;
}
static int usrcmd_help(int argc, char **argv)
{
const cmd_table_t *p = &cmdlist[0];
for (unsigned int i = 0; i < sizeof(cmdlist) / sizeof(cmdlist[0]); i++) {
printf("%s",p->cmd);
printf("%s","\t:");
printf("%s",p->desc);
printf("%s","\n");
p++;
}
return 0;
}
static int usrcmd_info(int argc, char **argv)
{
if (argc != 2) {
printf("%s","info sys\n");
printf("%s","info ver\n");
return 0;
}
if (ntlibc_strcmp(argv[1], "sys") == 0) {
printf("%s","PSoC 6 MBED Monitor\n");
return 0;
}
if (ntlibc_strcmp(argv[1], "ver") == 0) {
printf("%s","Version 0.0.0\n");
return 0;
}
printf("%s","Unknown sub command found\n");
return -1;
}
static int usrcmd_clear(int argc, char **argv)
{
vtsend_erase_display_home(&ntshell.vtsend);
return 0;
}
static int usrcmd_pargs(int argc, char **argv)
{
printf("ARGC = %d\n",argc);
for(int i =0;i<argc;i++)
{
printf("argv[%d] = %s\n",i,argv[i]);
}
return 0;
}
#ifdef configUSE_TRACE_FACILITY
#if configUSE_STATS_FORMATTING_FUNCTIONS ==1
static int usrcmd_list(int argc,char **argv)
{
// 40 bytes/task + some margin
char buff[40*10 + 100];
vTaskList( buff );
printf("Name State Priority Stack Num\n");
printf("------------------------------------------\n");
printf("%s",buff);
printf("‘B’ – Blocked\n‘R’ – Ready\n‘D’ – Deleted (waiting clean up)\n‘S’ – Suspended, or Blocked without a timeout\n");
printf("Stack = bytes free at highwater\n");
return 0;
}
#endif
#endif
static int usrcmd_print(int argc, char **argv)
{
    btm_printTableCmd();
    return 0;
}

static int usrcmd_set(int argc, char **argv)
{
    int gravity;
    int temperature;
    int txPower;
    int num;
    if(argc == 5)
    {
        sscanf(argv[1],"%d",&num);
        sscanf(argv[2],"%d",&temperature);
        sscanf(argv[3],"%d",&gravity);
        sscanf(argv[4],"%d",&txPower);

        btm_setDataCmd(num,temperature,gravity,txPower);
    }
    return 0;
}

static int usrcmd_update(int argc, char **argv)
{
    int gravity;
    int temperature;
    int rate;
    int num;
    if(argc == 5)
    {
        sscanf(argv[1],"%d",&num);
        sscanf(argv[2],"%d",&rate);
        sscanf(argv[3],"%d",&temperature);
        sscanf(argv[4],"%d",&gravity);

        btm_updateDataCmd(num,rate,temperature,gravity);
    }
    return 0;
}