Summary
This article updates the user interface to have input as well as output by adding a CapSense GUI.
This series is broken up into the following 12 articles with a few additional possible articles.
Tilt Hydrometer (Part 1) Overview & Out-of-Box
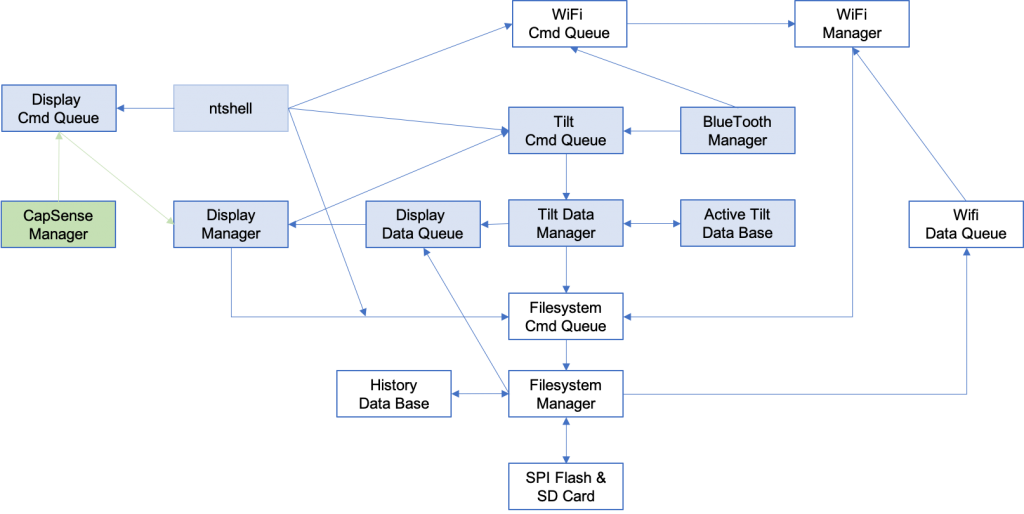
Tilt Hydrometer (Part 2) Architecture
Tilt Hydrometer (Part 3) Advertising Scanner
Tilt Hydrometer (Part 4) Advertising Packet Error?
Tilt Hydrometer (Part 5) Tilt Simulator & Multi Advertising iBeacons
Tilt Hydrometer (Part 6) Tilt Simulator an Upgrade
Tilt Hydrometer (Part 7) Advertising Database
Tilt Hydrometer (Part 8) Read the Database
Tilt Hydrometer (Part 9) An LCD Display
Tilt Hydrometer (Part 10) The Display State Machine
Tilt Hydrometer (Part 11) Draw the Display Screens
Tilt Hydrometer (Part 12) CapSense
Tilt Hydrometer: LittleFS & SPI Flash (Part ?)
Tilt Hydrometer: WiFi Introducer (Part ?)
Tilt Hydrometer: WebServer (Part ?)
Tilt Hydrometer: Amazon MQTT (Part ?)
Tilt Hydrometer: Printed Circuit Board (Part ?)
You can get the source code from git@github.com:iotexpert/Tilt2.git This repository has tags for each of the articles which can be accessed with "git checkout part12" You can find the Tilt Simulator at git@github.com:iotexpert/TiltSimulator.git.
Story
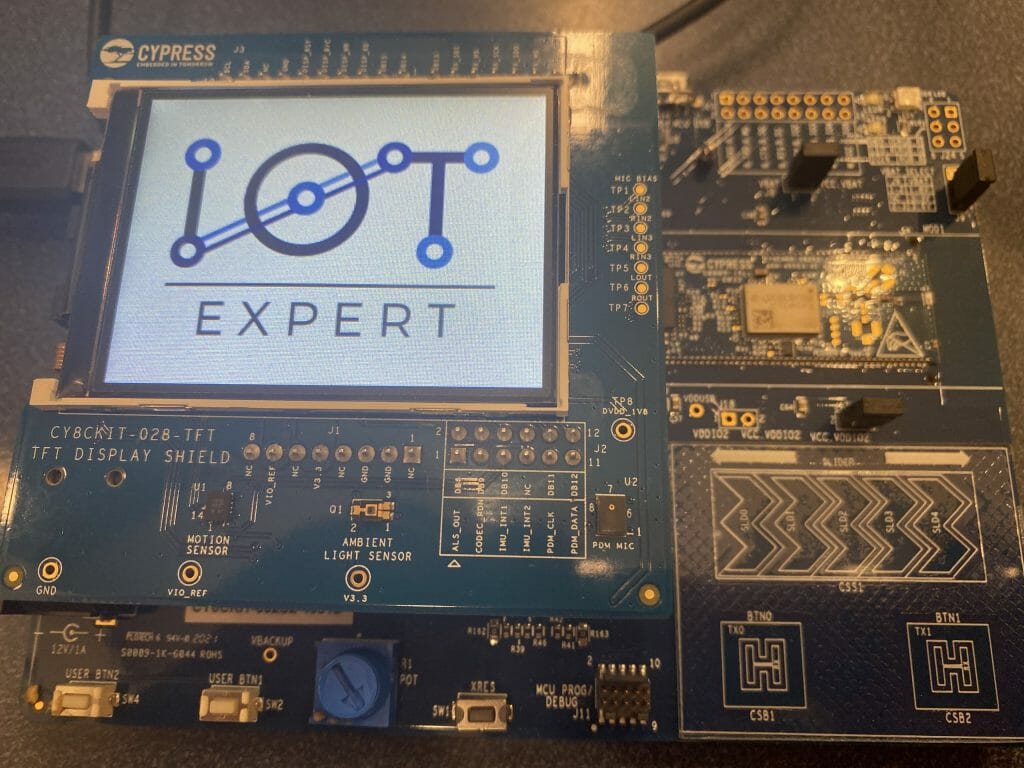
If you look at the development kit you will notice on the right side that there are two CapSense buttons and one slider. I know that this is going to come as a great shock to those of you who know me, but Im not very patient. I don’t always want to wait for the system to page through screens every 5 seconds. So let’s turn on those buttons to do something useful. But what? How about the left button will toggle “auto mode” and the right button will go to the next screen.
Board Support Package
We (Cypress/Infineon) created all of the setup stuff you need to make CapSense work on all of our development kits. If you run “make config” you can look at the configuration of the Board Support Package for this development kit. Notice that
- The CapSense is enabled
- The pins are setup for two buttons and a slider.

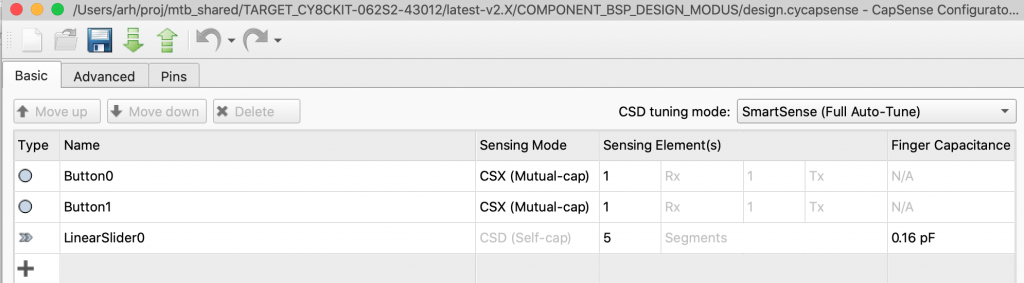
When you run the CapSense Configurator you can see that there is a slider and two buttons
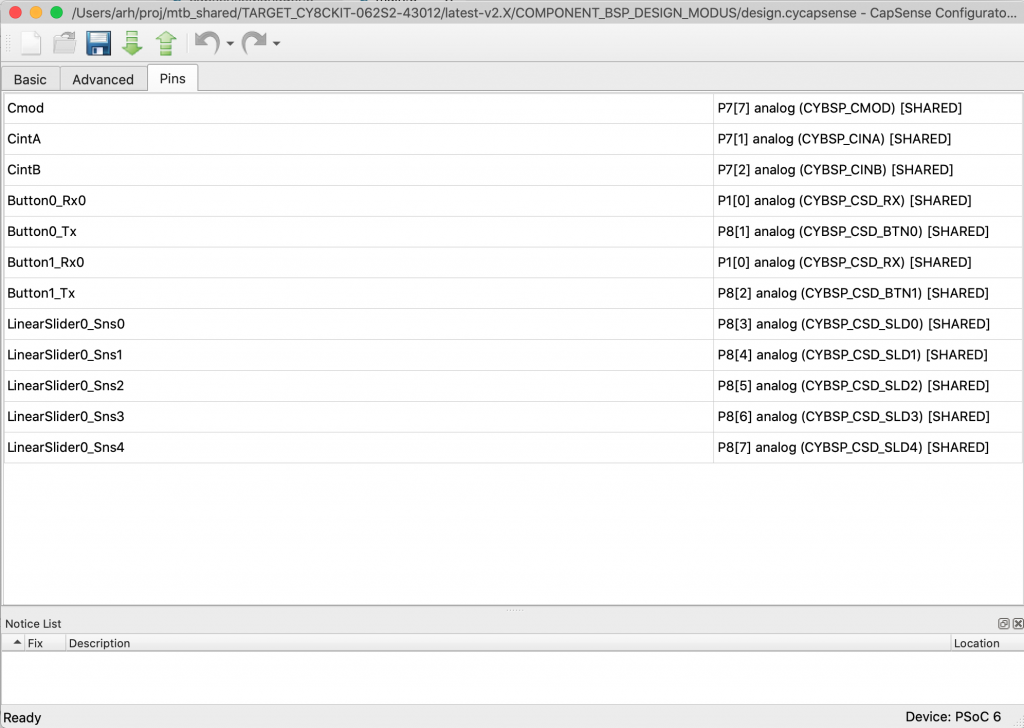
And they are attached to these pins:
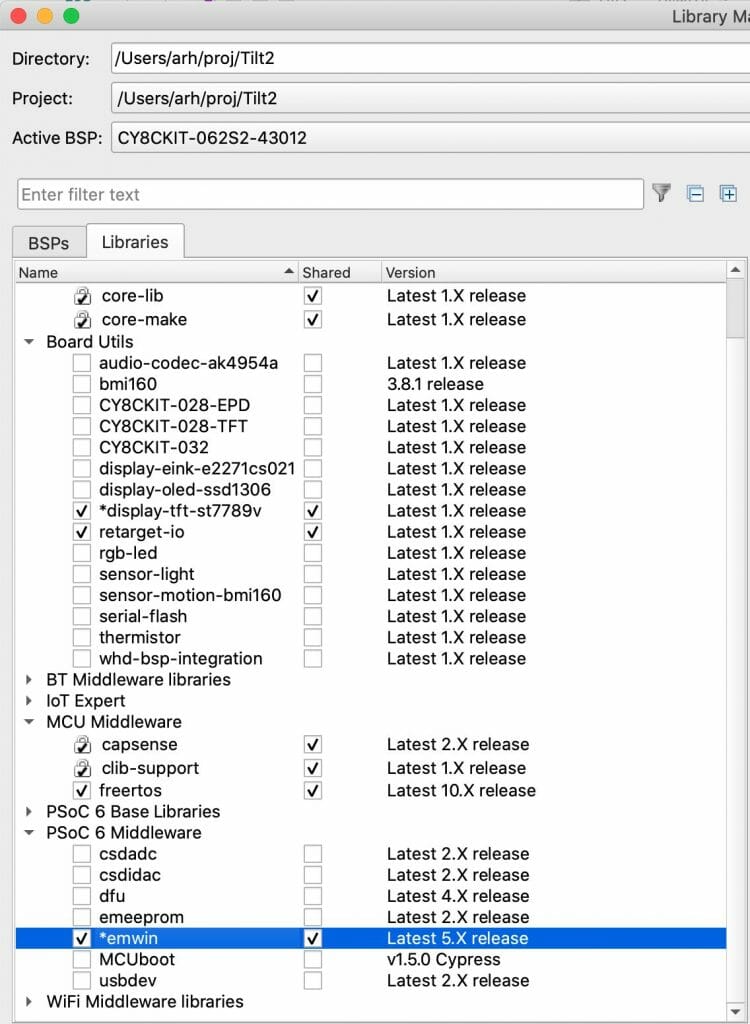
When you run the Library Manager you can also see that the CapSense middleware is already loaded into your project (notice MCU Middleware)
The Firmware
Let’s add the new capsenseManager.h, capsenseManager.c and update main.c. The capsenseManager.h will just define the task:
#pragma once
void cpm_task();
main.c needs to start the task.
xTaskCreate(cpm_task, "CapSense Manager", configMINIMAL_STACK_SIZE*2,0 /* args */ ,0 /* priority */, 0);
All of the action takes place in capsenseManager.c. In the file there are really only two things that are even mildly complicated. The CapSense block is a combination of a hardware block plus some firmware plus some middleware. The hardware block does the CapSense to digital conversion then triggers an interrupt. The interrupt firmware is responsible for managing the hardware block including sequencing the measurements, running the baseline etc. When you trigger a scan, there is a back and forth between the hardware block and the firmware that must happen in an ISR. Finally when things are done, you can ask for a callback.
The flow looks like this
- Initialize the hardware
- Initialize the Interrupt Service Routine
- Ask for a Callback
- Enable the CapSense block
- Start a scan
- Wait for the callback
- Process the results
- Start a scan (repeat)
Initialize the CapSense (steps 1-4)
To get this going you need to:
- Define the task
- Initialize a semaphore (which you will use in the callback)
- Initialize the hardware block
- Initialize the interrupt
- Register the callback
- Enable the CapSense block
void cpm_task()
{
    cpm_semaphore = xSemaphoreCreateCounting(10,0);

    static const cy_stc_sysint_t CapSense_ISR_cfg =
    {
        .intrSrc = csd_interrupt_IRQn, /* Interrupt source is the CSD interrupt */
        .intrPriority = 7u,            /* Interrupt priority is 7 */
    };

    Cy_CapSense_Init(&cy_capsense_context);

    Cy_SysInt_Init(&CapSense_ISR_cfg, &cpm_isr);
    NVIC_ClearPendingIRQ(CapSense_ISR_cfg.intrSrc);
    NVIC_EnableIRQ(CapSense_ISR_cfg.intrSrc);

    Cy_CapSense_RegisterCallback	(CY_CAPSENSE_END_OF_SCAN_E,cpm_callback, &cy_capsense_context);
    Cy_CapSense_Enable (&cy_capsense_context);
The ISR & CallBack
The ISR is trivial. All it does is run our interrupt handler.
The callback just gives a semaphore which has held the task in suspension while the CapSense is running.
static void cpm_isr(void)
{
    Cy_CapSense_InterruptHandler(CYBSP_CSD_HW, &cy_capsense_context);
}

static void cpm_callback(cy_stc_active_scan_sns_t *ptrActiveScan)
{
    xSemaphoreGiveFromISR(cpm_semaphore,portMAX_DELAY);
}
Main Task Loop
In the main loop I
- Scan all of the widgets… then wait until the scan is done by holding on the semaphore.
- After the scan is done I need to run all of the Cypress code which manages the data.
- Then I find out the state of the two buttons.
- Based on the state I call either the toggle auto mode or next screen command
Notice that I wait for 20ms after I get this done. What this does is give me a GUI update rate of about 50hz. Probably 10hz would be fine.
  int button0Prev = 0;
    int button1Prev = 0;
    int button0Curr = 0;
    int button1Curr = 0;
    while(1)
    {
        Cy_CapSense_ScanAllWidgets (&cy_capsense_context);
        xSemaphoreTake(cpm_semaphore,portMAX_DELAY);
        Cy_CapSense_ProcessAllWidgets(&cy_capsense_context);
        button0Curr = Cy_CapSense_IsWidgetActive(CY_CAPSENSE_BUTTON0_WDGT_ID,&cy_capsense_context);
        button1Curr = Cy_CapSense_IsWidgetActive(CY_CAPSENSE_BUTTON1_WDGT_ID,&cy_capsense_context);

        if(button0Curr != button0Prev && button0Curr == 1)
        {
            dm_submitAutoCmd();
        }
        if(button1Curr != button1Prev && button1Curr == 1)
        {
            dm_submitNextScreenCmd();
        }

        button0Prev = button0Curr;
        button1Prev = button1Curr;

        vTaskDelay(20); // 50 Hz Update Rate

    }
capSenseManager.c
Here is the whole file.
#include <stdio.h>

#include "cycfg_capsense.h"

#include "FreeRTOS.h"
#include "task.h"
#include "semphr.h"

#include "displayManager.h"

static SemaphoreHandle_t cpm_semaphore;

static void cpm_isr(void)
{
    Cy_CapSense_InterruptHandler(CYBSP_CSD_HW, &cy_capsense_context);
}

static void cpm_callback(cy_stc_active_scan_sns_t *ptrActiveScan)
{
    xSemaphoreGiveFromISR(cpm_semaphore,portMAX_DELAY);
}

void cpm_task()
{
    cpm_semaphore = xSemaphoreCreateCounting(10,0);

    static const cy_stc_sysint_t CapSense_ISR_cfg =
    {
        .intrSrc = csd_interrupt_IRQn, /* Interrupt source is the CSD interrupt */
        .intrPriority = 7u,            /* Interrupt priority is 7 */
    };

    Cy_CapSense_Init(&cy_capsense_context);

    Cy_SysInt_Init(&CapSense_ISR_cfg, &cpm_isr);
    NVIC_ClearPendingIRQ(CapSense_ISR_cfg.intrSrc);
    NVIC_EnableIRQ(CapSense_ISR_cfg.intrSrc);

    Cy_CapSense_RegisterCallback	(CY_CAPSENSE_END_OF_SCAN_E,cpm_callback, &cy_capsense_context);
    Cy_CapSense_Enable (&cy_capsense_context);

    int button0Prev = 0;
    int button1Prev = 0;
    int button0Curr = 0;
    int button1Curr = 0;
    while(1)
    {
        Cy_CapSense_ScanAllWidgets (&cy_capsense_context);
        xSemaphoreTake(cpm_semaphore,portMAX_DELAY);
        Cy_CapSense_ProcessAllWidgets(&cy_capsense_context);
        button0Curr = Cy_CapSense_IsWidgetActive(CY_CAPSENSE_BUTTON0_WDGT_ID,&cy_capsense_context);
        button1Curr = Cy_CapSense_IsWidgetActive(CY_CAPSENSE_BUTTON1_WDGT_ID,&cy_capsense_context);

        if(button0Curr != button0Prev && button0Curr == 1)
        {
            dm_submitAutoCmd();
        }
        if(button1Curr != button1Prev && button1Curr == 1)
        {
            dm_submitNextScreenCmd();
        }

        button0Prev = button0Curr;
        button1Prev = button1Curr;

        vTaskDelay(20); // 50 Hz Update Rate

    }
}


No comment yet, add your voice below!