Summary
This article discusses the new library structure that was released with ModusToolbox 2.2. I explain it by showing the creation of a template project that use FreeRTOS and NT Shell.
Story
I have often started projects from the IoT Expert FreeRTOS template project. I realized the other day that almost always the first thing I do after creating the project is add the NT Shell library. My friend Hassane has a personal mantra that if he is going to do the same job more than once he will always automate it. I should have listened to him on this one because I have done it a bunch of times.
In Modus Toolbox 2.2 we have created a new library scheme which allows sharing of libraries between projects. So this will also be a good example of how that works.
This will also give you another example of adding template projects to your own manifest.
Here is what I am going to do:
- Create a project from the IoT Expert FreeRTOS Template
- Add the NTShell Library & Examine New Library Structure
- Update the Project and Program
- Add the Task List functionality (a nice feature of FreeRTOS)
- Put the new template on GitHub
- Update the IoT Expert App Manifest
- Test the new Template
Create & Test a project from the IoT Expert FreeRTOS Template
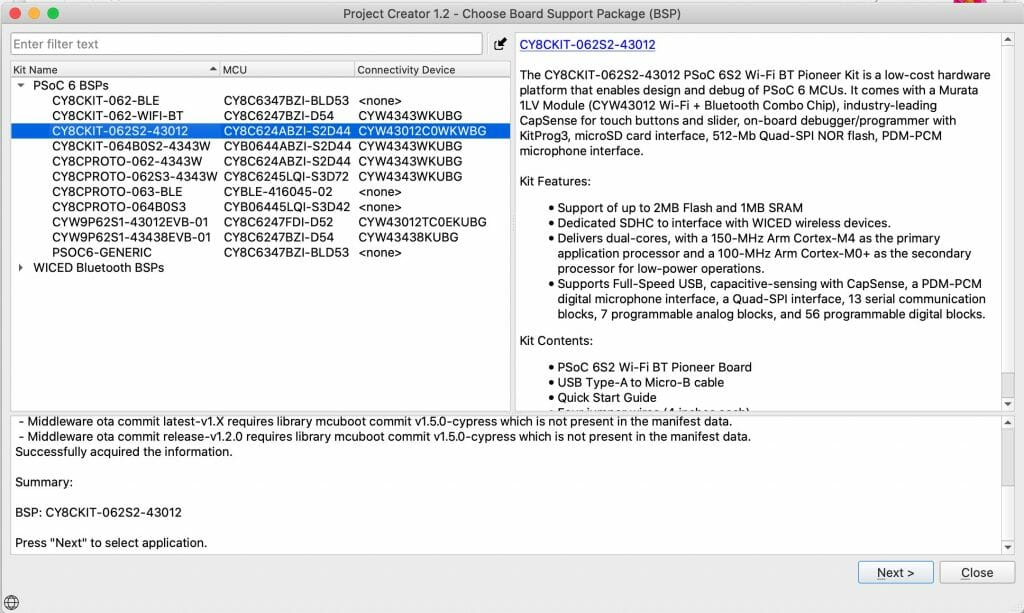
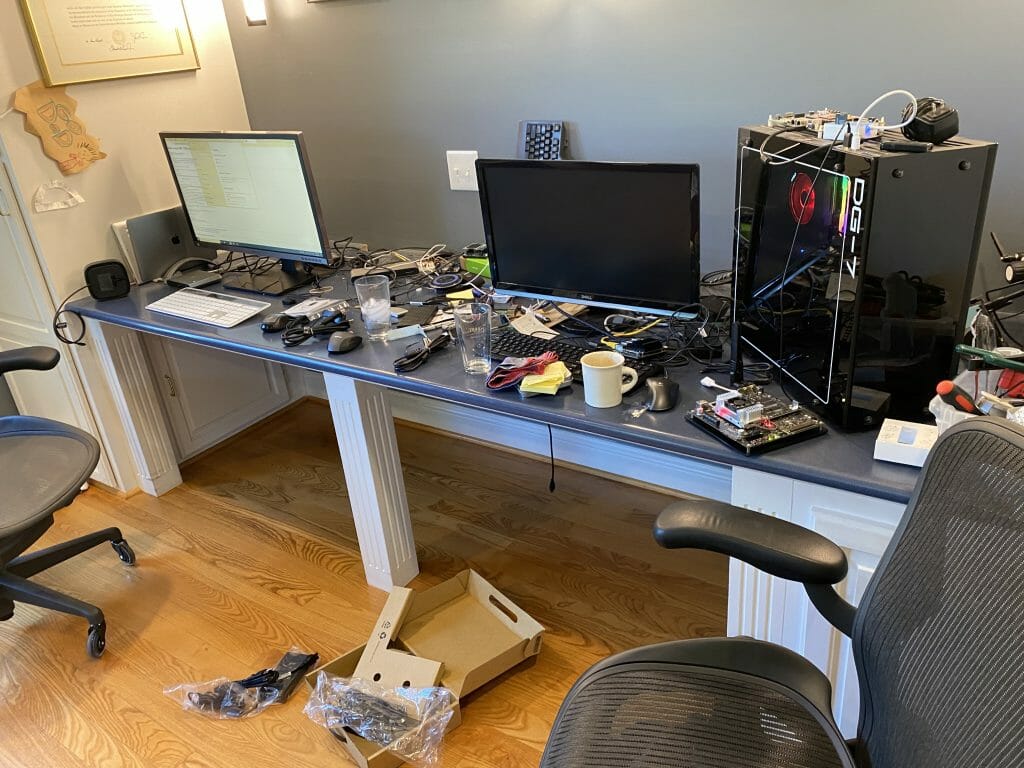
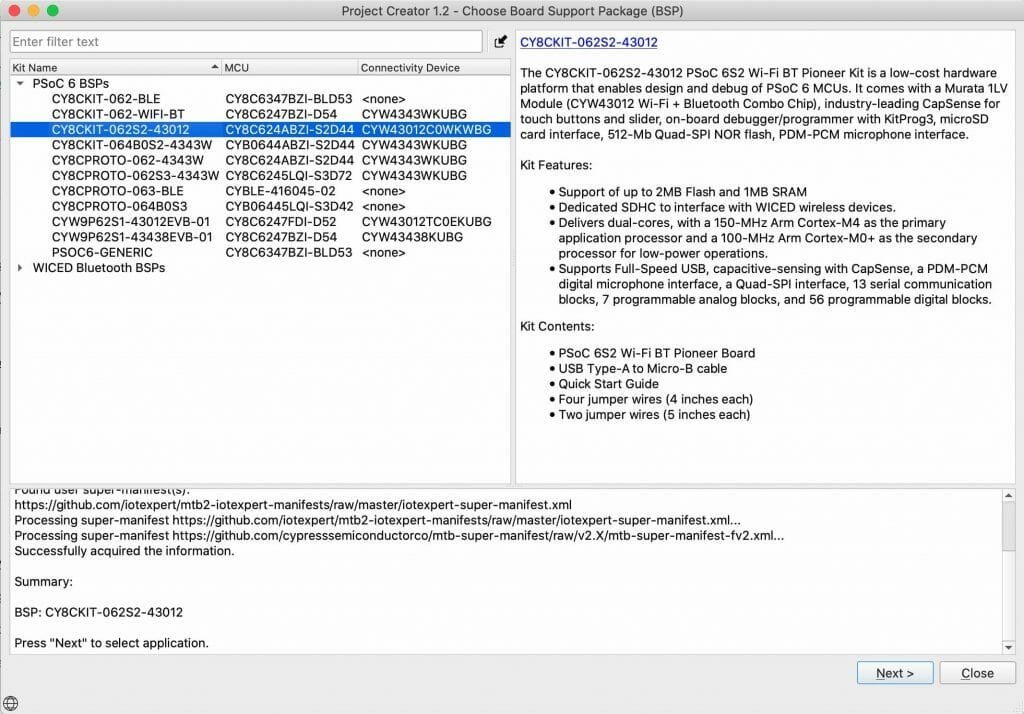
I will start the whole process by creating new project using my existing base template. The kit that I happen to have on my desk right now is the CY8CKIT-062S2-43012.
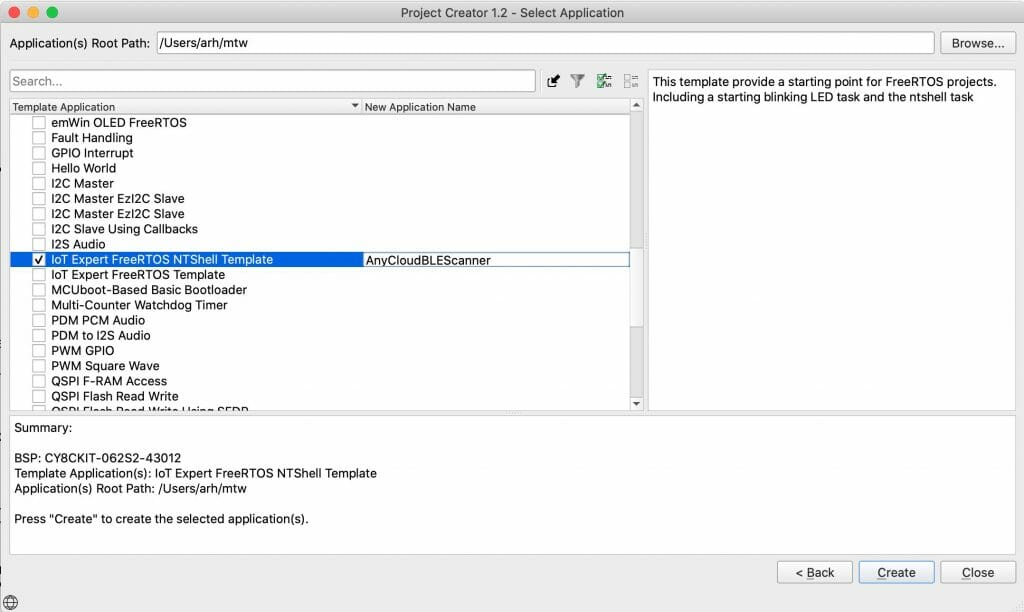
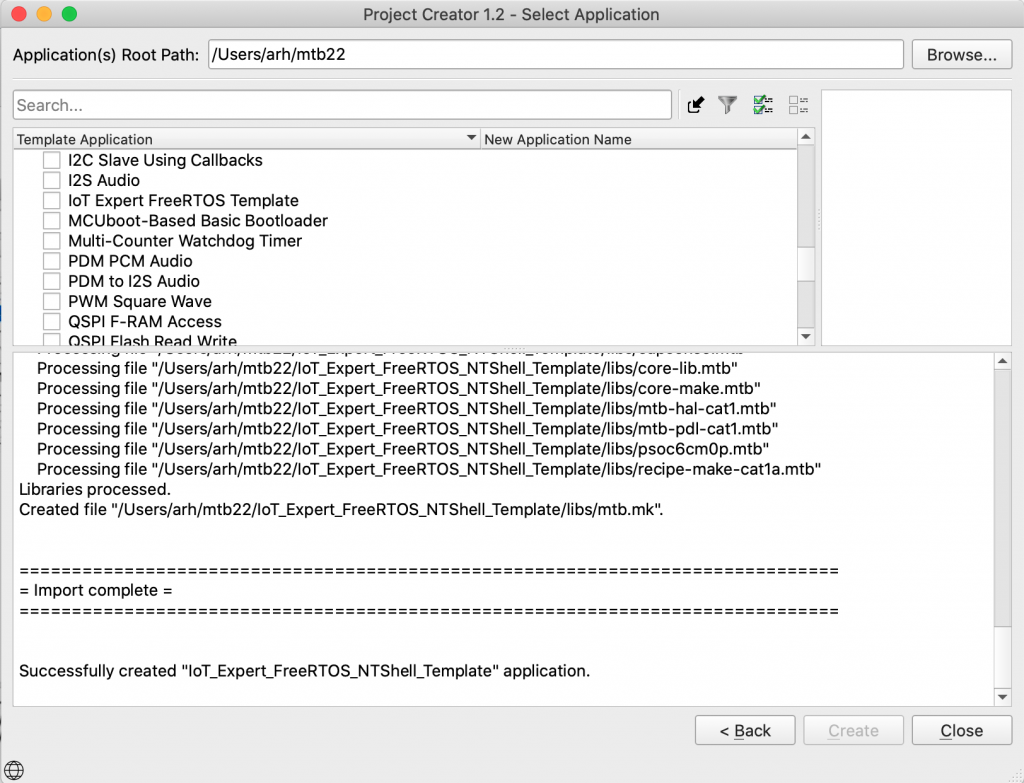
Select the IoT Expert FreeRTOS Template and give it a name. Notice that I add “NTShell” to the name (because that is what Im gonna add)
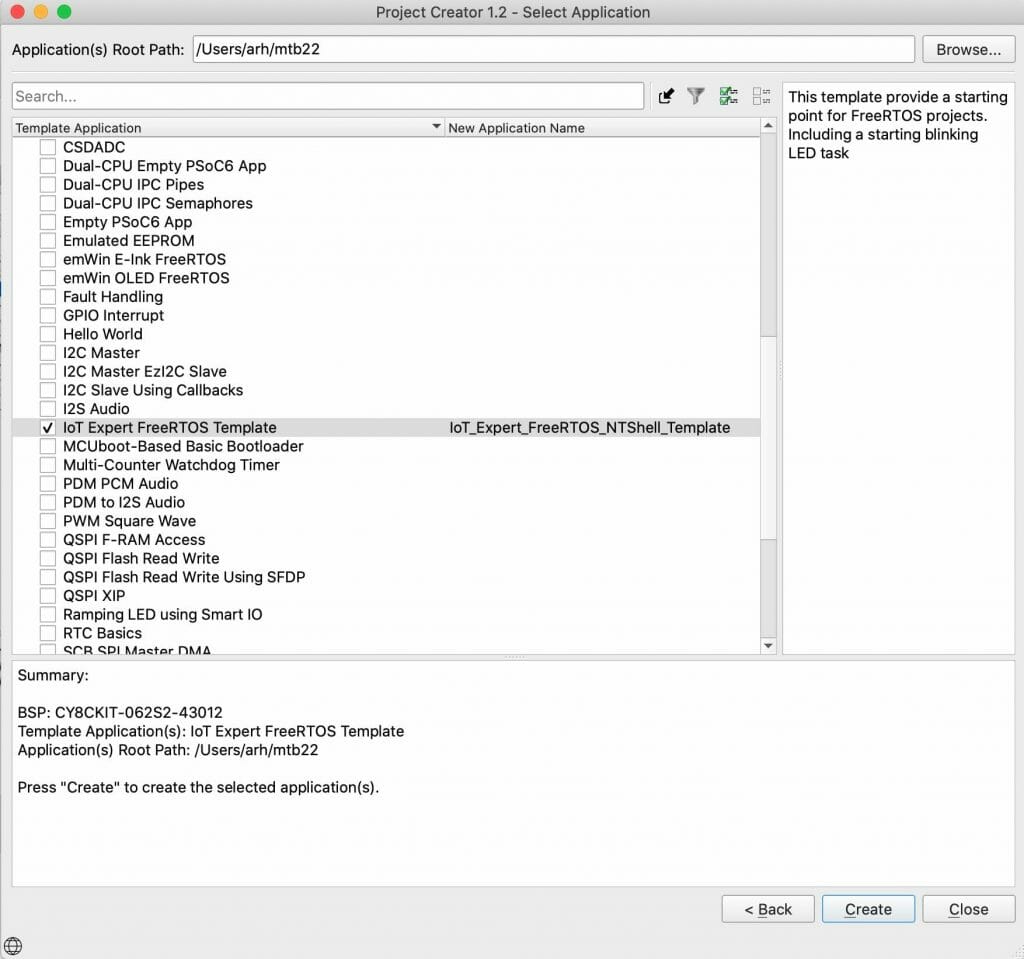
When you click create, Modus will do its magic and build you a complete project.
Today Im going to edit using Visual Studio Code. Actually almost always I edit using Visual Studio Code. You can do all of these tasks using Eclipse as well. To turn my created project into a VSCODE project run “make vscode”
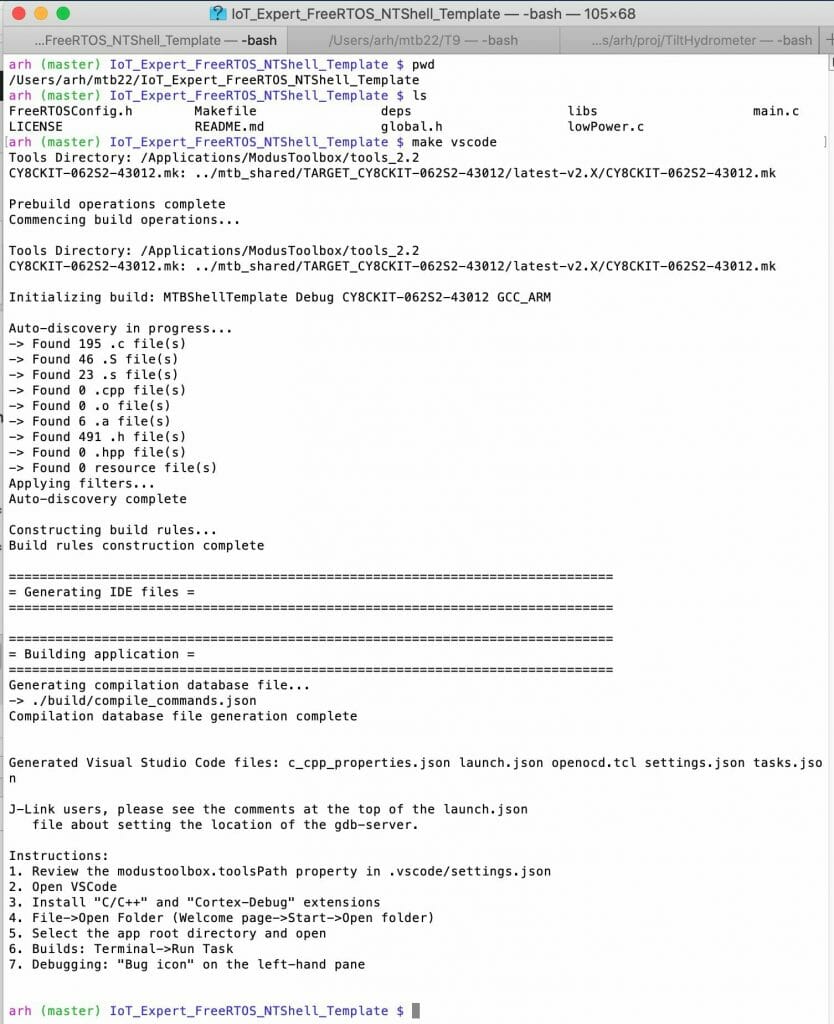
Before getting to far down the road I like to run a build to make sure everything is OK. So “make -j build”
arh (master) IoT_Expert_FreeRTOS_NTShell_Template $ make -j build
Tools Directory: /Applications/ModusToolbox/tools_2.2
CY8CKIT-062S2-43012.mk: ../mtb_shared/TARGET_CY8CKIT-062S2-43012/latest-v2.X/CY8CKIT-062S2-43012.mk

Prebuild operations complete
Commencing build operations...

Tools Directory: /Applications/ModusToolbox/tools_2.2
CY8CKIT-062S2-43012.mk: ../mtb_shared/TARGET_CY8CKIT-062S2-43012/latest-v2.X/CY8CKIT-062S2-43012.mk

Initializing build: MTBShellTemplate Debug CY8CKIT-062S2-43012 GCC_ARM

Auto-discovery in progress...
-> Found 195 .c file(s)
-> Found 46 .S file(s)
-> Found 23 .s file(s)
-> Found 0 .cpp file(s)
-> Found 0 .o file(s)
-> Found 6 .a file(s)
-> Found 491 .h file(s)
-> Found 0 .hpp file(s)
-> Found 0 resource file(s)
Applying filters...
Auto-discovery complete

Constructing build rules...
Build rules construction complete

==============================================================================
= Building application =
==============================================================================
Generating compilation database file...
-> ./build/compile_commands.json
Compilation database file generation complete
Building 183 file(s)
    Compiling app file lowPower.c
    Compiling app file main.c
    Compiling ext file startup_psoc6_02_cm4.S
    Compiling ext file cy_syslib_gcc.S
    Compiling ext file cycfg.c
    Compiling ext file cycfg_capsense.c
    Compiling ext file cycfg_clocks.c

....a bunch of stuff deleted

    Compiling ext file psoc6_04_cm0p_sleep.c
    Compiling ext file cy_retarget_io.c
    Linking output file MTBShellTemplate.elf
==============================================================================
= Build complete =
==============================================================================

Calculating memory consumption: CY8C624ABZI-S2D44 GCC_ARM -Og

   ----------------------------------------------------
  | Section Name         |  Address      |  Size       |
   ----------------------------------------------------
  | .cy_m0p_image        |  0x10000000   |  6044       |
  | .text                |  0x10002000   |  30280      |
  | .ARM.exidx           |  0x10009648   |  8          |
  | .copy.table          |  0x10009650   |  24         |
  | .zero.table          |  0x10009668   |  8          |
  | .data                |  0x080022e0   |  1320       |
  | .cy_sharedmem        |  0x08002808   |  8          |
  | .noinit              |  0x08002810   |  148        |
  | .bss                 |  0x080028a4   |  1324       |
  | .heap                |  0x08002dd0   |  1030704    |
   ----------------------------------------------------

  Total Internal Flash (Available)          2097152
  Total Internal Flash (Utilized)           39848

  Total Internal SRAM (Available)           1046528
  Total Internal SRAM (Utilized with heap)  1033504


arh (master) IoT_Expert_FreeRTOS_NTShell_Template $
Then program it, just to make sure. “make program”
arh (master) IoT_Expert_FreeRTOS_NTShell_Template $ make program
Tools Directory: /Applications/ModusToolbox/tools_2.2
CY8CKIT-062S2-43012.mk: ../mtb_shared/TARGET_CY8CKIT-062S2-43012/latest-v2.X/CY8CKIT-062S2-43012.mk

Prebuild operations complete
Commencing build operations...

Tools Directory: /Applications/ModusToolbox/tools_2.2
CY8CKIT-062S2-43012.mk: ../mtb_shared/TARGET_CY8CKIT-062S2-43012/latest-v2.X/CY8CKIT-062S2-43012.mk

Initializing build: MTBShellTemplate Debug CY8CKIT-062S2-43012 GCC_ARM

Auto-discovery in progress...
-> Found 195 .c file(s)
-> Found 46 .S file(s)
-> Found 23 .s file(s)
-> Found 0 .cpp file(s)
-> Found 0 .o file(s)
-> Found 6 .a file(s)
-> Found 491 .h file(s)
-> Found 0 .hpp file(s)
-> Found 0 resource file(s)
Applying filters...
Auto-discovery complete

Constructing build rules...
Build rules construction complete

==============================================================================
= Building application =
==============================================================================
Generating compilation database file...
-> ./build/compile_commands.json
Compilation database file generation complete
Building 183 file(s)
==============================================================================
= Build complete =
==============================================================================

Calculating memory consumption: CY8C624ABZI-S2D44 GCC_ARM -Og

   ----------------------------------------------------
  | Section Name         |  Address      |  Size       |
   ----------------------------------------------------
  | .cy_m0p_image        |  0x10000000   |  6044       |
  | .text                |  0x10002000   |  30280      |
  | .ARM.exidx           |  0x10009648   |  8          |
  | .copy.table          |  0x10009650   |  24         |
  | .zero.table          |  0x10009668   |  8          |
  | .data                |  0x080022e0   |  1320       |
  | .cy_sharedmem        |  0x08002808   |  8          |
  | .noinit              |  0x08002810   |  148        |
  | .bss                 |  0x080028a4   |  1324       |
  | .heap                |  0x08002dd0   |  1030704    |
   ----------------------------------------------------

  Total Internal Flash (Available)          2097152
  Total Internal Flash (Utilized)           39848

  Total Internal SRAM (Available)           1046528
  Total Internal SRAM (Utilized with heap)  1033504


Programming target device...
Open On-Chip Debugger 0.10.0+dev-4.1.0.1058 (2020-08-11-03:45)
Licensed under GNU GPL v2
For bug reports, read
	http://openocd.org/doc/doxygen/bugs.html
Info : auto-selecting first available session transport "swd". To override use 'transport select <transport>'.
adapter speed: 2000 kHz
adapter srst delay: 25
adapter srst pulse_width: 25
** Auto-acquire enabled, use "set ENABLE_ACQUIRE 0" to disable
cortex_m reset_config sysresetreq
cortex_m reset_config sysresetreq
Info : Using CMSIS loader 'CY8C6xxA_SMIF' for bank 'psoc6_smif0_cm0' (footprint 14672 bytes)
Warn : SFlash programming allowed for regions: USER, TOC, KEY
Info : CMSIS-DAP: SWD  Supported
Info : CMSIS-DAP: FW Version = 2.0.0
Info : CMSIS-DAP: Interface Initialised (SWD)
Info : SWCLK/TCK = 1 SWDIO/TMS = 1 TDI = 0 TDO = 0 nTRST = 0 nRESET = 1
Info : CMSIS-DAP: Interface ready
Info : KitProg3: FW version: 1.14.514
Info : KitProg3: Pipelined transfers disabled, please update the firmware
Info : VTarget = 3.221 V
Info : kitprog3: acquiring the device...
Info : clock speed 2000 kHz
Info : SWD DPIDR 0x6ba02477
Info : psoc6.cpu.cm0: hardware has 4 breakpoints, 2 watchpoints
***************************************
** Silicon: 0xE453, Family: 0x102, Rev.: 0x12 (A1)
** Detected Device: CY8C624ABZI-S2D44
** Detected Main Flash size, kb: 2048
** Flash Boot version: 3.1.0.378
** Chip Protection: NORMAL
***************************************
Info : psoc6.cpu.cm4: hardware has 6 breakpoints, 4 watchpoints
Info : starting gdb server for psoc6.cpu.cm0 on 3333
Info : Listening on port 3333 for gdb connections
Info : starting gdb server for psoc6.cpu.cm4 on 3334
Info : Listening on port 3334 for gdb connections
Info : SWD DPIDR 0x6ba02477
Info : kitprog3: acquiring the device...
psoc6.cpu.cm0 halted due to debug-request, current mode: Thread
xPSR: 0x41000000 pc: 0x00000190 msp: 0x080ff800
** Device acquired successfully
** psoc6.cpu.cm4: Ran after reset and before halt...
psoc6.cpu.cm4 halted due to debug-request, current mode: Thread
xPSR: 0x01000000 pc: 0x0000012a msp: 0x080ff800
** Programming Started **
auto erase enabled
Info : Flash write discontinued at 0x1000179c, next section at 0x10002000
Info : Padding image section 0 at 0x1000179c with 100 bytes (bank write end alignment)
[100%] [################################] [ Erasing     ]
[100%] [################################] [ Programming ]
Info : Padding image section 1 at 0x10009ba0 with 96 bytes (bank write end alignment)
[100%] [################################] [ Erasing     ]
[100%] [################################] [ Programming ]
wrote 37888 bytes from file /Users/arh/mtb22/IoT_Expert_FreeRTOS_NTShell_Template/build/CY8CKIT-062S2-43012/Debug/MTBShellTemplate.hex in 1.402638s (26.379 KiB/s)
** Programming Finished **
** Verify Started **
verified 37692 bytes in 0.080973s (454.579 KiB/s)
** Verified OK **
** Resetting Target **
Info : SWD DPIDR 0x6ba02477
shutdown command invoked
Info : psoc6.dap: powering down debug domain...
Warn : Failed to power down Debug Domains

arh (master) IoT_Expert_FreeRTOS_NTShell_Template $
Add the NTShell Library & Examine New Library Structure
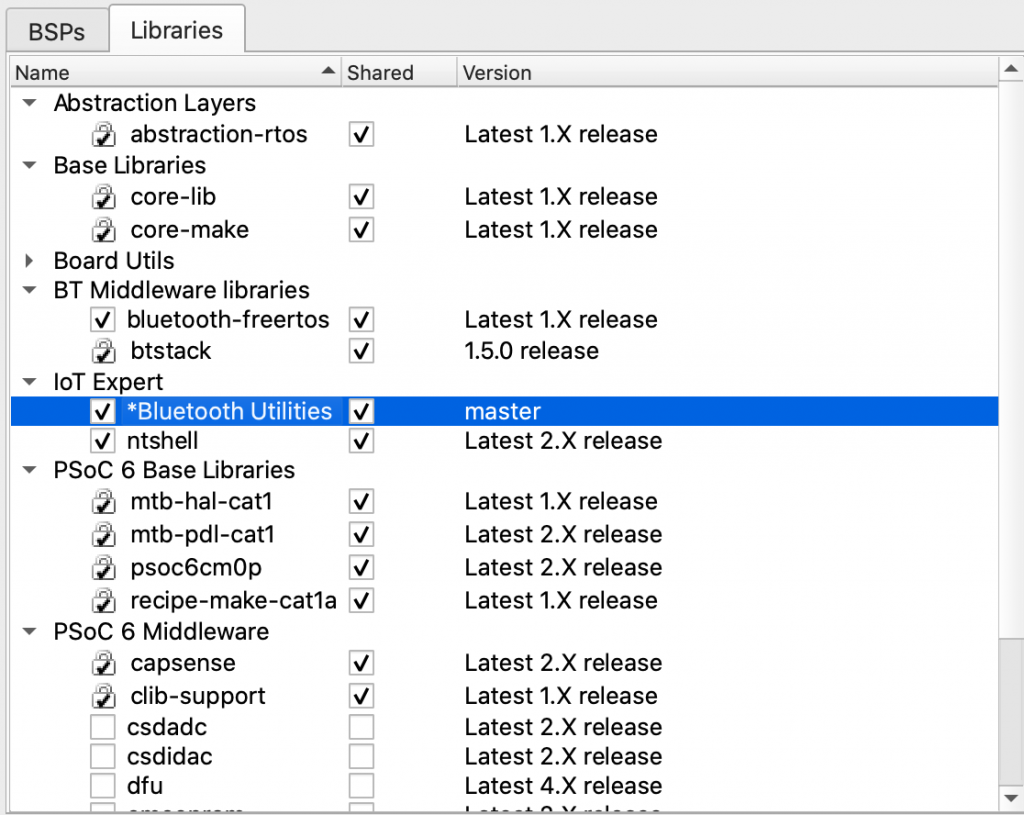
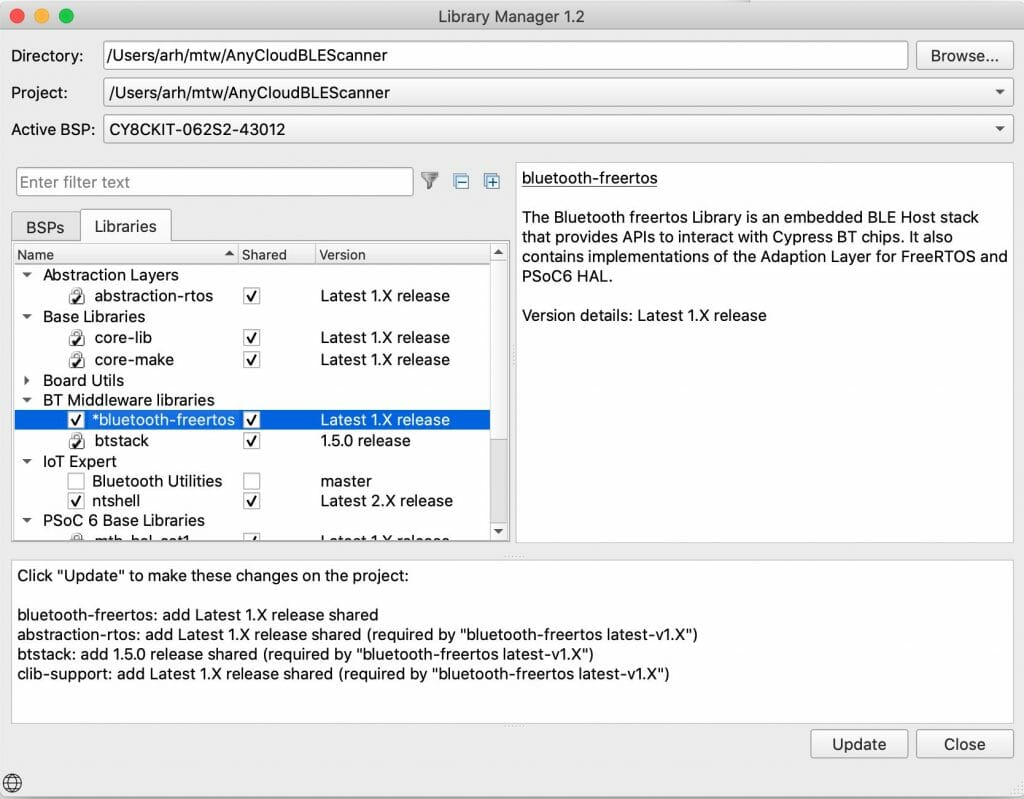
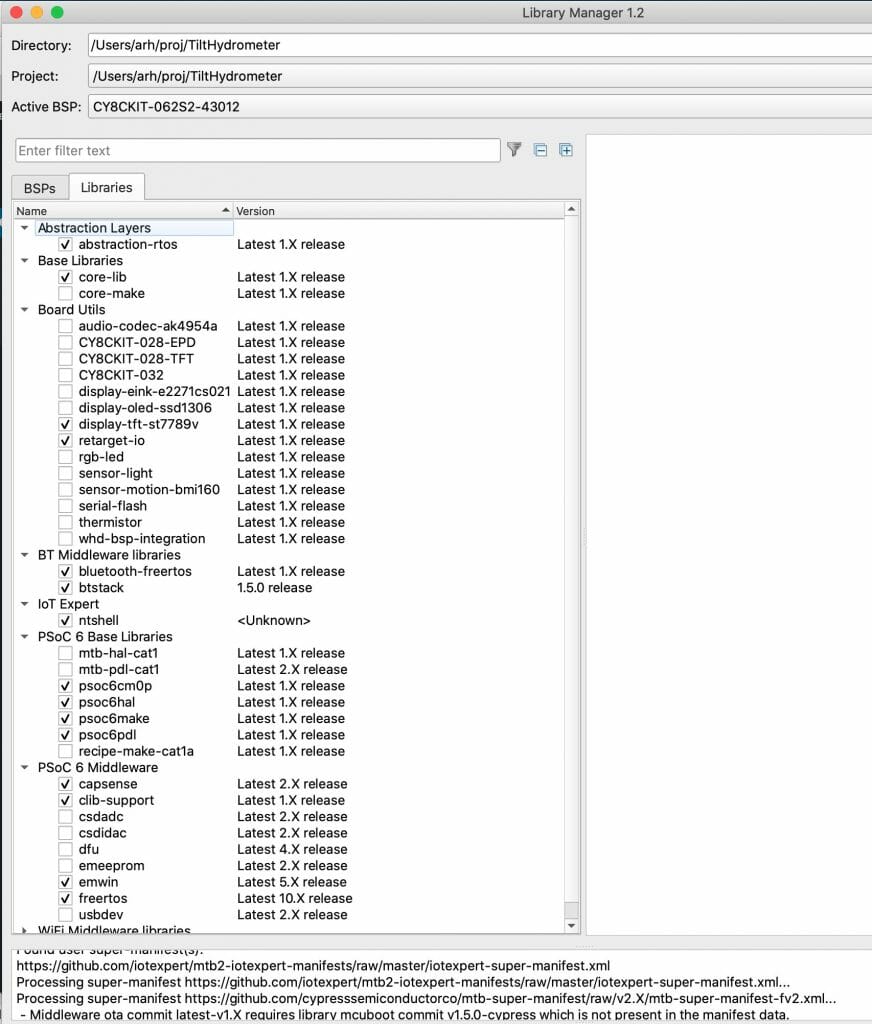
Everything is working and my basic project has FreeRTOS and a blinking LED. Now let’s add the NT Shell Library. To do this run the library manager by running “make modlibs” (or click on the button in Eclipse). Select Libraries –> IoT Expert –> ntshell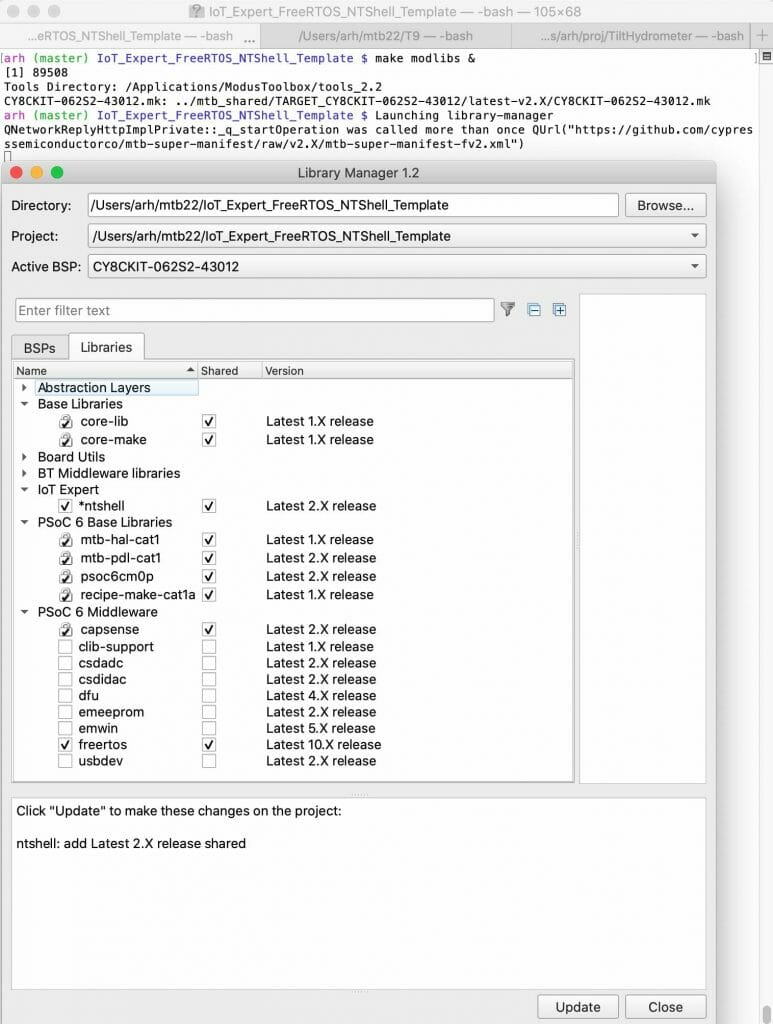
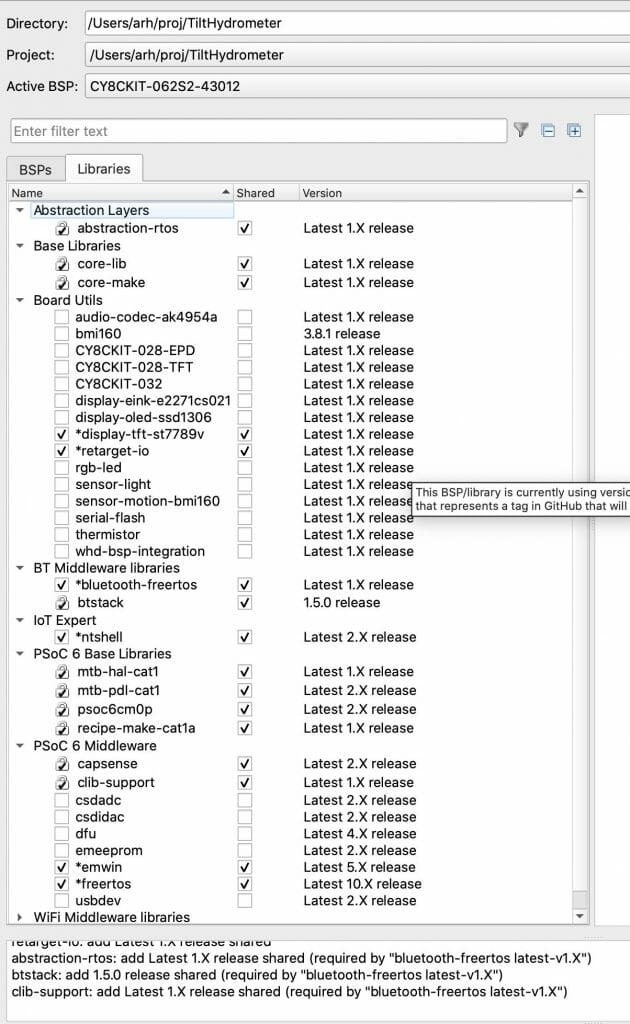
When you press update, the library manager will do its thing again.
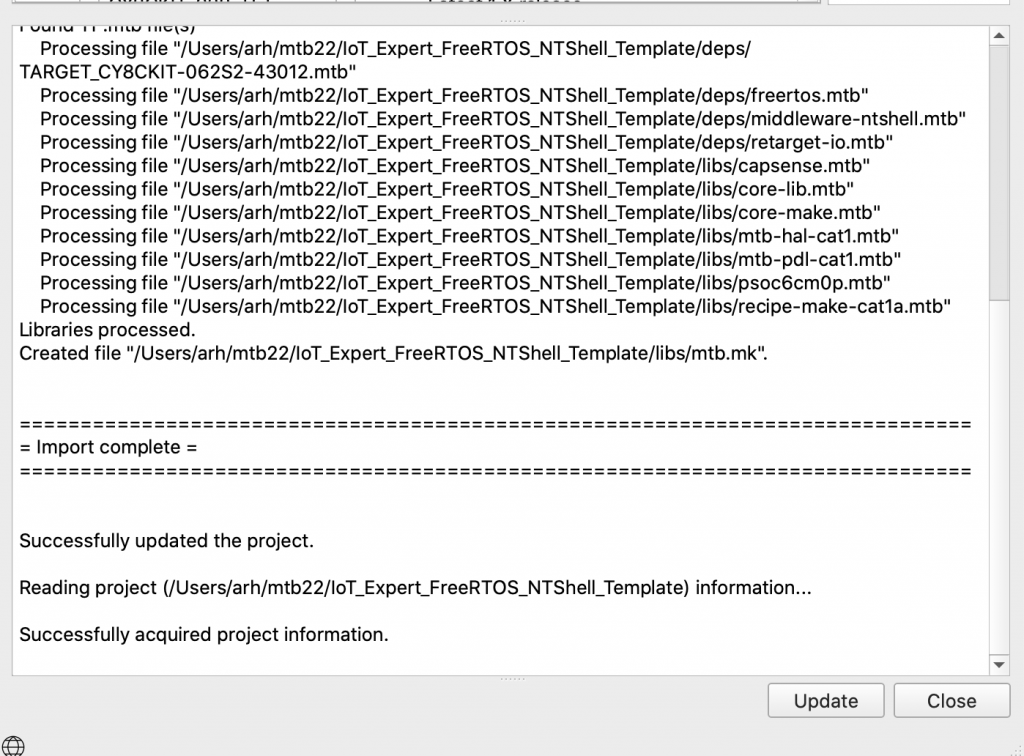
When I look in the “deps” directory, I see some new file types called “.mtb”. These files tell your project where to find each of the libraries. Notice that the middleware-ntshell.mtb points to “$$ASSET_REPO$$”. Where is that?
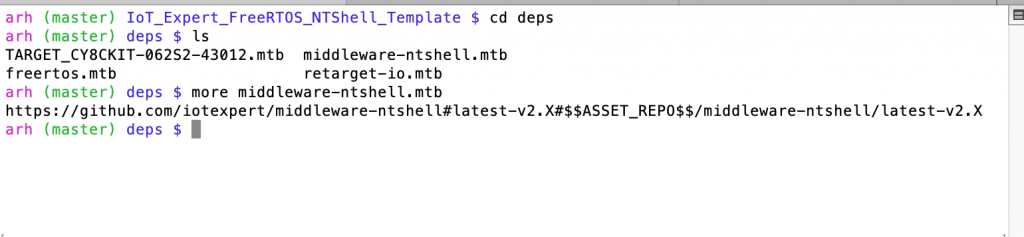
If you have a aook at the Makefile it tell you that it is “../” and “mtb_shared”.
# Relative path to the shared repo location.
#
# All .mtb files have the format, <URI><COMMIT><LOCATION>. If the <LOCATION> field
# begins with $$ASSET_REPO$$, then the repo is deposited in the path specified by
# the CY_GETLIBS_SHARED_PATH variable. The default location is one directory level
# above the current app directory.
# This is used with CY_GETLIBS_SHARED_NAME variable, which specifies the directory name.
CY_GETLIBS_SHARED_PATH=../

# Directory name of the shared repo location.
#
CY_GETLIBS_SHARED_NAME=mtb_shared
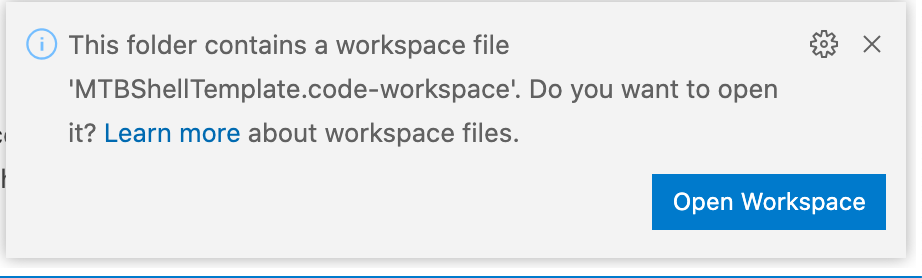
To start editing I will run Visual Studio Code by typing “code .”. The first thing that happens is that it notices that this is a workspace instead of just a directory.
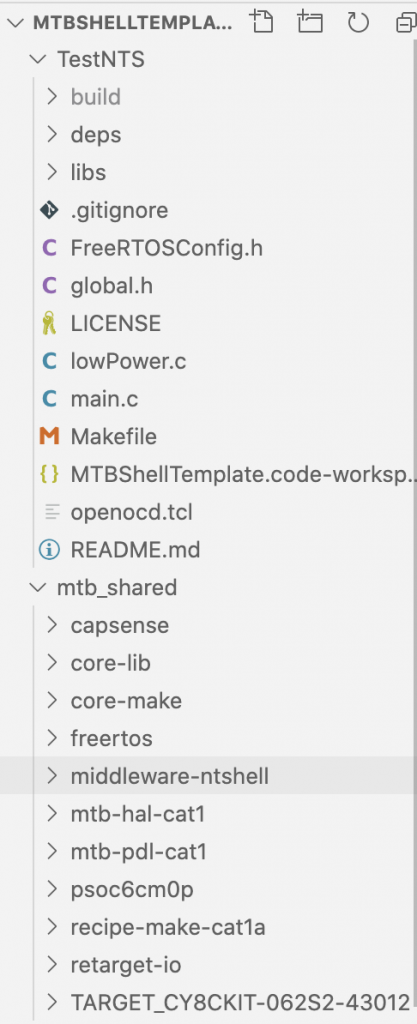
And when you look at the workspace you can see that it knows about both the example project as well as “mtb_shared”. That is sweet.
Update the Project and Program
Now follow the instructions from the middlware-ntshell readme by copying “usrcmd.*” into my project.
arh (master) IoT_Expert_FreeRTOS_NTShell_Template $ cp ../mtb_shared/middleware-ntshell/latest-v2.X/template/psoc6sdk/usrcmd.* .
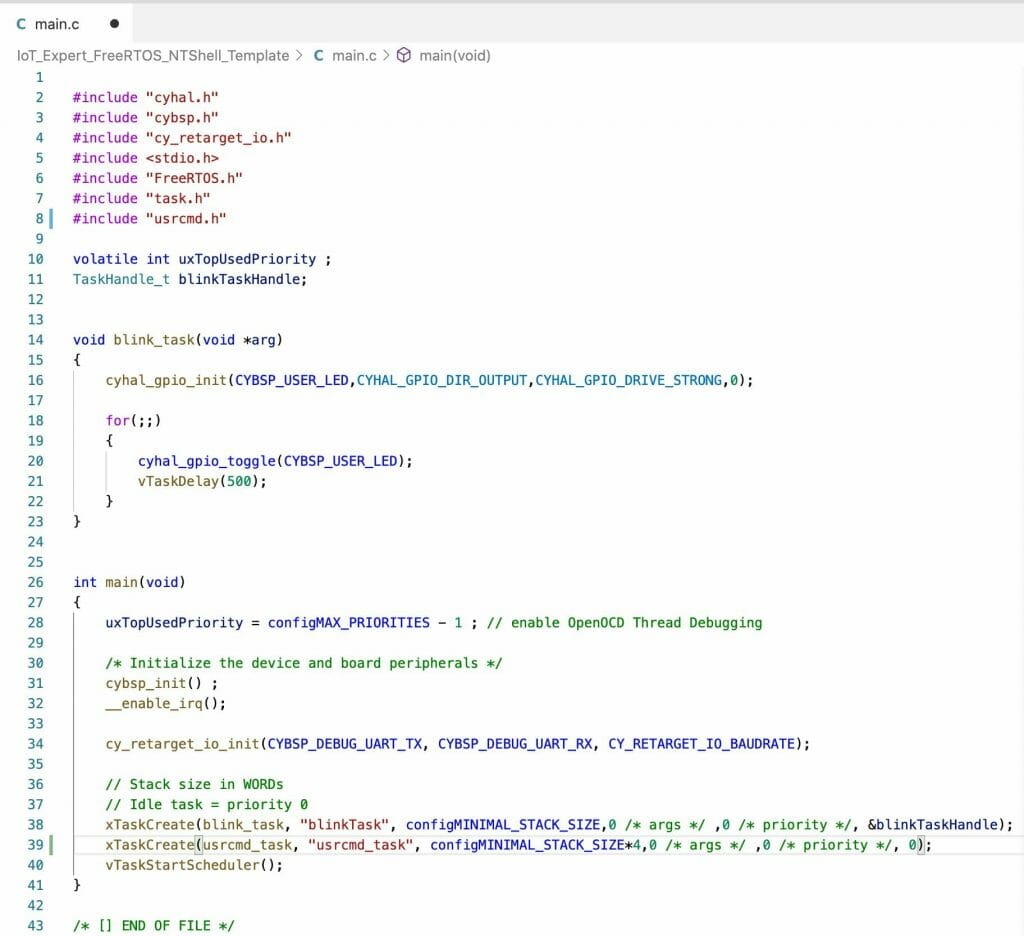
Then I edit main.c to
- #include “usrcmd.h” on line 8
- Start the shell task which is called “usrcmd_task” on line 39
Now buid/project by running “make -j program”
arh (master *) IoT_Expert_FreeRTOS_NTShell_Template $ make -j program
Tools Directory: /Applications/ModusToolbox/tools_2.2
CY8CKIT-062S2-43012.mk: ../mtb_shared/TARGET_CY8CKIT-062S2-43012/latest-v2.X/CY8CKIT-062S2-43012.mk

Prebuild operations complete
Commencing build operations...

Tools Directory: /Applications/ModusToolbox/tools_2.2
CY8CKIT-062S2-43012.mk: ../mtb_shared/TARGET_CY8CKIT-062S2-43012/latest-v2.X/CY8CKIT-062S2-43012.mk

Initializing build: MTBShellTemplate Debug CY8CKIT-062S2-43012 GCC_ARM

Auto-discovery in progress...
-> Found 205 .c file(s)
-> Found 46 .S file(s)
-> Found 23 .s file(s)
-> Found 0 .cpp file(s)
-> Found 0 .o file(s)
-> Found 6 .a file(s)
-> Found 503 .h file(s)
-> Found 0 .hpp file(s)
-> Found 0 resource file(s)
Applying filters...
Auto-discovery complete

Constructing build rules...
Build rules construction complete

==============================================================================
= Building application =
==============================================================================
Generating compilation database file...
-> ./build/compile_commands.json
Compilation database file generation complete
Building 193 file(s)
    Compiling app file main.c
    Linking output file MTBShellTemplate.elf
==============================================================================
= Build complete =
==============================================================================

Calculating memory consumption: CY8C624ABZI-S2D44 GCC_ARM -Og

   ----------------------------------------------------
  | Section Name         |  Address      |  Size       |
   ----------------------------------------------------
  | .cy_m0p_image        |  0x10000000   |  6044       |
  | .text                |  0x10002000   |  52780      |
  | .ARM.exidx           |  0x1000ee2c   |  8          |
  | .copy.table          |  0x1000ee34   |  24         |
  | .zero.table          |  0x1000ee4c   |  8          |
  | .data                |  0x080022e0   |  1688       |
  | .cy_sharedmem        |  0x08002978   |  8          |
  | .noinit              |  0x08002980   |  148        |
  | .bss                 |  0x08002a14   |  2136       |
  | .heap                |  0x08003270   |  1029520    |
   ----------------------------------------------------

  Total Internal Flash (Available)          2097152
  Total Internal Flash (Utilized)           62716

  Total Internal SRAM (Available)           1046528
  Total Internal SRAM (Utilized with heap)  1033500


Programming target device...
Open On-Chip Debugger 0.10.0+dev-4.1.0.1058 (2020-08-11-03:45)
Licensed under GNU GPL v2
For bug reports, read
	http://openocd.org/doc/doxygen/bugs.html
Info : auto-selecting first available session transport "swd". To override use 'transport select <transport>'.
adapter speed: 2000 kHz
adapter srst delay: 25
adapter srst pulse_width: 25
** Auto-acquire enabled, use "set ENABLE_ACQUIRE 0" to disable
cortex_m reset_config sysresetreq
cortex_m reset_config sysresetreq
Info : Using CMSIS loader 'CY8C6xxA_SMIF' for bank 'psoc6_smif0_cm0' (footprint 14672 bytes)
Warn : SFlash programming allowed for regions: USER, TOC, KEY
Info : CMSIS-DAP: SWD  Supported
Info : CMSIS-DAP: FW Version = 2.0.0
Info : CMSIS-DAP: Interface Initialised (SWD)
Info : SWCLK/TCK = 1 SWDIO/TMS = 1 TDI = 0 TDO = 0 nTRST = 0 nRESET = 1
Info : CMSIS-DAP: Interface ready
Info : KitProg3: FW version: 1.14.514
Info : KitProg3: Pipelined transfers disabled, please update the firmware
Info : VTarget = 3.225 V
Info : kitprog3: acquiring the device...
Info : clock speed 2000 kHz
Info : SWD DPIDR 0x6ba02477
Info : psoc6.cpu.cm0: hardware has 4 breakpoints, 2 watchpoints
***************************************
** Silicon: 0xE453, Family: 0x102, Rev.: 0x12 (A1)
** Detected Device: CY8C624ABZI-S2D44
** Detected Main Flash size, kb: 2048
** Flash Boot version: 3.1.0.378
** Chip Protection: NORMAL
***************************************
Info : psoc6.cpu.cm4: hardware has 6 breakpoints, 4 watchpoints
Info : starting gdb server for psoc6.cpu.cm0 on 3333
Info : Listening on port 3333 for gdb connections
Info : starting gdb server for psoc6.cpu.cm4 on 3334
Info : Listening on port 3334 for gdb connections
Info : SWD DPIDR 0x6ba02477
Info : kitprog3: acquiring the device...
psoc6.cpu.cm0 halted due to debug-request, current mode: Thread
xPSR: 0x41000000 pc: 0x00000190 msp: 0x080ff800
** Device acquired successfully
** psoc6.cpu.cm4: Ran after reset and before halt...
psoc6.cpu.cm4 halted due to debug-request, current mode: Thread
xPSR: 0x01000000 pc: 0x0000012a msp: 0x080ff800
** Programming Started **
auto erase enabled
Info : Flash write discontinued at 0x1000179c, next section at 0x10002000
Info : Padding image section 0 at 0x1000179c with 100 bytes (bank write end alignment)
[100%] [################################] [ Erasing     ]
[100%] [################################] [ Programming ]
Info : Padding image section 1 at 0x1000f4f4 with 268 bytes (bank write end alignment)
[100%] [################################] [ Erasing     ]
[100%] [################################] [ Programming ]
wrote 60928 bytes from file /Users/arh/mtb22/IoT_Expert_FreeRTOS_NTShell_Template/build/CY8CKIT-062S2-43012/Debug/MTBShellTemplate.hex in 2.017097s (29.498 KiB/s)
** Programming Finished **
** Verify Started **
verified 60560 bytes in 0.119193s (496.175 KiB/s)
** Verified OK **
** Resetting Target **
Info : SWD DPIDR 0x6ba02477
shutdown command invoked
Info : psoc6.dap: powering down debug domain...

arh (master *) IoT_Expert_FreeRTOS_NTShell_Template $
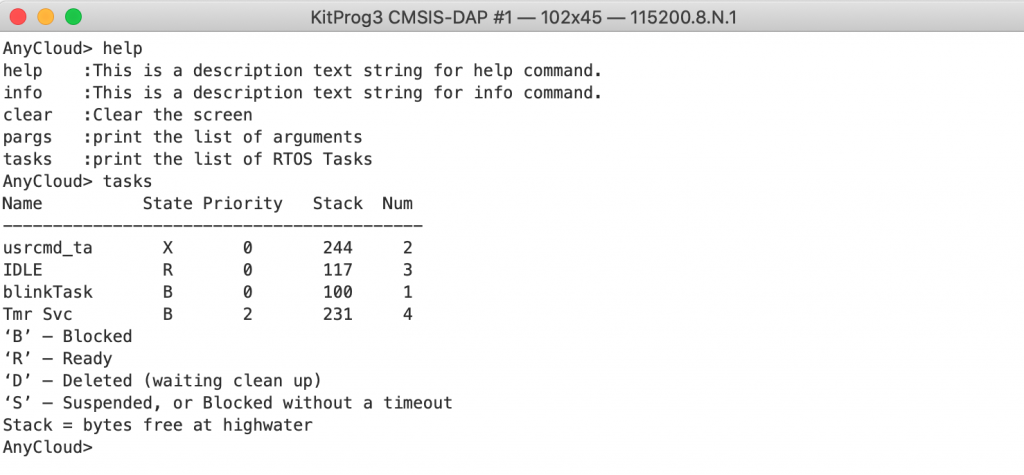
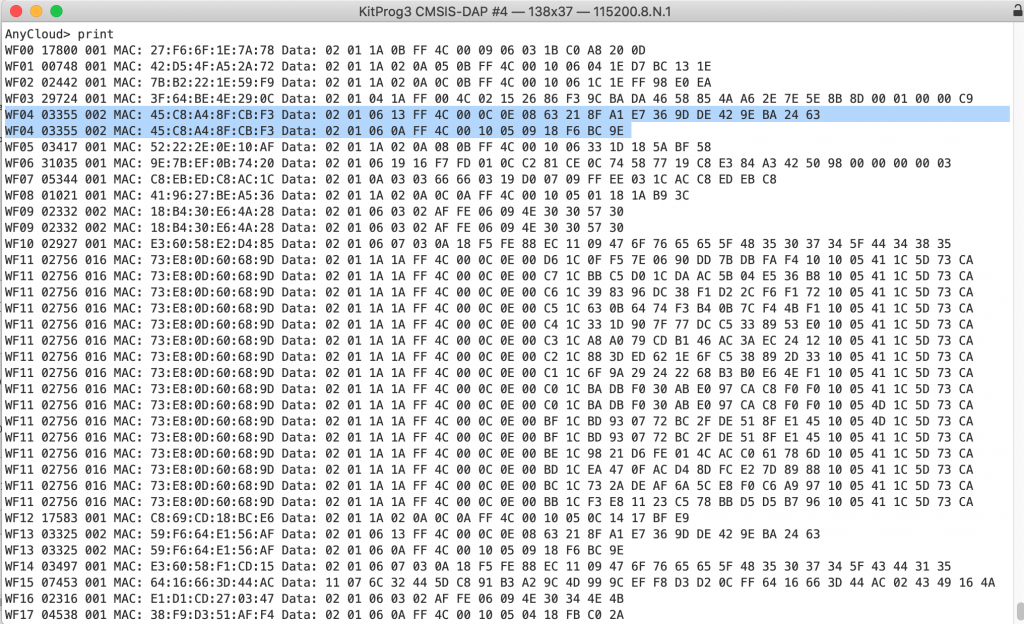
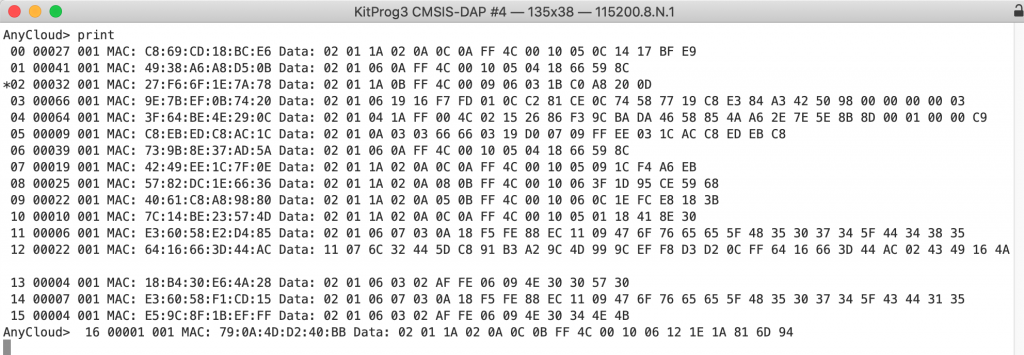
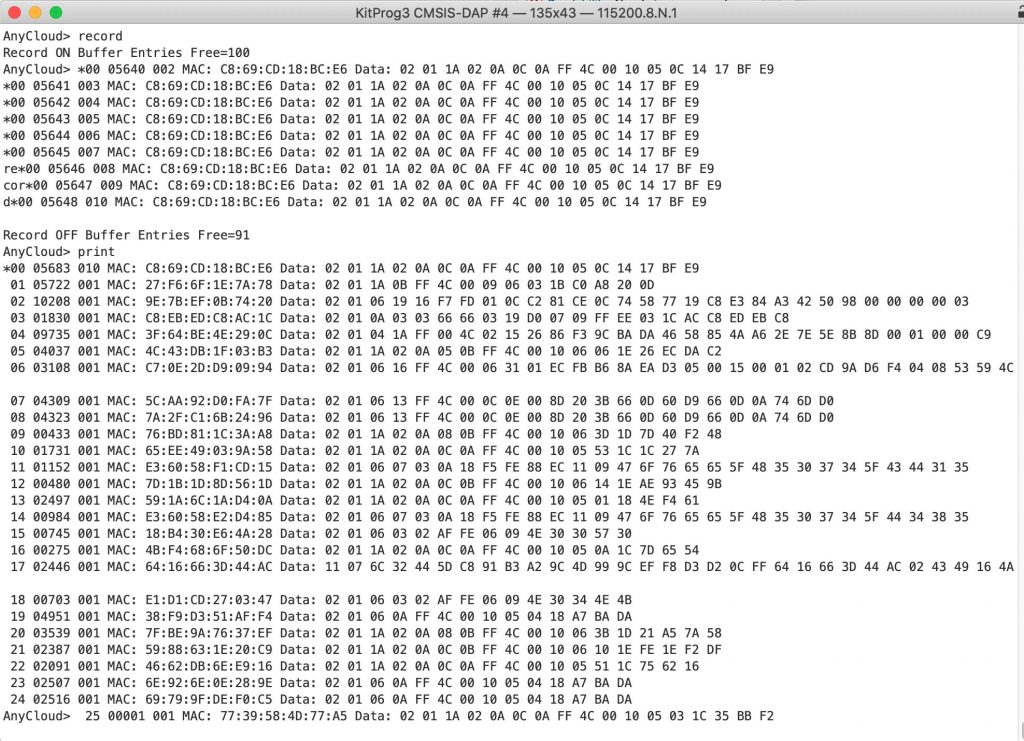
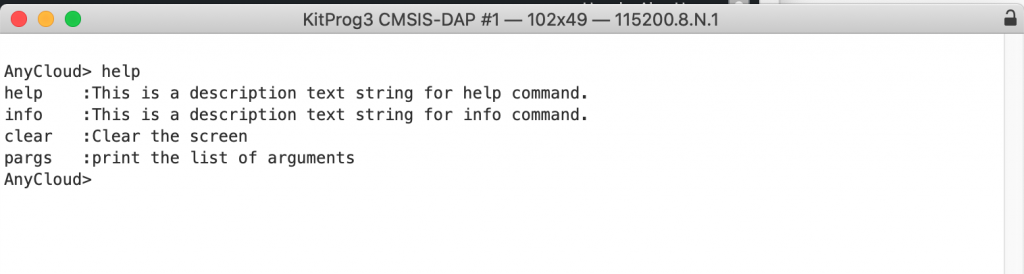
Now I have a functional shell. Here is the serial console.
Add the Task List functionality
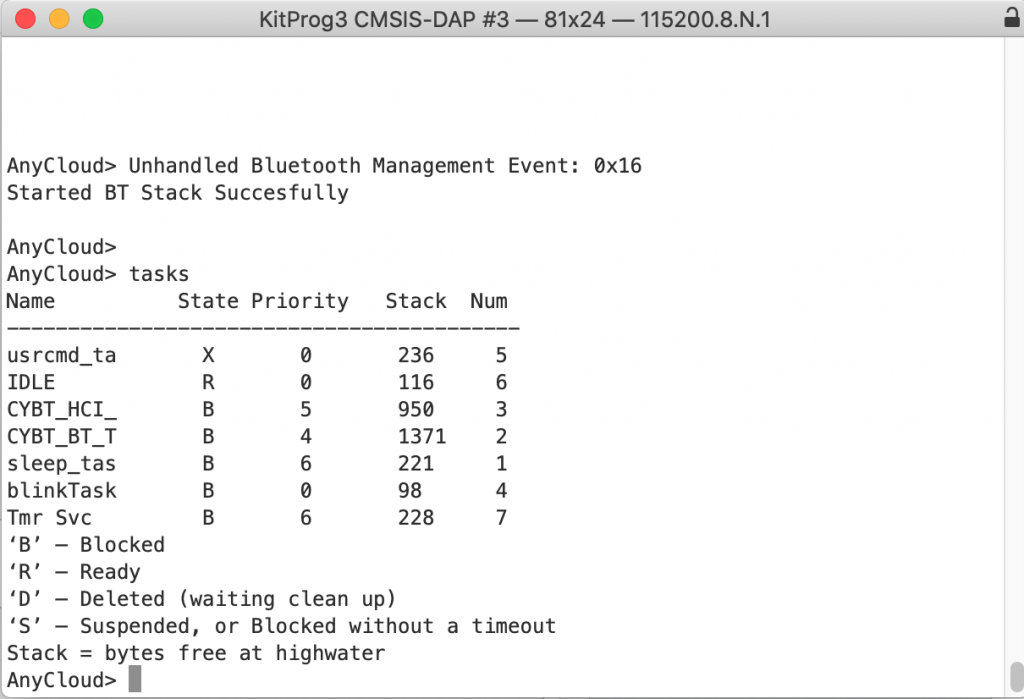
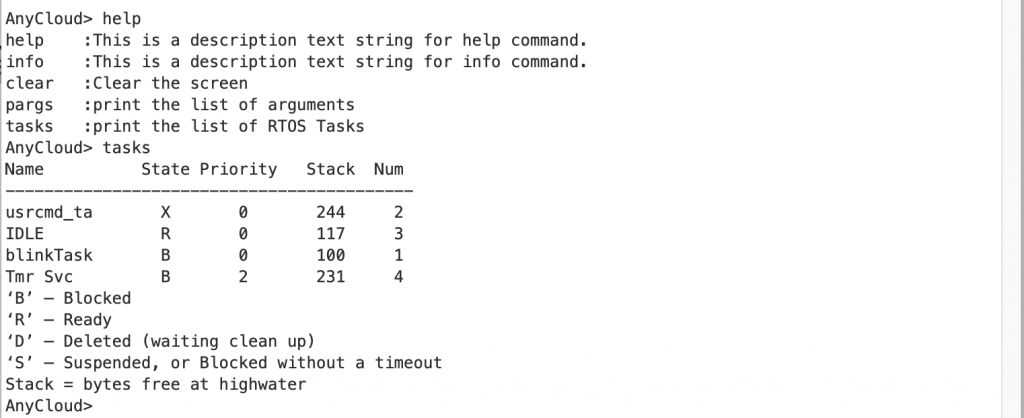
In the main.c above I started up the usrcmd_task with a stack size of config_MINIMAL_STACK_SIZE * 4. Where did I get that? Well the first couple of times I did this it crashed by running out of stack so I tried bigger and bigger numbers until it stopped crashing. This is a kind of a pain in the ass. If you know FreeRTOS there is a function called “vTaskList” which will give you stats about the tasks.
In order to use that function you need to turn it on. Notice that I #ifdef and #if to see if it is turned on inside of usrcmd.c
#ifdef configUSE_TRACE_FACILITY
#if configUSE_STATS_FORMATTING_FUNCTIONS ==1
static int usrcmd_list(int argc, char **argv);
#endif
#endif
So let’s turn it on by editing “FreeRTOSConfig.h” and enabling the two required defines.
#define configUSE_TRACE_FACILITY					1
#define configUSE_STATS_FORMATTING_FUNCTIONS        1
Now build/program.
arh (master *) IoT_Expert_FreeRTOS_NTShell_Template $ make -j program
Tools Directory: /Applications/ModusToolbox/tools_2.2
CY8CKIT-062S2-43012.mk: ../mtb_shared/TARGET_CY8CKIT-062S2-43012/latest-v2.X/CY8CKIT-062S2-43012.mk

Prebuild operations complete
Commencing build operations...

Tools Directory: /Applications/ModusToolbox/tools_2.2
CY8CKIT-062S2-43012.mk: ../mtb_shared/TARGET_CY8CKIT-062S2-43012/latest-v2.X/CY8CKIT-062S2-43012.mk

Initializing build: MTBShellTemplate Debug CY8CKIT-062S2-43012 GCC_ARM

Auto-discovery in progress...
-> Found 205 .c file(s)
-> Found 46 .S file(s)
-> Found 23 .s file(s)
-> Found 0 .cpp file(s)
-> Found 0 .o file(s)
-> Found 6 .a file(s)
-> Found 503 .h file(s)
-> Found 0 .hpp file(s)
-> Found 0 resource file(s)
Applying filters...
Auto-discovery complete

Constructing build rules...
Build rules construction complete

==============================================================================
= Building application =
==============================================================================
Generating compilation database file...
-> ./build/compile_commands.json
Compilation database file generation complete
Building 193 file(s)
    Compiling app file lowPower.c
    Compiling app file main.c
    Compiling app file usrcmd.c
    Compiling ext file croutine.c
    Compiling ext file event_groups.c
    Compiling ext file list.c
    Compiling ext file heap_1.c
    Compiling ext file heap_2.c
    Compiling ext file heap_3.c
    Compiling ext file heap_4.c
    Compiling ext file heap_5.c
    Compiling ext file port.c
    Compiling ext file queue.c
    Compiling ext file stream_buffer.c
    Compiling ext file tasks.c
    Compiling ext file timers.c
    Compiling ext file psoc6_ntshell_port.c
    Linking output file MTBShellTemplate.elf
==============================================================================
= Build complete =
==============================================================================

Calculating memory consumption: CY8C624ABZI-S2D44 GCC_ARM -Og

   ----------------------------------------------------
  | Section Name         |  Address      |  Size       |
   ----------------------------------------------------
  | .cy_m0p_image        |  0x10000000   |  6044       |
  | .text                |  0x10002000   |  54876      |
  | .ARM.exidx           |  0x1000f65c   |  8          |
  | .copy.table          |  0x1000f664   |  24         |
  | .zero.table          |  0x1000f67c   |  8          |
  | .data                |  0x080022e0   |  1688       |
  | .cy_sharedmem        |  0x08002978   |  8          |
  | .noinit              |  0x08002980   |  148        |
  | .bss                 |  0x08002a14   |  2136       |
  | .heap                |  0x08003270   |  1029520    |
   ----------------------------------------------------

  Total Internal Flash (Available)          2097152
  Total Internal Flash (Utilized)           64812

  Total Internal SRAM (Available)           1046528
  Total Internal SRAM (Utilized with heap)  1033500


Programming target device...
Open On-Chip Debugger 0.10.0+dev-4.1.0.1058 (2020-08-11-03:45)
Licensed under GNU GPL v2
For bug reports, read
	http://openocd.org/doc/doxygen/bugs.html
Info : auto-selecting first available session transport "swd". To override use 'transport select <transport>'.
adapter speed: 2000 kHz
adapter srst delay: 25
adapter srst pulse_width: 25
** Auto-acquire enabled, use "set ENABLE_ACQUIRE 0" to disable
cortex_m reset_config sysresetreq
cortex_m reset_config sysresetreq
Info : Using CMSIS loader 'CY8C6xxA_SMIF' for bank 'psoc6_smif0_cm0' (footprint 14672 bytes)
Warn : SFlash programming allowed for regions: USER, TOC, KEY
Info : CMSIS-DAP: SWD  Supported
Info : CMSIS-DAP: FW Version = 2.0.0
Info : CMSIS-DAP: Interface Initialised (SWD)
Info : SWCLK/TCK = 1 SWDIO/TMS = 1 TDI = 0 TDO = 0 nTRST = 0 nRESET = 1
Info : CMSIS-DAP: Interface ready
Info : KitProg3: FW version: 1.14.514
Info : KitProg3: Pipelined transfers disabled, please update the firmware
Info : VTarget = 3.220 V
Info : kitprog3: acquiring the device...
Info : clock speed 2000 kHz
Info : SWD DPIDR 0x6ba02477
Info : psoc6.cpu.cm0: hardware has 4 breakpoints, 2 watchpoints
***************************************
** Silicon: 0xE453, Family: 0x102, Rev.: 0x12 (A1)
** Detected Device: CY8C624ABZI-S2D44
** Detected Main Flash size, kb: 2048
** Flash Boot version: 3.1.0.378
** Chip Protection: NORMAL
***************************************
Info : psoc6.cpu.cm4: hardware has 6 breakpoints, 4 watchpoints
Info : starting gdb server for psoc6.cpu.cm0 on 3333
Info : Listening on port 3333 for gdb connections
Info : starting gdb server for psoc6.cpu.cm4 on 3334
Info : Listening on port 3334 for gdb connections
Info : SWD DPIDR 0x6ba02477
Info : kitprog3: acquiring the device...
psoc6.cpu.cm0 halted due to debug-request, current mode: Thread
xPSR: 0x41000000 pc: 0x00000190 msp: 0x080ff800
** Device acquired successfully
** psoc6.cpu.cm4: Ran after reset and before halt...
psoc6.cpu.cm4 halted due to debug-request, current mode: Thread
xPSR: 0x01000000 pc: 0x0000012a msp: 0x080ff800
** Programming Started **
auto erase enabled
Info : Flash write discontinued at 0x1000179c, next section at 0x10002000
Info : Padding image section 0 at 0x1000179c with 100 bytes (bank write end alignment)
[100%] [################################] [ Erasing     ]
[100%] [################################] [ Programming ]
Info : Padding image section 1 at 0x1000fd24 with 220 bytes (bank write end alignment)
[100%] [################################] [ Erasing     ]
[100%] [################################] [ Programming ]
wrote 62976 bytes from file /Users/arh/mtb22/IoT_Expert_FreeRTOS_NTShell_Template/build/CY8CKIT-062S2-43012/Debug/MTBShellTemplate.hex in 2.092903s (29.385 KiB/s)
** Programming Finished **
** Verify Started **
verified 62656 bytes in 0.123619s (494.968 KiB/s)
** Verified OK **
** Resetting Target **
Info : SWD DPIDR 0x6ba02477
shutdown command invoked
Info : psoc6.dap: powering down debug domain...
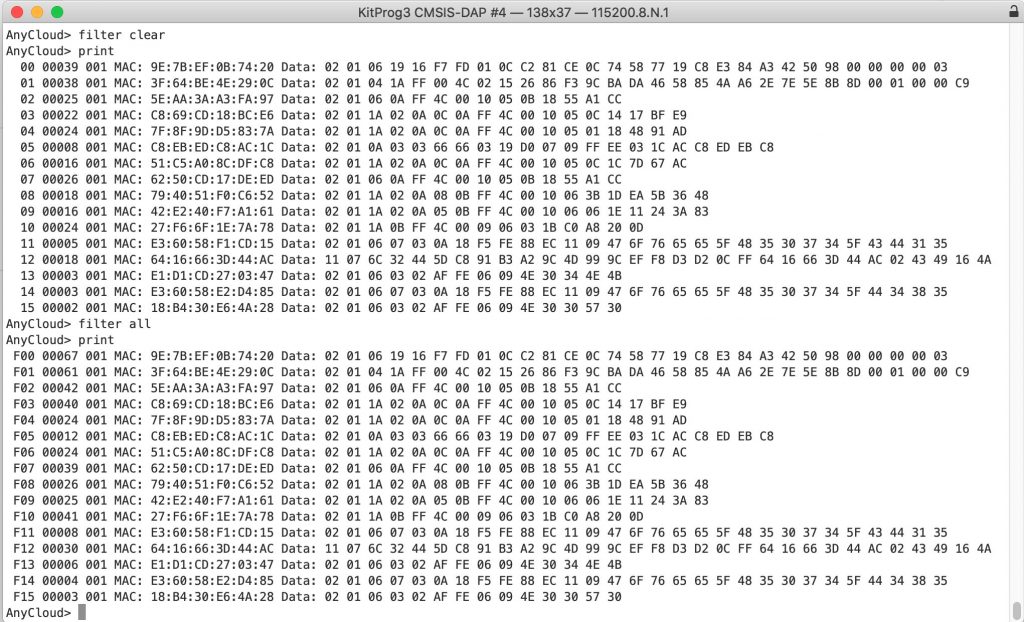
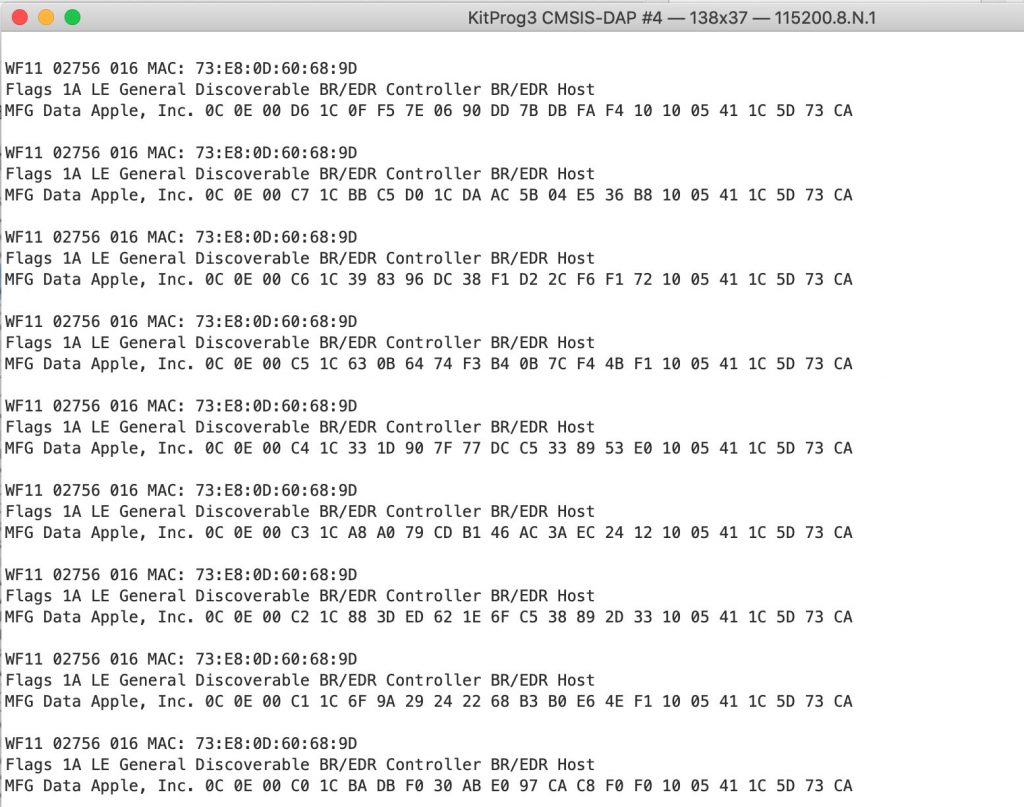
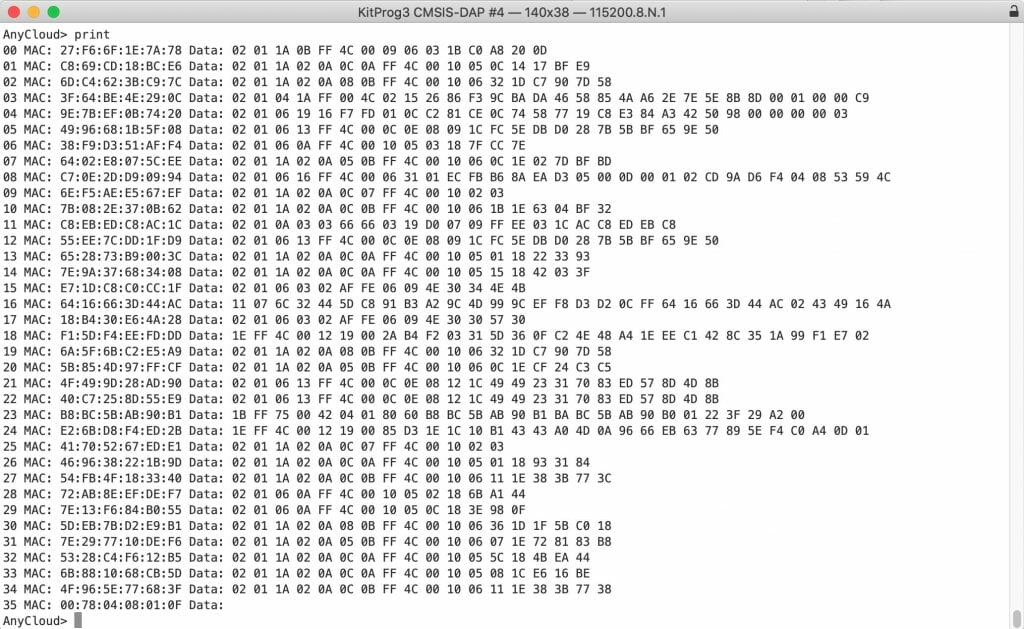
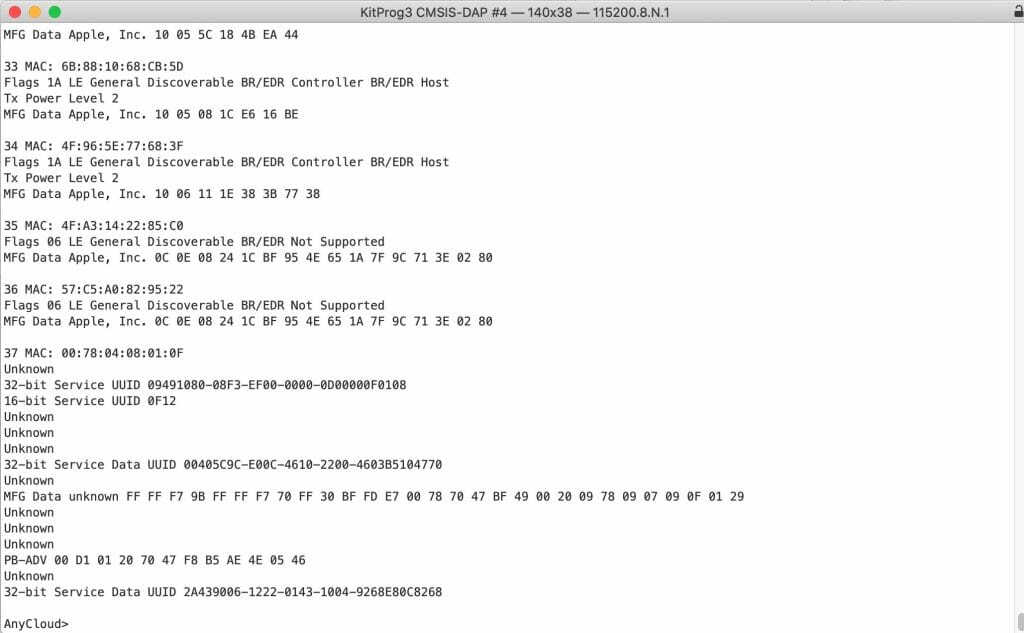
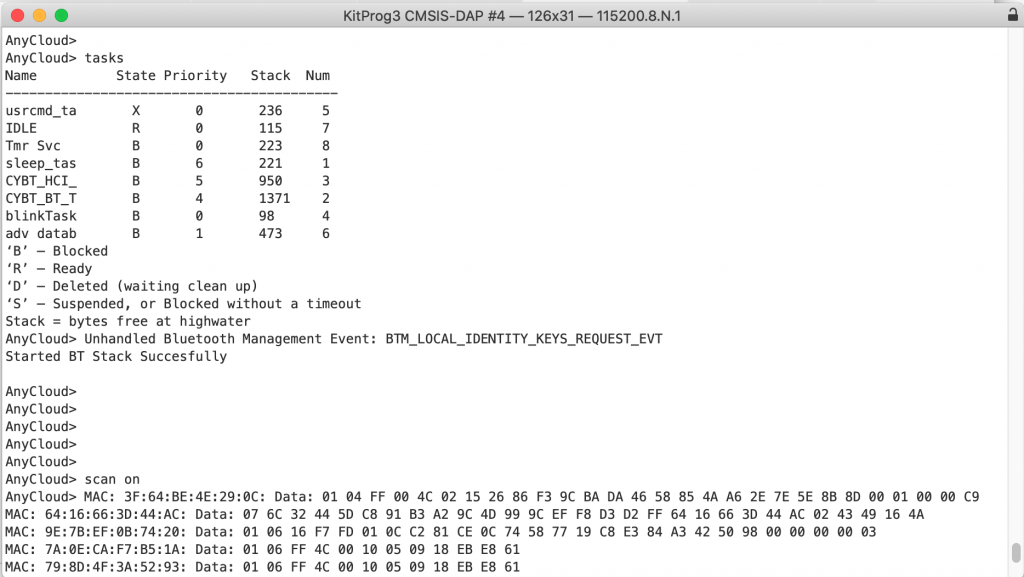
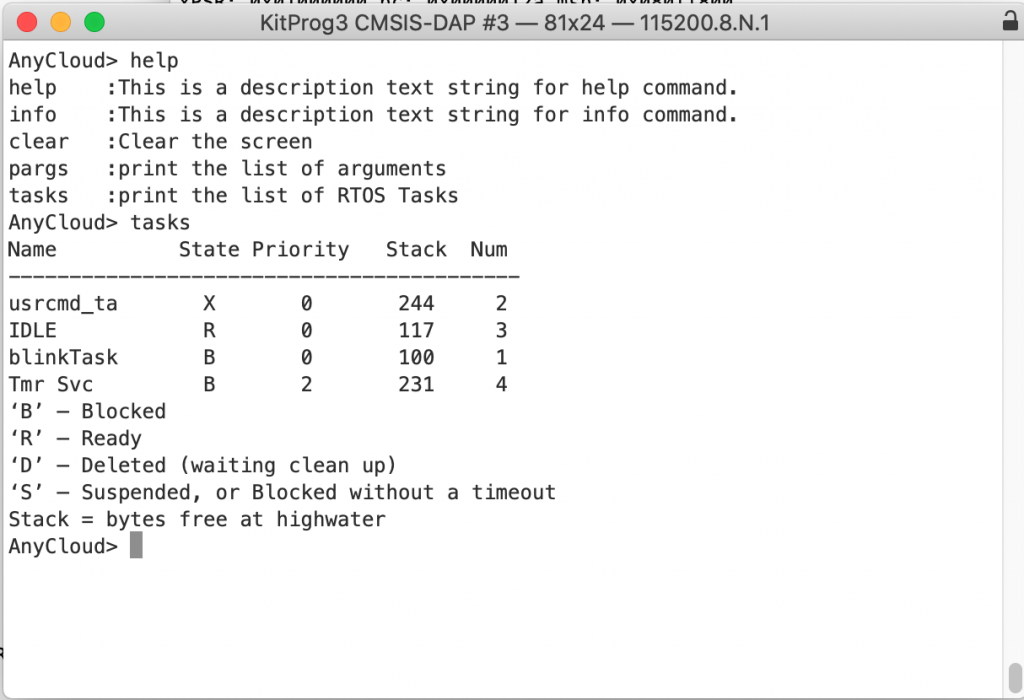
When I run help you can see I have a new command called “tasks” which lists all of the tasks and their stack high water marks.
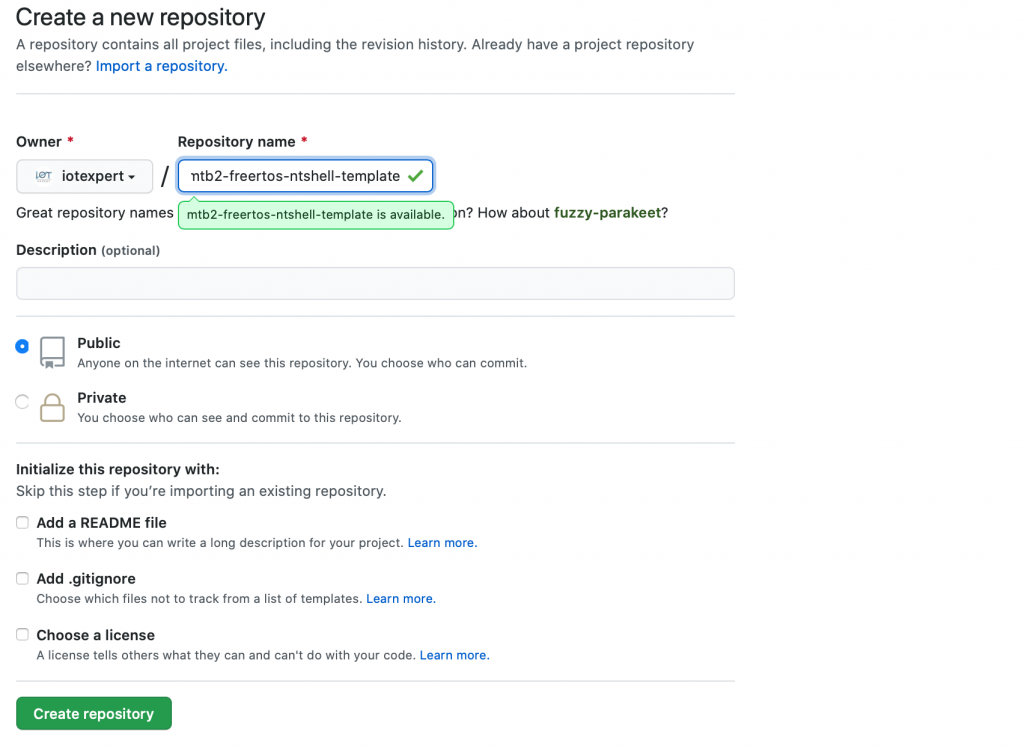
Put the Template on GitHub
I am happy with my new template. So, I go to GitHub and create a new repository.
Then on my current project:
- I blow away the git history (didnt really have to do that).
- Create a new git repo “git init .”
- Add a pointer to GitHub “git remote add….”
- Add all of the files “git add *”
- Add the .gitignore “git add .gitignore”
- Commit the changes “git commit…”
- Push it to GitHub “git push …”
arh (master *) IoT_Expert_FreeRTOS_NTShell_Template $ rm -rf .git
arh IoT_Expert_FreeRTOS_NTShell_Template $ git init .
Initialized empty Git repository in /Users/arh/mtb22/IoT_Expert_FreeRTOS_NTShell_Template/.git/
arh (master #) IoT_Expert_FreeRTOS_NTShell_Template $ git remote add origin git@iotexpert.github.com:iotexpert/mtb2-freertos-ntshell-template.git
arh (master #) IoT_Expert_FreeRTOS_NTShell_Template $ git add *
The following paths are ignored by one of your .gitignore files:
build
Use -f if you really want to add them.
arh (master #) IoT_Expert_FreeRTOS_NTShell_Template $ git add .gitignore
arh (master #) IoT_Expert_FreeRTOS_NTShell_Template $ git status
On branch master

No commits yet

Changes to be committed:
  (use "git rm --cached <file>..." to unstage)
	new file:   .gitignore
	new file:   FreeRTOSConfig.h
	new file:   LICENSE
	new file:   MTBShellTemplate.code-workspace
	new file:   Makefile
	new file:   README.md
	new file:   deps/TARGET_CY8CKIT-062S2-43012.mtb
	new file:   deps/freertos.mtb
	new file:   deps/middleware-ntshell.mtb
	new file:   deps/retarget-io.mtb
	new file:   global.h
	new file:   lowPower.c
	new file:   main.c
	new file:   openocd.tcl
	new file:   usrcmd.c
	new file:   usrcmd.h

Untracked files:
  (use "git add <file>..." to include in what will be committed)
	.vscode/

arh (master #) IoT_Expert_FreeRTOS_NTShell_Template $ git commit -m "Initial commit"
[master (root-commit) 26b5d3c] Initial commit
 16 files changed, 994 insertions(+)
 create mode 100644 .gitignore
 create mode 100644 FreeRTOSConfig.h
 create mode 100644 LICENSE
 create mode 100644 MTBShellTemplate.code-workspace
 create mode 100644 Makefile
 create mode 100644 README.md
 create mode 100644 deps/TARGET_CY8CKIT-062S2-43012.mtb
 create mode 100644 deps/freertos.mtb
 create mode 100644 deps/middleware-ntshell.mtb
 create mode 100644 deps/retarget-io.mtb
 create mode 100644 global.h
 create mode 100644 lowPower.c
 create mode 100644 main.c
 create mode 100644 openocd.tcl
 create mode 100644 usrcmd.c
 create mode 100644 usrcmd.h
arh (master) IoT_Expert_FreeRTOS_NTShell_Template $ git push -u origin master
Enumerating objects: 19, done.
Counting objects: 100% (19/19), done.
Delta compression using up to 12 threads
Compressing objects: 100% (19/19), done.
Writing objects: 100% (19/19), 16.21 KiB | 5.40 MiB/s, done.
Total 19 (delta 0), reused 0 (delta 0)
To iotexpert.github.com:iotexpert/mtb2-freertos-ntshell-template.git
 * [new branch]      master -> master
Branch 'master' set up to track remote branch 'master' from 'origin'.
arh (master) IoT_Expert_FreeRTOS_NTShell_Template $
Update the Manifests
To get access to the new template I need to add it to the IoT Expert App Manifest. I edit the xml file to have the new app
<apps>
  <app>
    <name>IoT Expert FreeRTOS Template</name>
    <id>mtb2-freertos-template</id>
    <uri>https://github.com/iotexpert/mtb2-freertos-template</uri>
    <description>This template provide a starting point for FreeRTOS projects.  Including a starting blinking LED task</description>
    <req_capabilities>psoc6</req_capabilities>
    <versions>
      <version>
        <num>Latest 1.X release</num>
        <commit>master</commit>
      </version>
    </versions>
  </app>
    <app>
    <name>IoT Expert FreeRTOS NTShell Template</name>
    <id>mtb2-freertos-ntshell-template</id>
    <uri>https://github.com/iotexpert/mtb2-freertos-ntshell-template</uri>
    <description>This template provide a starting point for FreeRTOS projects.  Including a starting blinking LED task and shell</description>
    <req_capabilities>psoc6</req_capabilities>
    <versions>
      <version>
        <num>Latest 1.X release</num>
        <commit>master</commit>
      </version>
    </versions>
  </app>
</apps>
Now I need to git add, git commit and git push it to GitHub.
arh (master) mtb2-iotexpert-manifests $ code .
arh (master) mtb2-iotexpert-manifests $ git status
On branch master
Your branch is up to date with 'origin/master'.

Changes not staged for commit:
  (use "git add <file>..." to update what will be committed)
  (use "git restore <file>..." to discard changes in working directory)
	modified:   iotexpert-app-manifest.xml

no changes added to commit (use "git add" and/or "git commit -a")
arh (master *) mtb2-iotexpert-manifests $ git add iotexpert-app-manifest.xml
arh (master +) mtb2-iotexpert-manifests $ git commit -m "Updated with ntshell example"
[master 47a7bb1] Updated with ntshell example
 1 file changed, 13 insertions(+)
arh (master) mtb2-iotexpert-manifests $ git push
Enumerating objects: 5, done.
Counting objects: 100% (5/5), done.
Delta compression using up to 12 threads
Compressing objects: 100% (3/3), done.
Writing objects: 100% (3/3), 554 bytes | 554.00 KiB/s, done.
Total 3 (delta 1), reused 0 (delta 0)
remote: Resolving deltas: 100% (1/1), completed with 1 local object.
To iotexpert.github.com:iotexpert/mtb2-iotexpert-manifests.git
   28ed2d0..47a7bb1  master -> master
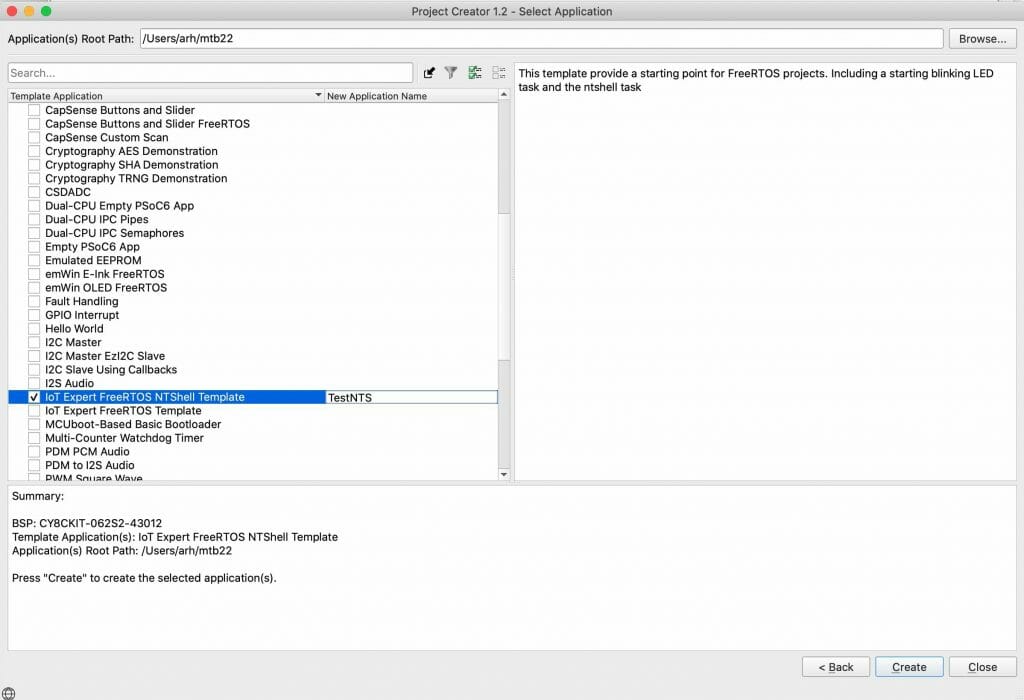
Test the new Template
Everything should be working so make a new project.
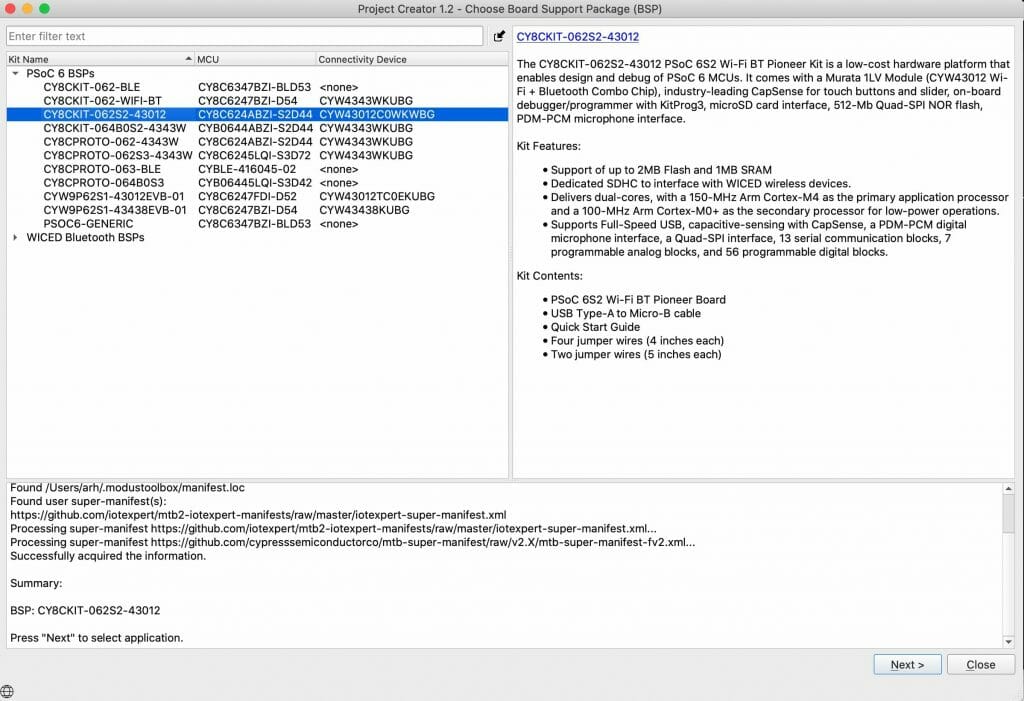
Cool. There is the new template.
When I program it… everything is cool.
arh (master) TestNTS $ make -j program
Tools Directory: /Applications/ModusToolbox/tools_2.2
CY8CKIT-062S2-43012.mk: ../mtb_shared/TARGET_CY8CKIT-062S2-43012/latest-v2.X/CY8CKIT-062S2-43012.mk

Prebuild operations complete
Commencing build operations...

Tools Directory: /Applications/ModusToolbox/tools_2.2
CY8CKIT-062S2-43012.mk: ../mtb_shared/TARGET_CY8CKIT-062S2-43012/latest-v2.X/CY8CKIT-062S2-43012.mk

Initializing build: MTBShellTemplate Debug CY8CKIT-062S2-43012 GCC_ARM

Auto-discovery in progress...
-> Found 205 .c file(s)
-> Found 46 .S file(s)
-> Found 23 .s file(s)
-> Found 0 .cpp file(s)
-> Found 0 .o file(s)
-> Found 6 .a file(s)
-> Found 503 .h file(s)
-> Found 0 .hpp file(s)
-> Found 0 resource file(s)
Applying filters...
Auto-discovery complete

Constructing build rules...
Build rules construction complete

==============================================================================
= Building application =
==============================================================================
Generating compilation database file...
-> ./build/compile_commands.json
Compilation database file generation complete
Building 193 file(s)
    Compiling app file lowPower.c
    Compiling app file main.c
    Compiling app file usrcmd.c
    Compiling ext file startup_psoc6_02_cm4.S
    Compiling ext file cy_syslib_gcc.S
    Compiling ext file cycfg.c
    Compiling ext file cycfg_capsense.c
    Compiling ext file cycfg_clocks.c
    Compiling ext file cycfg_peripherals.c
    Compiling ext file cycfg_pins.c
    Compiling ext file cycfg_qspi_memslot.c
    Compiling ext file cycfg_routing.c
    Compiling ext file cycfg_system.c
    Compiling ext file system_psoc6_cm4.c
    Compiling ext file cybsp.c
    Compiling ext file cy_capsense_centroid.c
    Compiling ext file cy_capsense_control.c
    Compiling ext file cy_capsense_csd.c
    Compiling ext file cy_capsense_csx.c
    Compiling ext file cy_capsense_filter.c
    Compiling ext file cy_capsense_processing.c
    Compiling ext file cy_capsense_selftest.c
    Compiling ext file cy_capsense_sensing.c
    Compiling ext file cy_capsense_structure.c
    Compiling ext file cy_capsense_tuner.c
    Compiling ext file croutine.c
    Compiling ext file event_groups.c
    Compiling ext file list.c
    Compiling ext file heap_1.c
    Compiling ext file heap_2.c
    Compiling ext file heap_3.c
    Compiling ext file heap_4.c
    Compiling ext file heap_5.c
    Compiling ext file port.c
    Compiling ext file queue.c
    Compiling ext file stream_buffer.c
    Compiling ext file tasks.c
    Compiling ext file timers.c
    Compiling ext file ntlibc.c
    Compiling ext file ntshell.c
    Compiling ext file text_editor.c
    Compiling ext file text_history.c
    Compiling ext file vtrecv.c
    Compiling ext file vtsend.c
    Compiling ext file psoc6_ntshell_port.c
    Compiling ext file ntopt.c
    Compiling ext file ntstdio.c
    Compiling ext file cyhal_adc.c
    Compiling ext file cyhal_analog_common.c
    Compiling ext file cyhal_clock.c
    Compiling ext file cyhal_comp.c
    Compiling ext file cyhal_comp_ctb.c
    Compiling ext file cyhal_comp_lp.c
    Compiling ext file cyhal_crc.c
    Compiling ext file cyhal_crypto_common.c
    Compiling ext file cyhal_dac.c
    Compiling ext file cyhal_deprecated.c
    Compiling ext file cyhal_dma.c
    Compiling ext file cyhal_dma_dmac.c
    Compiling ext file cyhal_dma_dw.c
    Compiling ext file cyhal_ezi2c.c
    Compiling ext file cyhal_flash.c
    Compiling ext file cyhal_gpio.c
    Compiling ext file cyhal_hwmgr.c
    Compiling ext file cyhal_i2c.c
    Compiling ext file cyhal_i2s.c
    Compiling ext file cyhal_interconnect.c
    Compiling ext file cyhal_lptimer.c
    Compiling ext file cyhal_not_implemented.c
    Compiling ext file cyhal_opamp.c
    Compiling ext file cyhal_pdmpcm.c
    Compiling ext file cyhal_pwm.c
    Compiling ext file cyhal_qspi.c
    Compiling ext file cyhal_rtc.c
    Compiling ext file cyhal_scb_common.c
    Compiling ext file cyhal_sdhc.c
    Compiling ext file cyhal_spi.c
    Compiling ext file cyhal_syspm.c
    Compiling ext file cyhal_system.c
    Compiling ext file cyhal_tcpwm_common.c
    Compiling ext file cyhal_timer.c
    Compiling ext file cyhal_trng.c
    Compiling ext file cyhal_uart.c
    Compiling ext file cyhal_udb_sdio.c
    Compiling ext file cyhal_usb_dev.c
    Compiling ext file cyhal_utils.c
    Compiling ext file cyhal_wdt.c
    Compiling ext file cyhal_psoc6_01_104_m_csp_ble.c
    Compiling ext file cyhal_psoc6_01_104_m_csp_ble_usb.c
    Compiling ext file cyhal_psoc6_01_116_bga_ble.c
    Compiling ext file cyhal_psoc6_01_116_bga_usb.c
    Compiling ext file cyhal_psoc6_01_124_bga.c
    Compiling ext file cyhal_psoc6_01_124_bga_sip.c
    Compiling ext file cyhal_psoc6_01_43_smt.c
    Compiling ext file cyhal_psoc6_01_68_qfn_ble.c
    Compiling ext file cyhal_psoc6_01_80_wlcsp.c
    Compiling ext file cyhal_psoc6_02_100_wlcsp.c
    Compiling ext file cyhal_psoc6_02_124_bga.c
    Compiling ext file cyhal_psoc6_02_128_tqfp.c
    Compiling ext file cyhal_psoc6_02_68_qfn.c
    Compiling ext file cyhal_psoc6_03_100_tqfp.c
    Compiling ext file cyhal_psoc6_03_49_wlcsp.c
    Compiling ext file cyhal_psoc6_03_68_qfn.c
    Compiling ext file cyhal_psoc6_04_64_tqfp.c
    Compiling ext file cyhal_psoc6_04_68_qfn.c
    Compiling ext file cyhal_psoc6_04_80_tqfp.c
    Compiling ext file cyhal_triggers_psoc6_01.c
    Compiling ext file cyhal_triggers_psoc6_02.c
    Compiling ext file cyhal_triggers_psoc6_03.c
    Compiling ext file cyhal_triggers_psoc6_04.c
    Compiling ext file cy_ble_clk.c
    Compiling ext file cy_canfd.c
    Compiling ext file cy_crypto.c
    Compiling ext file cy_crypto_core_aes_v1.c
    Compiling ext file cy_crypto_core_aes_v2.c
    Compiling ext file cy_crypto_core_cmac_v1.c
    Compiling ext file cy_crypto_core_cmac_v2.c
    Compiling ext file cy_crypto_core_crc_v1.c
    Compiling ext file cy_crypto_core_crc_v2.c
    Compiling ext file cy_crypto_core_des_v1.c
    Compiling ext file cy_crypto_core_des_v2.c
    Compiling ext file cy_crypto_core_ecc_domain_params.c
    Compiling ext file cy_crypto_core_ecc_ecdsa.c
    Compiling ext file cy_crypto_core_ecc_key_gen.c
    Compiling ext file cy_crypto_core_ecc_nist_p.c
    Compiling ext file cy_crypto_core_hmac_v1.c
    Compiling ext file cy_crypto_core_hmac_v2.c
    Compiling ext file cy_crypto_core_hw.c
    Compiling ext file cy_crypto_core_hw_v1.c
    Compiling ext file cy_crypto_core_mem_v1.c
    Compiling ext file cy_crypto_core_mem_v2.c
    Compiling ext file cy_crypto_core_prng_v1.c
    Compiling ext file cy_crypto_core_prng_v2.c
    Compiling ext file cy_crypto_core_rsa.c
    Compiling ext file cy_crypto_core_sha_v1.c
    Compiling ext file cy_crypto_core_sha_v2.c
    Compiling ext file cy_crypto_core_trng_v1.c
    Compiling ext file cy_crypto_core_trng_v2.c
    Compiling ext file cy_crypto_core_vu.c
    Compiling ext file cy_crypto_server.c
    Compiling ext file cy_csd.c
    Compiling ext file cy_ctb.c
    Compiling ext file cy_ctdac.c
    Compiling ext file cy_device.c
    Compiling ext file cy_dma.c
    Compiling ext file cy_dmac.c
    Compiling ext file cy_efuse.c
    Compiling ext file cy_flash.c
    Compiling ext file cy_gpio.c
    Compiling ext file cy_i2s.c
    Compiling ext file cy_ipc_drv.c
    Compiling ext file cy_ipc_pipe.c
    Compiling ext file cy_ipc_sema.c
    Compiling ext file cy_lpcomp.c
    Compiling ext file cy_lvd.c
    Compiling ext file cy_mcwdt.c
    Compiling ext file cy_pdm_pcm.c
    Compiling ext file cy_pra.c
    Compiling ext file cy_pra_cfg.c
    Compiling ext file cy_profile.c
    Compiling ext file cy_prot.c
    Compiling ext file cy_rtc.c
    Compiling ext file cy_sar.c
    Compiling ext file cy_scb_common.c
    Compiling ext file cy_scb_ezi2c.c
    Compiling ext file cy_scb_i2c.c
    Compiling ext file cy_scb_spi.c
    Compiling ext file cy_scb_uart.c
    Compiling ext file cy_sd_host.c
    Compiling ext file cy_seglcd.c
    Compiling ext file cy_smartio.c
    Compiling ext file cy_smif.c
    Compiling ext file cy_smif_memslot.c
    Compiling ext file cy_sysanalog.c
    Compiling ext file cy_sysclk.c
    Compiling ext file cy_sysint.c
    Compiling ext file cy_syslib.c
    Compiling ext file cy_syspm.c
    Compiling ext file cy_systick.c
    Compiling ext file cy_tcpwm_counter.c
    Compiling ext file cy_tcpwm_pwm.c
    Compiling ext file cy_tcpwm_quaddec.c
    Compiling ext file cy_tcpwm_shiftreg.c
    Compiling ext file cy_trigmux.c
    Compiling ext file cy_usbfs_dev_drv.c
    Compiling ext file cy_usbfs_dev_drv_io.c
    Compiling ext file cy_usbfs_dev_drv_io_dma.c
    Compiling ext file cy_wdt.c
    Compiling ext file psoc6_01_cm0p_sleep.c
    Compiling ext file psoc6_02_cm0p_sleep.c
    Compiling ext file psoc6_03_cm0p_sleep.c
    Compiling ext file psoc6_04_cm0p_sleep.c
    Compiling ext file cy_retarget_io.c
    Linking output file MTBShellTemplate.elf
==============================================================================
= Build complete =
==============================================================================

Calculating memory consumption: CY8C624ABZI-S2D44 GCC_ARM -Og

   ----------------------------------------------------
  | Section Name         |  Address      |  Size       |
   ----------------------------------------------------
  | .cy_m0p_image        |  0x10000000   |  6044       |
  | .text                |  0x10002000   |  54876      |
  | .ARM.exidx           |  0x1000f65c   |  8          |
  | .copy.table          |  0x1000f664   |  24         |
  | .zero.table          |  0x1000f67c   |  8          |
  | .data                |  0x080022e0   |  1688       |
  | .cy_sharedmem        |  0x08002978   |  8          |
  | .noinit              |  0x08002980   |  148        |
  | .bss                 |  0x08002a14   |  2136       |
  | .heap                |  0x08003270   |  1029520    |
   ----------------------------------------------------

  Total Internal Flash (Available)          2097152
  Total Internal Flash (Utilized)           64812

  Total Internal SRAM (Available)           1046528
  Total Internal SRAM (Utilized with heap)  1033500


Programming target device...
Open On-Chip Debugger 0.10.0+dev-4.1.0.1058 (2020-08-11-03:45)
Licensed under GNU GPL v2
For bug reports, read
	http://openocd.org/doc/doxygen/bugs.html
Info : auto-selecting first available session transport "swd". To override use 'transport select <transport>'.
adapter speed: 2000 kHz
adapter srst delay: 25
adapter srst pulse_width: 25
** Auto-acquire enabled, use "set ENABLE_ACQUIRE 0" to disable
cortex_m reset_config sysresetreq
cortex_m reset_config sysresetreq
Info : Using CMSIS loader 'CY8C6xxA_SMIF' for bank 'psoc6_smif0_cm0' (footprint 14672 bytes)
Warn : SFlash programming allowed for regions: USER, TOC, KEY
Info : CMSIS-DAP: SWD  Supported
Info : CMSIS-DAP: FW Version = 2.0.0
Info : CMSIS-DAP: Interface Initialised (SWD)
Info : SWCLK/TCK = 1 SWDIO/TMS = 1 TDI = 0 TDO = 0 nTRST = 0 nRESET = 1
Info : CMSIS-DAP: Interface ready
Info : KitProg3: FW version: 1.14.514
Info : KitProg3: Pipelined transfers disabled, please update the firmware
Info : VTarget = 3.221 V
Info : kitprog3: acquiring the device...
Info : clock speed 2000 kHz
Info : SWD DPIDR 0x6ba02477
Info : psoc6.cpu.cm0: hardware has 4 breakpoints, 2 watchpoints
***************************************
** Silicon: 0xE453, Family: 0x102, Rev.: 0x12 (A1)
** Detected Device: CY8C624ABZI-S2D44
** Detected Main Flash size, kb: 2048
** Flash Boot version: 3.1.0.378
** Chip Protection: NORMAL
***************************************
Info : psoc6.cpu.cm4: hardware has 6 breakpoints, 4 watchpoints
Info : starting gdb server for psoc6.cpu.cm0 on 3333
Info : Listening on port 3333 for gdb connections
Info : starting gdb server for psoc6.cpu.cm4 on 3334
Info : Listening on port 3334 for gdb connections
Info : SWD DPIDR 0x6ba02477
Info : kitprog3: acquiring the device...
psoc6.cpu.cm0 halted due to debug-request, current mode: Thread
xPSR: 0x41000000 pc: 0x00000190 msp: 0x080ff800
** Device acquired successfully
** psoc6.cpu.cm4: Ran after reset and before halt...
psoc6.cpu.cm4 halted due to debug-request, current mode: Thread
xPSR: 0x01000000 pc: 0x0000012a msp: 0x080ff800
** Programming Started **
auto erase enabled
Info : Flash write discontinued at 0x1000179c, next section at 0x10002000
Info : Padding image section 0 at 0x1000179c with 100 bytes (bank write end alignment)
[100%] [################################] [ Erasing     ]
[100%] [################################] [ Programming ]
Info : Padding image section 1 at 0x1000fd24 with 220 bytes (bank write end alignment)
[100%] [################################] [ Erasing     ]
[100%] [################################] [ Programming ]
wrote 62976 bytes from file /Users/arh/mtb22/TestNTS/build/CY8CKIT-062S2-43012/Debug/MTBShellTemplate.hex in 2.082329s (29.534 KiB/s)
** Programming Finished **
** Verify Started **
verified 62656 bytes in 0.122516s (499.425 KiB/s)
** Verified OK **
** Resetting Target **
Info : SWD DPIDR 0x6ba02477
shutdown command invoked
Info : psoc6.dap: powering down debug domain...

arh (master) TestNTS $
And the project seems to be doing the needful.