In the last post I went through all of the setup work for the I2CDB program. Now I will give you the main course. My program is divided into five functions
- main: a simple function that loads the configuration file, attaches to the I2C bus, reads the data from the I2C slave and saves it into the database.
- getI2CBus: uses the Pi4J library to attach to the I2C Master and initialize the two gobal variables bus1 and bus2.
- readProperties: reads the “config.properties” file containing the global configuration (like the database name, userid and password) as well as the I2C registers, addresses and names.
- insertStringDatabase: run the MySql insert function.
- i2readVariables: read the data from the I2C, setup the insert string, and call the insert function. This (long) function is where all of the action is at.
I am sure that more could be done to handle exceptions, mostly do a few retrys, but I decided to just print out the error message.
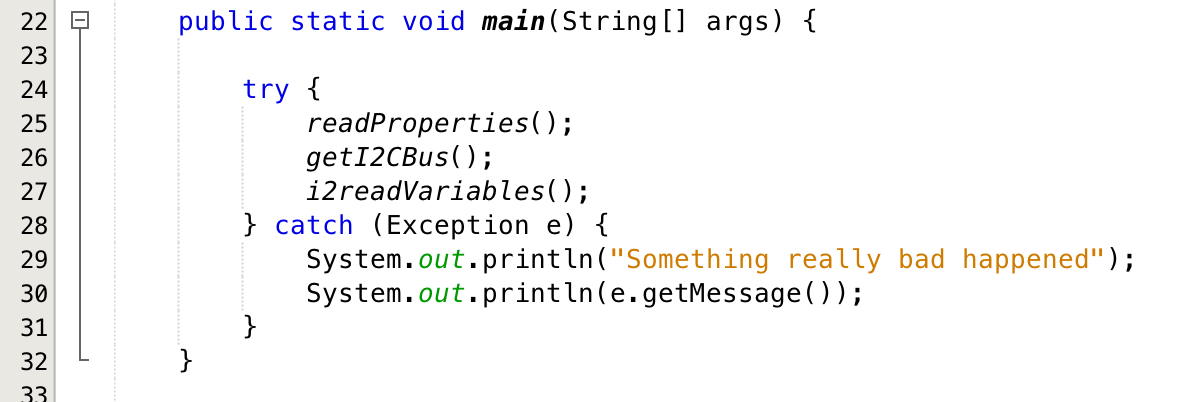
main
This function is called when the i2cdb program is run by the “runi2c” shell script. It simply
- reads in the properties file
- attaches to the Raspberry Pi i2c master
- reads the i2c slave
- saves the data into the MySql database
- print out an error message if there is some exception
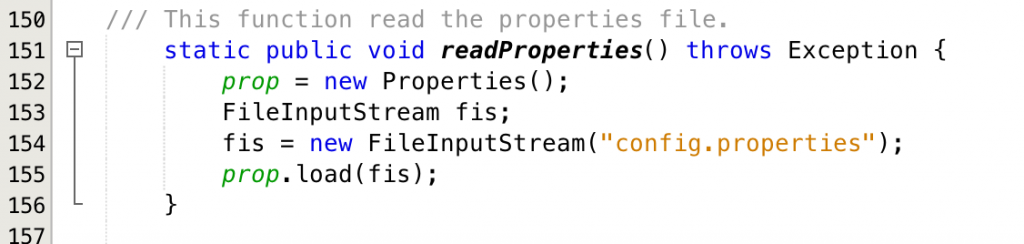
readProperties
This function reads the “config.properties” file into the global class “prop”. The Properties class handles key/value pairs and knows how to read a file of “key=value” lines. You can make whatever keys you want, and they have whatever value you want. Later in the program I use the Integer(String) constructor to convert the String “123” into the Integer 123.
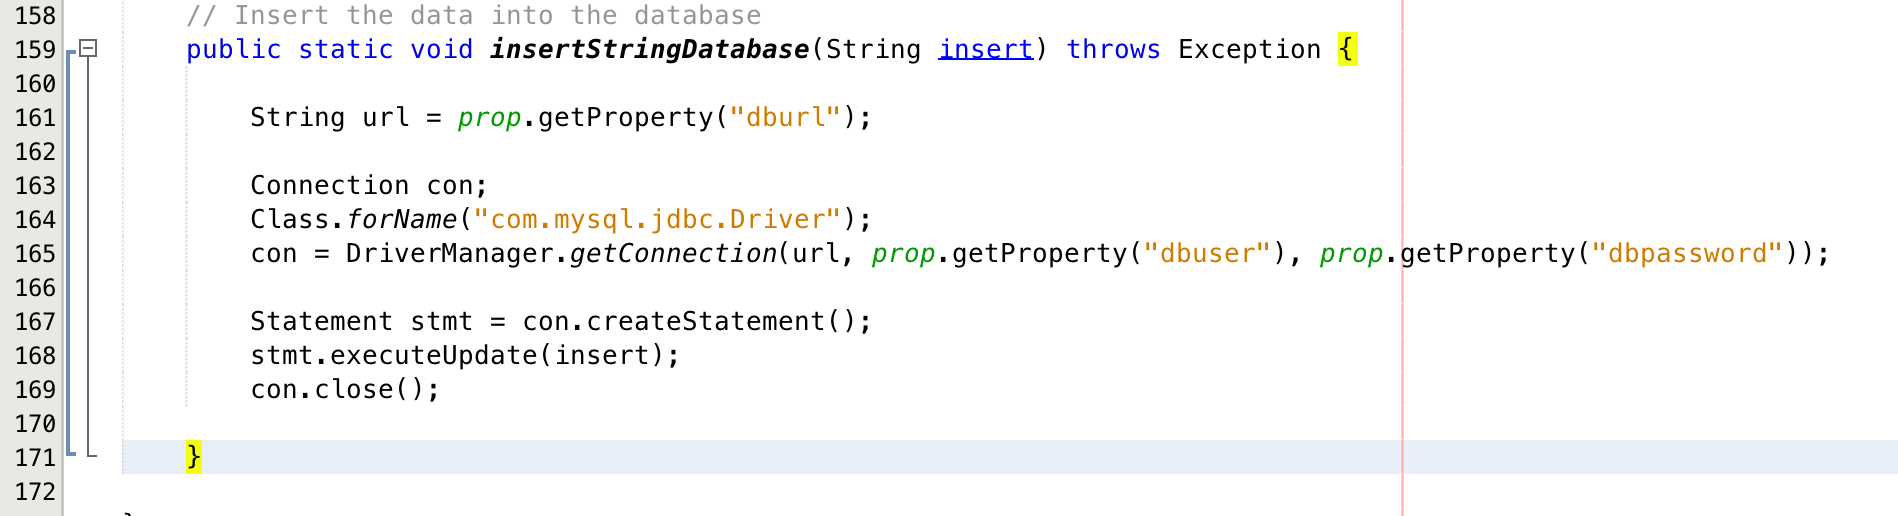
insertStringDatabase
This function handles the interface to MySql:
- 159 Takes an input sql command formatted into a string like “insert into creekdata.creekdata (created_at,depth,temperature) values (“2016-04-10 13:16:43.261″,1.568,21.199991);”
- 163-165 Makes a connection to the “dburl” that it gets from the config.properties file. The URL specifies, which protocol (jdbc), which port and IP address and what database. e.g “dburl=jdbc:mysql://192.168.15.82/creekdata”
- 167-169: Executes the insert command
getI2CBus
The Broadcom 2835 ARM controller is the main chip that runs the Raspberry Pi. It is essentially a cell phone MCU. As with most MCUs it has fixed function serial communication blocks embedded into the chip. In this case the RPi device driver enumerates the I2C blocks as “0” and “1”. I have no idea what block 0 is attached to. Block 1 is attached to the GPIO pins on the RPi. The geti2C function makes a connection to the two controllers. If you are unable to attach to either of the controllers then I throw an exception. Hopefully this will future proof this code for updated version of the RPi.

i2readVariables
Finally the function that does all of the work. Big picture, this function:
- iterates over all of the number of variables specified by “i2vars”
- Figures out the I2C Bus, Address, Register Address and # of bytes
- Reads the bytes into a “buffer”
- Converts the buffer to the correct endian-ness
- Converts the buffer to the correct type (uint8, int8, uint16, int16, float,double)
- saves the name of the MySql column into the insertNames[] array
- saves the value of the variable into the insertVals[] array
- builds up a string with the MySQL “insert ….” command
- run the insert
The start of the i2readVariables (I really should have called this i2cReadVariables) gets things going
- I noticed that the I2C reads are not perfectly reliable and it sometimes takes several reads to get a successful read. I believe that the Broadcom chip does not like to have its I2C clock stretched. I use the variables I2CReadSuccess and I2CRetryCount to keep track of failures and to retry.
- Lines 51-52 declare arrays to hold the names of the MySql Columns and the Values to insert. I declare them as “Object” so that they can hold Integers or Floats.
- Lines 56-60 look at the properties class to figure out the I2C Bus, I2C Slave Address, I2C Register #, the type of data, and the endinaness
- Lines 63-68 set the nbytes variable to the right number of bytes to read. One sin that I perform in this code is to embed the property name (uint8, …) into the code. Even worse I duplicated the name a few places.
- Line 70: declare a buffer of bytes to hold the data read from the I2C Slave

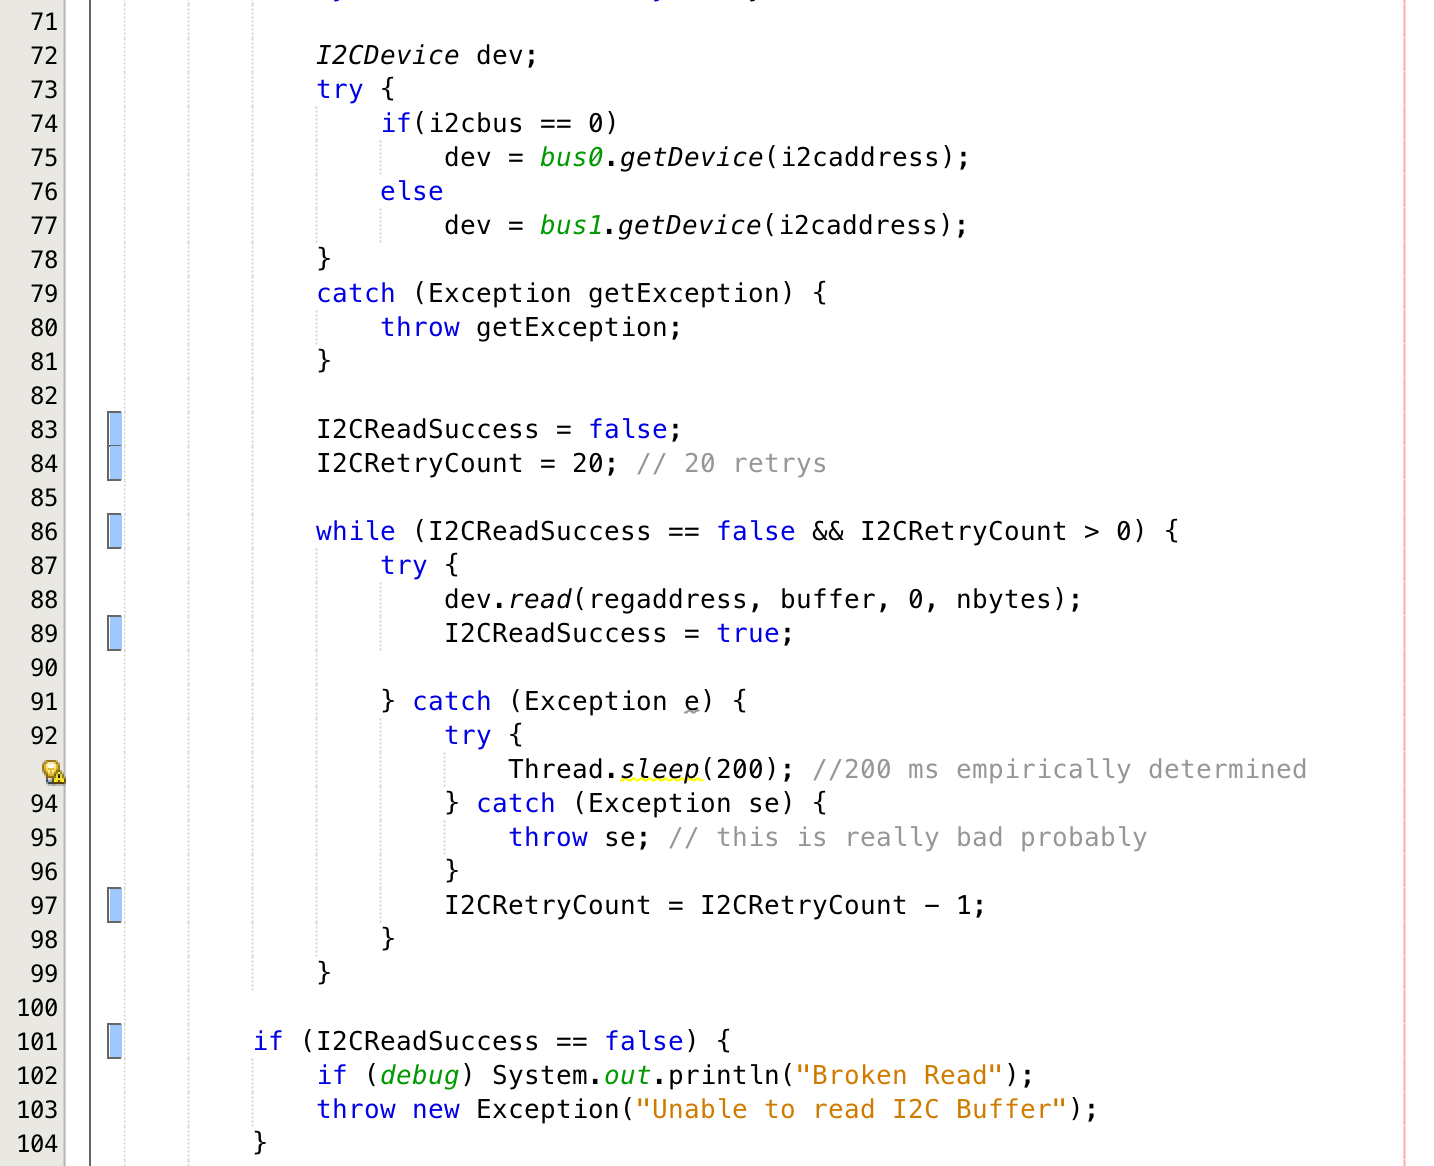
The next block of code reads the I2C Slave.
- Lines 71-81 attaches to the device on the correct I2C bus. If there a problem it throws an exception which terminates this function. Perhaps it would have been better to have a retry scheme, but I didn’t.
- Lines 83-84: Setup the retry and success variables. The retry scheme counts down from the hardcoded 20. When I was running tests I noticed that it may fail 2-3-4 times.
- Line 86: Sets up a loop that runs until
- You have had a successful read as indicated by I2CReadSuccess == true
- You have retried 20 times as indicated by I2CRetryCount == 0
- Line 88: Reads the I2C Slave
- Lines 91-97: If there is a failed read as indicated by an Exception being thrown, then sleep for 200ms and try again.
- Lines 101-104: If you fall out of the loop and haven’t had a succesfull read then throw an exception and exit the read process
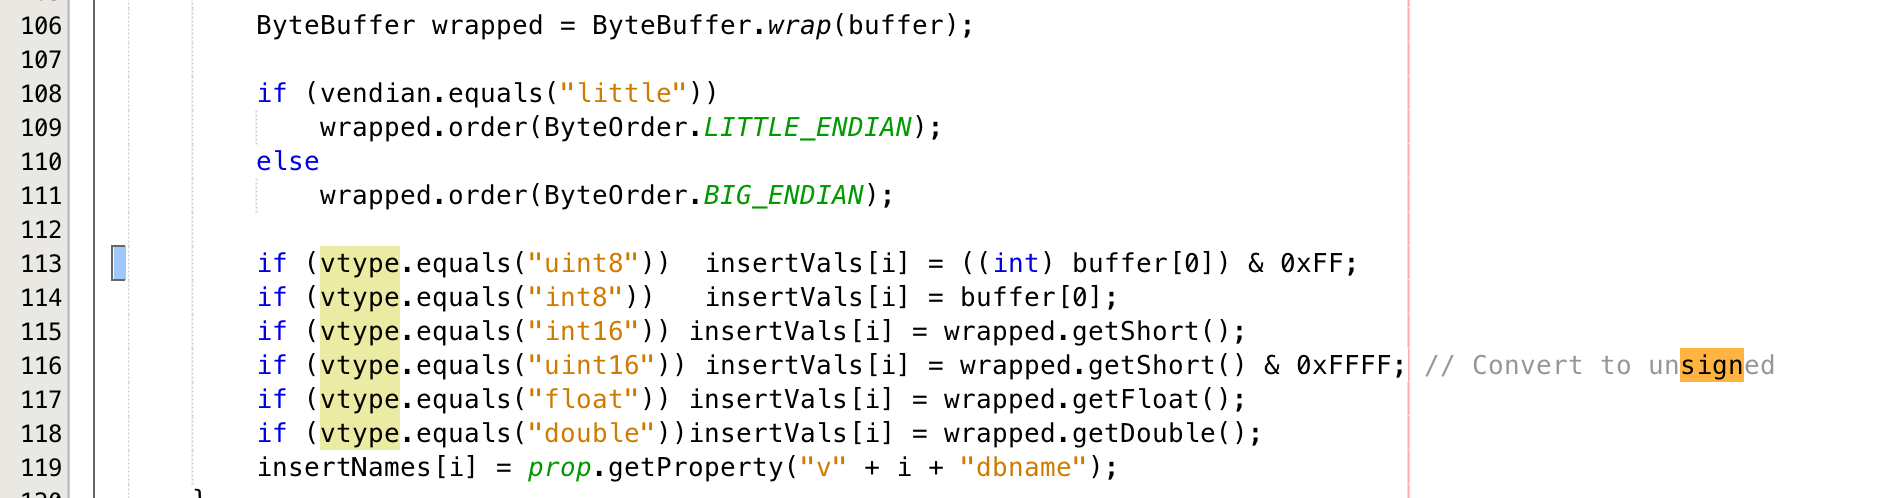
The next block of code uses a cool class called “ByteBuffer” to help convert the individual bytes read from the I2C Slave into Java variables of the right type.
- Line 106 takes the array of bytes and turns it into a ByteBuffer
- Lines 108-111 look at the endian-ness setup in the config.properties and then convert the ByteBuffer to the correct endianness. Originally I did this design using a PSoC3 which was Big Endian… but it now uses a PSoC4 which is little endian.
- Lines 113-118 convert the ByteBuffer to a value of the right type as specified by the config.properties file. One trick is that Java does not like unsigned so the bitwise “and” is used to convert the signed values to unsigned.
- Line 119 saves the MySql column name of the variable
The last block of code builds up the MySql String and then calls the insert function
- Lines 122 & 126-129: If the user has specified that he wants a timestamp, then create that timestamp and add it to the MySql Insert statement
- Line 124: setup the MySql Statement template
- Lines 130-133 iterate through the column names and add them to the MySql Statement
- Lines 135-139 if they have asked for a timestamp then add that value to the insert statement
- Lines 141-143 iterate through all of the values and add them to the insert statement
- Lines 144-147: finish the MySql Statement, print it out and run it.

I like this program because I can create a new template file without having to change the program. Basically I created a generic interface that can bridge from an I2CSlave that collects data and then write that data into the database.
In the next posts Ill show you the user interface web pages.
| Index | Description |
|---|---|
| The Creek: IOT for the Elkhorn Creek | Introduction |
| The Creek: Solution Architecture 1.0 | Overall architecture |
| The Creek: Creek Board 1.1 | Eagle layout of the board |
| The Creek: Creek Board 1.0 – RCCA | A discussion of the errors in the 1.0 board |
| The Creek: CYPI, a Raspberry Pi to Arduino Bridge | PSoC4 <--> Raspberry Pi Bridge Board |
| The Creek: PSoC4 Creator Schematic and Firmware | Firmware to interface with the temperature and pressure sensors |
| The Creek: Testing the Firmware | Using tools to verify that the PSoC 4 Firmware is working correctly |
| The Creek: Testing the Bootloader | Make sure that you can load new firmware into the PSoC |
| The Creek: Software Architecture | All of the Raspberry Pi software connections |
| The Creek: Install MySql | Instruction to configure MySql |
| The Creek: Install Tomcat | Instruction to configure Tomcat JSP Server |
| The Creek: Data Collection Java (Part 1) | The Java program that reads the I2C and saves it in the database |
| The Creek: Data Collection Java (Part 2) | The Java program that reads the I2C and saves it in the database |
| The Creek: Create the Chart with JFreeChart | Using open source Java charting software to create plots of the Creek Depth |
| The Creek: Flood Event Data Processor | A batch program to create analyze the database and create a table of flood events |
| The Creek: Flood Event Web Page | A batch program to create the flood event web page |
| The Creek: Creek Server 1.1 | Updates to all of the back off server programs to integrate charts |
| The Creek: JSP Web Page for www.elkhorn-creek.org | The JSP program to make the table and display the website |
| The Creek: Raspberry Pi Clock Stretching | Sorting out a bug in the system having to do with the Broadcomm Raspberry Pi Master not functioning well with clock stretching |
| The Creek: Creek Server 1.2 | Caching the web pages to make them faster |
No comment yet, add your voice below!