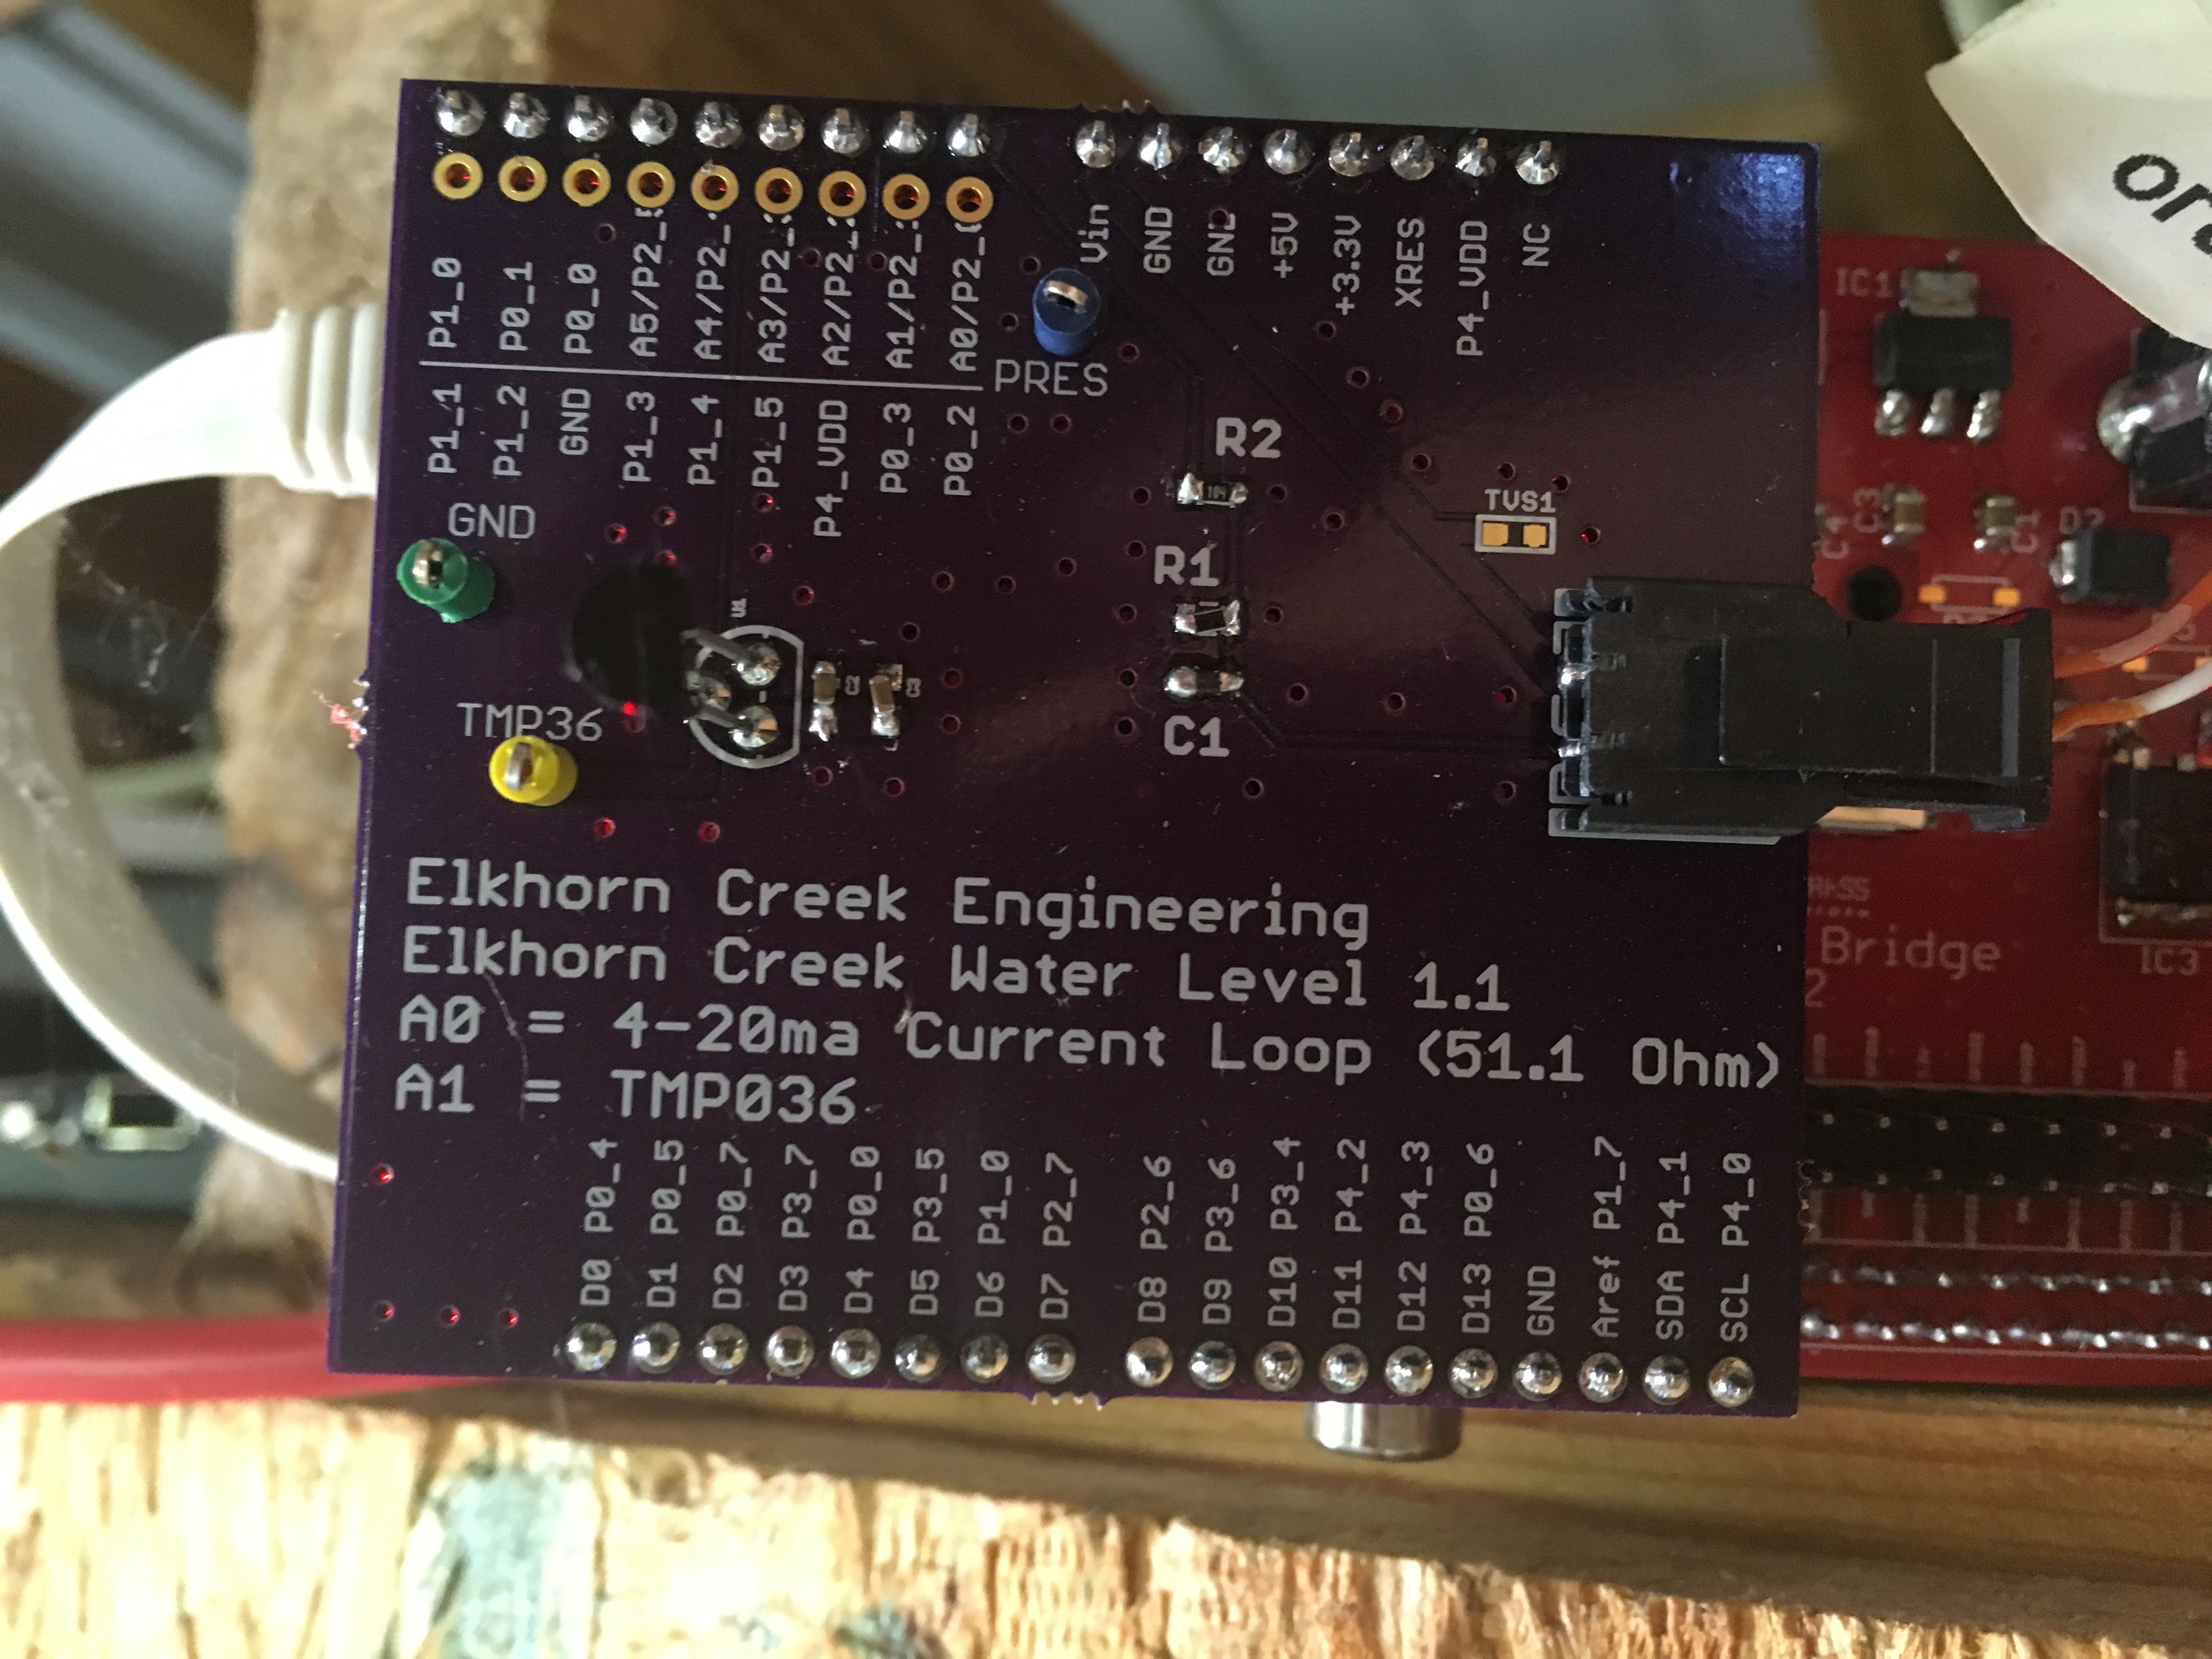
In the previous post I described the entire system architecture. In this post, I am going to describe the Arduino shield that I unfortunately call “Elkhorn Creek Water Level 1.1”. It is unfortunate because in version 1.0 I made a really stupid error which ruined the first run of printed circuit boards. You can read more about how I made the error and what I am doing in the future in the post Creek Board 1.0 RCCA.
To make this system work I need to be able to interface the PSoC4200 with two sensors:
- The US381-000005-015PG pressure sensor
- A TMP036 temperature sensor
Both of these sensors are subject to environmental noise so they both have capacitive or RC filters connected to them. I originally built a prototype of this board using a proto board. However, it was a PITA because the wires would come loose and the system would stop working.

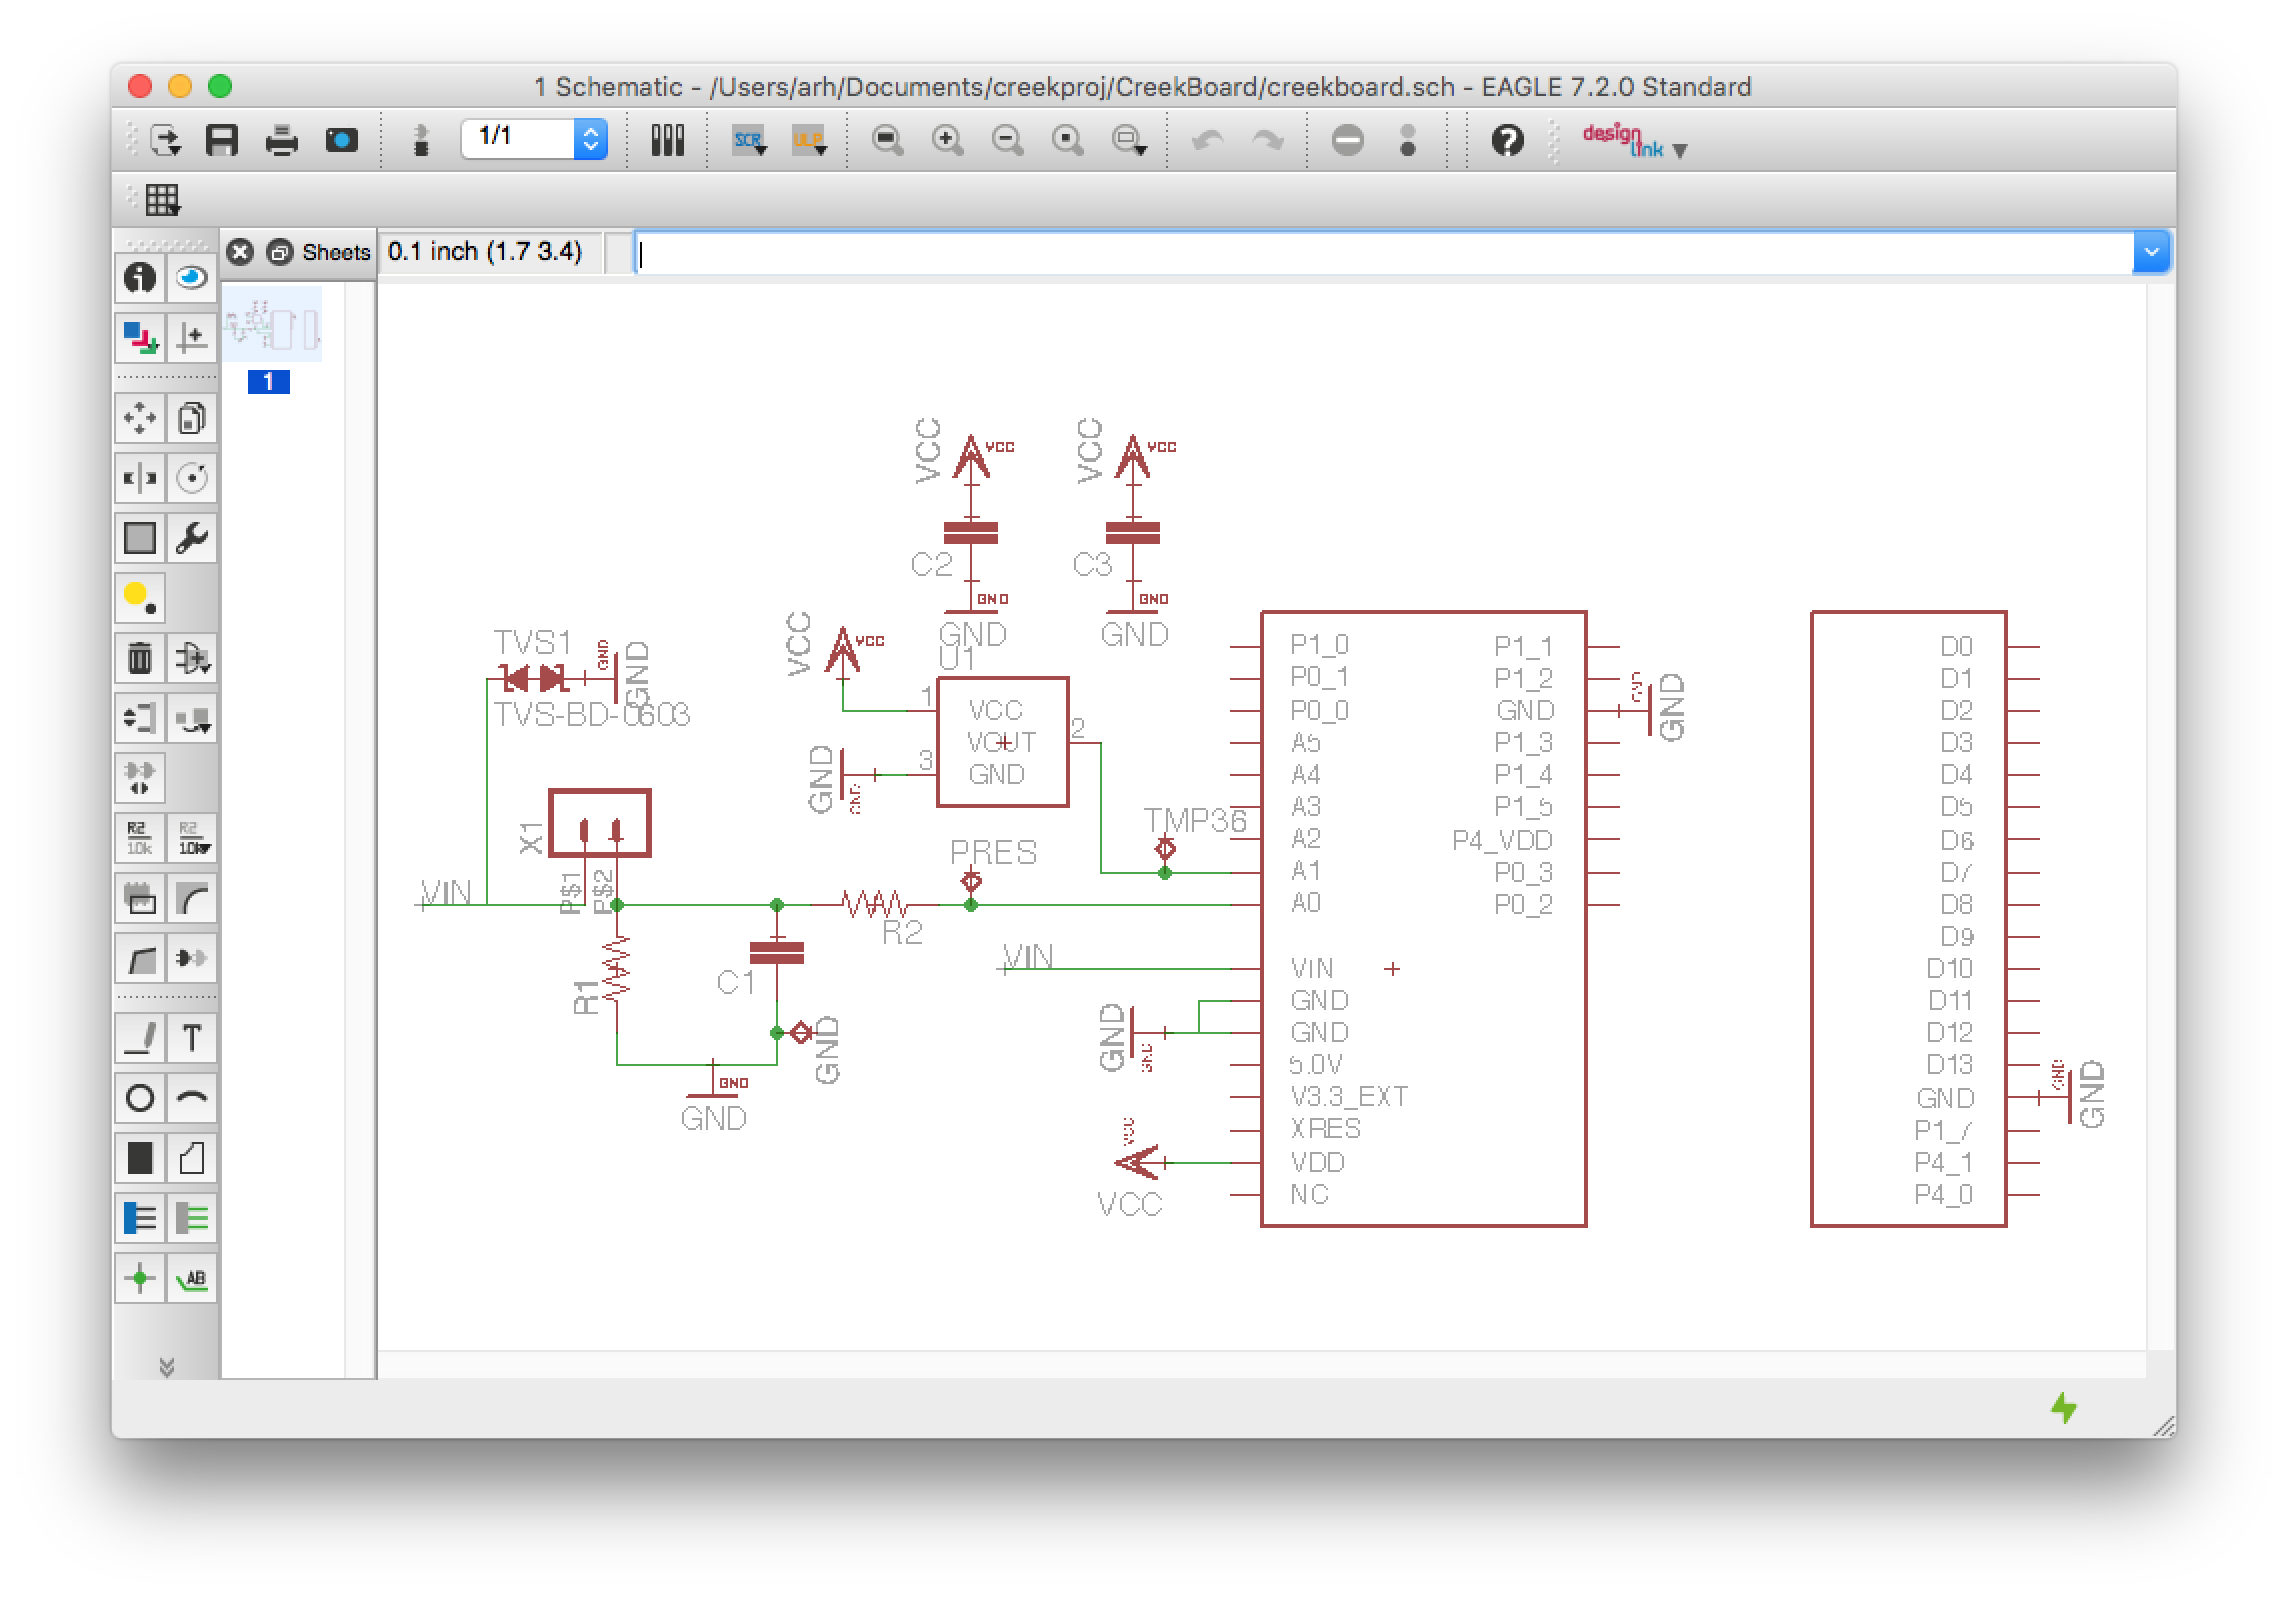
So I decided to make a real PCB. To do the design, I used the Eagle 7.2 PCB editor as it seemed like it had the most support from the maker community. The schematic for the system is fairly simple. It has
- Pressure Sensor
- X1: A Molex Microfit 3.0 Connector to attach the two wires from the pressure sensor
- R1: A 51.1 Ohm resistor to group to convert the 4-20mA –> 0.204mV to 1.022V
- C1/R2: A low pass filter
- TVS1: A ESD diode to clamp any ESD event to ground to prevent it from blowing up the PSoC4A or the Sensor
- Temperature Sensor
- TMP36: A sensor that turns temperature into a voltage. The equation for temperature is T=0.5V+10mV/degreeC. For 25 degrees C the Voltage = 750mV
- C2 + C3: Two decoupling capacitors to filter power supply noise
- Arduino Interface
- A standard Arduino interface set of pins + the additional Cypress CY8CKIT-042 pins. I only used the A0 and A1 pins for signals and the Vin pin (which is 12v) to drive the current loop
- Measurement Test Points
- Keystone 5000 test points. These test points are a little loop of wire that sticks up from the surface of the PCB to make it easy to probe a voltage with your DMM.

- Keystone 5000 test points. These test points are a little loop of wire that sticks up from the surface of the PCB to make it easy to probe a voltage with your DMM.
Here is the final Eagle Schematic for the board.
And the layout: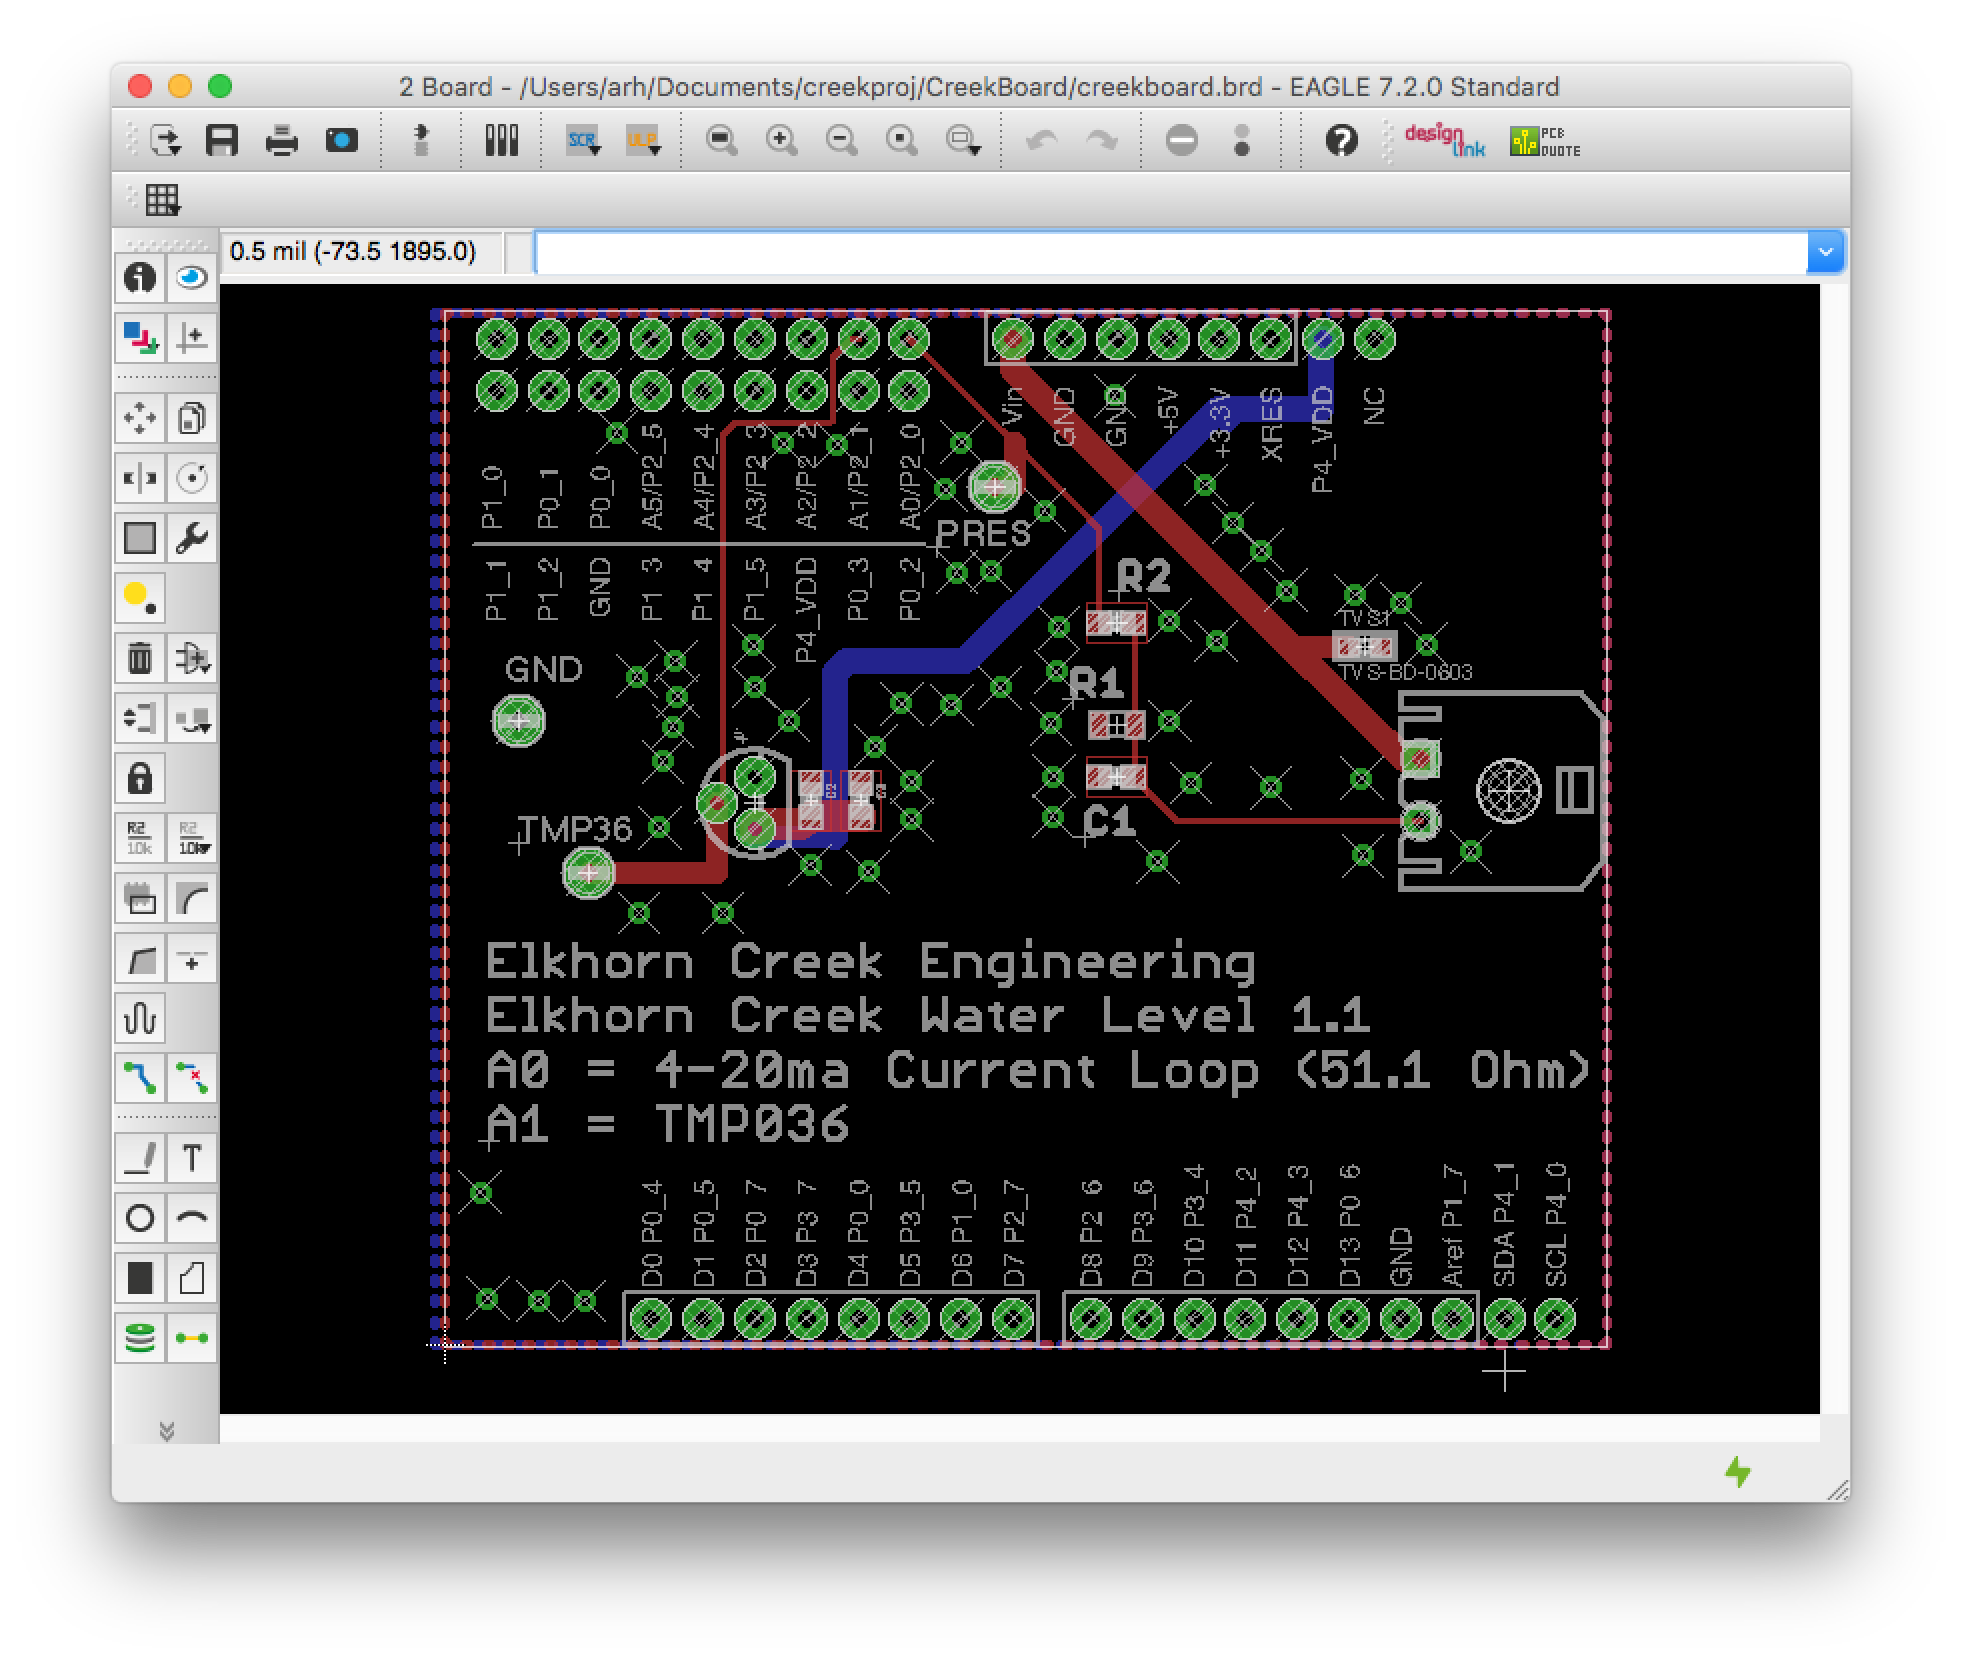
Once I completed the layout I sent the board to OSH Park to be manufactured. I have shared the project on their website. OSH Park is an excellent company that is easy to do business with. They charged me $22.55 for three of the boards. The fit and finish of the boards is very nice. Here is the board:
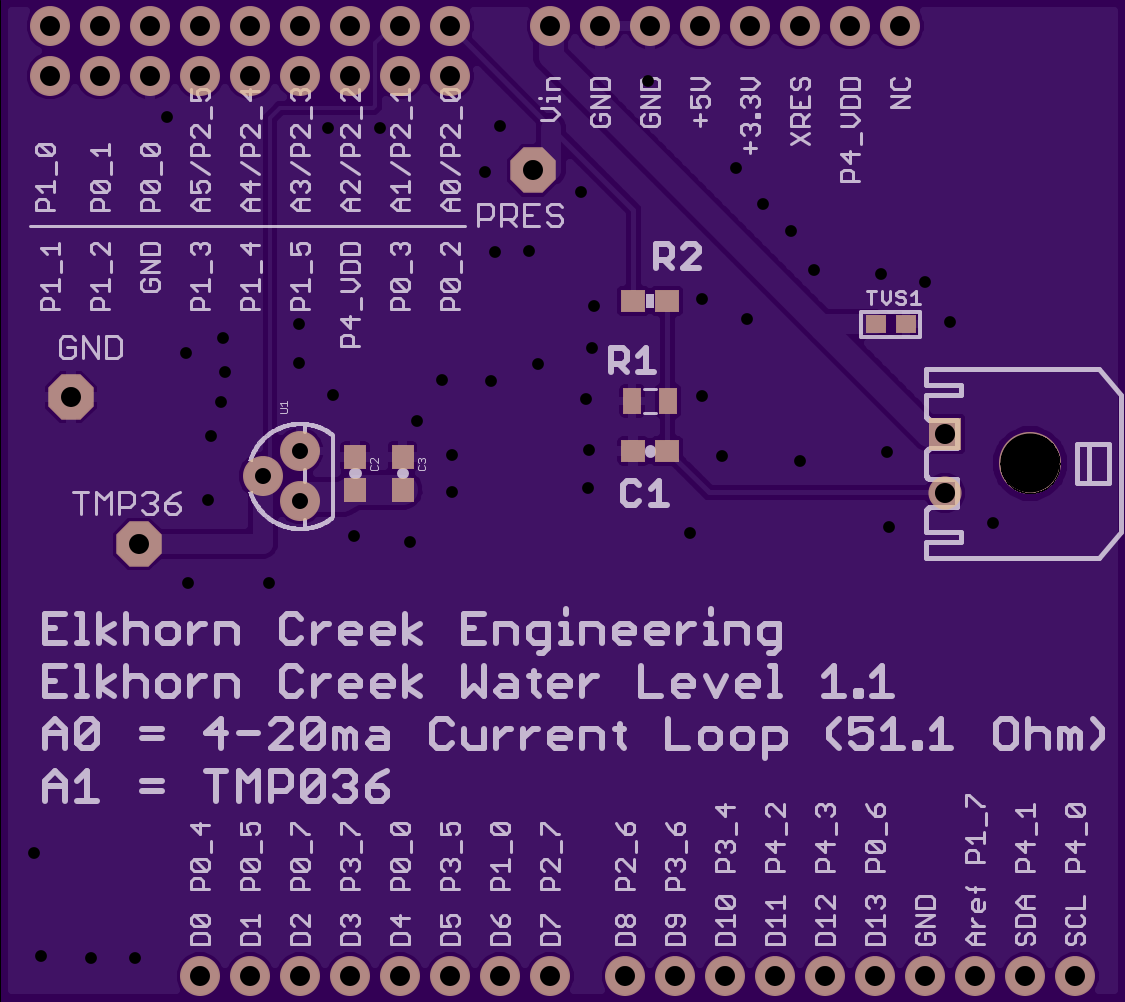
Here is the assembled board:
I have posted all of the project files at github. You can “git” them from https://github.com/iotexpert/TheCreek The Eagle project is in the CreekBoard directory.
Index
Description
The Creek: IOT for the Elkhorn Creek
Introduction
The Creek: Solution Architecture 1.0
Overall architecture
The Creek: Creek Board 1.1
Eagle layout of the board
The Creek: Creek Board 1.0 – RCCA
A discussion of the errors in the 1.0 board
The Creek: CYPI, a Raspberry Pi to Arduino Bridge
PSoC4 <--> Raspberry Pi Bridge Board
The Creek: PSoC4 Creator Schematic and Firmware
Firmware to interface with the temperature and pressure sensors
The Creek: Testing the Firmware
Using tools to verify that the PSoC 4 Firmware is working correctly
The Creek: Testing the Bootloader
Make sure that you can load new firmware into the PSoC
The Creek: Software Architecture
All of the Raspberry Pi software connections
The Creek: Install MySql
Instruction to configure MySql
The Creek: Install Tomcat
Instruction to configure Tomcat JSP Server
The Creek: Data Collection Java (Part 1)
The Java program that reads the I2C and saves it in the database
The Creek: Data Collection Java (Part 2)
The Java program that reads the I2C and saves it in the database
The Creek: Create the Chart with JFreeChart
Using open source Java charting software to create plots of the Creek Depth
The Creek: Flood Event Data Processor
A batch program to create analyze the database and create a table of flood events
The Creek: Flood Event Web Page
A batch program to create the flood event web page
The Creek: Creek Server 1.1
Updates to all of the back off server programs to integrate charts
The Creek: JSP Web Page for www.elkhorn-creek.org
The JSP program to make the table and display the website
The Creek: Raspberry Pi Clock Stretching
Sorting out a bug in the system having to do with the Broadcomm Raspberry Pi Master not functioning well with clock stretching
The Creek: Creek Server 1.2
Caching the web pages to make them faster
No comment yet, add your voice below!