The Creek: Collect Data (Part 1)

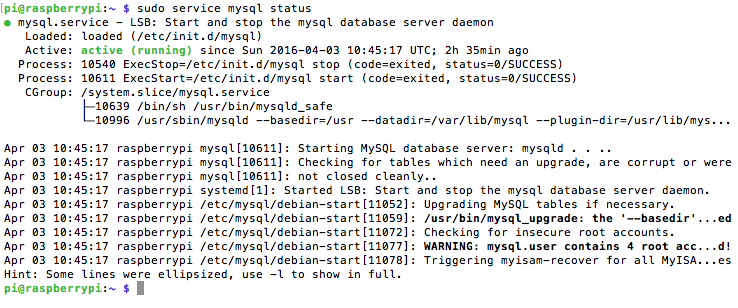
In The Creek: Server Architecture I described a program called “runI2C” which is a shell script that is run once per minute by the crontab on the Raspberry PI (RPi).  This shell script does a “sudo” and runs the java program “i2cdb”.

Screen Shot 2016-04-09 at 1.02.25 PM

“i2cdb” is a Java program that uses the open source pi4j library to access the RPi I2C bus, reads the data out of the PSoC4 and then inserts it into the “creek data” database.  In order for all of this to work you first need to get the pi4j jar files.  To do that, on the Raspberry Pi, run “curl -s get.pi4j.com | sudo bash” which will install everything you need:

Screen Shot 2016-04-08 at 3.43.32 PM

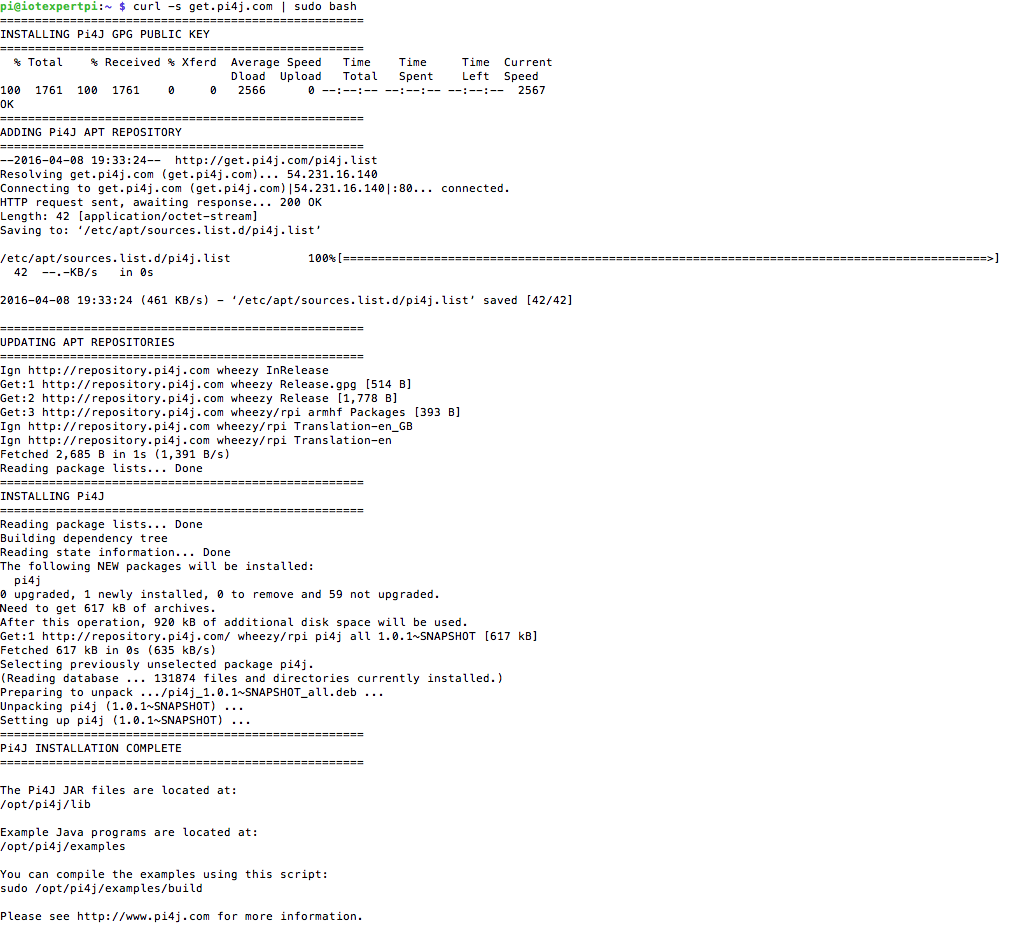
Pi4J is a Java library that will give you complete access to the GPIOs on the Raspberry Pi, you can read and write the GPIOs as well as use the UART, SPI and I2C communication devices.  Once you install the libraries you will have 4 jar files in “/opt/pi4j/lib” as well as a bunch of examples in “/opt/pi4j/examples”.

Because I wanted to edit the files on my Mac, I copied the libraries into my “lib” directory in the project so that Netbeans would know about them.

The next library that you need is the mysql-connector which is a jar supplied by the MySql team.  You can get it from their website.  I put this jar file in my “lib” folder as well.

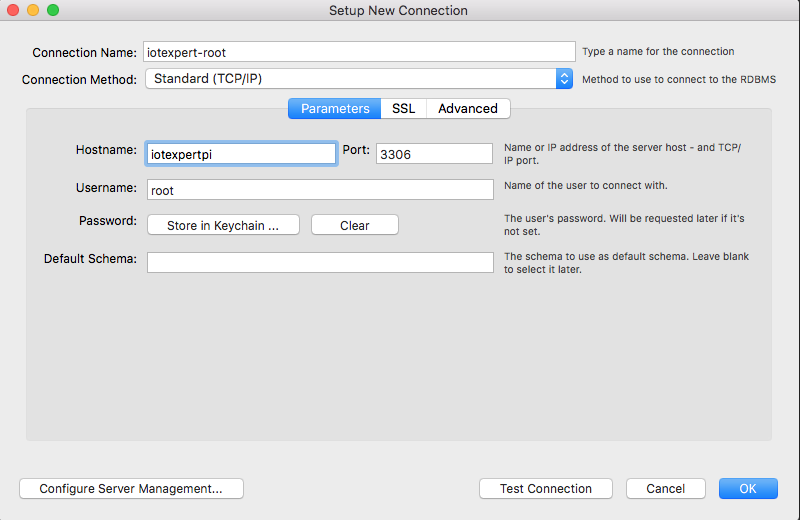
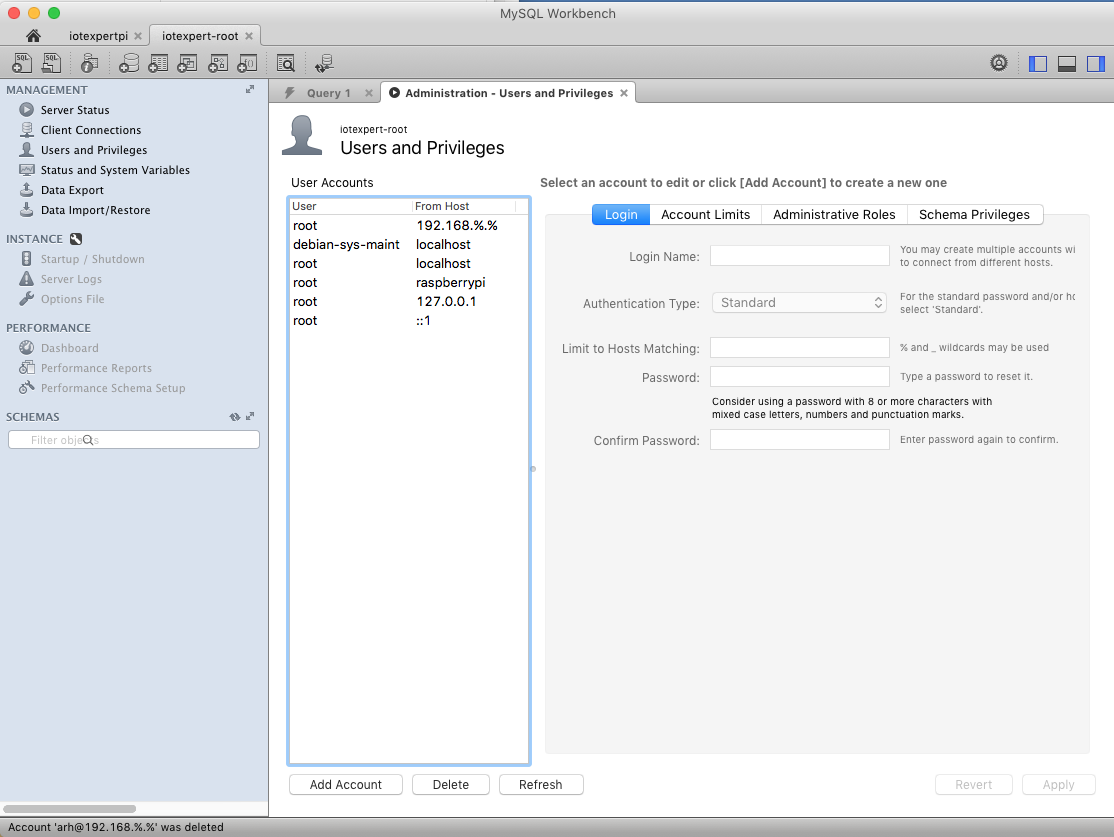
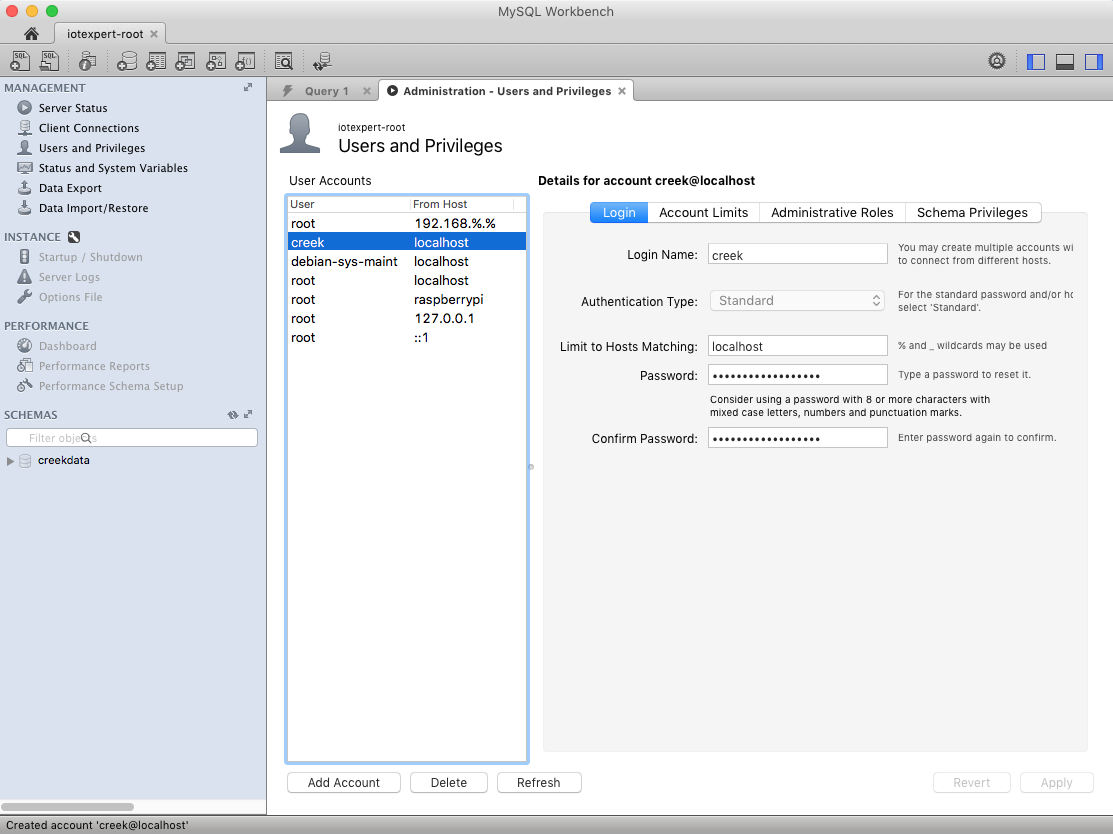
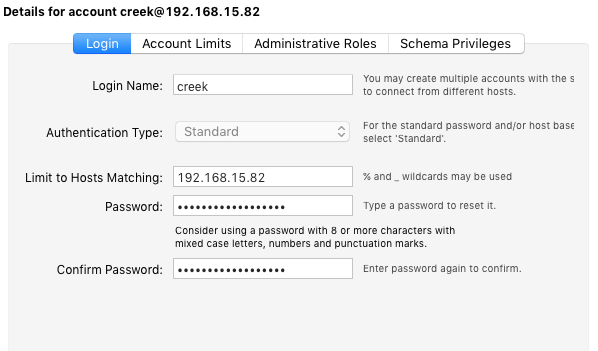
In order to access the database, there needs to be a user in the MySql database.  To do this, log in as root in the MySqlWorkbench tool and add a new user.  I call this user “creek” and give it a password of “creek”, then restrict it to only being able to connect from the RPi IP address.

Screen Shot 2016-04-09 at 1.27.39 PM

Then assign “creek”s privileges

Screen Shot 2016-04-09 at 1.31.30 PM

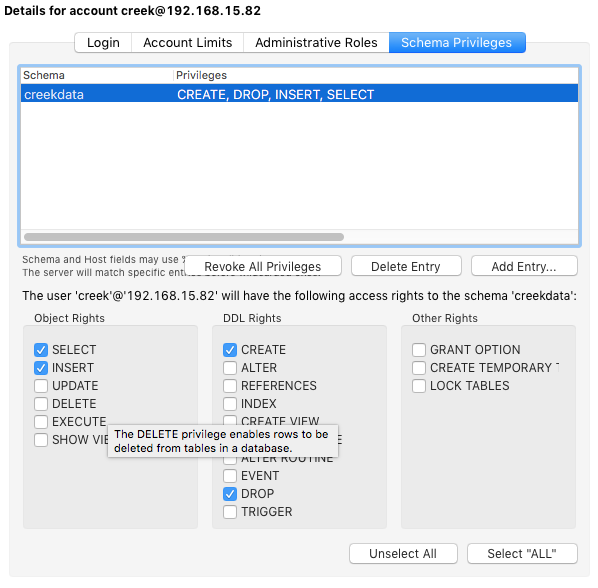
The next step is to create a MySql script to create the database.  Originally, I stored the ADC raw counts in the database because I wasn’t sure about calibration and I was interested in the raw data.  The problem with this method is that I had to encode the conversion from raw counts to depth on the server side.  I have come to believe that is a bad idea and that the acquisition hardware should be responsible for that conversion.

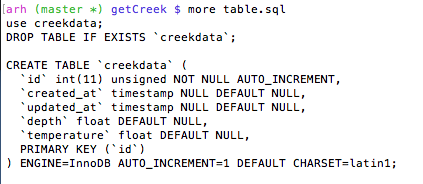
The easiest thing to do is to make a script to make the table.  I called it “table.sql” and I run it by doing “mysql -u creek -p < table.sql”

Screen Shot 2016-04-09 at 1.24.51 PM

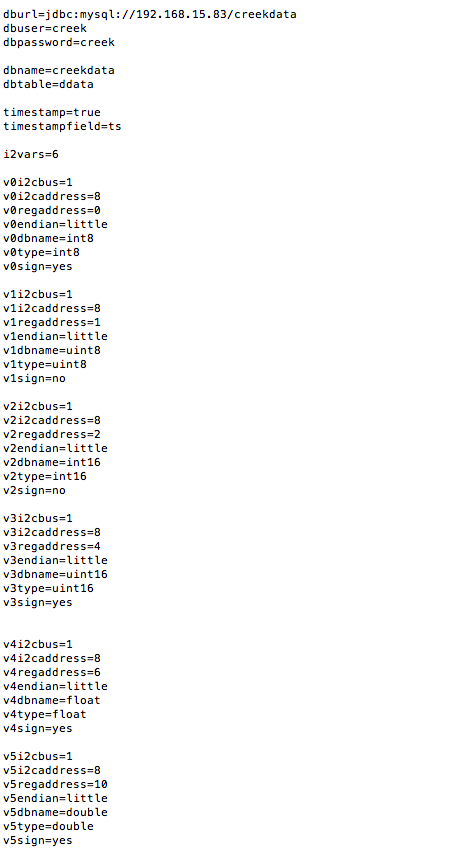
This program has been written and re-written about a dozen times (including as I prepared this post) as I searched around for what was the “best” solution.  Originally it started as a hard coded program.  After some iteration I decided to create a configuration file.  That file, called “config.properties” is read in when the program starts.  It specifies:

  • The mysql url, user and password
  • Which database and table to store the data into
  • If it should store timestamps, and the name of the timestamp column
  • The number of “variables” to read
  • For each variable
    • The BUS # (0 or 1) on RPi (on my model only bus 1 works)
    • The I2C slave address
    • little or big endian
    • The name of the column to store the data in
    • What type of data (uint8, int8, uint16, int16, float, double)

Here is the file “config.properties.test”:

Screen Shot 2016-04-09 at 1.35.41 PM

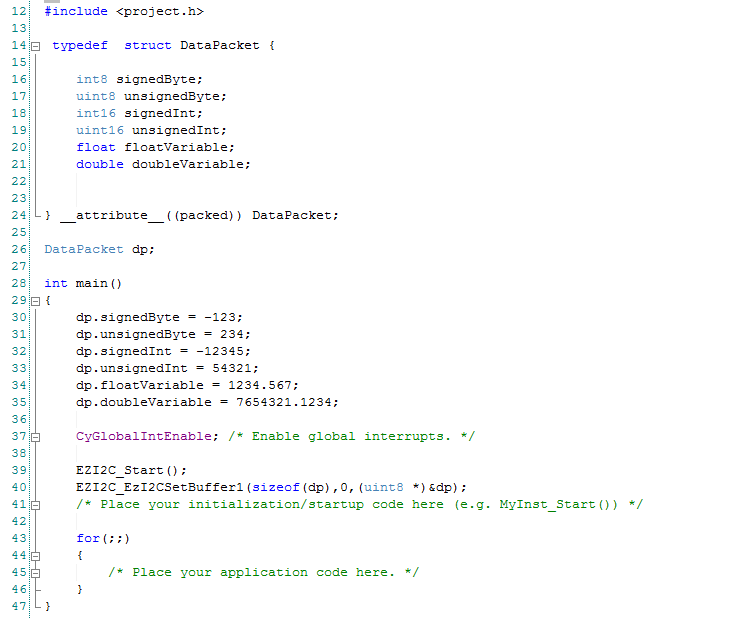
I was going crazy trying to get all of the pieces to fit together (the endian-ness, the sign) and trying to sort out the fact that Java doesnt like unsigned.  So I created firmware for the PSoC that just had one of each test case.  The project is called “debugJavaPi” and is available on the iotexpert github site.  This program just creates an I2C buffer with one of each type of data, then initializes them with known data, then services I2C requests.

Screen Shot 2016-04-09 at 1.42.16 PM

In the next post I will explain in detail the I2CDB Java Program.

Index Description
The Creek: IOT for the Elkhorn Creek Introduction
The Creek: Solution Architecture 1.0 Overall architecture
The Creek: Creek Board 1.1 Eagle layout of the board
The Creek: Creek Board 1.0 – RCCA A discussion of the errors in the 1.0 board
The Creek: CYPI, a Raspberry Pi to Arduino Bridge PSoC4 <--> Raspberry Pi Bridge Board
The Creek: PSoC4 Creator Schematic and Firmware Firmware to interface with the temperature and pressure sensors
The Creek: Testing the Firmware Using tools to verify that the PSoC 4 Firmware is working correctly
The Creek: Testing the Bootloader Make sure that you can load new firmware into the PSoC
The Creek: Software Architecture All of the Raspberry Pi software connections
The Creek: Install MySql Instruction to configure MySql
The Creek: Install Tomcat Instruction to configure Tomcat JSP Server
The Creek: Data Collection Java (Part 1) The Java program that reads the I2C and saves it in the database
The Creek: Data Collection Java (Part 2) The Java program that reads the I2C and saves it in the database
The Creek: Create the Chart with JFreeChart Using open source Java charting software to create plots of the Creek Depth
The Creek: Flood Event Data Processor A batch program to create analyze the database and create a table of flood events
The Creek: Flood Event Web Page A batch program to create the flood event web page
The Creek: Creek Server 1.1 Updates to all of the back off server programs to integrate charts
The Creek: JSP Web Page for www.elkhorn-creek.org The JSP program to make the table and display the website
The Creek: Raspberry Pi Clock Stretching Sorting out a bug in the system having to do with the Broadcomm Raspberry Pi Master not functioning well with clock stretching
The Creek: Creek Server 1.2 Caching the web pages to make them faster


The Creek: Install MySQL

As I described in the Creek Software Architecture, I am using MySql as the database to hold all of the creek temperature and depth information.  That means I need to get MySql going on the Raspberry Pi.  The process is well documented on the MySql installation website.  To do the installation you need to run:

  • sudo apt-get update
  • sudo apt-get install mysql-server
  • type password for root when it asks

After a bunch of gyrations and pages of information barf onto the screen, you will have MySql going on your Raspberry Pi.  You can verify that by running

  • sudo service mysql status

Screen Shot 2016-04-03 at 9.20.27 AM

It turns out that the command “service” has a number of useful options including:

  • sudo service mysql stop [which will turn off mysql]
  • sudo service mysql start [which will start it]
  • sudo service mysql restart [which will restart it]

As you guys might have noticed I like to run stuff on my Mac.  In order to get mysql to talk on the network you need to change the networking configuration.  To do this edit the file  “/etc/mysql/my.cnf”

  • sudo vi /etc/mysql/my.cnf

Then add a “#” to comment out this bind-address statement

  • #bind-address = 127.0.0.1

Then you can restart mysql with the updated options using:

  • sudo service mysql restart

Once that is working you can add the ability for the root user to access the mysql service remotely on the network.  To do this run the command line version of mysql

  • mysql -u root -p [it will ask you the mysql root password]
  • grant all privileges on *.* to ‘root’@’192.168.%.%’ with grant option;
  • quit

The “192.168.%.%” will restrict the access to this server/user to only the private IP addresses in my network.

Then you can startup MySqlWorkBench from your Mac (or whatever).  The first thing that I do in MySqlWorkbench is to create a connection to the RPi.  Remember in the previous post I added the IP address of the RPi to my “/etc/hosts” file and called it “iotexpertpi” this lets me refer to the RPi by name.

Screen Shot 2016-04-03 at 7.38.19 AM

After I make the connection and click on the “Users and Privileges” button things look like this:

Screen Shot 2016-04-03 at 7.41.51 AM

Then I create a database for storing the creekdata.

Screen Shot 2016-04-03 at 7.44.51 AM

And a user called “creek” who is allowed to connect only from the Raspberry Pi.

Screen Shot 2016-04-03 at 7.47.18 AM

And give that user insert/select privileges on the creekdata database:

Screen Shot 2016-04-03 at 7.49.46 AM

That is it for MySql.  In the next posts I will add Tomcat- a JSP Server- to the RPi.

Index Description
The Creek: IOT for the Elkhorn Creek Introduction
The Creek: Solution Architecture 1.0 Overall architecture
The Creek: Creek Board 1.1 Eagle layout of the board
The Creek: Creek Board 1.0 – RCCA A discussion of the errors in the 1.0 board
The Creek: CYPI, a Raspberry Pi to Arduino Bridge PSoC4 <--> Raspberry Pi Bridge Board
The Creek: PSoC4 Creator Schematic and Firmware Firmware to interface with the temperature and pressure sensors
The Creek: Testing the Firmware Using tools to verify that the PSoC 4 Firmware is working correctly
The Creek: Testing the Bootloader Make sure that you can load new firmware into the PSoC
The Creek: Software Architecture All of the Raspberry Pi software connections
The Creek: Install MySql Instruction to configure MySql
The Creek: Install Tomcat Instruction to configure Tomcat JSP Server
The Creek: Data Collection Java (Part 1) The Java program that reads the I2C and saves it in the database
The Creek: Data Collection Java (Part 2) The Java program that reads the I2C and saves it in the database
The Creek: Create the Chart with JFreeChart Using open source Java charting software to create plots of the Creek Depth
The Creek: Flood Event Data Processor A batch program to create analyze the database and create a table of flood events
The Creek: Flood Event Web Page A batch program to create the flood event web page
The Creek: Creek Server 1.1 Updates to all of the back off server programs to integrate charts
The Creek: JSP Web Page for www.elkhorn-creek.org The JSP program to make the table and display the website
The Creek: Raspberry Pi Clock Stretching Sorting out a bug in the system having to do with the Broadcomm Raspberry Pi Master not functioning well with clock stretching
The Creek: Creek Server 1.2 Caching the web pages to make them faster


CY8CKIT-021: Example 10 — The iOS App

Now that we have completely tested PRoC and PSoC4200M firmware the next step is to build an iOS App called Example 10.  The Xcode project is available in the Xcode directory in the project directory at github.com/iotexpert/cy8ckit-021/

Ill try to build this App to be as simple as possible.   Here is what the (single) screen looks like in three different state (nothing pressed, button0 pressed, led0 on):

IMG_0027     IMG_0028    IMG_0029

This App is built up with four files

  1. ViewController.swift: an object which controls the screen (button clicks)
  2. BluetoothNeighborhood.swift: an object which controls the Bluetooth in the phone and represents the CY8CKIT021 board (the Model)
  3. globals.swift: Defines the NSNotifications that can be sent
  4. Main.storyboard: The screen layout

The code will do the following:

  1. When the ViewController (VC) starts it will instantiate a BluetoothNeighborhood (BN) object
  2. VC: Tell the BN to start the bluetooth central in the phone
  3. BN: Scan for BLE Peripherals that are advertising the CY8CKIT-021 Service UUID
  4. BN: When it hears the peripheral with the correct UUID then connect
  5. BN: Read the state of the button0 and led0 then send an NSNotification
  6. BN: Turn on the notify for button0 (to cause the PRoC to send an NSNotification when there are changes)
  7. VC: update the screen when it gets the NSNotification from (5)
  8. VC: If the LED0 switch on the screen is switched then tell the BN to write to the PRoC
  9. BN: If the button0 is changed then send an NSNotification to the VC
  10. VC: If there is an NSNotification (9) of a button0 change then update the screen
  11. VC: If the bootloader button is pressed tell the BN to write the bootloader characteristic
  12. BN: If there is a disconnect event then send an NSNotification to the VC to disable the GUI elements and start scanning again (step 3)

ViewController.swift

The viewDidLoad method runs when the Apps starts and loads the first screen.  This method

  1. Initializes the BluetoothNeighborhood object
  2. Tell it to start the bluetooth scanning
  3. Disables the UI buttons
  4. Then registers with the NSNotificationCenter that it wants to hear the 4 possible messages that the model can send
    1. Connect: enable the buttons
    2. Disconnect: disable the buttons
    3. UpdateLED: reflect the current state of the LED on the screen
    4. UpdateButton: reflect the current state of the button on the screen


//
//  ViewController.swift
//  Example10
//
// Project: Example10
// Kit: CY8CKIT-021 Sheild
// Baseboard: CY8CKit-44 PSoC4M
//
//  This file contains the viewcontroller for the single view application.
//  Basically when it loads you startup and connect to the bleboard
//  then display the state of things... or let the user flip the switch
//
 
import UIKit
 
class ViewController: UIViewController {
 
var bleLand : BlueToothNeighborhood!
 
override func viewDidLoad() {
super.viewDidLoad()
 
// bleLand-BlueToothNeighborhood is the model.  It is capable of finding
// a CY8CKIT021 and connecting to it. It can also read/write etc
bleLand = BlueToothNeighborhood()
bleLand.startUpCentralManager()
 
// start with the switch disabled.  it will turn on once there is a connection
led0switch.userInteractionEnabled = false
bootLoaderButton.userInteractionEnabled = false
 
 
// The global structure CY8CKITNotifications defines the different notificateions
// that can come from the bleLand model.  Basically a connection/disconnection or
// and update of the Led0 or Button0 State
 
// If you get a complete connection then turn on the buttons to start working
NSNotificationCenter.defaultCenter().addObserverForName(CY8CKIT021Notifications.ConnectionComplete, object: nil, queue: NSOperationQueue.mainQueue()) { _ in
self.led0switch.userInteractionEnabled = true
self.bootLoaderButton.userInteractionEnabled = true
}
 
// if you get disconnected then turn off the buttons
NSNotificationCenter.defaultCenter().addObserverForName(CY8CKIT021Notifications.DisconnectedDevice, object: nil, queue: NSOperationQueue.mainQueue()) { _ in
self.led0switch.userInteractionEnabled = false
self.bootLoaderButton.userInteractionEnabled = false
}
 
// The we got feedback from the model about the state of the button0
NSNotificationCenter.defaultCenter().addObserverForName(CY8CKIT021Notifications.UpdatedButton0, object: nil, queue: NSOperationQueue.mainQueue()) { _ in self.button0.selected = self.bleLand.button0State }
 
// The we got feedback from the model about the state of the led0
NSNotificationCenter.defaultCenter().addObserverForName(CY8CKIT021Notifications.UpdateLed0, object: nil, queue: NSOperationQueue.mainQueue()) { _ in self.updateLed0() }
 
}

The GUI part of the code just acts when the button/switch is pressed to send messages to the model.  These methods are linked to the GUI elements on the main.storyboard

    // This function grabs the current button0 state from the model and sets the button
// to indicate it is either being pressed or not
func updateButton0()
{
self.button0.selected = self.bleLand.button0State
}
 
// This functiong rabs the current led0 state from the model and then flips the 
// switch the right way
func updateLed0()
{
led0switch.on = bleLand.led0State
}
 
@IBOutlet weak var button0: UIButton!
@IBOutlet weak var led0switch: UISwitch!
 
// When the user flips the switch you need to write the updated value to the model
@IBAction func led0SwitchAction(sender: UISwitch) {
 
bleLand.writeLed0Characteristic(sender.on)
}
 
// If the user presses the bootload button then send the bootload command
// this will cause and immediate BLE disconnect... etc
@IBOutlet weak var bootLoaderButton: UIButton!
@IBAction func startBootLoader(sender: AnyObject) {
bleLand.startBootloader()
}

BluetoothNeighborhood

This file contains all of the code that interacts with the CY8CKIT021 board.  The first block of code defines a structure with a list of the UUIDs that we need to search for.  These are defined in the Bluetooth Component Customizer from the PRoC firmware.

// BlueToothNeighborhood.swift
//
// Project: Example10
// Kit: CY8CKIT-021 Sheild
// Baseboard: CY8CKit-44 PSoC4M
//
// This file contains the model for the CY8CKIT021 board with 1 LED0 and 1 Button 0
//
 
import CoreBluetooth
 
 
// This structure conatains the UUIDS for the services and characteristics on the board
// it MUST match what you defined in the creator BLE Configuration Wizard
private struct BLEParameters {
static let CY8CKIT021Service = CBUUID(string: "00000000-0000-1000-8000-00805F9B3400")
static let bootloadCharactersticUUID = CBUUID(string:"00000000-0000-1000-8000-00805F9B3401")
static let ledCharactersticUUID = CBUUID(string:"00000000-0000-1000-8000-00805F9B3402")
static let buttonCharactersticUUID = CBUUID(string:"00000000-0000-1000-8000-00805F9B3404")
 
}

The next block of code

// The model for the board
// The BlueToothNeighborhood has BOTH the board model and the Bluetooth model.  This
// makes the code slightly simpler to explain but is a bit weird architectururally
class BlueToothNeighborhood: NSObject, CBCentralManagerDelegate, CBPeripheralDelegate  {
 
private var centralManager : CBCentralManager!
private var CY8CKIT021Board : CBPeripheral?
private var CY8CKIT021Service : CBService!
private var led0Characteristic : CBCharacteristic!
private var button0Characteristic : CBCharacteristic!
private var bootloadCharacteristic : CBCharacteristic!
 
// This function is called by the main view controller to get things going
func startUpCentralManager() {
centralManager = CBCentralManager(delegate: self, queue: nil)
}
 
// This is the bluetooth delegate function
@objc func centralManagerDidUpdateState(central: CBCentralManager) {
switch (central.state) {
case .PoweredOff: break
case .PoweredOn:
print("Bluetooth is on - Starting scan")
// start scanning for a device that we can talk to
centralManager.scanForPeripheralsWithServices([BLEParameters.CY8CKIT021Service], options: [CBCentralManagerScanOptionAllowDuplicatesKey:false])
 
case .Resetting: break
case .Unauthorized: break
case .Unknown:break
case .Unsupported:break
}
}
 
// This delegate function is called by the bluetooth when it finds a device
// that matches our UUID that we told it when we started the scan
func centralManager(central: CBCentralManager, didDiscoverPeripheral peripheral: CBPeripheral, advertisementData: [String : AnyObject], RSSI: NSNumber)
{
// if you already are connected to a device ignore this one
if CY8CKIT021Board == nil {
print("Found a new Periphal advertising CY8CKIT021 Service")
CY8CKIT021Board = peripheral
centralManager.stopScan()
centralManager.connectPeripheral(CY8CKIT021Board!, options: nil)
}
}
 
// This delegate is called when a device connection is complete
func centralManager(central: CBCentralManager, didConnectPeripheral peripheral: CBPeripheral) {
print("Connection complete \(CY8CKIT021Board) \(peripheral)")
CY8CKIT021Board!.delegate = self
CY8CKIT021Board!.discoverServices(nil)
}
 
// This delegate is called after the service discovery is complete
func peripheral(peripheral: CBPeripheral, didDiscoverServices error: NSError?) {
print("discovered services")
for service in peripheral.services! {
print("Found service \(service)")
if service.UUID == BLEParameters.CY8CKIT021Service {
CY8CKIT021Service = service // as! CBService
}
}
CY8CKIT021Board!.discoverCharacteristics(nil, forService: CY8CKIT021Service)
}
 
 
// This delegate is called when the characteristic discovery is complete
func peripheral(peripheral: CBPeripheral, didDiscoverCharacteristicsForService service: CBService, error: NSError?) {
for characteristic in service.characteristics!
{
 
print("Found characteristic \(characteristic)")
switch characteristic.UUID {
case BLEParameters.buttonCharactersticUUID: button0Characteristic = characteristic
case BLEParameters.ledCharactersticUUID: led0Characteristic = characteristic
case BLEParameters.bootloadCharactersticUUID: bootloadCharacteristic = characteristic
default: break
}
}
 
// You have a complete connection... so find out the current state of the LED0
// and Button.. then notify the viewcontroller that things are rolling
 
// read the led0 characteristic to find out its current state
CY8CKIT021Board?.readValueForCharacteristic(led0Characteristic)
 
// read the button0 characteristic to find out its current state
CY8CKIT021Board?.readValueForCharacteristic(button0Characteristic)
 
CY8CKIT021Board!.setNotifyValue(true, forCharacteristic: button0Characteristic)
NSNotificationCenter.defaultCenter().postNotificationName(CY8CKIT021Notifications.ConnectionComplete, object: nil)
}
 
// disconnected device - start scanning again
func centralManager(central: CBCentralManager, didDisconnectPeripheral peripheral: CBPeripheral, error: NSError?) {
print("Disconnected \(peripheral)")
CY8CKIT021Board = nil
NSNotificationCenter.defaultCenter().postNotificationName(CY8CKIT021Notifications.DisconnectedDevice, object: nil)
centralManager.scanForPeripheralsWithServices([BLEParameters.CY8CKIT021Service], options: [CBCentralManagerScanOptionAllowDuplicatesKey:false])
 
}

The last block of code is responsible for interacting with the board

// start the bootloader...this will cause an immediate disconnect by the board
func startBootloader()
{
var val: UInt8 = 1 // it doesnt matter the value... any write will cause the bootloader to start
let ns = NSData(bytes: &amp;val, length: sizeof(UInt8))
CY8CKIT021Board!.writeValue(ns, forCharacteristic: bootloadCharacteristic, type: CBCharacteristicWriteType.WithResponse)
}
 
 
// a helper function to write the the device
func writeLed0Characteristic(state: Bool)
{
var val : Int8
if(state)
{
val = 1
}
else
{
val = 0
}
let ns = NSData(bytes: &amp;val, length: sizeof(Int8))
CY8CKIT021Board!.writeValue(ns, forCharacteristic: led0Characteristic, type: CBCharacteristicWriteType.WithResponse)
}
 
// this is the model of the board
var button0State : Bool = false 
var led0State : Bool = false // assume that it is off
 
// This delegate function is called when an updated value is received from the Bluetooth Stack
func peripheral(peripheral: CBPeripheral, didUpdateValueForCharacteristic characteristic: CBCharacteristic, error: NSError?) {
if characteristic == button0Characteristic {
var out: UInt8 = 0
characteristic.value!.getBytes(&amp;out, length:sizeof(UInt8))
if(out == 0)
{
button0State = false
}
else
{
button0State = true
}
NSNotificationCenter.defaultCenter().postNotificationName(CY8CKIT021Notifications.UpdatedButton0, object: nil)
}
 
if characteristic == led0Characteristic {
var out: NSInteger = 0
characteristic.value!.getBytes(&amp;out, length:sizeof(UInt8))
if(out == 0)
{
led0State = false
}
else
{
led0State = true
}
NSNotificationCenter.defaultCenter().postNotificationName(CY8CKIT021Notifications.UpdateLed0, object: nil)
}
}

In the next post Ill show you how to build the Android App.

index description
CY8CKIT-021: A Simple FM/PSoC + BLE Demonstration Board Introduction to CY8CKIT021
CY8CKIT-021: The first four example projects Use the LEDs Buzzer 7-Segment display and the Potentiometer
CY8CKIT-021: The next three example projects Use theThermistor and two Capsense Examples
CY8CKIT-021: Bootloading the PRoC How to put firmware into the PRoC
CY8CKIT-021: The BLEIOT Component A custom component to communicate with the PRoC/PSoC
CY8CKIT-021: Using the BLEIOT Component A full example of the tho MCUs talking
CY8CKIT-021: The PRoC BLE Firmware How to make PRoC Firmware and use it with the BLEIOT Component
CY8CKIT-021: Example 10 - the new IOS App How to build and IOS App to talk to the development kit

CY8CKIT-021: The PRoC BLE Firmware

In the next few posts I am going to show how to build a very simple BLE project for the shield, debug it using CySmart, make an iOS app, and finally make an Android app.  I am going to try to only put in the bare minimum of feature that will enable you to see the whole project work from end to end.  This next series of posts will use

  • LED0: which can be turned on/off from the from the Android and iOS App
  • Button0: which will be displayed as on/off on the Android and iOS App
  • Bootload: you will be able to trigger the bootloader from the baseboard or by writing into the BLE Bootload characteristic
  • The blue LED attached to the PRoC will blink when advertising and be solid when connected

All of this firmware is available as Example10a (for the PRoC) and Example10b for the PSoC4200m in the firmware directory on github.com/iotexpert/CY8CKIT-021

Example 10a: The PRoC Firmware

The schematic for this project has two pages.  The first page has everything except for the bootloadble.

Screen Shot 2016-05-30 at 10.11.35 AM

The second page of the schematic has the bootloadable.  This allows me to “disable” that page if I am not using the Bootloader

Screen Shot 2016-05-30 at 10.14.59 AM

The BLE component has the “CY8CKIT021” service with three characteristics one for LED0, Button and Bootload,  The Button has a notify CCCD setup.  All three are uint8s.

Screen Shot 2016-05-30 at 10.11.56 AM

This program is broken up into three functions

  • updateGattDB: A helper function that can take data as a void* and write it into the correct place in the GattDB.  For example when the app changes the LED0 Characteristic you need to write that update into the GattDB.  This function is generic which will support the same logic on a bunch of different characteristic (for instance when I put in all of the other characteristics LED0/1, Button0/1, Pot, …)
  • BleCallBack: This function  processes the BLE Events
    • Stack on or disconnect: start advertising and start blinking
    • Write of characterstic from Central: store the written value into the GattDB and do something
    • Connect: update the GattDB and turn on the LED
  • main: This function is very simple and forms the main loop of the program.
    • Start the components
    • If there is a remote from the 4200M side then update the GattDB

First, the updateGattDB helper function.

// updateGattDB() -  
//
// Arguments: 
//  uint8* val  - a pointer to the bytes that need to be writted into the GATTDB
//  int size - the number of bytes that need to be written into the GATTDB
//  uint8 notify - if the NOTIFY is on then send a notification
//  CYBLE_GATT_DB_ATTR_HANDLE_T handle - a handle to the entry in the gatt table
//  uint8 flags - a request 
//   
// This is a helper function that will update the GATT database with a value.  It update the field of
// the "CYBLE_GATT_DB_ATTR_HANDLE_T"
 
void updateGattDB(uint8 *val,int size,uint8 notify, CYBLE_GATT_DB_ATTR_HANDLE_T handle,uint8 flags)
{
 
// this little block of code doesnt make me happy... 
switch(CyBle_GetState())
{
case CYBLE_STATE_ADVERTISING:
return;
case CYBLE_STATE_DISCONNECTED:
return;
case CYBLE_STATE_STOPPED:
return;
case CYBLE_STATE_CONNECTED:
break;
case CYBLE_STATE_INITIALIZING:
return;
}
//update the GATT Database
CYBLE_GATTS_HANDLE_VALUE_NTF_T 	tempHandle;
tempHandle.attrHandle = handle;
tempHandle.value.val = val;
tempHandle.value.len = size;
CYBLE_GATT_ERR_CODE_T ret = CyBle_GattsWriteAttributeValue(&amp;tempHandle,0,&amp;cyBle_connHandle,flags);
if(ret != CYBLE_GATT_ERR_NONE) // this is really not a good place to be.
{
return;
 
CYASSERT(0);
while(1);
}
// if peer initiated then write response.
if(flags == CYBLE_GATT_DB_PEER_INITIATED)
CyBle_GattsWriteRsp(cyBle_connHandle);
else if(notify) // If notify &amp; local initiated 
{
CyBle_GattsNotification(cyBle_connHandle,&amp;tempHandle);
}    
}

The next block of code is the BleCallback.  One cool thing that PSoC Creator does is give you the ability to #ifndef to remove code when a schematic page is disabled.  In the code below when I have “disabled” the Bootloadable schematic page it will remove that block of code from my firmware.

/***************************************************************
* Function to handle the BLE stack
**************************************************************/
void BleCallBack(uint32 event, void* eventParam)
{
CYBLE_GATTS_WRITE_REQ_PARAM_T *wrReqParam;
switch(event)
{
/* if there is a disconnect or the stack just turned on from a reset then start the advertising and turn on the LED blinking */
case CYBLE_EVT_STACK_ON:
case CYBLE_EVT_GAP_DEVICE_DISCONNECTED:
CyBle_GappStartAdvertisement(CYBLE_ADVERTISING_FAST);
PWM_Start();
memset(&amp;notifyFlags,0,sizeof(notifyFlags));
break;       
 
case CYBLE_EVT_GAP_DEVICE_CONNECTED:           
PWM_Stop();
updateGattDB(&amp;BLEIOT_local.led0,sizeof(BLEIOT_local.led0),notifyFlags.led0,CYBLE_CY8CKIT021_LED0_CHAR_HANDLE,CYBLE_GATT_DB_LOCALLY_INITIATED);
updateGattDB(&amp;BLEIOT_local.button0,sizeof(BLEIOT_local.button0),notifyFlags.button0,CYBLE_CY8CKIT021_BUTTON0_CHAR_HANDLE,CYBLE_GATT_DB_LOCALLY_INITIATED);
break;
 
case CYBLE_EVT_GATTS_WRITE_REQ:
wrReqParam = (CYBLE_GATTS_WRITE_REQ_PARAM_T *) eventParam;
// Bootload
#ifndef BootLoadable__DISABLED
if(wrReqParam-&gt;handleValPair.attrHandle == CYBLE_CY8CKIT021_BOOTLOAD_CHAR_HANDLE)
{
if(wrReqParam-&gt;handleValPair.value.val[0]) Bootloadable_Load();
 
}
#endif
 
// LED0
if(wrReqParam-&gt;handleValPair.attrHandle == CYBLE_CY8CKIT021_LED0_CHAR_HANDLE)
{
BLEIOT_updateLed0(wrReqParam-&gt;handleValPair.value.val[0]);
updateGattDB(wrReqParam-&gt;handleValPair.value.val,1,notifyFlags.led0,CYBLE_CY8CKIT021_LED0_CHAR_HANDLE,CYBLE_GATT_DB_PEER_INITIATED);
}
 
if(wrReqParam-&gt;handleValPair.attrHandle == CYBLE_CY8CKIT021_LED0_CCCD_DESC_HANDLE)
{
notifyFlags.led0 = wrReqParam-&gt;handleValPair.value.val[0];
CyBle_GattsWriteRsp(cyBle_connHandle);
}
 
// BUTTON 0
if(wrReqParam-&gt;handleValPair.attrHandle == CYBLE_CY8CKIT021_BUTTON0_CCCD_DESC_HANDLE)
{
notifyFlags.button0 = wrReqParam-&gt;handleValPair.value.val[0];
CyBle_GattsWriteRsp(cyBle_connHandle);
}
break;  
 
default:
break;
}
}

Finally the last block of code is the main loop

int main()
{
CyGlobalIntEnable;
BLEIOT_Start();
 
EZI2C_Start();
EZI2C_EzI2CSetBuffer1(sizeof(BLEIOT_local),1,(uint8 *)&amp;BLEIOT_local);
 
CyBle_Start(BleCallBack);
 
for(;;)
{
 
#ifndef BootLoadable__DISABLED
// if they write into the BLEIOT_local.bootload (from EzI2C)
if(BLEIOT_getDirtyFlags() &amp; BLEIOT_FLAG_BOOTLOAD || BLEIOT_local.bootload)
{
// enter the bootloader
Bootloadable_Load();
}
 
#endif
 
if(BLEIOT_getDirtyFlags() &amp; BLEIOT_FLAG_LED0)
{
BLEIOT_updateLed0(BLEIOT_remote.led0);
updateGattDB(&amp;BLEIOT_local.led0,sizeof(BLEIOT_local.led0),notifyFlags.led0,CYBLE_CY8CKIT021_LED0_CHAR_HANDLE,CYBLE_GATT_DB_LOCALLY_INITIATED);
}
 
if(BLEIOT_getDirtyFlags() &amp; BLEIOT_FLAG_BUTTON0)
{
BLEIOT_updateButton0(BLEIOT_remote.button0);
updateGattDB(&amp;BLEIOT_local.button0,sizeof(BLEIOT_local.button0),notifyFlags.button0,CYBLE_CY8CKIT021_BUTTON0_CHAR_HANDLE,CYBLE_GATT_DB_LOCALLY_INITIATED);
}
 
CyBle_ProcessEvents();
CyBle_EnterLPM(CYBLE_BLESS_DEEPSLEEP);
}
}

PSoC FIRMWARE

To make this project work I built the simplest firmware that I can think of for the PSoC4200M.  The schematic has only the BLEIOT, CapSense and the LED.

Screen Shot 2016-05-30 at 11.11.51 AM

The firmware just

  • Starts the components
  • If the capsense is not busy then it updates the Button0 state if it has changed then rescans
  • If the PRoC side writes the LED0 then it updates the state.
// Project: Example10b - PSoC
// Kit: CY8CKIT-021 Sheild
// Baseboard: CY8CKit-44 PSoC4M
//
// This project demonstrates the simplest connection to the PRoC and BLE
// It updates the LED0 based on writes from the PRoC side
// It sends out updates to the PRoC based on button processes
#include <project.h>
 
int main()
{
CyGlobalIntEnable;
 
BLEIOT_Start();
CapSense_Start();
CapSense_InitializeEnabledBaselines();
CapSense_ScanEnabledWidgets();
 
for(;;)
{
if(!CapSense_IsBusy())
{
uint8 b0=CapSense_CheckIsWidgetActive(CapSense_BUTTON0__BTN);
if(b0 != BLEIOT_local.button0) // if the state has changed then send an update
BLEIOT_updateButton0(b0);
CapSense_UpdateEnabledBaselines();
CapSense_ScanEnabledWidgets();
}
 
if(BLEIOT_getDirtyFlags() &amp; BLEIOT_FLAG_LED0)  // if the PRoC side send an update, write it
{
BLEIOT_updateLed0(BLEIOT_remote.led0);
led0_Write(!BLEIOT_local.led0); // the led is active low
}
}
}
</project.h>


Debugging using CySmart

After I created all of the code and bootloaded it into the PRoC I used CySmart to debug it.  Once the board is reset I can see the blinking blue LED that is connected to the PRoC.   When I start CySmart I can see the “C021” board (that is the name I gave the device in the Gap settings:

Screenshot_20160530-112449

When I connect to the device and explore the Gatt Database I can see the three characteristics (Boatload, LED0 and Button0).  You can recognize them from the UUIDs that I configured in the component.

Screenshot_20160530-112358

When I write a 1 into the LED0 characteristic the Green LED0 lights up.

Screenshot_20160530-112421

When I turn on notification for the Button0 characteristic and then touch the button I can see it turn back and forth from 0/1

Screenshot_20160530-112435

Now that everything seems to be working Ill move onto the iPhone App in the next post.

index description
CY8CKIT-021: A Simple FM/PSoC + BLE Demonstration Board Introduction to CY8CKIT021
CY8CKIT-021: The first four example projects Use the LEDs Buzzer 7-Segment display and the Potentiometer
CY8CKIT-021: The next three example projects Use theThermistor and two Capsense Examples
CY8CKIT-021: Bootloading the PRoC How to put firmware into the PRoC
CY8CKIT-021: The BLEIOT Component A custom component to communicate with the PRoC/PSoC
CY8CKIT-021: Using the BLEIOT Component A full example of the tho MCUs talking
CY8CKIT-021: The PRoC BLE Firmware How to make PRoC Firmware and use it with the BLEIOT Component
CY8CKIT-021: Example 10 - the new IOS App How to build and IOS App to talk to the development kit

CY8CKIT-021: Using the BLEIOT Component

Now that we have a component built up, I will build up a test to demonstrate its functionality.  The test will do the following

On the PSoC side it will:

  • Read the Capsense Button0.  If it is pressed it will send a “boatload” command to the PRoC
  • Read the Capsense Button1.  Each time it is pressed it will toggle the PRoC blue LED by sending alternating On/Off
  • Read the remote LED0 update and turn on/off the LED0 based on the remote command

On the PRoC side it will:

  • Alternate sending a 1/0 every 500ms to the “led0” on the PSoC side
  • If the Capsense Button 0 is changed from the PSoC side it will turn the Blue LED On/Off
  • If it get a Bootload it will enter the bootloader

These projects are available as Example9 in the CY8CKIT-021 workspace that is in the firmware directory on github at github.com/iotexpert/CY8CKIT-021

PSoC

After creating a new schematic for PSoC 4200m, the next thing that I do is make a dependency to the components in the BLEInterface project.  This gives me access to the BLEIOT component.

Screen Shot 2016-05-28 at 11.56.18 AM

When I go to the component catalog I see the “IOT” and in that tab I find the  IOT Tab with the BLEIOT component.

Screen Shot 2016-05-28 at 12.02.55 PM

Now I add components for CapSense and the LED to get the final schematic.

Screen Shot 2016-05-28 at 12.09.56 PM

Now assign the Pins in the cydwr.

Screen Shot 2016-05-28 at 12.10.57 PM

And finally the code:

// Project: Example9b-PSoC-BLEIOT-Test
// Kit: CY8CKIT-021 Sheild
// Baseboard: CY8CKit-44 PSoC4M
//
// This project demonstrates using the BLEIOT component
// If the other side writes the LED then update it
// If the user presses button 0 then send an bootload command
// If the user presses button 1 then send an update to the button
 
#include <project.h>
 
int main()
{
CyGlobalIntEnable; 
CapSense_Start();
CapSense_InitializeEnabledBaselines();
CapSense_ScanEnabledWidgets();
 
BLEIOT_Start();
 
for(;;)
{
if(!CapSense_IsBusy())
{
uint8 b0 = CapSense_CheckIsWidgetActive(CapSense_BUTTON0__BTN);
uint8 b1 = CapSense_CheckIsWidgetActive(CapSense_BUTTON1__BTN);
 
if(b0)
BLEIOT_updateBootload(1); // send the bootload command
 
if(b1 != BLEIOT_local.button1) // if the button state has changed send it
BLEIOT_updateButton1(b1);
 
CapSense_UpdateEnabledBaselines();
CapSense_ScanEnabledWidgets();
}
 
if(BLEIOT_getDirtyFlags() &amp; BLEIOT_FLAG_LED0) // other side wrote LED0, update state
{
BLEIOT_updateLed0(BLEIOT_local.led0); // update local state
led0_Write(!BLEIOT_remote.led0); // the LED is active low
}
}
}
</project.h>

PRoC

Unfortunately it is prohibited to create custom components for PRoC BLE devices.  So, the first thing that I do after creating the project is to copy over BLEIOT_BLEIOT.c and BLEIOT_BLEIOT.h from the generated source directory of the PSoC project.  Yes I understand that this is a bit of a lame thing to do, but there it is:

cd Example9a-ProC-BLEIOT-Test.cydsn/
cp ../Example9b-PSoC-BLEIOT-Test.cydsn/Generated_Source/PSoC4/BLEIOT_BLEIOT.* .

One you have the files in the correct directory you need to add them to the project by right clicking on the “header files” in the workspace explorer and “add existing” then adding the BLEIOT_BLEIOT.h.  You also should do the same with “source files” and BLEIOT_BLEIOT.c

Finally you need to add #include “BLEIOT_BLEIOT.h” to the top of BLEIOT_BLEIOT.c

After that I finish the schematic.  First, add a UART Component to the schematic and call it BLEIOT_UART (so that it will match the code that was generated in the other project).  Then add the bootloadable and the blue LED pin.  Don’t forget to configure the Bootloadable to link to the bootloader just like Example 8.  Also you need to configure the UART to have a 32 byte software buffer.

Screen Shot 2016-05-28 at 12.40.14 PM

Then assign the pins:

Screen Shot 2016-05-28 at 12.41.51 PM

Finally the main.c

// Project: Example9b-PRoC-BLEIOT-Test
// Kit: CY8CKIT-021 Sheild
// Baseboard: CY8CKit-44 PSoC4M
//
// This project should be bootloaded into the PRoC.  It demonstrates using the BLEIOT
// component.
//
// Using the systick, send an update to led0 every 500ms
// If the other side writes to Bootload... then start the bootloader
// If the other side writes to the button1... then display that on the blue led
#include <project.h>
#include "BLEIOT_BLEIOT.h"
 
int countMs =0;
 
// This is the ISR for the systick
void sendLedUpdate()
{
if(countMs++&lt;500) // count 500ms
return;
countMs = 0;
BLEIOT_updateLed0(!BLEIOT_local.led0);
}
 
int main()
{
 
CyGlobalIntEnable; 
CyDelay(100);
BLEIOT_Start();
 
CySysTickStart(); // start the systick and register our call back
CySysTickSetCallback(0,sendLedUpdate);
 
for(;;)
{
 
if(BLEIOT_getDirtyFlags() &amp; BLEIOT_FLAG_BOOTLOAD)
Bootloadable_Load();
 
if(BLEIOT_getDirtyFlags() &amp; BLEIOT_FLAG_BUTTON1)
{
BLEIOT_updateButton1(BLEIOT_remote.button1);
blue_Write(!BLEIOT_local.button1);
}
}
}
</project.h>


As always these projects are available in the firmware directory at http://github.com/iotexpert/CY8CKIT-021

In the next post Ill show you the BLE Firmware.

index description
CY8CKIT-021: A Simple FM/PSoC + BLE Demonstration Board Introduction to CY8CKIT021
CY8CKIT-021: The first four example projects Use the LEDs Buzzer 7-Segment display and the Potentiometer
CY8CKIT-021: The next three example projects Use theThermistor and two Capsense Examples
CY8CKIT-021: Bootloading the PRoC How to put firmware into the PRoC
CY8CKIT-021: The BLEIOT Component A custom component to communicate with the PRoC/PSoC
CY8CKIT-021: Using the BLEIOT Component A full example of the tho MCUs talking
CY8CKIT-021: The PRoC BLE Firmware How to make PRoC Firmware and use it with the BLEIOT Component
CY8CKIT-021: Example 10 - the new IOS App How to build and IOS App to talk to the development kit