A bootloader is a firmware program that can update the application firmware in an embedded system without using a programmer (like the Miniprog-3). This is a convienient way to fix bugs, release features, etc. without having to be physically at the system. As a developer you can update your design, then create a “hex” file image, then release that image (through email, the internet, etc) to be installed on all of your remote devices. Once your new hex file arrives at the host computer, the bootloader has the job of flashing the new firmware into your system. You can read more detail about bootloading in the excellent Cypress application note AN86526 PSoC4 I2C Bootloader.
In general, bootloaders are triggered by some external event (like a chip reset, a trigger from a GPIO, or a command from the application firmware). The bootloader then listens for communication from a host computer. The host computer could be lots of different things including a cell phone, a central application processor, or an external computer plugged into your system. Once the bootloader starts:
- If there is no communication it will generally timeout after a set time, then jump into the application firmware to put the system into normal application mode.
- If there is communication, it will copy a new application from the host computer and then write it into the flash in the correct place. There is a special case called a “dual application” boot loader. This provides safety by keeping and old image still in flash in case there is a problem bootloading the new firmware.
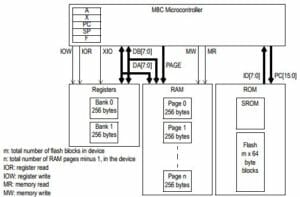
Here is a picture of the architecture:
In the Cypress language the bootloadable is an application image that can be bootloaded by the bootloader.
When I am making firmware like this I generally put two projects in the same workspace. One project is the bootloader and the other project is the bootloadable. This is exactly what you will find in in the PSoC Creator workspace called CreekFirmware on github. The first project is called p4arduino-creek which is the main application firmware that I discussed in detail in the previous post.
This bootloader, called p4bootloader, is a simple I2C bootloader. After the chip resets it:
- Starts blinking the blue led to indicate that it is in bootloader mode
- Waits 10 seconds to hear I2C communication
- If there is none then it jumps into the main application (called the bootloadable)
- It there is then it starts the boot loading process
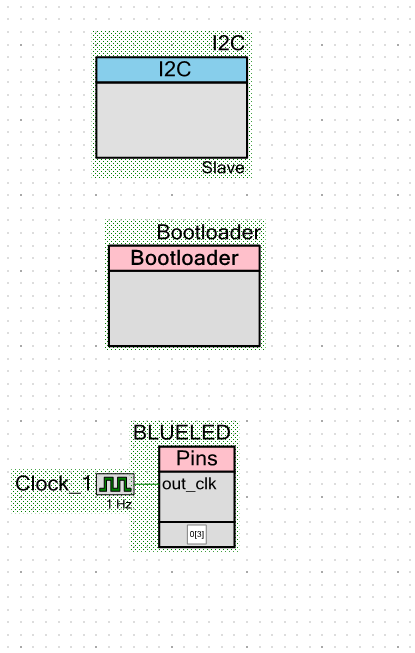
The schematic is simply:
- An I2C Slave
- A bootloader component
- A blinking LED (a clock tied directly to an output pin)
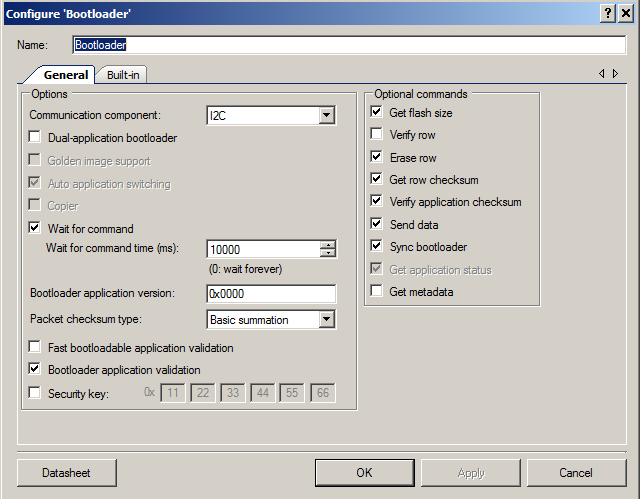
When you configure the bootloader component you need to select which communication interface to use. In this case it is the “I2C”. Then you configure how long you want to wait before timing out and jumping into the main application. In this case 10000ms a.k.a. 10s
The last step is to start the bootloader component in the firmware.
That is it. In the next post I will discuss the steps I took to test the firmware.
Index
Description
The Creek: IOT for the Elkhorn Creek
Introduction
The Creek: Solution Architecture 1.0
Overall architecture
The Creek: Creek Board 1.1
Eagle layout of the board
The Creek: Creek Board 1.0 – RCCA
A discussion of the errors in the 1.0 board
The Creek: CYPI, a Raspberry Pi to Arduino Bridge
PSoC4 <--> Raspberry Pi Bridge Board
The Creek: PSoC4 Creator Schematic and Firmware
Firmware to interface with the temperature and pressure sensors
The Creek: Testing the Firmware
Using tools to verify that the PSoC 4 Firmware is working correctly
The Creek: Testing the Bootloader
Make sure that you can load new firmware into the PSoC
The Creek: Software Architecture
All of the Raspberry Pi software connections
The Creek: Install MySql
Instruction to configure MySql
The Creek: Install Tomcat
Instruction to configure Tomcat JSP Server
The Creek: Data Collection Java (Part 1)
The Java program that reads the I2C and saves it in the database
The Creek: Data Collection Java (Part 2)
The Java program that reads the I2C and saves it in the database
The Creek: Create the Chart with JFreeChart
Using open source Java charting software to create plots of the Creek Depth
The Creek: Flood Event Data Processor
A batch program to create analyze the database and create a table of flood events
The Creek: Flood Event Web Page
A batch program to create the flood event web page
The Creek: Creek Server 1.1
Updates to all of the back off server programs to integrate charts
The Creek: JSP Web Page for www.elkhorn-creek.org
The JSP program to make the table and display the website
The Creek: Raspberry Pi Clock Stretching
Sorting out a bug in the system having to do with the Broadcomm Raspberry Pi Master not functioning well with clock stretching
The Creek: Creek Server 1.2
Caching the web pages to make them faster


1 Comment
nicholas was here