In this post I will describe the PSoC Creator schematic and firmware that I built to run the PSoC4. You can find the project on github. After you open the project in PSoC Creator you will find two projects in the workspace explorer:
- p4ardino-creek: This project starts running 10 seconds after the chip powers up. It uses PSoC Analog to Digital Convertor to read the pressure sensor and the temperature sensor. It then convert the data to a readable form and stores it into the EZI2C buffer to be read by the Raspberry PI.
- p4bootloader: This project runs for 10 seconds when the chip is rebooted. If it detects the Raspberry Pi host trying to load new firmware it will “bootload”. If after 10 seconds it doesn’t hear anything, it will run the p4arduino-creek application. I will describe how the bootloader works in the next post.

p4ardunio-creek
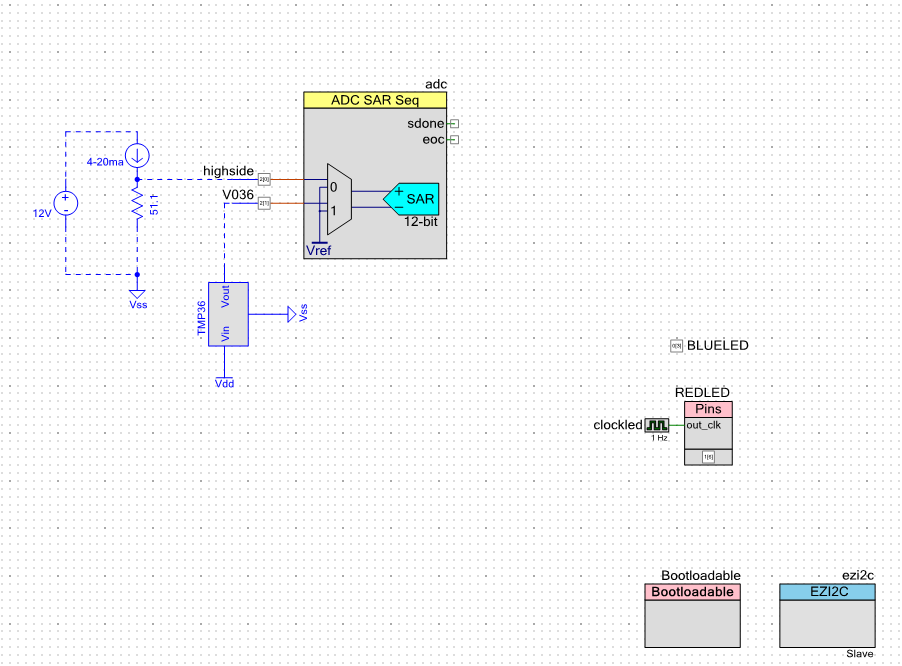
The schematic for this project contains four sections
- The Analog to Digital convertor and the “external” schematic of the pressure current loop. The elements in blue are external to the PSoC and are there just for documentation.
- The Red and Blue LED pins and the clock that drives the Red LED to blink
- The EZI2C which serves as the I2C Slave for the Raspberry Pi to read
- The Bootloadable component which allows this project to be boot loaded.
The configuration of each of elements is show below.
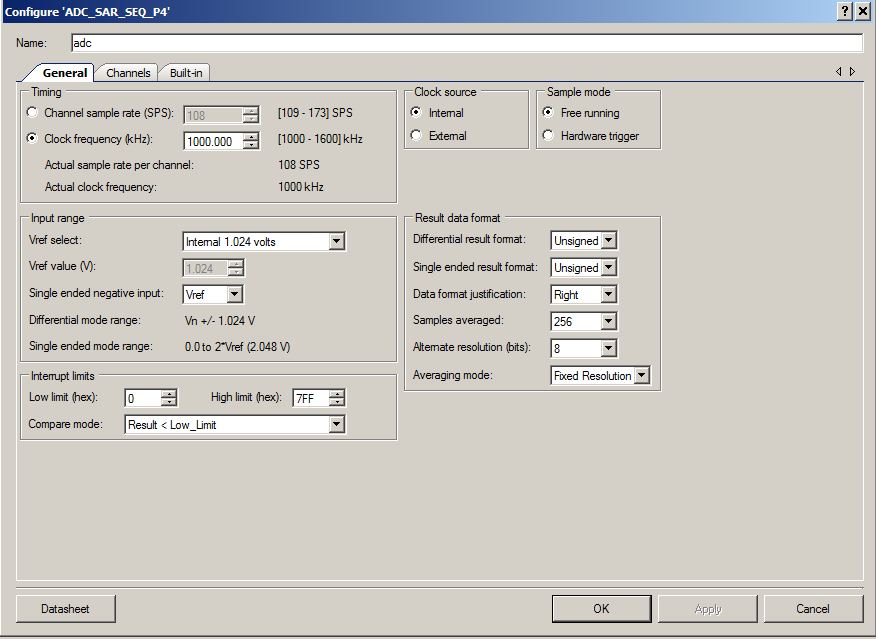
The ADC is configured to run as slowly as possible (1000 SPS). I have also enabled the averaging which automatically averages 256 samples. This effectively makes a low pass filter to remove noise. This is possible because the pressure and temperature move very slowly as compared to the speed at which they are sampled. The SAR ADC in the PSoC is inherently differential, I tell the ADC that I want the negative channel to be connected to a stable VREF. This allows me to measure between 0V and 2*vref = 2.048 volts.
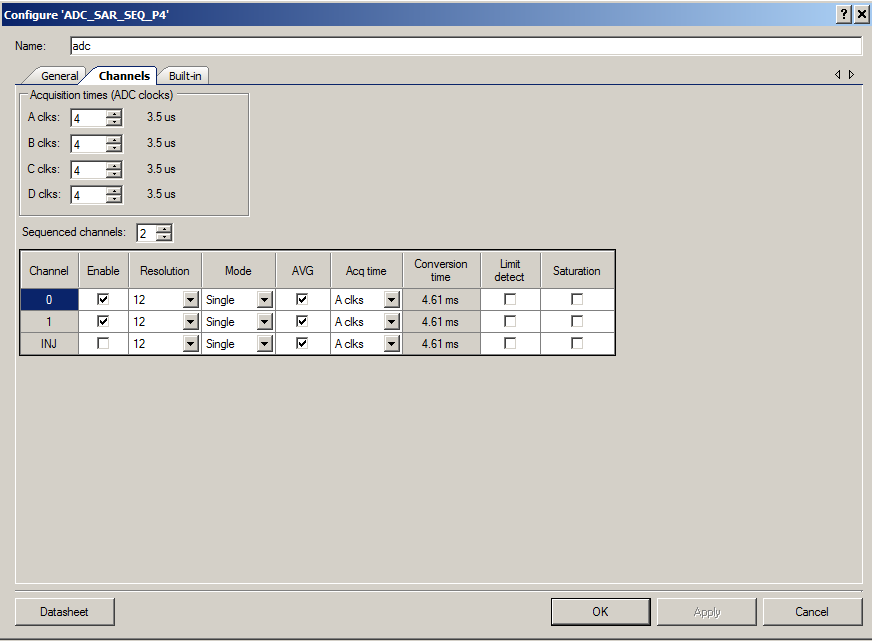
On the ADC channels TAB I enable two channels, both single ended, both with averaging turned on. Channel 0 is connected to the pressure sensor (on Arduino pin A0 = PSoC Pin P2[0]) and channel 1 is connected to the TMP036 (on Arduino pin A1 = PSoC Pin P2[1])
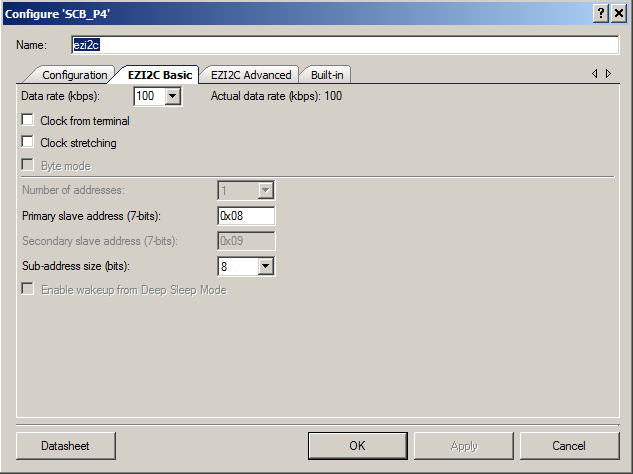
For this design I setup the PSoC4 to act as an EZI2C slave. EZI2C means that the chip follows the EEPROM protocol which many many I2C masters understand. The only thing that I configure in this case is to use the slave address of 0X08.
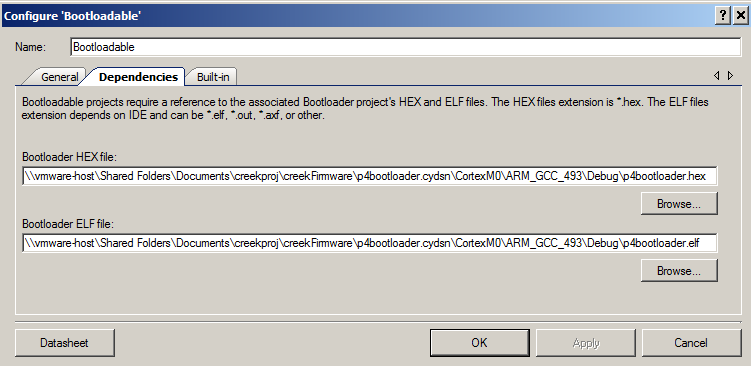
For this project to be compatible with a bootloader it needs the bootloadble component instantiated. In this case I use all of the default configurations. When I make changes to the firmware in the future I will up-rev the version numbers. These settings are here to prevent you from accidentally overwriting and newer rev of the firmware or putting in the wrong application type.

In order for the bootloadable to work I need to tell it where its “bootloader” image resides. Remember from above that I put both projects in the same workspace. So, what I need to do is browse through the directory hierarchy into the bootloader project and selects its ELF and HEX files. If you want to read more about PSoC4 Bootloading you can read AN86526 entitled “PSoC 4 I2C Bootloader”
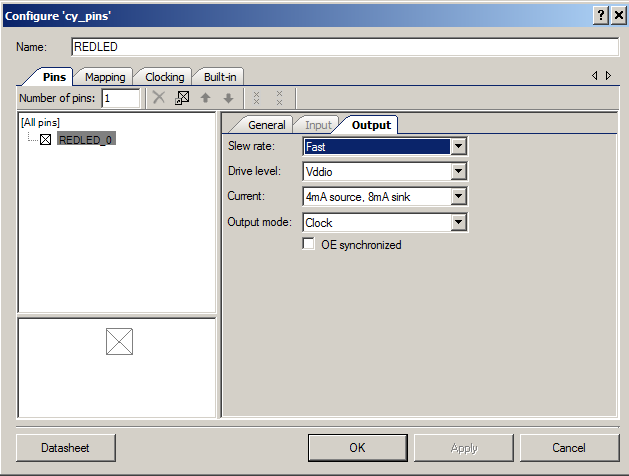
One of the unique features of a PSoC is its ability to do hardware based design. In this design I want a slowly blinking LED to indicate that the system is running. For this task I have to configure the pin to let one of the internal clocks drive it. To make this work you need to selected the output mode as “Clock”.
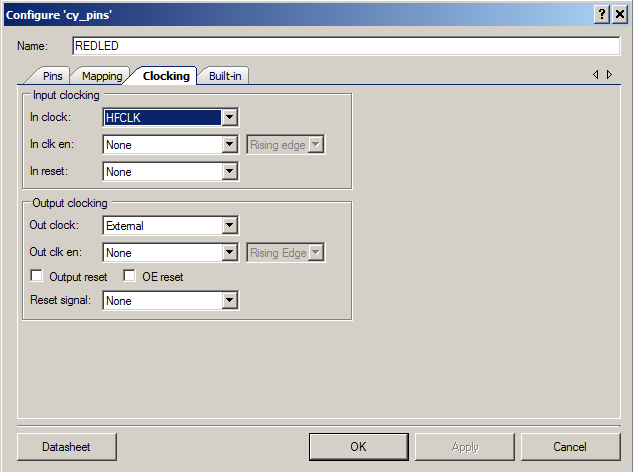
And you need to selected the “Out clock” as external.
Now, I want to turn off the Blue LED. As the LED is active Low, to turn it off you write a 1 to the pin. I do this as part of the setup of the pin by setting the initial drive state to high.

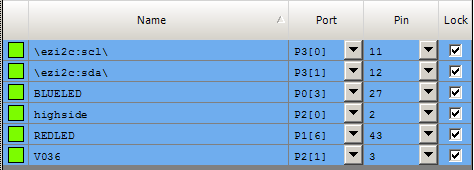
The last step in the device configuration is to select the proper pins on the Design Wide Resources (DWR) pins tab. Not setting the pins correctly is one of the most frequent errors that users make with PSoC Creator.
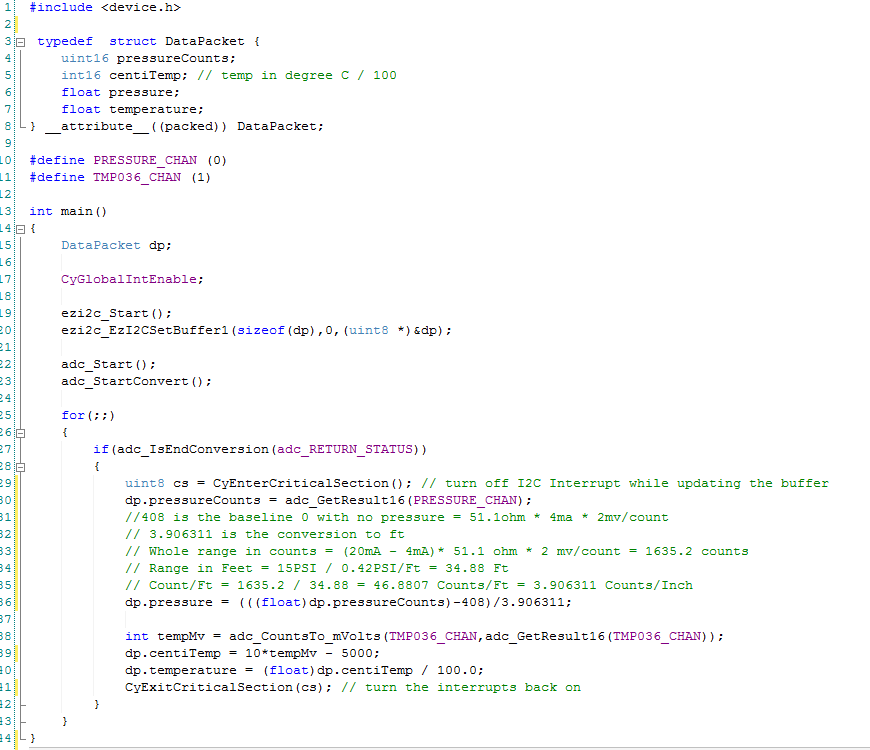
The firmware for the project is simple. In the first section (lines 3-8) I define a packed structure to serve as the I2C buffer. The __attribute__((packed)) tells the compiler to put all of the members of the structure in contiguous bytes. In the structure I defined below, if I had not marked it is packed, it is likely that the compiler would have put two bytes of padding after the pressureCounts and two bytes after the centiTemp. It would have done this to work align those datatypes to make the memory access more efficient.
The next section (lines 17-23) I initialize the system and start the components.
The the main body of the program (lines 27-43) I ask the ADC if it is done reading the voltages, if not go on, if so then calculate the different values and store them in the I2C buffer. The “CyEnterCriticalSection” prevents an I2C interrupt from reading the buffer before the data is completely written to prevent a partial read of the data.
In the next post I will explain boot loading and the p4bootloader project.
Index
Description
The Creek: IOT for the Elkhorn Creek
Introduction
The Creek: Solution Architecture 1.0
Overall architecture
The Creek: Creek Board 1.1
Eagle layout of the board
The Creek: Creek Board 1.0 – RCCA
A discussion of the errors in the 1.0 board
The Creek: CYPI, a Raspberry Pi to Arduino Bridge
PSoC4 <--> Raspberry Pi Bridge Board
The Creek: PSoC4 Creator Schematic and Firmware
Firmware to interface with the temperature and pressure sensors
The Creek: Testing the Firmware
Using tools to verify that the PSoC 4 Firmware is working correctly
The Creek: Testing the Bootloader
Make sure that you can load new firmware into the PSoC
The Creek: Software Architecture
All of the Raspberry Pi software connections
The Creek: Install MySql
Instruction to configure MySql
The Creek: Install Tomcat
Instruction to configure Tomcat JSP Server
The Creek: Data Collection Java (Part 1)
The Java program that reads the I2C and saves it in the database
The Creek: Data Collection Java (Part 2)
The Java program that reads the I2C and saves it in the database
The Creek: Create the Chart with JFreeChart
Using open source Java charting software to create plots of the Creek Depth
The Creek: Flood Event Data Processor
A batch program to create analyze the database and create a table of flood events
The Creek: Flood Event Web Page
A batch program to create the flood event web page
The Creek: Creek Server 1.1
Updates to all of the back off server programs to integrate charts
The Creek: JSP Web Page for www.elkhorn-creek.org
The JSP program to make the table and display the website
The Creek: Raspberry Pi Clock Stretching
Sorting out a bug in the system having to do with the Broadcomm Raspberry Pi Master not functioning well with clock stretching
The Creek: Creek Server 1.2
Caching the web pages to make them faster
No comment yet, add your voice below!