Summary
In the previous articles I showed you the overall Creek 2.0 Architecture (1-8). Then I explained how AWS MQTT (5) works, and I showed you how to write a Python program to update the device shadow (4). In this article, I will create an AWS Relational Database Server (RDS) that runs MySQL which will be used to store the data.
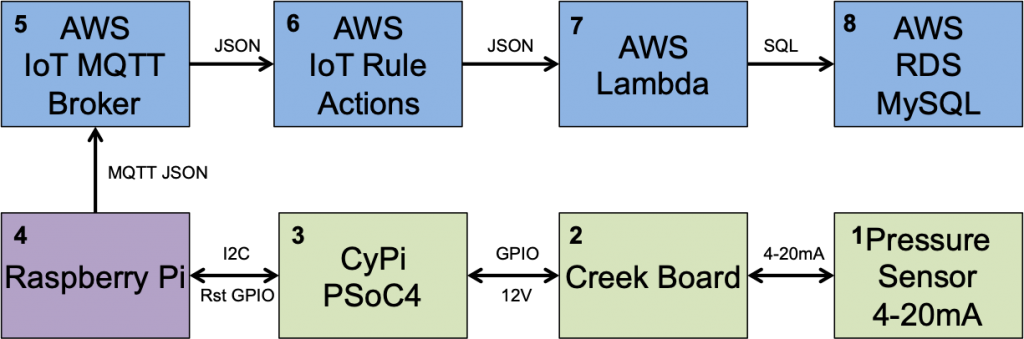
You might ask yourself why would I explain (8) before I explained (6) & (7)? The answer is that I need a place to send the data before the send the data functions will make any sense.
First, a definition, RDS – Relational Database Server – is Amazons name for a service that give you a database server, in your VPC, running an instance of MySQL, Aurora, DynamoDb, or Postgres. In their words, RDS “…provides cost-efficient and resizable capacity while automating time-consuming administration tasks such as hardware provisioning, database setup, patching and backups.” The AWS definition is largely true. It does not however abdicate your DataBase Administrator (DBA) responsibilities.
For my application I need MySQL, so for this article I will walk you through setting up a MySQL database using AWS RDS. The specific topics are:
- Create a Database Using the Amazon Defaults
- Create MySQL WorkBench Connection
- Examining the Security
- Rethinking the Security & Subnet Groups
- Configure Security Groups
- Create the Database I Really Want
- MySQL WorkBench EC2 Tunneling over SSL
Create a Database Using the Amazon Defaults
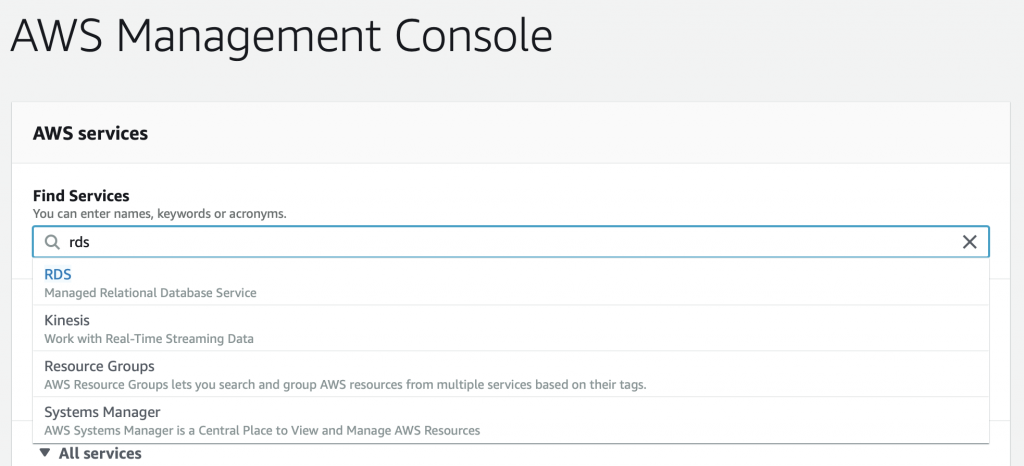
It is really easy to create a MySQL database using the default Amazon settings. The setting will be absolutely fine, except that the Database will be attached to a Public Subnet rather than a private one. This is probably mostly OK as the subnet settings that AWS creates by default are probably safe enough? It is certainly easy, so let’s start there. Go to your AWS management console. Then search for RDS.
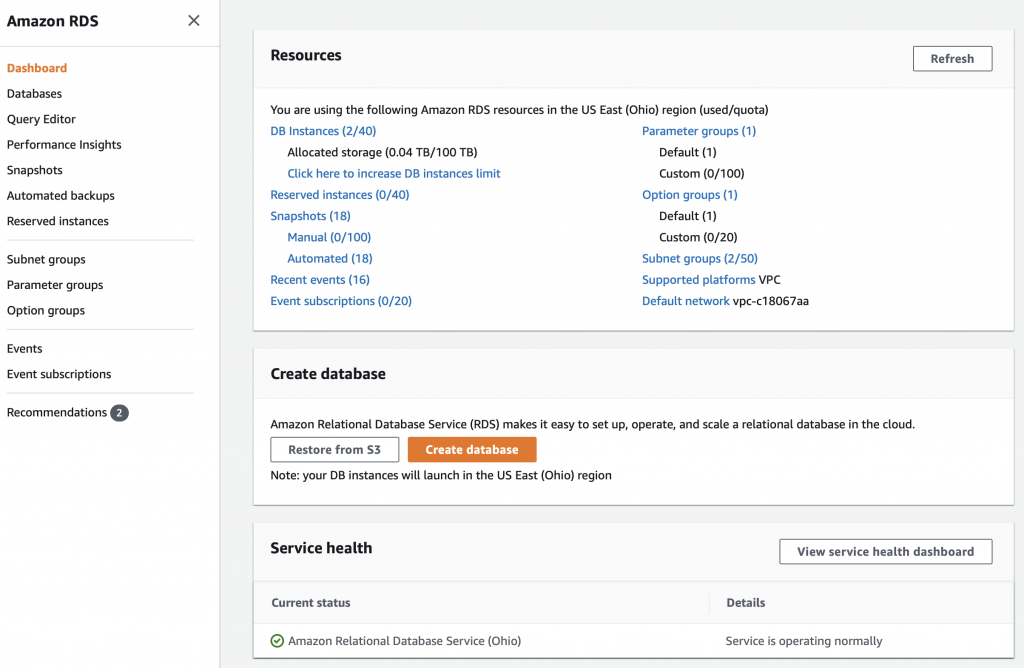
You will arrive a screen that should look something like this one. I say should because 1) they like to change things around and 2) I already have some stuff going in my RDS setup. To create a database click on “Create database”
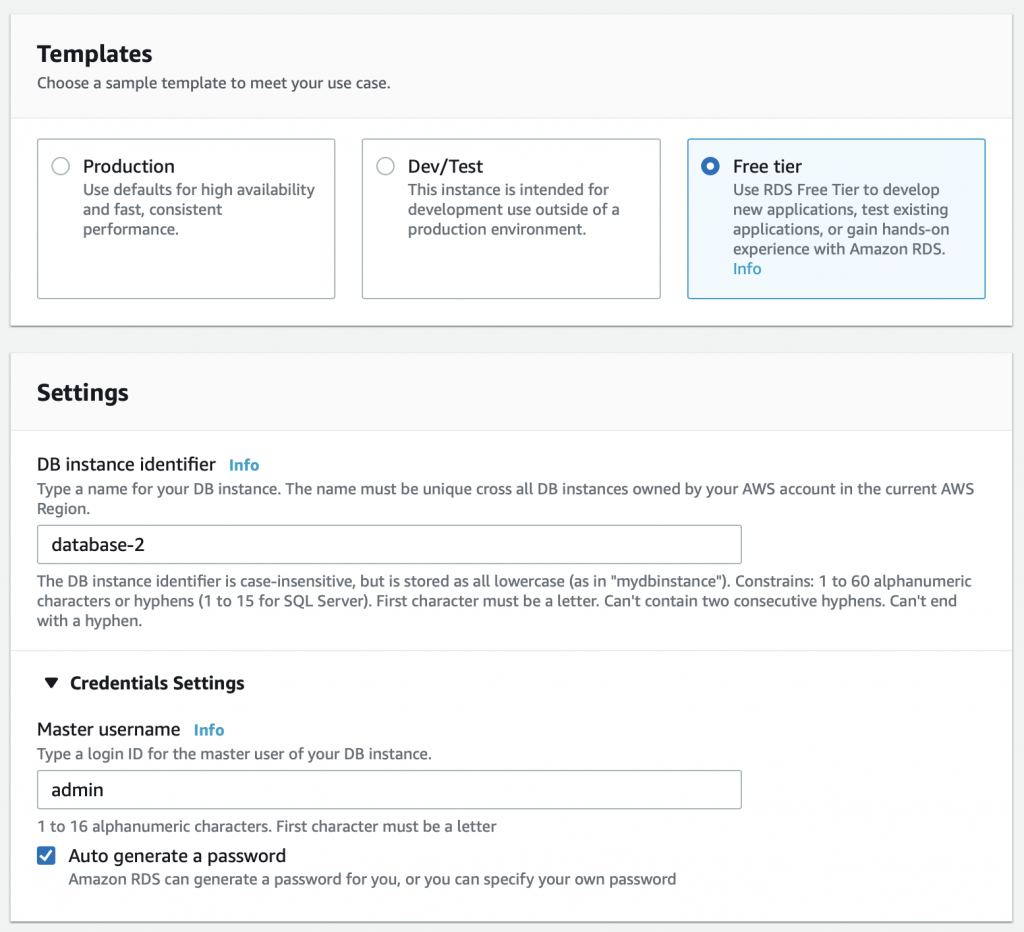
When you get to the create database screen it will give you some options. Notice at the top of my screen shot they are already offering me a new user interface. For the first database select:
- Easy Create
- MySQL
- Free Tier
- DB instance identifier (I leave the default database-1)
- Master username = admin
- Autogenerate password
Then press “Create database”
![]()
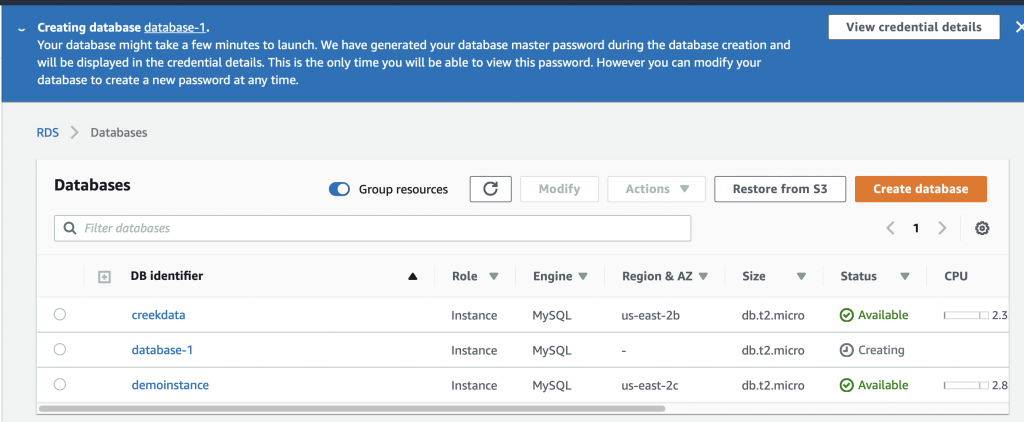
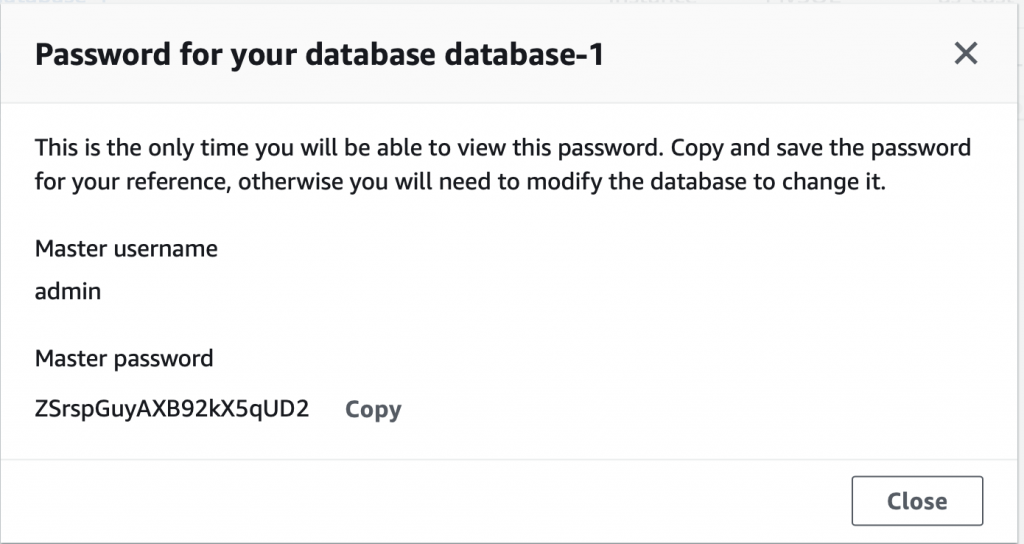
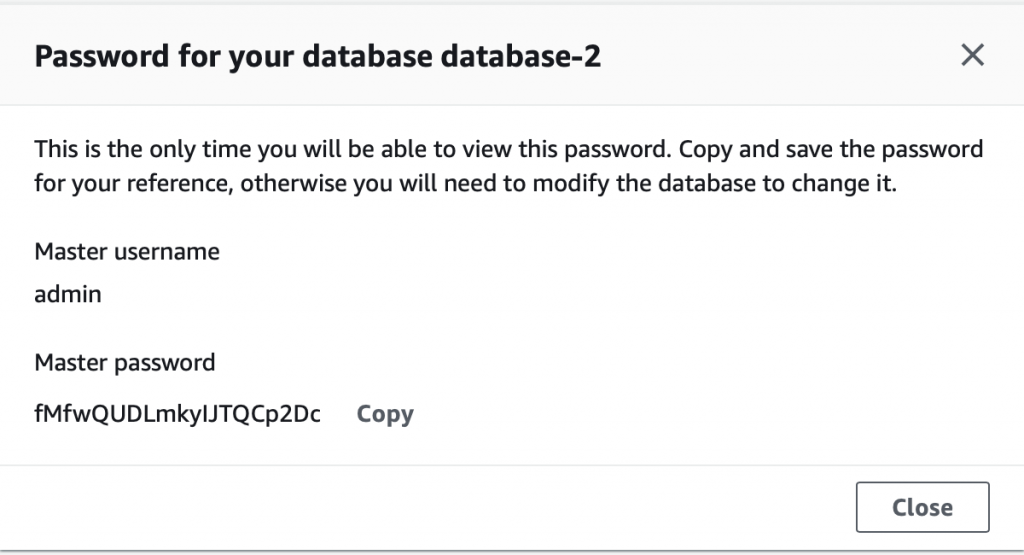
Creating a database takes about 5 minutes. In the screen shot below you can see that it is “Creating” and that I am already running two other databases. Also you can see at the top of the screen it says “View credential details”. This is where you find out the password that was automatically created for you. If you leave this screen without the password your database becomes inaccessible and you will need to delete it.
When you click the details screen you will get something like this:
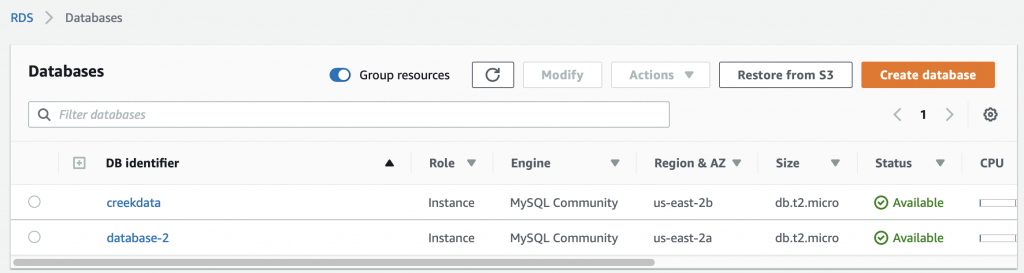
Once the database is created your screen will look something like this:
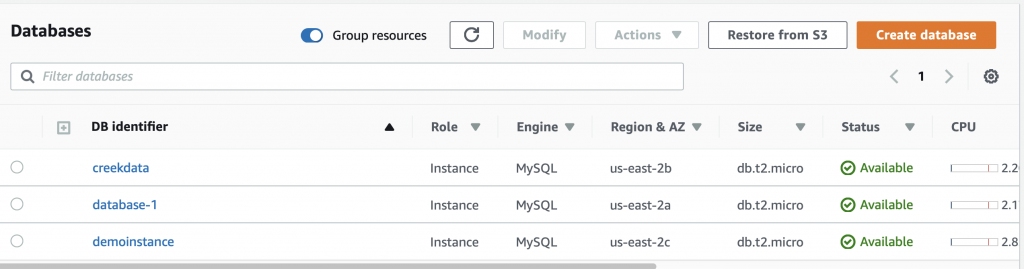
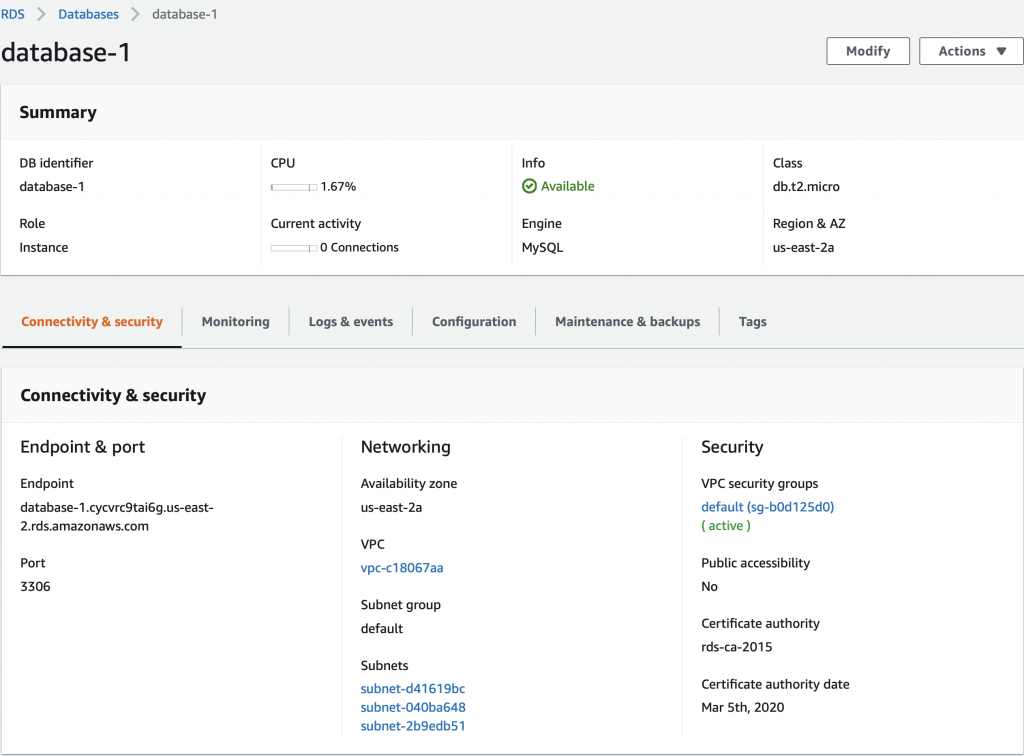
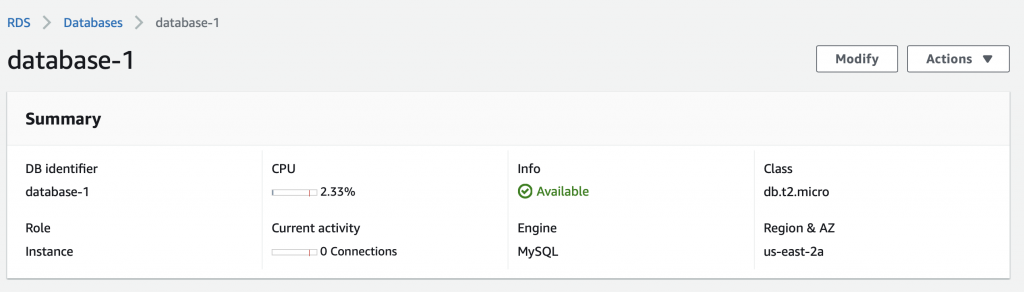
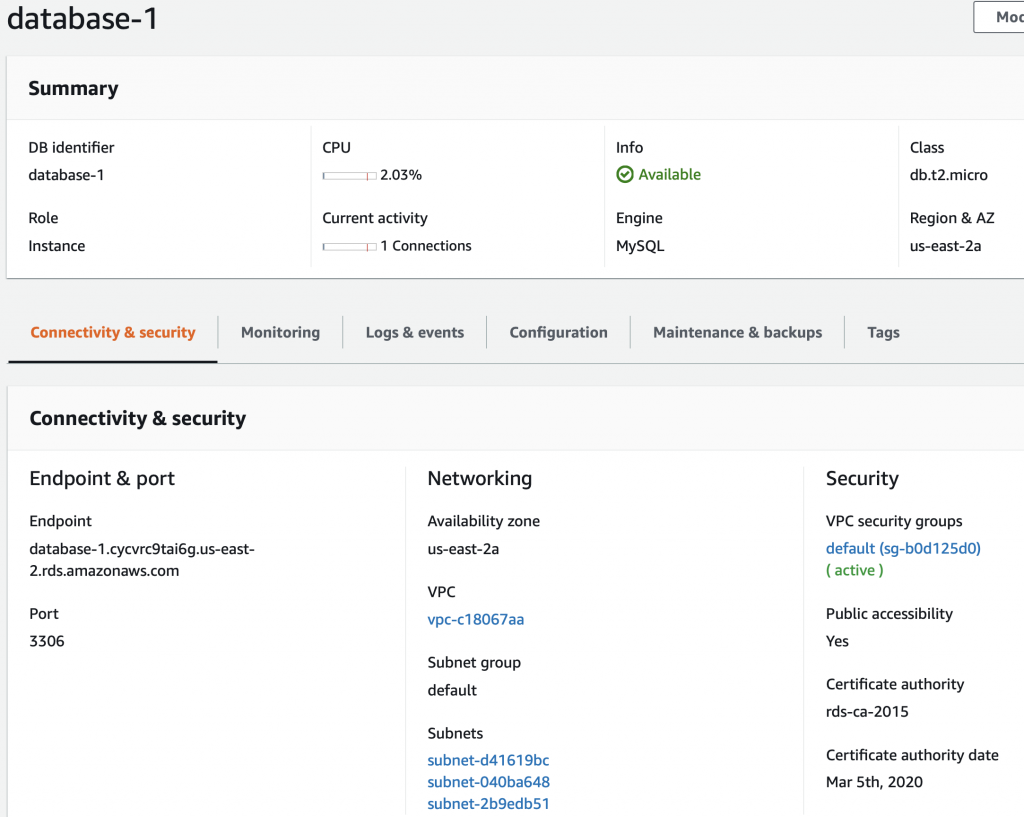
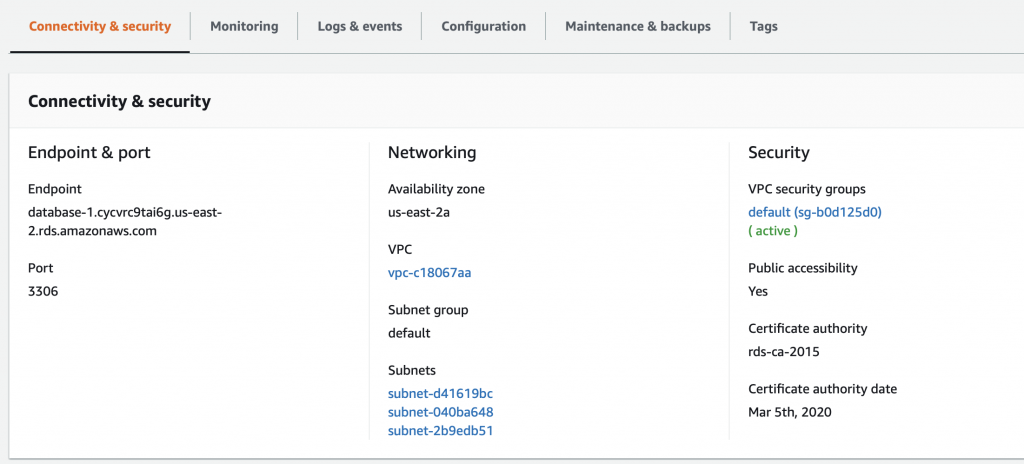
When you click on database-1 (the one we just created) it will show you details about the database. This screen has a bunch of useful information including the endpoint a.k.a the DNS name of your database.
Create MySQL WorkBench Connection
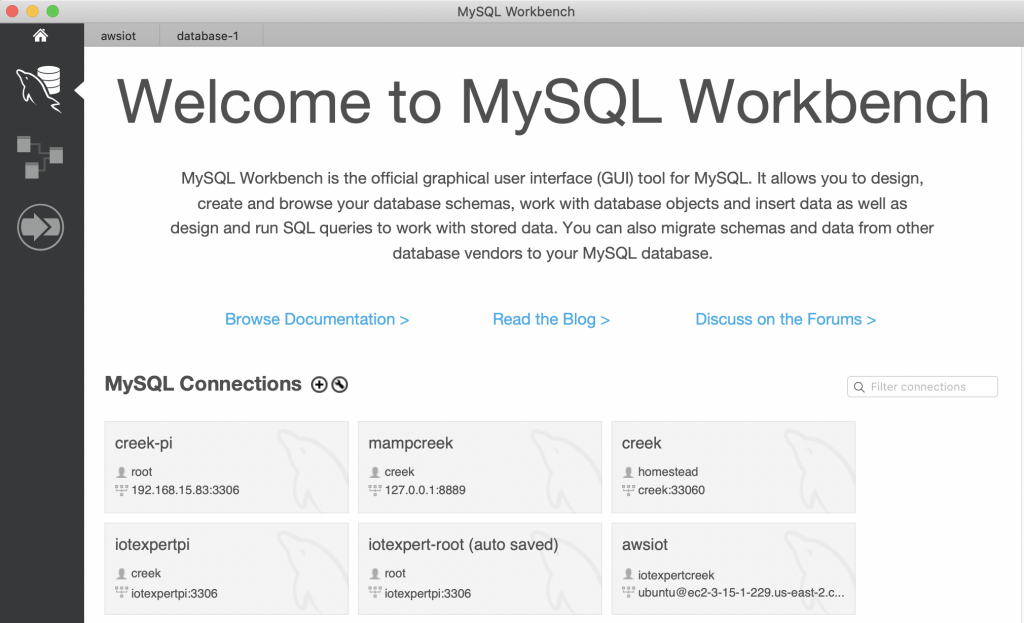
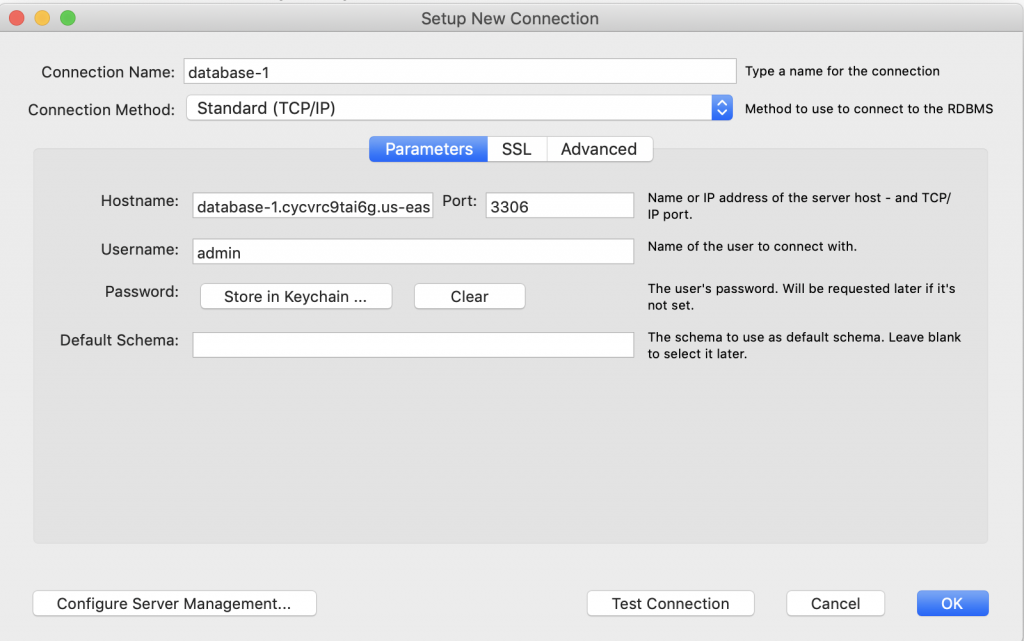
I am not a real database administrator so I like to use the MySQL Workbench GUI to access my database. To make a new connection, press the little plus next to MySQL Connections.
On this screen you need to provide the hostname, which in Amazon terms is the endpoint. You also need to give the Username (which in my case was default admin) and the crazy generated password.
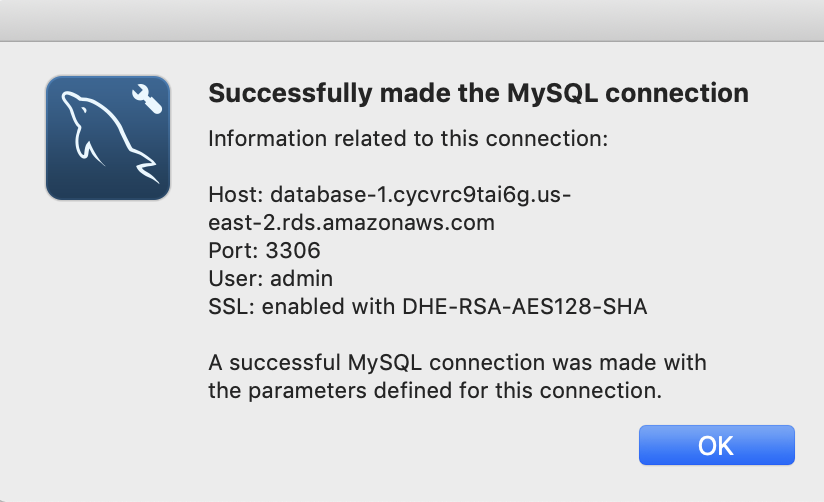
When I press the “Test Connection” I get this lovely message.
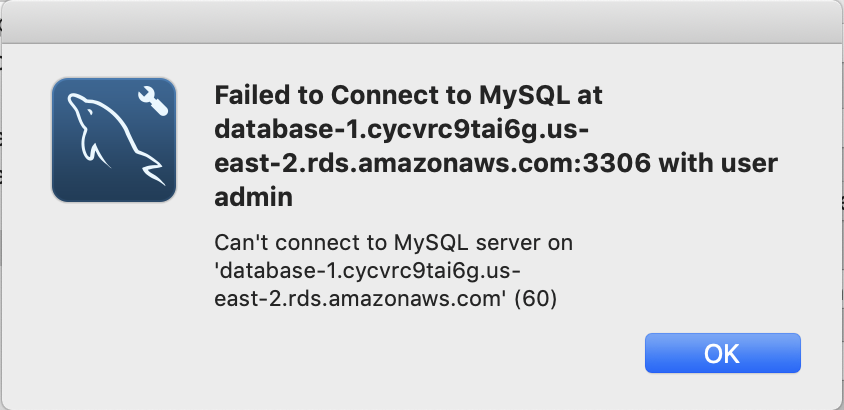
The problem is that my database is not “Publicly available” To fix this click on “Modify”
Then scroll down to “Network and Security” and select “Public accessibility” and pick yes.
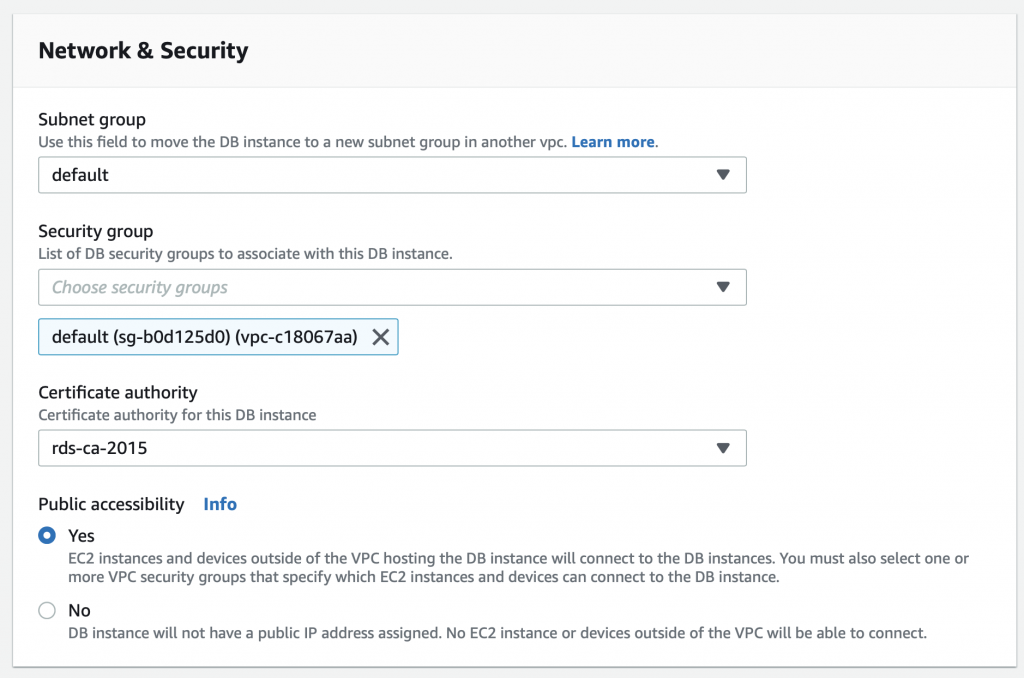
Then scroll down some more and pick “Continue”
It will then ask you when? Tell it NOW!!! right NOW!!! I can’t WAIT!!! But seriously, it doesn’t matter because we don’t have anything in the database and no connections.

On my database this takes about a minute… so be patient. I wasn’t and the connection didn’t work and I went looking to figure out why. I finally realized that it was because it took a while to make the change. Now when I test the connection it says:
And when I open the connection it works.
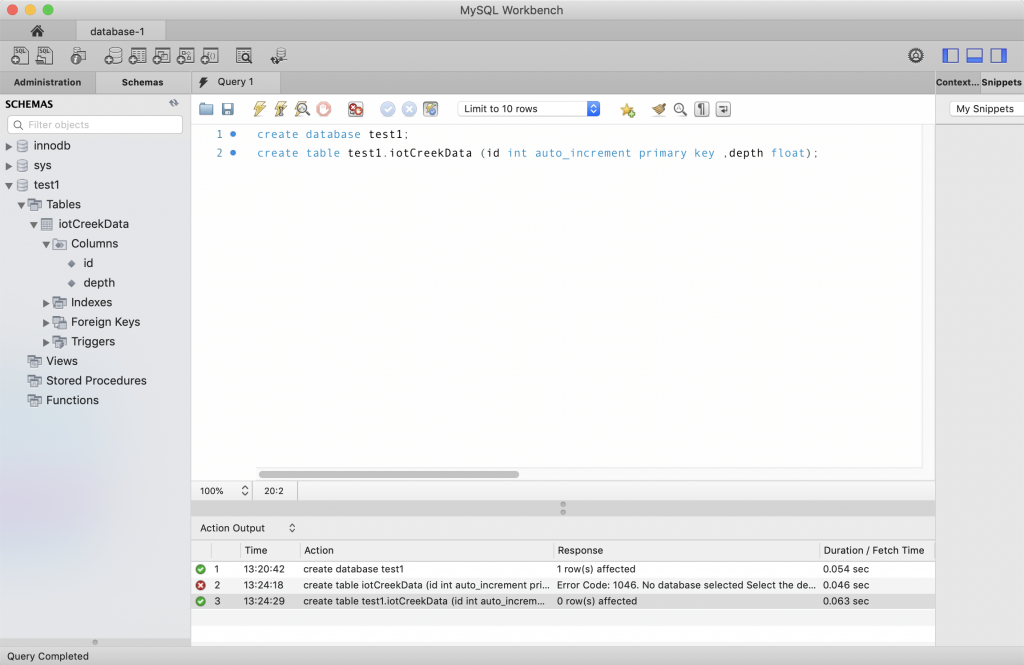
Now I can make database and a table.
Examining the Security
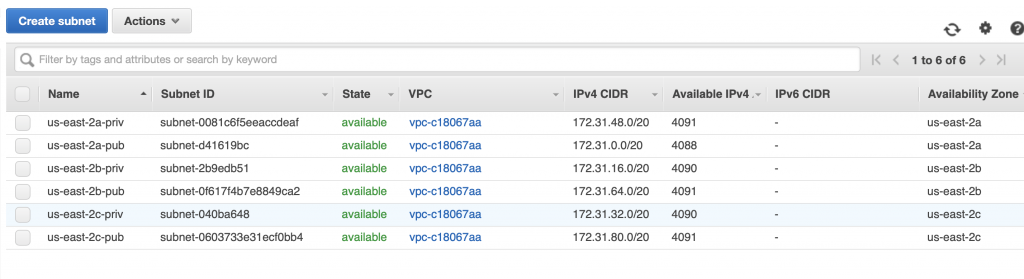
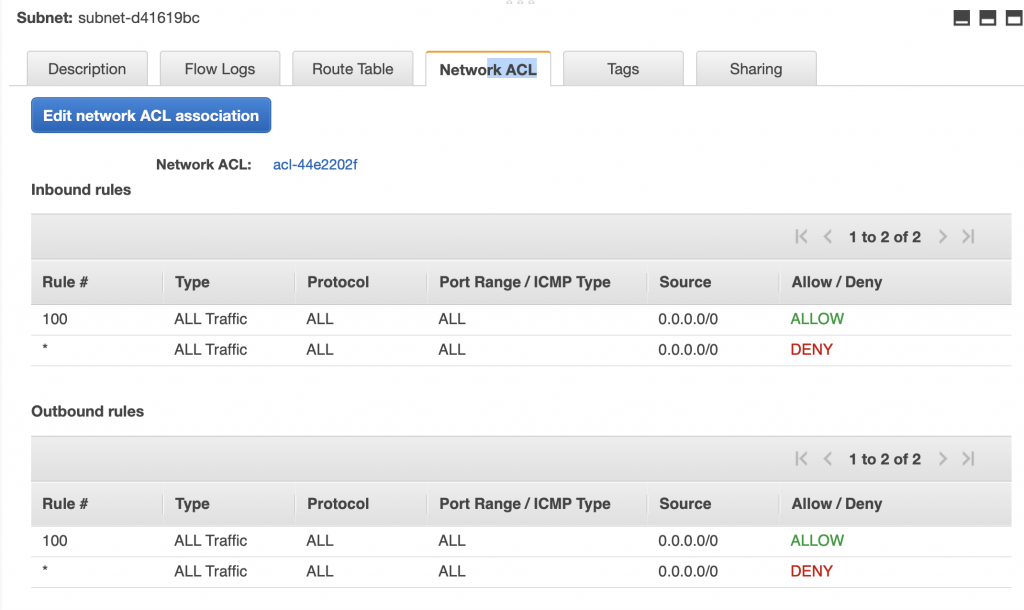
A couple of things to notice about this database. First, this database is setup to run on us-east-2a. And that the database is in the “Default” subnet group which is either subnet-d41619bc, subnet-040ba648 or subnet-2b9edb51 (three subnets in the three availability zones in us-east-2). For some reason which I can’t figure, they don’t display which subnet instead they make you figure it out by combining region and you knowledge of the subnets.
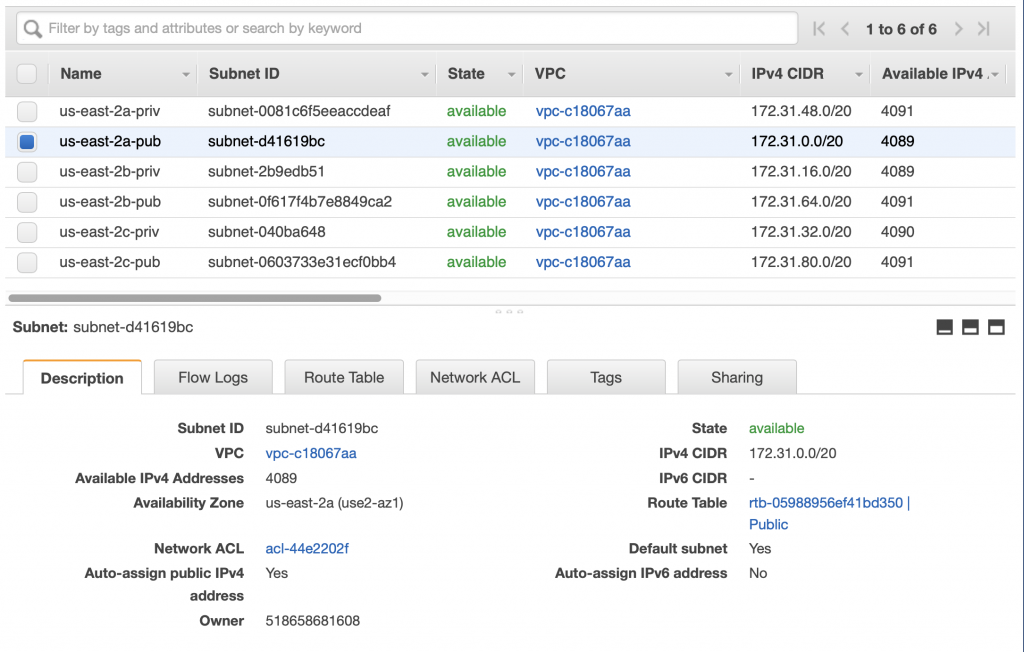
But wait is that subnet public or private? And which one is it? If you go to the AWS console for the VPCs and then click on the subnet tab you will find this configuration (at least in my VPC). I did this work for the article I did on VPCs where I setup one private and one public subnet for each of the availability zone in the us-east-2. From the screen above you can see that my RDS is setup in us-east-2a which means that it is on subnet-d41619bc.
Notice that I gave that network the name us-east-2a-pub because it is a PUBLIC network. Which you can see when you click on it. Notice that the Route Table is Public.
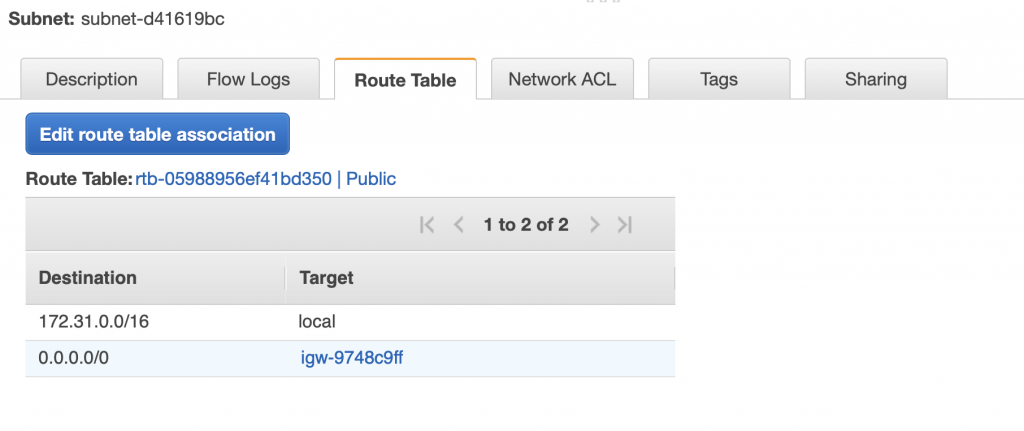
When you click on “Route Table” you see that it has 0.0.0.0/0 sent to the Internet gateway named igw-9748c9ff
And that the Network ACL allows all traffic to and from the subnet.
Rethinking the Security & Subnet Groups
Having a MySQL database server directly connected to the public internet may not actually be such a good idea. Whatever application you develop for sure wants to be able to connect to it, but do you really want the rest of the world hacking at it? Probably not. If the database server is attached to a private subnet that only servers that are inside of your VPC are allowed to attach to it.
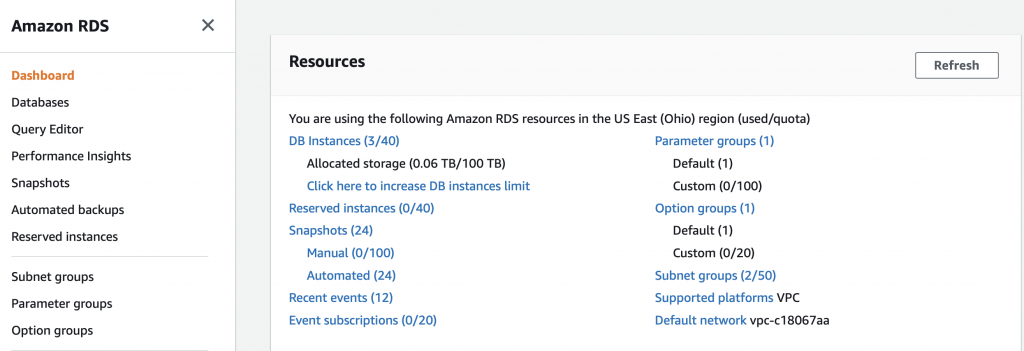
How do you move a RDS from a public to a private subnet? Well, unfortunately, there is no good way to do that (there is a way but just not very good) and you actually needed to get it into the correct subnet when you created the database. But you might ask yourself, there was no place on any of those screens to setup the subnet. And that is true. BUT you can tell it which “subnet group” to attach to. A subnet group is literally just a list of subnets with a name. On the RDS console on the far right there is a link to subnet groups. In my class the link says “Subnet Groups (2/50)”. It sure seems like this tab should be on the VPC screen and I can’t think of any reason they wouldn’t have put it there. But there it is. When you click on the “Subnet Groups…”
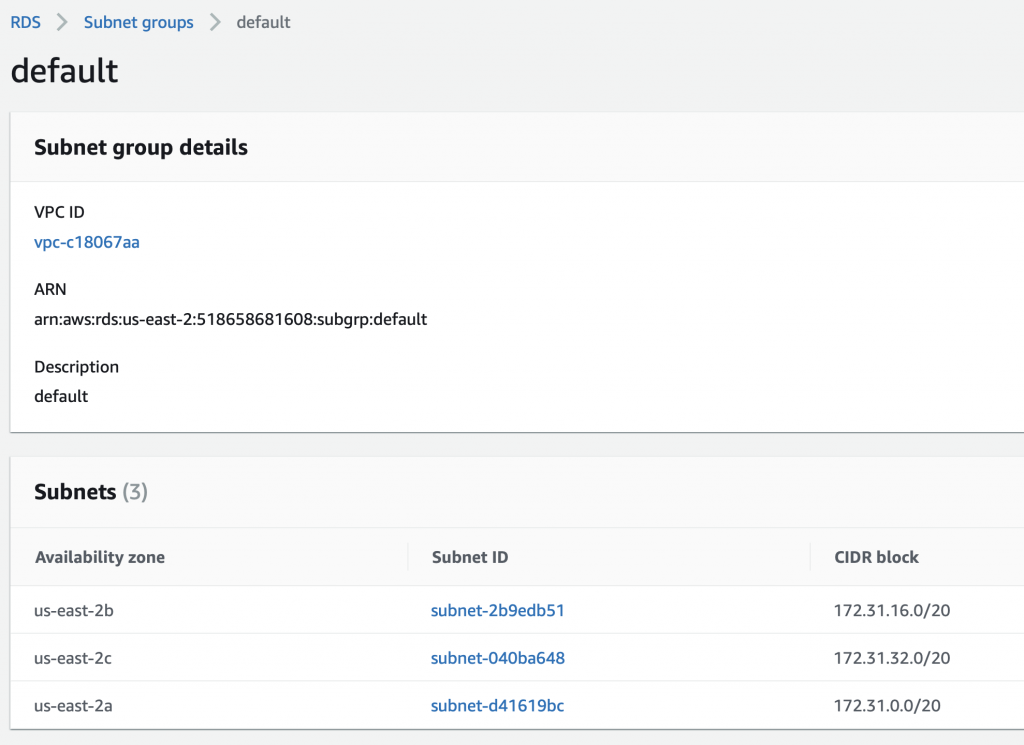
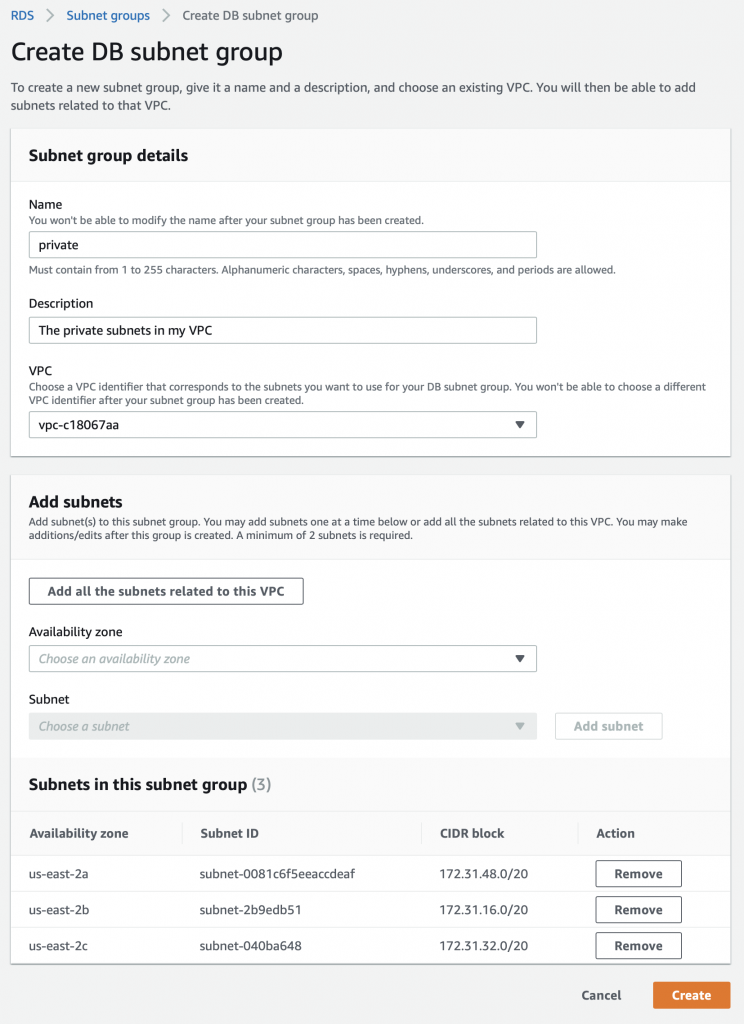
You see that there are two subnet groups. One called “default” and one called “test1” (which I created while I was making all of these screen shots). If you click on default …
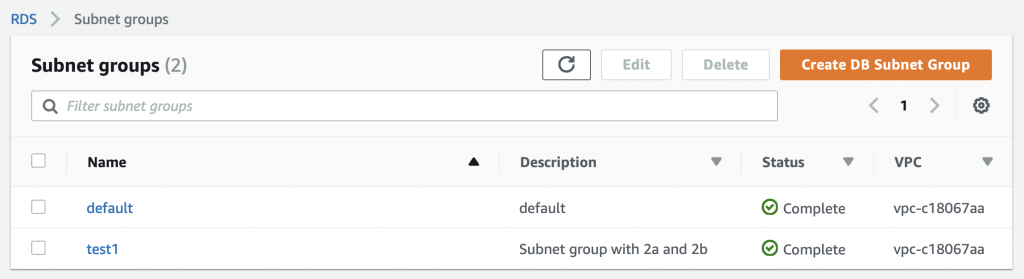
You will see that this group contains 3 subnets. In fact this group was created automatically for you and contains ALL of the subnets in your VPC that were automatically created for you when the VPC was created. Since that time I made some of them private which is the source of confusion.
In order to create a new subnet group you click on the button “Create DB Subnet Group”
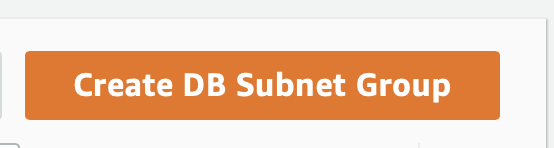
Then set things up:
- Named the group “private”
- Made a short description
- Clicked “Add all of the subnets in the group”
- Then I removed the public ones.
- Then press create
Alternatively, you could just add the private ones by selecting the availability zone, then the private subnets.
Configure Security Groups
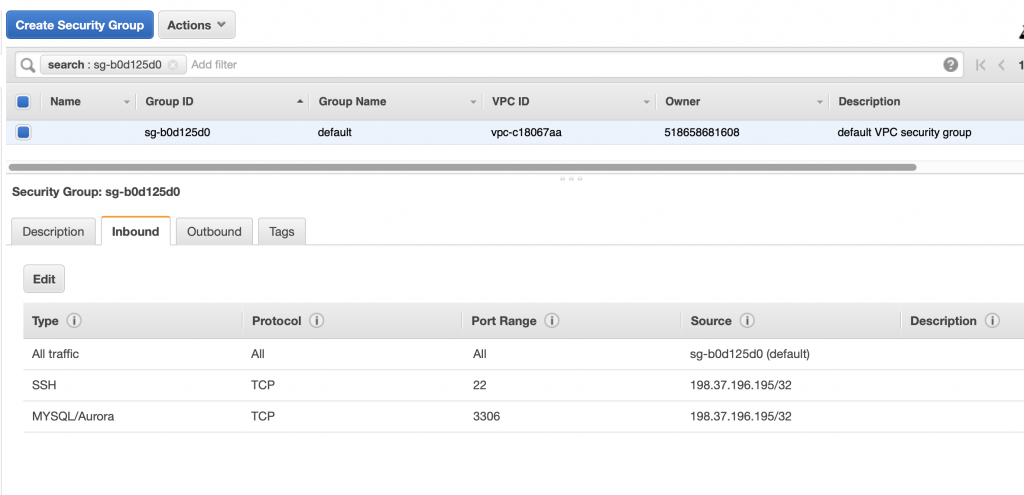
The next thing that is goofy in security is that when I click on the VPC security groups I can see the security configuration for that subnet.
When I click on that security group you can see that the Amazon helped me by adding an Inbound rule to the security group to allow connections from 198.37.196.195 (which is the current IP address at my house) on port 3306. In other words it poked a hole in the firewall that was limited to MySQL connections from my house… which I suppose is cool until my DHCP address changes. Oh well.
Create the Database I Really Want
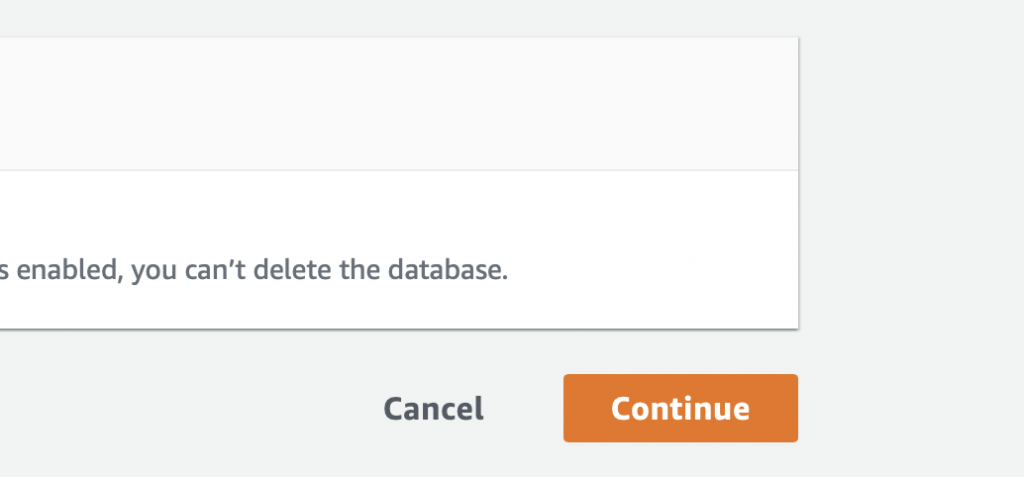
OK lets create the database that we really want. First, I will delete the database that I don’t want because there is not really any way to move it to another subnet. Well, that actually isn’t true. Apparently you can create a new VPC, transfer the RDS to the new VPC, then transfer it back to the original VPC, then delete the temporary VPC. But that isn’t what I’m doing.
If you select the database, then select actions->delete.
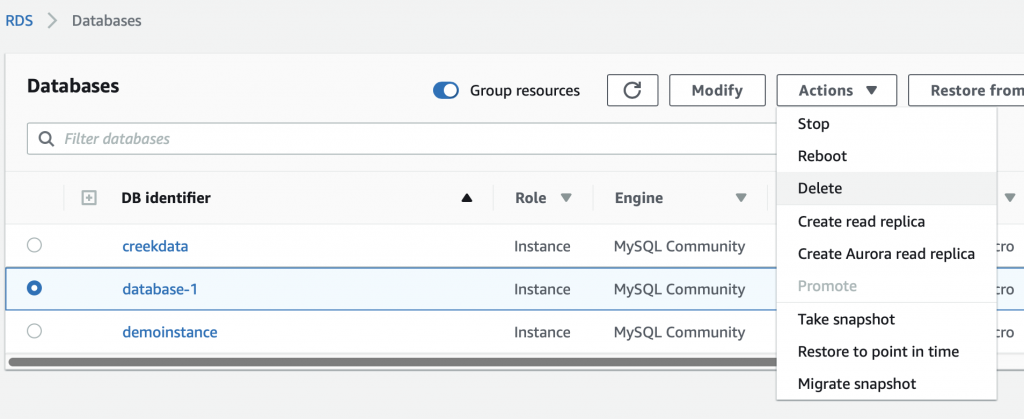
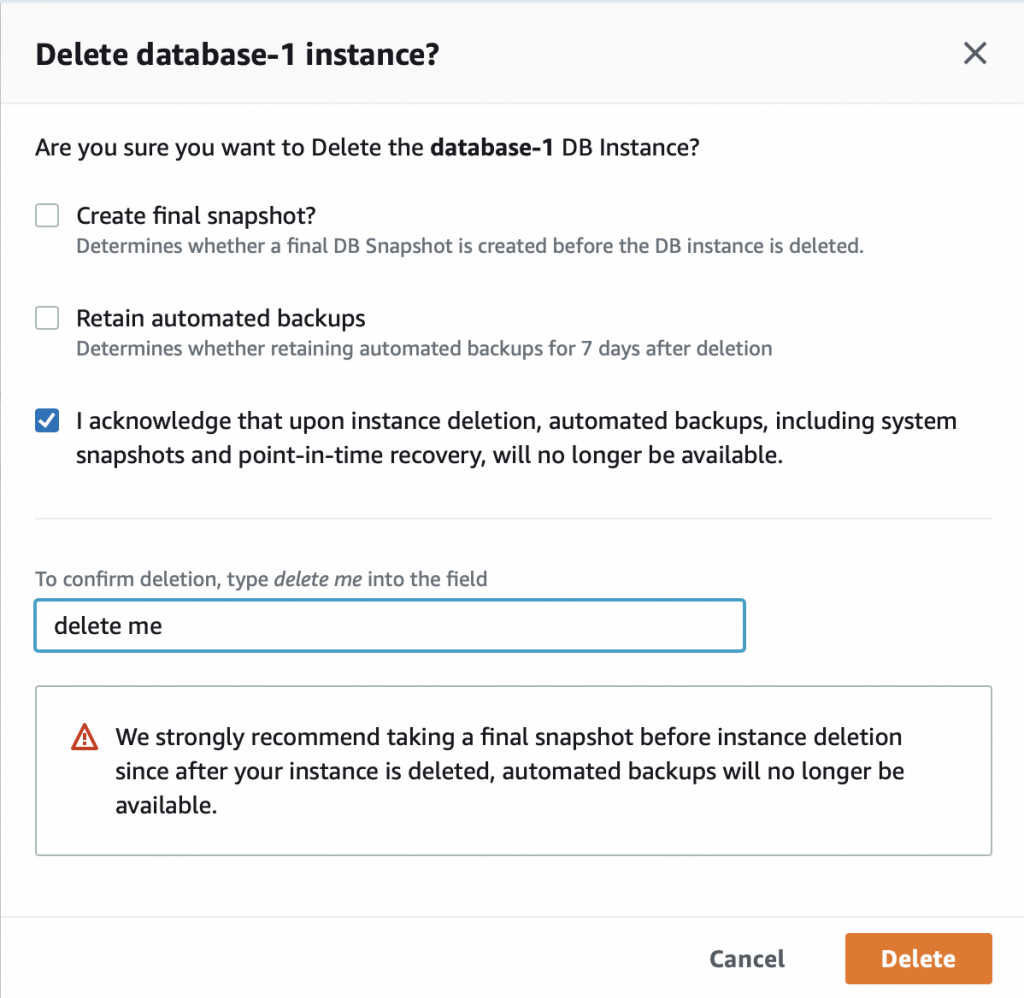
It will ask you if you are SURE!!! Because there is no data in the database I turn off the final snapshot. I acknowledge that Im really sure… and then press “delete me”
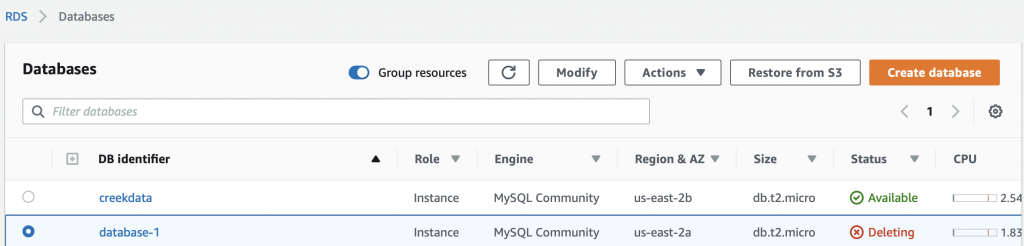
Then it takes a bit of time to delete.
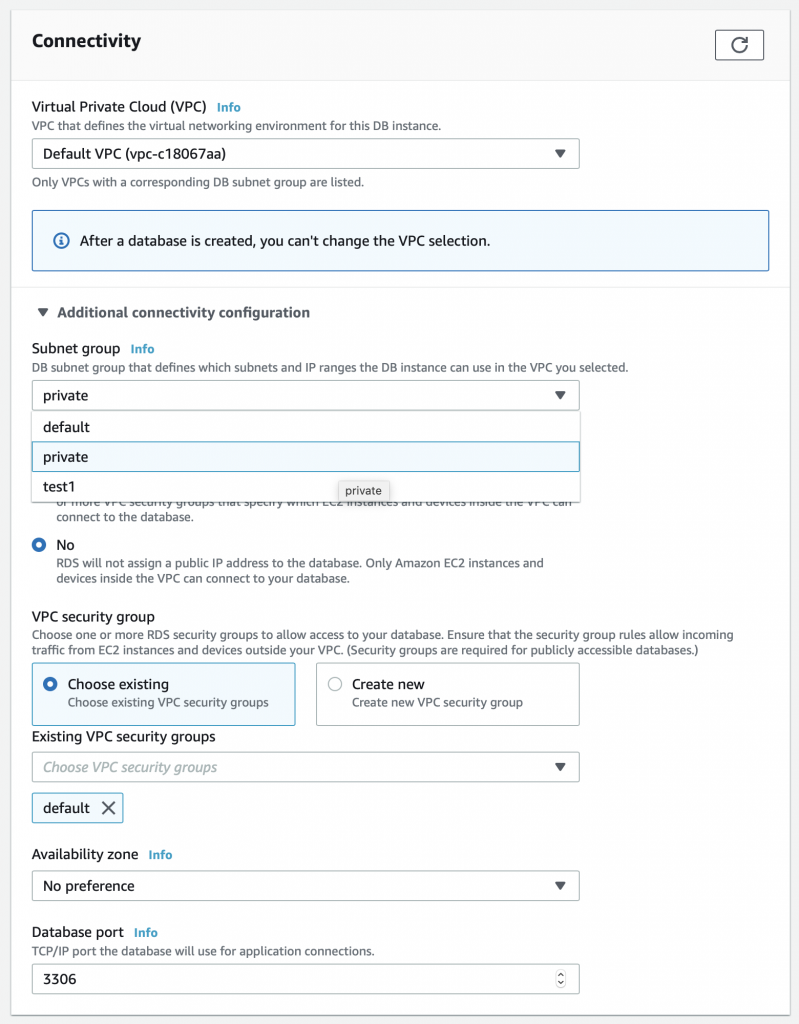
Now I press Create database. Turn off easy create (so that I get access to the option to place the the new database in the correct subnet group.
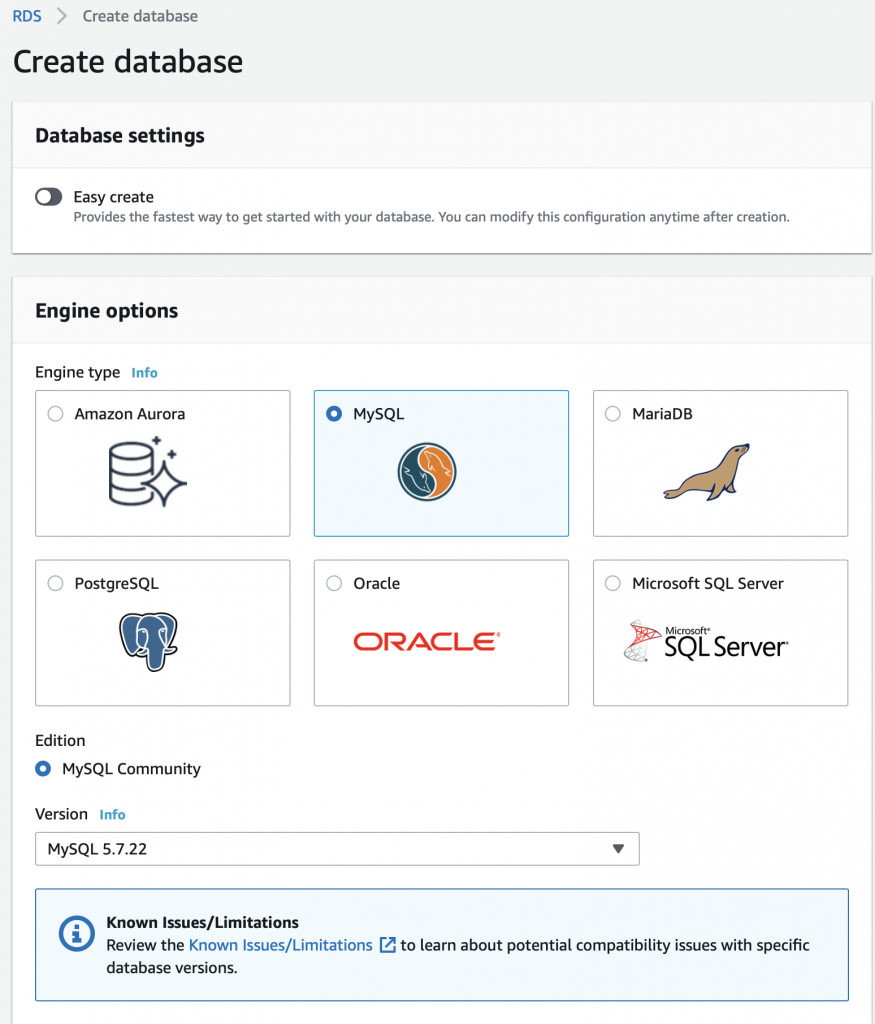
Free tier is plenty good for this setup. And I don’t really care what the name of the database is. As before I’ll let it generate the password.
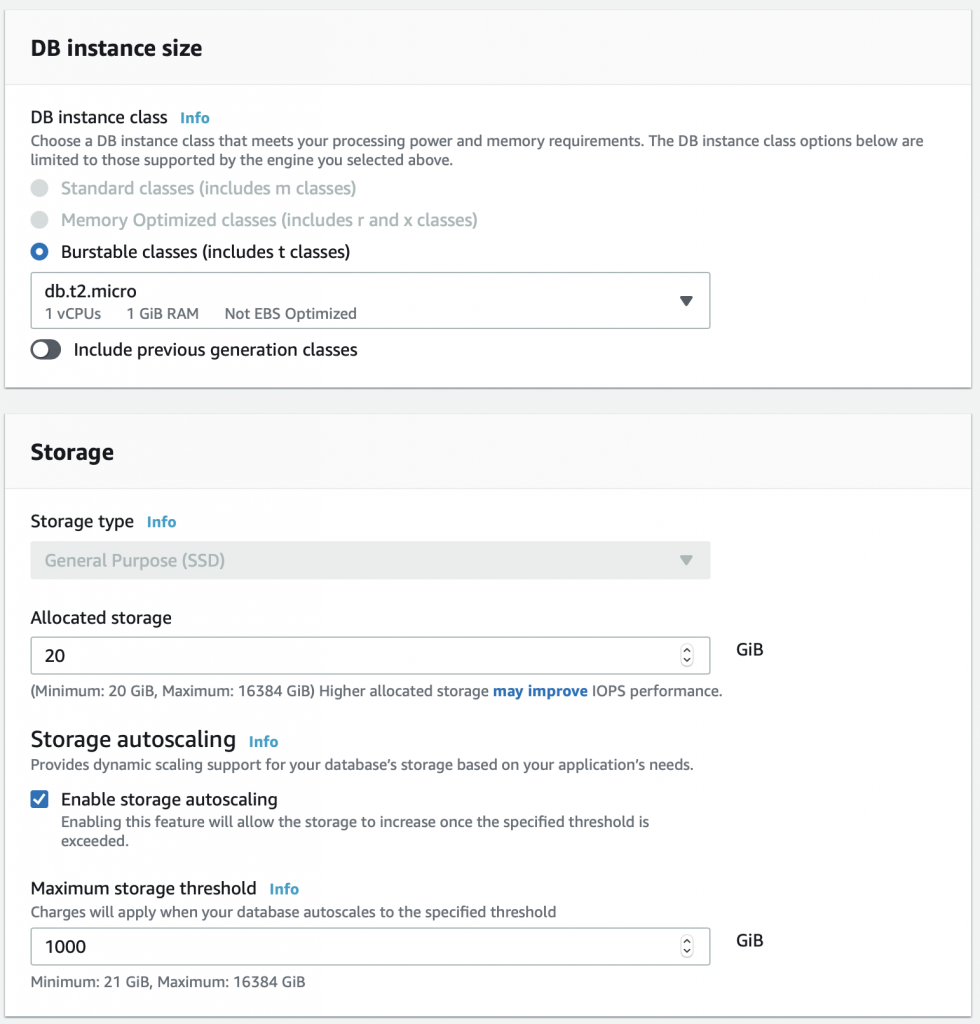
No choices on the instance size.
Finally in the connectivity section there is something interesting. You need to expand the “additional connectivity configuration” to see these options. Specifically, I can pick out the subnet group for this RDS instance. Recall from above I created the private subnet group. Pick it.
When I press create, I get this screen … sweet success.
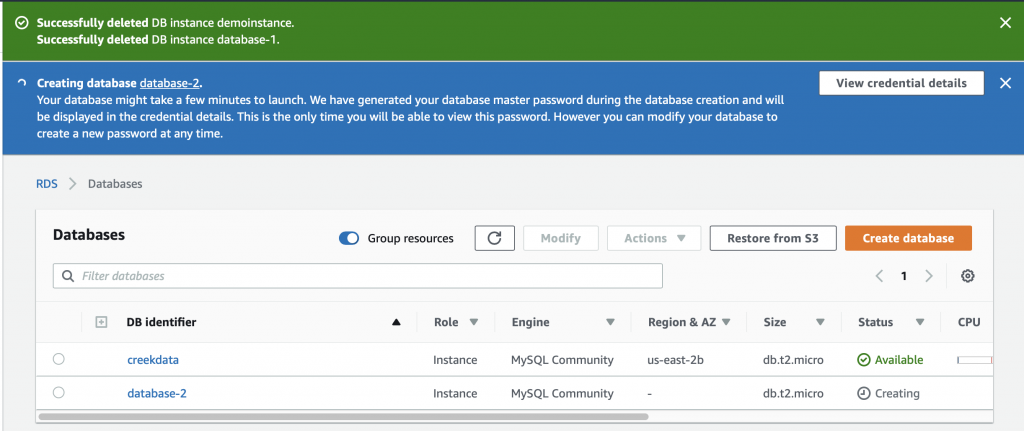
And once again it creates credentials for me.
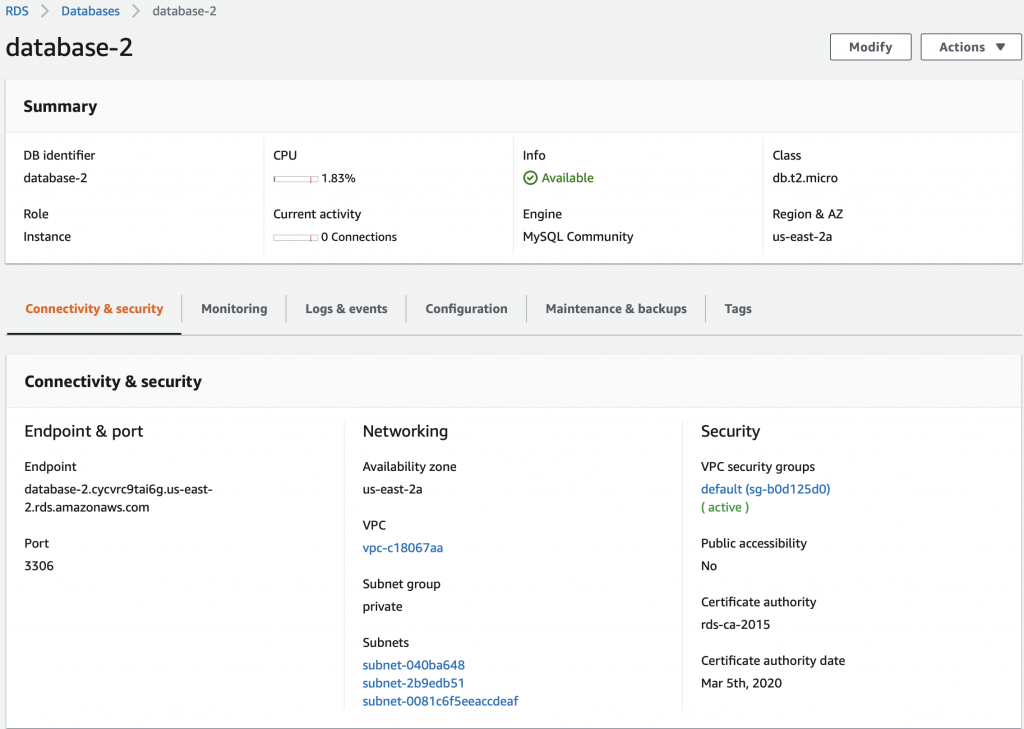
Now I have “database-2” which is running in “us-east-2a”
Click on database-2 and you can see that it is in the “private” subnet group. If you look higher in this article you will find out that it MUST be running on subnet-0081c6f5eeaccdeaf.
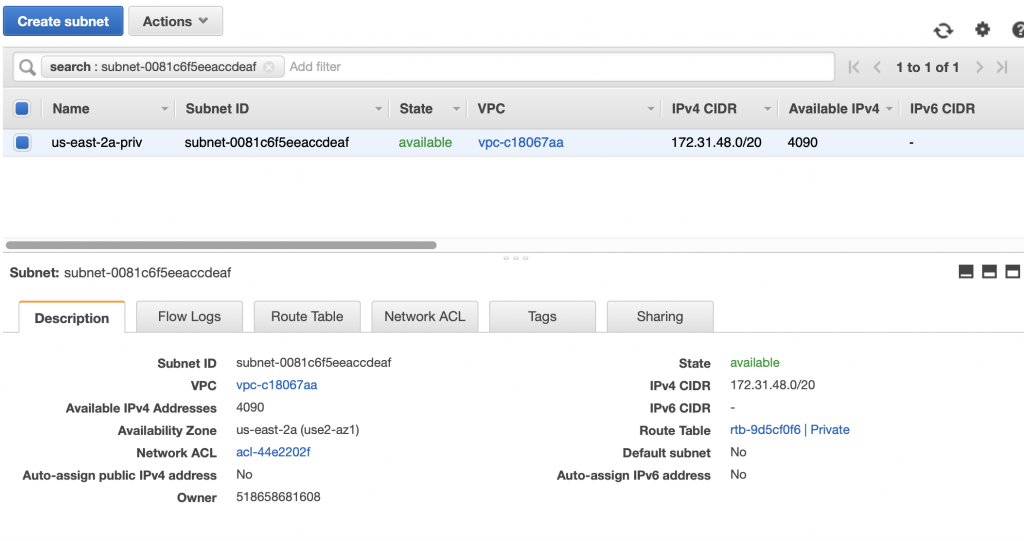
When I click on that subnet I find that it is a private subnet in us-east-2a. Notice that the route table is marked as “Private”
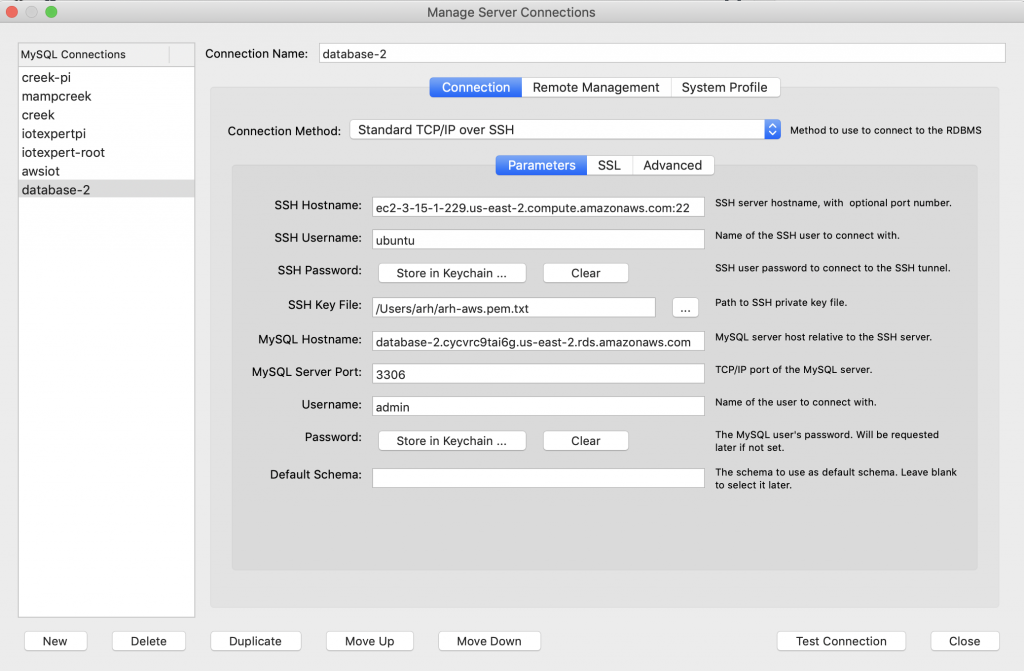
MySQL WorkBench EC2 Tunneling over SSL
All that security is cool and everything. But, How do I talk to the database? Well, the answer to that question is that the RDS server is running in my VPC and any computer that is attached to that VPC can talk to the database server. To make all of this work, I run an EC2 server in my VPC. You can only attach to this server if you have the RSA keys. But that still doesn’t answer the question how do I connect from my computer. The answer is you need to do MySQL Tunneling over SSL. To set this up in MySQL Workbench, first create a new connection.
- Pick the connection method as “Standard TCP/IP over SSH”
- Set the SSH Hostname to be your EC2 Instance
- Set the User (I have the default ubuntu)
- Make a link to your keyfile
- Give the DNS name of your RDS Server
- The user name (remember from above it is admin)
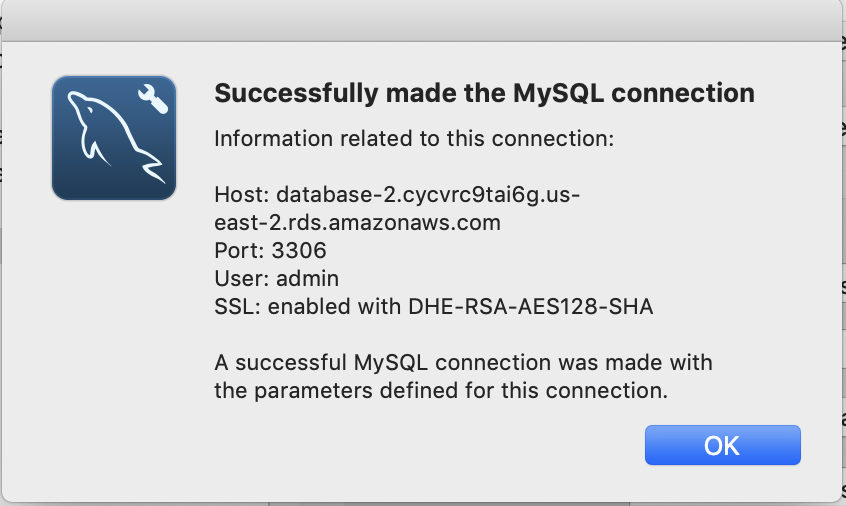
Now when I test the connection… sweet success.
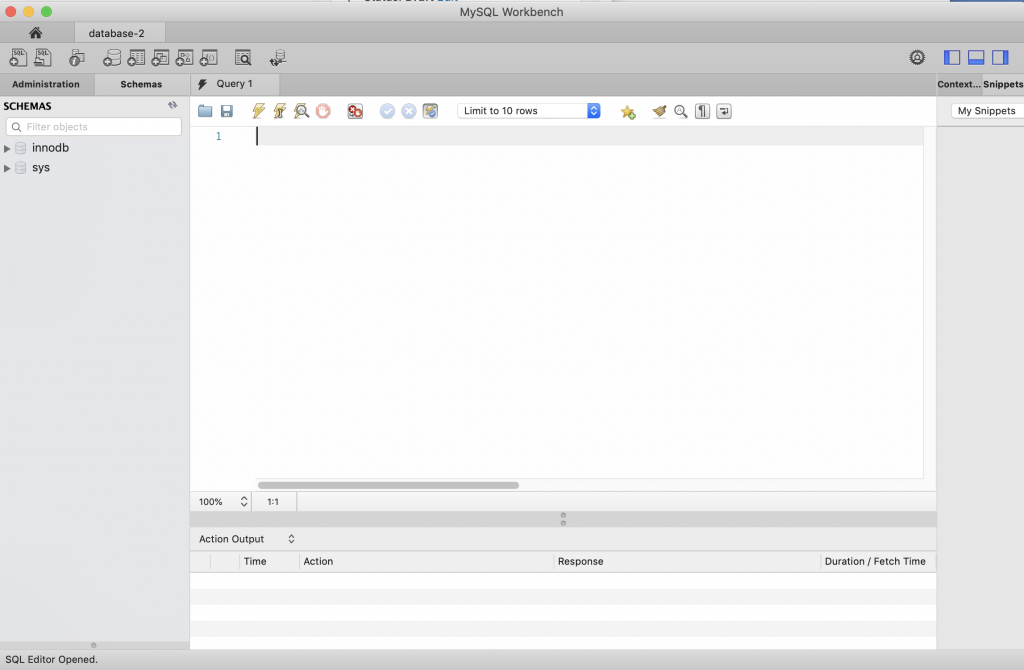
And now I can talk to the MySQL server (and do whatever SQL stuff I want)
In the next article I will create a lambda function to send data onto the RDS database.
2 Comments
Great example
Thanks