Summary
In this article I will show you how to use Python to read from the I2C bus and then send the data to the AWS IoT Cloud via MQTT. This will include the steps to install the two required libraries. I will follow these steps:
- Install the SMBUS Python Library
- Create pyGetData.py to test the I2C
- Install the AWS IoT Python Library
- Create pyGetData.py to send data to AWS IoT
- Add the pyGetData.py to runI2C (which is run every 2 minutes)
- Verify that everything is functioning
Install the SMBUS Python Library & Test
In order to have a Python program talk to the Raspberry Pi I2C you need to have the “python3-smbus” library installed. To do this run “sudo apt-get install python3-smbus”
pi@iotexpertpi:~ $ sudo apt-get install python3-smbus
Reading package lists... Done
Building dependency tree
Reading state information... Done
The following NEW packages will be installed:
  python3-smbus
0 upgraded, 1 newly installed, 0 to remove and 426 not upgraded.
Need to get 0 B/9,508 B of archives.
After this operation, 58.4 kB of additional disk space will be used.
Selecting previously unselected package python3-smbus.
(Reading database ... 136023 files and directories currently installed.)
Preparing to unpack .../python3-smbus_3.1.1+svn-2_armhf.deb ...
Unpacking python3-smbus (3.1.1+svn-2) ...
Setting up python3-smbus (3.1.1+svn-2) ...
pi@iotexpertpi:~ $
I like to make sure that everything is working with the I2C bus. There is a program called “i2cdetect” which can probe all of the I2C addresses on the bus. It was already installed on my Raspberry Pi, but you can install it with “sudo apt-get install i2c-tools”. There are two I2C busses in the system and the PSoC 4 is attached to bus “1”. When I run “i2cdetect -y 1” I can see that address ox08 ACKs.
pi@iotexpertpi:~/pyGetData $ i2cdetect -y 1
     0  1  2  3  4  5  6  7  8  9  a  b  c  d  e  f
00:          -- -- -- -- -- 08 -- -- -- -- -- -- --
10: -- -- -- -- -- -- -- -- -- -- -- -- -- -- -- --
20: -- -- -- -- -- -- -- -- -- -- -- -- -- -- -- --
30: -- -- -- -- -- -- -- -- -- -- -- -- -- -- -- --
40: -- -- -- -- -- -- -- -- -- -- -- -- -- -- -- --
50: -- -- -- -- -- -- -- -- -- -- -- -- -- -- -- --
60: -- -- -- -- -- -- -- -- -- -- -- -- -- -- -- --
70: -- -- -- -- -- -- -- --
pi@iotexpertpi:~/pyGetData $
You might recall from an earlier article that I setup the register map of the PSoC4 as follows:
typedef  struct DataPacket {
    uint16 pressureCounts;
    int16 centiTemp; // temp in degree C / 100
    float depth;
    float temperature;
} __attribute__((packed)) DataPacket;
If I use the i2ctools to read some data from the PSoC4 like this:
pi@iotexpertpi:~/pyGetData $ i2cget -y 1 8 0 w
0x0196
pi@iotexpertpi:~/pyGetData $
I get 0x196 which is 406 in decimal. In my ADC I have it setup as 12-bits into 0-2.048v which means that it is 0.5mv per count in other words the ADC is reading .204v which is about .204V/51.1 ohm = 4mA also knowns as 0 PSI. OK that makes sense.
Now I create a program called testI2C.py.
import smbus

######################################################
#Read the data from the PSoC 4
######################################################
bus = smbus.SMBus(1)
address = 0x08

# The data structure in the PSOC 4 is:
# uint16_t pressureCount ; the adc-counts being read on the pressure sensor
# int16_t centiTemp ; the temperaure in 10ths of a degree C
# float depth ; four bytes float representing the depth in Feet
# float temperature ; four byte float representing the temperature in degrees C

numBytesInStruct = 12
block = bus.read_i2c_block_data(address, 0, numBytesInStruct)
print(block)
What I will do next is run the program to see what data it gets back from the Raspberry Pi. Then I will use the i2ctools to get the same data and compare to make sure that things are working.
pi@iotexpertpi:~/pyGetData $ python3 testI2C.py
[150, 1, 236, 14, 0, 0, 0, 0, 204, 204, 24, 66]
pi@iotexpertpi:~/pyGetData $ i2cget -y 1 8 0 w
0x0196
pi@iotexpertpi:~/pyGetData $
Hang on 150,1 isn’t 0x0196. Well yes it is because the data is in decimal and is little endian. When you switch it to hex and display it the same way you get 0x0196 same answer. Good.
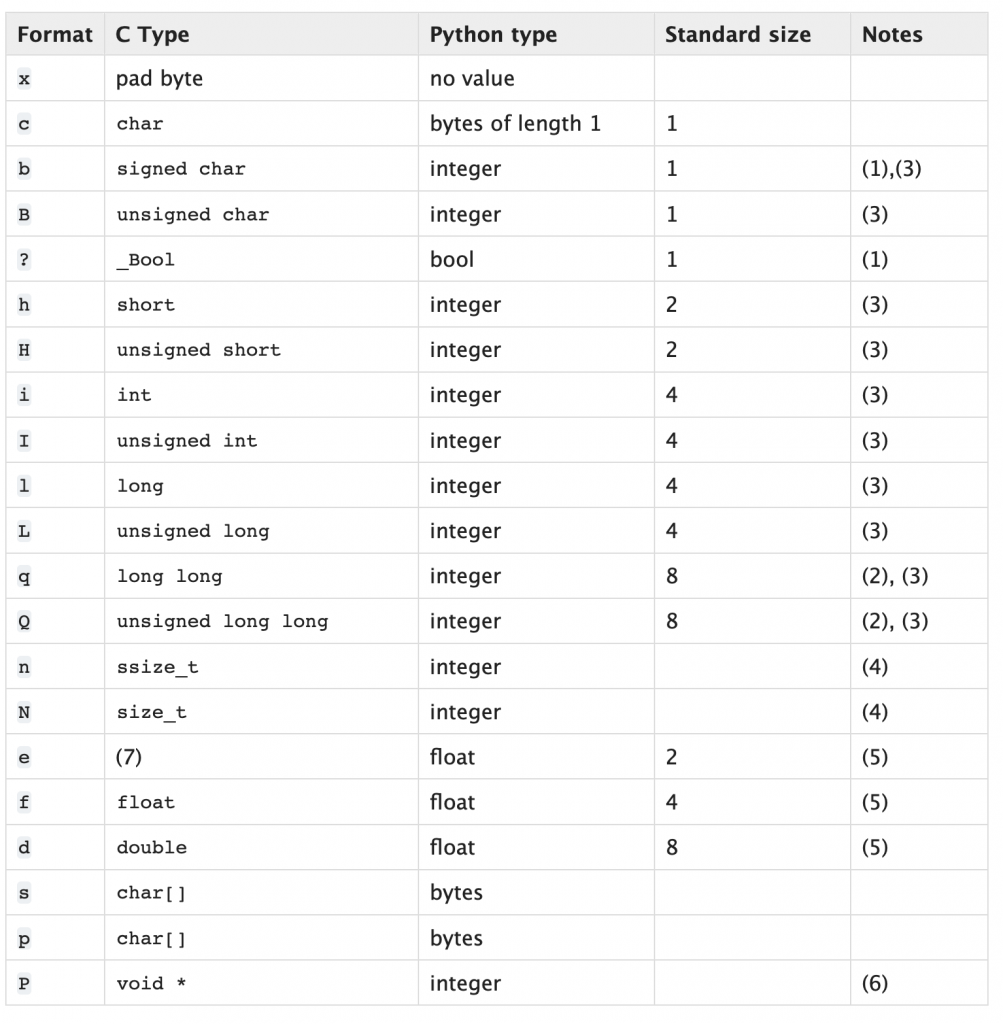
The next problem is that a list of bytes isn’t really that useful and you need to convert it to an array of bytes using the function “bytearray”. A bytearray also isn’t that helpful, but, Python has a library called “struct” which can convert arrays of bytes into their equivalent values. Think converting a packed C-struct of bytes into the different fields. You have to describe the struct using this ridiculous text format.
The first part of the code is as before. The only really new things are:
- On line 20 I convert and array of bytes into a bytearray
- On line 26 I unpack the byte array using the format string. You can see in the table above “h” is a signed 16-bit int. “H” is a unsigned 16-bit int. “f” is a four byte float.
The unpack method turns the bytes into a tuple. Here is the whole code.
import struct
import smbus

######################################################
#Read the data from the PSoC 4
######################################################
bus = smbus.SMBus(1)
address = 0x08

# The data structure in the PSOC 4 is:
# uint16_t pressureCount ; the adc-counts being read on the pressure sensor
# int16_t centiTemp ; the temperaure in 10ths of a degree C
# float depth ; four bytes float representing the depth in Feet
# float temperature ; four byte float representing the temperature in degrees C

numBytesInStruct = 12
block = bus.read_i2c_block_data(address, 0, numBytesInStruct)
print(block)
# convert list of bytes returned from sensor into array of bytes
mybytes = bytearray(block)
# convert the byte array into
# H=Unsigned 16-bit int
# h=Signed 16-bit int
# f=Float
# this function will return a tuple with pressureCount,centiTemp,depth,temperature
vals = struct.unpack_from('Hhff',mybytes,0)
# prints the tuple
print(vals)
When I run the program I get the raw data. Then the unpacked data. Notice the 406 which is the same value from the ADC as earlier.
pi@iotexpertpi:~/pyGetData $ python3 testI2C.py
[150, 1, 76, 14, 0, 0, 0, 0, 214, 71, 18, 66]
(406, 3660, 0.0, 36.570152282714844)
pi@iotexpertpi:~/pyGetData $
Install the AWS IoT Python Library
Now I want to send the data to AWS IoT using MQTT. All the time I have been using Python I have been questioning my sanity as Python is an ugly ugly language. However, one beautiful thing about Python is the huge library of code to do interesting things. Amazon is no exception, they have built a Python library based on the Eclipse Paho library. You can read about the library in the documentation.

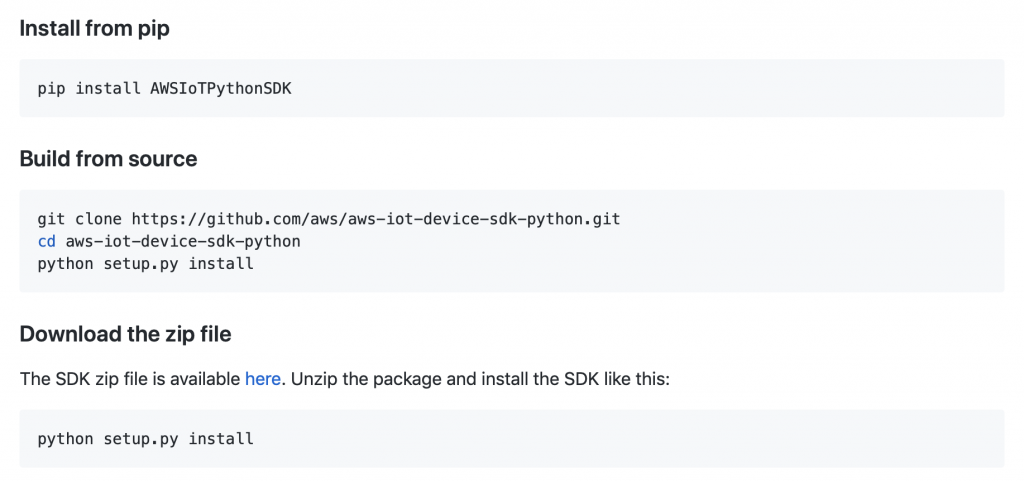
To get this going I install using “sudo pip3…”
pi@iotexpertpi:~ $ sudo pip3 install AWSIoTPythonSDK
Downloading/unpacking AWSIoTPythonSDK
  Downloading AWSIoTPythonSDK-1.4.7.tar.gz (79kB): 79kB downloaded
  Running setup.py (path:/tmp/pip-build-ajpr2imp/AWSIoTPythonSDK/setup.py) egg_info for package AWSIoTPythonSDK

Installing collected packages: AWSIoTPythonSDK
  Running setup.py install for AWSIoTPythonSDK

Successfully installed AWSIoTPythonSDK
Cleaning up...
pi@iotexpertpi:~ $
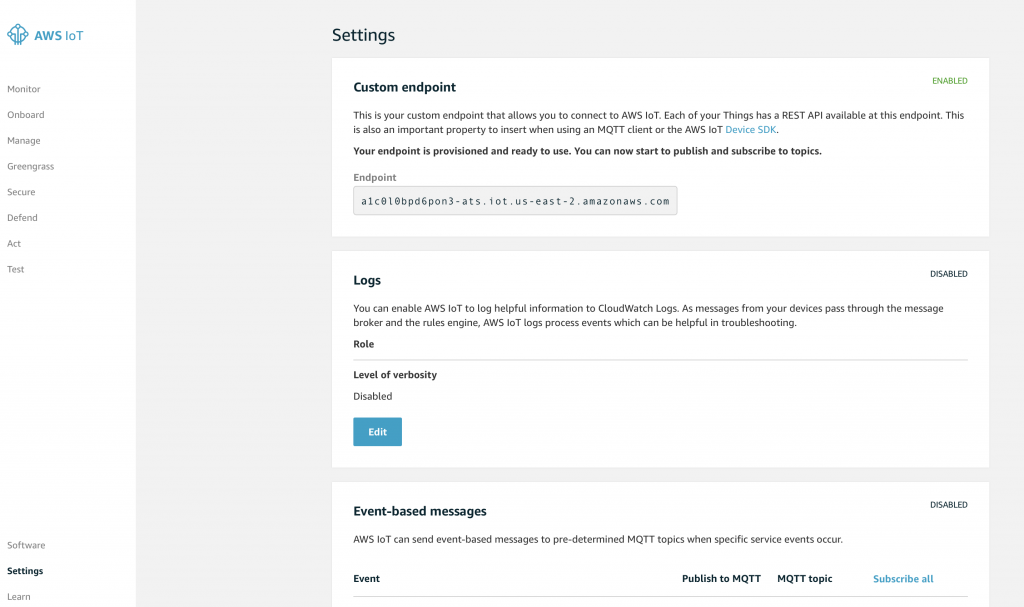
To use the library to connect to AWS you need to know your “endpoint”. The endpoint is just the DNS name of the virtual server that Amazon setup for you. This can be found on the AWS IoT management console. You should click on the “Settings” on the left. Then you will see the name at the top of the screen in the “Custom endpoint”
The next thing that you need is
- Your Thing Certificate (I hope you downloaded them when you had the chance)
- Your Thing Private Key
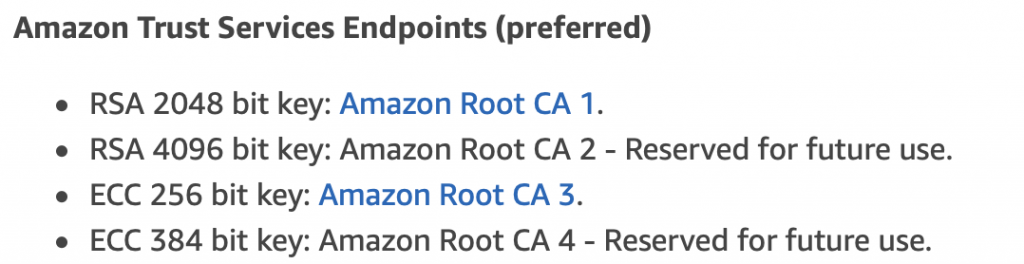
- The Amazon Root CA which you can get on this page You should choose “Amazon Root CA 1”
The program is really simple. On lines 7-13 I just setup variables with all of the configuration information. Then I create a JSON message by concatenating all of the stuff together that I read from the PSoC 4. Lines 18-20 setup an MQTT endpoint with your credentials. Line 22 opens the MQTT connection. And finally line 21 Publishes the message.
from AWSIoTPythonSDK.MQTTLib import AWSIoTMQTTClient

######################################################
# Send Data to AWS
######################################################

host = "a1c0l0bpd6pon3-ats.iot.us-east-2.amazonaws.com"
rootCAPath = "../aws-keys/AmazonRootCA1.pem"
certificatePath = "../aws-keys/a083ad1cff-certificate.pem.crt"
privateKeyPath = "../aws-keys/a083ad1cff-private.pem.key"
port = 8883
clientId = "applecreek"
topic = "$aws/things/Test1/shadow/update"

# Shadow JSON Message formware
messageJson = '{"state":{"reported":{"temperature":' + str(vals[3]) +',"depth": ' + str(vals[2]) + ',"thing":"applecreek"}}}'

myAWSIoTMQTTClient = AWSIoTMQTTClient(clientId)
myAWSIoTMQTTClient.configureEndpoint(host, port)
myAWSIoTMQTTClient.configureCredentials(rootCAPath, privateKeyPath, certificatePath)

myAWSIoTMQTTClient.connect()
myAWSIoTMQTTClient.publish(topic, messageJson, 1)
Now that I have the Python program, I want to plumb it into the rest of my stuff. On my RPI I run “crontab -l” to figure out what my collect data program is. That turns out to be “runI2C” which appears to run every two minutes.
0,2,4,6,8,10,12,14,16,18,20,22,24,26,28,30,32,34,36,38,40,42,44,46,48,50,52,54,56,58 * * * * /home/pi/getCreek/runi2c
I edit the runI2C shell script and add on my python program.
#!/bin/sh
cd ~pi/getCreek
sudo java -cp build/jar/getCreek.jar:classes:./lib/* CreekServer GetData
cd ~pi/pyGetData
python3 pyGetData.py
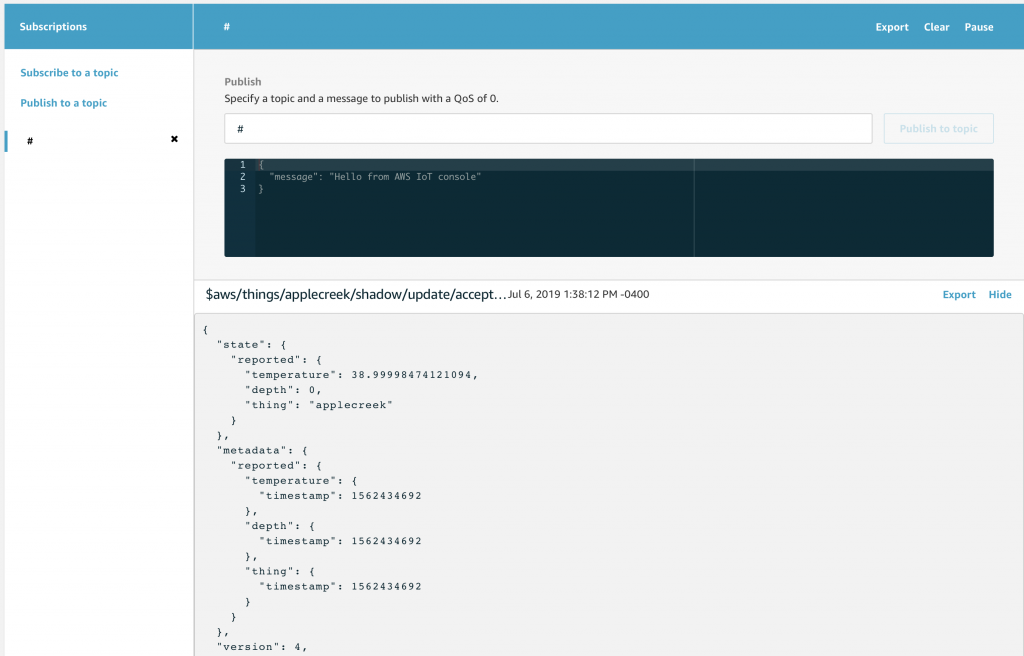
Finally we are ready for the moment of truth. Log into the console and start the test client. Subscribe to “#” and after a bit of time I see that my publish happened and it was accepted into the Device Shadow of my Thing.
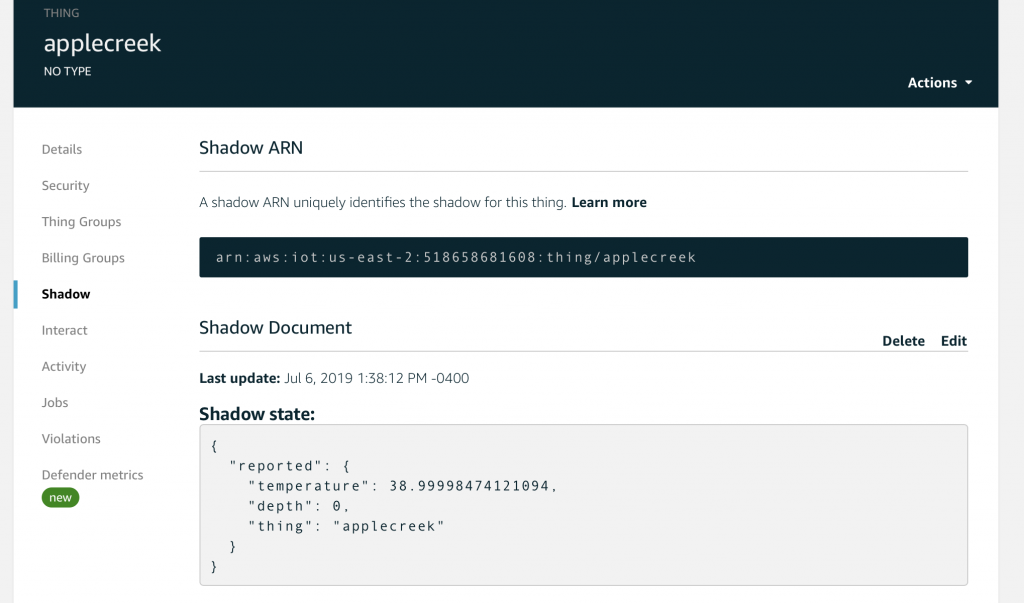
Here is the device shadow
Here is the whole program
import struct
import sys
import smbus
from AWSIoTPythonSDK.MQTTLib import AWSIoTMQTTClient

######################################################
#Read the data from the PSoC 4
######################################################
bus = smbus.SMBus(1)
address = 0x08

# The data structure in the PSOC 4 is:
# uint16_t pressureCount ; the adc-counts being read on the pressure sensor
# int16_t centiTemp ; the temperaure in 10ths of a degree C
# float depth ; four bytes float representing the depth in Feet
# float temperature ; four byte float representing the temperature in degrees C

numBytesInStruct = 12
block = bus.read_i2c_block_data(address, 0, numBytesInStruct)

# convert list of bytes returned from sensor into array of bytes
mybytes = bytearray(block)
# convert the byte array into
# H=Unsigned 16-bit int
# h=Signed 16-bit int
# f=Float
# this function will return a tuple with pressureCount,centiTemp,depth,temperature
vals = struct.unpack_from('Hhff',mybytes,0)
# prints the tuple
print(vals)

######################################################
# Send Data to AWS
######################################################

host = "a1c0l0bpd6pon3-ats.iot.us-east-2.amazonaws.com"
rootCAPath = "../aws-keys/AmazonRootCA1.pem"
certificatePath = "../aws-keys/a083ad1cff-certificate.pem.crt"
privateKeyPath = "../aws-keys/a083ad1cff-private.pem.key"
port = 8883
clientId = "applecreek"
topic = "$aws/things/applecreek/shadow/update"

# Shadow JSON Message formware
messageJson = '{"state":{"reported":{"temperature":' + str(vals[3]) +',"depth": ' + str(vals[2]) + ',"thing":"applecreek"}}}'

myAWSIoTMQTTClient = AWSIoTMQTTClient(clientId)
myAWSIoTMQTTClient.configureEndpoint(host, port)
myAWSIoTMQTTClient.configureCredentials(rootCAPath, privateKeyPath, certificatePath)

myAWSIoTMQTTClient.connect()
myAWSIoTMQTTClient.publish(topic, messageJson, 1)
No comment yet, add your voice below!