Summary
In order to interact with AWS you need some basic understanding of how the Amazon Virtual Private Cloud (VPC) fits together. I generally find that writing things down is a huge help in cementing my understanding of a topic. For me, that is the point of this article, making sure that I understand how the AWS VPC fits together. I will preface all of this by saying that I am hardly an AWS networking expert so your mileage may vary but I hope that it helps you understand. For some reason, I mostly dug around inside of the AWS console to figure it out before I realized that there is a huge amount of documentation and tutorials out there. At the end of this article I will link to the documentation etc. that I thought was useful.
The sections of this article are:
- Overview of AWS VPC Architecture
- Region
- VPC
- Availability Zone
- Subnet
- Internet Gateway
- Routing Table
- Network ACLs
- Security Group
- Subnet group
- A Stern Warning
- Documentation and References
Overview of AWS VPC Architecture
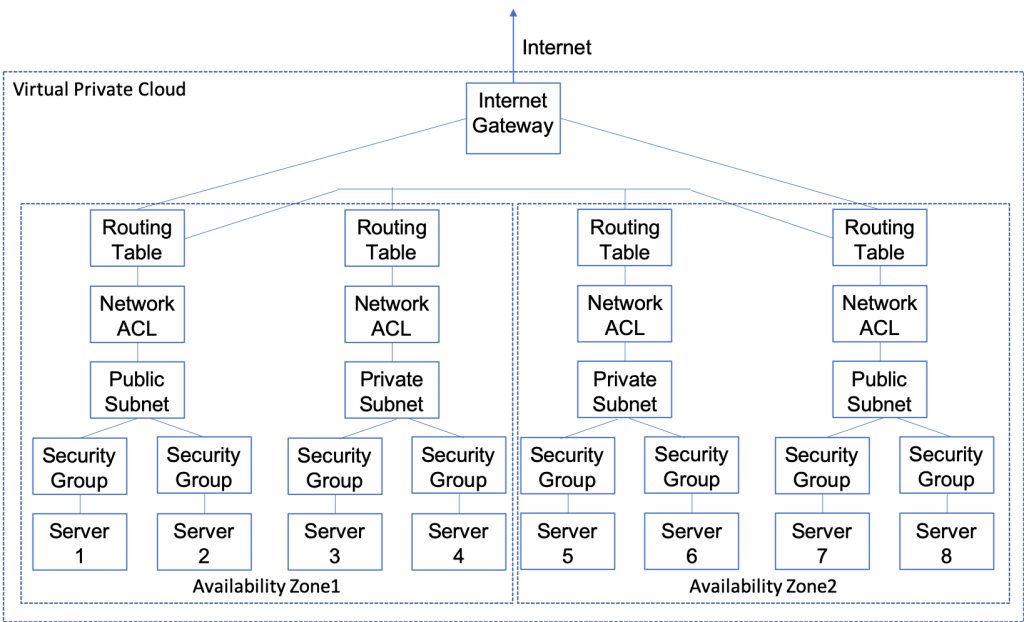
Amazon Web Services (AWS) is divided into 16 Regions (for now). In any Region, you can create a Virtual Private Cloud (VPC) essentially a private network for you to attach AWS services to e.g. EC2 or RDS. In each Region there are several Availability Zones, which you can think of as completely independent, physically separate, redundant computer rooms. Although these Availability Zones are independent, they are also closely linked from a network standpoint. A subnet is just a IP address range of a related group of servers that must fit completely in one unique Availability Zone. In your VPC you should have at least one subnet per Availability Zone . Each subnet is connected to your VPC by a routing table which can be shared by one or more subnets. In other words, your subnets are connected together via routers and you control the routing tables. Your VPC can be connected to the public internet via up to one Internet Gateway. In the routing table, you optionally specify a route to the public internet, which creates a public subnet. If there is no route to the internet then the subnet is considered a private subnet. Each subnet has an optional Network Access Control List (ACL) which allows you to secure that subnet by IP address and IP Port number. A security group is an instance (server) level of access control – just like a ACL but on a server by server level. It is called security group because you can apply the same list of rules to multiple servers. Missing from the diagram is a subnet group. A subnet group is a just a named list of subnets. Subnet groups are used by some of the AWS systems e.g. RDS to choose which subnets to attach to. I will talk in more details about them in the RDS article.
The picture below is a LOGICAL diagram to show how data flows inside of the VPC. You can see that I have two availability zones, each with a public and a private subnet. Each subnet has it’s own routing table and network access control list. And there is one Internet gateway which is routed to the two public subnets. There are 8 servers which are attached two each of the subnets. Each server has a security group. The main point of all of this is that for devices to talk all of these things need to be configured correctly.
- Internet gateway
- Routing tables
- Network ACLs
- Security Groups
I guess the good news is that when you create an AWS account it default configures all of this stuff to a semi-sensible starting point.
Region
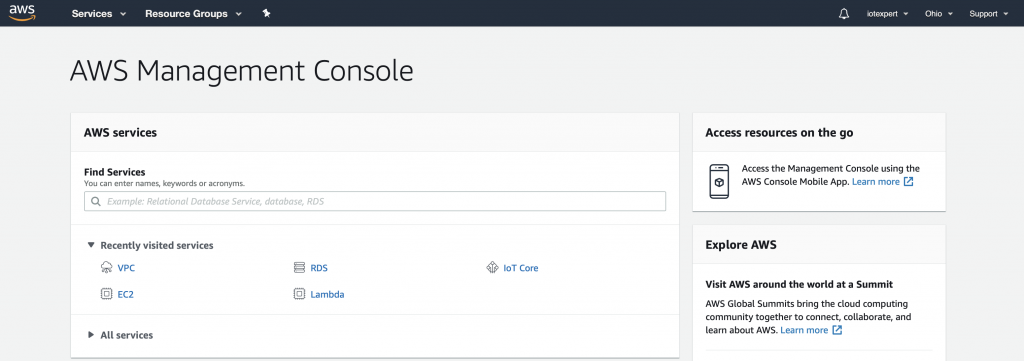
When you create your AWS account Amazon will select a default region for you. When you are logged into the console you can see your region in the upper right. In this case my region is Ohio.
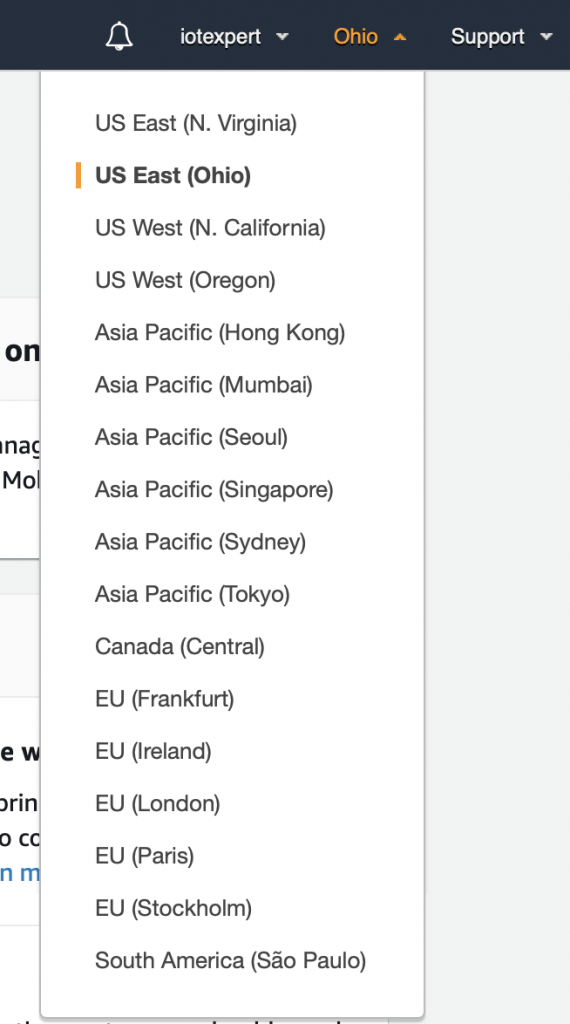
When you click on the region you can see all of the available regions. Currently, there are 16 of them.
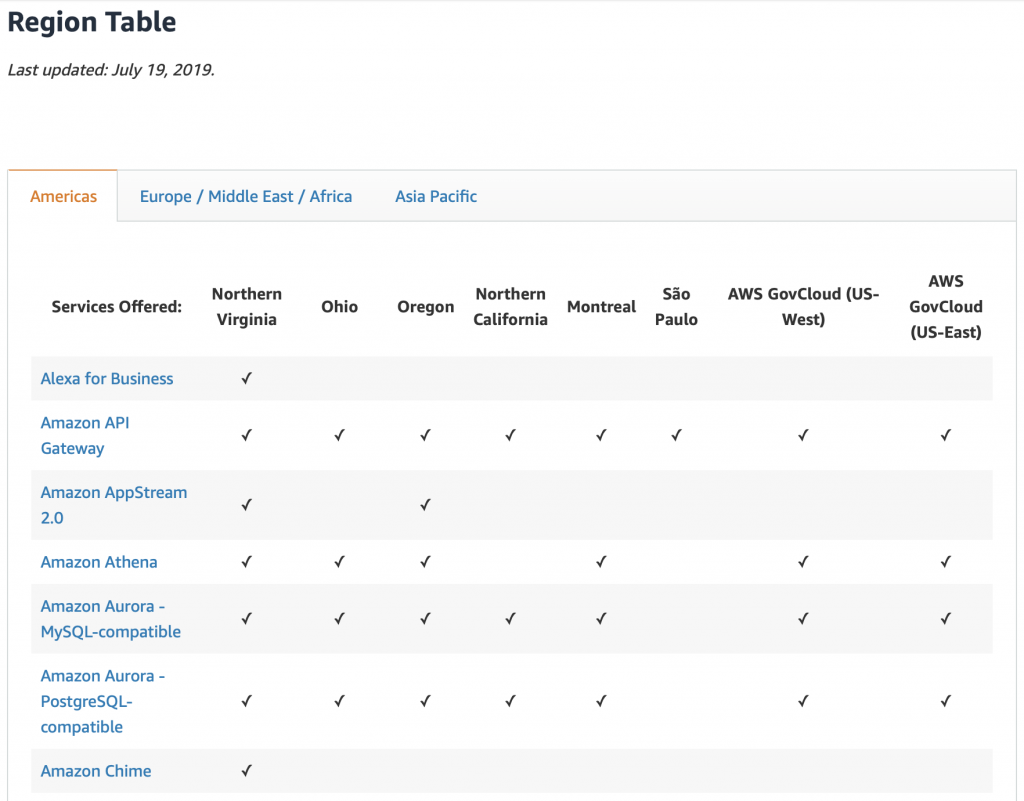
Each region has different services available. You can see the whole list here. But this is a snapshot of the top of that page.
Virtual Private Cloud (VPC)
The Amazon marketing material has a nice description of the VPC. “Amazon Virtual Private Cloud (Amazon VPC) lets you provision a logically isolated section of the AWS Cloud where you can launch AWS resources in a virtual network that you define. You have complete control over your virtual networking environment, including selection of your own IP address range, creation of subnets, and configuration of route tables and network gateways. You can use both IPv4 and IPv6 in your VPC for secure and easy access to resources and applications.”
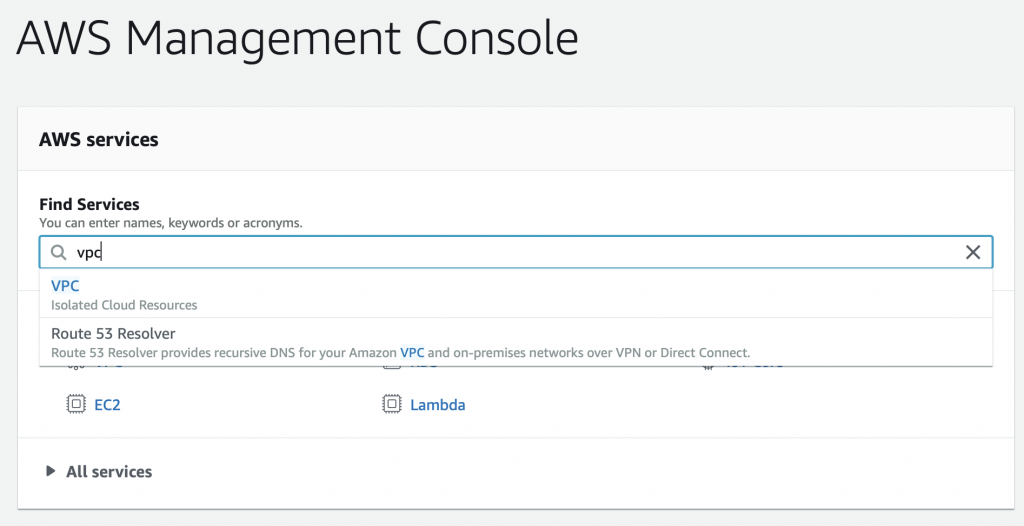
In any one region you can have up to 5 separate VPCs (at least without special $$s to Amazon). Each VPC has a control console that lets you edit, update, and manage the configuration of your VPC. You can get to it from the AWS management console. Search for VPC.
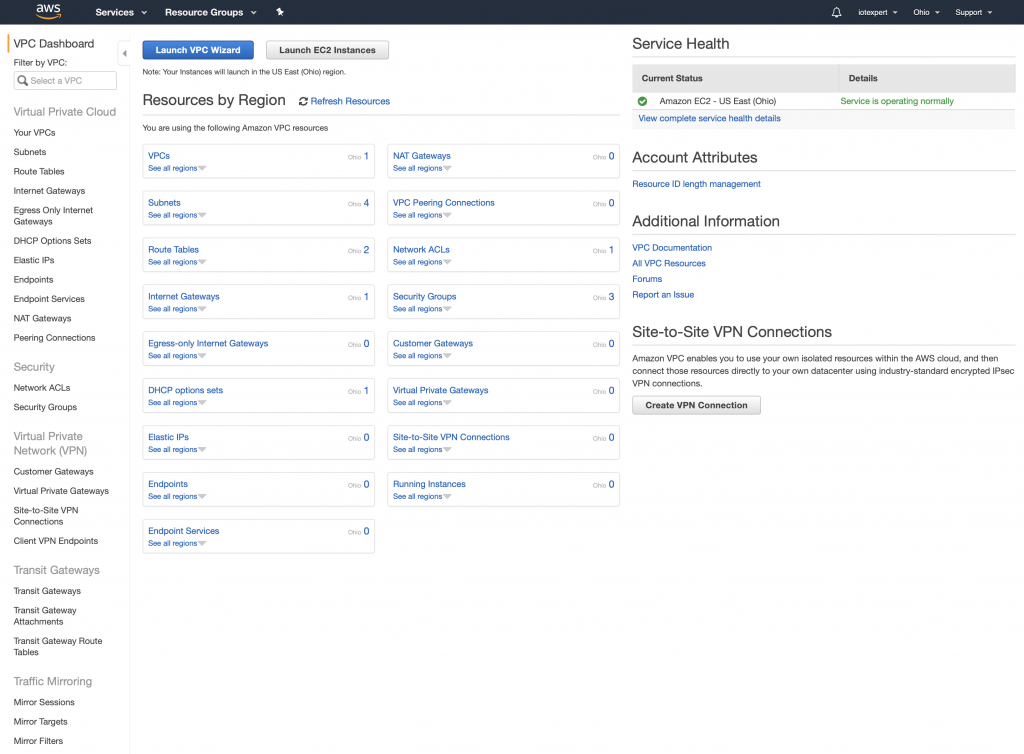
When you get there it should look something like the picture below. Notice down the left side of the screen are the different sections to control the various attributes of your VPC. In the picture you can see that I have 1 active VPC and it is in Ohio. My VPC has 4 subnets, 2 routing tables, 1 internet gateway, 1 network ACL, 3 security groups etc.
In the console when you click on “Your VPCs” you will see a screen that looks like the one below. When you signed up, Amazon automatically created a VPC for you in the region that you selected. Which you probably didn’t realize – or at least I didn’t realize at the time. The VPC console gives you information about your VPC including
- CIDR IPV4 Networking information (in CIDR Blocks)
- DHCP Options
- Routing Table (i.e. the default routing table)
- Network ACLs
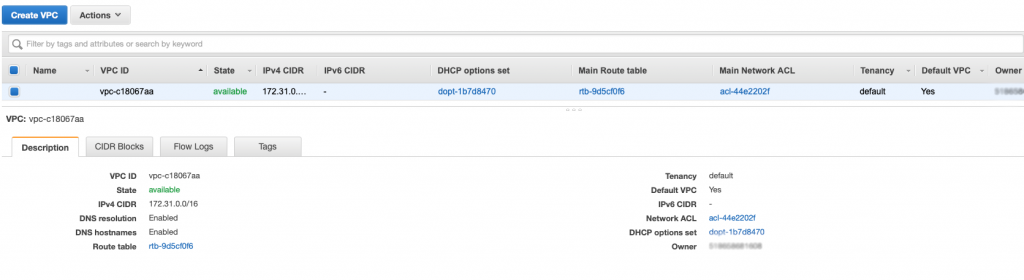
If you want to create a new VPC the only information you really need is what network do you want to use. When the original VPC was created by Amazon, the default picks are a private network range, 172.31.0.0/16. I know that you can also create network in the 10.0.0.0. Your network must have 16-bits of network address.
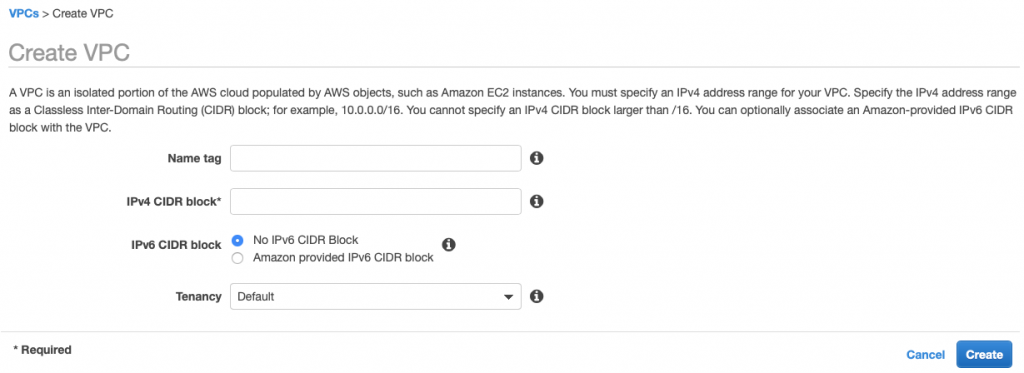
If you decide to create your own VPC you will basically only need the IPv4 CIDR (aka network) for your VPC.
Availability Zone
The AWS documentation says that “… Availability Zones are the core of our infrastructure architecture and they form the foundation of AWS’s and customers’ reliability and operations. Availability Zones are designed for physical redundancy and provide resilience, enabling uninterrupted performance, even in the event of power outages, Internet downtime, floods, and other natural disasters.”
Each Region has several availability zone that are closely connected but isolated. I am using the Ohio Region (aka us-east-2) which has three availability zones:
- us-east-2a
- us-east-2b
- us-east-2c
There is no sub-menu for Availability Zones. The way you control the Availability Zones is by creating subnets in the intended Availability Zone and then assigning resources to the intended subnet. In order to control your subnets click on “Subnets”…
Subnet
… which will put you on a subnet screen that looks like this:
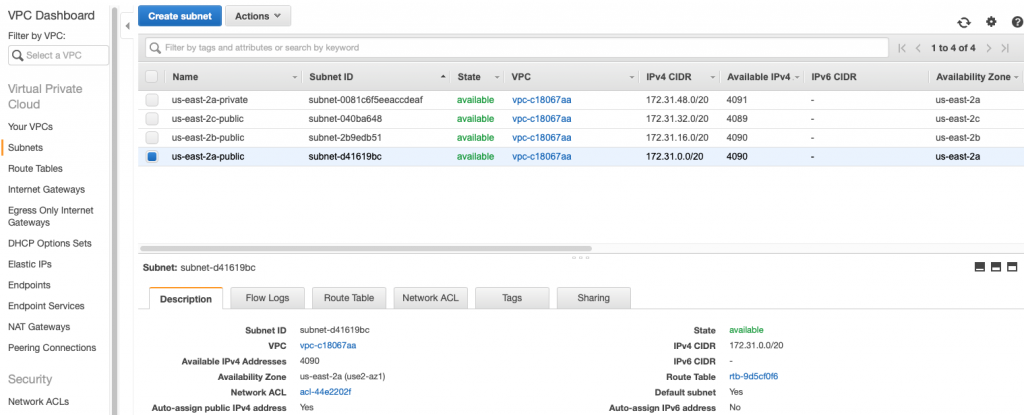
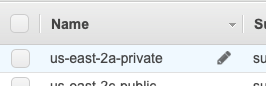
Notice that I have four subnets. Three of them were created automatically for me by Amazon (the ones with the short Subnet IDs). The “name” of the subnet is assigned by you, or in this case, were assigned by me. When you hover over the name of the subnet it will put a little pencil icon on the name. When you click it, you will be able to type a new name for the subnet. The names don’t mean anything in the system. They are for your use only when you are assigning resources etc.
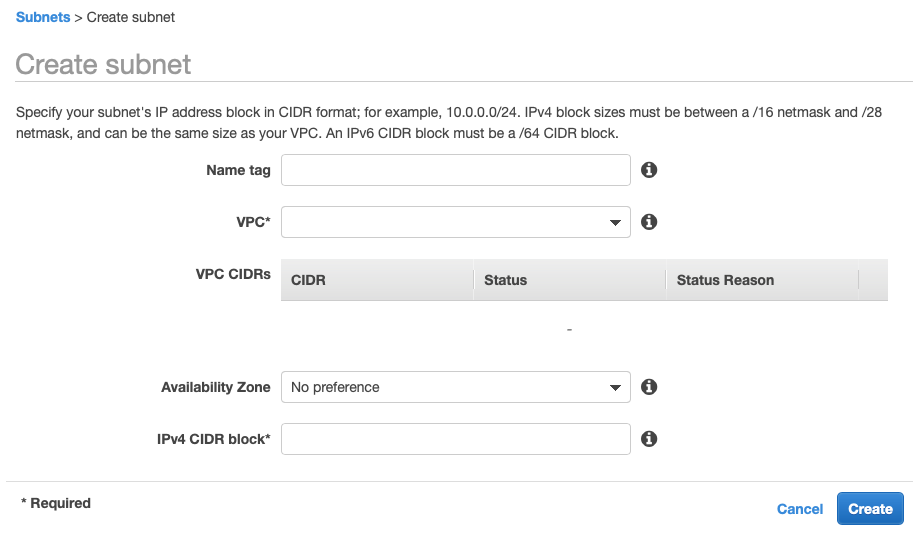
When you create a subnet you will need to specify the network CIDR range. Notice that all of mine are 20-bit network addresses starting with 172.31.0.0 and going up from there. To add a new subnet click on “Create Subnet” where you will brought to a screen like this. The two really interesting things on this screen are your ability to specify the network CIDR, and the Availability Zone. A subnet must reside completely in one Availability Zone.
Internet Gateway
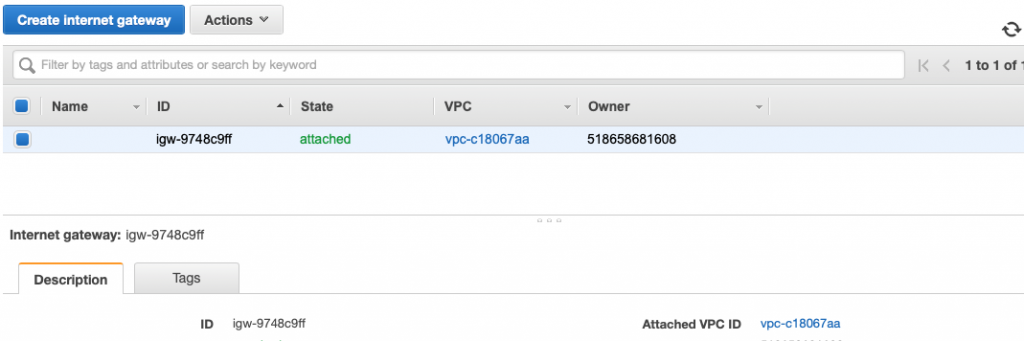
You can think of the internet gateway as a device that is attached to your VPC network. Each of the subnets are allowed to route packets to the Internet Gateway. When you configure the routing tables for your subnets, you will specify the internet gateway as the destination for packets that you want to go out onto the network e.g. 0.0.0.0/0 (meaning any device). In terms of configuration, there isn’t much, just tags which are used only for your searching purposes. The last thing of note with the internet gateway is that there can be only one attached to your VPC.
Routing Table
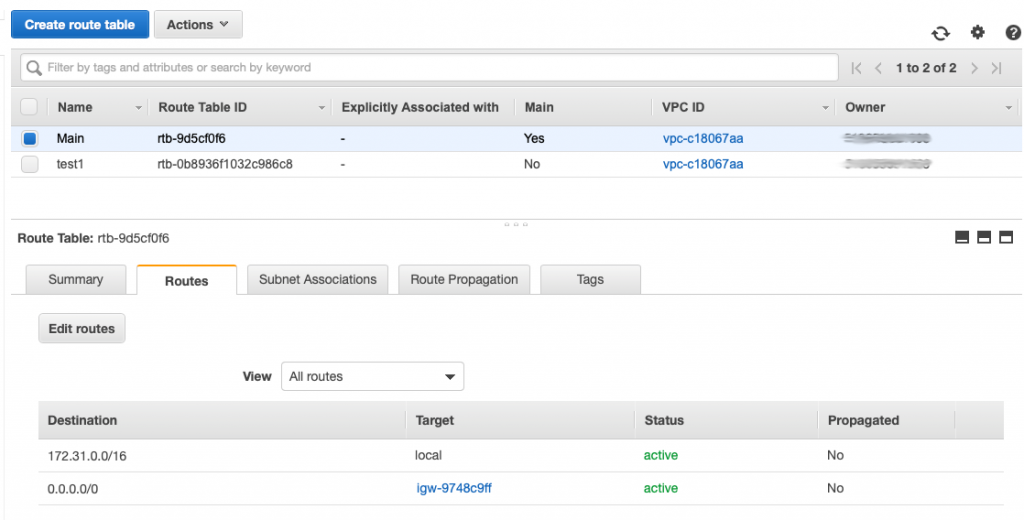
When you click on Routing Table, you will see a page like this one. You can see in the picture that I have two routing tables. The first one is called “Main” and is amazingly enough called the “Main” routing table, imagine that. You can see the routes at the bottom of the picture. The first one say that all of the 172.31.0.0/16 routes are local. The second route says that any packets going to 0.0.0.0/0 (meaning any device on the network) should be sent to the internet gateway.
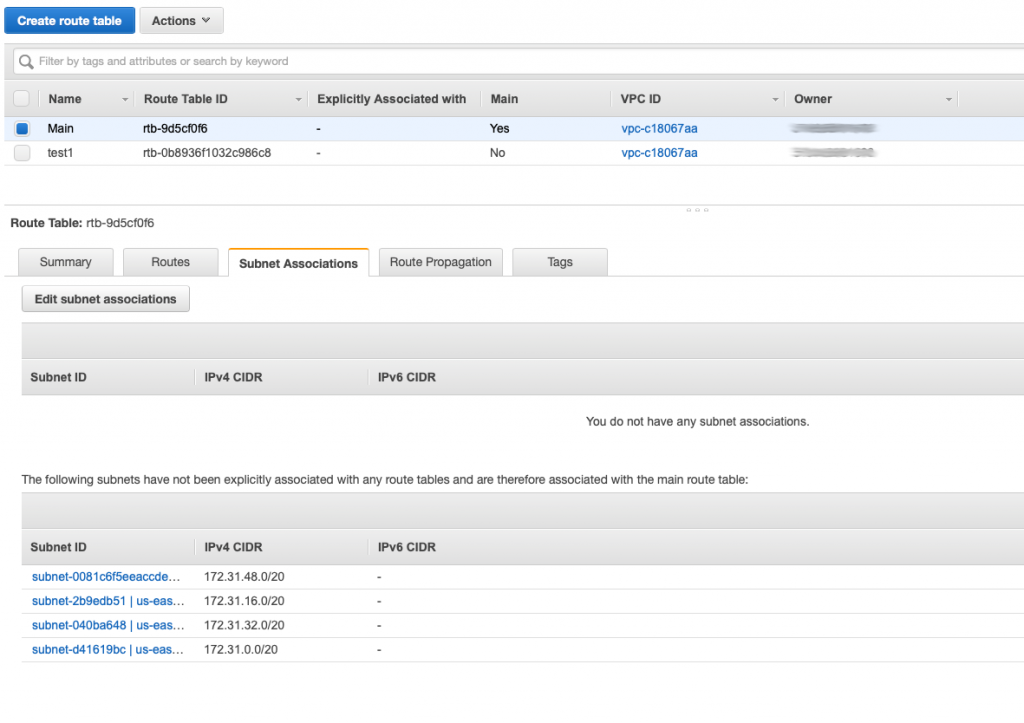
This routing table probably should have been called the default routing table as it is by default attached to all of the subnets in your network. When you click on the “Subnet associations” you can see that it is by default attached to all of the subnets in my network. When a subnet is not explicitly attached to a network by you then it adopts the Main routing table.
By definition any subnet that is attached to a routing table that has a route to the internet gateway is called “Public” and any subnet that doesn’t have a route to the internet is called “Private”. Why would you want a private network? Simple, imagine that a database server should only be accessed by servers that are in your VPC and should not be accessible by devices on the public internet.
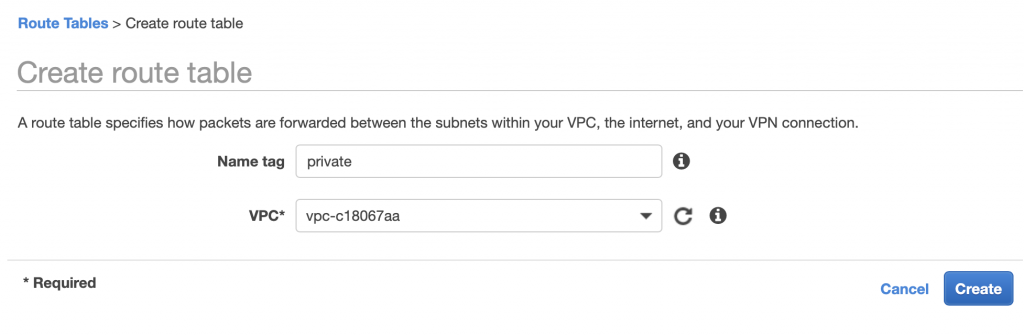
If I wanted to create a “private” routing table I would first click create and then give the new table a name. In this case “private”
After I click “Create” I will have the net routing table. You can see it in the picture below.
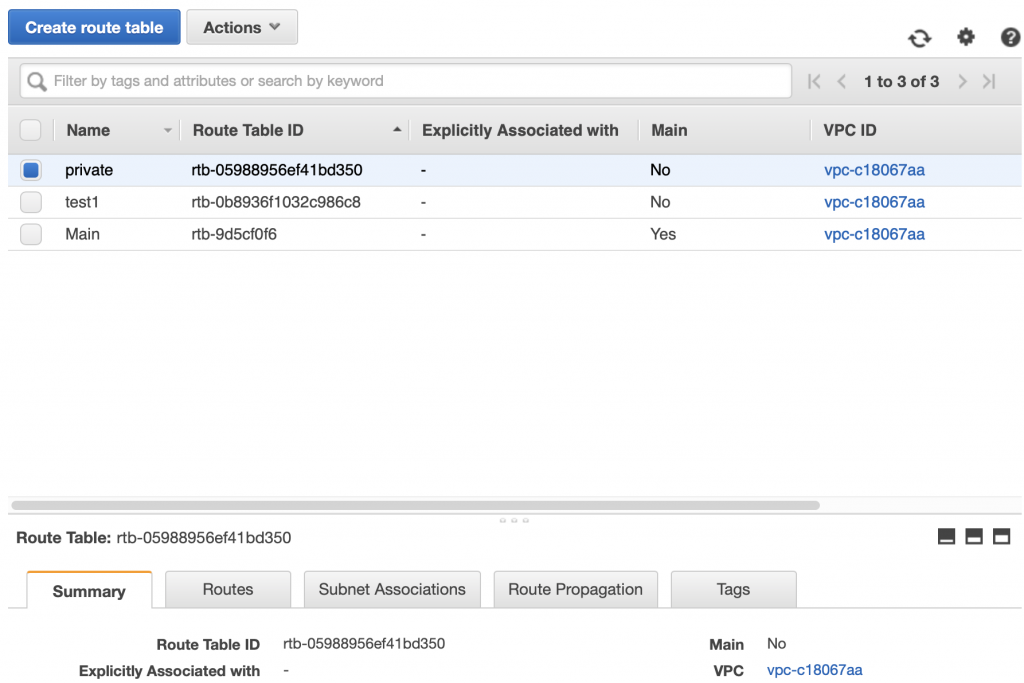
When you click on the routes, you can see that be default it creates a “local” only route. Giving this subnet access to only the local subnets.

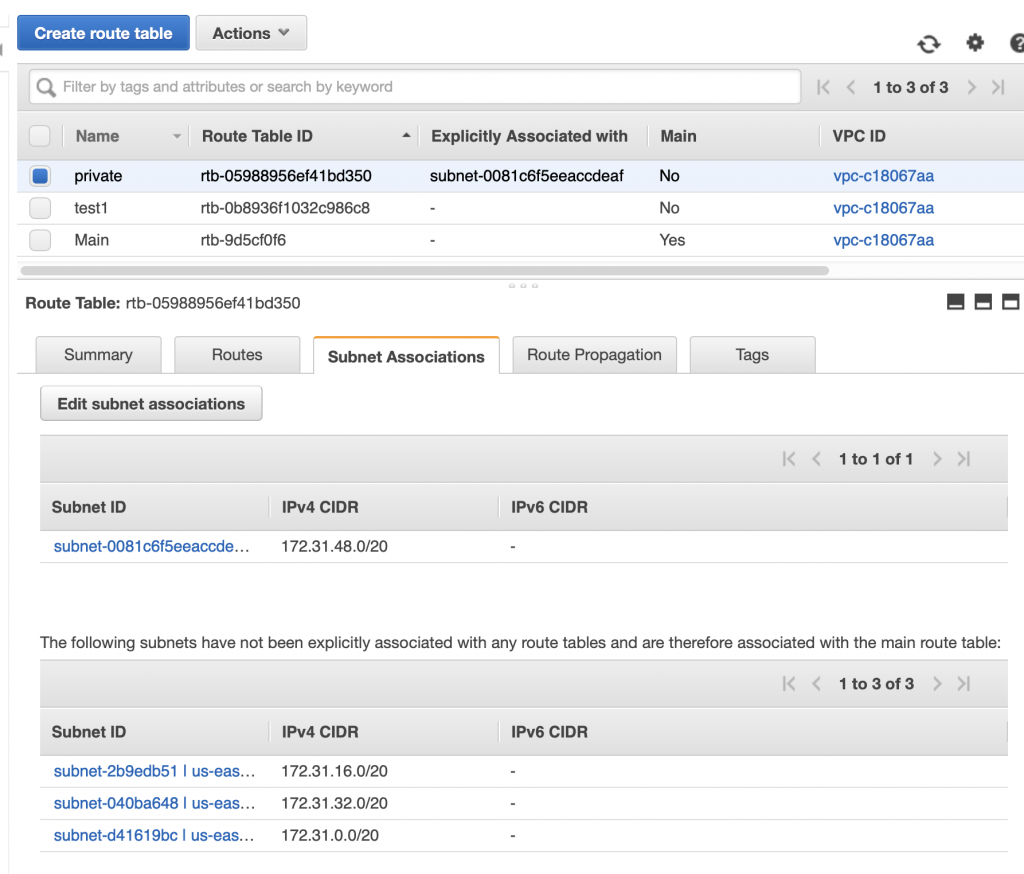
By default a subnet is not associated with any routing table. Which means that by default it uses the “Main” routing table. If you want to associate the subnet with a specific routing table then you click on the “Subnet Associates” tab then “Edit subnet associations”

Now you can select a subnet to associate with the routing table, then “Save”
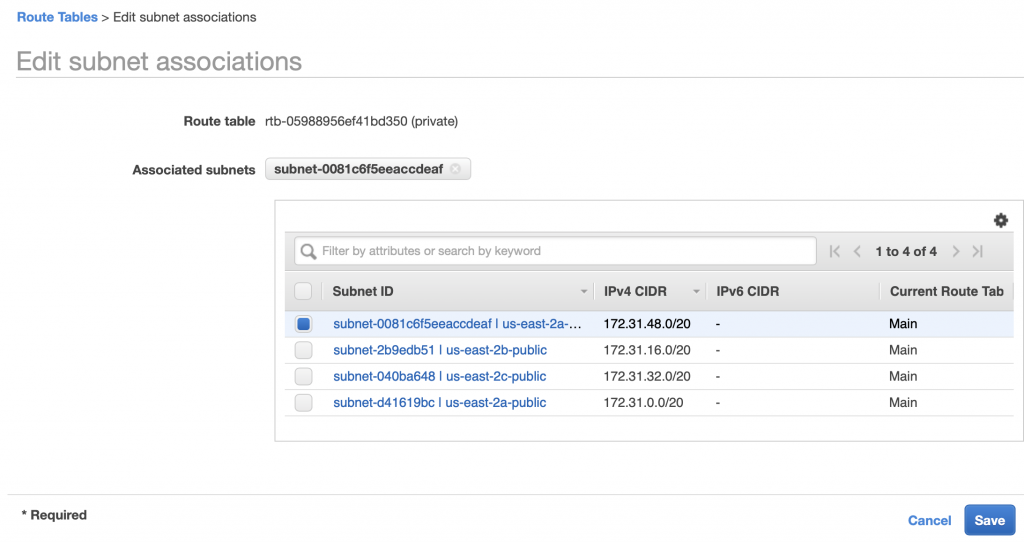
When it comes back to the main routing table page you can see that “private” is now associated with subnet “subnet-0081…”. To bad that the interface doesn’t show the name of the subnet instead of the subnet id.
Network ACLs
After the routing table, which limits outgoing traffic on a subnet, the next layer of security is the Network Access Control List (ACL or NACL). The ACL is just a list of IP addresses/Port pairs that are legal (allowed) or illegal (deny). You can think of the ACL as a firewall for the subnet. When a packet is inbound or outbound from a subnet, the ACL rules are evaluated one by one, starting with the lowest number, and going until a rule is matched. The final rule is a “deny” meaning, if there isn’t a match then the packet is by default a deny. Some features of the ACL include:
- NACLs are optional
- NACLs are applied to 0 or more subnets (you can use the same NACL for more than one subnet)
- There is a default NACL which is by default associated with every subnet
- You can control access with BOTH routing tables and/or NACLs and/or Security Groups
- There are separate inbound rules and outbound rules
The default has ALLOW for everything on Inbound and Outbound … here is what it looks like in the control panel.
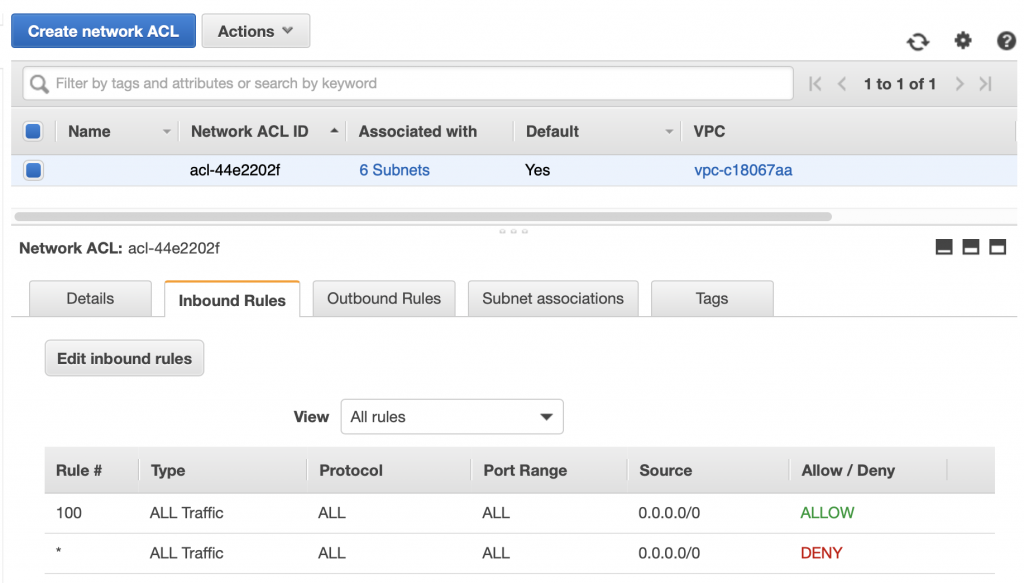
You can add/edit/change the rules by clicking on Edit Inbound Rules.
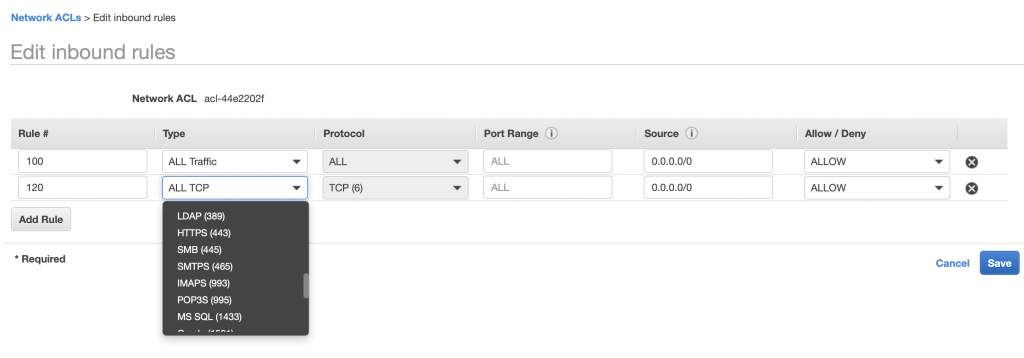
You need to specify a:
- Rule # which much be less than 32768 and is used to specify the execution order (lowest–>highest)
- The Rule #s should increase and you leave gaps so you can come back and add more
- The Type – there is a big list of Types (which will automatically fill out the port) or you can completely specify it
- The Source address
It is tempting to make these rules very promiscuous. Don’t do it. You should make them as constrained as possible.
Security Group
The last level of security in the AWS VPC architecture is the Security Group. A security group is an instance level firewall. Meaning you can write inbound and outbound port level rules that apply to a SPECIFIC server instance in your system. A security group can be applied to more than one server, meaning it can be generic to a function. For example you might make a security group for MySQL servers that restricts all incoming connections to port 3306. Every server instance in your VPC belongs to a security group by default when you create it.
The security groups has a a console in the VPC console. In the picture below you can see that I have three security groups. The interesting thing is that the first two security groups were created automatically by the Relational Database Server system when I made two MySQL databases.
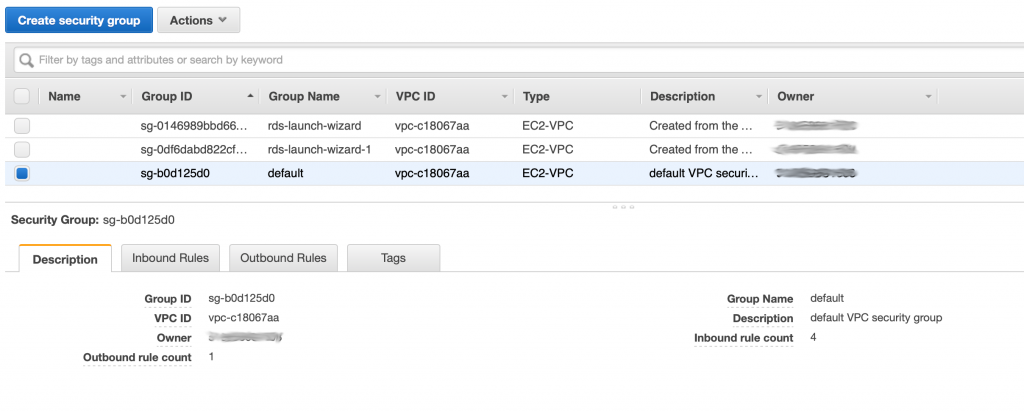
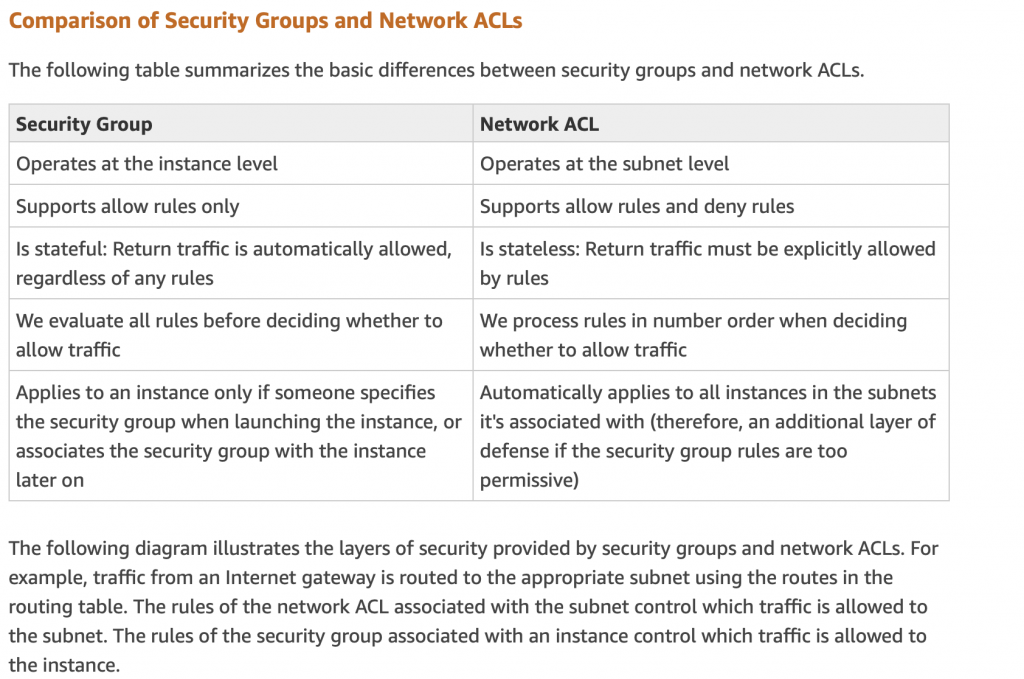
When I looked at all of this originally I wondered what is the difference between Security Group and NACL. Amazon answers this question nicely in their documentation:
Subnet Group
A subnet group is just a list of subnets from one up to the total list of subnets in your VPC. The subnet group is NOT listed as an attribute of the VPC on the console. However, it is used by the the Relational Database Server (RDS) setup screens. When you create a new RDS MySQL database it will ask you which subnet group to assign the server to. RDS will then pick one of the subnets and attach your server. You need to think about the subnet groups in advance or you will end up with an RDS instance on the wrong subnet.
There is a default subnet group which has all of the subnets in your VPC at the time of creation. It does NOT add subnets to your “default” subnet group when you add new subnets.
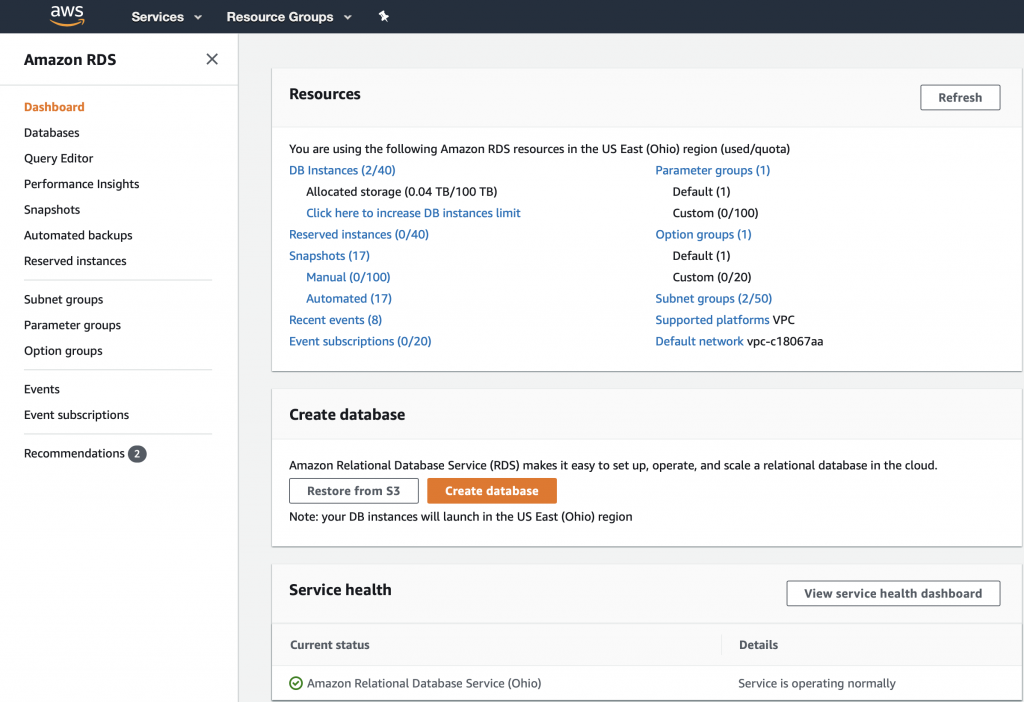
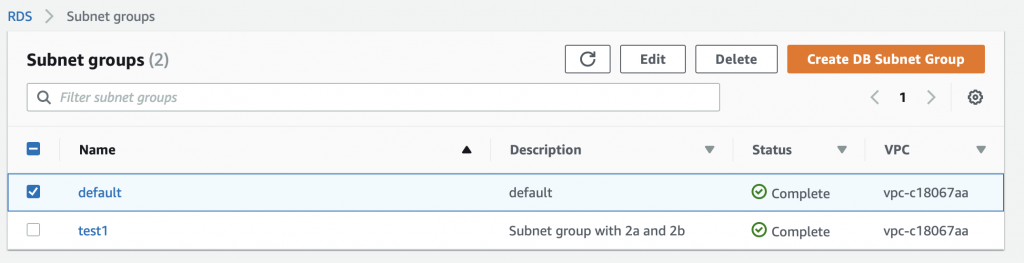
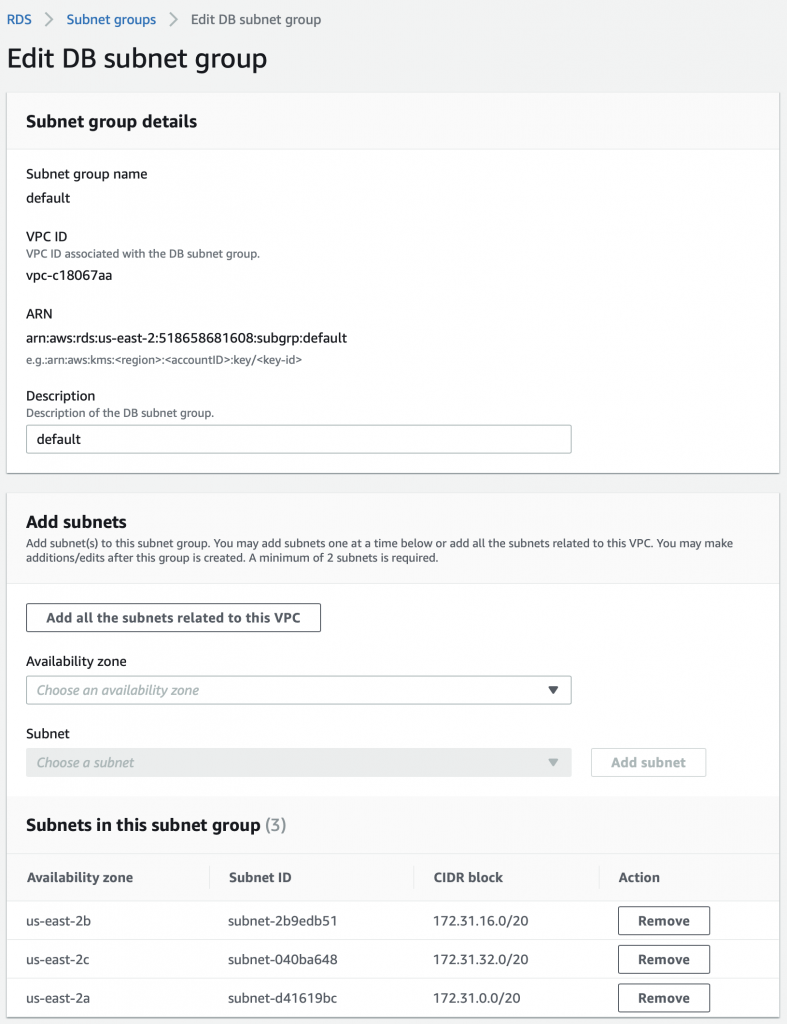
To edit the Subnet Groups you need to go to the Amazon RDS dashboard. Then you click “Subnet groups”. You can see in the picture below that I currently have 2 subnet groups.
On the subnet group screen you can edit or create subnet groups.
On the Edit screen you can Add or Remove subnets (or potentially filter the list to regions)
A Stern Warning
Although it seems like a terrible idea to put a section called “A Stern Warning” at the very end of a discussion, I did this because without understanding everything else the warning doesn’t make sense.
It is almost impossible to move servers between subnets once they are created. That means YOU HAD BETTER PLAN YOUR SUBNETS BEFORE YOU CREATE SERVERS or you will find yourself roasting in HELL.
I got lulled into a sense of security because Amazon did such a good job setting things up by default. But, when I decided to have Public/Private subnets I already had servers turned on in subnets. This made getting everything unwound a real pain in the ass. On the internet there is quite a bit of conversation about how to move RDS MySQL servers and EC2 instances. All of the options suck so it is better to design it right from the outset. Imagine that.
Documentation and References
| Resource | Notes |
|---|---|
| Amazon VPC Documentation | |
| Amazon VPC Security | |
| AWS Essentials Course Material | |
| AWS Essentials YouTube |
4 Comments
But why would I want to go thru all the pain of setting up a AVPC? What’s the point?
Maybe more to the point, what does it cost?
Id say that there is a whole bunch of ROI issues surrounding deploying application to the Cloud… including this one. There is a huge amount of territory between running a Raspberry Pi in your barn and running a VPC at amazon… I suppose those are approximately the two extremes with a lot of ground between them.
There is a reason why Jeff Bezos is the richest dude on the face of the planet… and a big part of that is AWS.
I think to really answer your question you need to start with how many 9’s are enough?
For running creek depth… clearly overkill … but it does make a nice example.
Alan
Hey Alan, stumbled on your blog, it looks great! I just started AWS exploration, and I’m trying to put the concepts together on remote connections. Traditionally, you would have a VPN router that is connected to your devices, such as PLC, sensors etc, sitting behind said router, to connect to it remotely. It seems like this VPC is the “new” way? conceptually? but I feel like you still need some router or that would need to connect to the VPC, so I say, what’s the point. I must be missing something to grasp why VPC should be more “superior”.
I’m familar with the Edge gateway, where said devices are polled and using MQTT to publish to IOT core or broker, but I can’t put my finger how to NOT do the VPN thing.
Yes… you need to have devices behind a firewall.
I think that you have a couple of options… one is to VPN into the VPC as you say.
Alan