Summary
In this article I explain how to use a PSoC 6 SCB to implement I2C Detect.
Recently, I wrote about using the Raspberry PI I2C bus master to talk to a PSoC 4 I2C Slave. In that project I used a program on the Raspberry Pi called “I2CDetect” which probes the I2C bus and prints out devices that are attached. Here is what the output looks like:
pi@iotexpertpi:~/pyGetData $ i2cdetect -y 1
     0  1  2  3  4  5  6  7  8  9  a  b  c  d  e  f
00:          -- -- -- -- -- 08 -- -- -- -- -- -- --
10: -- -- -- -- -- -- -- -- -- -- -- -- -- -- -- --
20: -- -- -- -- -- -- -- -- -- -- -- -- -- -- -- --
30: -- -- -- -- -- -- -- -- -- -- -- -- -- -- -- --
40: -- -- -- -- -- -- -- -- -- -- -- -- -- -- -- --
50: -- -- -- -- -- -- -- -- -- -- -- -- -- -- -- --
60: -- -- -- -- -- -- -- -- -- -- -- -- -- -- -- --
70: -- -- -- -- -- -- -- --
pi@iotexpertpi:~/pyGetData $
You can do this same thing by using the bridge control panel (which comes as part of PSoC Creator). I have used this program a bunch of times on this blog and you can search for all of those here.
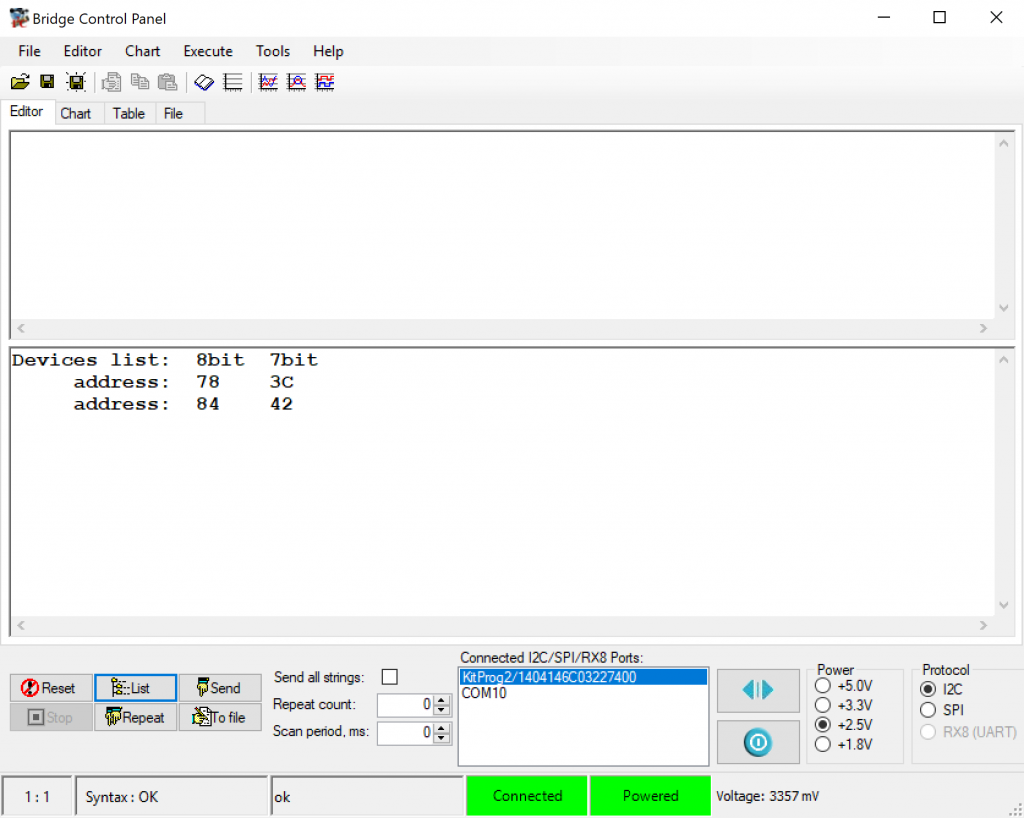
But how does it work? Simple, it uses the I2C bus master to iterate through all of the addresses 0-0x7F and
- Send a start
- Send the address
- Send a write
- If you get ACK print out the address
- If you get a NAK print out —
- Send a stop
You can easily do this using the PSoC 6 (or 4) Serial Communication Block. Here is an implementation in Modus Toolbox 1.1 where I
- Create the project and configure the middleware
- Implement probe
- Implement the main loop
- Test
Create the Project, Configure the Hardware and Middleware
Start by creating a new project. In this case I have a CY8CKIT_062_WIFI_BT. But this will work on any PSoC6s.
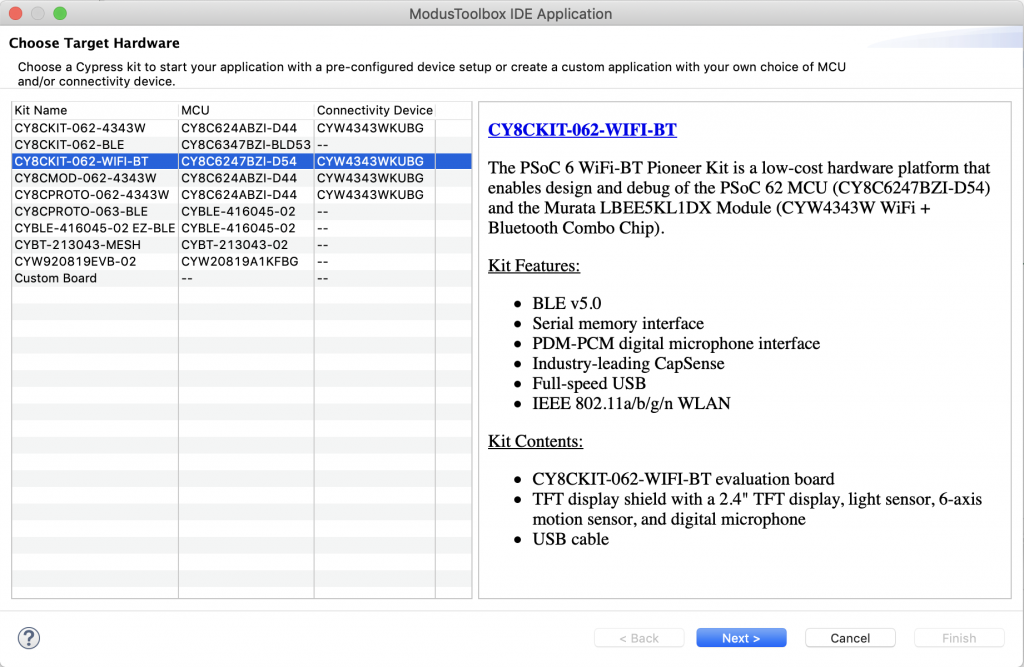
I just start with the empty project.
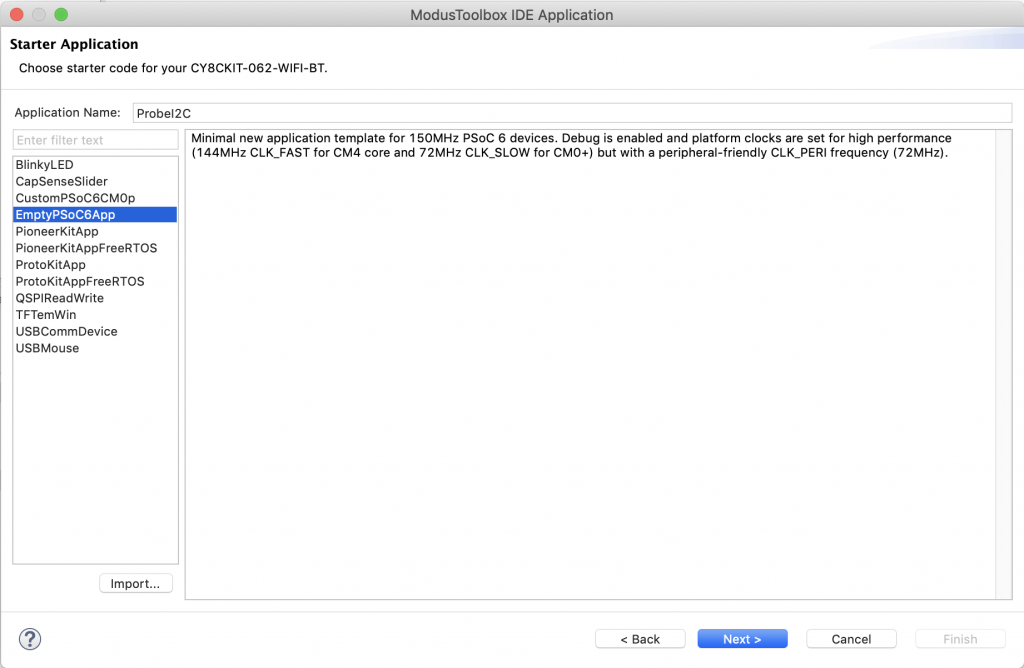
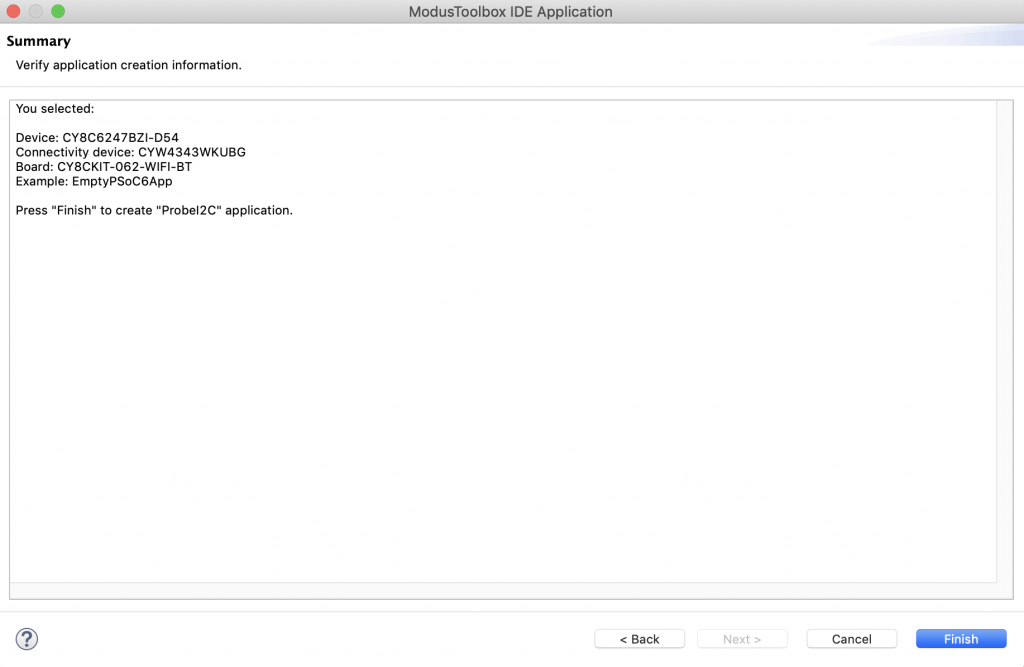
Click Finish to make the project.
Double click on the “design.modus” or click “Configure Device” from the quick panel.

Here is the design.modus
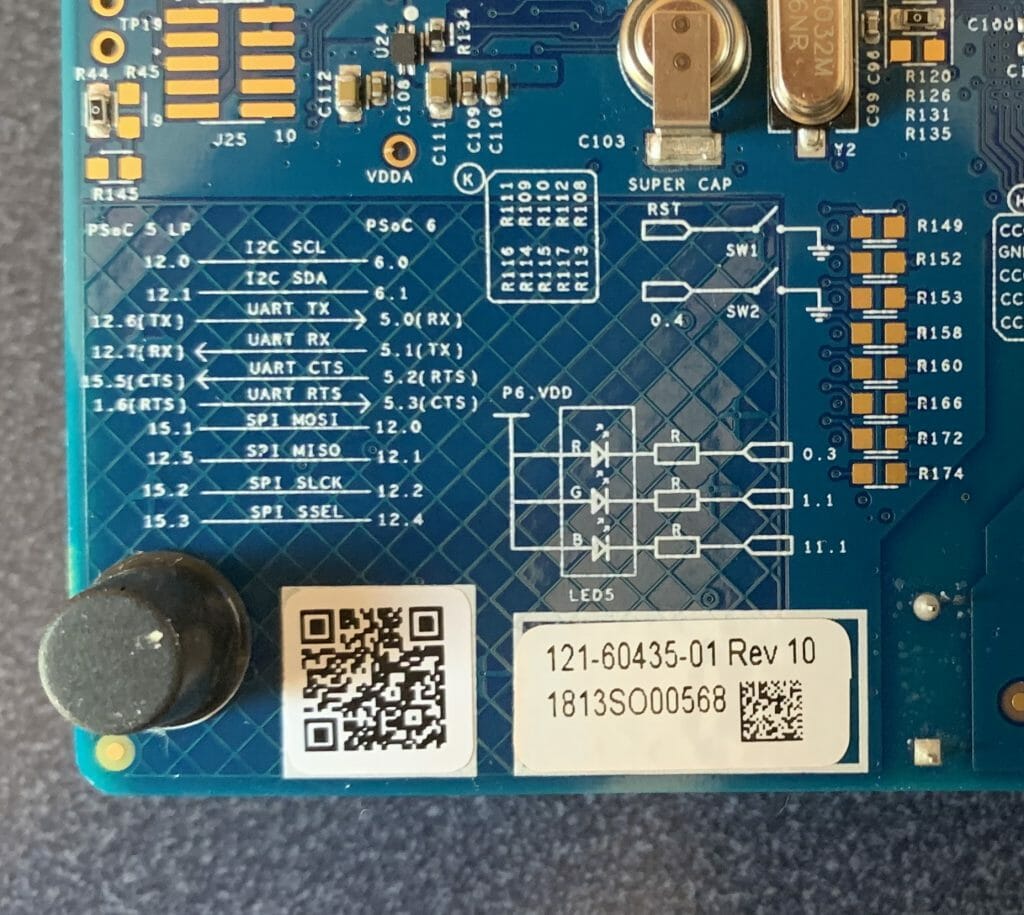
When the configurator starts you need to enable the SCB that is connected to the Kitprog bridge. You can figure this out by looking on the back of your development kit where there is a little table. In the picture below you can see that the UART is connected to P5.0 and P5.1
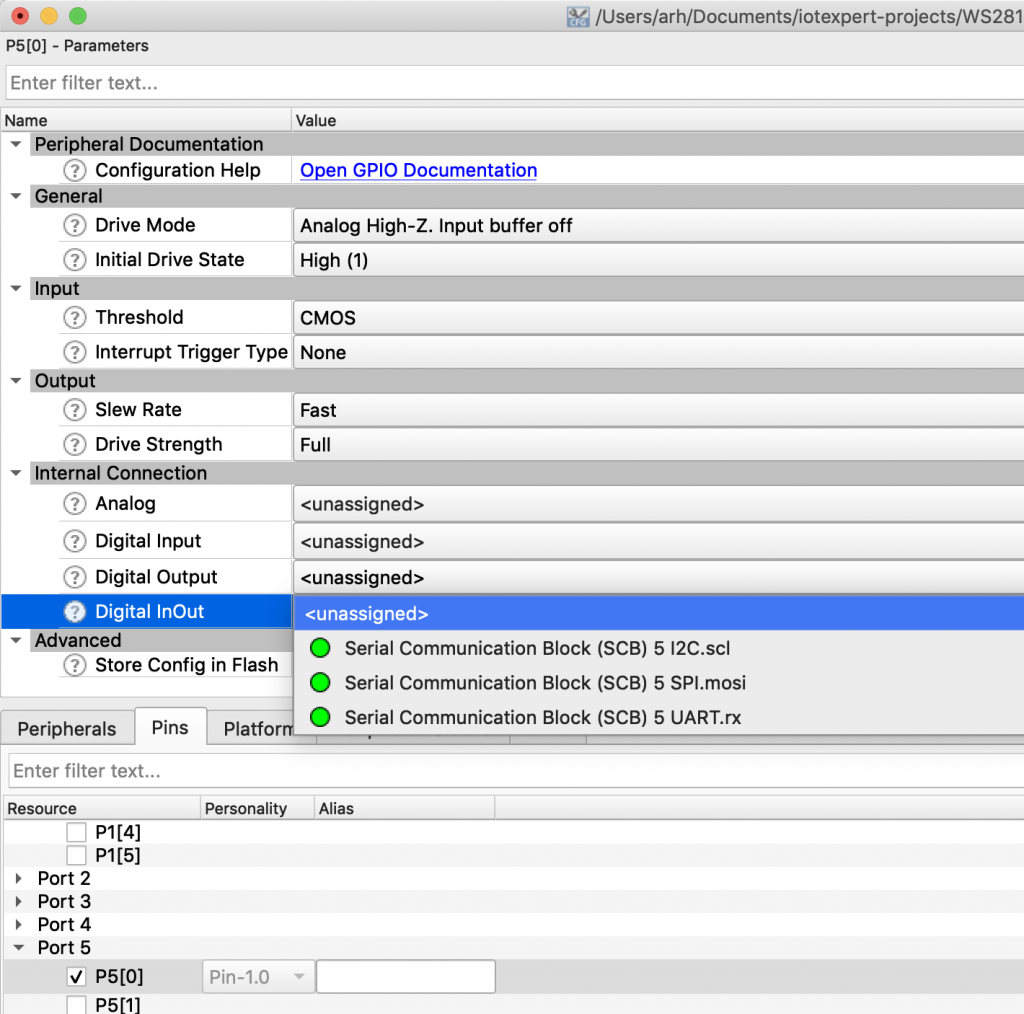
Which SCB is P5.0/P5.1 connected to? The answer is SCB5. But how do you figure that out? Click on the Pins table. Then select P5[0] and then Digital In/Out and you can see that the SCB 5 UART RX is attached to that pin.
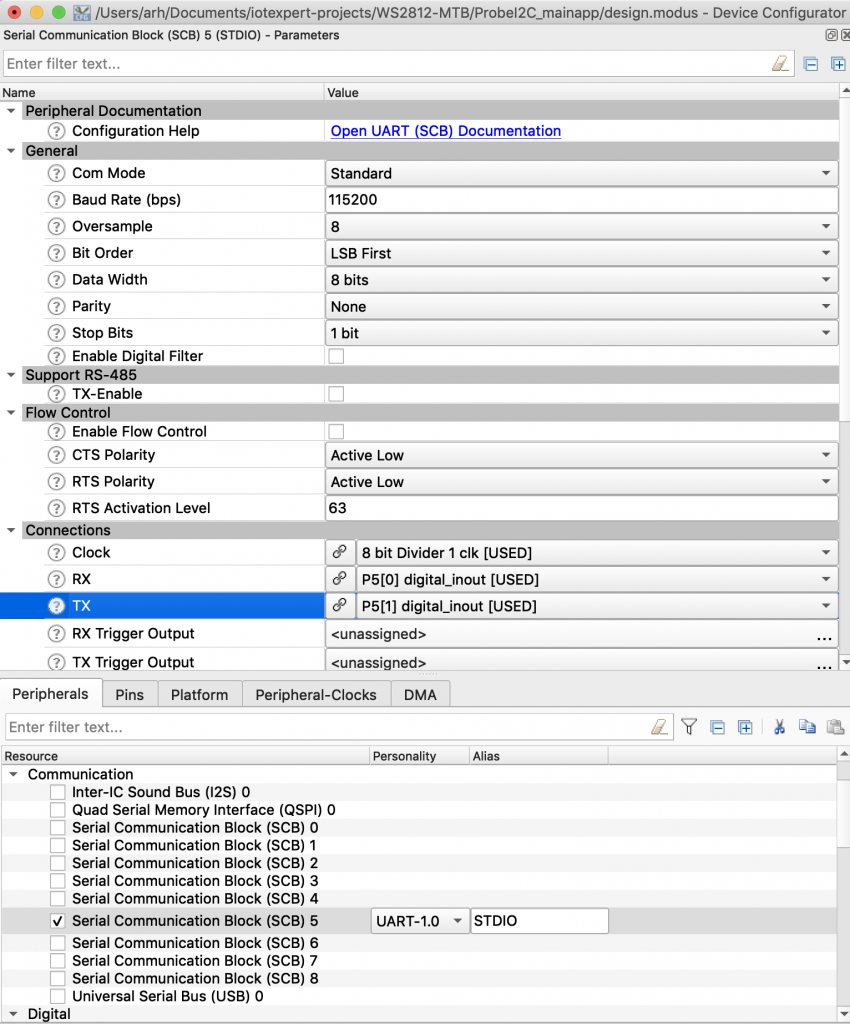
Cancel that and go to SCB 5. Enable it. Select the UART personality. Give it the name “STDIO”. Pick a clock divider (in this case I picked 1… but it doesn’t matter as the configurator will pick the right divide value). Then pick the Rx/Tx to be P5[0] and P5[1]
Next you need to turn on the I2C Master. On my board the SCB bus that I want to use is connected to P6[0] P6[1]. The bus I want is the standard Arduino I2C pins. I can see that from the back of the development kit (just like above). These pins are connected to SCB3 (which I figured out just like I did with the UART).
Enable SCB3. Select the I2C personality. Give it the name I2CBUS. Select Master. Make it 400kbs. Assign a clock divider (in this case 0). Assign the SCL and SDA pins to P6[0] and P6[1]
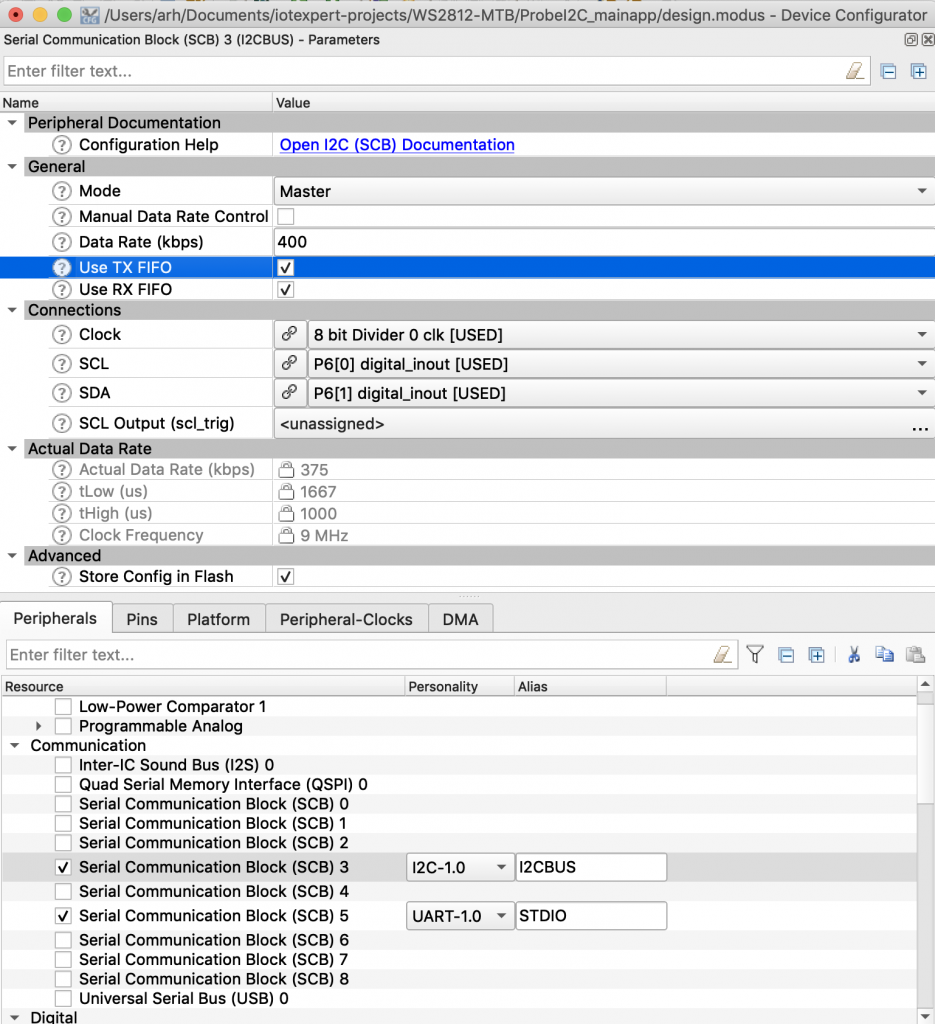
Hit save.
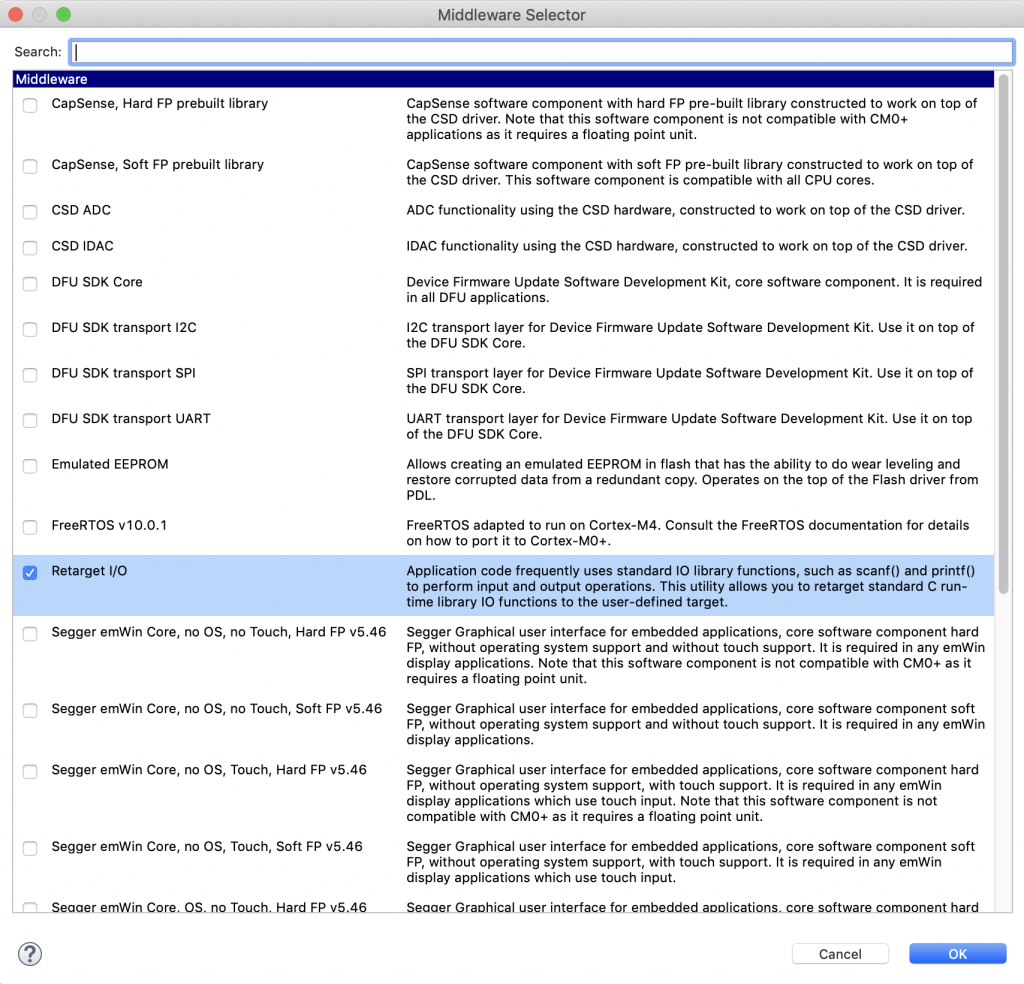
For this example I want to be able to use printf. So I right click on the “Select Middleware” from the quick panel.
Then I add “Retarget I/O”.
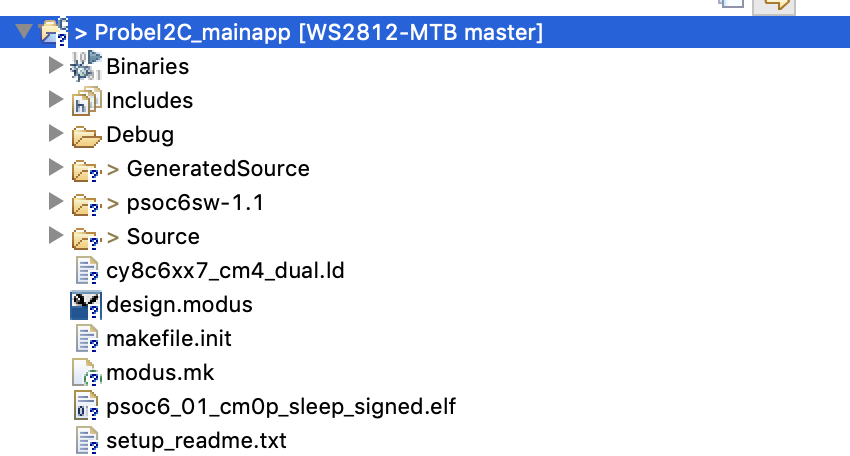
Once that is done you will have “stdio_user.h” and “stdio_user.c” in your Source directory:

In order to turn on printf you need to modify stdio_user.h so that it uses the right SCB for printing. But what is that SCB? Simple we called it “STDIO” in the configurator. Here is the change you need to make:
#include "cy_device_headers.h"
#include "cycfg.h"

/* Must remain uncommented to use this utility */
#define IO_STDOUT_ENABLE
#define IO_STDIN_ENABLE
#define IO_STDOUT_UART      STDIO_HW
#define IO_STDIN_UART       STDIO_HW
Edit main.c. Add a function called “probe” which will
- Print a header (line 15-19)
- Iterate through all of the addresses (line 22)
- If you have hit the end of a line setup the next line (lines 24-25)
- Send a start and write (line 27)
- If you get a CY_SCB_SUCCESS then print the address (line 30)
- Otherwise print a “–” (line 34)
// Print the probe table
void probe()
{
	uint32_t rval;

	// Setup the screen and print the header
	printf("\n\n   ");
	for(unsigned int i=0;i<0x10;i++)
	{
		printf("%02X ",i);
	}

	// Iterate through the address starting at 0x00
	for(uint32_t i2caddress=0;i2caddress<0x80;i2caddress++)
	{
		if(i2caddress % 0x10 == 0 )
			printf("\n%02X ",(unsigned int)i2caddress);

		rval = Cy_SCB_I2C_MasterSendStart(I2CBUS_HW,i2caddress,CY_SCB_I2C_WRITE_XFER,10,&I2CBUS_context);
		if(rval == CY_SCB_I2C_SUCCESS ) // If you get ACK then print the address
		{
			printf("%02X ",(unsigned int)i2caddress);
		}
		else //  Otherwise print a --
		{
			printf("-- ");
		}
		Cy_SCB_I2C_MasterSendStop(I2CBUS_HW,0,&I2CBUS_context);
	}
	printf("\n");
}
For all of this to work you need to have two context global variables which are used by PDL to save state.
cy_stc_scb_uart_context_t STDIO_context;
cy_stc_scb_i2c_context_t I2CBUS_context;
Create a main function to:
- initialize the two SCBs 45-50
- The API call setvbuf on line 47 just turns off buffering on stdin so that every character will come directly to getc
- print the header (line 54-56)
- the clear screen line just send the VT100 escape sequence to clear the screen and go home. Almost all terminal programs are essentially VT100 emulators.
- run the probe one time (line 57)
- go into an infinite loop looking for key presses (line 59-61)
- if they press ‘p’ then call the probe function (line 64)
- if they press ‘?’ then printout help (line 69)
int main(void)
{
    /* Set up the device based on configurator selections */
    init_cycfg_all();

    Cy_SCB_UART_Init(STDIO_HW,&STDIO_config,&STDIO_context);
    Cy_SCB_UART_Enable(STDIO_HW);
    setvbuf( stdin, NULL, _IONBF, 0 ); // Turn off stdin buffering

    Cy_SCB_I2C_Init(I2CBUS_HW,&I2CBUS_config,&I2CBUS_context);
    Cy_SCB_I2C_Enable(I2CBUS_HW);

    __enable_irq();

    printf("\033[2J\033[H"); // clear the screen
    printf("I2C Detect\n");
    printf("Press p for probe, ? for help\n");
    probe(); // Do an initial probe

    while(1)
    {
    		char c = getchar();
    		switch(c)
    		{
    		case 'p':
			probe();
    		break;
    		case '?':
    			printf("------------------\n");
			printf("Command\n");
    			printf("p\tProbe\n");
    			printf("?\tHelp\n");

    			break;
    		}

    }
}
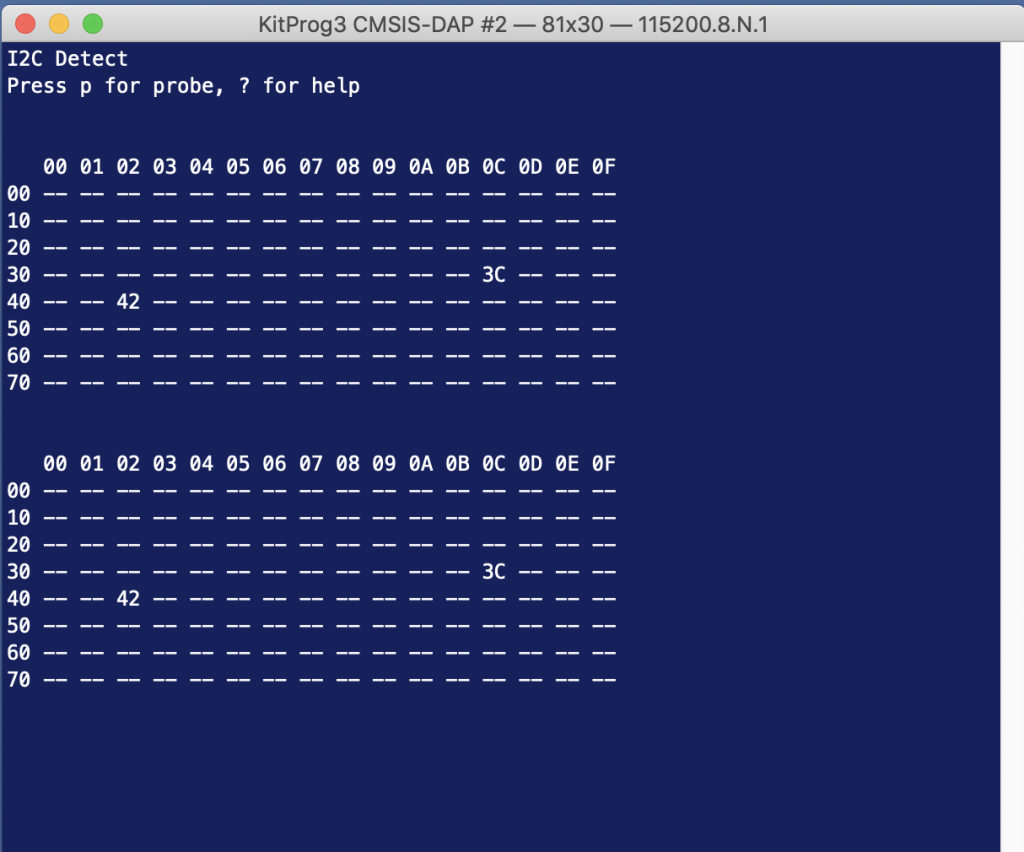
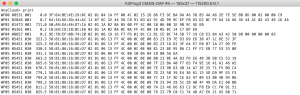
Once I program this I get a nice output. Notice that these are all 7-bit addresses.
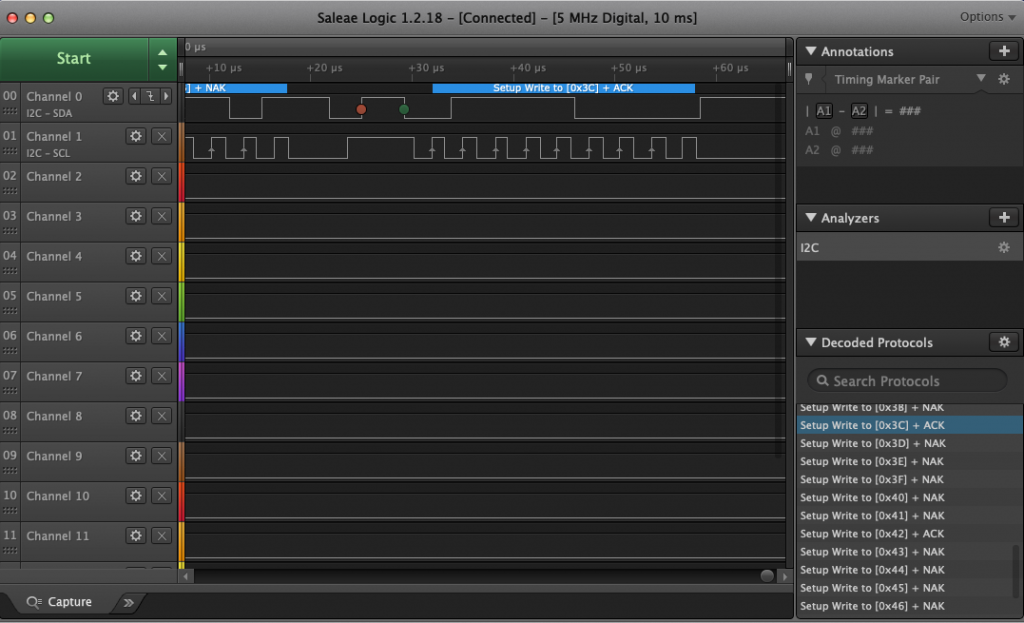
If I connect a logic analyzer you can see the bus behavior. Start with a bunch of 0 – nak, 1-nak ….
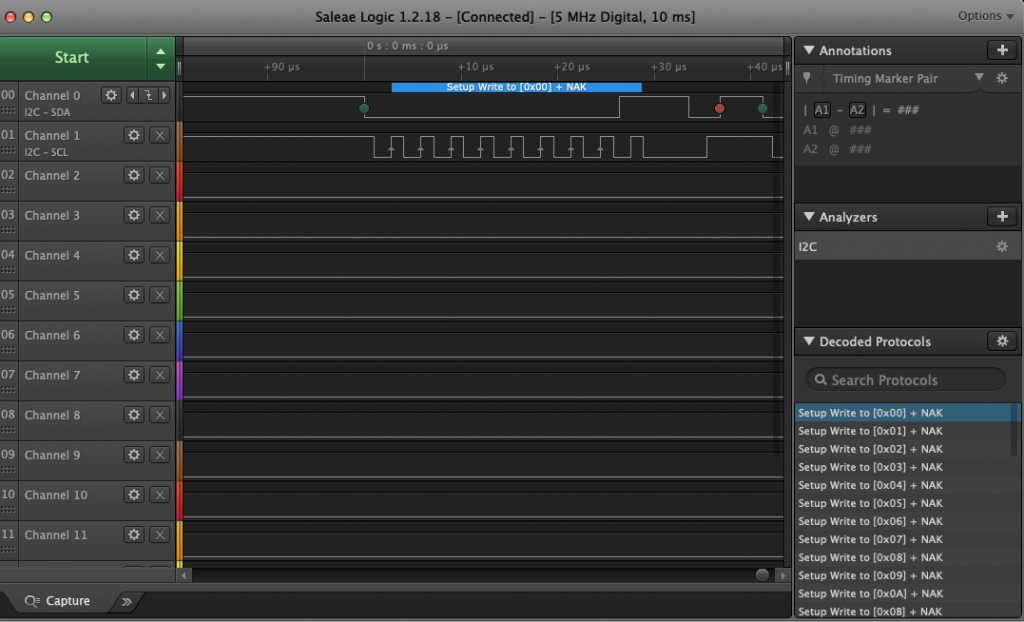
until finally it hits 3C when it get an ACK
Here is the whole program
#include "cy_device_headers.h"
#include "cycfg.h"
#include <stdio.h>

cy_stc_scb_uart_context_t STDIO_context;
cy_stc_scb_i2c_context_t I2CBUS_context;

// Print the probe table
void probe()
{
	uint32_t rval;

	// Setup the screen and print the header
	printf("\n\n   ");
	for(unsigned int i=0;i<0x10;i++)
	{
		printf("%02X ",i);
	}

	// Iterate through the address starting at 0x00
	for(uint32_t i2caddress=0;i2caddress<0x80;i2caddress++)
	{
		if(i2caddress % 0x10 == 0 )
			printf("\n%02X ",(unsigned int)i2caddress);

		rval = Cy_SCB_I2C_MasterSendStart(I2CBUS_HW,i2caddress,CY_SCB_I2C_WRITE_XFER,10,&I2CBUS_context);
		if(rval == CY_SCB_I2C_SUCCESS ) // If you get ACK then print the address
		{
			printf("%02X ",(unsigned int)i2caddress);
		}
		else //  Otherwise print a --
		{
			printf("-- ");
		}
		Cy_SCB_I2C_MasterSendStop(I2CBUS_HW,0,&I2CBUS_context);
	}
	printf("\n");
}

int main(void)
{
    /* Set up the device based on configurator selections */
    init_cycfg_all();

    Cy_SCB_UART_Init(STDIO_HW,&STDIO_config,&STDIO_context);
    Cy_SCB_UART_Enable(STDIO_HW);
    setvbuf( stdin, NULL, _IONBF, 0 ); // Turn off stdin buffering

    Cy_SCB_I2C_Init(I2CBUS_HW,&I2CBUS_config,&I2CBUS_context);
    Cy_SCB_I2C_Enable(I2CBUS_HW);

    __enable_irq();

    printf("\033[2J\033[H"); // clear the screen
    printf("I2C Detect\n");
    printf("Press p for probe, ? for help\n");
    probe(); // Do an initial probe

    while(1)
    {
    		char c = getchar();
    		switch(c)
    		{
    		case 'p':
			probe();
    		break;
    		case '?':
    			printf("------------------\n");
			printf("Command\n");
    			printf("p\tProbe\n");
    			printf("?\tHelp\n");

    			break;
    		}

    }
}

No comment yet, add your voice below!