Summary
At Electronica last fall my project included two strips of WS2812B LEDs. These LEDs were controlled by a PSoC 4 UDB component that my friend Mark Hastings built. Here is a link to his project called FunWithLEDs. That was cool and everything but I wanted to drive the LEDs from my PSoC 6. The problem that I have is that there are no UDBs in the PSoC 6-2M and I’m not really a bit-banging kind of guy… so this gave me a chance to use the PSoC 6 DMA.
In this article I will
- Show you how the WS2812B LEDs work
- Give you a schematic for a PSoC 6 to drive them
- Explain how to create and use a frame buffer for the LEDs
- Explain the PSoC 6 DMA
- Glue it all together in a project
- Take you through debugging the code (I made several bugs)
- Show you how to calculate and measure the performance
- Take you through another layer of debugging
- Explain DMA chaining
- Automatically send the frameBuffer
- Explain why I’m lucky it works
WS2812B
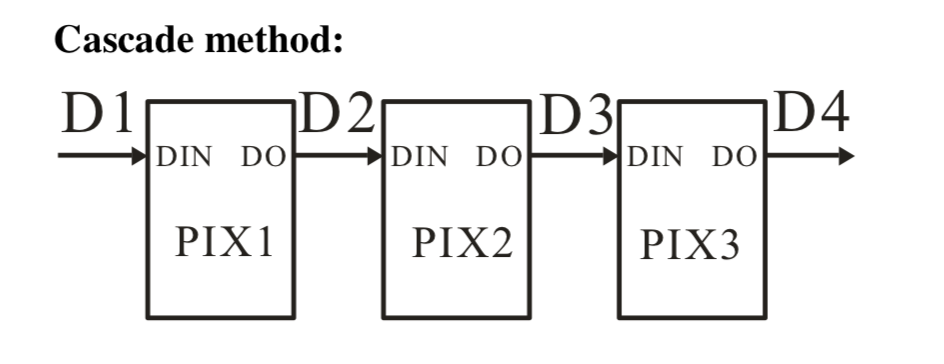
The WS2812B LED strips are an almost arbitrary length (not quite true – more on this later) string of pixels that can be cascaded together via a serial line like this:
If you look on the internet you can purchase these strings in a whole bunch of different configurations e.g. Mouser and Adafruit NeoPixel.
Each pixel actually has three individual LEDs – Red, Green and Blue. And each LED is attached to an 8-bit PWM, giving you 256 values of intensity – which is also known as 24-bit color because of 3 LEDs times 8-bit color. Sometimes this is also known as 16 Million Colors. To set the color of an individual pixel you it send three bytes, one each for Red, Green and Blue. When the LED receives the reset code it takes the most recent RGB values and turns it on.
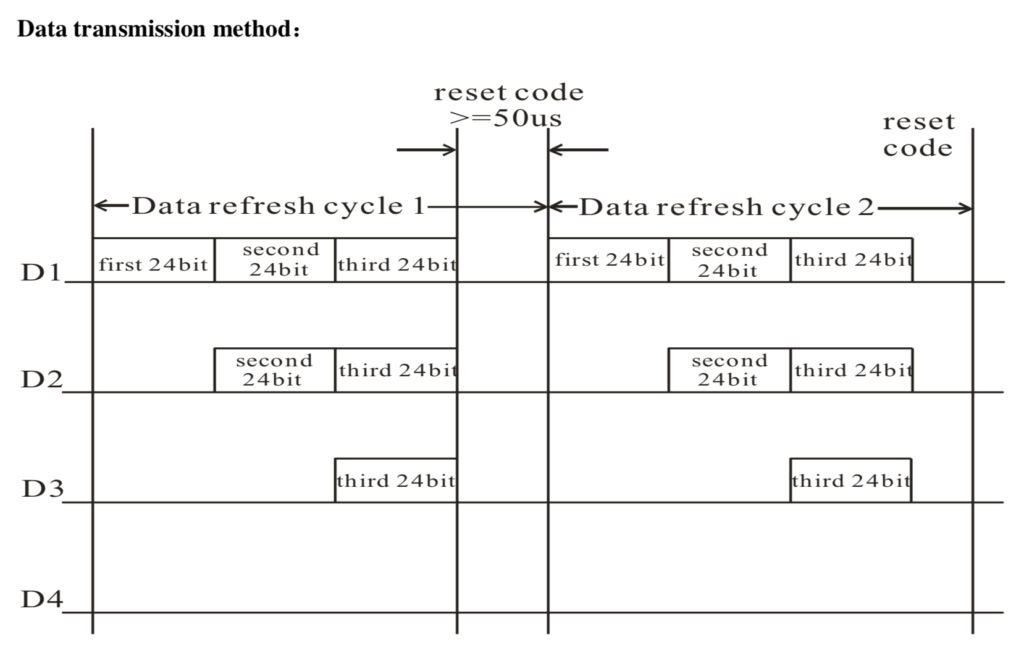
The communication protocol is cool. When communication starts, a pixel takes its Red, Green and Blue value from the data stream, then passes on the rest of the bytes to the next pixels. Basically each pixel peels off three bytes, then passes the rest through. This scheme allows you to have almost any length string of pixels. In the picture below you can see that the first pixels sees 3×3 bytes. The second sees 2×3 bytes and the final pixel only sees its three bytes.
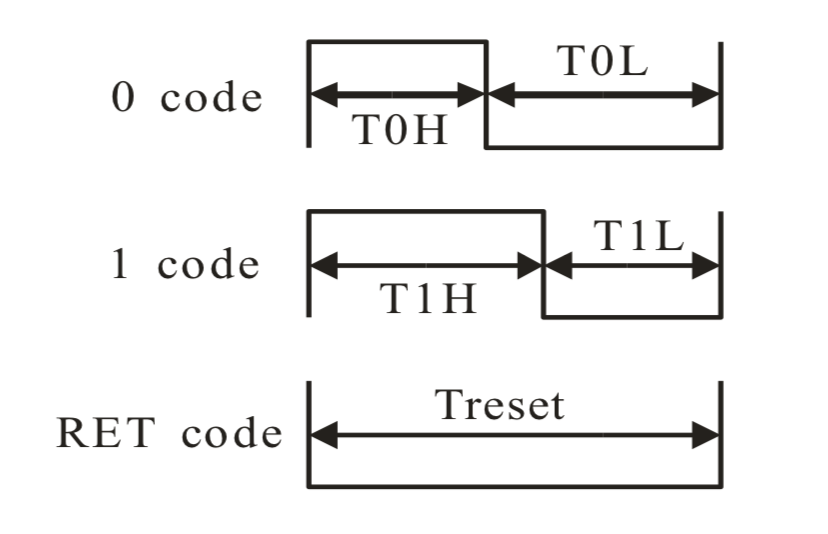
The only thing that is a bit weird in this protocol is that a “bit 1” is actually encoded as a long pulse of 1 followed by a short pulse of 0. And a “bit 0” is short pulse of 1 followed by a long pulse of 0. Here is a picture from the datasheet:
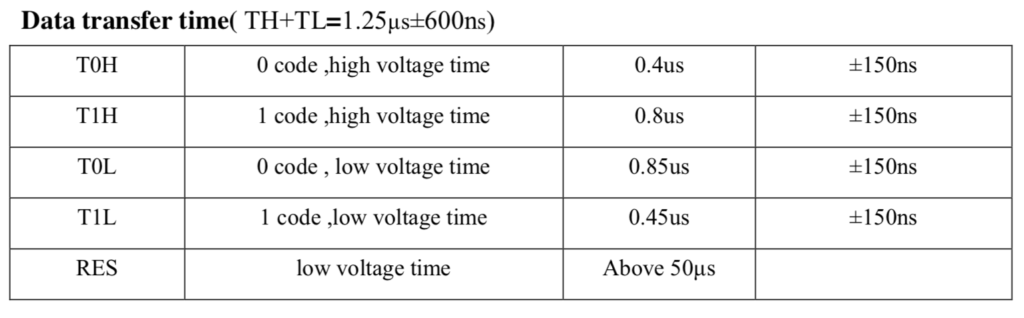
There is tons of blab-blabbing on the internet about how hard the timing is to deal with inside of the driver chip. Here is the exact requirement:
My guess is that most of the heart ache is a result of people trying to bit-bang the protocol, which causes them to have to create fairly accurate, short timing loops.
But that isn’t what I am going to do. But, Alan, what are you going to do? First, observe from the table above that a T1H is double a T0H and a T0L is almost exactly double a T0H. That means that the fundamental unit of time in this system is 0.4uS. Which made me think to use the PSoC 6 to drive 0’s and 1’s out to the DI line of the first pixel at a rate of 1/0.4uS = 2.5 MHz using the SPI port. This will let me encode 1 as 110 and encode 0 as 100.
Schematic
To build this project I started by making a new PSoC Creator Project. I chose PSoC Creator instead of Modus Toolbox because I wanted to be able to use PSoC 4 component as well as PSoC 6. My schematic has a SPI connected to DMA. The DMA is connected to an interrupt. A digital pin called “Red” which is attached to P0[3] on the board. And finally a UART connected to the KitProg bridge.
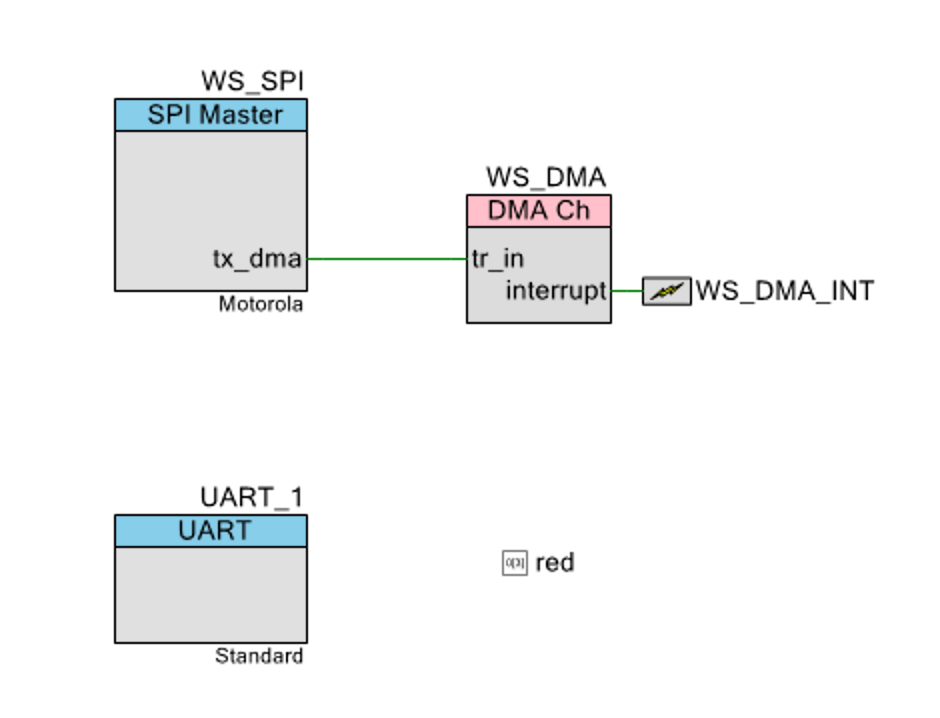
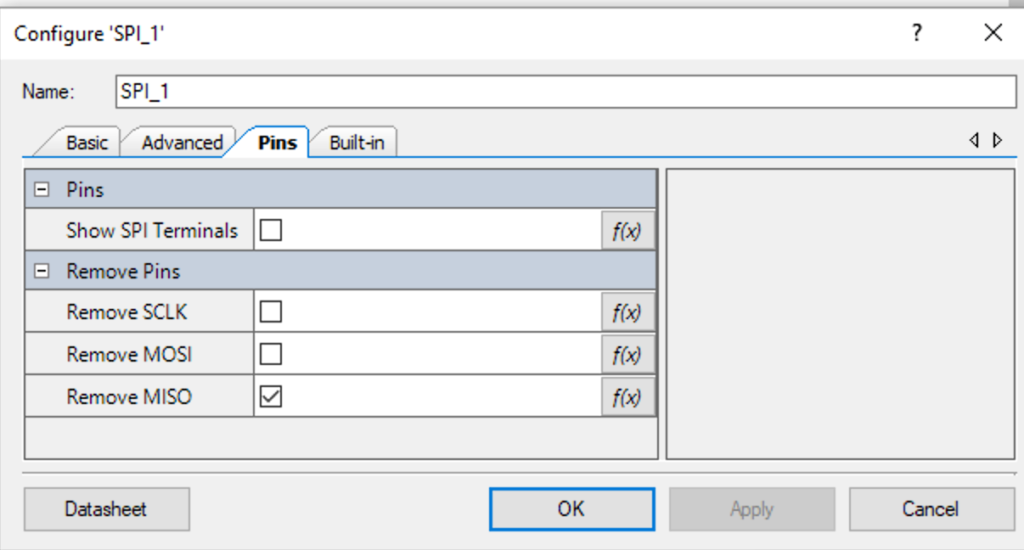
In the SPI Configuration I remove the MISO pin (because we dont need SPI input data). I could also remove the SCLK pin, but I left it attached so that I could see what was happening with an oscilloscope (which I needed when I was trying to figure out the bugs)
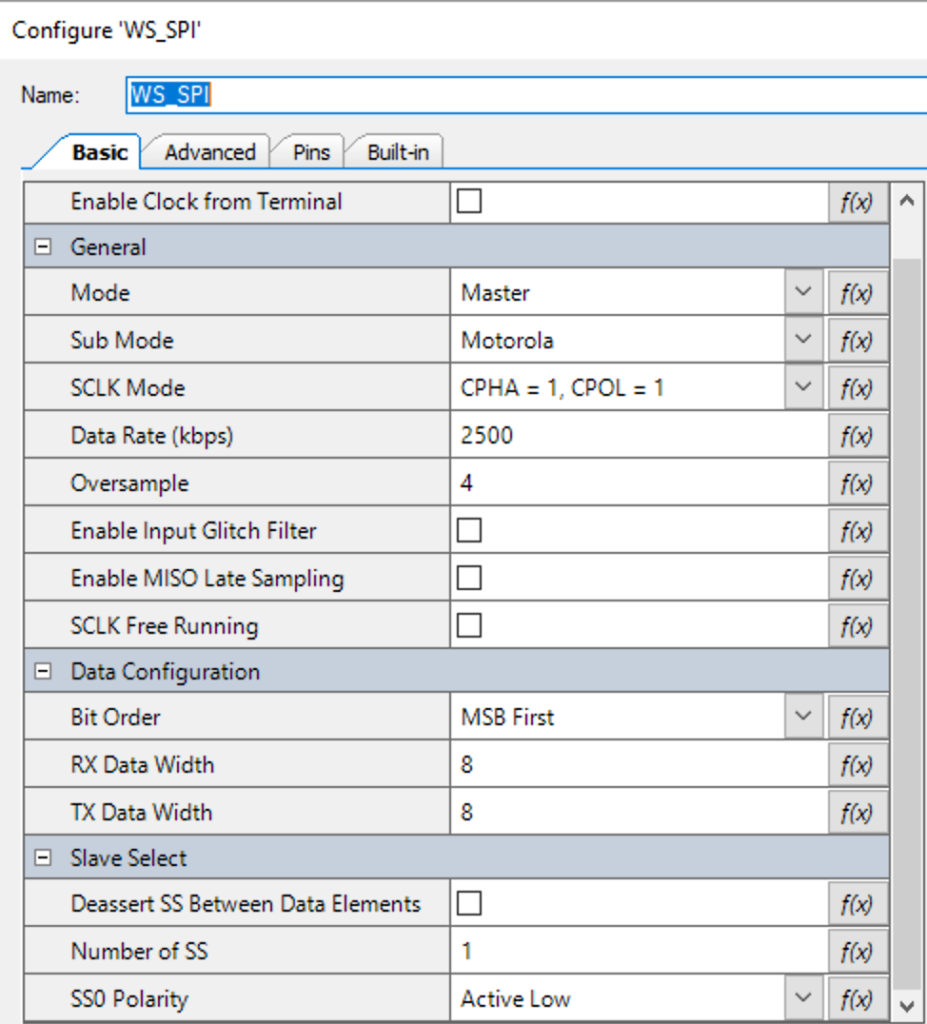
The Basic SPI is configured with a data rate of 2500kbs which is also known as 0.4uS per bit, as well as an oversample rate of 4. The state machine of the SPI needs an input clock which is at least 2x the data rate. If the MISO was still attached it might need an even higher input clock rate in order to oversample the input. Notice that I also have one slave select line, which I was using to trigger the oscilloscope. In the real system, there is no slave to select so you can use a 0 there.
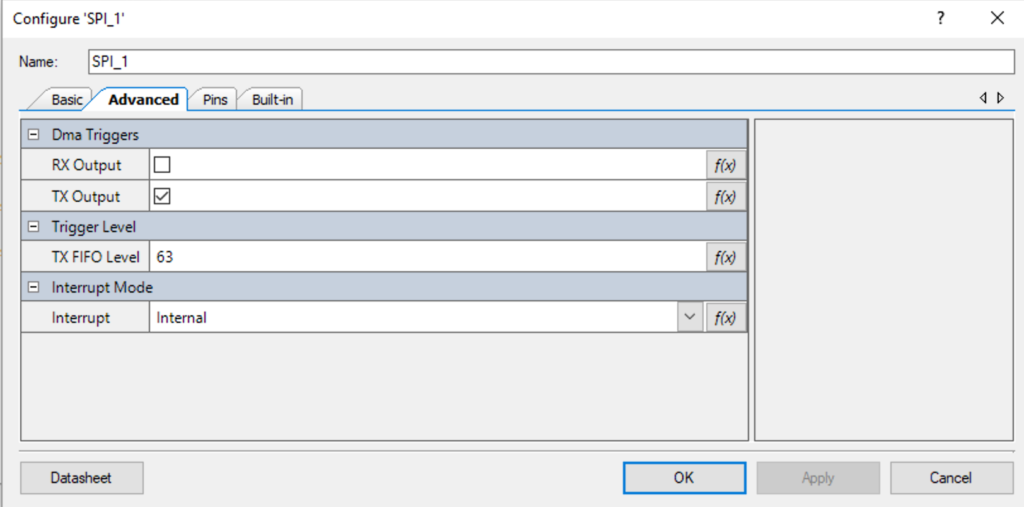
On the Advanced table I enable “Dma Trigger on Tx Output” with the Fifo set to “63”. This will cause the DMA trigger to be asserted anytime the transmit FIFO falls below 63 bytes.
WS2812 Framebuffer Code
From the schematic above you can see that my plan is to DMA data out of a buffer into the SPI transmit FIFO. Given that you need a 1 to be 110 and a 0 to be 100 this will require 3 output bytes for each RGV value. And each pixel will take 3-bits per bit or 3*3*8 bits or 9 bytes total per pixel.
As an Application developer using the WS2812 library, it will be nice to have functions that let you think in 3-bytes (RGB) and the library will translate those values into the 9-bytes required by the SPI. OK, lets build the library with that in mind. First I make some defines to get rid of the magic numbers. Then I make the frame buffer which will hold the 9-byte formatted information. Notice that I have a define called “WS_OFFSET” which I will talk about in more detail later.
#define WS_ZOFFSET (1)
#define WS_ONE3  (0b110<<24)
#define WS_ZERO3 (0b100<<24)
#define WS_NUM_LEDS (5)
#define WS_SPI_BIT_PER_BIT (3)
#define WS_COLOR_PER_PIXEL (3)
#define WS_BYTES_PER_PIXEL (WS_SPI_BIT_PER_BIT * WS_COLOR_PER_PIXEL)

static uint8_t WS_frameBuffer[WS_NUM_LEDS*WS_BYTES_PER_PIXEL+WS_ZOFFSET];
The next thing I create is a function to turn a 1-byte input into the 3-byte output. It takes 1 bit at a time and then or’s in either 110 or 100. It returns a uint32_t … but with the first byte is set to 0x0.
// Function: convert3Code
// This function takes an 8-bit value representing a color
// and turns it into a WS2812 bit code... where 1=110 and 0=011
// 1 input byte turns into three output bytes of a uint32_t
uint32_t WS_convert3Code(uint8_t input)
{
    uint32_t rval=0;
    for(int i=0;i<8;i++)
    {
        if(input%2)
        {
            rval |= WS_ONE3;
        }
        else
        {
            rval |= WS_ZERO3;
        }
        rval = rval >> 3;

        input = input >> 1;
    }
    return rval;
}
This first helper function WS_setRGB will configure a specific pixel in the frameBuffer to be the RGB value encoded as 9-bytes. Notice that the order in the frameBuffer is Green, Red, Blue (not RGB order)
// Function: WS_setRGB
// Takes a position and a three byte rgb value and updates the WS_frameBuffer with the correct 9-bytes
void WS_setRGB(int led,uint8_t red, uint8_t green, uint8_t blue)
{

    typedef union {
    uint8_t bytes[4];
    uint32_t word;
    } WS_colorUnion;

    WS_colorUnion color;
    color.word = WS_convert3Code(green);
    WS_frameBuffer[led*WS_BYTES_PER_PIXEL+WS_ZOFFSET] = color.bytes[2];
    WS_frameBuffer[led*WS_BYTES_PER_PIXEL+1+WS_ZOFFSET] = color.bytes[1];
    WS_frameBuffer[led*WS_BYTES_PER_PIXEL+2+WS_ZOFFSET] = color.bytes[0];

    color.word = WS_convert3Code(red);
    WS_frameBuffer[led*WS_BYTES_PER_PIXEL+3+WS_ZOFFSET] = color.bytes[2];
    WS_frameBuffer[led*WS_BYTES_PER_PIXEL+4+WS_ZOFFSET] = color.bytes[1];
    WS_frameBuffer[led*WS_BYTES_PER_PIXEL+5+WS_ZOFFSET] = color.bytes[0];

    color.word = WS_convert3Code(blue);
    WS_frameBuffer[led*WS_BYTES_PER_PIXEL+6+WS_ZOFFSET] = color.bytes[2];
    WS_frameBuffer[led*WS_BYTES_PER_PIXEL+7+WS_ZOFFSET] = color.bytes[1];
    WS_frameBuffer[led*WS_BYTES_PER_PIXEL+8+WS_ZOFFSET] = color.bytes[0];
}
DMA Code & Configuration
The DMA configuration starts with the defaults. The channel priority doesn’t matter as I am only using one channel in this design. I left the default descriptors set to 1 … which actually turns out to be a problem later on in my debugging (more on this later)
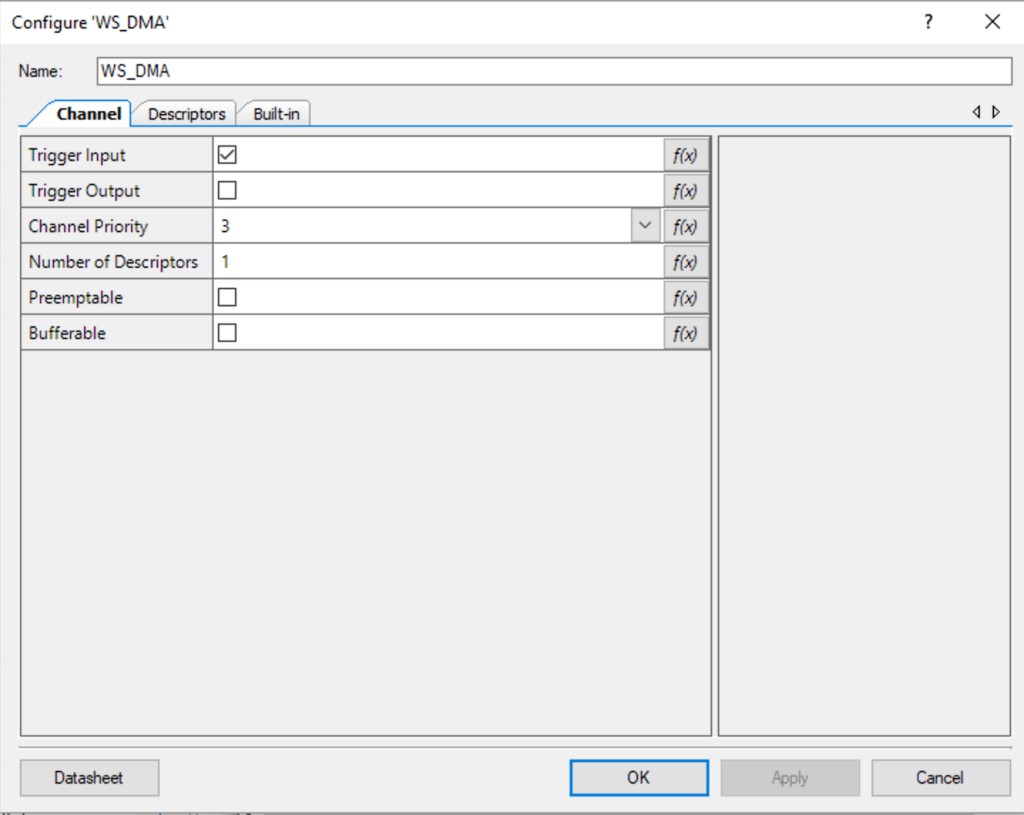
The descriptor is configured like this. The configuration includes:
- The trigger output is unused
- An interrupt at the end (which I dont use)
- No chaining (meaning only on descriptor)
- The channel is disabled at the end (which I reset in software)
- One transfer per trigger (1-byte –> 1 word)
- As long as the trigger is active keep triggering (retrigger immediately)
- My buffer has bytes… but the input to the FIFO is words so setup Byte–>Word
- Hardcoded to 4-bytes of transfer, but I change this with the firmware based on the size of the frameBuffer
The first bit of code is an interrupt service routine which is attached to the DMA chain. When I was trying to debug this originally I used the ISR to toggle an LED when the DMA was complete. Now it doesnt do anything, but I left it in case I want to add something later.
// This is the interrupt handler for the WS DMA
// It doesnt do anything... and is just a stub
static void WS_DMAComplete(void)
{
    Cy_DMA_Channel_ClearInterrupt(WS_DMA_HW, WS_DMA_DW_CHANNEL);
}
The function WS_DMAConfigure is used to:
- Initializes the DMA Descriptor
- Initializes the interrupt (which doenst do anything)
- Enables the DMA block
static void WS_DMAConfigure(void)
{
    /* Initialize descriptor */
    Cy_DMA_Descriptor_Init(&WS_DMA_Descriptor_1, &WS_DMA_Descriptor_1_config);

    /* Set source and destination for descriptor 1 */
    Cy_DMA_Descriptor_SetSrcAddress(&WS_DMA_Descriptor_1, (uint8_t *)WS_frameBuffer);
    Cy_DMA_Descriptor_SetDstAddress(&WS_DMA_Descriptor_1, (void *)&WS_SPI_HW->TX_FIFO_WR);
    Cy_DMA_Descriptor_SetXloopDataCount(&WS_DMA_Descriptor_1,sizeof(WS_frameBuffer));

     /* Initialize and enable the interrupt from WS_DMA */
    Cy_SysInt_Init(&WS_DMA_INT_cfg, &WS_DMAComplete);
    NVIC_EnableIRQ(WS_DMA_INT_cfg.intrSrc);
    Cy_DMA_Channel_SetInterruptMask(WS_DMA_HW, WS_DMA_DW_CHANNEL, WS_DMA_INTR_MASK);

    Cy_DMA_Enable(WS_DMA_HW);
}
To actually make the DMA “go”, the function WS_DMATrigger sets up the DMA Channel, and then enables it.
void WS_DMATrigger()
{
        /* Initialize the DMA channel */
    cy_stc_dma_channel_config_t channelConfig;
    channelConfig.descriptor  = &WS_DMA_Descriptor_1;
    channelConfig.preemptable = WS_DMA_PREEMPTABLE;
    channelConfig.priority    = WS_DMA_PRIORITY;
    channelConfig.enable      = false;
    Cy_DMA_Channel_Init(WS_DMA_HW, WS_DMA_DW_CHANNEL, &channelConfig);
    Cy_DMA_Channel_Enable(WS_DMA_HW,WS_DMA_DW_CHANNEL);
}
Gluing it all together
Now that we have a complete library, the last thing to do is build a command line interface to test it. Lines 299-306 just get things going. Then lines 308-310 turn on the systick timer and set it to a 1ms period. I use the timer to trigger the DMA every 33ms. The last part allows me to type a character and have it test a part of the system.
int main(void)
{
    __enable_irq(); /* Enable global interrupts. */

    UART_1_Start();
    setvbuf( stdin, NULL, _IONBF, 0 );
    printf("Started\n");
    WS_Start();

    Cy_SysTick_Init(CY_SYSTICK_CLOCK_SOURCE_CLK_IMO,8000);
    Cy_SysTick_Enable();
    Cy_SysTick_SetCallback(0,WS_SysTickHandler);

    for(;;)
    {
        char c=getchar();
        switch(c)
        {
            case 'u':
                printf("Enable auto DMA updating\n");
                Cy_SysTick_SetCallback(0,WS_SysTickHandler);
            break;
            case 'U':
                printf("Disable auto DMA updating\n");
                Cy_SysTick_SetCallback(0,0);
            break;
            case 't':
                printf("Trigger DMA\n");
                WS_DMATrigger();
            break;
            case 'r':
                WS_setRGB(0,0xFF,0,0);
                printf("Set LED0 Red\n");
                break;
           case 'g':
                WS_setRGB(0,0,0xFF,0);
                printf("Set LED0 Green\n");
                break;
            case 'O':
                WS_setRange(0,WS_NUM_LEDS-1,0,0,0);
                printf("Turn off all LEDs\n");
                break;
            case 'o':
                WS_setRange(0,WS_NUM_LEDS-1,0xFF,0xFF,0xFF);
                printf("Turn on all LEDs\n");
                break;
            case 'b':
                WS_setRGB(0,0,0,0xFF);
                printf("Set LED0 Blue\n");
                break;
            case 'R':
                WS_setRange(0,WS_NUM_LEDS-1,0x80,0,0);
                printf("Turn on all LEDs RED\n");
                break;
            case 'G':
                WS_setRange(0,WS_NUM_LEDS-1,0,0x80,0);
                printf("Turn on all LEDs Green\n");
                break;
            case 'B':
                WS_setRange(0,WS_NUM_LEDS-1,0,0,0x80);
                printf("Turn on all LEDs Blue\n");
                break;
            case 'a':
                WS_initMixColorRGB();
                printf("Turn on all LEDs RGB Pattern\n");
                break;
            case '?':
                printf("u\tEnable Auto Update of LEDs\n");
                printf("U\tDisable Auto Update of LEDs\n");
                printf("t\tTrigger the DMA\n");
                printf("r\tSet the first pixel Red\n");
                printf("g\tSet the first pixel Green\n");
                printf("b\tSet the first pixel Blue\n");
                printf("O\tTurn off all of the pixels\n");
                printf("o\tSet the pixels to white full on\n");
                printf("R\tSet all of the pixels to Red\n");
                printf("G\tSet all of the pixels to Green\n");
                printf("B\tSet all of the pixels to Blue\n");
                printf("a\tSet pixels to repeating RGBRGB\n");
                printf("?\tHelp\n");
                break;
        }
    }
}
Why is it not working?
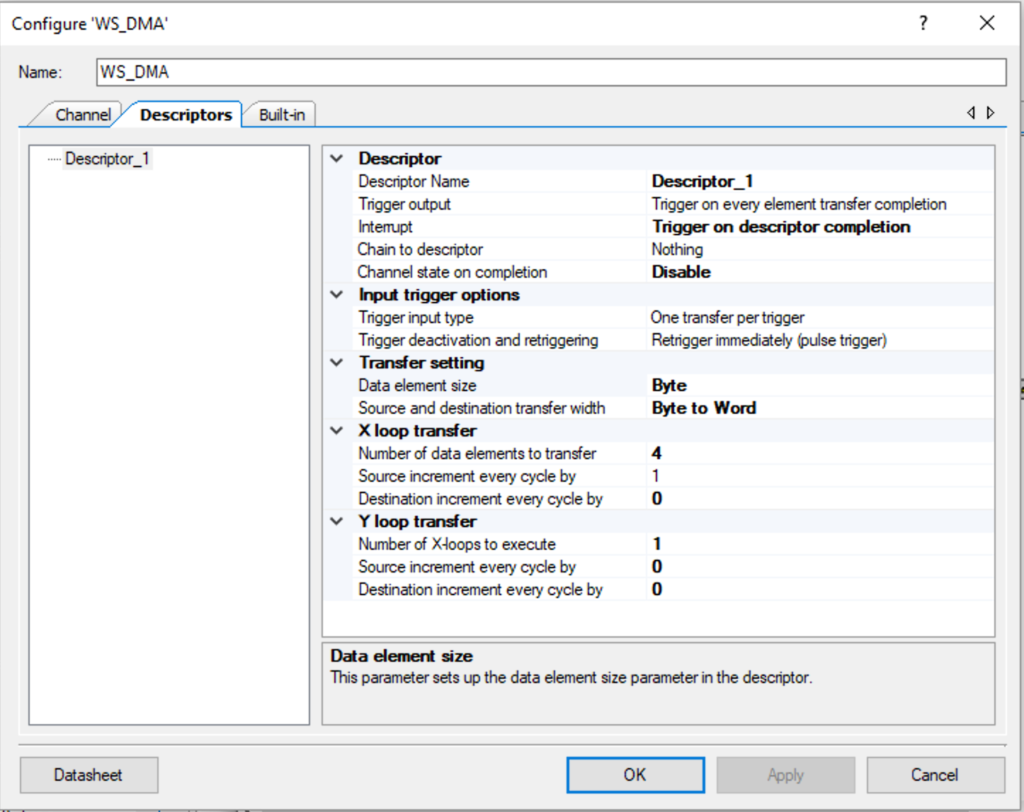
After all of that I programmed the PSoC…. and… I got nothing. This made me very unhappy because I wondered what the cause was. Specifically, I was worried that I didn’t understand how to talk to the WS2812Bs.
My first step in debugging the problem was to get out the oscilloscope. When I captured the data here is what I got. The blue trace is the MOSI line which is driving the LED string, and the yellow trace is the SPI clock. You can see from the measurement that the clock pulses are 392ns = 0.39uS … thats good. You can see in the picture that the first “pulse” on the blue line is 2 clocks long, thats good, but it is immediately followed by a 2 clock long 0. That isn’t good.
Hang on I need 110 for 1 and 100 for 0… but I got 110 then 011. No good. Here is the code with the bug
#define ONE3  (0b110<<24)
#define ZERO3 (0b011<<24)
Once I fix that to be
#define ONE3  (0b110<<24)
#define ZERO3 (0b100<<24)
Things look good now.
However, this bug is really stupid because I did a partial job putting in unit test. Here is the stupid part. I wrote this:
    setRGB(0,0,0x80,0);

    for(int i=0;i<10;i++)
    {
        printf("%02X ",frameBuffer[i]);
    }
    printf("\n");

    printf("Test 0x00 = %0X\n",convert3Code(0));
    printf("Test 0xFF = %0X\n",convert3Code(0xFF));
    printf("Test 0x80 = %0X\n",convert3Code(0x80));
Which yielded
What would have been much better would have been to do this:
    setRGB(0,0,0x80,0);

    for(int i=0;i<10;i++)
    {
        printf("%02X ",frameBuffer[i]);
    }
    printf("\n");

    printf("Test 0x00 = %0X\n",convert3Code(0));
    printf("Test 0xFF = %0X\n",convert3Code(0xFF));
    printf("Test 0x80 = %0X\n",convert3Code(0x80));

    CY_ASSERT(convert3Code(0x00) == 0b00000000100100100100100100100100);
    CY_ASSERT(convert3Code(0xFF) == 0b00000000110110110110110110110110);
    CY_ASSERT(convert3Code(0x80) == 0b00000000110100100100100100100100);
Which would have put me here when the assert failed:
How long does it take to run?
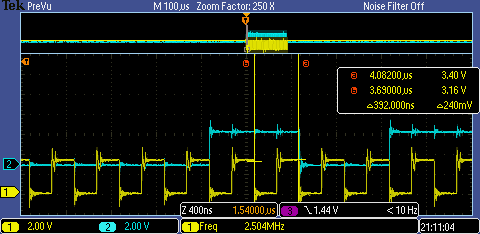
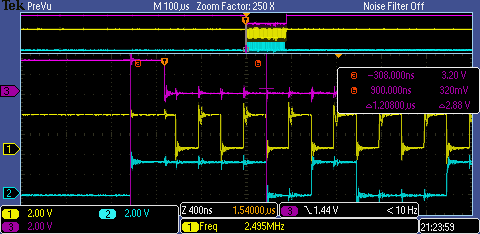
The next thing that I was curious about is how long does it take to dump one frameBuffer into the LED string. Well, the simplest thing seems to be to setup a longer transaction (25 LEDs) and then measure. In the screen shot below you can see that is 721 uS for 25 LEDs or about 29uS per LED.
Which I suppose makes sense as 1 LED is 9 bytes or 9*8=72 bits at 0.4uS per but = 28.8uS. This means 1000 LEDs is about 29 milliseconds. Which means that you can easily do 1000 LEDs at 30Hz.
Why is it “yellow”?
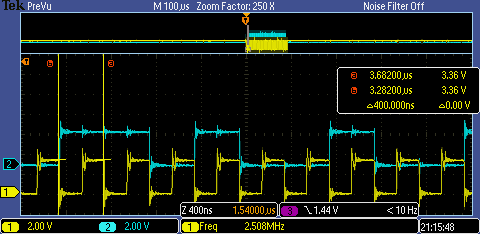
As I was testing the runtime I noticed that the first LED of the chain was always yellow. Why is that? (Notice that the LEDs are too bright to take a picture of and you can really only see the yellow in the reflection)
When I looked at the oscilloscope trace I notice that the pulse width of the first “1” was 1.2uS (the blue line is the data). This is a result of the Serial Communication Block SPI pulling up the MOSI line a good while before it enables the chip select (the purple trace) which has the effect of making a very long 1 to start with. This obviously is not a problem for the SPI protocol as it is clocked by the serial clock line. But in this case where the LEDs are self-clocked it makes for a long 1.
OK, how do I fix that? The cheap way to fix this is to make the first bit of the sequence a 0. But, that would be a major pain because that would effectively shift every bit in the frame buffer over by 1-bit which is a pain in the ass. So, to fix it I just make the entire first byte of the buffer be 0 which means it takes an extra byte and 8×0.4 uS = 3.2uS longer. No big deal.
The code change is to add 1 byte to the buffer (which I called the WS_ZOFFSET)
#define WS_ZOFFSET (1)
#define WS_ONE3  (0b110<<24)
#define WS_ZERO3 (0b100<<24)
#define WS_NUM_LEDS (5)
#define WS_SPI_BIT_PER_BIT (3)
#define WS_COLOR_PER_PIXEL (3)
#define WS_BYTES_PER_PIXEL (WS_SPI_BIT_PER_BIT * WS_COLOR_PER_PIXEL)

static uint8_t WS_frameBuffer[WS_NUM_LEDS*WS_BYTES_PER_PIXEL+WS_ZOFFSET];
Then offset all of the writes by WS_ZOFFSET
// Function: WS_setRGB
// Takes a position and a three byte rgb value and updates the WS_frameBuffer with the correct 9-bytes
void WS_setRGB(int led,uint8_t red, uint8_t green, uint8_t blue)
{

    typedef union {
    uint8_t bytes[4];
    uint32_t word;
    } WS_colorUnion;

    WS_colorUnion color;
    color.word = WS_convert3Code(green);
    WS_frameBuffer[led*WS_BYTES_PER_PIXEL+WS_ZOFFSET] = color.bytes[2];
    WS_frameBuffer[led*WS_BYTES_PER_PIXEL+1+WS_ZOFFSET] = color.bytes[1];
    WS_frameBuffer[led*WS_BYTES_PER_PIXEL+2+WS_ZOFFSET] = color.bytes[0];

    color.word = WS_convert3Code(red);
    WS_frameBuffer[led*WS_BYTES_PER_PIXEL+3+WS_ZOFFSET] = color.bytes[2];
    WS_frameBuffer[led*WS_BYTES_PER_PIXEL+4+WS_ZOFFSET] = color.bytes[1];
    WS_frameBuffer[led*WS_BYTES_PER_PIXEL+5+WS_ZOFFSET] = color.bytes[0];

    color.word = WS_convert3Code(blue);
    WS_frameBuffer[led*WS_BYTES_PER_PIXEL+6+WS_ZOFFSET] = color.bytes[2];
    WS_frameBuffer[led*WS_BYTES_PER_PIXEL+7+WS_ZOFFSET] = color.bytes[1];
    WS_frameBuffer[led*WS_BYTES_PER_PIXEL+8+WS_ZOFFSET] = color.bytes[0];
}
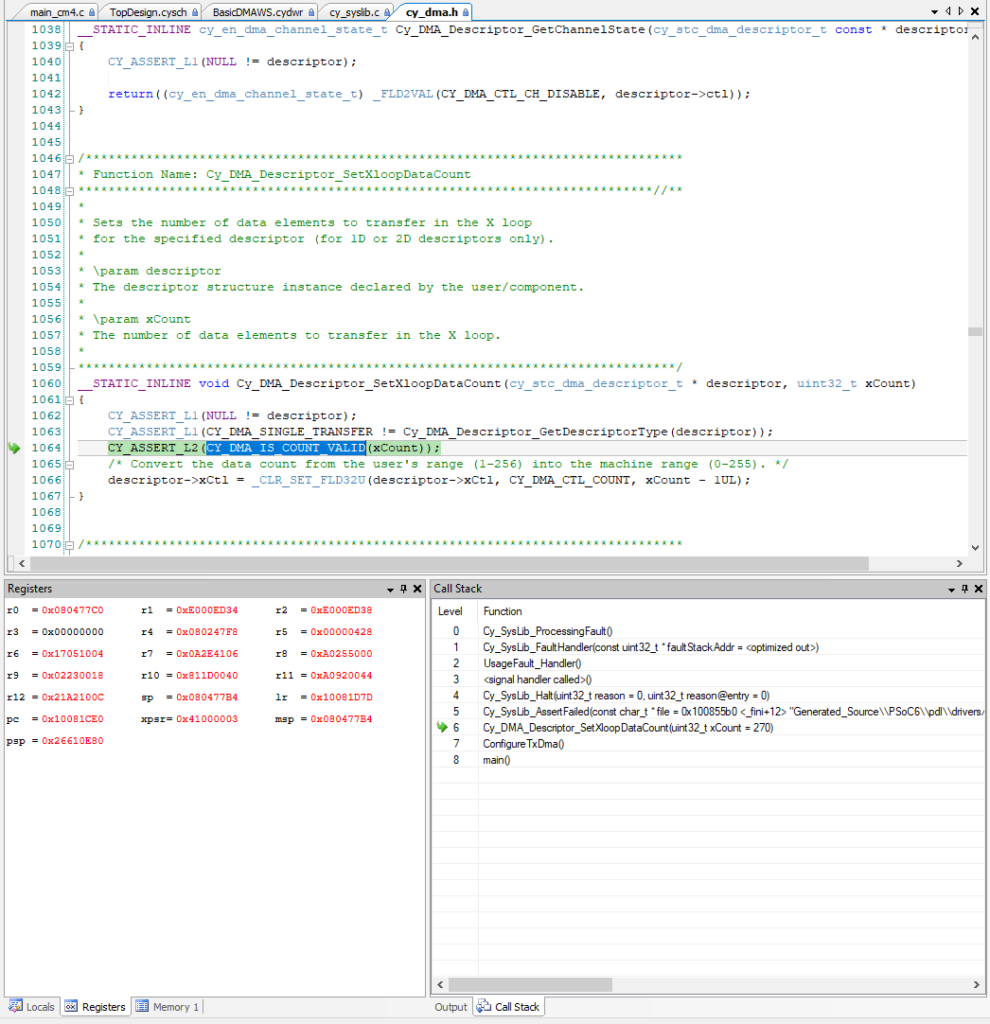
Why did it crash?
While I was testing the runtime of the DMA loop, I kept increasing the number of LEDs. When I typed 30, the PSoC crashed and was no longer responsive. When this happens it is always useful to click on “Debug->Attach to Running Target”. When I did that I ended up with this screen. This tells me that there was an assert that was triggered. When I hovered over the CY_DMA_IS_COUNT_VALID I realized that you can only DMA 256 bytes per descriptor… and with 30 LEDs I need 270 bytes… which means that I need to chain descriptors.
Chaining DMA Descriptors
You are allowed to create multiple DMA descriptors in the component configuration like this:
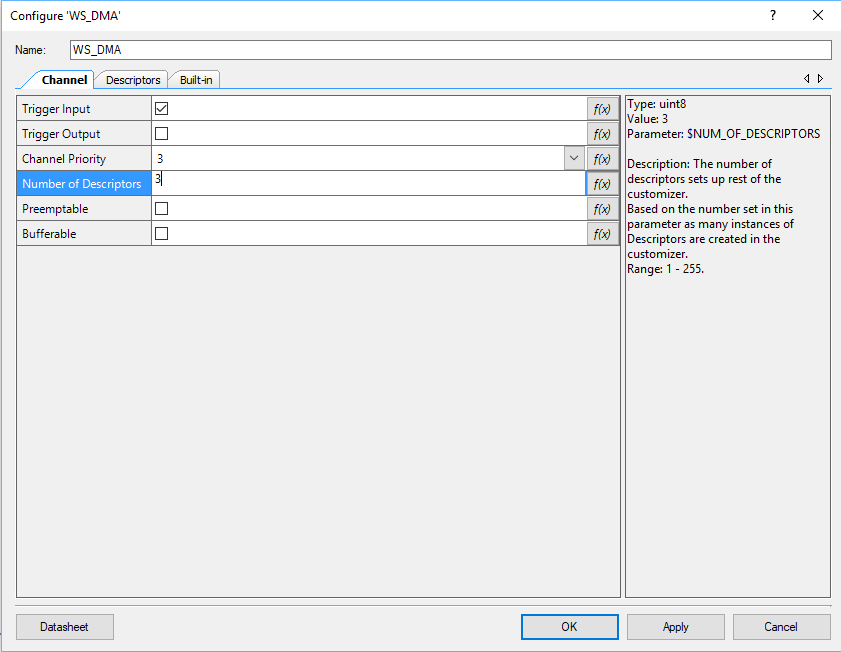
Which will give you three descriptors to configure.
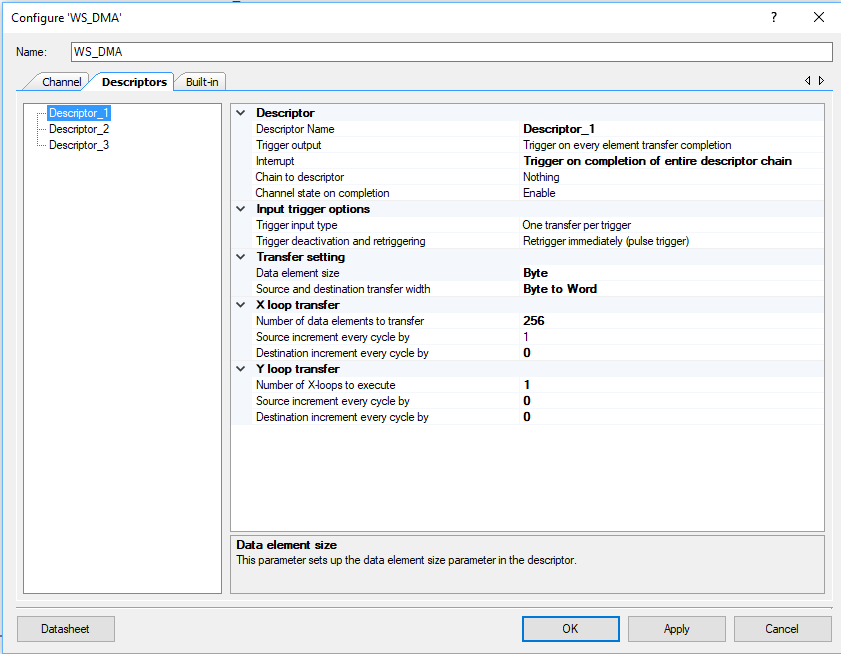
And when you build the code you will find configuration structures for each of the descriptors in the generated source. Here is a clip of code from then WS_DMA.C (which PSoC Creator generates)
const cy_stc_dma_descriptor_config_t WS_DMA_Descriptor_2_config =
{
    .retrigger       = CY_DMA_RETRIG_IM,
    .interruptType   = CY_DMA_1ELEMENT,
    .triggerOutType  = CY_DMA_1ELEMENT,
    .channelState    = CY_DMA_CHANNEL_ENABLED,
    .triggerInType   = CY_DMA_1ELEMENT,
    .dataSize        = CY_DMA_WORD,
    .srcTransferSize = CY_DMA_TRANSFER_SIZE_DATA,
    .dstTransferSize = CY_DMA_TRANSFER_SIZE_DATA,
    .descriptorType  = CY_DMA_SINGLE_TRANSFER,
    .srcAddress      = NULL,
    .dstAddress      = NULL,
    .srcXincrement   = 1L,
    .dstXincrement   = 1L,
    .xCount          = 1UL,
    .srcYincrement   = 1L,
    .dstYincrement   = 1L,
    .yCount          = 1UL,
    .nextDescriptor  = NULL
};

cy_stc_dma_descriptor_t WS_DMA_Descriptor_2 =
{
    .ctl = 0UL,
    .src = 0UL,
    .dst = 0UL,
    .xCtl = 0UL,
    .yCtl = 0UL,
    .nextPtr = 0UL
};
The problem is that it will be much better for the user of the WS2812 library to be able to configure the number of LEDs have it adjust the DMA chain automatically. So, to chain the DMA Descriptors together I created my own descriptor initialization code:
- Calculate the number of descriptors required by looking at the sizeof the WS_frameBuffer. You need to have at least 1.
- Create an array with enough descriptors
- Copy one of the descriptor initialization structures into my code (from the generated source), so that I can use the Cy_DMA_Descriptor_Init function
- Loop through all of the descriptors and initialize them. Notice that I make the next descriptor be the next descriptor in the array
- The last descriptor will have less bytes, no next descriptor and you want to disable the channel when it is done
#define WS_NUM_DESCRIPTORS (sizeof(WS_frameBuffer) / 256 + 1)
static cy_stc_dma_descriptor_t WSDescriptors[WS_NUM_DESCRIPTORS];


static void WS_DMAConfigure(void)
{
    // I copies this structure from the PSoC Creator Component configuration
    // in generated source
    const cy_stc_dma_descriptor_config_t WS_DMA_Descriptors_config =
    {
    .retrigger       = CY_DMA_RETRIG_IM,
    .interruptType   = CY_DMA_DESCR_CHAIN,
    .triggerOutType  = CY_DMA_1ELEMENT,
    .channelState    = CY_DMA_CHANNEL_ENABLED,
    .triggerInType   = CY_DMA_1ELEMENT,
    .dataSize        = CY_DMA_BYTE,
    .srcTransferSize = CY_DMA_TRANSFER_SIZE_DATA,
    .dstTransferSize = CY_DMA_TRANSFER_SIZE_WORD,
    .descriptorType  = CY_DMA_1D_TRANSFER,
    .srcAddress      = NULL,
    .dstAddress      = NULL,
    .srcXincrement   = 1L,
    .dstXincrement   = 0L,
    .xCount          = 256UL,
    .srcYincrement   = 0L,
    .dstYincrement   = 0L,
    .yCount          = 1UL,
    .nextDescriptor  = 0
    };

    for(unsigned int i=0;i<WS_NUM_DESCRIPTORS;i++)
    {
        Cy_DMA_Descriptor_Init(&WSDescriptors[i], &WS_DMA_Descriptors_config);
        Cy_DMA_Descriptor_SetSrcAddress(&WSDescriptors[i], (uint8_t *)&WS_frameBuffer[i*256]);
        Cy_DMA_Descriptor_SetDstAddress(&WSDescriptors[i], (void *)&WS_SPI_HW->TX_FIFO_WR);
        Cy_DMA_Descriptor_SetXloopDataCount(&WSDescriptors[i],256); // the last
        Cy_DMA_Descriptor_SetNextDescriptor(&WSDescriptors[i],&WSDescriptors[i+1]);
    }

    // The last one needs a bit of change
    Cy_DMA_Descriptor_SetXloopDataCount(&WSDescriptors[WS_NUM_DESCRIPTORS-1],sizeof(WS_frameBuffer)-256*(WS_NUM_DESCRIPTORS-1)); // the last
    Cy_DMA_Descriptor_SetNextDescriptor(&WSDescriptors[WS_NUM_DESCRIPTORS-1],0);
    Cy_DMA_Descriptor_SetChannelState(&WSDescriptors[WS_NUM_DESCRIPTORS-1],CY_DMA_CHANNEL_DISABLED);


     /* Initialize and enable the interrupt from WS_DMA */
    Cy_SysInt_Init(&WS_DMA_INT_cfg, &WS_DMAComplete);
    NVIC_EnableIRQ(WS_DMA_INT_cfg.intrSrc);
    Cy_DMA_Channel_SetInterruptMask(WS_DMA_HW, WS_DMA_DW_CHANNEL, WS_DMA_INTR_MASK);

    Cy_DMA_Enable(WS_DMA_HW);
}
With all of that done, the last change is to change the DMA channel initialization code to use the correct first descriptor
void WS_DMATrigger()
{
    cy_stc_dma_channel_config_t channelConfig;
    channelConfig.descriptor  = &WSDescriptors[0];
    channelConfig.preemptable = WS_DMA_PREEMPTABLE;
    channelConfig.priority    = WS_DMA_PRIORITY;
    channelConfig.enable      = false;
    Cy_DMA_Channel_Init(WS_DMA_HW, WS_DMA_DW_CHANNEL, &channelConfig);
    Cy_DMA_Channel_Enable(WS_DMA_HW,WS_DMA_DW_CHANNEL);
}
Automatically send the Frame Buffer
I initially “triggered” the DMA using keyboard commands that called the function WS_DMATrigger. But after I got things working I realized that what I really wanted to do was update the “screen” aka the strip of LEDs at about 30Hz. To do this I turn on the ARM SysTick timer to call my function WS_SysTickHandler every 1ms.
    Cy_SysTick_Init(CY_SYSTICK_CLOCK_SOURCE_CLK_IMO,8000);
    Cy_SysTick_Enable();
In the WS_SysTickHandler, I count the number of times I have been called and store it in a static variable called “count”. When count gets to 33 (or greater) meaning that 33mS has gone by, I check to make sure that the DMA is disabled and then I call the update function. I also reset the timer back to 0.
void WS_SysTickHandler()
{
    static int count=0;
    if((Cy_DMA_Channel_GetStatus(WS_DMA_HW,WS_DMA_DW_CHANNEL) & CY_DMA_INTR_CAUSE_COMPLETION) && count++>32)
    {
        WS_DMATrigger();
        count = 0;
    }
}
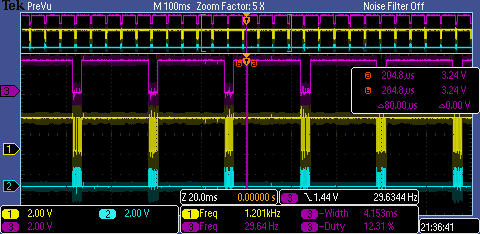
With that installed I get a nice 30Hz update. The screenshot below is configured with 144 Pixels and it take 4.15mS to update the screen which is about a 12% duty cycle.
I’m Lucky it Works
The last thing to observe in all of this is that I am driving the LED string with a 5V wall wart.
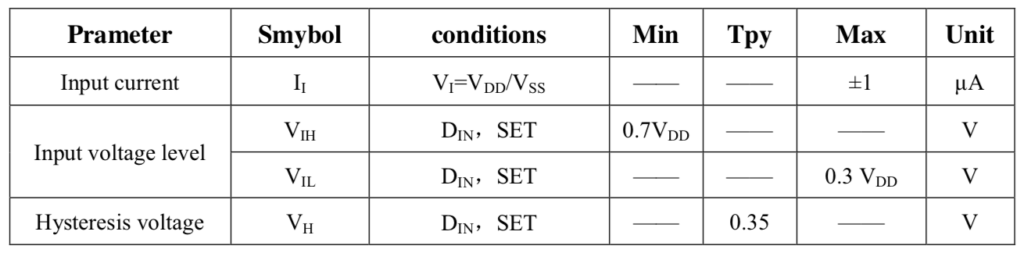
And according to the datasheet VIH is 0x7 * VDD = 3.5V … and I am driving it with a PSoC 6 with 3.3V. Oh well.
All of this source code is available at GitHub or you can clone git@github.com:iotexpert/WS2812.git


