Summary
A discussion of reading I2C data from a sensor and sending it to a MySQL instance in the cloud using Python.
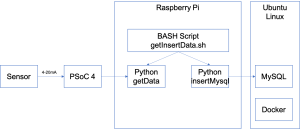
I was originally planning only one article on the MySQL part of this project. But things got really out of control and I ended up splitting the article into two parts. I jokingly called this article “Part 2.5”. In today’s article I’ll take the steps to have Python and the libraries running on the Raspberry Pi to read data and send it to my new Docker MySQL Server.
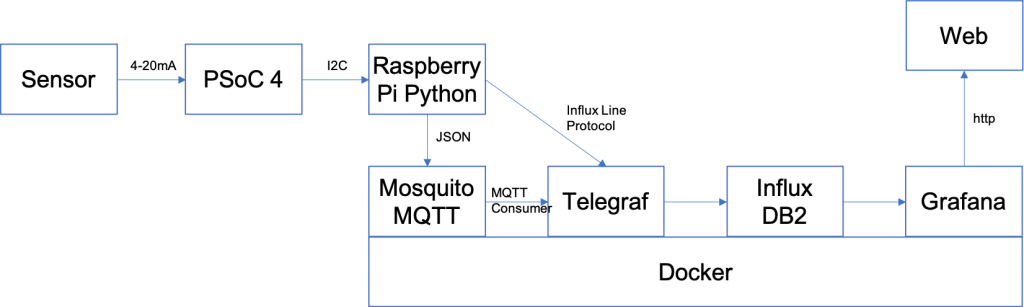
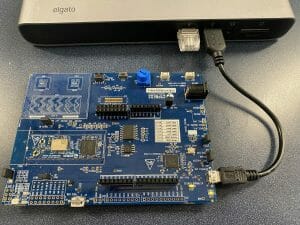
Here is what the picture looks like:
Build the Python Environment w/smbus & mysql-connector-python
I typically like to build a Python virtual environment with the specific version of python and all of the required packages. To do this you need to
- python3 -m venv venv
- source venv/bin/activate
- pip install smbus
- pip install mysql-connector-python
pi@iotexpertpi:~ $ mkdir mysql-docker
pi@iotexpertpi:~ $ python3 -m venv venv
pi@iotexpertpi:~ $ source venv/bin/activate
(venv) pi@iotexpertpi:~ $ pip install smbus
Looking in indexes: https://pypi.org/simple, https://www.piwheels.org/simple
Collecting smbus
  Using cached https://www.piwheels.org/simple/smbus/smbus-1.1.post2-cp37-cp37m-linux_armv6l.whl
Installing collected packages: smbus
Successfully installed smbus-1.1.post2
(venv) pi@iotexpertpi:~ $ pip install mysql-connector-python
Looking in indexes: https://pypi.org/simple, https://www.piwheels.org/simple
Collecting mysql-connector-python
  Using cached https://files.pythonhosted.org/packages/2a/8a/428d6be58fab7106ab1cacfde3076162cd3621ef7fc6871da54da15d857d/mysql_connector_python-8.0.25-py2.py3-none-any.whl
Collecting protobuf>=3.0.0 (from mysql-connector-python)
  Downloading https://files.pythonhosted.org/packages/6b/2c/62cee2a27a1c4c0189582330774ed6ac2bfc88cb223f04723620ee04d59d/protobuf-3.17.0-py2.py3-none-any.whl (173kB)
    100% |████████████████████████████████| 174kB 232kB/s
Collecting six>=1.9 (from protobuf>=3.0.0->mysql-connector-python)
  Using cached https://files.pythonhosted.org/packages/d9/5a/e7c31adbe875f2abbb91bd84cf2dc52d792b5a01506781dbcf25c91daf11/six-1.16.0-py2.py3-none-any.whl
Installing collected packages: six, protobuf, mysql-connector-python
Successfully installed mysql-connector-python-8.0.25 protobuf-3.17.0 six-1.16.0
(venv) pi@iotexpertpi:~
Once that is done you can see that everything is copasetic by running “pip freeze” where you can see the mysql-connector-python and the smbus.
(venv) pi@iotexpertpi:~ $ pip freeze
mysql-connector-python==8.0.25
pkg-resources==0.0.0
protobuf==3.17.0
six==1.16.0
smbus==1.1.post2
Python: Get Data SMBUS
If you remember from the original design that the PSoC 4 acts as a register file with the data from the temperature and pressure sensor. It has 12 bytes of data as
- 2-bytes formatted as a 16-bit unsigned ADC counts from the Pressure Sensor
- 2-bytes formatted as a 16-bit signed pressure in “centiTemp”
- 4-bytes float as the depth in Feet
- 4-bytes float as the temperature in Centigrade
This program:
- Reads the I2c for 12-bytes
- Converts it into an array
- Prints out the values
import struct
import sys
import smbus
from datetime import datetime
from influxdb_client import InfluxDBClient, Point, WritePrecision
from influxdb_client.client.write_api import SYNCHRONOUS


######################################################
#Read the data from the PSoC 4
######################################################
bus = smbus.SMBus(1)
address = 0x08

# The data structure in the PSOC 4 is:
# uint16_t pressureCount ; the adc-counts being read on the pressure sensor
# int16_t centiTemp ; the temperaure in 10ths of a degree C
# float depth ; four bytes float representing the depth in Feet
# float temperature ; four byte float representing the temperature in degrees C

numBytesInStruct = 12
block = bus.read_i2c_block_data(address, 0, numBytesInStruct)

# convert list of bytes returned from sensor into array of bytes
mybytes = bytearray(block)
# convert the byte array into
# H=Unsigned 16-bit int
# h=Signed 16-bit int
# f=Float
# this function will return a tuple with pressureCount,centiTemp,depth,temperature
vals = struct.unpack_from('Hhff',mybytes,0)
# prints the tuple
depth = vals[2]
temperature = vals[3]
print(f"{depth} {temperature}")
Python: MySQL
I created a separate Python program to insert the data into the MySQL database. This program does the following things
- Makes sure the command line arguments make sense
- Makes a connection to the server
- Creates the SQL statement
- Runs the inserts
import mysql.connector
import sys
from datetime import datetime


if len(sys.argv) != 3:
    sys.exit("Wrong number of arguments")

mydb = mysql.connector.connect(
    host="spiff.local",
    user="creek",
    password="donthackme",
    database="creekdata",
    auth_plugin='mysql_native_password')

now = datetime.now()
formatted_date = now.strftime('%Y-%m-%d %H:%M:%S')
sql = "insert into creekdata.creekdata (depth,temperature,created_at) values (%s,%s,%s)"
vals = (sys.argv[1],sys.argv[2],formatted_date)


mycursor = mydb.cursor()

mycursor.execute(sql, vals)

mydb.commit()
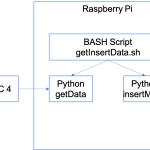
Shell Script & Crontab
I created a simple bash shell script to
- Activate the virtual enviroment
- Run the get data python program
- Run the insert program
#!/bin/bash

cd ~/influxdb
source venv/bin/activate
vals=$(python getData.py)
#echo $vals
python insertMysql.py $vals
Finally, a cronjob to run the program every 5 minutes.
# Edit this file to introduce tasks to be run by cron.
#
# Each task to run has to be defined through a single line
# indicating with different fields when the task will be run
# and what command to run for the task
#
# To define the time you can provide concrete values for
# minute (m), hour (h), day of month (dom), month (mon),
# and day of week (dow) or use '*' in these fields (for 'any').
#
# Notice that tasks will be started based on the cron's system
# daemon's notion of time and timezones.
#
# Output of the crontab jobs (including errors) is sent through
# email to the user the crontab file belongs to (unless redirected).
#
# For example, you can run a backup of all your user accounts
# at 5 a.m every week with:
# 0 5 * * 1 tar -zcf /var/backups/home.tgz /home/
#
# For more information see the manual pages of crontab(5) and cron(8)
#
# m h  dom mon dow   command
0,5,10,20,25,30,35,40,45,50,55 * * * * /home/pi/influxdb/getInsertData.sh
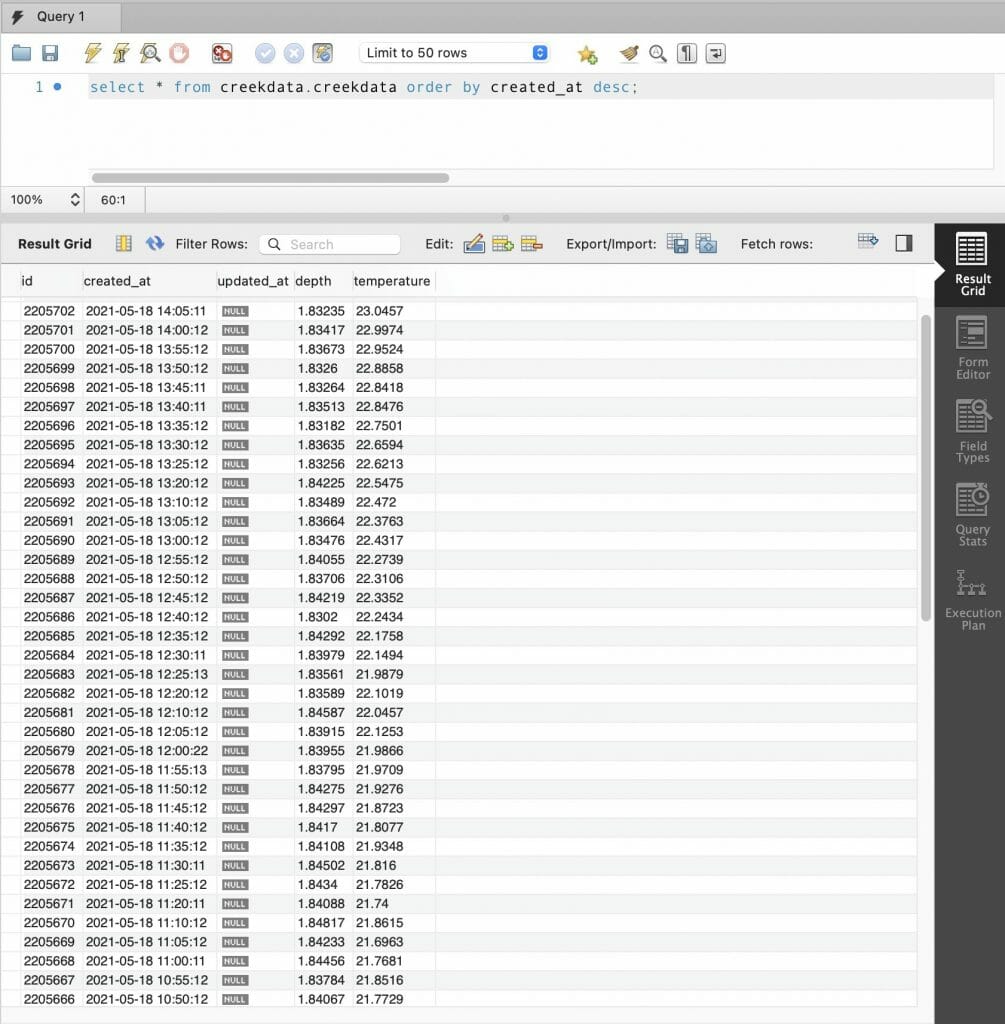
Test with MySQL WorkBench
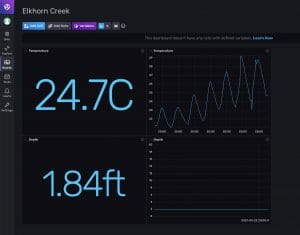
Now when I load the data from the MySQL Workbench I can see the inserts are happening. Kick ass.

No comment yet, add your voice below!