AnyCloud WiFi Template + WiFi Helper Library (Part 3): A New Modus Toolbox Library

Summary

Instructions to create a new Modus Toolbox / AnyCloud library including modifying your master middleware manifest and updating the dependencies.  The new library and dependencies will then be available in your library browser and new project creator.

Article
(Part 1) Create Basic Project & Add Cypress Logging Functionality
(Part 2) Create New Thread to manage WiFi using the Wireless Connection Manager
(Part 3) Create a New Middleware Library with WiFi helper functions
(Part 4) Add WiFi Scan
Add WiFi Connect
Add WiFi Disconnect
Add WiFi Ping
Add Gethostbyname
Add MDNS
Add Status
Add StartAP
Make a new template project (update manifest)

Story

In the previous article we discussed the steps to turn on the WiFi chip in your project using the Wireless Connection Manager Anycloud (WCM) library.  When something happens with the WCM it will give you a callback to tell you what happened.  In my example code there were three printf’s that were commented out for the conditions:

  • CY_WCM_EVENT_IP_CHANGED
  • CY_WCM_EVENT_STA_JOINED_SOFTAP
  • CY_WCM_EVENT_STA_LEFT_SOFTAP

The question you might have is “What is the new Ip Address”” or “What is the MAC address of the Station which joined the SoftAp?”

        case CY_WCM_EVENT_IP_CHANGED:           /**< IP address change event. This event is notified after connection, re-connection, and IP address change due to DHCP renewal. */
 //               cy_wcm_get_ip_addr(wifi_network_mode, &ip_addr, 1);
                printf("Station IP Address Changed: %s\n",wifi_ntoa(&ip_addr));
        break;
        case CY_WCM_EVENT_STA_JOINED_SOFTAP:    /**< An STA device connected to SoftAP. */
//            printf("STA Joined: %s\n",wifi_mac_to_string(event_data->sta_mac));
        break;
        case CY_WCM_EVENT_STA_LEFT_SOFTAP:      /**< An STA device disconnected from SoftAP. */
//            printf("STA Left: %s\n",wifi_mac_to_string(event_data->sta_mac));

So I wrote “standard” functions to

  • Convert an IP address structure to a string (like ntoa in Linux)
  • Convert a MAC address to a string

I essentially got these from the code example where they were redundantly repeatedly repeated.  After tweaking them to suit my liking I wanted to put them in a library.

Make the C-Library

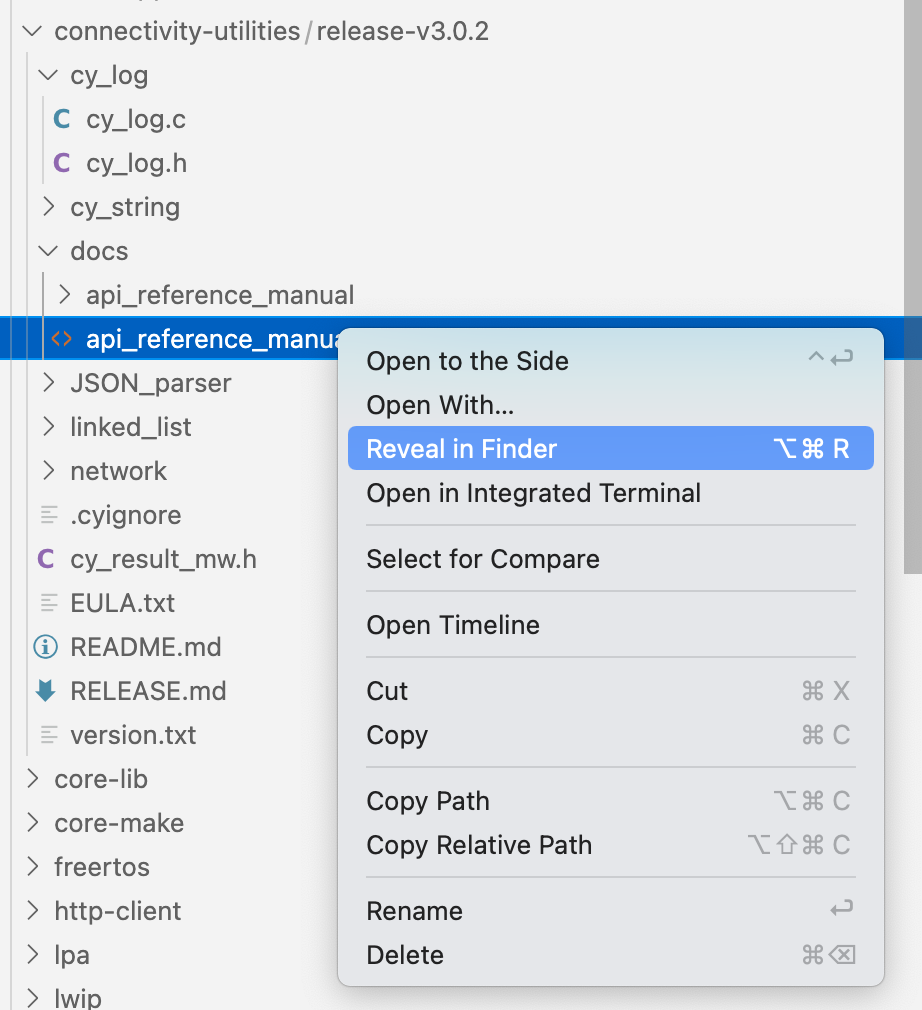
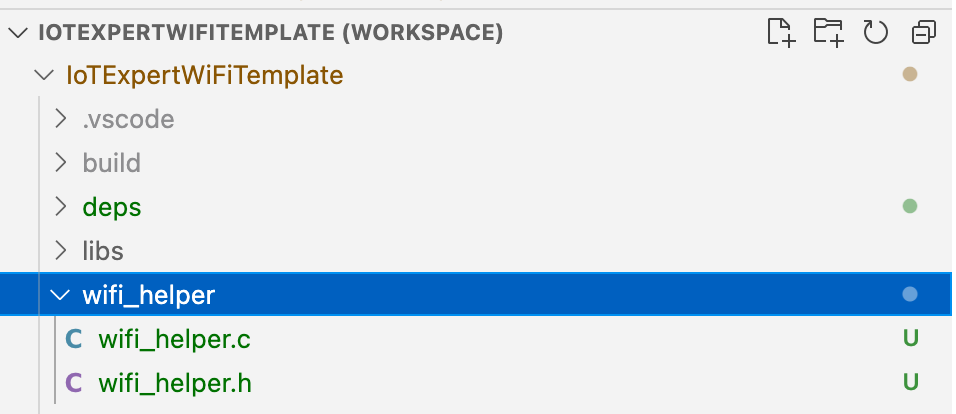
Follow these steps to make the c-library.  First, make a new directory in your project called “wifi_helper”.  You can do this in Visual Studio Code by pressing the folder button with the plus on it.

Then create the files wifi_helper.h and wifi_helper.c

In “wifi_helper.h” type in the public interface.  Specifically, that we want a function that takes a mac address returns a char*.  And another function that takes an IP address and returns a char*

#pragma once

#include "cy_wcm.h"

char *wifi_mac_to_string(cy_wcm_mac_t mac);

char *wifi_ntoa(cy_wcm_ip_address_t *ip_addr);


All right Hassane… yes these functions need comments.  Notice that I allocated a static buffer inside of these two function.  That means that these functions are NOT NOT NOT thread safe.  However, personally I think that is fine as I think that it is unlikely that they would ever be called from multiple threads.

#include "wifi_helper.h"
#include "cy_wcm.h"
#include <stdio.h>
#include "cy_utils.h"
#include "cy_log.h"

char *wifi_mac_to_string(cy_wcm_mac_t mac)
{
    static char _mac_string[] = "xx:xx:xx:xx:xx:xx";
    sprintf(_mac_string,"%02X:%02X:%02X:%02X:%02X:%02X",mac[0],mac[1],mac[2],mac[3],mac[4],mac[5]);
    return _mac_string; 
}


char *wifi_ntoa(cy_wcm_ip_address_t *ip_addr)
{
    static char _netchar[32];
    switch(ip_addr->version)
    {
        case CY_WCM_IP_VER_V4:
            sprintf(_netchar,"%d.%d.%d.%d", (uint8_t)ip_addr->ip.v4,
                (uint8_t)(ip_addr->ip.v4 >> 8), (uint8_t)(ip_addr->ip.v4 >> 16),
                (uint8_t)(ip_addr->ip.v4 >> 24));        break;
        case CY_WCM_IP_VER_V6:
            sprintf(_netchar,"%X:%X:%X:%X", (uint8_t)ip_addr->ip.v6[0],
                (uint8_t)(ip_addr->ip.v6[1]), (uint8_t)(ip_addr->ip.v6[2]),
                (uint8_t)(ip_addr->ip.v6[3]));
        break;
    }
    CY_ASSERT(buff[0] != 0); // SOMETHING should have happened
    return _netchar;
}

Git Repository

Now that I have the files I need in the library, I want to create a place on GitHub to hold the library.

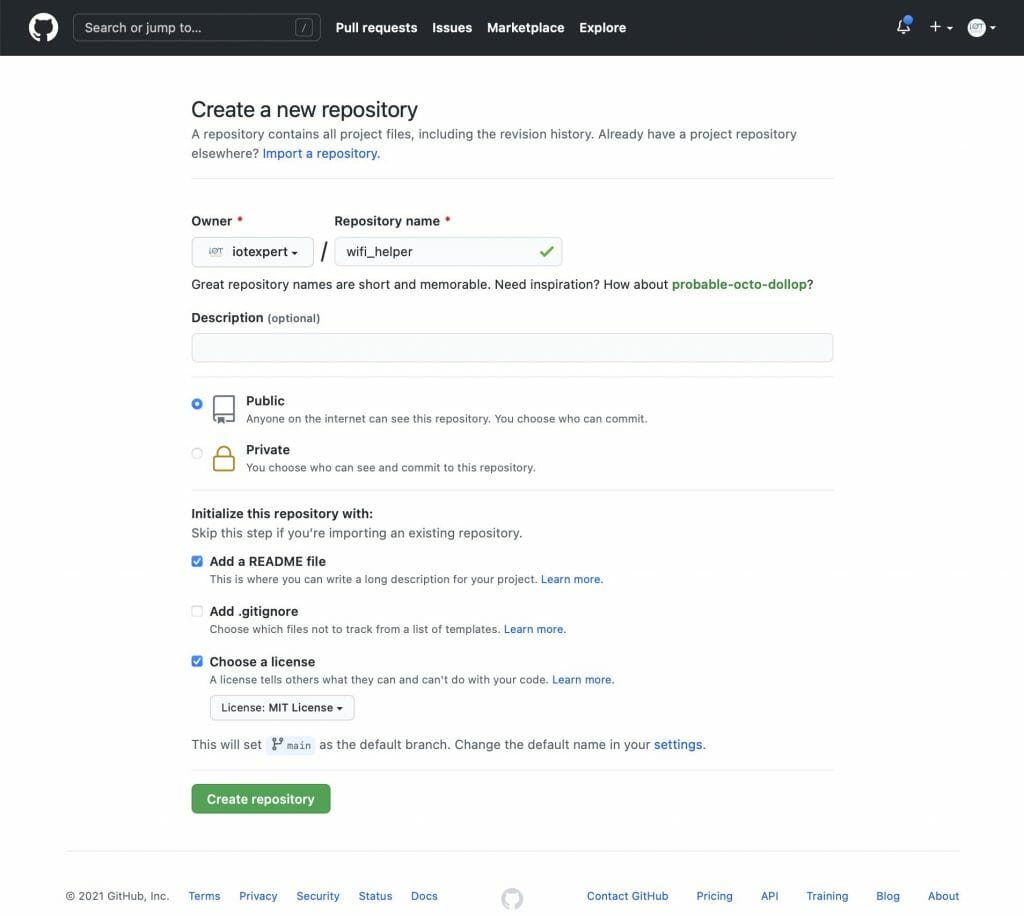
Now we need to integrate the files into Git.  To do this you need to

  1. Initialize a new git repository (git init .)
  2. Add a remote (git remote add origin git@github.com:iotexpert/wifi_helper.git)
  3. Pull the remote files (README and LICENSE) with (git pull origin main)
  4. Add the wifi_helper files (git add wifi_helper.*)
  5. Commit the changes (git commit -m “added initial c files”)
  6. Push them to the remote (git push -u origin main)
arh (master *+) wifi_helper $ pwd
/Users/arh/proj/elkhorncreek3/IoTExpertWiFiTemplate/wifi_helper
arh (master *+) wifi_helper $ git init .
Initialized empty Git repository in /Users/arh/proj/elkhorncreek3/IoTExpertWiFiTemplate/wifi_helper/.git/
arh (main #) wifi_helper $ git remote add origin git@github.com:iotexpert/wifi_helper.git
arh (main #) wifi_helper $ git pull origin main
remote: Enumerating objects: 4, done.
remote: Counting objects: 100% (4/4), done.
remote: Compressing objects: 100% (4/4), done.
remote: Total 4 (delta 0), reused 0 (delta 0), pack-reused 0
Unpacking objects: 100% (4/4), 1.28 KiB | 436.00 KiB/s, done.
From iotexpert.github.com:iotexpert/wifi_helper
 * branch            main       -> FETCH_HEAD
 * [new branch]      main       -> origin/main
arh (main) wifi_helper $ git add wifi_helper.*
arh (main +) wifi_helper $ git commit -m "added initial c files"
[main f7d10b1] added initial c files
 2 files changed, 72 insertions(+)
 create mode 100644 wifi_helper.c
 create mode 100644 wifi_helper.h
arh (main) wifi_helper $ git push -u origin main
Enumerating objects: 5, done.
Counting objects: 100% (5/5), done.
Delta compression using up to 12 threads
Compressing objects: 100% (4/4), done.
Writing objects: 100% (4/4), 1.10 KiB | 1.10 MiB/s, done.
Total 4 (delta 0), reused 0 (delta 0), pack-reused 0
To iotexpert.github.com:iotexpert/wifi_helper.git
   3a1ad32..f7d10b1  main -> main
Branch 'main' set up to track remote branch 'main' from 'origin'.
arh (main) wifi_helper $ 

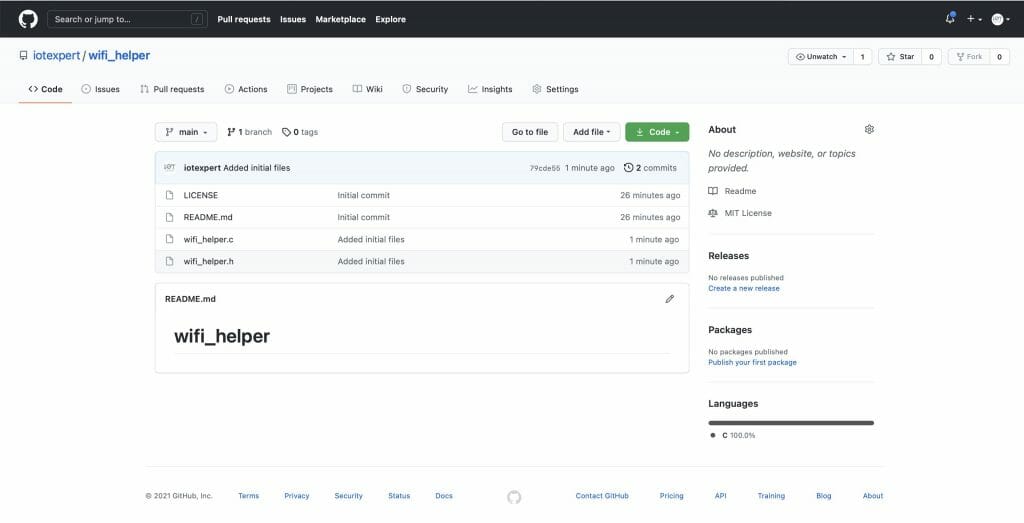
Now you will have something like this on GitHub.

Manifest Files

I would like to be able to have my new library show up in the library browser.  But how?  When the library browser starts up it needs to discover:

  1. Board Support Packages
  2. Template Projects
  3. Middleware Code Libraries

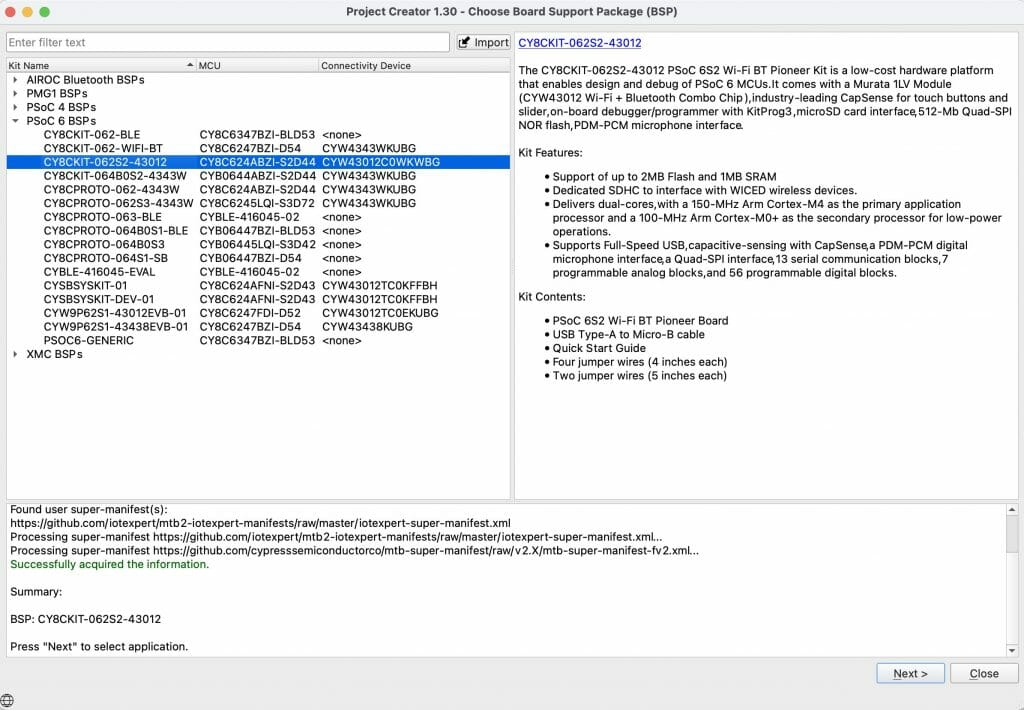
To do this, it reads a series of XML files called “manifests”.  These manifest files tell the library browser where to find the libraries.  If you have ever noticed the library browser (or the new project creator) it looks like this:

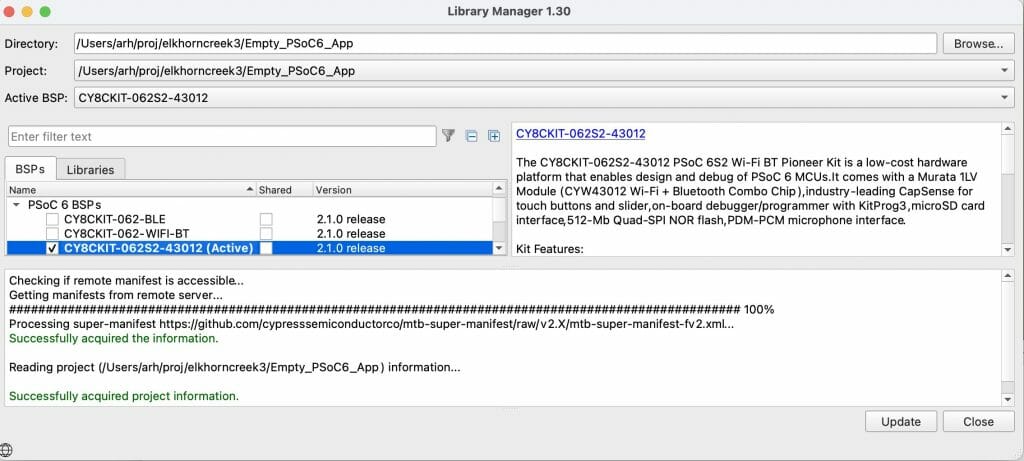
The message “Processing super-manifest …” give you a hint to go to https://raw.githubusercontent.com/cypresssemiconductorco/mtb-super-manifest/v2.X/mtb-super-manifest-fv2.xml

Here it is.  Notice that the XML scheme says that this file is a “super-manifest”.  Then notice that there are sections:

  • <board-manifest-list> these are BSPs
  • <app-manifest-list> these are template projects
  • <middleware-manifest-list> these are middleware code libraries
<super-manifest>
<board-manifest-list>
<board-manifest>
<uri>https://github.com/cypresssemiconductorco/mtb-bsp-manifest/raw/v2.X/mtb-bsp-manifest.xml</uri>
</board-manifest>
<board-manifest dependency-url="https://github.com/cypresssemiconductorco/mtb-bsp-manifest/raw/v2.X/mtb-bsp-dependencies-manifest.xml">
<uri>https://github.com/cypresssemiconductorco/mtb-bsp-manifest/raw/v2.X/mtb-bsp-manifest-fv2.xml</uri>
</board-manifest>
<board-manifest>
<uri>https://github.com/cypresssemiconductorco/mtb-bt-bsp-manifest/raw/v2.X/mtb-bt-bsp-manifest.xml</uri>
</board-manifest>
<board-manifest dependency-url="https://github.com/cypresssemiconductorco/mtb-bt-bsp-manifest/raw/v2.X/mtb-bt-bsp-dependencies-manifest.xml">
<uri>https://github.com/cypresssemiconductorco/mtb-bt-bsp-manifest/raw/v2.X/mtb-bt-bsp-manifest-fv2.xml</uri>
</board-manifest>
</board-manifest-list>
<app-manifest-list>
<app-manifest>
<uri>https://github.com/cypresssemiconductorco/mtb-ce-manifest/raw/v2.X/mtb-ce-manifest.xml</uri>
</app-manifest>
<app-manifest>
<uri>https://github.com/cypresssemiconductorco/mtb-ce-manifest/raw/v2.X/mtb-ce-manifest-fv2.xml</uri>
</app-manifest>
<app-manifest>
<uri>https://github.com/cypresssemiconductorco/mtb-bt-app-manifest/raw/v2.X/mtb-bt-app-manifest.xml</uri>
</app-manifest>
<app-manifest>
<uri>https://github.com/cypresssemiconductorco/mtb-bt-app-manifest/raw/v2.X/mtb-bt-app-manifest-fv2.xml</uri>
</app-manifest>
</app-manifest-list>
<middleware-manifest-list>
<middleware-manifest>
<uri>https://github.com/cypresssemiconductorco/mtb-mw-manifest/raw/v2.X/mtb-mw-manifest.xml</uri>
</middleware-manifest>
<middleware-manifest dependency-url="https://github.com/cypresssemiconductorco/mtb-mw-manifest/raw/v2.X/mtb-mw-dependencies-manifest.xml">
<uri>https://github.com/cypresssemiconductorco/mtb-mw-manifest/raw/v2.X/mtb-mw-manifest-fv2.xml</uri>
</middleware-manifest>
<middleware-manifest>
<uri>https://github.com/cypresssemiconductorco/mtb-bt-mw-manifest/raw/v2.X/mtb-bt-mw-manifest.xml</uri>
</middleware-manifest>
<middleware-manifest dependency-url="https://github.com/cypresssemiconductorco/mtb-bt-mw-manifest/raw/v2.X/mtb-bt-mw-dependencies-manifest.xml">
<uri>https://github.com/cypresssemiconductorco/mtb-bt-mw-manifest/raw/v2.X/mtb-bt-mw-manifest-fv2.xml</uri>
</middleware-manifest>
<middleware-manifest>
<uri>https://github.com/cypresssemiconductorco/mtb-wifi-mw-manifest/raw/v2.X/mtb-wifi-mw-manifest.xml</uri>
</middleware-manifest>
<middleware-manifest dependency-url="https://github.com/cypresssemiconductorco/mtb-wifi-mw-manifest/raw/v2.X/mtb-wifi-mw-dependencies-manifest.xml">
<uri>https://github.com/cypresssemiconductorco/mtb-wifi-mw-manifest/raw/v2.X/mtb-wifi-mw-manifest-fv2.xml</uri>
</middleware-manifest>
</middleware-manifest-list>
</super-manifest>

But you can’t modify this to add your own?  So what do you do now?  Cypress put in the capability for you to extend the system by creating a file called “~/.modustoolbox/manifest.loc”.  This file contains one or more URLs to super-manifest files (like the one above) where you can add whatever you want.

Here is the iotexpert manifest.loc

arh ~ $ cd ~/.modustoolbox/
arh .modustoolbox $ more manifest.loc
https://github.com/iotexpert/mtb2-iotexpert-manifests/raw/master/iotexpert-super-manifest.xml
arh .modustoolbox $

This file points to a super manifest file in a GitHub repository.  Here is the repository:
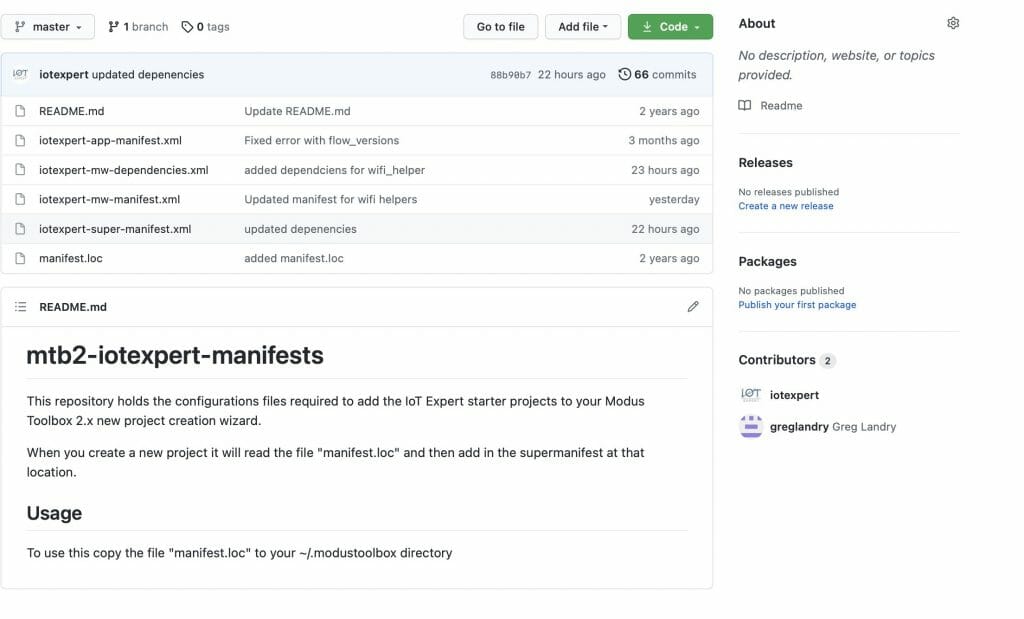
Notice that it has

  • iotexpert-super-manifest.xml – the top level iotexpert manifest
  • iotexpert-app-manifest.xml – my template projects
  • iotexpert-mw-manifest.xml – my middleware
  • manifest.loc – the file you need to put in your home directory
  • iotexpert-mw-dependencies.xml – a new file which I will talk about later

And the super manifest file that looks like this:

<super-manifest>
<board-manifest-list>
</board-manifest-list>
<app-manifest-list>
<app-manifest>
<uri>https://github.com/iotexpert/mtb2-iotexpert-manifests/raw/master/iotexpert-app-manifest.xml</uri>
</app-manifest>
</app-manifest-list>
<board-manifest-list>
</board-manifest-list>
<middleware-manifest-list>
<middleware-manifest dependency-url="https://github.com/iotexpert/mtb2-iotexpert-manifests/raw/master/iotexpert-mw-dependencies.xml">
<uri>https://github.com/iotexpert/mtb2-iotexpert-manifests/raw/master/iotexpert-mw-manifest.xml</uri>
</middleware-manifest>
</middleware-manifest-list>
</super-manifest>

To add the library we created above, I need to add the new middleware into my middleware manifest.  Modify the file “iotexpert-mw-manifest.xml” to have the new middleware.

<middleware>
<name>WiFi Helper Utilties</name>
<id>wifi_helper</id>
<uri>https://github.com/iotexpert/wifi_helper</uri>
<desc>A library WiFi Helper utilities (e.g. aton)</desc>
<category>IoT Expert</category>
<req_capabilities>psoc6</req_capabilities>
<versions>
<version flow_version="2.0">
<num>main</num>
<commit>main</commit>
<desc>main</desc>
</version>
</versions>
</middleware>

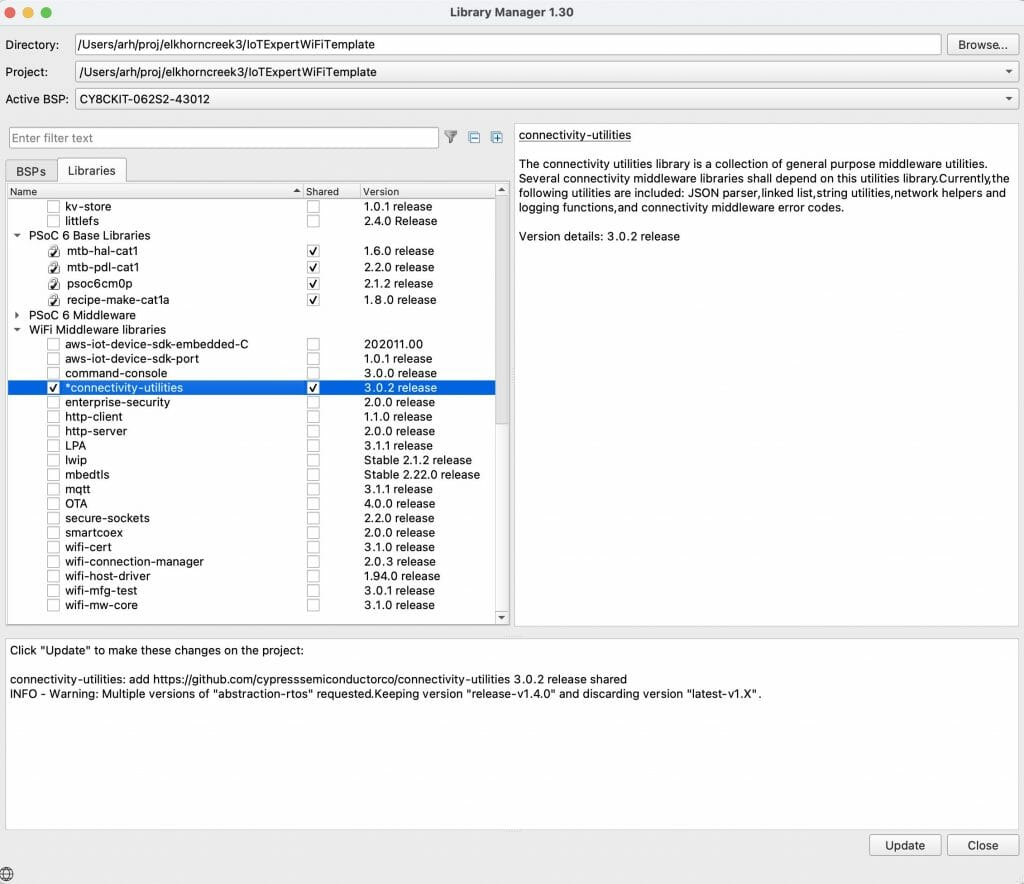
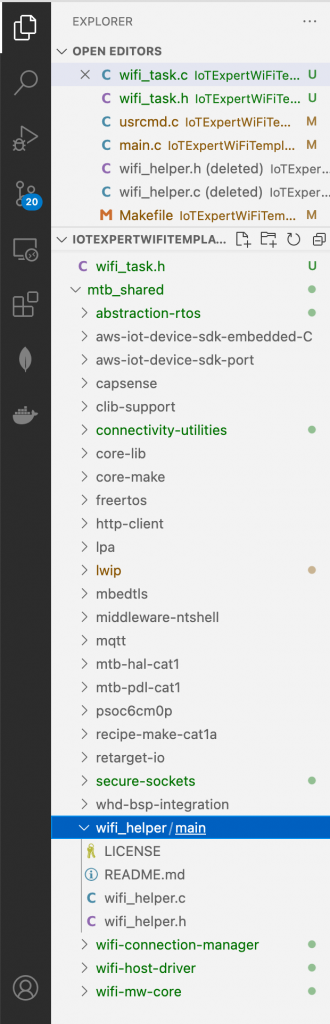
If you recall I have the “wifi_helper” directory inside of my project.  Not what I want (because I want it to be pulled using the library browser).  So I move out my project directory.  Now, let’s test the whole thing by running the library browser.

arh (master *+) IoTExpertWiFiTemplate $ pwd
/Users/arh/proj/elkhorncreek3/IoTExpertWiFiTemplate
arh (master *+) IoTExpertWiFiTemplate $ mv wifi_helper/ ~/proj/
arh (master *+) IoTExpertWiFiTemplate $ make modlibs
Tools Directory: /Applications/ModusToolbox/tools_2.3
CY8CKIT-062S2-43012.mk: ./libs/TARGET_CY8CKIT-062S2-43012/CY8CKIT-062S2-43012.mk
Launching library-manager

Excellent the WiFI Helper utilities show up.

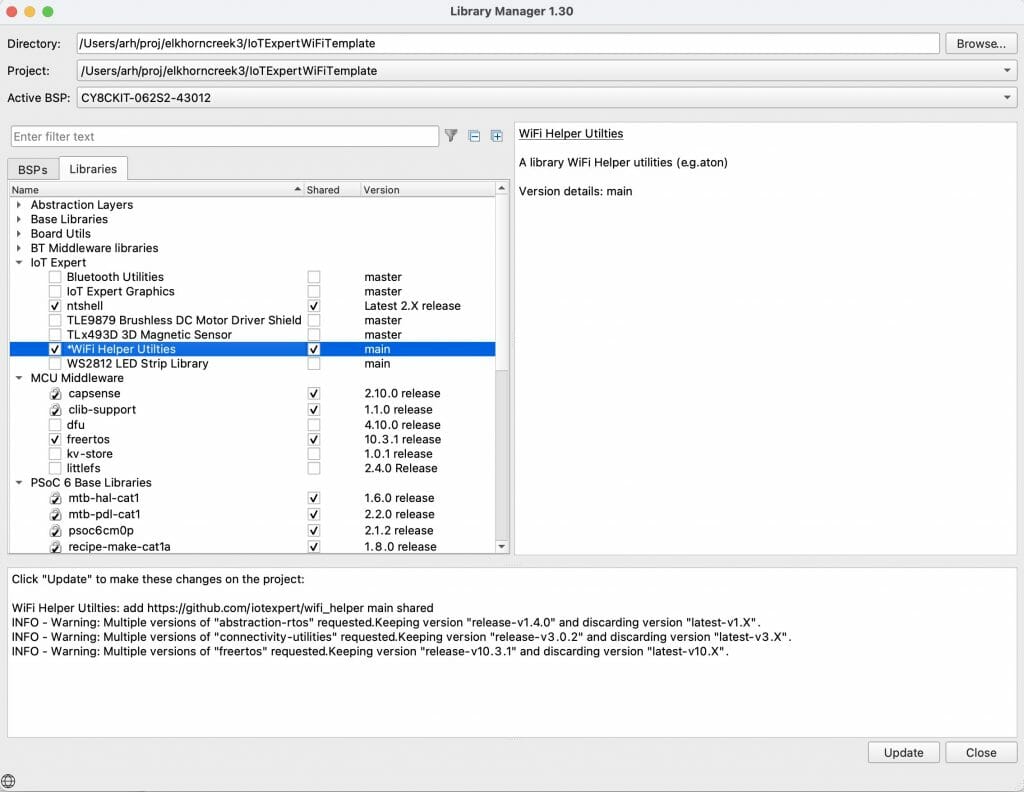
And when I run the “update” the files show up in the project.

Add Dependencies

If you recall from the code I had this include:

#include "cy_wcm.h"

That means that I am dependent on the library “wifi-connection-manager”.  To make this work I create a new file called “iotexpert-mw-depenencies.xml”.  In that file I tell the system that “wifi_helper” is now dependent on “wcm”

<dependencies version="2.0">
<depender>
<id>wifi_helper</id>
<versions>
<version>
<commit>main</commit>
<dependees>
<dependee>
<id>wcm</id>
<commit>latest-v2.X</commit>
</dependee>
</dependees>
</version>
</versions>
</depender>
</dependencies>

Once I have that file, I add that depencency file to my middleware manifest file.

  <middleware-manifest-list>
<middleware-manifest dependency-url="https://github.com/iotexpert/mtb2-iotexpert-manifests/raw/master/iotexpert-mw-dependencies.xml">
<uri>https://github.com/iotexpert/mtb2-iotexpert-manifests/raw/master/iotexpert-mw-manifest.xml</uri>
</middleware-manifest>
</middleware-manifest-list>
</super-manifest>

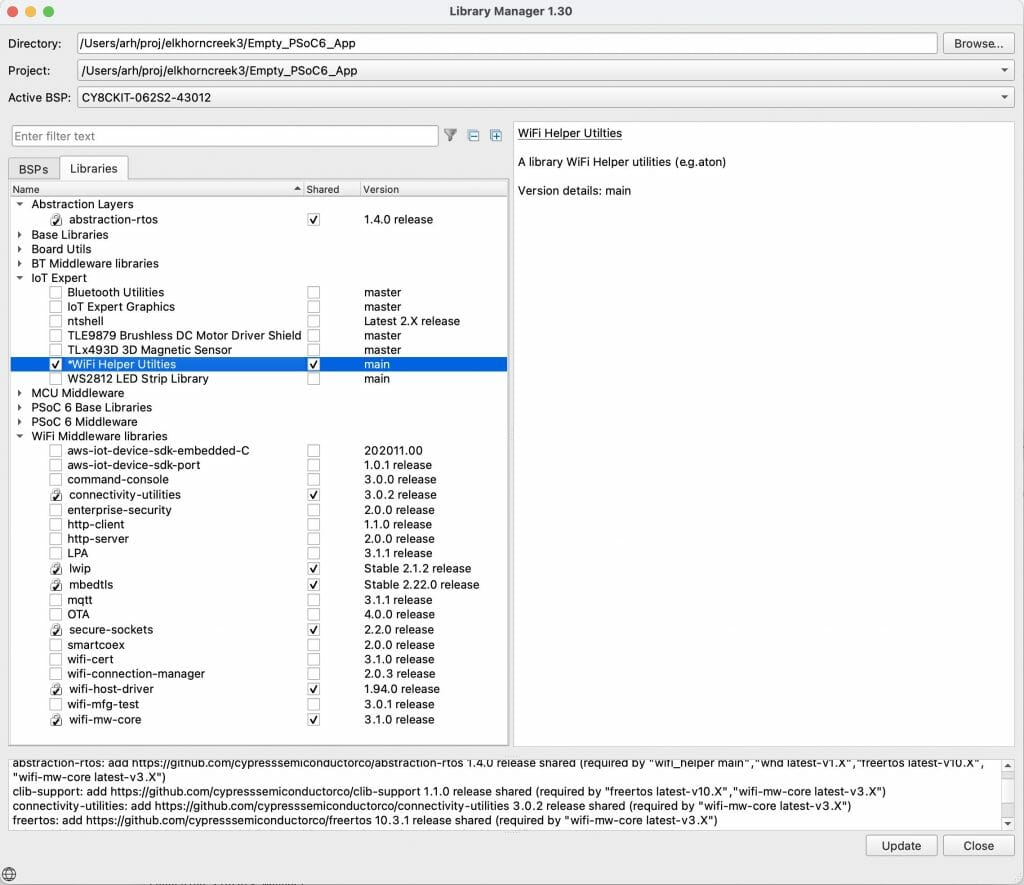
Now when I start the library browser and add the “WiFi Help Utilities” it will automatically add the wireless connection manager (and all of the libraries that the wcm is dependent on.

In the next article I will add Scanning functionality to the WiFi Task.

AnyCloud WiFi Template + WiFi Helper Library (Part 1): Introduction

Summary

The first article in a series that discusses building a new IoT project using Modus Toolbox and the AnyCloud SDK.  Specifically:

  1. The new-ish Error Logging library
  2. AnyCloud Wireless Connection Manager
  3. Creation of New Libraries and Template Projects
  4. Dual Role WiFi Access Point and Station using CYW43012
  5. MDNS

Story

I am working on a new implementation of my Elkhorn Creek IoT monitoring system.  In some of the previous articles I discussed the usage of the Influx Database and Docker as a new cloud backend.  To make this whole thing better I wanted to replace the Raspberry Pi (current system) with a PSoC 6 MCU and a CYW43012 WiFi Chip.  In order to do this, I need to make the PSoC 6 talk to the Influx Database using the WiFi and the Influx DB WebAPI.  I started to build this from my IoT Expert template, but quickly realized that I should make a template project with WiFi.

In this series of article I teach you how to use the Wireless Connection Manager, make new libraries and make new template projects.  Here is the agenda:

Article
(Part 1) Create Basic Project & Add Cypress Logging Functionality
(Part 2) Create New Thread to manage WiFi using the Wireless Connection Manager
(Part 3) Create a New Middleware Library with WiFi helper functions
(Part 4) Add WiFi Scan
Add WiFi Connect
Add WiFi Disconnect
Add WiFi Ping
Add Gethostbyname
Add MDNS
Add Status
Add StartAP
Make a new template project (update manifest)

Create Basic Project

Today I happen to have a CY8CKIT-062S2-43012 on my desk.

So that looks like a good place to start.  Pick that development kit in from the new project creator.

I want to start from my tried and true NT Shell, FreeRTOS Template.  If you use the filter window and type “iot” it will filter things down to just the IoT templates.  Notice that I selected that I want to get a “Microsoft Visual Studio Code” target workspace.

After clicking create you will get a new project.

Something weird happened.  Well actually something bad happened.  When I start Visual Studio Code I get the message that I have multiple workspace files.  Why is that?

So I pick the first one.

Now there is a problem.  In the Makefile for this project I find out that the “APPNAME” is MTBShellTemplate

# Name of application (used to derive name of final linked file).
APPNAME=MTBShellTemplate

By default when you run “make vscode” it will make a workspace file for you with the name “APPNAME.code-workspace”.  This has now created a problem for you.  Specifically, if you regenerate the workspace by running “make vscode” you will update the WRONG file.  When the new project creator runs the “make vscode” it uses the name you entered on that form, not the one in the Makefile.

To fix this, edit he Makefile & delete the old MTB…workspace.  Then re-run make vscode

APPNAME=IoTExpertWiFiTemplate

I have been checking in the *.code-workspace file, but that may not be exactly the right thing to do.  I am not sure.  Oh well.  Here is what you screen should look like now that you have Visual Studio Code going.

I always like to test things to make sure everything works before I start editing.  So, press the play button, then the green play button.

It should build and program the development kit.

Then stop at main.

Press play and your terminal should look something like this.  Notice that I typed “help” and “tasks”

Add the Cypress Logging Functionality

Sometime recently the Software team added a logging capability.  This seems like a good time to try that that.  Start the library browser by running “make modlibs”.  Then enable the “connectivity-utilities”.  For some silly reason that is where the logging functions were added.

If you look in the “mtb_shared” you will now the cy_log directory.

Then click on the “api_reference.html”

And open it.

Cool.  This gives you some insight into the capability.

A simple test will be to printout a “blink” message in sync with the default blinking led.  To do this, I modify the blink_task in main.c  Take the following actions

  1. Add the include “cy_log.h”
  2. Add the initialization call “cy_log_init”
  3. Printout a test message using “cy_log_msg”
  4. Fix the stack
#include "cyhal.h"
#include "cybsp.h"
#include "cy_retarget_io.h"
#include <stdio.h>
#include "FreeRTOS.h"
#include "task.h"
#include "usrcmd.h"
#include "cy_log.h"
volatile int uxTopUsedPriority ;
TaskHandle_t blinkTaskHandle;
void blink_task(void *arg)
{
cyhal_gpio_init(CYBSP_USER_LED,CYHAL_GPIO_DIR_OUTPUT,CYHAL_GPIO_DRIVE_STRONG,0);
for(;;)
{
cy_log_msg(CYLF_DEF,CY_LOG_INFO,"Blink Info\n");
cyhal_gpio_toggle(CYBSP_USER_LED);
vTaskDelay(500);
}
}
int main(void)
{
uxTopUsedPriority = configMAX_PRIORITIES - 1 ; // enable OpenOCD Thread Debugging
/* Initialize the device and board peripherals */
cybsp_init() ;
__enable_irq();
cy_retarget_io_init(CYBSP_DEBUG_UART_TX, CYBSP_DEBUG_UART_RX, CY_RETARGET_IO_BAUDRATE);
cy_log_init(CY_LOG_INFO,0,0);
// Stack size in WORDs
// Idle task = priority 0
xTaskCreate(blink_task, "blinkTask", configMINIMAL_STACK_SIZE*2,0 /* args */ ,0 /* priority */, &blinkTaskHandle);
xTaskCreate(usrcmd_task, "usrcmd_task", configMINIMAL_STACK_SIZE*4,0 /* args */ ,0 /* priority */, 0);
vTaskStartScheduler();
}

When you run this, you will get the message repeatedly coming on the screen (probably gonna-want-a delete this before you go on)

Now that we have a working project with logging, in the next article Ill add WiFi

The Creek 3.0: Docker & InfluxDB

Summary

Instructions for installing InfluxDB2 in a docker container and writing a Python program to insert data.

Story

I don’t really have a long complicated story about how I got here.  I just wanted to replace my Java, MySQL, Tomcat setup with something newer.  I wanted to do it without writing a bunch of code.  It seemed like Docker + Influx + Telegraph + Grafana was a good answer.  In this article I install Influx DB on my new server using Docker.  Then I hookup my Creek data via a Python script.

Docker & InfluxDB

I have become a huge believer in using Docker, I think it is remarkable what they did.  I also think that using docker-compose is the correct way to launch new docker containers so that you don’t loose the secret sauce on the command line when doing a “docker run”.  Let’s get this whole thing going by creating a new docker-compose.yaml file with the description of our new docker container.  It is pretty simple:

  1. Specify the influxdb image
  2. Map port 8086 on the client and on the container
  3. Specify the initial conditions for the Influxdb – these are nicely documented in the installation instructions here.
  4. Create a volume
version: "3.3"  # optional since v1.27.0
services:
influxdb:
image: influxdb
ports:
- "8086:8086"
environment:
- DOCKER_INFLUXDB_INIT_MODE=setup
- DOCKER_INFLUXDB_INIT_USERNAME=root
- DOCKER_INFLUXDB_INIT_PASSWORD=password
- DOCKER_INFLUXDB_INIT_ORG=creekdata
- DOCKER_INFLUXDB_INIT_BUCKET=creekdata
volumes:
- influxdb2:/var/lib/influxdb2
volumes:
influxdb2:

Once you have that file you can run “docker-compose up”… and wait … until everything gets pulled from the docker hub.

arh@spiff:~/influx-telegraf-grafana$ docker-compose up
Creating network "influx-telegraf-grafana_default" with the default driver
Creating volume "influx-telegraf-grafana_influxdb2" with default driver
Pulling influxdb (influxdb:)...
latest: Pulling from library/influxdb
d960726af2be: Pull complete
e8d62473a22d: Pull complete
8962bc0fad55: Pull complete
3b26e21cfb07: Pull complete
f77b907603e3: Pull complete
2b137bdfa0c5: Pull complete
7e6fa243fc79: Pull complete
3e0cae572c4f: Pull complete
9a27f9435a76: Pull complete
Digest: sha256:090ba796c2e5c559b9acede14fc7c1394d633fb730046dd2f2ebf400acc22fc0
Status: Downloaded newer image for influxdb:latest
Creating influx-telegraf-grafana_influxdb_1 ... done
Attaching to influx-telegraf-grafana_influxdb_1
influxdb_1  | 2021-05-19T12:37:14.866162317Z	info	booting influxd server in the background	{"system": "docker"}
influxdb_1  | 2021-05-19T12:37:16.867909370Z	info	pinging influxd...	{"system": "docker"}
influxdb_1  | 2021-05-19T12:37:18.879390124Z	info	pinging influxd...	{"system": "docker"}
influxdb_1  | 2021-05-19T12:37:20.891280023Z	info	pinging influxd...	{"system": "docker"}
influxdb_1  | ts=2021-05-19T12:37:21.065674Z lvl=info msg="Welcome to InfluxDB" log_id=0UD9wCAG000 version=2.0.6 commit=4db98b4c9a build_date=2021-04-29T16:48:12Z
influxdb_1  | ts=2021-05-19T12:37:21.068517Z lvl=info msg="Resources opened" log_id=0UD9wCAG000 service=bolt path=/var/lib/influxdb2/influxd.bolt
influxdb_1  | ts=2021-05-19T12:37:21.069293Z lvl=info msg="Bringing up metadata migrations" log_id=0UD9wCAG000 service=migrations migration_count=15
influxdb_1  | ts=2021-05-19T12:37:21.132269Z lvl=info msg="Using data dir" log_id=0UD9wCAG000 service=storage-engine service=store path=/var/lib/influxdb2/engine/data
influxdb_1  | ts=2021-05-19T12:37:21.132313Z lvl=info msg="Compaction settings" log_id=0UD9wCAG000 service=storage-engine service=store max_concurrent_compactions=3 throughput_bytes_per_second=50331648 throughput_bytes_per_second_burst=50331648
influxdb_1  | ts=2021-05-19T12:37:21.132325Z lvl=info msg="Open store (start)" log_id=0UD9wCAG000 service=storage-engine service=store op_name=tsdb_open op_event=start
influxdb_1  | ts=2021-05-19T12:37:21.132383Z lvl=info msg="Open store (end)" log_id=0UD9wCAG000 service=storage-engine service=store op_name=tsdb_open op_event=end op_elapsed=0.059ms
influxdb_1  | ts=2021-05-19T12:37:21.132407Z lvl=info msg="Starting retention policy enforcement service" log_id=0UD9wCAG000 service=retention check_interval=30m
influxdb_1  | ts=2021-05-19T12:37:21.132428Z lvl=info msg="Starting precreation service" log_id=0UD9wCAG000 service=shard-precreation check_interval=10m advance_period=30m
influxdb_1  | ts=2021-05-19T12:37:21.132446Z lvl=info msg="Starting query controller" log_id=0UD9wCAG000 service=storage-reads concurrency_quota=1024 initial_memory_bytes_quota_per_query=9223372036854775807 memory_bytes_quota_per_query=9223372036854775807 max_memory_bytes=0 queue_size=1024
influxdb_1  | ts=2021-05-19T12:37:21.133391Z lvl=info msg="Configuring InfluxQL statement executor (zeros indicate unlimited)." log_id=0UD9wCAG000 max_select_point=0 max_select_series=0 max_select_buckets=0
influxdb_1  | ts=2021-05-19T12:37:21.434078Z lvl=info msg=Starting log_id=0UD9wCAG000 service=telemetry interval=8h
influxdb_1  | ts=2021-05-19T12:37:21.434165Z lvl=info msg=Listening log_id=0UD9wCAG000 service=tcp-listener transport=http addr=:9999 port=9999
influxdb_1  | 2021-05-19T12:37:22.905008706Z	info	pinging influxd...	{"system": "docker"}
influxdb_1  | 2021-05-19T12:37:22.920976742Z	info	got response from influxd, proceeding	{"system": "docker"}
influxdb_1  | Config default has been stored in /etc/influxdb2/influx-configs.
influxdb_1  | User	Organization	Bucket
influxdb_1  | root	creekdata	creekdata
influxdb_1  | 2021-05-19T12:37:23.043336133Z	info	Executing user-provided scripts	{"system": "docker", "script_dir": "/docker-entrypoint-initdb.d"}
influxdb_1  | 2021-05-19T12:37:23.044663106Z	info	initialization complete, shutting down background influxd	{"system": "docker"}
influxdb_1  | ts=2021-05-19T12:37:23.044900Z lvl=info msg="Terminating precreation service" log_id=0UD9wCAG000 service=shard-precreation
influxdb_1  | ts=2021-05-19T12:37:23.044906Z lvl=info msg=Stopping log_id=0UD9wCAG000 service=telemetry interval=8h
influxdb_1  | ts=2021-05-19T12:37:23.044920Z lvl=info msg=Stopping log_id=0UD9wCAG000 service=scraper
influxdb_1  | ts=2021-05-19T12:37:23.044970Z lvl=info msg=Stopping log_id=0UD9wCAG000 service=tcp-listener
influxdb_1  | ts=2021-05-19T12:37:23.545252Z lvl=info msg=Stopping log_id=0UD9wCAG000 service=task
influxdb_1  | ts=2021-05-19T12:37:23.545875Z lvl=info msg=Stopping log_id=0UD9wCAG000 service=nats
influxdb_1  | ts=2021-05-19T12:37:23.546765Z lvl=info msg=Stopping log_id=0UD9wCAG000 service=bolt
influxdb_1  | ts=2021-05-19T12:37:23.546883Z lvl=info msg=Stopping log_id=0UD9wCAG000 service=query
influxdb_1  | ts=2021-05-19T12:37:23.548747Z lvl=info msg=Stopping log_id=0UD9wCAG000 service=storage-engine
influxdb_1  | ts=2021-05-19T12:37:23.548788Z lvl=info msg="Closing retention policy enforcement service" log_id=0UD9wCAG000 service=retention
influxdb_1  | ts=2021-05-19T12:37:29.740107Z lvl=info msg="Welcome to InfluxDB" log_id=0UD9wj2l000 version=2.0.6 commit=4db98b4c9a build_date=2021-04-29T16:48:12Z
influxdb_1  | ts=2021-05-19T12:37:29.751816Z lvl=info msg="Resources opened" log_id=0UD9wj2l000 service=bolt path=/var/lib/influxdb2/influxd.bolt
influxdb_1  | ts=2021-05-19T12:37:29.756974Z lvl=info msg="Checking InfluxDB metadata for prior version." log_id=0UD9wj2l000 bolt_path=/var/lib/influxdb2/influxd.bolt
influxdb_1  | ts=2021-05-19T12:37:29.757053Z lvl=info msg="Using data dir" log_id=0UD9wj2l000 service=storage-engine service=store path=/var/lib/influxdb2/engine/data
influxdb_1  | ts=2021-05-19T12:37:29.757087Z lvl=info msg="Compaction settings" log_id=0UD9wj2l000 service=storage-engine service=store max_concurrent_compactions=3 throughput_bytes_per_second=50331648 throughput_bytes_per_second_burst=50331648
influxdb_1  | ts=2021-05-19T12:37:29.757099Z lvl=info msg="Open store (start)" log_id=0UD9wj2l000 service=storage-engine service=store op_name=tsdb_open op_event=start
influxdb_1  | ts=2021-05-19T12:37:29.757149Z lvl=info msg="Open store (end)" log_id=0UD9wj2l000 service=storage-engine service=store op_name=tsdb_open op_event=end op_elapsed=0.051ms
influxdb_1  | ts=2021-05-19T12:37:29.757182Z lvl=info msg="Starting retention policy enforcement service" log_id=0UD9wj2l000 service=retention check_interval=30m
influxdb_1  | ts=2021-05-19T12:37:29.757187Z lvl=info msg="Starting precreation service" log_id=0UD9wj2l000 service=shard-precreation check_interval=10m advance_period=30m
influxdb_1  | ts=2021-05-19T12:37:29.757205Z lvl=info msg="Starting query controller" log_id=0UD9wj2l000 service=storage-reads concurrency_quota=1024 initial_memory_bytes_quota_per_query=9223372036854775807 memory_bytes_quota_per_query=9223372036854775807 max_memory_bytes=0 queue_size=1024
influxdb_1  | ts=2021-05-19T12:37:29.758844Z lvl=info msg="Configuring InfluxQL statement executor (zeros indicate unlimited)." log_id=0UD9wj2l000 max_select_point=0 max_select_series=0 max_select_buckets=0
influxdb_1  | ts=2021-05-19T12:37:30.056855Z lvl=info msg=Listening log_id=0UD9wj2l000 service=tcp-listener transport=http addr=:8086 port=8086
influxdb_1  | ts=2021-05-19T12:37:30.056882Z lvl=info msg=Starting log_id=0UD9wj2l000 service=telemetry interval=8h

After everything is rolling you can open up a web browser and go to “http://localhost:8086” and you should see something like this:  (I will sort out the http vs https in a later post – because I don’t actually know how to fix it right now.

Once you enter the account and password (that you configured in the docker-compose.yaml” you will see this screen and you are off to the races.

InfluxDB Basics

Before we go too much further lets talk about some of the basics of the Influx Database.  An Influx Database also called a “bucket” has the following built in columns:

  • _timestamp: The time for the data point stored in epoch nanosecond format (how’s that for some precision)
  • _measurement: A text string name for the a group of related datapoints
  • _field: A text string key for the datapoint
  • _value: The value of the datapoint

In addition you can add “ad-hoc” columns called “tags” which have a “key” and a “value”

Organization A group of users and the related buckets, dashboards and tasks
Bucket A database
Timestamp The time of the datapoint measured in epoch nanoseconds
Field A field includes a field key stored in the _field column and a field value stored in the _value column.
Field Set A field set is a collection of field key-value pairs associated with a timestamp.
Measurement A measurement acts as a container for tags fields and timestamps. Use a measurement name that describes your data.
Tag Key/Value pairs assigned to a datapoint.  They are used to index the datapoints (so searches are faster)

Here is a snapshot of the data in my Creek Influx database.  You can see that I have two fields

  • depth
  • temperature

I am saving all of the datapoints in the “elkhorncreek” _measurement.  And there are no tags (but I have ideas for that in the future)

InfluxDB Line Protocol

There are a number of different methods to insert data into the Influx DB.  Several of them rely on “Line Protocol“.  This is simply a text string formatted like this:

For my purposes a text string like this will insert a new datapoint into the “elkhorncreek” measurement with a depth of 1.85 fee and a temperature of 19c (yes we are a mixed unit household)

  • elkhorncreek depth=1.85,temperature=19.0

Python & InfluxDB

I know that I want to run a Python program on the Raspberry Pi which gets the sensor data via I2C and then writes it into the cloud using the InfluxAPI.  It turns out that when you log into you new Influx DB that there is a built in webpage which shows you exactly how to do this.  Click on “Data” then “sources” then “Python”

You will see a screen like this which has exactly the Python code you need (almost).

To make this code work on your system you need to install the influxdb-client library by running “pip install influxdb-client”

(venv) pi@iotexpertpi:~/influx-test $ pip install influxdb-client
Looking in indexes: https://pypi.org/simple, https://www.piwheels.org/simple
Collecting influxdb-client
Using cached https://files.pythonhosted.org/packages/6b/0e/5c5a9a2da144fae80b23dd9741175493d8dbeabd17d23e5aff27c92dbfd5/influxdb_client-1.17.0-py3-none-any.whl
Collecting urllib3>=1.15.1 (from influxdb-client)
Using cached https://files.pythonhosted.org/packages/09/c6/d3e3abe5b4f4f16cf0dfc9240ab7ce10c2baa0e268989a4e3ec19e90c84e/urllib3-1.26.4-py2.py3-none-any.whl
Collecting pytz>=2019.1 (from influxdb-client)
Using cached https://files.pythonhosted.org/packages/70/94/784178ca5dd892a98f113cdd923372024dc04b8d40abe77ca76b5fb90ca6/pytz-2021.1-py2.py3-none-any.whl
Collecting certifi>=14.05.14 (from influxdb-client)
Using cached https://files.pythonhosted.org/packages/5e/a0/5f06e1e1d463903cf0c0eebeb751791119ed7a4b3737fdc9a77f1cdfb51f/certifi-2020.12.5-py2.py3-none-any.whl
Collecting rx>=3.0.1 (from influxdb-client)
Using cached https://files.pythonhosted.org/packages/e2/a9/efeaeca4928a9a56d04d609b5730994d610c82cf4d9dd7aa173e6ef4233e/Rx-3.2.0-py3-none-any.whl
Collecting six>=1.10 (from influxdb-client)
Using cached https://files.pythonhosted.org/packages/d9/5a/e7c31adbe875f2abbb91bd84cf2dc52d792b5a01506781dbcf25c91daf11/six-1.16.0-py2.py3-none-any.whl
Requirement already satisfied: setuptools>=21.0.0 in ./venv/lib/python3.7/site-packages (from influxdb-client) (40.8.0)
Collecting python-dateutil>=2.5.3 (from influxdb-client)
Using cached https://files.pythonhosted.org/packages/d4/70/d60450c3dd48ef87586924207ae8907090de0b306af2bce5d134d78615cb/python_dateutil-2.8.1-py2.py3-none-any.whl
Installing collected packages: urllib3, pytz, certifi, rx, six, python-dateutil, influxdb-client
Successfully installed certifi-2020.12.5 influxdb-client-1.17.0 python-dateutil-2.8.1 pytz-2021.1 rx-3.2.0 six-1.16.0 urllib3-1.26.4
(venv) pi@iotexpertpi:~/influx-test $

Now write a little bit of code.  If you remember from the previous post I run a cronjob that gets the data from the I2C.  It will then run this program to do the insert of the data into the Influxdb.  Notice that I get the depth and temperature from the command line.   The “token” is an API key which you must include with requests to identify you are having permission to write into the database (more on this later).  The “data” variable is just a string formatted in “Influx Line Protocol”

import sys
from datetime import datetime
from influxdb_client import InfluxDBClient, Point, WritePrecision
from influxdb_client.client.write_api import SYNCHRONOUS
if len(sys.argv) != 3:
sys.exit("Wrong number of arguments")
# You can generate a Token from the "Tokens Tab" in the UI
token = "UvZvrrnk8yXvlVm1yrMmH2ZE706dZ14kpqSoE2u0COnDdqmQFTmIWPMjk0U2tO_GqmjzCupi_EaYP65RP4bELQ=="
org = "creekdata"
bucket = "creekdata"
client = InfluxDBClient(url="http://linux.local:8086", token=token)
write_api = client.write_api(write_options=SYNCHRONOUS)
data = f"elkhorncreek depth={sys.argv[1]},temperature={sys.argv[2]}"
write_api.write(bucket, org, data)
#print(data)

Now I update my getInsertData.sh shell script to run the Influx as well as the original MySQL insert.

#!/bin/bash
cd ~/influxdb
source venv/bin/activate
vals=$(python getData.py)
#echo $vals
python insertMysql.py $vals
python insertInflux.py $vals

InfluxDB Data Explorer

After a bit of time (for some inserts to happen) I go to the data explorer in the web interface.  You can see that I have a number of readings.  This is filtering for “depth”

This is filtering for “temperature”

Influx Tokens

To interact with an instance of the InfluxDB you will need an API key, which they call a token.  Press the “data” icon on the left side of the screen.  Then click “Tokens”.  You will see the currently available tokens, in this case just the original token.  You can create more tokens by pressing the blue + generate Token icon.

Clock on the token.  Then copy it to your clipboard.

The Creek 3.0: A Docker MySQL Diversion – Part 2.5

Summary

A discussion of reading I2C data from a sensor and sending it to a MySQL instance in the cloud using Python.

I was originally planning only one article on the MySQL part of this project.  But things got really out of control and I ended up splitting the article into two parts.  I jokingly called this article “Part 2.5”.  In today’s article I’ll take the steps to have Python and the libraries running on the Raspberry Pi to read data and send it to my new Docker MySQL Server.

Here is what the picture looks like:

Build the Python Environment w/smbus & mysql-connector-python

I typically like to build a Python virtual environment with the specific version of python and all of the required packages.  To do this you need to

  1. python3 -m venv venv
  2. source venv/bin/activate
  3. pip install smbus
  4. pip install mysql-connector-python
pi@iotexpertpi:~ $ mkdir mysql-docker
pi@iotexpertpi:~ $ python3 -m venv venv
pi@iotexpertpi:~ $ source venv/bin/activate
(venv) pi@iotexpertpi:~ $ pip install smbus
Looking in indexes: https://pypi.org/simple, https://www.piwheels.org/simple
Collecting smbus
Using cached https://www.piwheels.org/simple/smbus/smbus-1.1.post2-cp37-cp37m-linux_armv6l.whl
Installing collected packages: smbus
Successfully installed smbus-1.1.post2
(venv) pi@iotexpertpi:~ $ pip install mysql-connector-python
Looking in indexes: https://pypi.org/simple, https://www.piwheels.org/simple
Collecting mysql-connector-python
Using cached https://files.pythonhosted.org/packages/2a/8a/428d6be58fab7106ab1cacfde3076162cd3621ef7fc6871da54da15d857d/mysql_connector_python-8.0.25-py2.py3-none-any.whl
Collecting protobuf>=3.0.0 (from mysql-connector-python)
Downloading https://files.pythonhosted.org/packages/6b/2c/62cee2a27a1c4c0189582330774ed6ac2bfc88cb223f04723620ee04d59d/protobuf-3.17.0-py2.py3-none-any.whl (173kB)
100% |████████████████████████████████| 174kB 232kB/s 
Collecting six>=1.9 (from protobuf>=3.0.0->mysql-connector-python)
Using cached https://files.pythonhosted.org/packages/d9/5a/e7c31adbe875f2abbb91bd84cf2dc52d792b5a01506781dbcf25c91daf11/six-1.16.0-py2.py3-none-any.whl
Installing collected packages: six, protobuf, mysql-connector-python
Successfully installed mysql-connector-python-8.0.25 protobuf-3.17.0 six-1.16.0
(venv) pi@iotexpertpi:~

Once that is done you can see that everything is copasetic by running “pip freeze” where you can see the mysql-connector-python and the smbus.

(venv) pi@iotexpertpi:~ $ pip freeze
mysql-connector-python==8.0.25
pkg-resources==0.0.0
protobuf==3.17.0
six==1.16.0
smbus==1.1.post2

Python: Get Data SMBUS

If you remember from the original design that the PSoC 4 acts as a register file with the data from the temperature and pressure sensor.  It has 12 bytes of data as

  1. 2-bytes formatted as a 16-bit unsigned ADC counts from the Pressure Sensor
  2. 2-bytes formatted as a 16-bit signed pressure in “centiTemp”
  3. 4-bytes float as the depth in Feet
  4. 4-bytes float as the temperature in Centigrade

This program:

  1. Reads the I2c for 12-bytes
  2. Converts it into an array
  3. Prints out the values
import struct
import sys
import smbus
from datetime import datetime
from influxdb_client import InfluxDBClient, Point, WritePrecision
from influxdb_client.client.write_api import SYNCHRONOUS
######################################################
#Read the data from the PSoC 4
######################################################
bus = smbus.SMBus(1)
address = 0x08
# The data structure in the PSOC 4 is:
# uint16_t pressureCount ; the adc-counts being read on the pressure sensor
# int16_t centiTemp ; the temperaure in 10ths of a degree C
# float depth ; four bytes float representing the depth in Feet
# float temperature ; four byte float representing the temperature in degrees C
numBytesInStruct = 12
block = bus.read_i2c_block_data(address, 0, numBytesInStruct)
# convert list of bytes returned from sensor into array of bytes
mybytes = bytearray(block)
# convert the byte array into
# H=Unsigned 16-bit int
# h=Signed 16-bit int
# f=Float 
# this function will return a tuple with pressureCount,centiTemp,depth,temperature
vals = struct.unpack_from('Hhff',mybytes,0)
# prints the tuple
depth = vals[2]
temperature = vals[3]
print(f"{depth} {temperature}")

Python: MySQL

I created a separate Python program to insert the data into the MySQL database.  This program does the following things

  1. Makes sure the command line arguments make sense
  2. Makes a connection to the server
  3. Creates the SQL statement
  4. Runs the inserts
import mysql.connector
import sys
from datetime import datetime
if len(sys.argv) != 3:
sys.exit("Wrong number of arguments")
mydb = mysql.connector.connect(
host="spiff.local",
user="creek",
password="donthackme",
database="creekdata",
auth_plugin='mysql_native_password')
now = datetime.now()
formatted_date = now.strftime('%Y-%m-%d %H:%M:%S')
sql = "insert into creekdata.creekdata (depth,temperature,created_at) values (%s,%s,%s)"
vals = (sys.argv[1],sys.argv[2],formatted_date)
mycursor = mydb.cursor()
mycursor.execute(sql, vals)
mydb.commit()

Shell Script & Crontab

I created a simple bash shell script to

  1. Activate the virtual enviroment
  2. Run the get data python program
  3. Run the insert program
#!/bin/bash
cd ~/influxdb
source venv/bin/activate
vals=$(python getData.py)
#echo $vals
python insertMysql.py $vals

Finally, a cronjob to run the program every 5 minutes.

# Edit this file to introduce tasks to be run by cron.
# 
# Each task to run has to be defined through a single line
# indicating with different fields when the task will be run
# and what command to run for the task
# 
# To define the time you can provide concrete values for
# minute (m), hour (h), day of month (dom), month (mon),
# and day of week (dow) or use '*' in these fields (for 'any').
# 
# Notice that tasks will be started based on the cron's system
# daemon's notion of time and timezones.
# 
# Output of the crontab jobs (including errors) is sent through
# email to the user the crontab file belongs to (unless redirected).
# 
# For example, you can run a backup of all your user accounts
# at 5 a.m every week with:
# 0 5 * * 1 tar -zcf /var/backups/home.tgz /home/
# 
# For more information see the manual pages of crontab(5) and cron(8)
# 
# m h  dom mon dow   command
0,5,10,20,25,30,35,40,45,50,55 * * * * /home/pi/influxdb/getInsertData.sh

Test with MySQL WorkBench

Now when I load the data from the MySQL Workbench I can see the inserts are happening.  Kick ass.

The Creek 3.0: A Docker MySQL Diversion – Part 2

Summary

A tutorial on running MySQL in an instance of Docker on Ubuntu Linux.  Then creating a Raspberry Pi Python interface from a sensor to insert data over the network to the new MySQL Server.

Story

As I said in the introduction, this whole process has been a bit chaotic.  So here we go.  The Raspberry Pi that runs the current creek system has been in my barn since at least 2013 running on the same SD Card and never backed up.  I suppose that it wouldn’t have really mattered if I lost the old flood data, but it would have been annoying.  Also, that Raspberry Pi is very slow running queries given the 2.2M records that now exist in the database.

To fix this I decided that I want to start by moving the MySQL server to a new computer that runs Docker.  Here is the original configuration (from the original article)

When I set out to do in this article the plan was to move the MySQL Instance from the Raspberry Pi to a new Linux box.  Unfortunately while I was doing this, I broke the operating system on the Raspberry Pi and ended up having to rebuild the interface to the PSoC 4.  Here is what I ended up building:

This article will walk you through the following steps.

  1. Build a new Linux machine & Install Ubuntu Server
  2. Install Docker & MySQL
  3. Migrate the Data from the original Raspberry Pi MySQL Database
  4. Build the Python Environment (Part 2.5)
  5. Python: Get Data SMBUS (Part 2.5)
  6. Python: Insert MySQL (Part 2.5)
  7. Shell Script & Crontab (Part 2.5)
  8. Test using MySQL WorkBench (Part 2.5)

Build a new Linux Box with Ubuntu Server

I wanted to have a local to my lan server running MySQL.  My lab assistant suggested that I find something fairly inexpensive on ebay.  Here is what I bought:


And… for sure it needed an SSD.

Then I downloaded Ubuntu Server 20.04 from https://ubuntu.com/download/server

After the file was downloaded I created a bootable sdcard by running: dd if=ubuntu-20.04.2-live-server-amd64.iso of=/dev/rdisk4 bs=1m

arh Downloads $ sudo diskutil unmountDisk /dev/disk4
Unmount of all volumes on disk4 was successful
arh Downloads $ sudo dd if=ubuntu-20.04.2-live-server-amd64.iso of=/dev/rdisk4 bs=1m
1158+1 records in
1158+1 records out
1215168512 bytes transferred in 32.400378 secs (37504763 bytes/sec)
arh Downloads $ diskutil list /dev/disk4
/dev/disk4 (external, physical):
#:                       TYPE NAME                    SIZE       IDENTIFIER
0:     Apple_partition_scheme                        *31.1 GB    disk4
1:        Apple_partition_map ⁨⁩                        4.1 KB     disk4s1
2:                  Apple_HFS ⁨⁩                        4.1 MB     disk4s2

After doing the installation (I dont have screen captures of that, but it is easy).  I installed the avahi daemon.  What is that?  Avahi is program that enables mDNS – a part of no configuration networking that helps you manage “names”.  Specifically in my case it will create a DNS-like name for this computer without having to actually configure the DNS.  That name is “linux.local”.

To install avahi run sudo apt install avahi-daemon

arh@spiff:~$ systemctl status avahi-daemon
● avahi-daemon.service - Avahi mDNS/DNS-SD Stack
Loaded: loaded (/lib/systemd/system/avahi-daemon.service; enabled; vendor preset: enabled)
Active: active (running) since Sat 2021-05-01 14:20:40 UTC; 2 weeks 1 days ago
TriggeredBy: ● avahi-daemon.socket
Main PID: 713 (avahi-daemon)
Status: "avahi-daemon 0.7 starting up."
Tasks: 2 (limit: 14105)
Memory: 2.8M
CGroup: /system.slice/avahi-daemon.service
├─713 avahi-daemon: running [spiff.local]
└─757 avahi-daemon: chroot helper
May 11 11:26:26 spiff avahi-daemon[713]: Registering new address record for fe80::4409:73ff:fe08:4c75 on veth72ac3b7.*.
May 11 11:26:26 spiff avahi-daemon[713]: Joining mDNS multicast group on interface br-18a7431f8090.IPv6 with address fe80::42:beff:fe8c:e24.
May 11 11:26:26 spiff avahi-daemon[713]: New relevant interface br-18a7431f8090.IPv6 for mDNS.
May 11 11:26:26 spiff avahi-daemon[713]: Registering new address record for fe80::42:beff:fe8c:e24 on br-18a7431f8090.*.
May 11 11:26:43 spiff avahi-daemon[713]: Interface veth72ac3b7.IPv6 no longer relevant for mDNS.
May 11 11:26:43 spiff avahi-daemon[713]: Leaving mDNS multicast group on interface veth72ac3b7.IPv6 with address fe80::4409:73ff:fe08:4c75.
May 11 11:26:43 spiff avahi-daemon[713]: Withdrawing address record for fe80::4409:73ff:fe08:4c75 on veth72ac3b7.
May 11 11:26:48 spiff avahi-daemon[713]: Joining mDNS multicast group on interface veth5c71e0d.IPv6 with address fe80::4499:b0ff:feef:30fe.
May 11 11:26:48 spiff avahi-daemon[713]: New relevant interface veth5c71e0d.IPv6 for mDNS.
May 11 11:26:48 spiff avahi-daemon[713]: Registering new address record for fe80::4499:b0ff:feef:30fe on veth5c71e0d.*.
arh@spiff:~$ 

I also will be running MySQL in a Docker instance.  To install docker run: sudo apt install docker.io

arh@spiff:~$ systemctl status docker
● docker.service - Docker Application Container Engine
Loaded: loaded (/lib/systemd/system/docker.service; enabled; vendor preset: enabled)
Active: active (running) since Sat 2021-05-01 14:20:42 UTC; 2 weeks 1 days ago
TriggeredBy: ● docker.socket
Docs: https://docs.docker.com
Main PID: 758 (dockerd)
Tasks: 26
Memory: 142.1M
CGroup: /system.slice/docker.service
├─   758 /usr/bin/dockerd -H fd:// --containerd=/run/containerd/containerd.sock
└─240639 /usr/bin/docker-proxy -proto tcp -host-ip 0.0.0.0 -host-port 3306 -container-ip 172.18.0.2 -container-port 3306
May 02 13:39:42 spiff dockerd[758]: time="2021-05-02T13:39:42.754047181Z" level=info msg="ignoring event" container=4d2e6a3c8c779e01676e4fd8f748aa4581c9469d92398ff274a3800c5d3e98a2 module>
May 02 13:40:42 spiff dockerd[758]: time="2021-05-02T13:40:42.381681852Z" level=error msg="Error setting up exec command in container 4d2e6a3c8c77: Container 4d2e6a3c8c779e01676e4fd8f748a>
May 02 13:40:42 spiff dockerd[758]: time="2021-05-02T13:40:42.760184585Z" level=warning msg="error locating sandbox id 5e4b44ba78eacdb974bfd773ffabf46526177f4ff135ace09b667c3e497b3468: sa>
May 02 13:40:42 spiff dockerd[758]: time="2021-05-02T13:40:42.762228692Z" level=error msg="4d2e6a3c8c779e01676e4fd8f748aa4581c9469d92398ff274a3800c5d3e98a2 cleanup: failed to delete conta>
May 02 13:40:42 spiff dockerd[758]: time="2021-05-02T13:40:42.764274310Z" level=error msg="restartmanger wait error: network c6593d532df7651e3a38572e609d42f69f0daba3ac36263933ca0ae43504cc>
May 11 11:26:24 spiff dockerd[758]: time="2021-05-11T11:26:24.772660650Z" level=info msg="No non-localhost DNS nameservers are left in resolv.conf. Using default external servers: [namese>
May 11 11:26:24 spiff dockerd[758]: time="2021-05-11T11:26:24.772680359Z" level=info msg="IPv6 enabled; Adding default IPv6 external servers: [nameserver 2001:4860:4860::8888 nameserver 2>
May 11 11:26:42 spiff dockerd[758]: time="2021-05-11T11:26:42.994091472Z" level=info msg="ignoring event" container=bfd550cab791b061bbd4e26f3435165de7b3664373de9cbb80d2e78a0aff08e2 module>
May 11 11:26:46 spiff dockerd[758]: time="2021-05-11T11:26:46.212688536Z" level=info msg="No non-localhost DNS nameservers are left in resolv.conf. Using default external servers: [namese>
May 11 11:26:46 spiff dockerd[758]: time="2021-05-11T11:26:46.212708396Z" level=info msg="IPv6 enabled; Adding default IPv6 external servers: [nameserver 2001:4860:4860::8888 nameserver 2>
arh@spiff:~$

Docker Training

I knew that I wanted to try Docker, no kidding eh, but I didn’t know much of anything about it.  I am not really a “video” person for learning, but my son had talked me into trying a skill share class to learn how to edit video.  So, I thought that I would give it a try for Docker as well.  This class was OK but not great (like 2/5)  Here is a screenshot from the class:

I also watched this class, which is excellent…. especially if you watch it at 1.5x speed.

Docker Introduction

There are four basic ideas which you need to understand Docker.

Concept Description Commands
Image A runnable binary template that can be instantiated into a container (like a class in object oriented programming) docker image ls
Container An VM-like instance of an image (like an object i.e. an instance of a class in object oriented programming).  This includes network port mapping, volumes,network etc. docker ps -a
Volume A directory or file map between the host operating system and the docker container.  For example a directory X on the host is mapped to the directory Y inside of the container docker volume ls
Network A synthetic network that is created by the docker daemon to map one or more containers together.  This includes a dhcp, dns, routing etc. docker network ls

Docker Compose & MySQL

You can find new images at https://hub.docker.com.  In fact this is where I get everything that I need for mysql.

If you look a little bit later down on the docker hub you will find the specific instruction for “running” a docker mysql image.

These instructions will work.  However, there are two problems.

#1 by running it this way you will not expose the ip port 3306 from inside of the container to the outside work (on your computer or network).  This means you won’t be able to talk to the MySQL instance.  That is not very helpful

#2 all of the secret sauce you typed will be lost if you need to do that same command again.

The good news is that docker has a specific file format for saving this information called “docker-compose.yaml”.

My docker compose file looks like this.

  1. The image is “mysql” (use the official docker mysql image)
  2. Map the MySQL port 3306 from inside the container to the outside
  3. Make the root password “supersecret”
  4. Create a database called “creekdata”
  5. Create a user called “creek” with a password “asillypassword”
  6. Map the mysql data inside of the container at /var/lib/mysql to an outside volume called “mysql”
arh@spiff:~/mysql$ more docker-compose.yaml
version: '3.1'
services:
db:
image: mysql
restart: always
ports:
- 3306:3306
environment:
MYSQL_ROOT_PASSWORD: supersecret
MYSQL_DATABASE: creekdata
MYSQL_USER: creek
MYSQL_PASSWORD: asillypassword
volumes:
- mysql:/var/lib/mysql
volumes:
mysql:

With this file I can create the container by running “docker-compose up”

linux$ docker-compose up
Creating network "mysql_default" with the default driver
Creating volume "mysql_mysql" with default driver
Pulling db (mysql:latest)...
latest: Pulling from library/mysql
69692152171a: Pull complete
1651b0be3df3: Pull complete
951da7386bc8: Pull complete
0f86c95aa242: Pull complete
37ba2d8bd4fe: Pull complete
6d278bb05e94: Pull complete
497efbd93a3e: Pull complete
f7fddf10c2c2: Pull complete
16415d159dfb: Pull complete
0e530ffc6b73: Pull complete
b0a4a1a77178: Pull complete
cd90f92aa9ef: Pull complete
Digest: sha256:d50098d7fcb25b1fcb24e2d3247cae3fc55815d64fec640dc395840f8fa80969
Status: Downloaded newer image for mysql:latest
Creating mysql_db_1 ... 
Creating mysql_db_1 ... done
Attaching to mysql_db_1
db_1  | 2021-05-17 20:01:20+00:00 [Note] [Entrypoint]: Entrypoint script for MySQL Server 8.0.25-1debian10 started.
db_1  | 2021-05-17 20:01:20+00:00 [Note] [Entrypoint]: Switching to dedicated user 'mysql'
db_1  | 2021-05-17 20:01:20+00:00 [Note] [Entrypoint]: Entrypoint script for MySQL Server 8.0.25-1debian10 started.
db_1  | 2021-05-17 20:01:20+00:00 [Note] [Entrypoint]: Initializing database files
db_1  | 2021-05-17T20:01:20.192621Z 0 [System] [MY-013169] [Server] /usr/sbin/mysqld (mysqld 8.0.25) initializing of server in progress as process 41
db_1  | 2021-05-17T20:01:20.196027Z 1 [System] [MY-013576] [InnoDB] InnoDB initialization has started.
db_1  | 2021-05-17T20:01:20.770999Z 1 [System] [MY-013577] [InnoDB] InnoDB initialization has ended.
db_1  | 2021-05-17T20:01:21.809117Z 6 [Warning] [MY-010453] [Server] root@localhost is created with an empty password ! Please consider switching off the --initialize-insecure option.
db_1  | 2021-05-17 20:01:24+00:00 [Note] [Entrypoint]: Database files initialized
db_1  | 2021-05-17 20:01:24+00:00 [Note] [Entrypoint]: Starting temporary server
db_1  | 2021-05-17T20:01:24.396505Z 0 [System] [MY-010116] [Server] /usr/sbin/mysqld (mysqld 8.0.25) starting as process 86
db_1  | 2021-05-17T20:01:24.415784Z 1 [System] [MY-013576] [InnoDB] InnoDB initialization has started.
db_1  | 2021-05-17T20:01:24.551463Z 1 [System] [MY-013577] [InnoDB] InnoDB initialization has ended.
db_1  | 2021-05-17T20:01:24.618191Z 0 [System] [MY-011323] [Server] X Plugin ready for connections. Socket: /var/run/mysqld/mysqlx.sock
db_1  | 2021-05-17T20:01:24.726805Z 0 [Warning] [MY-010068] [Server] CA certificate ca.pem is self signed.
db_1  | 2021-05-17T20:01:24.726923Z 0 [System] [MY-013602] [Server] Channel mysql_main configured to support TLS. Encrypted connections are now supported for this channel.
db_1  | 2021-05-17T20:01:24.728714Z 0 [Warning] [MY-011810] [Server] Insecure configuration for --pid-file: Location '/var/run/mysqld' in the path is accessible to all OS users. Consider choosing a different directory.
db_1  | 2021-05-17T20:01:24.738807Z 0 [System] [MY-010931] [Server] /usr/sbin/mysqld: ready for connections. Version: '8.0.25'  socket: '/var/run/mysqld/mysqld.sock'  port: 0  MySQL Community Server - GPL.
db_1  | 2021-05-17 20:01:24+00:00 [Note] [Entrypoint]: Temporary server started.
db_1  | Warning: Unable to load '/usr/share/zoneinfo/iso3166.tab' as time zone. Skipping it.
db_1  | Warning: Unable to load '/usr/share/zoneinfo/leap-seconds.list' as time zone. Skipping it.
db_1  | Warning: Unable to load '/usr/share/zoneinfo/zone.tab' as time zone. Skipping it.
db_1  | Warning: Unable to load '/usr/share/zoneinfo/zone1970.tab' as time zone. Skipping it.
db_1  | 2021-05-17 20:01:25+00:00 [Note] [Entrypoint]: Creating database creekdata
db_1  | 2021-05-17 20:01:25+00:00 [Note] [Entrypoint]: Creating user creek
db_1  | 2021-05-17 20:01:25+00:00 [Note] [Entrypoint]: Giving user creek access to schema creekdata
db_1  | 
db_1  | 2021-05-17 20:01:25+00:00 [Note] [Entrypoint]: Stopping temporary server
db_1  | 2021-05-17T20:01:25.775184Z 13 [System] [MY-013172] [Server] Received SHUTDOWN from user root. Shutting down mysqld (Version: 8.0.25).
db_1  | 2021-05-17T20:01:27.490685Z 0 [System] [MY-010910] [Server] /usr/sbin/mysqld: Shutdown complete (mysqld 8.0.25)  MySQL Community Server - GPL.
db_1  | 2021-05-17 20:01:27+00:00 [Note] [Entrypoint]: Temporary server stopped
db_1  | 
db_1  | 2021-05-17 20:01:27+00:00 [Note] [Entrypoint]: MySQL init process done. Ready for start up.
db_1  | 
db_1  | 2021-05-17T20:01:27.988961Z 0 [System] [MY-010116] [Server] /usr/sbin/mysqld (mysqld 8.0.25) starting as process 1
db_1  | 2021-05-17T20:01:27.999715Z 1 [System] [MY-013576] [InnoDB] InnoDB initialization has started.
db_1  | 2021-05-17T20:01:28.135399Z 1 [System] [MY-013577] [InnoDB] InnoDB initialization has ended.
db_1  | 2021-05-17T20:01:28.202245Z 0 [System] [MY-011323] [Server] X Plugin ready for connections. Bind-address: '::' port: 33060, socket: /var/run/mysqld/mysqlx.sock
db_1  | 2021-05-17T20:01:28.287968Z 0 [Warning] [MY-010068] [Server] CA certificate ca.pem is self signed.
db_1  | 2021-05-17T20:01:28.288087Z 0 [System] [MY-013602] [Server] Channel mysql_main configured to support TLS. Encrypted connections are now supported for this channel.
db_1  | 2021-05-17T20:01:28.290206Z 0 [Warning] [MY-011810] [Server] Insecure configuration for --pid-file: Location '/var/run/mysqld' in the path is accessible to all OS users. Consider choosing a different directory.
db_1  | 2021-05-17T20:01:28.300867Z 0 [System] [MY-010931] [Server] /usr/sbin/mysqld: ready for connections. Version: '8.0.25'  socket: '/var/run/mysqld/mysqld.sock'  port: 3306  MySQL Community Server - GPL.

Migrate the Data using MySQLWorkbench

I have a BUNCH of data (2.2M rows or so) on the original Raspberry Pi.  I want this data in my newly created instance of MySQL.  To get it there I will use the MySQL Workbench migration wizard to move the data from the old to the new instance.

It starts with these nice instructions.

Then I specify the source (the original Raspberry Pi)

The target is specified next.

It then reads the database schema from the source and makes sure that it can talk to the target.

Then it asks me what I want to transfer.  There is only one database schema on the source, the “creekdata” database.

Next it reads the source schema and reverse engineers the tables etc.

Now it asks specifically what you want to transfer.  For my case there are two tables in the creekdata database.

Then it generates the specific mysql commands required to recreate the schema

Gives the option of changing it.

Now it asks you what method you want to use on the target.  I choose to have it do all of the work.

Then it creates the new database and tables.

And you can see that it worked.

Then it asks how I want to copy the data.  I tell it to do all of the work for me.

Then it runs a bulk transfer of the data.

And give me a final report that things worked.  Kick ass.

I can now make a connection to the new database.   And I see my old data back to 2013.

That is it for this article.  In the next article Ill do the Python Shell Script stuff to reconnect my data to the new MySql Server.

The Creek 3.0: Docker Telegraf, Influx, Grafana – Part 1

Summary

The architecture and first steps of a new IoT implementation using PSoC 6, CYW43012 WiFi, AnyCloud MQTT, Raspberry Pi, Python, Influx, Grafana, Telegraf and Docker.  Wow, sounds like a lot.

The Story

For quite some time, I have been wanting to replace my original Elkhorn Creek implementation because. … well …, it is old school and a bit tired.  I started an implementation which I called “The Creek 2.0” which used AWS IoT,  AWS Lambda, and MySQL.  I thought it was interesting to learn about all of the AWS stuff… but I never finished the user interface, nor did I replace the Raspberry Pi.  Also, this solution was going in the old school direction and I wanted to use more open source.

So, this time I am going to go all the way.  Here is the architecture:

There are a bunch of things that I have never used including:

  1. Docker
  2. Mosquito MQTT
  3. Telegraf
  4. Influx DB
  5. Grafana

Which is quite a bit of new stuff.  Almost every time I work on a series like this I do all of the work in advance of writing the first article.  That way I know how things are going to an end and what is going to go wrong.   This way I can fix them in advance of you guys having to suffer with me.  This time, well, not so much, so I am quite sure that there will be some drama.

To this point I have spend a bunch of time with:

  1. Learning Docker
  2. Trying out Influx DB and Grafana
  3. Making Telegraf work

There are still some things which are a bit unknown, including:

  1. I don’t like the Telegraf implementation of the mqtt_consumer, which is going to require me to spend time learning “Go”
  2. I don’t really know how to expose Grafana to the internet safely (is that going to be OK?)
  3. I am considering writing a “Influx Client Library” for PSoC to skip the MQTT?
  4. I am considering using “Influx Line Protocol” and not using MQTT

So over the next few weeks we will see how things evolves.  I also decided to purchase a new Linux box for my house to run the system so I will talk about what I did there.

Alan