Summary
In this article I will explain the fundamentals of the Amazon Web Service IoT Device Cloud. I will show you how to:
- Create a “Thing” in the AWS IoT Core
- Create and attach secret keys in the form of a X.509 Certificate
- Create and attach an access Policy to the Certificate
- Publish and Subscribe use a Message Queuing Telemetry Transport (MQTT) Message Broker (that Amazon creates for you)
- Use MQTT to update the cached “state” of your device, also called the Device Shadow
There are 5 fundamental concepts that you need in order to understand the AWS IoT system, specifically, Thing, Certificate, Policy, MQTT and Device Shadow.
A Thing is Amazon’s word for some device out in the world that attaches to the AWS IoT cloud. In my case, Thing means the Elkhorn Creek in Georgetown, Kentucky. But, it could be a garage door, dishwasher or whatever other ridiculous thing you want to connect to the internet. The AWS IoT Cloud allows you to create a Thing, setup and manage security, receive data from it, send data to it, and keep track of its state. In my case the state is the water level of the Creek and the temperature in my barn.
A Certificate is an X.509 document that has a signed public key of the Thing. When you use the Amazon IoT Console to create a Thing, you can also create a Certificate for the Thing, the private key that goes with the public key in the Certificate, as well as a copy of the public key that is embedded in the Certificate. In order to create a TLS connection to AWS IoT you will need to use the Certificate as Amazon AWS does “double sided” TLS connections. In other words you must verify Amazon and Amazon must verify you. You will also need your private key in order to decrypt data that Amazon sends to you encrypted with your public key. Amazon uses the Certificate to uniquely identify a specific Thing.
A Policy is a JSON document that is attached to a Certificate that specifies what “IoT Actions” your Thing is allowed to take and to which resources that it is allowed to take the action upon. Actions include Connect, Subscribe, Publish etc. All resources in the world of Amazon have an ARN (Amazon Resource Name), so in the Policy you specify what actions can happen to what ARNs.
MQTT stands for Message Queuing Telemetry Transport and is an IoT protocol for a Thing to Publish messages to a Message Broker Topic. A Message Broker is TCP/IP server that is running in the AWS IoT Cloud that Amazon creates for you and automatically turns on. A Topic is just a name which you create that serves as a way to identify message channels. In addition to Publishing messages to a Topic, a client can also Subscribe to a Topic. In other words a Thing can Publish to any topic and any Thing can Subscribe to any Topic. This you can create a many too many relationship for Publishing/Subscribing to message. There are some topics which have special meaning in the world of AWS IoT and are used for updating and monitoring Thing state stored which is stored in the Device Shadow.
A Device Shadow is just a JSON document that is cached in the AWS IoT Cloud and is used to represent the Desired and Reported state of a Thing. This allows other devices in the AWS IoT Cloud to communicate with a Thing even if it is not currently connected. The JSON Device Shadow is just a JSON key value map which is defined by YOUR application. Amazon doesn’t care what keys or values you use. In my case the keys are “temperature” and “depth”. When my Thing finds new values for the state of those two variables it will send updates to the Device Shadow via MQTT.
Amazon has pretty good documentation of how all of this fits together here. One thing to note is that Amazon changes the screens on this system all of the damn time. In my experience the changes are not major, but my screen shots may or may not reflect the current state of AWS. Actually, there will almost certainly be some differences, but I can’t help that. Please email bezos@amazon.com if don’t like it.
Here are the steps I will follow in this Article to show you this whole thing:
- Create an AWS IoT Account
- AWS IoT Core Console Tour
- Create a Thing & Certificate
- Create a Policy and Attach it to the Certificate
- Explain MQTT & Show the Test Client
- Explain the Device Shadow
- Update the Shadow Using the Test Client
Create an AWS IoT Account
In order to use all of this, you will need to create an AWS IoT Account. You can do that at https://console.aws.amazon.com. Obviously Amazon makes all of their profit from AWS, however, for small amounts of usage, it is essentially free to use. You will need to provide a credit card when you set this up, but for every thing that I have done, I have used <$10. So no big deal.
When you click on Create a new account it will bring you to this screen. This will be a different account (even if it has the same password as your Amazon commercial account).

Once you have an account you will end up on a Screen that looks like this. You can see that I have recently been using all of the services that I am talking about. Imagine that. For this lesson we will focus on IoT Core, but in the future lessons Ill talk about other services. You can get to IoT Core by typing IoT Core into the search box and the clicking it.
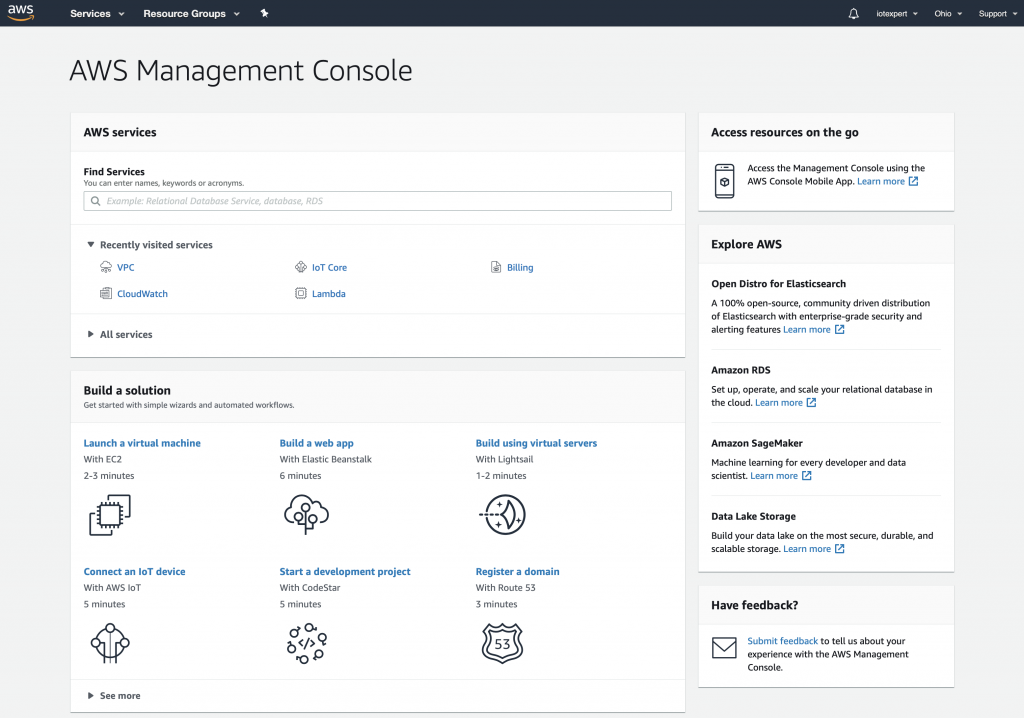
There is actually a bunch of good documentation (which you can see near the bottom of the screen) including tutorials (obviously none of them are as good as this one)
AWS IoT Core Console Tour
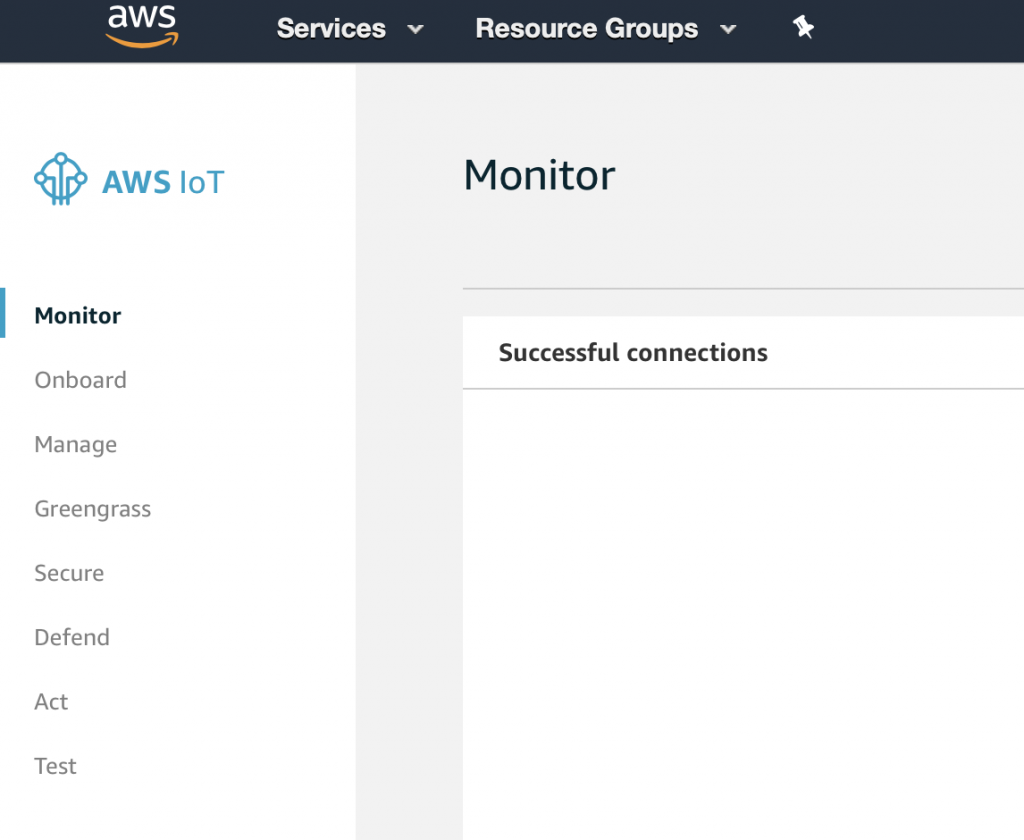
Once you click on IoT Core, you will end up on a screen like this one. It shows how much activity is going on in my account (basically not very much). On the left side of the screen are all of the functions that we will use in this tutorial.
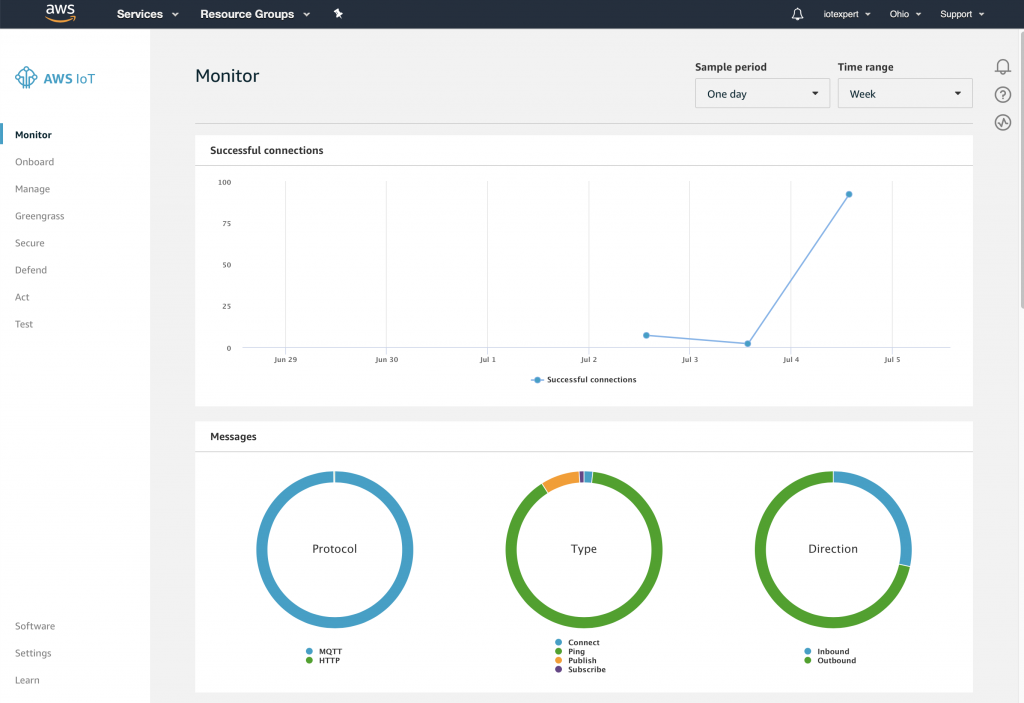
Monitor shows the screen shown above and gives you top level statistics about what is going on in your Cloud.
Onboard is a set of new tools to help you attach devices to your AWS IoT Cloud (I have not used any of them)
Manage allows you to create, delete, modify all of your Things (we will do quite a bit of this)
Greegrass is a tool that allows you to have a local “server” that all of your things attach to. I have not used it as of yet, but will in the future.
The Secure menu give you access to all of your Certificates and Policies.
Defend gives you access to tools to monitor and defend your IoT network as the Russians, Chinese and CIA are all trying to get into your network.
The Act screen allows you to create Rules to do stuff based on things happening in the world of your MQTT Message Broker. In a future article I will show you how to Act on an MQTT message to run an Amazon Lambda Function.
Test starts up a REALLY cool web based MQTT test tool that will allow you to Publish and Subscribe to messages that are flying around on your MQTT broker.
Create a Thing & Certificates
Amazon has some pretty decent documentation which shows you how to create and manage things which you can find here.
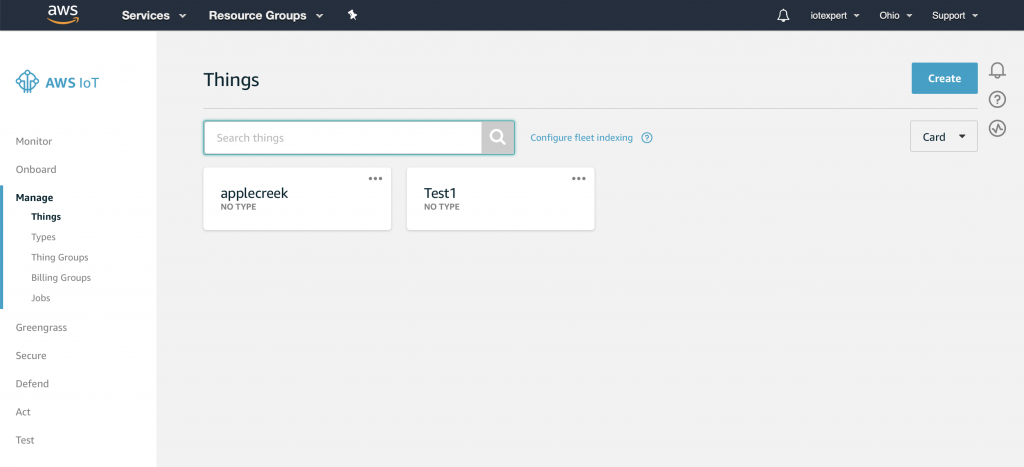
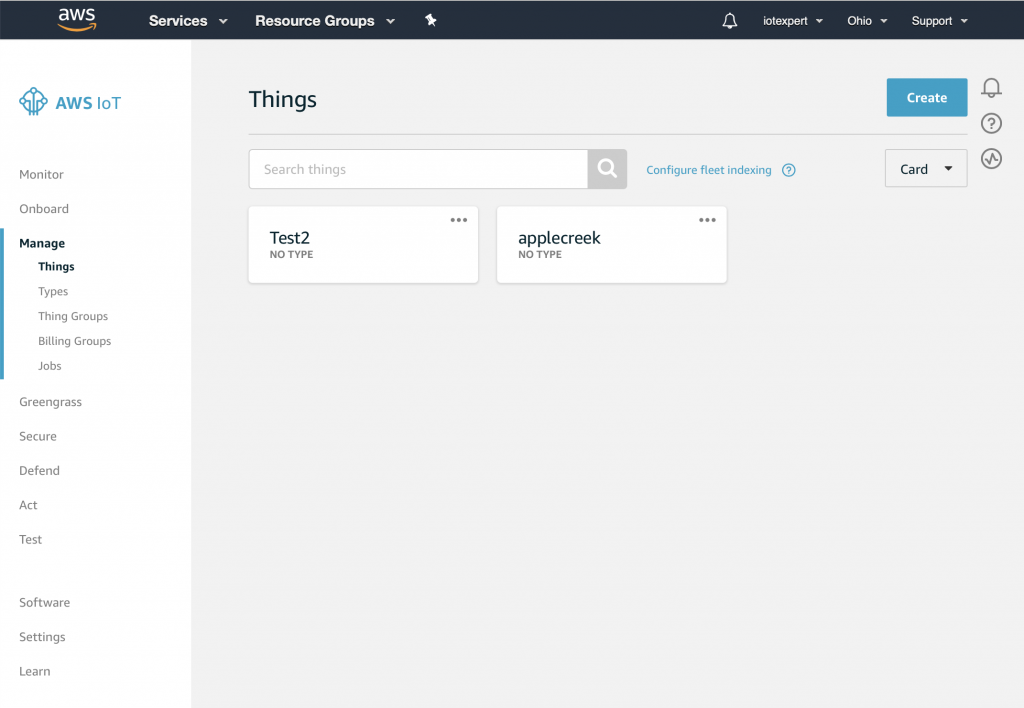
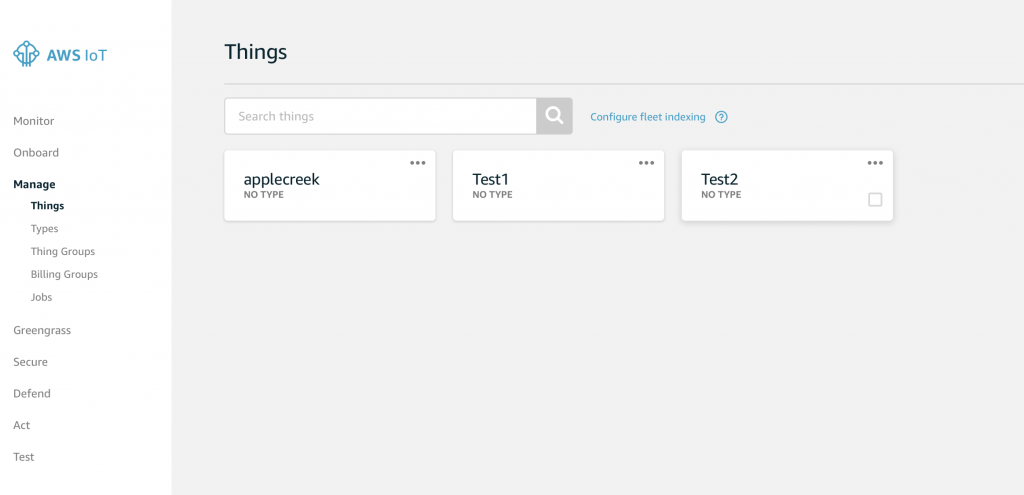
Finally, we are ready to actually do something. Specifically we will create a “Thing” to represent the water level in the Elkhorn Creek. Click on Manage -> Things. You can see in the picture below that I already have two devices in my Thing cloud, applecreek and Test1. Press “Create” to start the process of creating new Thing.
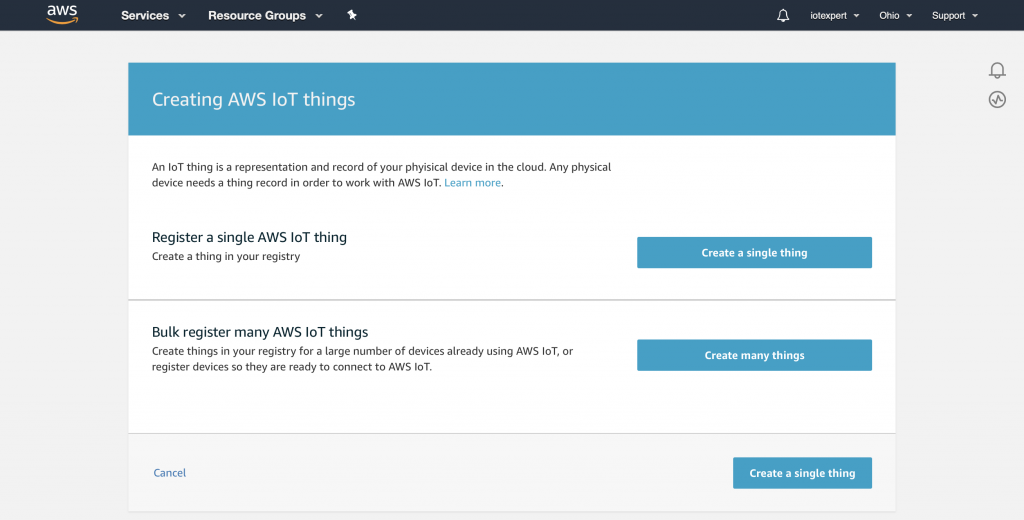
Obviously, Amazon designed this whole system to be able to handle boatloads of Things, so they provide the ability to create many things, both in the GUI as well as with the command line. But to learn the process we will create a single thing using the web gui. Press “Create a single thing”
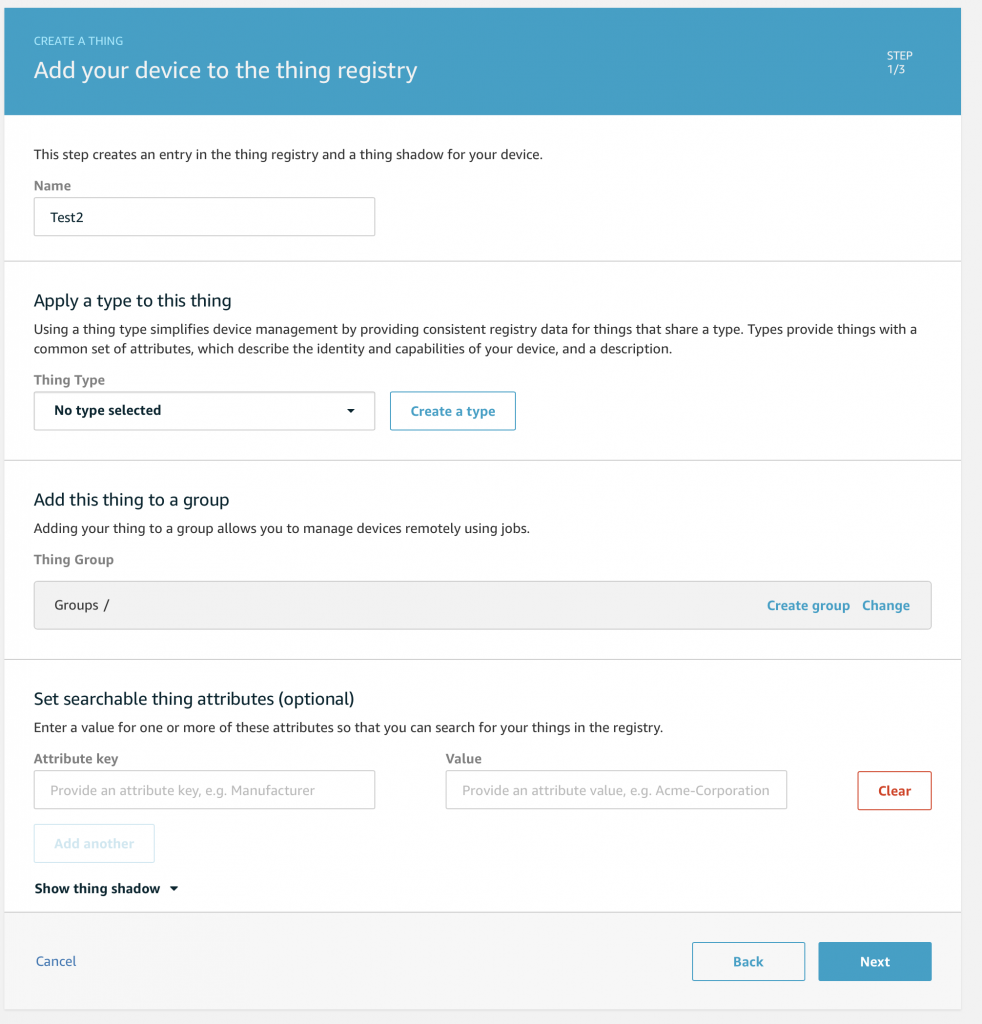
Give you Thing a name (yes there are tons of bad jokes which could be done here). I will call my example Thing “Test2”. Then press “Next”
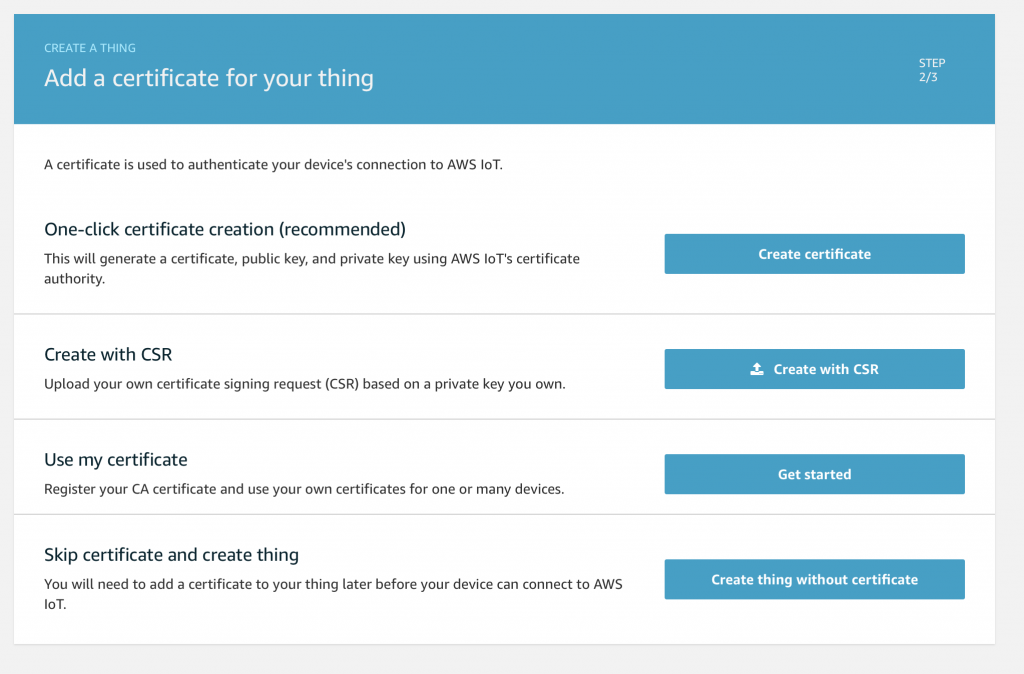
In order for you Thing to connect to the network it needs to have a Certificate attached to it. The certificate documentation is here. It is possible to use your own certificates or have Amazon sign your certificates. However, we will do the simple thing and let Amazon create the Certificate for us. Press “Create certificate”
Once the Certificate is created you will come to this screen. In order to use the Certificate on your Thing you will need to download it as well as the private/public key pair. You should take the opportunity to down these NOW. Once that is done press “Activate” to turn on the Certificate.
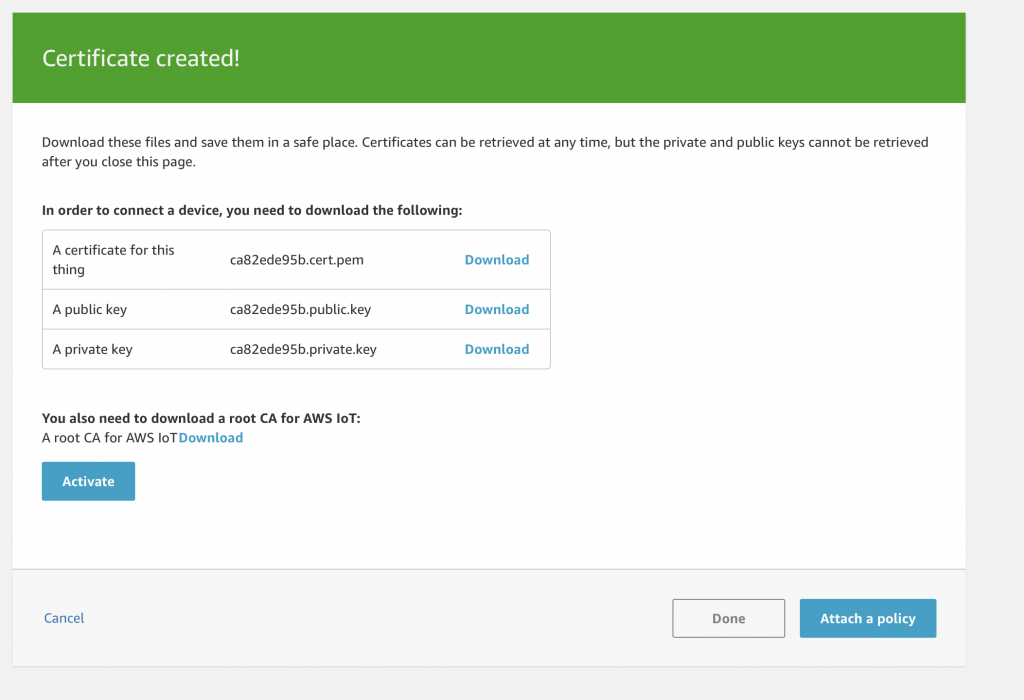
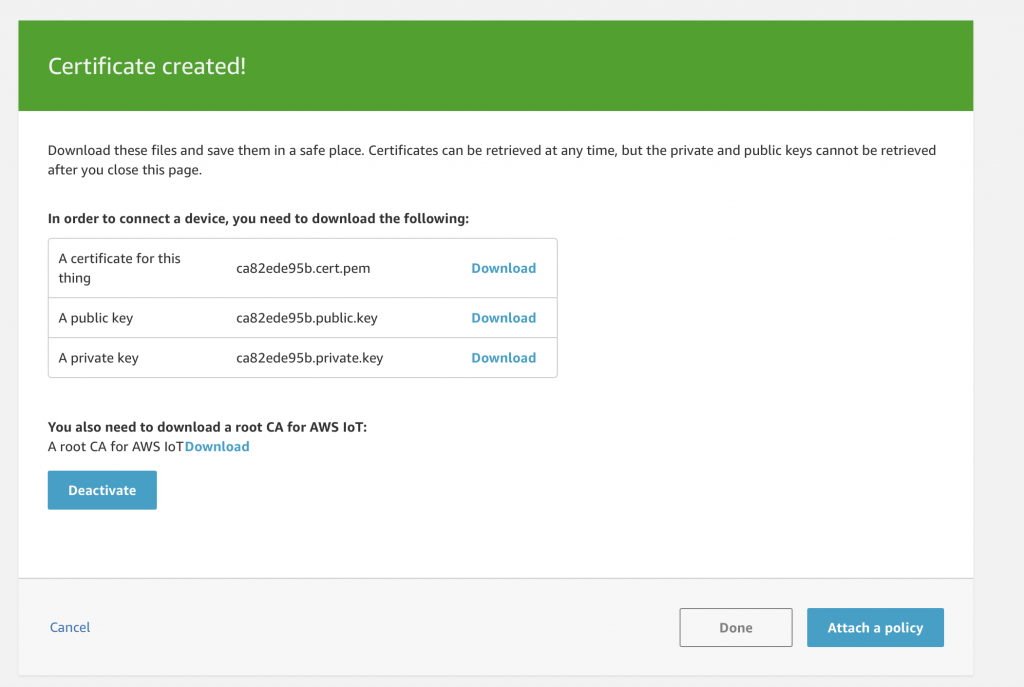
Once you have activated the certificate you get your LAST!!! chance to download the certificates. If you do not download them, then you will need to delete them and create a new set. You should be careful where you store the keys on your local device as they will give bad actors the ability to access your Things. If you look around on GitHub it will be common to find them, so be careful. Press “Done” to move to the next screen.
After you have created a device your screen will look something like this. You can see that I already created several Things which I called “applecreek” (the Thing that is in production on my real system. Now that you have “Test2” we can look at it to see some of the properties. Click “Test2”
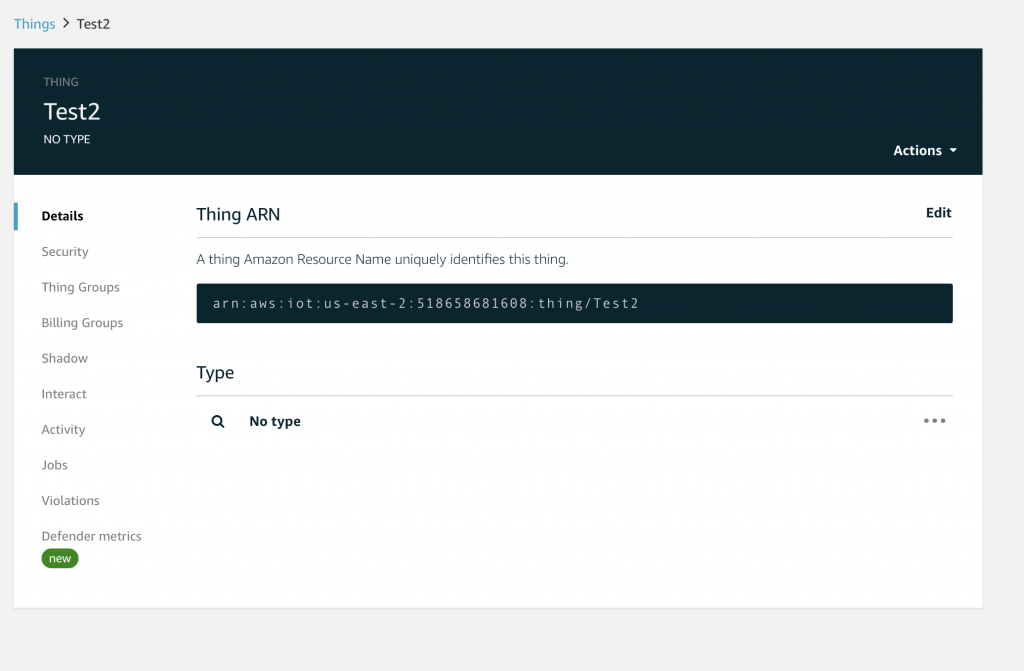
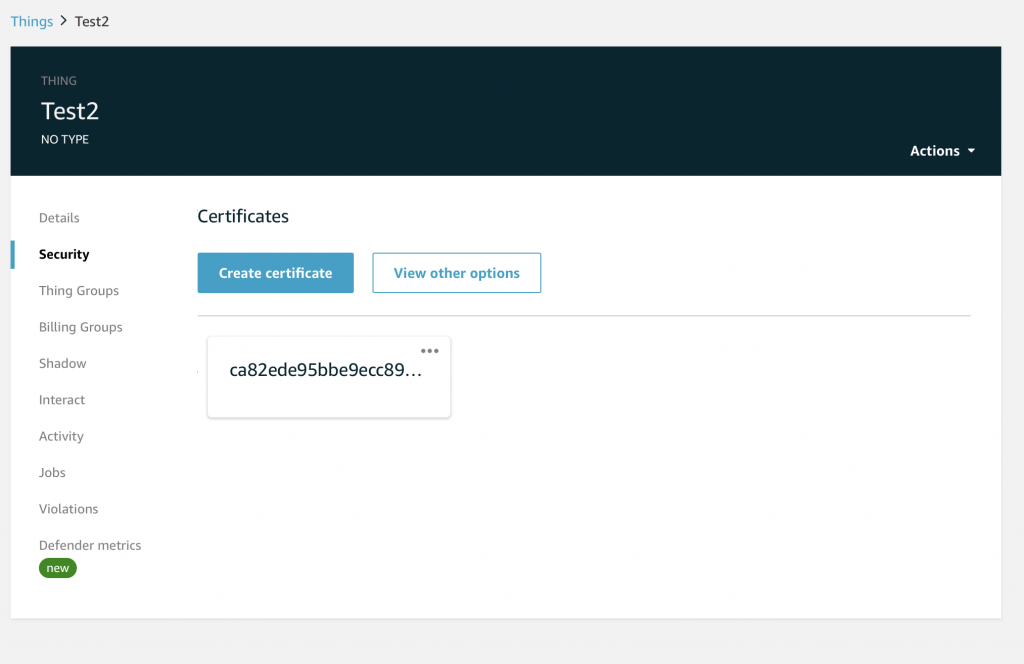
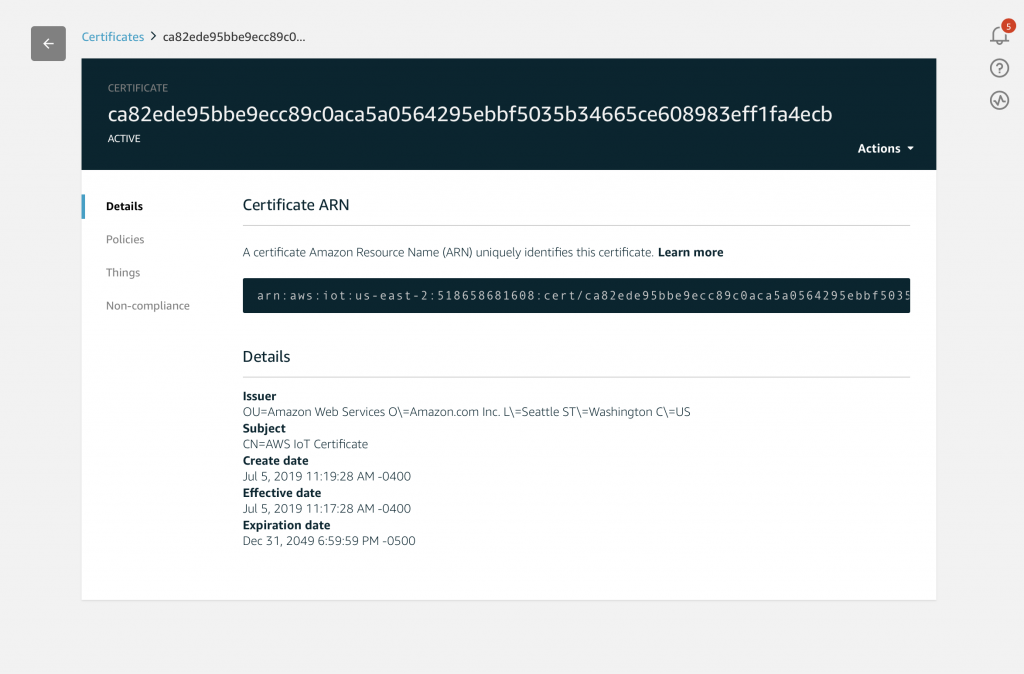
You will see a list of properties classes of the device. Starting with the official Amazon Resource Name (ARN) of your device. If you click on “Security”
You will see that indeed you have a Certificate that is “attached” to your device. Hopefully you downloaded the keys that go with the device. If you didn’t you are screwed and will need to create a new Certificate (which you can do on this screen)
Create a Policy and Attach it to your Certificate
Amazon has documentation for Policies here. As I discussed earlier a Policy is a JSON document that is attached to a Certificate that enables a Thing who is identified by that Certificate to take Action(s) on a specific Resource as identified by an ARN. Policies can have wildcards for Actions and Resources, so they may be attached to multiple Certificates. Imagine Action:* and Resource:* (which is probably a bad policy)
Let’s create one and that should illuminate things better. Go back to the main screen and click on “Secure->Policies”. Then click “Create”
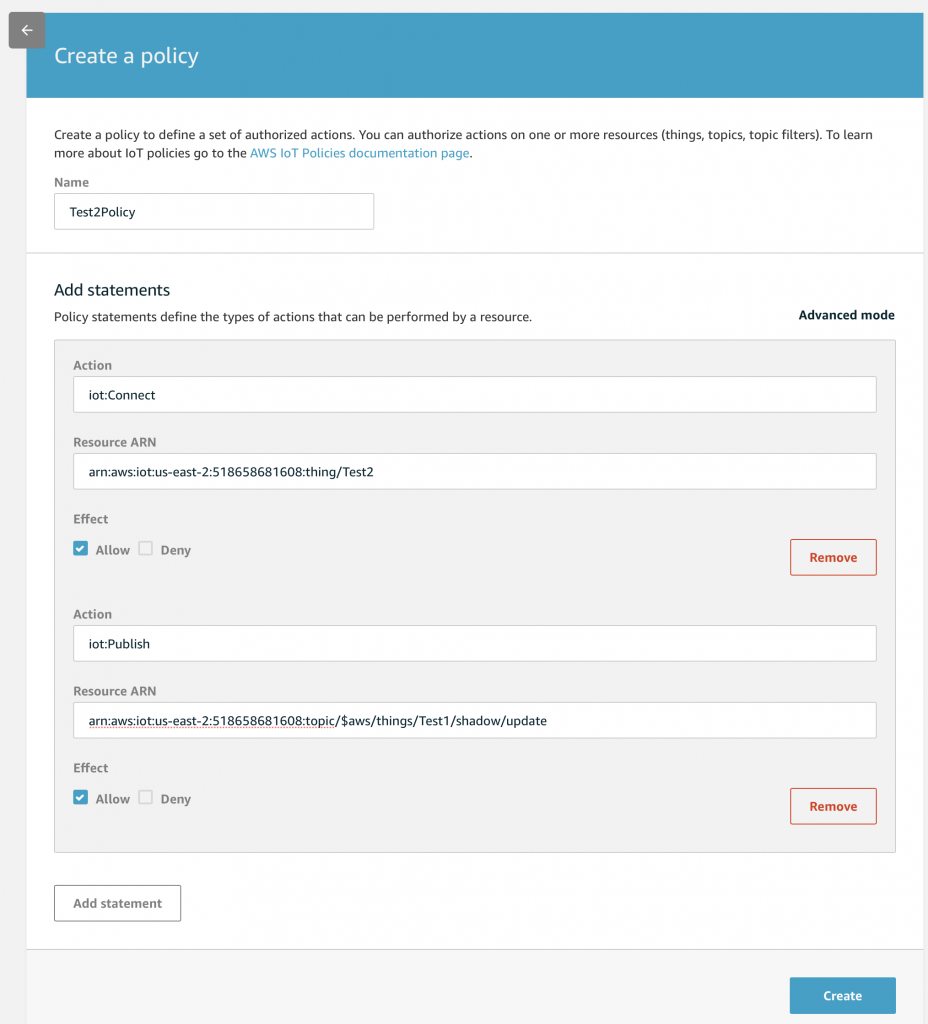
Give the Policy a name. In this case “Test2Policy”. My Policy has two Actions.
- IoT:Connect which is allowed by the Thing “…./Test2”
- IoT:Publish which is allowed you to MQTT Publish to the topic listed (notice I made an error and I really meant Test2)
When you click on the Actions box Amazon give you a list of suggestions. One of the suggestions is “IoT:*” which means ANY of the IoT actions (like Connect, Publish, Subscribe,…) You can also specify a wildcard for the resources with a “*”
After you have the policy done, click “Create”
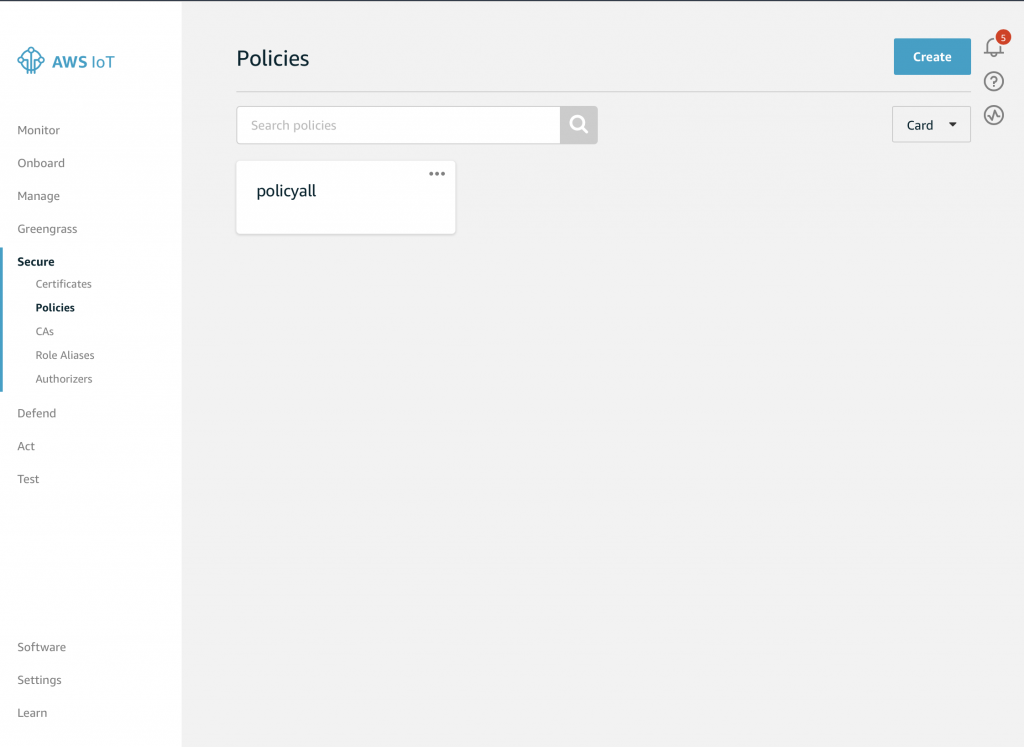
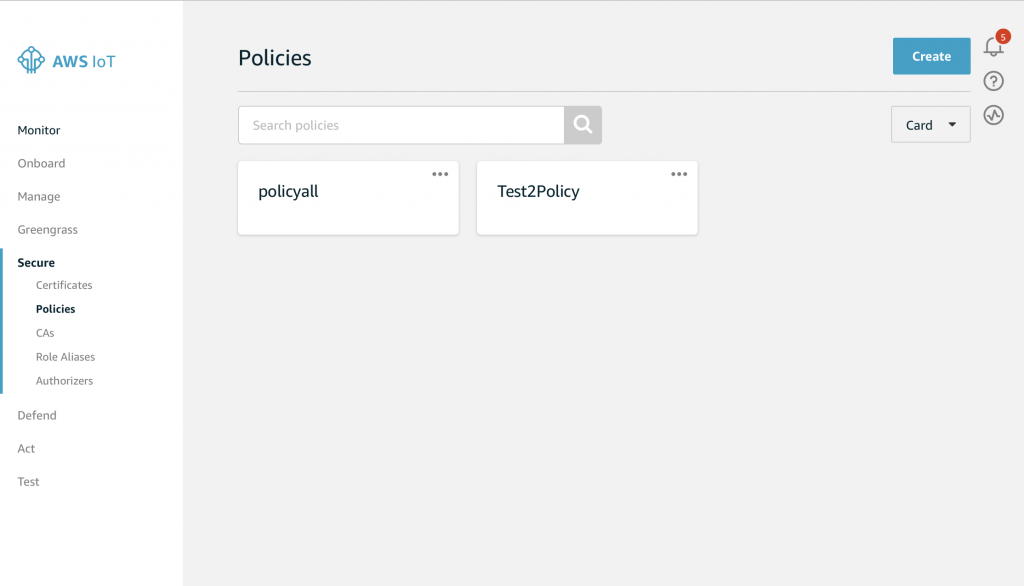
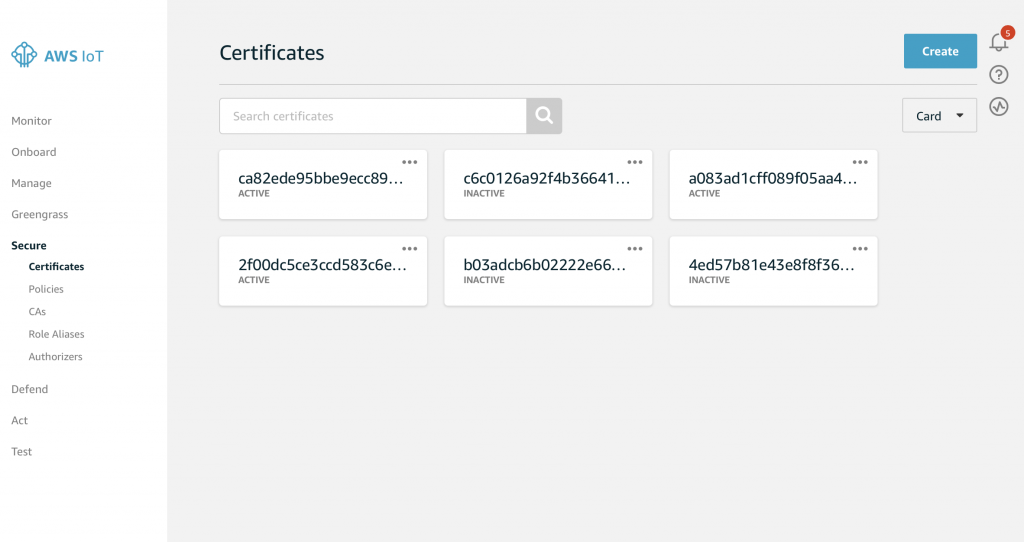
And your screen will look something like this. Notice that I setup a policy called “policyall” which is a wildcard policy that lets me do anything. You can click on the policies and see what is going on with them.
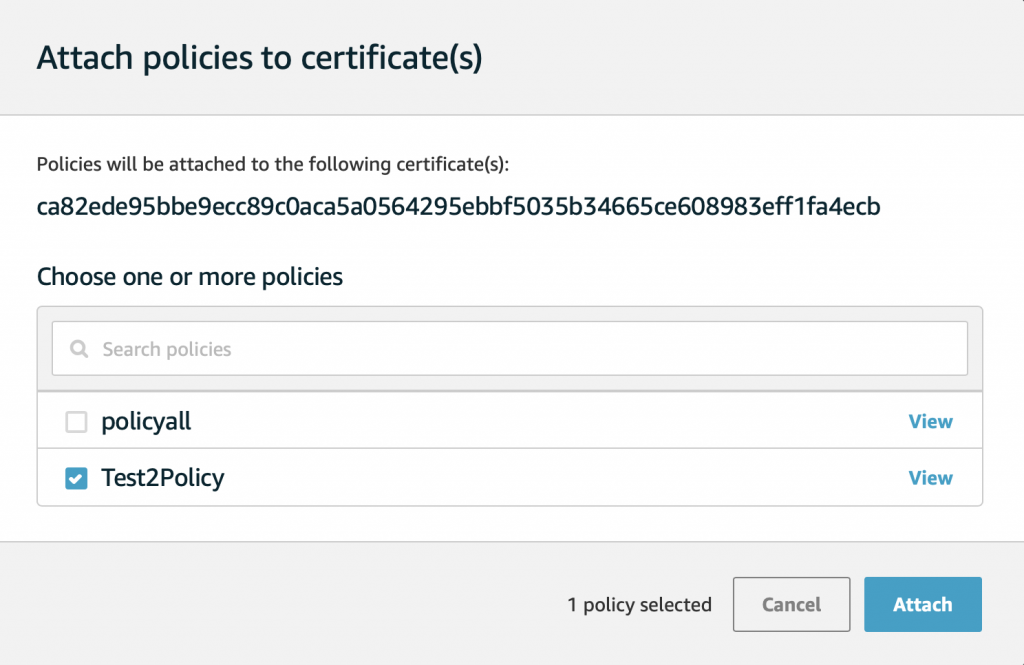
In order to have the Policy take effect you need to attach it to the Certificate. Click on Secure->Certificates. Then click your specific Certificate. In my case it was “ca8…”
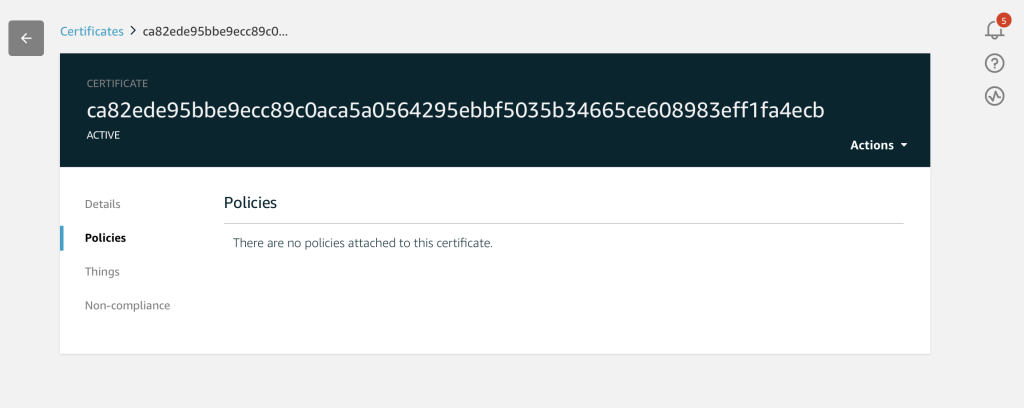
When you get to the Certificate page you can then click on “policies”
Where you will see that you don’t have a Policy associated with your Certificate.
Fix that by click on “Actions” which is on the right hand side of the screen. Pick “Attach Policy”
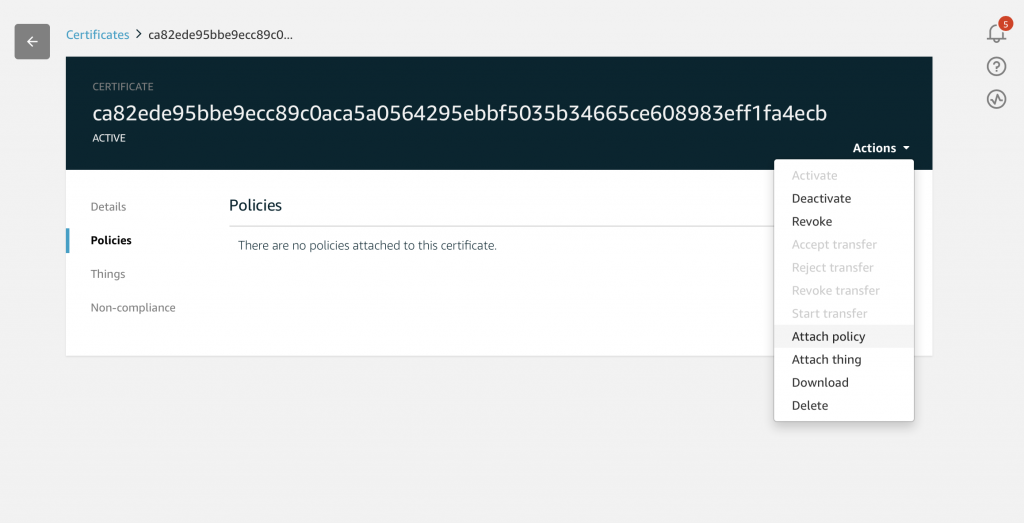
On this screen pick the policy you want to attach. In this case I picked “Test2Policy”. Then click attach.
MQTT & the Test Client
One of the coolest things that Amazon provides is a web browser based MQTT client. To get to it press “Test” (the last item on the left)
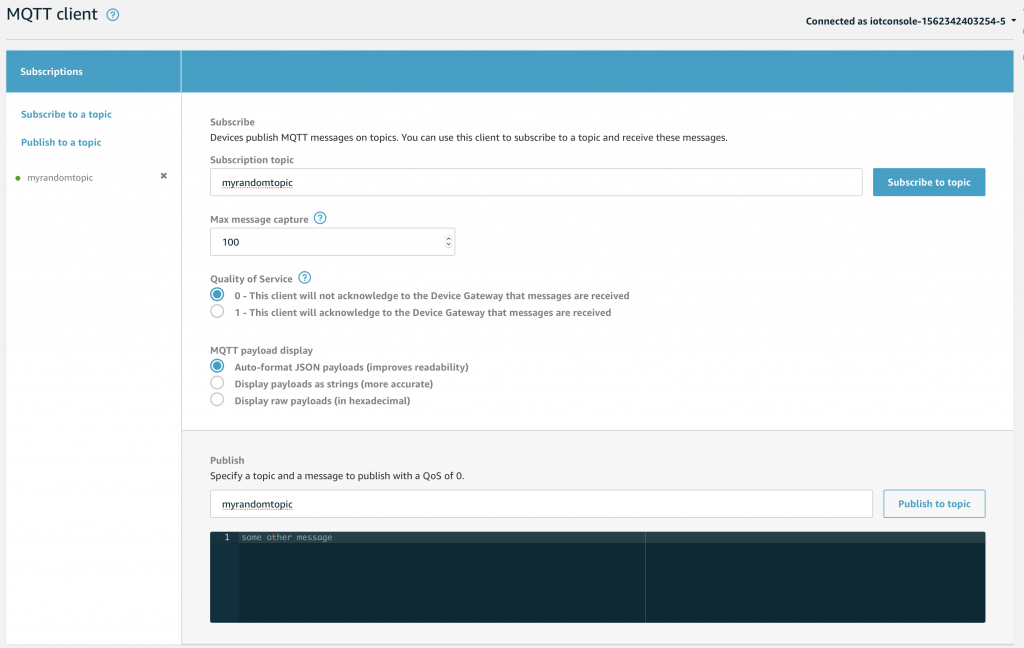
Which will bring you to this screen. Here you can Subscribe to Topics by typing the name of the topic you are interested in and clicking “Subscribe to Topic”. You can also Publish messages to a Topic by typing the Topic name in the Publish box, and typing the message in the black box. The message is typically in JSON format, but this is not actually a requirement.
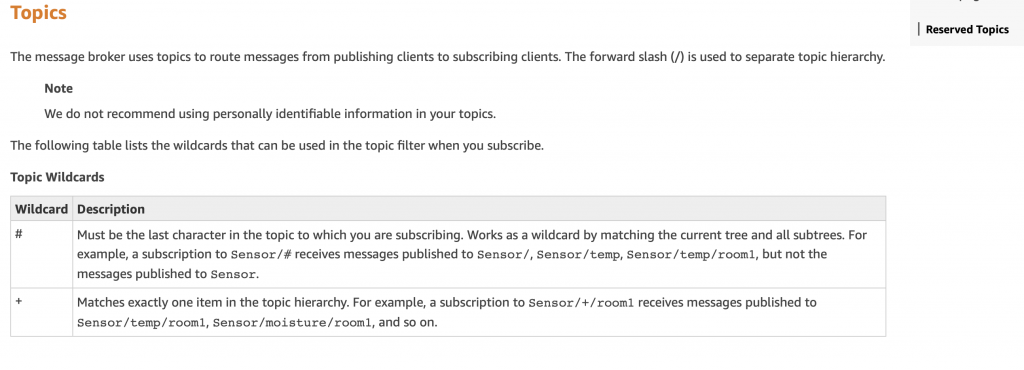
There are very few rules about topic names and as such are left up to you as application semantics. There are, however, a few reserved names which cause specific things to happen in the AWS IoT Cloud. These topics all start with $aws and are documented here.
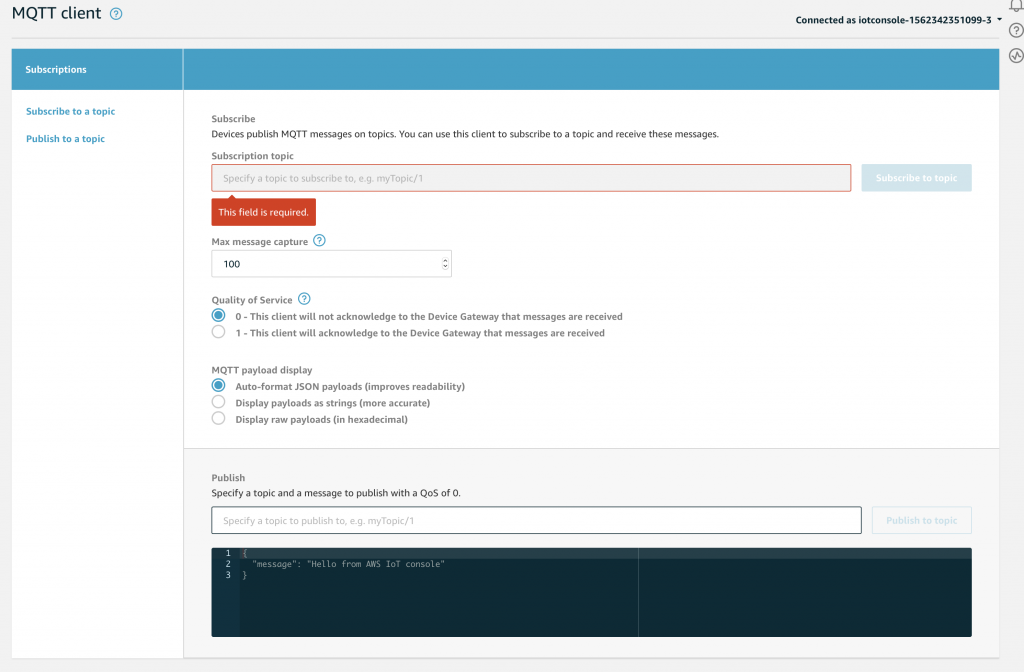
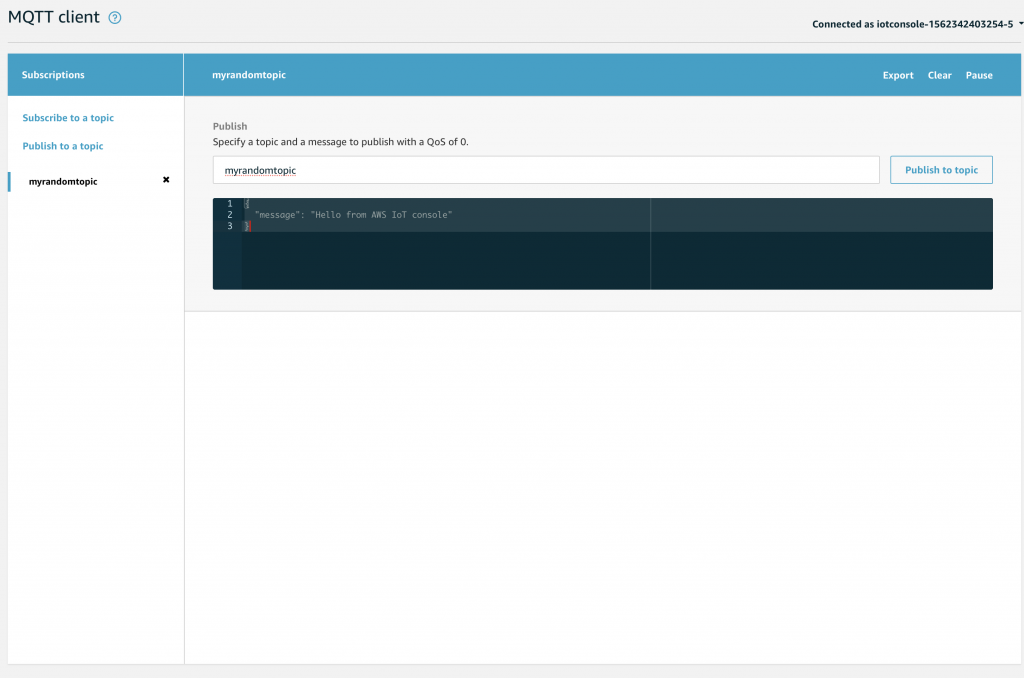
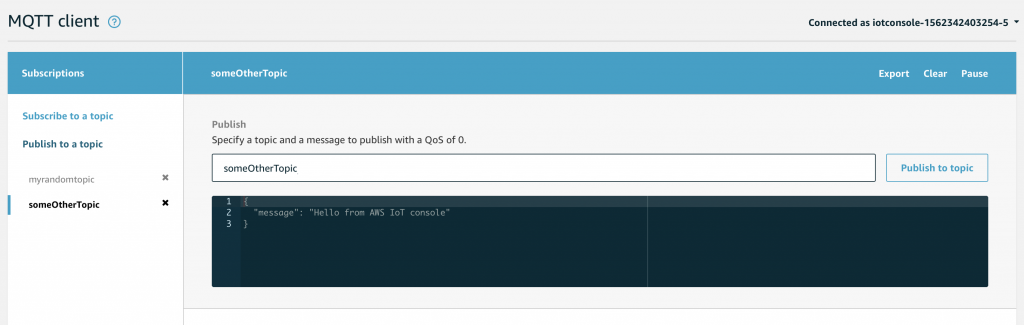
Let’s do a little demonstration of the system by subscribing to “myrandomtopic”, obviously just a name I made up. Type in the box and press “subscribe to topic”
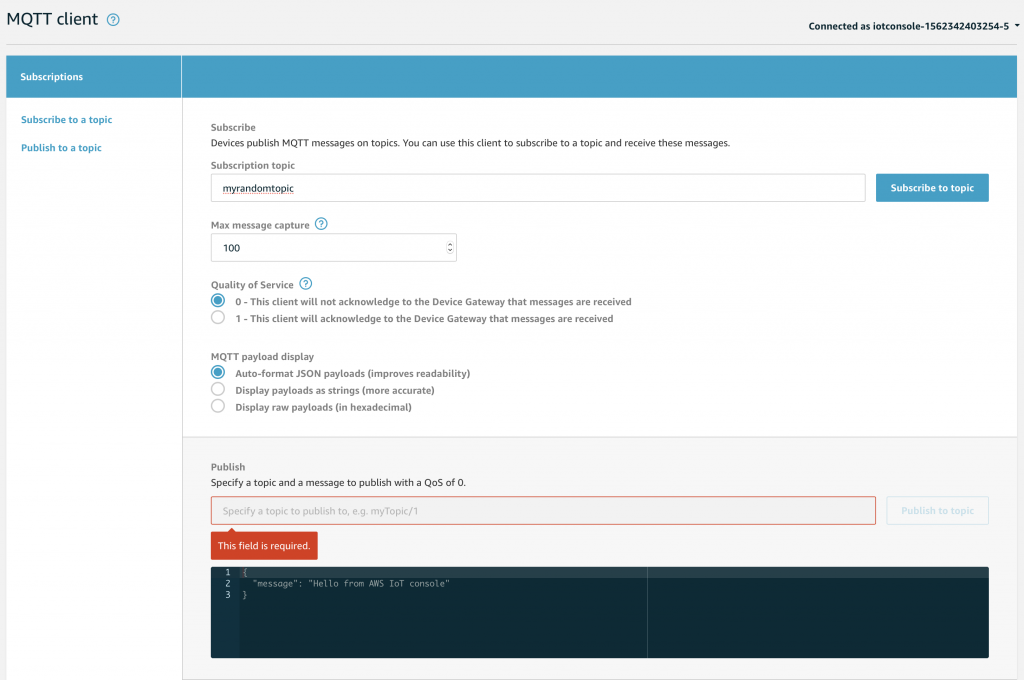
Once that is done you will see on the left side of the screen the topic name in bold with an “x”. To actually publish something you can type a message to be sent into the black box… and when you press “Publish to topic” Go ahead and type something.
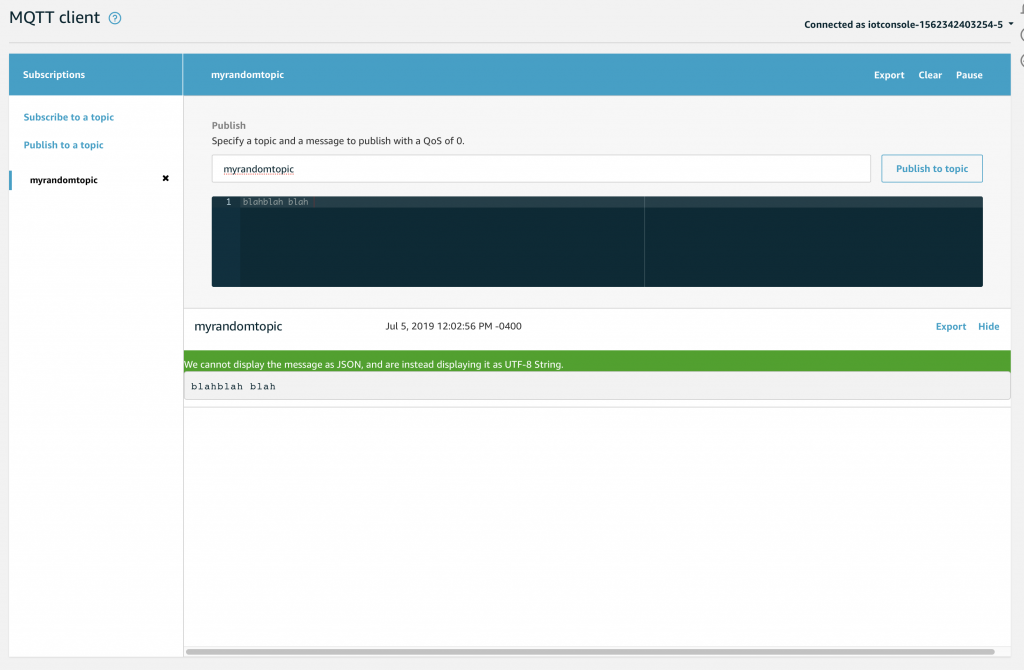
When you press publish, your screen will show each the message that is Published to the Topic because you are Subscribed. This will include messages you Publish in the Test console, as well as Messages that are Published by other devices, like your Thing. This is a really convenient way to debug what is going on in your system.
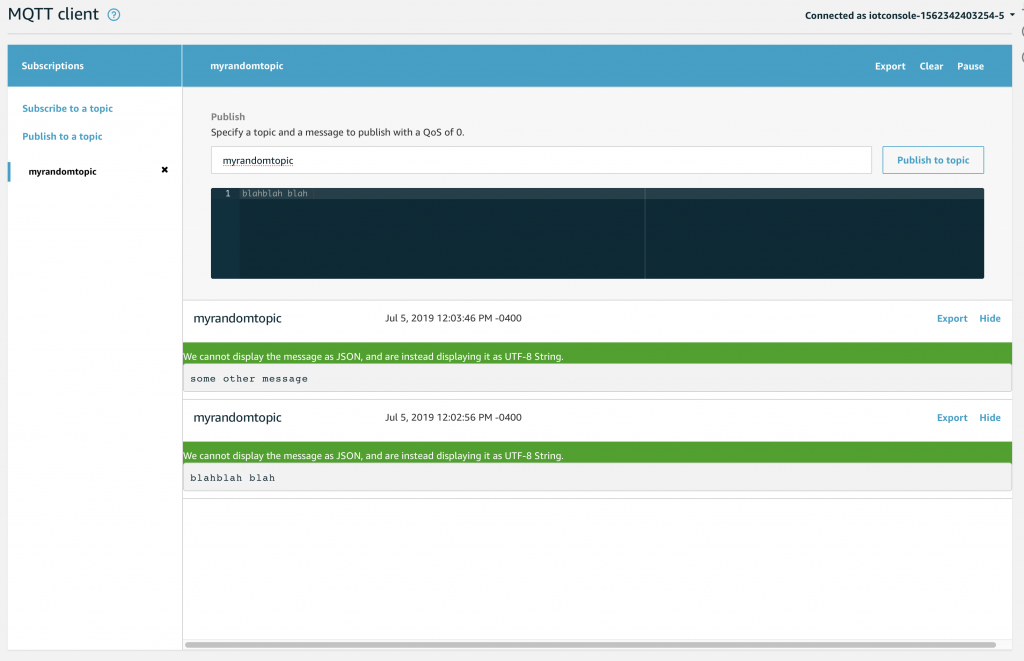
If you go back to the publish to a topic screen and type a different message… then press “publish to topic”… you will notice a green dot next to the topic indicating a new message.
And when you click the topic you will see the history of message Published since you Subscribed.
You are allowed to subscribe to multiple topics at a time and it will show all of them.
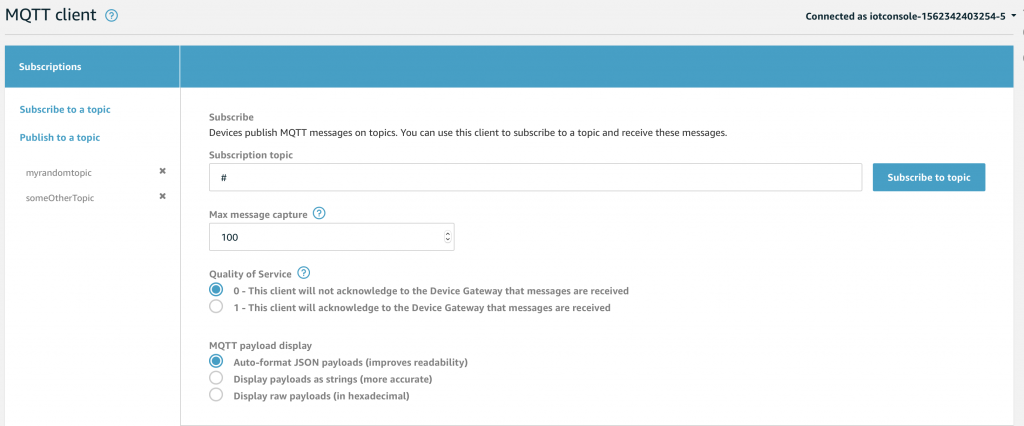
There is also the ability to subscribe to “wildcard” topics.
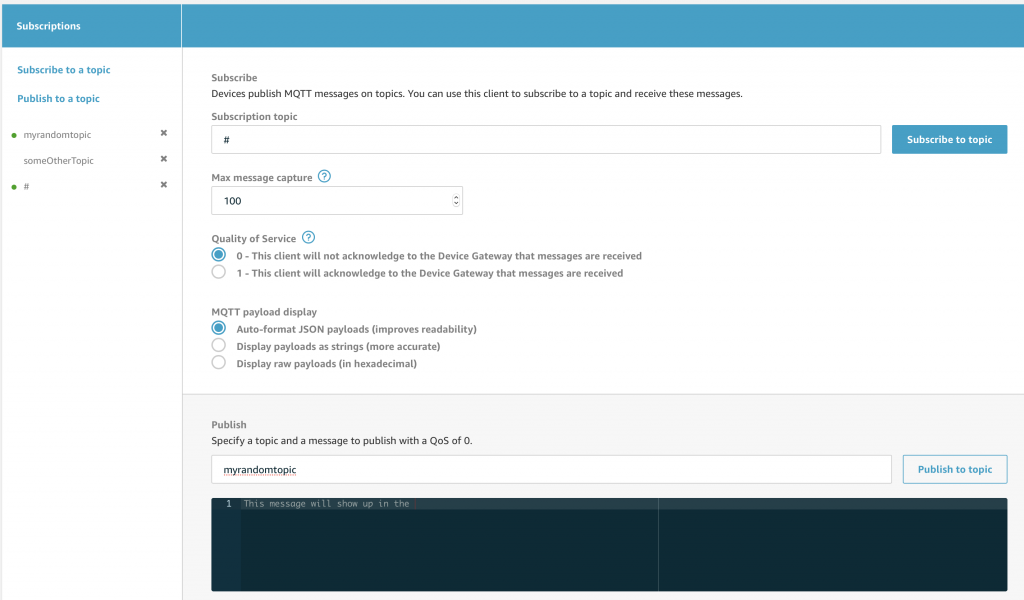
Which means you can subscribe to “#” which will give you all messages sent to the MQTT message broker
Notice that if I Publish to “myrandomtopic” that it will match by “myrandomtopic” as well as “#” (look at the green dots on the left of the screen)
The Device Shadow
The purpose of the Device Shadow is to serve as a Cache of the Reported and Desired State of a Thing. This allows a Thing to not be connected all of the time. Imagine that a light build sends its “reported” state every time that it changes. And a light switch will send the light bulbs “desired” state when it wants to change the light bulb. This allows a device to figure out what state it is supposed to be in when a power outage occurs. And it allows devices to find out what is going on with a Thing without having to talk directly to them.
The official format of the Device Shadow is as follows. Notice just another JSON document.
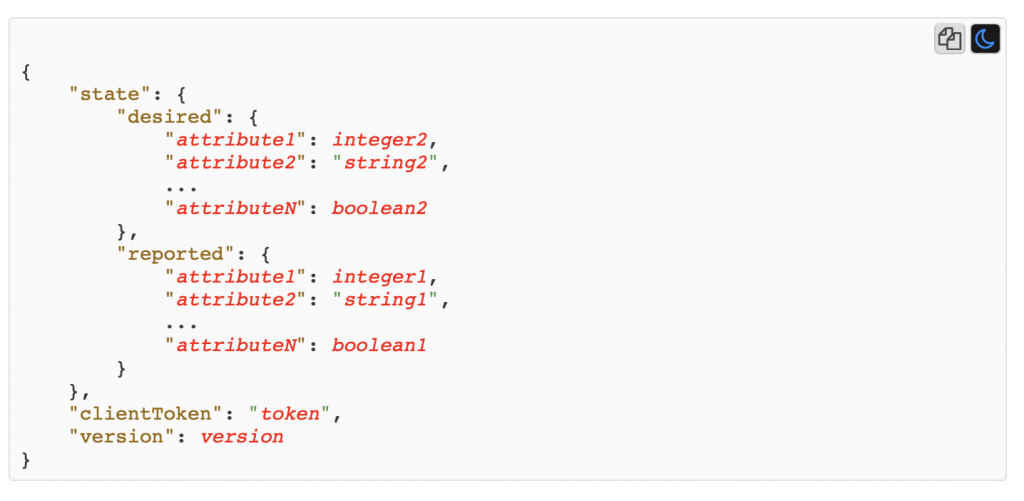
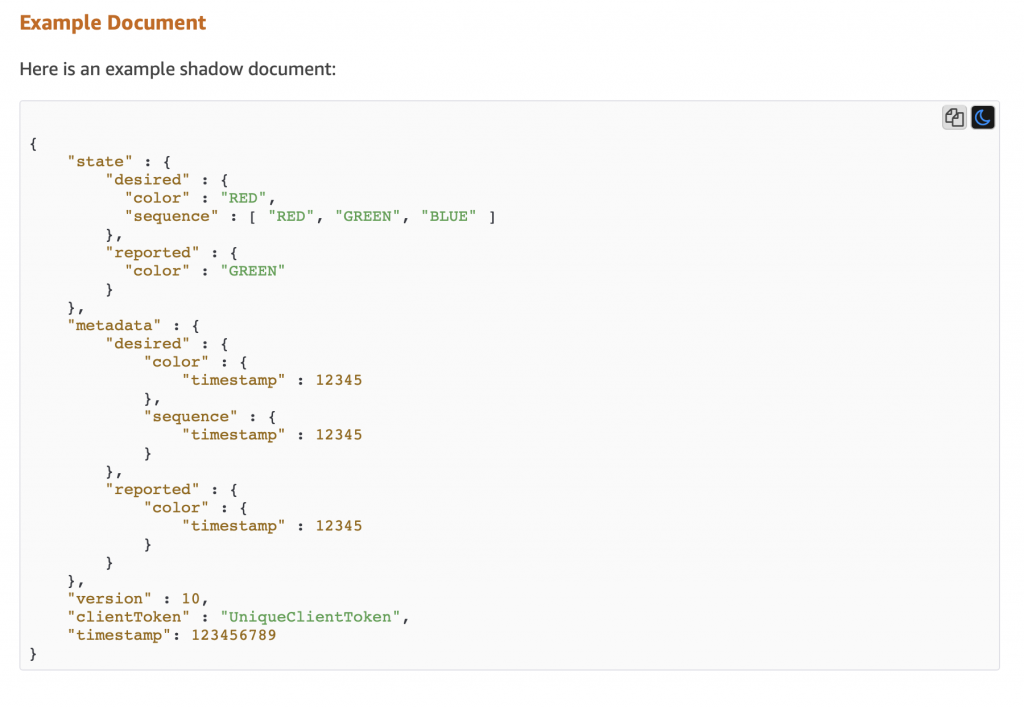
Here is an example document
You can look at the Device Shadow by Clicking on a Thing in the Management Console. Then clicking Shadow. This device has a boring document which nothing in it.

Update the Shadow Using the Test Client
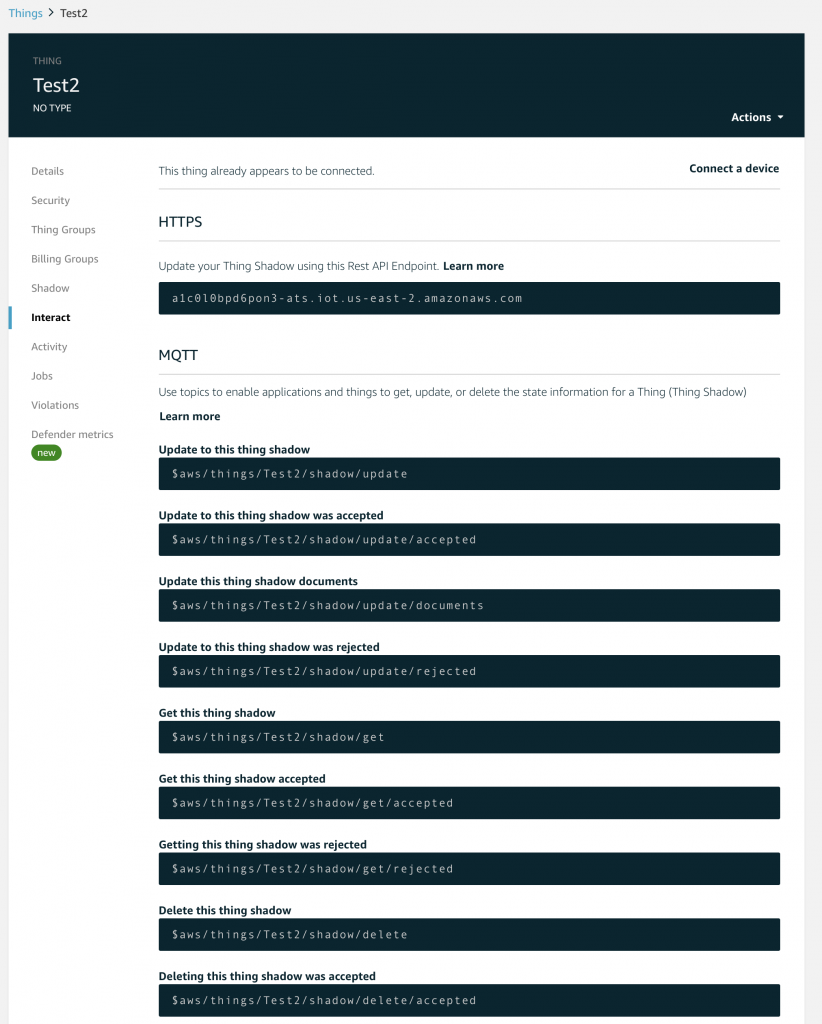
The last piece of this puzzle is how a Thing interacts with its Device Shadow. That is simple. A Thing needs to send JSON message in the right format to the right MQTT Topic. If you click on “Interact” it will show you the list of Topics.
In the documentation there are examples of JSON messages that you need to Publish.
![]()
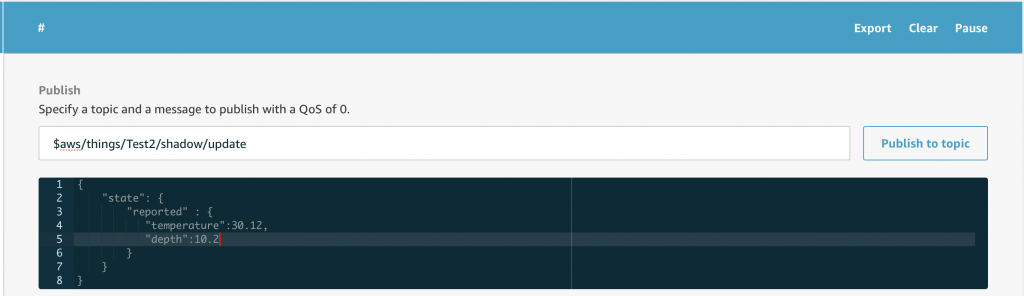
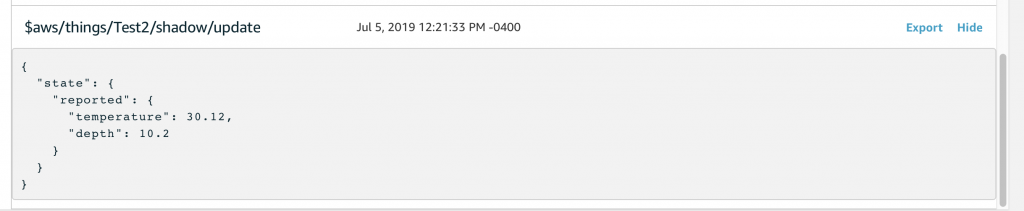
Given all of that, let’s update the shadow for Test2 by publishing a message with the temperature and depth in this JSON document
{
    "state": {
        "reported" : {
           "temperature":30.12,
           "depth":10.2
        }
    }
}
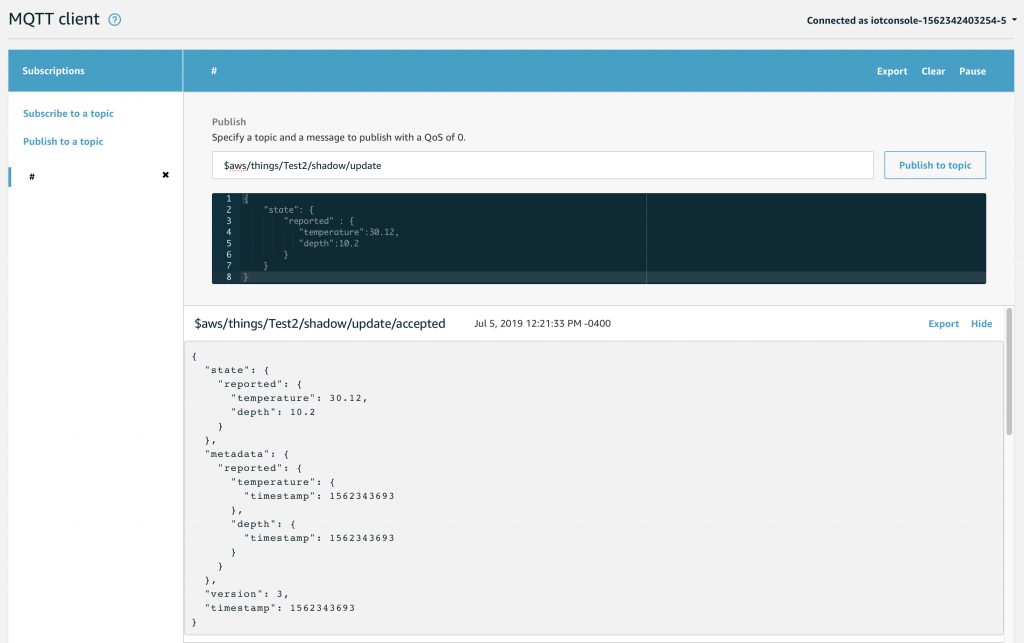
First subscribe to the “#” topic so you can see all of the messages. Then publish the JSON document.
In the MQTT test client you will see
- $aws/things/Test2/shadow/update/accepted
- $aws/things/Test2/shadow/update
- $aws/things/Test1/shadow/update/documents
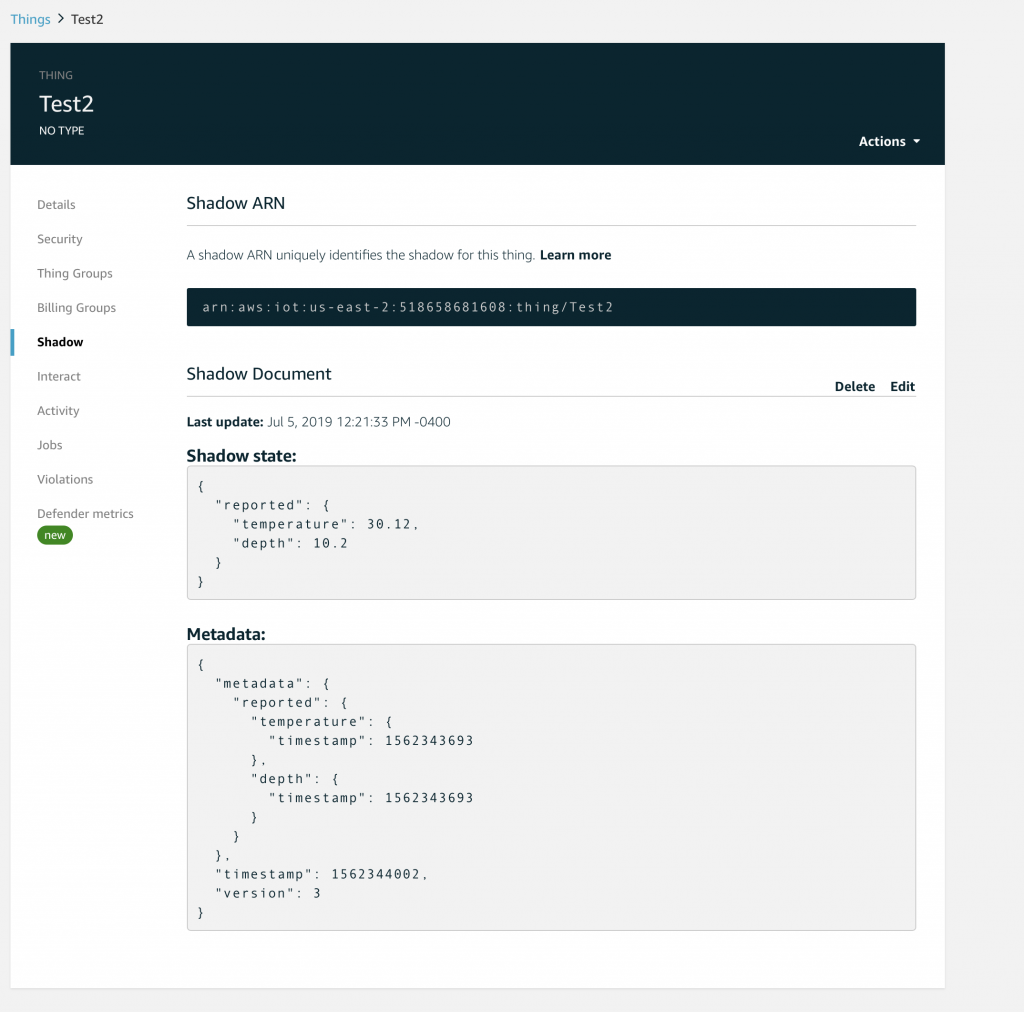
Then you will be able to go to the management console –> Manage -> Things. This will show you all of your “things” including the “Test2” that we just updated. Click on “Test2”
Then click Shadow. Now you will be able to see that the document has been updated and it is caching the state of the device.
Now that we know how to interact with the device shadow via MQTT. How do I get the Raspberry Pi to send MQTT messages? That is the topic of the next article.
No comment yet, add your voice below!