Summary
In a previous post I talked about the steps I took to repurpose my old Mac Mini as a server. In this post I will explain the steps that I went through to make it act as a “Git” server. Although I am an active github.com user it is sometimes nice to have something stored locally as well. The easiest (and best) way to make a git server on your network is to use SSH. In order to make SSH work you need to know about encryption and keys. I knew in an abstract way about encryption but I hadn’t really dug through how all of the parts operate in detail which I had to do to figure this out. I will start by explaining the practical mechanics of encryption, and then take you through the rest of the steps to setup and use Git.
- Symmetric and Asymmetric Encryption: A Foundation
- Setup Git as user on your Server
- Create RSA Keys for a User
- Give user permission to write into Git User Account
- Create a new repository called “repoName”
- Using the new repository
Symmetric and Asymmetric Encryption: A Foundation
SSH stands for Secure SHell. The reason it is called Secure is that it uses an encrypted channel for all communication. But how can that be? How do you get a secure channel going? And what does it mean to have a secure channel? What is secure? This could be a very complicated topic as establishing a fundamental mathematical understanding of encryption requires competence in advanced mathematics that is far beyond most everybody on the face of this planet. It is also beyond what there is room to type in this blog. It is also far beyond what I have the ability to explain. But, don’t despair. The practical aspects of getting this going are actually pretty simple.
First a word of caution. When you make the changes to your computers/network to make this stuff work, you are playing with fire. If you are not careful, you will compromise the security of your system. At this point all of the computer and operating system vendors have spent considerable amounts of time and money making computers safer by installing firewalls and closing security holes. For as much as they have spent making security, the fucking hackers, the Chinese government and the assholes in US government have put 10x that energy into trying to steal your information.
All encryption does the same thing. It takes un-encrypted data, combines it with a key, and runs it through an encryption algorithm to produce encrypted data. You then transmit the encrypted data over the network. When the other side receives the data it decrypts the encrypted data by combining it with a key, and running the decrypt algorithm.
There are two types of encryption schemes, symmetric and asymmetric.
Symmetric means that both sides use the same key. That is, the key that you encrypt with is the same as the key you unencrypt with. Examples of this type of encryption include AES and DES. This type of encryption is preferred because it is very fast and secure. However, both sides need to know the key before you can use it. If you have never talked before how do you get both sides to know the key? This is a big problem.
Asymmetric, often called Public Key, encryption techniques use two keys that are mathematically related. The keys are often referred to as the “public” and the “private” keys. The private key can be used to decrypt data that the public key encrypted and vis versa. This is super cool because you can give out your public key to everyone, they can encrypt data, then only your private key can be used to decrypt it. The problem with this encryption technique is that it is slow.
What now? The most common technique to communicate is to
- You open an unencrypted connection to a server
- You give out your public key to the server
- The server then creates a random symmetric key
- The server then encrypts its newly created random symmetric key using your public key and sends it back to you
- You use your private key to decrypt the symmetric key
- You open a new channel using symmetric key encryption
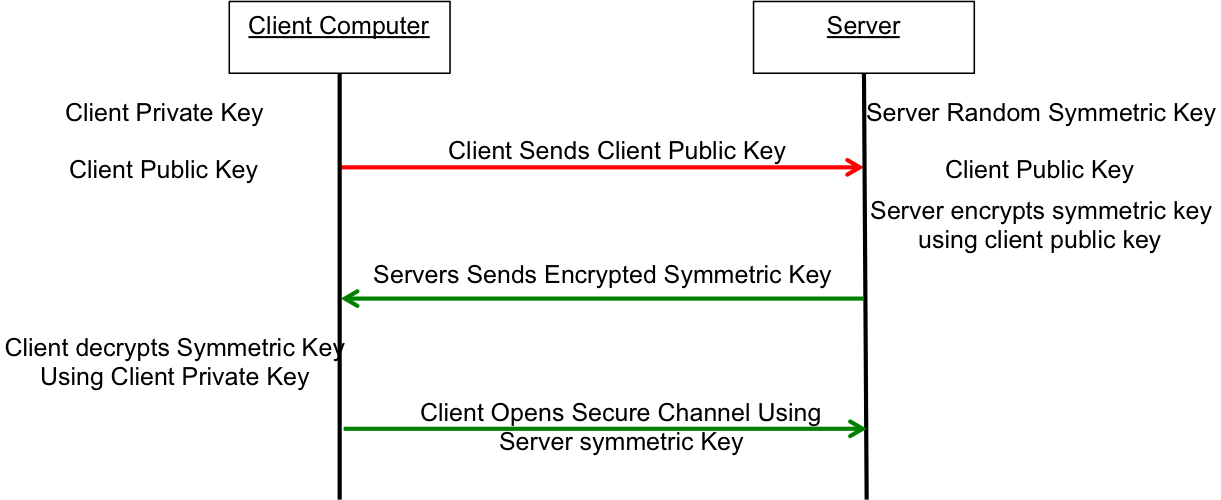
This scheme is completely effective against eavesdropping. What happens if someone eavesdrops the original public key? That is OK because they won’t have the “client private key” required to decrypt the symmetric key. What this scheme doesn’t work against is called man-in-the-middle (MIM). An MIM attack works by
- You open an unencrypted connection to a server [but it really turns out that it is a MIM]
- You send your public key to the MIM
- The MIM opens a channel to the server
- The MIM sends its public key to the server
- The Server encrypts a symmetric key using the MIMs public key and send it back to the MIM
- The MIM decrypts the symmetric key using its private key
- The MIM send you the symmetric key encrypted with your public key
- You unencrypt the MIM symmetric key using your private key
- Then you open new channel to the MIM using the symmetric key
- The MIM opens up a channel to the server using the symmetric key
Once the MIM is in the middle it can read all of the traffic. You are only vulnerable to this attack if the MIM gets in the middle on the first transaction. After that things are secure. However, the MIM can easily happen if someone gets control of an intermediate connection point in the network-like e.g. WIFI access point. The only way to protect against MIM attacks is to have a Certificate Authority (CA). A CA works by verifying that the Public Key actually belongs to who you think it belongs to by using a cryptographic hash. If the MIM sends you its public key then you check with the CA and find out that the MIM public key does not belong to the server that you are trying to connect to, then you know that you are being subjected to an MIM attack. How do you prevent an MIM when talking to a CA? This is done by building in known valid certificates into your program. This morning when I looked at the certificates on my Mac there were 179 built in, valid certificates. This is cool for HTTPS but what about SSH? With SSH you will need to manually verify the public key of the host you are attaching to. There is a nice discussion of this topic here.
When you configure your GIT server you will manually copy your public keys onto the GIT server. This will prevent MIM attacks and will support the establishment of a symmetric encrypted connection. This is called an out-of-band (OOB) key exchange. On github this is done with a browser. For other security systems it could be a USB stick or other scheme. More on that later. Now onto the mechanics of making the Git server work.
Setup Git as user on your Server
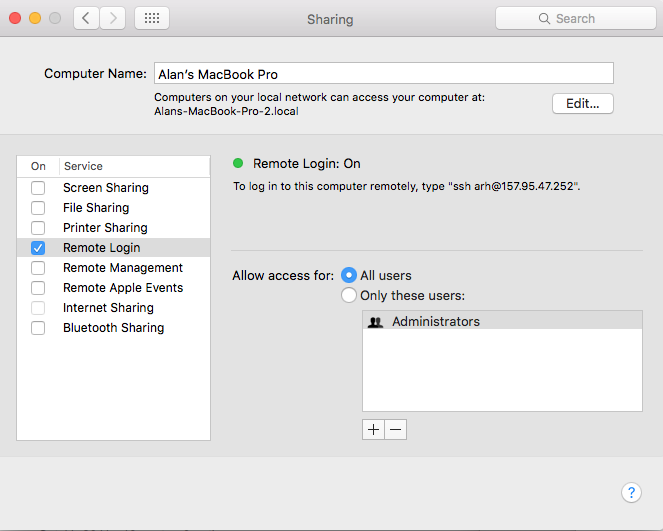
First you need to enable Remote Login (ssh) from the System Settings –> Sharing. Make sure that it enabled for All Users
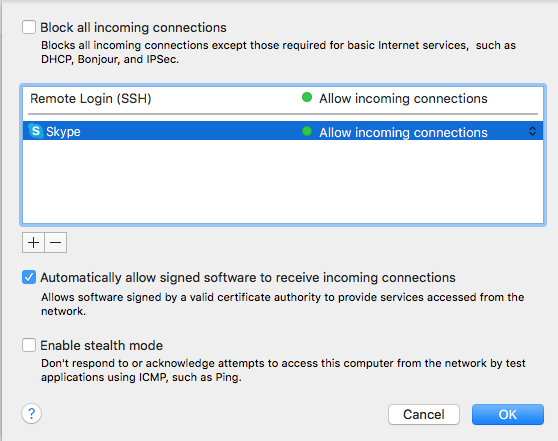
Then you need to turn on the firewall System Settings –> Security & Privacy

Press the “Firewall Option…” turn off the “Block all incoming connections” and then allow Remote Login (SSH)
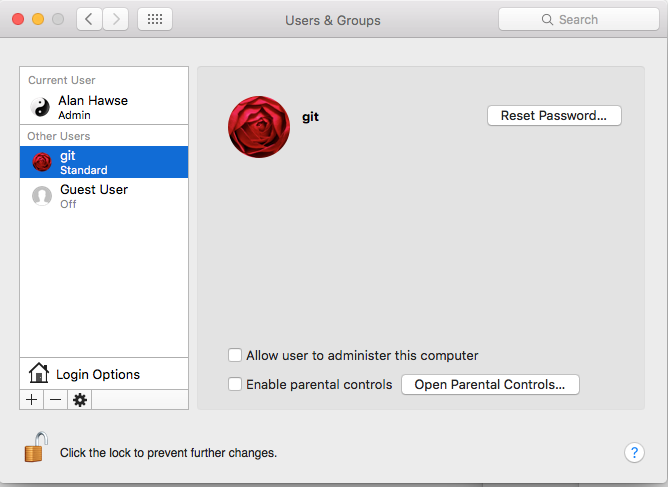
Then you need to create a “git” user account. The account should be a standard account.
The next step needs to be done in a terminal window. You need to have root access (your account need to be authorized as an administrator) to follow these steps. This will create the place to store the SSH RSA Keys.
| command | comment |
|---|---|
| su – git | log in a the git user. You will need to type the password that you set when you setup the git account |
| mkdir .ssh | Create the directory with the public and private secure shell keys |
| chmod 700 .ssh | This directory should only be redable by the git user |
| cd .ssh | |
| touch "authorized_keys" | Create a file that you will add public keys to of the people who are allowed to upload to this server |
| sudo chpass -s /usr/bin/git-shell git | Make the git user so that it can only do git commands. This is a way to enhance security by not letting the git account do anything other than local git commands. |
Create RSA keys for a user
In order for a user to have access to the git account on the server he will need to have RSA Keys. Specifically, in the ~/.ssh directory of the user you will need two files, id_rsa and id_rsa.pub These files are the public and the private keys of the user. When you run the command
- ssh-keygen -t rsa -b 4096 -C “user@computer”
it will first ask you where to store the keys. If you already have keys it will give you the option to store them someplace other than the default location. Then ssh-keygen will ask you for the password to encrypt the private key file. I don’t use a password on my private key file, but the security would probably be better if I did. The “-C” option just inserts the text in quotations into the key file as a comment so that when you look at the file you can figure out what the key is associated with.
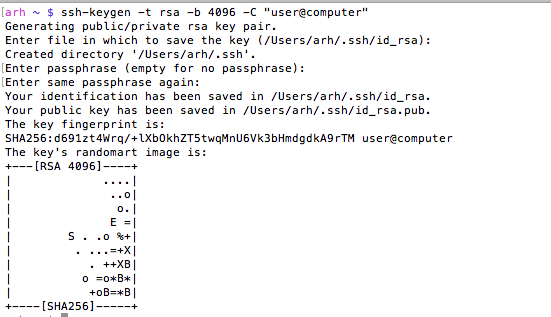
You can look at the MD5 signature (which is what github displays) of a public key by running
ssh-keygen -E md5 -lf id_rsa.pub
Give user permission to write into your Git User Account
In order for a user to be able to access the git server you will need to append his public key to the “~git/.ssh/authorized keys” file. As I talked about above, in the users home directory you will find a directory called “.ssh”. In that directory there will be two files, one is called “id_rsa.pub” which is the RSA public key, the other is called “id_rsa” which is called the private key. You should be very careful to only copy the public key.
- sudo cat id_rsa.pub >> ~git/.ssh/authorized_keys
In this example both users were on the same computer, but they don’t have to be. In that case you will need to copy the file some other way (ftp, scp, the browser, …) Then append it to the ~git/.ssh/authorized_keys file.
Create a new repository called “repoName”
Once you have everything setup with the git user and the SSH RSA keys you will need to create a “bare” repository
- cd ~git
- sudo git init –bare repoName.git
- sudo chown -R git repoName.git
Using your new repository
The last thing to do is to setup git remotes for the new repository. To do this, on your client machine you can either clone it with
- git clone git@githost:repoName.git
Or if you have an existing repo you can
- git remote origin git@githost:repoName.git
- git push origin master
Other random topics
When I was trying to figure out how all of this worked I found a couple of places (on google) that talked about modifying the file /etc/ssh/sshd_config. This turned out to be a red herring as the default Mac OS X settings work fine.
When you open a new shell on your client computer, then start your first SSH, the client shell automatically starts a daemon called “ssh-agent”. This daemon reads all of your key information and caches it. You can see the information that it is storing by running “ssh-add -l”. If for some reason you change your rsa keys you will need to either restart the daemon or tell it to read the new keys “ssh-add ~/.ssh/id_rsa”. You can read more about this in these articles ssh-agent-forwarding and ssh-agent-keys in the github documentation.
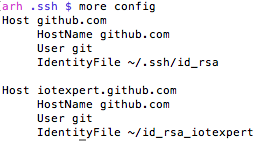
If for some reason you are using multiple rsa key files then you need to create a “~/.ssh/config” file to setup which key is used in which situation. I have this situation because I use github for my personal stuff as well for my iotexpert stuff. By default ssh uses the keys in “~/.ssh/id_rsa”. If you need to setup a different key for other hosts you can:
- Create an ssh name called “github.com” which uses “~/.ssh/id_rsa”
- Create and ssh name called “iotexpert.github.com” which uses “~/.ssh/id_rsa_iotexpert”
There is a daemon running called the ssh-agent. It is used to cache and deliver the keys. You can see what keys it knows about by running
ssh-add -L
You can delete the cache by running
ssh-add -D
You can add keys to the cache by running
ssh-add ~/.ssh/id_rsa
ssh-add ~/.ssh/id_rsa_iotexpert
To test all of this (with github) you can run
ssh -T git@iotexpert.github.com
or
ssh -T git@github.com
These commands will test the key exchange to make sure that the right key is being mapped to the correct user.
Then to setup the different remotes I do
- git remote add origin git@github.com/someuser/repository.git to use the id_rsa key
- git remote add origin git@iotexpert.com:iotexpert/repository.git to use the id_rsa_iotexpert key
The thing that was intensely confusing is “iotexpert.github.com” isn’t actually the name of a computer. It is just an ALIAS that ssh uses… when SSH runs it looks in the config file and if it sees a “Host” alias that matches what you typed, then it substitutes the value of “HostName” in place of where you gave it “Host”.


No comment yet, add your voice below!