In 2011, I bought a Mac Mini Server to act as my main desktop. That computer had 2GBs of RAM and 2 internal 500gb hard drives. I originally setup that computer as RAID1, meaning that the two drives were in a mirror configuration. This meant that if one failed that I didn’t loose my data and things kept going. As I am paranoid about my data I also had a Time Capsule that made regular backups using Time Machine. I will admit that I am an Apple fan boy. When I got married in 1992 the asshole photographer misprocessed the film, which resulted in all of the pictures being destroyed. Since then, I have been really really paranoid so I also backup my backup to the Cloud using Mozy.
In the fall of 2014 I switched to using a MacBook Pro as my main computer, so I moved the Mac Mini onto my kids desk. And, as computers seem to do, the Mac Mini became slower and slower as more crap was loaded onto it. Earlier this year I bought them a new Mac Mini and set my old workhorse to the side. About 6 weeks ago, I decided that I was interested in building a new cloud server and I decided to refurbish the Mac Mini as a server.
I started the process by installing two 8 GB SIMMs which I bought from MacSales.com because they have really excellent tutorials on their website. 16GB made a huge difference in the performance of the machine. The install process is pretty simple. The Mac just has a cover which twists off giving access to the two SIMM slots. Here is the video tutorial that they provide
https://player.vimeo.com/video/139638226?title=0&byline=0&portrait=0
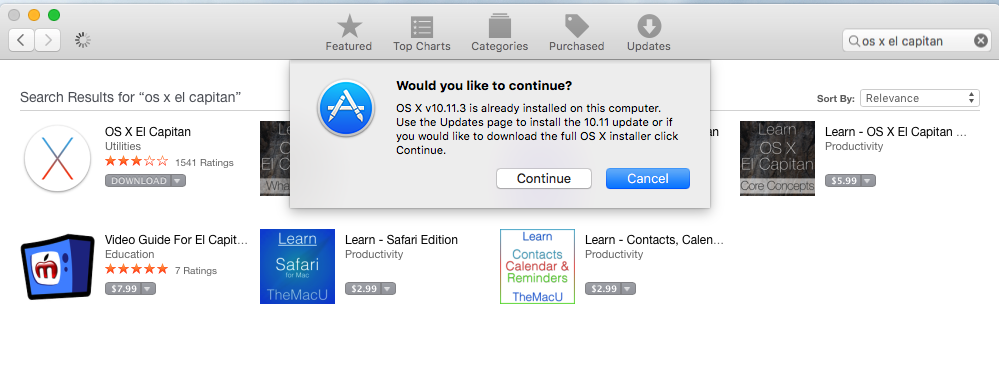
I then reinstalled the OS, which was a total pain in the neck. At some point in the last couple of years Apple stopped delivering an operating system DVD, moreover I wanted to make a clean install of the most recent version of the operating system and I wanted a backup. I found the instructions for creating a USB stick on Apples website. The problem was I didnt have the directory /Application/Install OS X El Capitan.app. Now what? After a bunch of google and false starts I figured out that you have to download it from the Appstore, even if you already have it installed on your computer.
To create a USB stick with the most recent Mac OS you need to take the following steps.
- Get the installation for Mac OSX from the App Store
- Press “download”
- When the installation screen starts, use the menu to quit. If you don’t do this it will try to install the OS on your computer.
- Insert a USB stick and start a terminal
- run the command “sudo /Applications/Install\ OS\ X\ El\ Capitan.app/Contents/Resources/createinstallmedia –volume /Volumes/MacOSX/ –applicationpath /Applications/Install\ OS\ X\ El\ Capitan.app/”
- The “/Volumes/…” is the path to the USB stick. You can figure that out using the command “df”
- When you run the “sudo …” it will ask you for your password, it will then erase the “/Volumes/…” Make SURE that you don’t erase your hard disk by picking the wrong directory
- I had an old USB stick and it took a very long time (about an hour) to make the copy
To emphasize, if you don’t quit the installer it will remove the installation directory from the “/Applications/Install…” folder and you will not be able to create the media.
If you don’t want to do this you can use DiskMaker which provides a GUI that does exactly the same thing. You can find it at http://diskmakerx.com
The next step is to reboot your Mac from the USB Stick. To do this, reboot and press the “Option” key to start the “Startup Manager”. I found an Apple Knowledge Base Article with a list of all of the startup commands here. After the computer reboots run the “disk utility” program to reformat the hard disks. When I ran the disk utility I found that one of my hard disks was dead. I guess that it was a good thing that I was running RAID. I decided to run on just one disk as this computer was going to be used only for testing, so I picked the good disk to reformat and went for it. After the disk was formatted I quit the disk utility and then continued the Mac OS installation.
With all of that done I found it remarkable how much faster the computer was. Night and day difference.
Fast forward several weeks. My experiments with cloud services were turning more serious (there will be a bunch of posts on this topic). This set me to worrying about the good disk going bad, which would be annoying, but I suppose, not a horrible problem as I had the belt-and-suspenders-setup. It seemed like installing two SSDs in RAID would make another leap in performance. So, I went back to macsales.com and bought a pair of 1TB SSDs, the toolkit to install them, and an external USB 3.0 drive enclosure so that I could read data off of the one good drive. Doing the installation was quite complicated and took me the better part of two hours. On the macsales.com website there is an outstanding video of the process.
https://player.vimeo.com/video/139637589?title=0&byline=0&portrait=0
After I got the drives installed the next step was to get RAID1 going again. Unfortunately, Apple in their infinite wisdom has discontinued support for RAID in the diskutility program. In order to get the RAID working you need to run diskutility from the command line. To do that:
- Reboot the Mac while holding down the option key with your USB stick installed. If you are using a PC keyboard on your mini then you are out of luck. Specifically, there is no option key on a PC keyboard and the only way I could get the option to be held down was to use an old Mac keyboard that I had laying around.
- When the Install OS screen comes up run the “Utilities -> Terminal”
- In the command window run “diskutil appleraid create mirror MyHardDisk JFHS+ disk0 disk1” This will create a new volume called “MyHardDisk” that is RAID1 (aka Mirror). Be aware that this ERASES your hard disks so be careful. There were several discussions I found on this topic on the internet including this one.
For me the last step was to restore my image from the time capsule. To do that I
- Rebooted the Mac and held down the “Command-R” which starts an internet recovery. I had to do this because my hard disk doesn’t have a recovery partition
- Select recover from Time Capsule
There are two troublesome things about what I have done.
- Apple seems to be discontinuing their support for RAID which makes me question how good an idea it is to run. There doesn’t seems to be any support infrastructure so Im not sure how I would know if there was a problem
- The first MacOS USB drive I made worked to install the OS. The second one did not. After I compared them, the second one was missing a file called “.IAProductInfo”. I copied that file from the first to the second drive and things started working. When I googled around I found a couple of references to this problem. I have no idea why the second install didnt have the .IAProductInfo.
If you have an answer, or an opinion about either of these topics then please email me or leave a comment.
In future posts I will talk about installing VMware, PHP and a bunch of other tools.

No comment yet, add your voice below!