PSoC 6 FreeRTOS – The First Example

Summary

In the previous article(s) I have been writing about using FreeRTOS on PSoC 4 development kits.  The other day a friend of mine in Kentucky sent me a note asking about PSoC6, so here it is.  PSoC 6.  In this article I will write about the first PSoC 6 FreeRTOS example, obviously, the blinking LED.  In this article I will also get to show off the Type-C connector on the new CY8CKIT-062-BLE Devkit.

Create PSoC 6 FreeRTOS Project

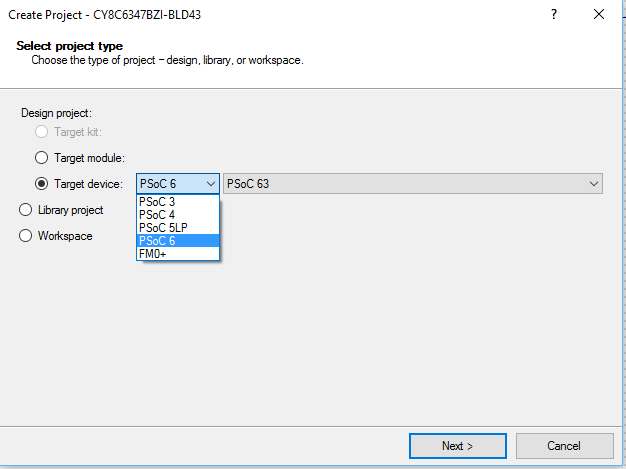
To get this whole thing going, create a new PSoC 6 project in PSoC Creator.  Because the PSoC 6 is still in early release, you will need the secret key to get it going in PSoC6 Creator (which you can find out from the Early Access Program).  But, when you know the key, you will get something that we have all been waiting for, the ability to create a PSoC 6 project.

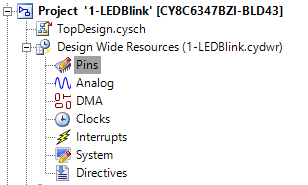
Once you have a new project (which I already renamed 1-LEDBlink) you can look at it in the Workspace Explorer where you will see the normal PSoC things, Schematic, Pins, Analog, etc.  So far, so good.

Next I click on then TopDesign.sch, then add a digital output pin.  That looks and feels familiar to all of you PSoC people out there.

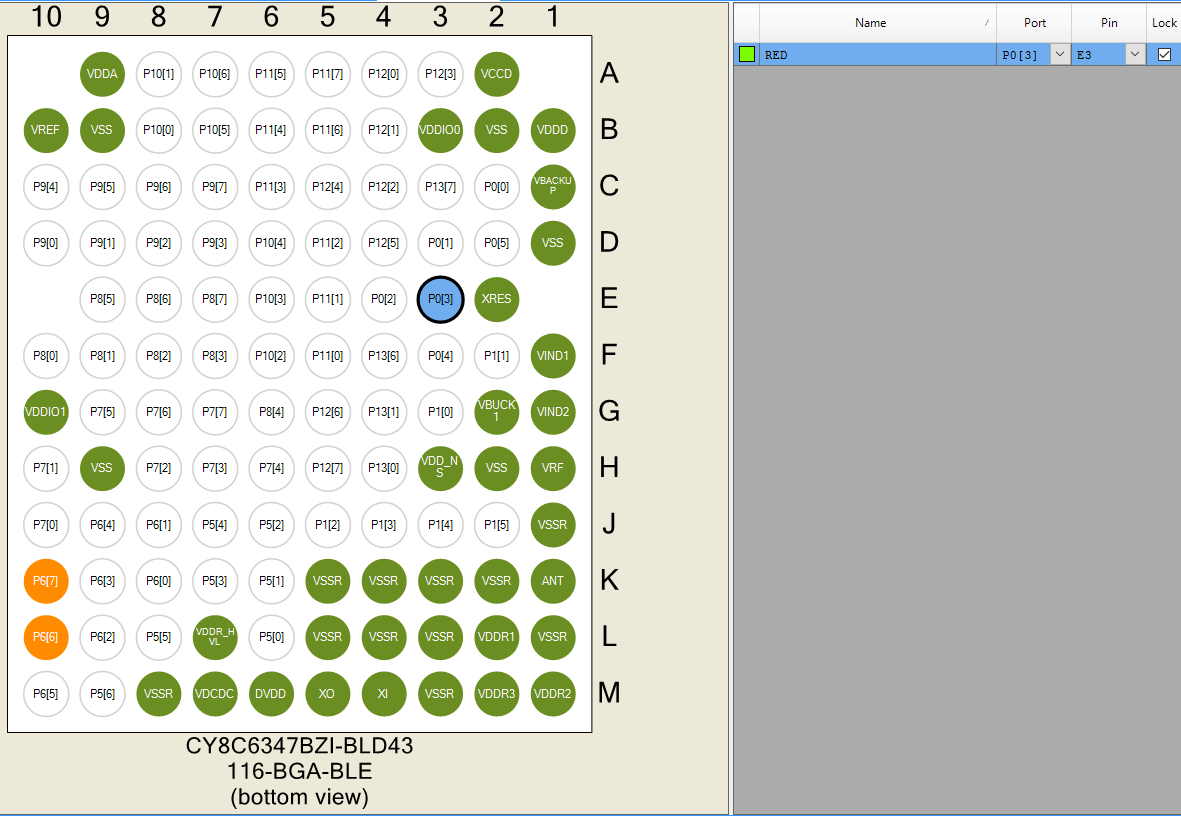
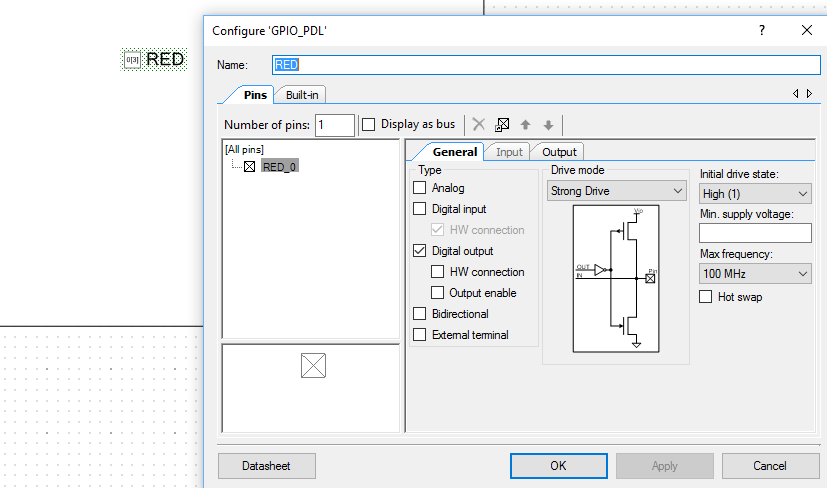
Next I assign the pin to “P0[3]” on the Pins tab.  Wow, that tiny little CSP has a boatload of pins, and yes this chip can do a bunch of things.

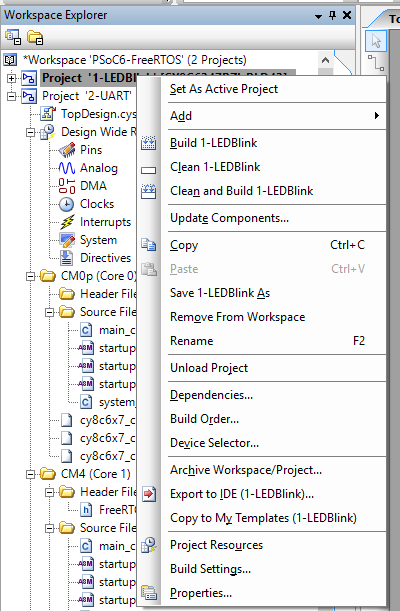
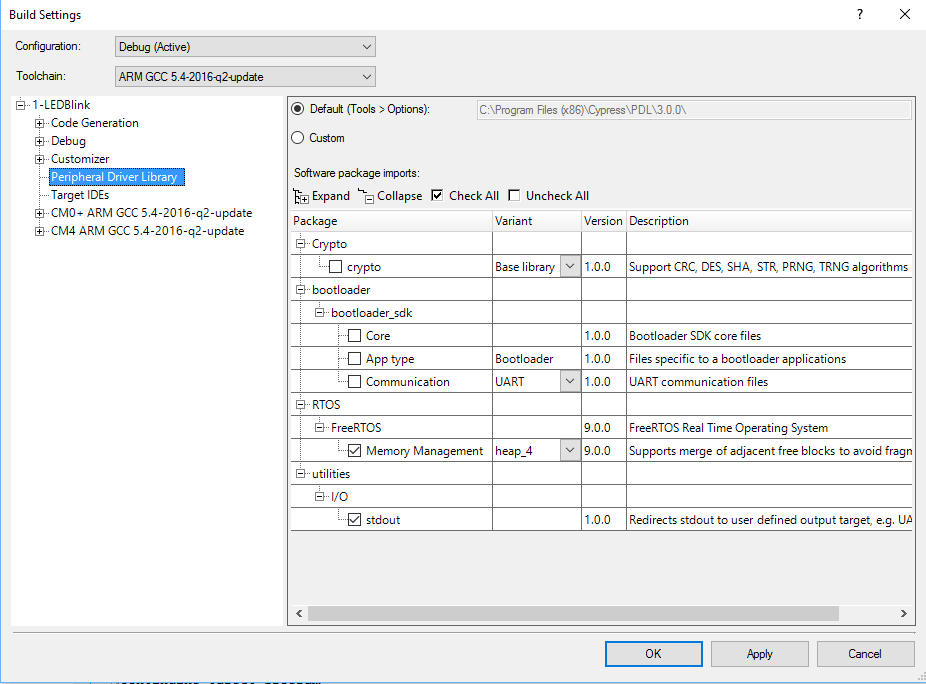
Now for some new stuff.  I want to have FreeRTOS included in my project.  In the PSoC 4 family you need to download it, add paths to your project etc. Read about it here.  Instead of doing that, you can edit the “Build Settings” by right clicking on the project.

Then on the build settings menu, pick Peripheral Driver Library (more on this later).  On the PDL screen you can click to add “FreeRTOS” and you can pick out the memory management scheme (in this case I picked heap_4).

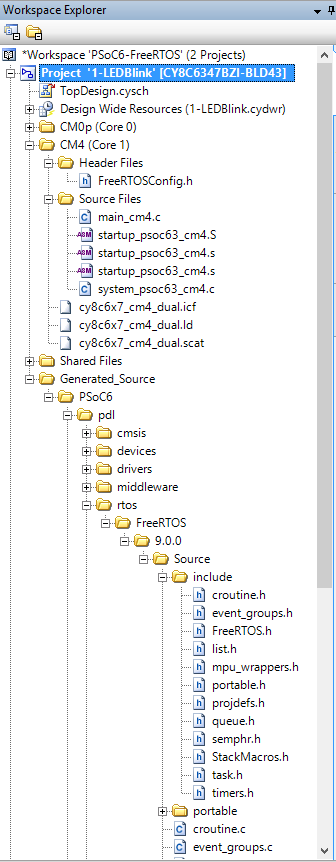
When you generate application, PSoC Creator will copy FreeRTOS into your project generated source, and give you a default FreeRTOSConfig.h (see it in the Header Files for the CM4)

PSoC Creator gives you a pretty generic FreeRTOSConfig.h file, with some of stuff hooked up (like the clock frequency).  This file is copied into your project.  Once that is done, you own it, and all of the changes to it.

#include "cy_device_headers.h"


#define configUSE_PREEMPTION                    1
#define configUSE_PORT_OPTIMISED_TASK_SELECTION 0
#define configUSE_TICKLESS_IDLE                 0
#define configCPU_CLOCK_HZ                      cy_delayFreqHz
#define configTICK_RATE_HZ                      1000u
#define configMAX_PRIORITIES                    7
#define configMINIMAL_STACK_SIZE                128
#define configMAX_TASK_NAME_LEN                 16
#define configUSE_16_BIT_TICKS                  0
#define configIDLE_SHOULD_YIELD                 1
#define configUSE_TASK_NOTIFICATIONS            1
#define configUSE_MUTEXES                       0
#define configUSE_RECURSIVE_MUTEXES             0
#define configUSE_COUNTING_SEMAPHORES           0
#define configQUEUE_REGISTRY_SIZE               10
#define configUSE_QUEUE_SETS                    0
#define configUSE_TIME_SLICING                  0
#define configUSE_NEWLIB_REENTRANT              0
#define configENABLE_BACKWARD_COMPATIBILITY     0
#define configNUM_THREAD_LOCAL_STORAGE_POINTERS 5

/* Memory allocation related definitions. */
#define configSUPPORT_STATIC_ALLOCATION         0
#define configSUPPORT_DYNAMIC_ALLOCATION        1
#define configTOTAL_HEAP_SIZE                   10240

The other thing that Creator does is hookup the necessary interrupt vectors (so that FreeRTOS will run)

/* Definitions that map the FreeRTOS port interrupt handlers to their CMSIS
standard names - or at least those used in the unmodified vector table. */
#define vPortSVCHandler     SVC_Handler
#define xPortPendSVHandler  PendSV_Handler
#define xPortSysTickHandler SysTick_Handler

Now you have a project setup, and template files for everything… including the CM0p.  After the chip turns on and the boot sequence is complete, it jumps to the main in the file main_cm0p.c.  That default version of that file just turns on the CM4.

/* ========================================
 *
 * Copyright YOUR COMPANY, THE YEAR
 * All Rights Reserved
 * UNPUBLISHED, LICENSED SOFTWARE.
 *
 * CONFIDENTIAL AND PROPRIETARY INFORMATION
 * WHICH IS THE PROPERTY OF your company.
 *
 * ========================================
*/
#include "project.h"

int main(void)
{
    __enable_irq(); /* Enable global interrupts. */
    /* Enable CM4.  CY_CORTEX_M4_APPL_ADDR must be updated if CM4 memory layout is changed. */
    Cy_SysEnableCM4(CY_CORTEX_M4_APPL_ADDR); 

    /* Place your initialization/startup code here (e.g. MyInst_Start()) */

    for(;;)
    {
        /* Place your application code here. */
    }
}

/* [] END OF FILE */

Finally, the file main_cm4.c contains your program.

On lines 3-6 I just create a function which locks the MCU if there is a memory allocation failure inside of the FreeRTOS.

Lines 8-17 is a FreeRTOS task to blink the LED.  Notice that the old PSoC 4 functions pin_Write() and pin_Read() are now replaced with PDL versions of those functions.

Lastly, lines 23-24 create the LED task and launch the RTOS.

#include <project.h>

void vApplicationStackOverflowHook(TaskHandle_t *pxTask, signed char *pcTaskName )
{
    while(1);
}

void ledTask(void *arg)
{
    (void)arg;
    
    while(1)
    {
        Cy_GPIO_Write(RED_PORT,RED_NUM,!Cy_GPIO_ReadOut(RED_PORT,RED_NUM));
        vTaskDelay(500);
    }
}

int main(void)
{
    __enable_irq(); /* Enable global interrupts. */

    xTaskCreate( ledTask, "LED Task",400,0,1,0);
    vTaskStartScheduler();

    while(1);
}

Program PSoC 6 FreeRTOS Project

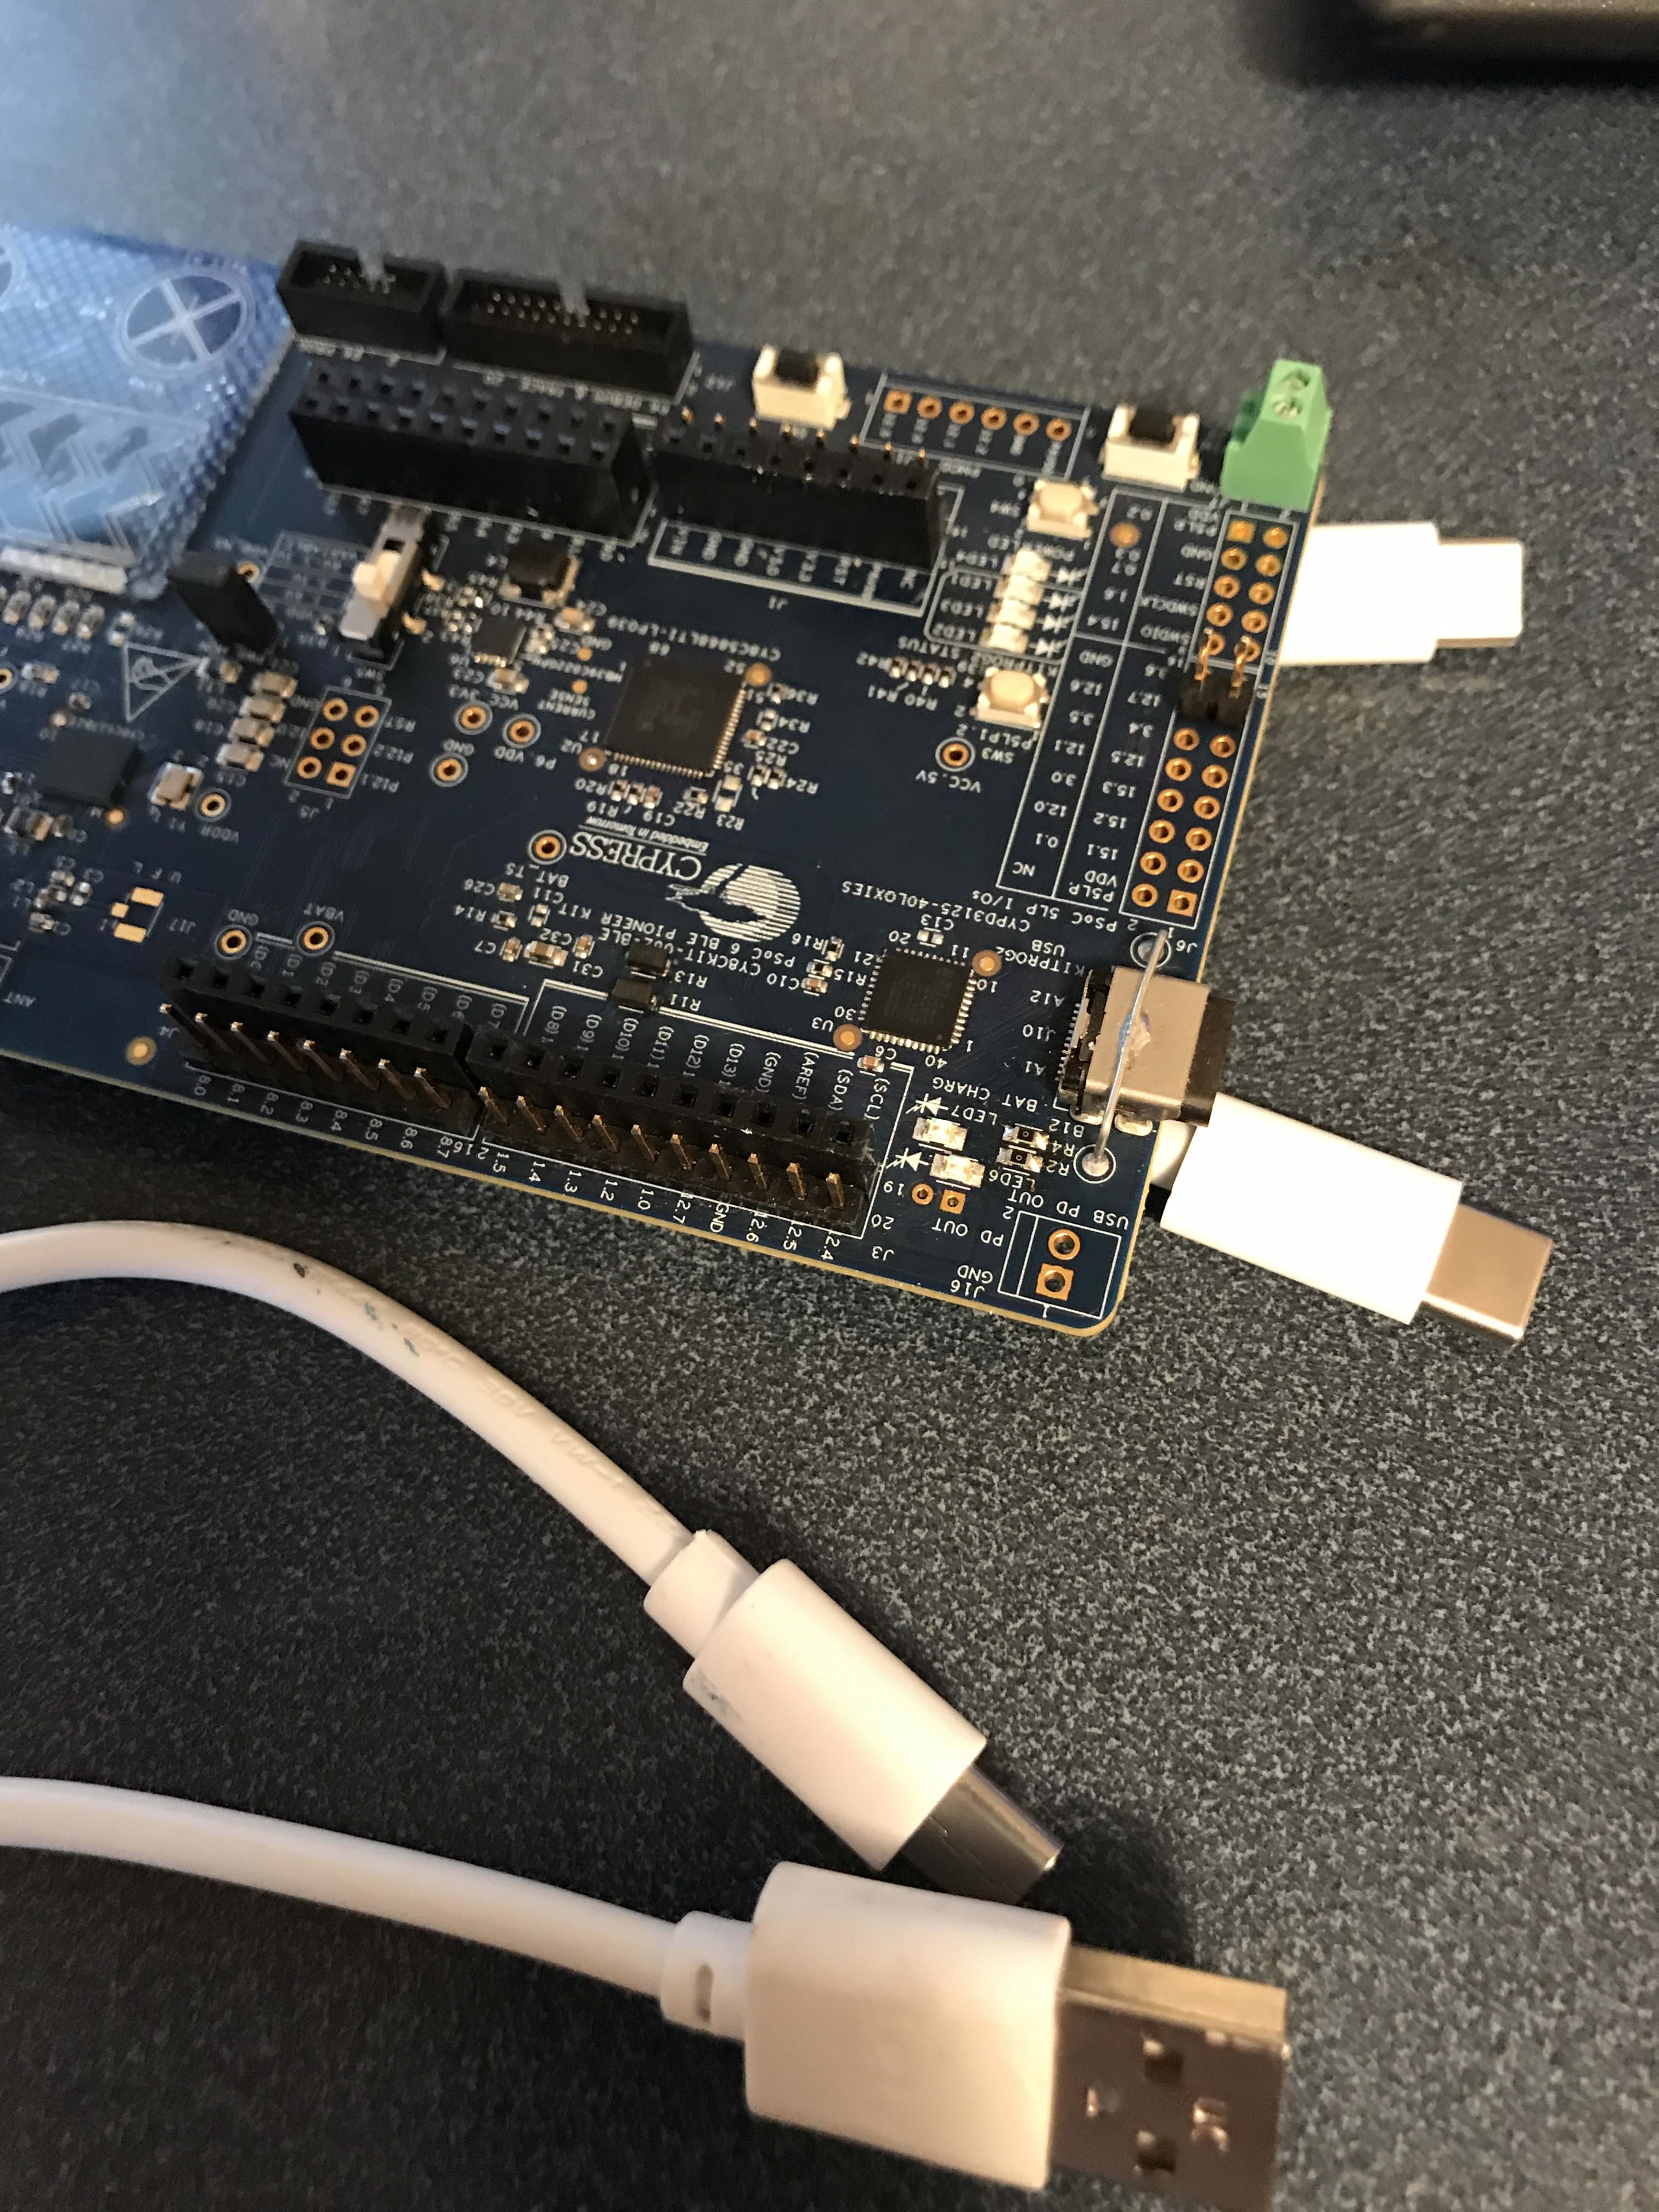
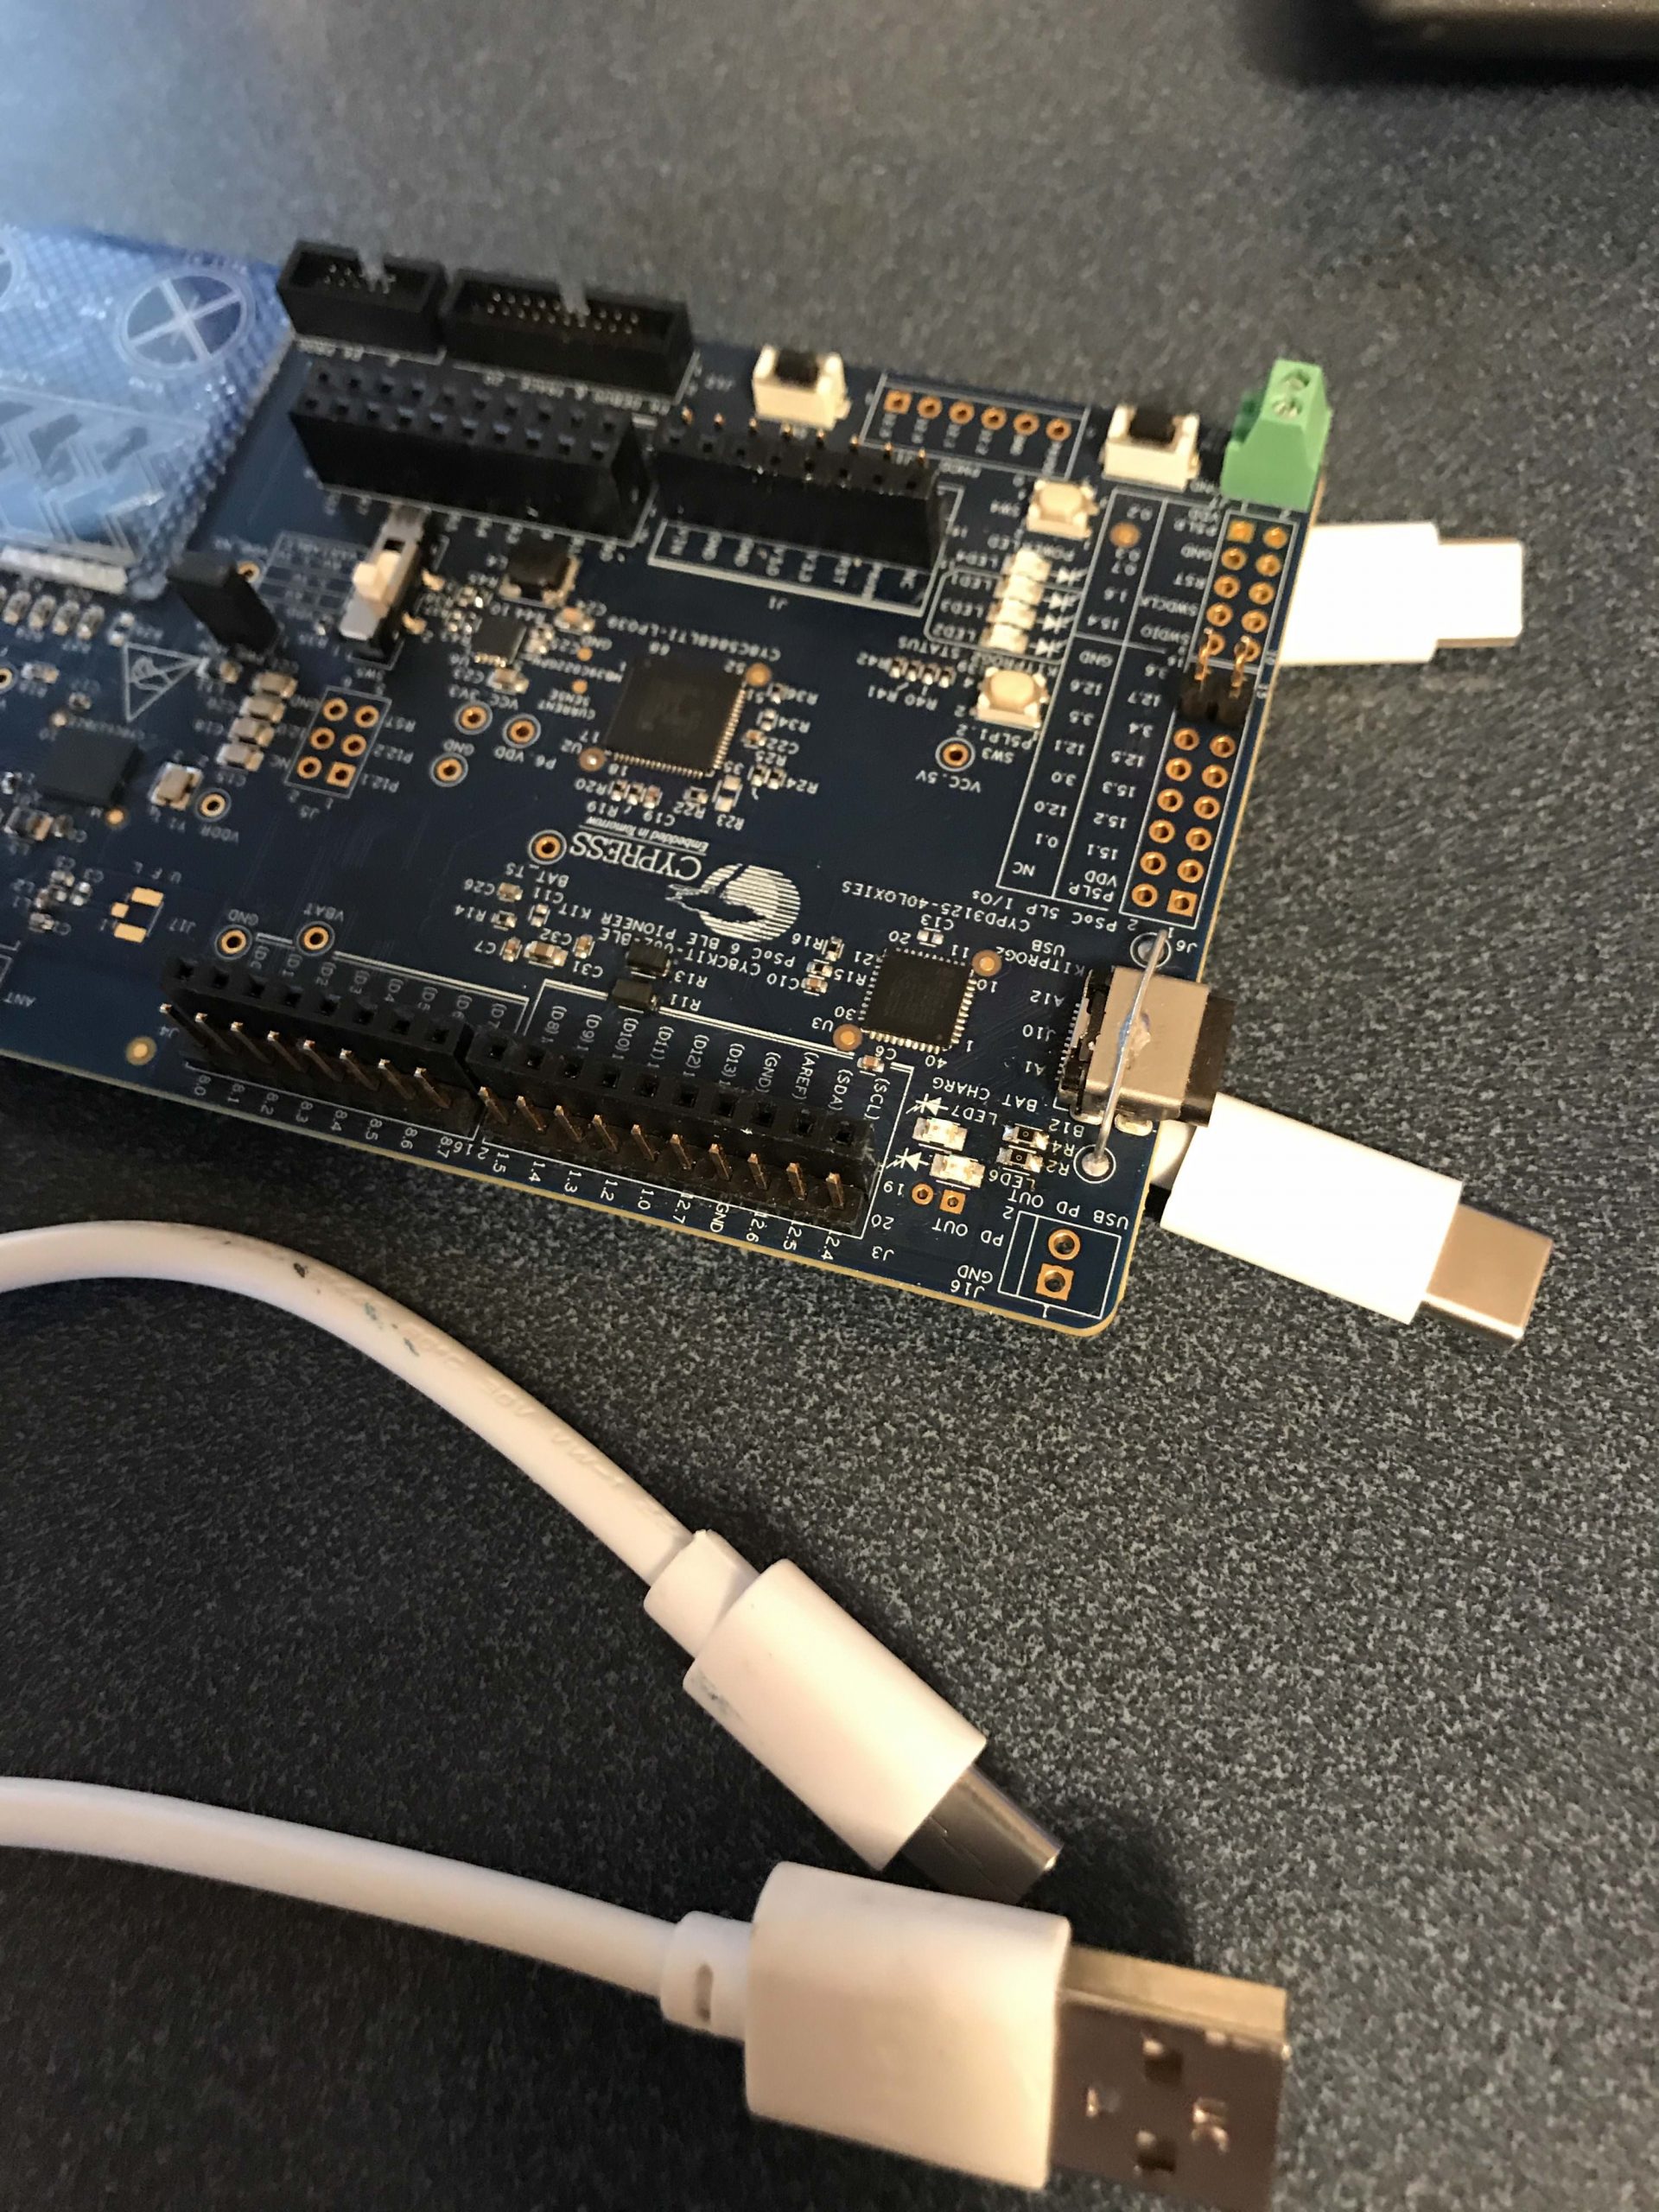
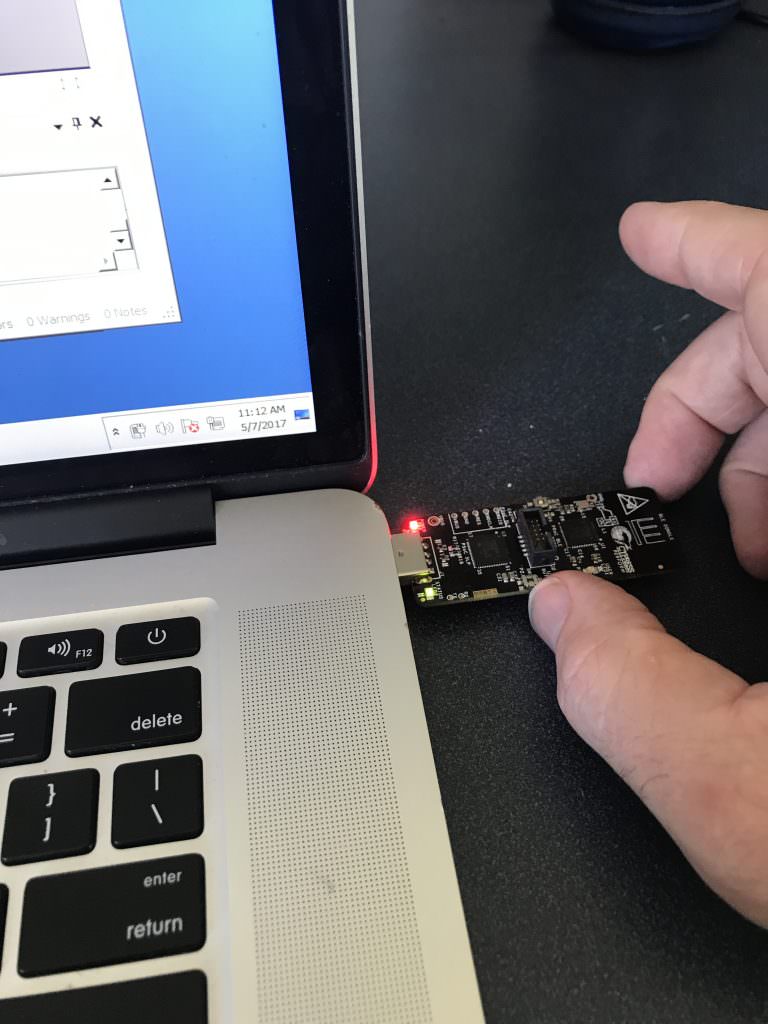
Now that we have firmware.  It is time to program the devkit.  One thing that I think is cool is that the devkit is the first (of ours) to have Type-C on the devkit (I wonder if it is the first in the Industry?).  We provide a Type-A to Type-C cable so you can keep rolling if you haven’t switched over to Type-C, but as I have a new Mac with only Type-C ,I use a Type-C to Type-C cable.PSoC 6 Type-C

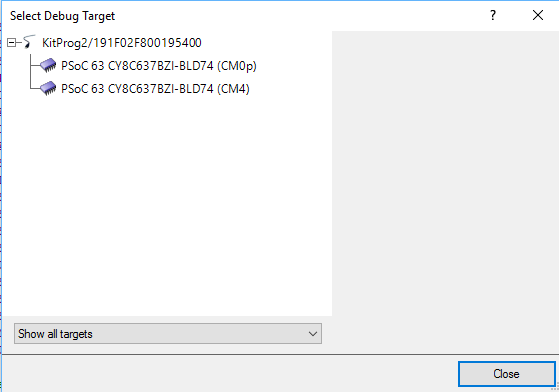
When you click program, PSoC Creator brings up the window asking you which core is the debug target.  In this case it doesn’t matter as you are programming a hex file with both the CM0+ and the CM4 code in it (remember they are shared memory).  So, I pick CM4 and let it rip.

Program PSoC 6 FreeRTOS Project

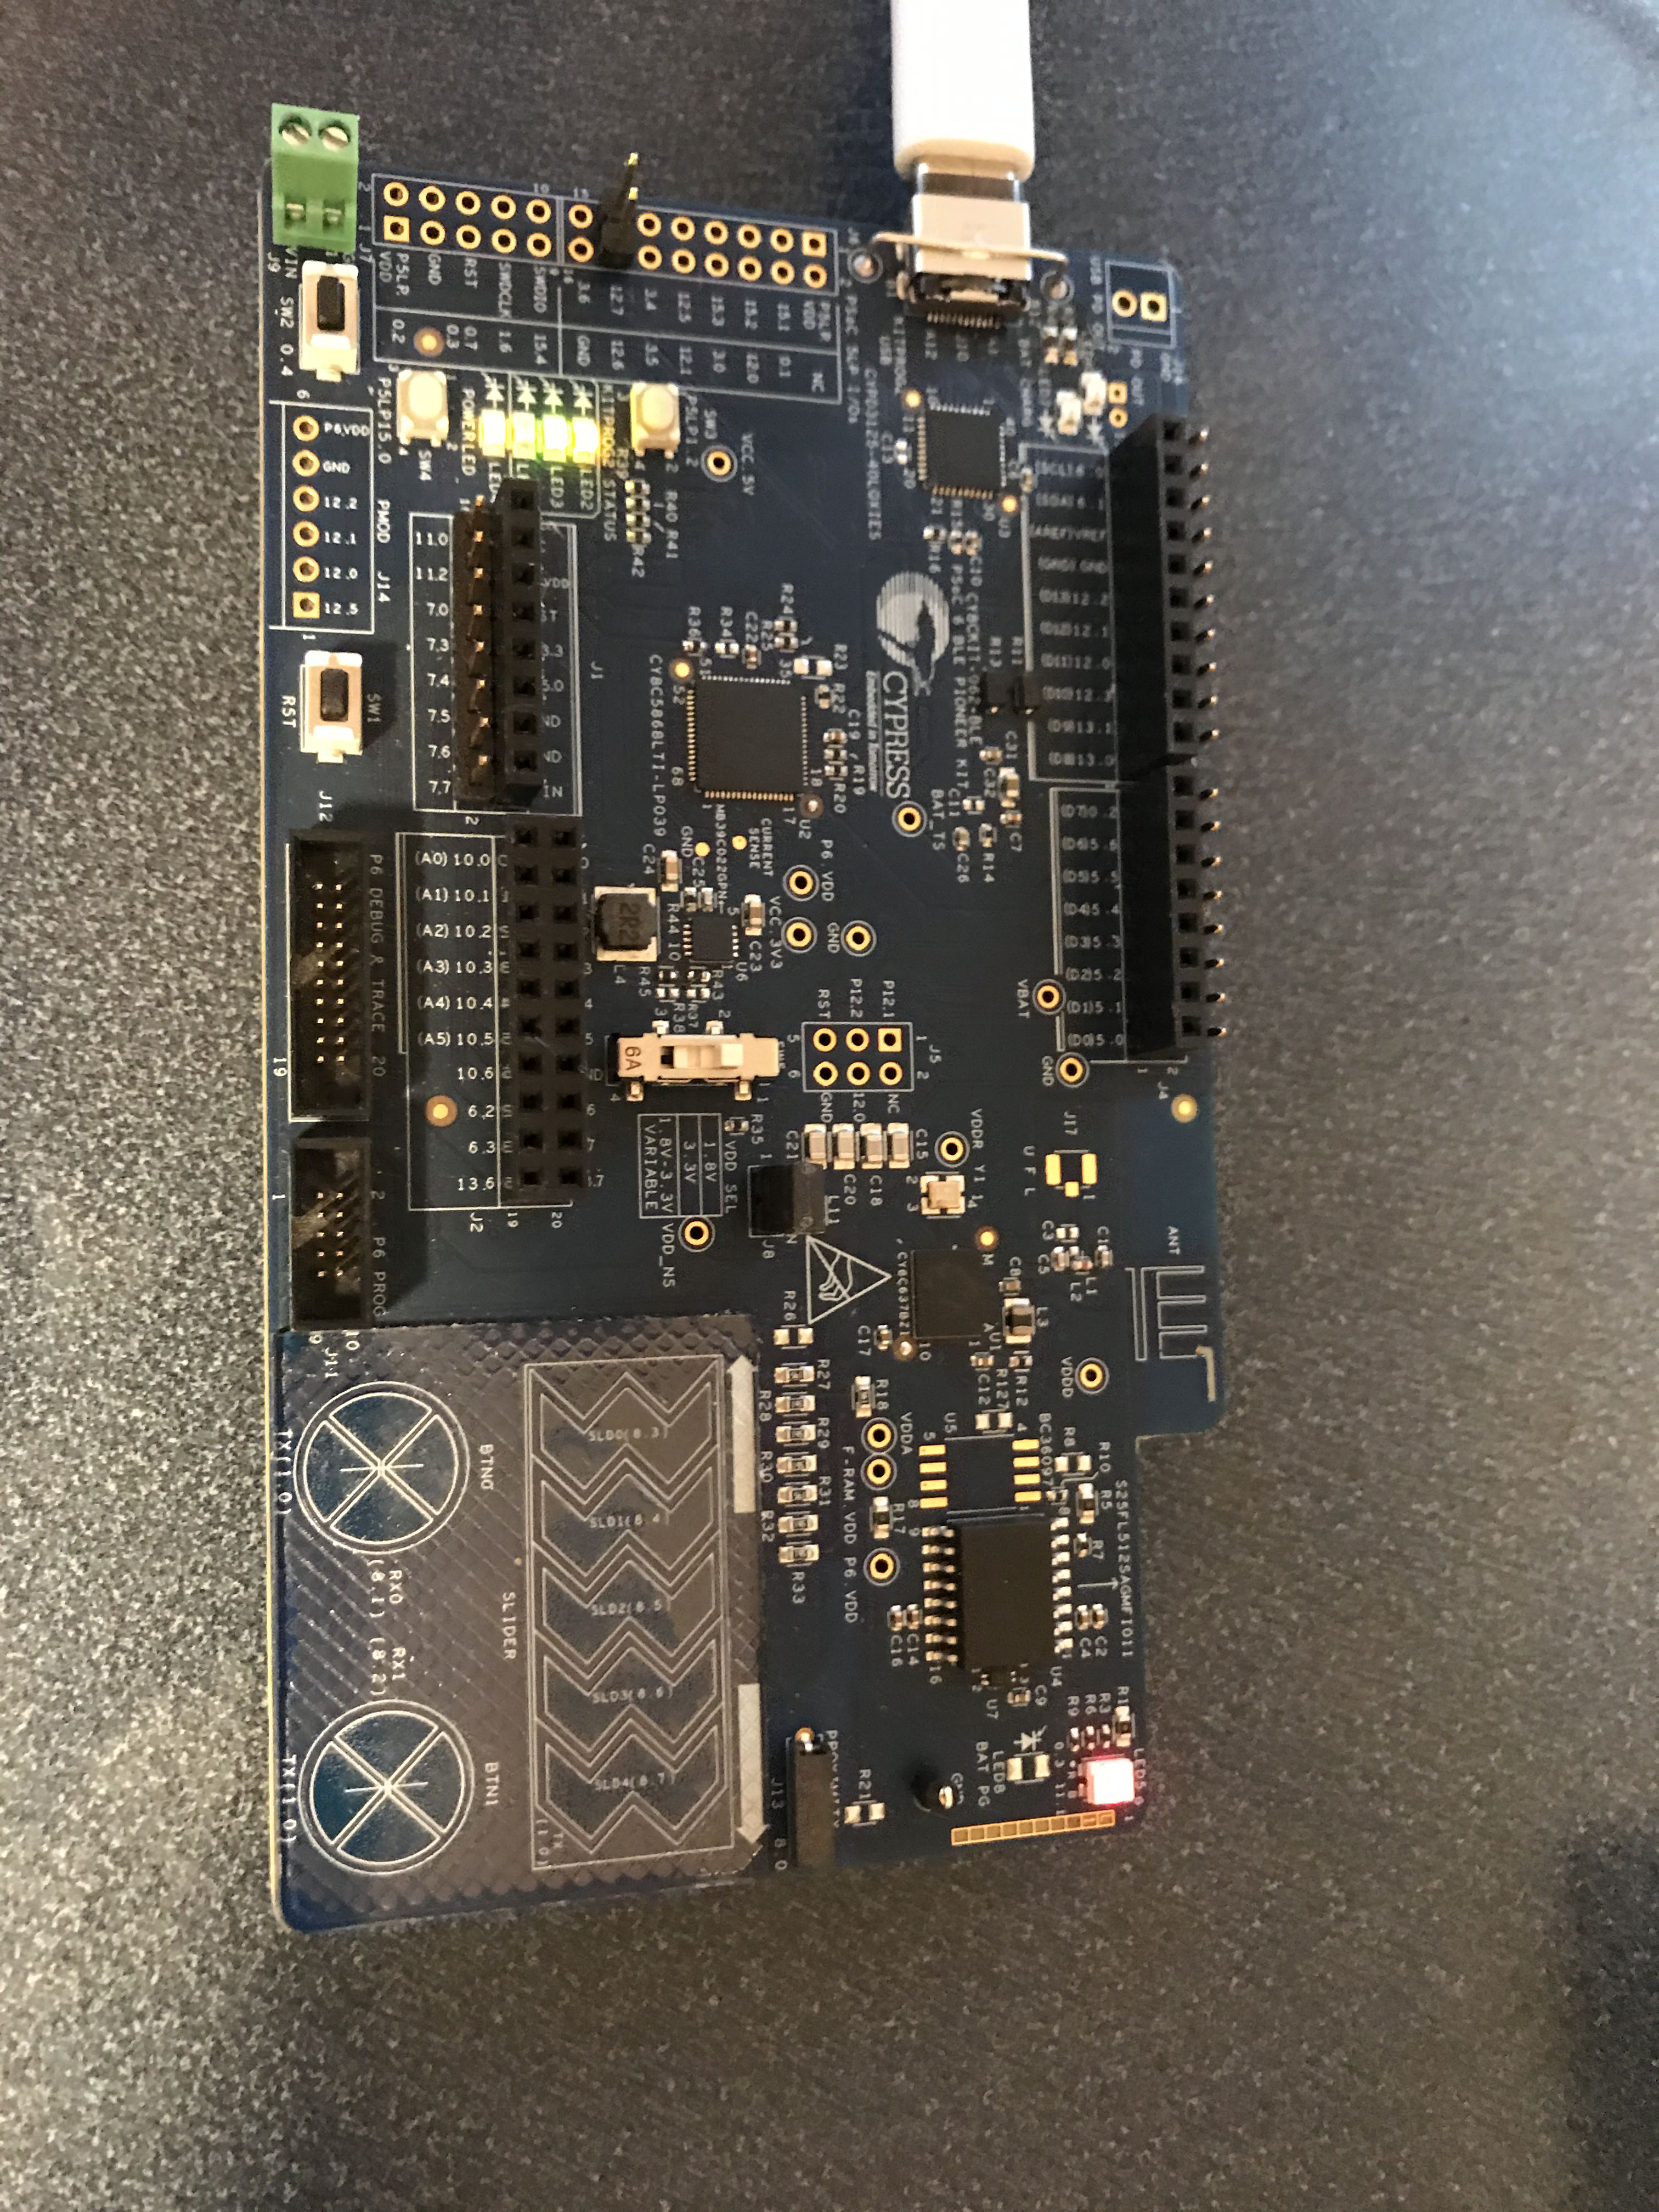
It is alive!  Amazing a dual core CM4/CM0 PSoC 6 FreeRTOS can blink the LED… how cool is that? PSoC6 FreeRTOS Blinking LED

In the next several articles I will be switching back and forth between the PSoC 4 & PSoC 6 FreeRTOS projects.

If you have something you are interested in please leave a comment and maybe I’ll build it for you.

Topic Description
FreeRTOS: A PSoC4 FreeRTOS Port An introduction to making FreeRTOS work on PSoC 4
FreeRTOS PSoC Examples Using multiple tasks in FreeRTOS
FreeRTOS Queue Example Using a queue to communicate between tasks
PSoC 6 FreeRTOS - The First Example Booting FreeRTOS on PSoC 6
FreeRTOS Binary Semaphore An first example of a binary semaphore
FreeRTOS Binary Semaphore (Part 2) Removing polling in the UART Task
FreeRTOS Counting Semaphore An example using a counting semaphore
PSoC FreeRTOS Reading I2C Sensors with a shared I2C Bus
PSoC FreeRTOS Task Notify A light weight scheme to replace Semaphores
PSoC FreeRTOS Task Notification Values A very light weight method to transfer one word of information into a task

PSoC FreeRTOS Queue Example

Summary

In the previous article I talked about getting FreeRTOS running on the PSoC, then creating two threads (one for a blinking LED and one for a UART command processor).  In this article I will add the ability to change which LED is blinking (the board has a tricolor RGB LED) by pressing a key on the keyboard.  Specifically ‘r’ for Red, ‘b’ for Blue and ‘g’ for Green.  In order for this to happen you will need to make the UART thread talk to the LED thread.  I will implement this with the FreeRTOS Queue mechanism.

FreeRTOS Queue

Using an RTOS like FreeRTOS is a great tool for reducing the complexity of your programs.  This is very useful when your MCU supports bigger more complicated programs.  However, using multiple threads of execution also creates problems. One of the poster children for threading problems is shared memory.

FreeRTOS uses a shared memory model.  Meaning, all of the threads in your program share the same address space and have access to all of the memory.  This means that one possible technique for communicating between threads would be to declare a global variable, which both threads have access to.

For example, you could declare a variable called “uint32_t ledColor” and have the the LED Thread read the variable to determine which LED to blink.  Then the UART thread could write the variable to set which LED is blinking.  Well maybe this isn’t such a good idea.  There are at least (and maybe more) things that can go wrong.

  • The compiler doesn’t know that there are multiple threads.  As a result, the variable may or may not always be in the RAM, it could be allocated for significant amounts of time into a register.  This means that one thread might write the RAM, and the other thread might not realize that it has changed because it is living in a register (this could be solved with the volatile keyword)
  • If instead of an “uint32_t” it was a “struct”, you could easily end up with a context switch while you had only partially written, or partially read the memory.
  • By using a variable, you will find yourself in the position of constantly polling the variable to find out if it had changed.

A better way to solve this problem is to use a FreeRTOS queue.  You can think of the queue as an array in the memory with a head and a tail.  You can insert new items into the tail of the queue, and you can remove them from the head of the queue.  The FreeRTOS queue makes sure that you do this “safely”, meaning you have complete transferred in or out before another thread can take over.  The FreeRTOS queue also makes sure that you don’t try to insert into a queue that is full, or remove from a queue that is empty by providing a mechanism to “block” your thread until it is either full/empty.

To use a queue you first

  1. Create a new queue with the FreeRTOS queue function xQueueCreate().  You need to tell it how many items are in the queue and how big the items are so that it can reserve space in the FreeRTOS heap to hold the items that you put in the queue.
  2. Next, Task1 can insert into the queue with the FreeRTOS queue function xQueueSend.  If there is room in the queue, FreeRTOS will memcpy your item into the head of the queue and then move down the tail pointer.  If there is no room it will either block your thread and wait until there is room in the queue, or it will return an error.
  3. Task2 can then receive from the queue with the FreeRTOS queue function xQueueReceive().  If there is something in the queue, it will memcpy from the queue into memory inside of your task, then move the tail pointer.  If there is nothing in the queue you can set it to either block your thread and wait, or return an error.


FreeRTOS Queue Example

Modify the project

I start the implementation process by copying the UART-Thread project to a new project called “Queue” and then adding the GREEN and BLUE LEDs to my schematic.

PSoC FreeRTOS Queue Example Project

Then I create a new type called “Color_t” which will represent the list of possible colors.  This is the “item” that I will add/remove from the queue.  Next I declare a global variable “QueueHandle_t” which is a data structure which FreeRTOS uses to keep track of the queue.  FreeRTOS can safely read and write this variable from multiple threads even though it is global.

typedef enum Color_t {
    RED,
    GREEN,
    BLUE
} Color_t;

QueueHandle_t colorQueue;

Before you can use a queue you must initialize it.  To do this call “xQueueCreate”.  This function takes two arguments

  • The number of elements that can be stored in the queue
  • How big the elements are in the queue.  You can store any “type” in the queue from a minimum of 1 word (32-bits) to something bigger, say a struct.  You are only limited by the memory on your MCU.
int main(void)
{
    CyGlobalIntEnable; /* Enable global interrupts. */
    
    setupFreeRTOS();
  
    colorQueue = xQueueCreate(1, sizeof(Color_t)); // 1 item queue that can hold colors

Next I will update the UART thread so that it can send a message to the queue.  If the queue is full I just printout that there is an error.  You could imagine that there are a number of ways that you might handle this error, but I opted for simple.  You can make this error happen if you press keys faster than 1x per 500ms.

            case 'r':
                tempColor = RED;
                if(xQueueSend(colorQueue,&tempColor,0) != pdTRUE)
                    UART_UartPutString("queue error\n\r");
            break;
                
            case 'b':
                tempColor = BLUE;
                if(xQueueSend(colorQueue,&tempColor,0) != pdTRUE)
                    UART_UartPutString("queue error\n\r");
            break;

            case 'g':
                tempColor = GREEN;
                if(xQueueSend(colorQueue,&tempColor,0) != pdTRUE)
                    UART_UartPutString("queue error\n\r");
            break;

The last thing to do is fixed the LED_Task to check for items in the queue.  If there is one, then turn off all of the LEDs and start blinking the new color.

void LED_Task(void *arg)
{
    (void)arg;
    
    Color_t currentColor = GREEN;
    
	while(1) {
        
        if(xQueueReceive(colorQueue,&currentColor,0) == pdTRUE)
            { RED_Write(1); BLUE_Write(1); GREEN_Write(1); }
        
        if(currentColor == RED)
            RED_Write(~RED_Read());
        else if (currentColor == BLUE)
            BLUE_Write(~BLUE_Read());
        else
            GREEN_Write(~GREEN_Read());
        
        vTaskDelay(500);
	}
}

If you have more FreeRTOS PSoC Examples that you are interested in please make a comment and maybe Ill create them.

As always, you can find the FreeRTOS PSoC Examples on the IoT Expert GitHub site or git@github.com:iotexpert/PSoC-FreeRTOS-Examples.git

Topic Description
FreeRTOS: A PSoC4 FreeRTOS Port An introduction to making FreeRTOS work on PSoC 4
FreeRTOS PSoC Examples Using multiple tasks in FreeRTOS
FreeRTOS Queue Example Using a queue to communicate between tasks
PSoC 6 FreeRTOS - The First Example Booting FreeRTOS on PSoC 6
FreeRTOS Binary Semaphore An first example of a binary semaphore
FreeRTOS Binary Semaphore (Part 2) Removing polling in the UART Task
FreeRTOS Counting Semaphore An example using a counting semaphore
PSoC FreeRTOS Reading I2C Sensors with a shared I2C Bus
PSoC FreeRTOS Task Notify A light weight scheme to replace Semaphores
PSoC FreeRTOS Task Notification Values A very light weight method to transfer one word of information into a task

FreeRTOS PSoC Examples (Part 1)

Summary: FreeRTOS PSoC Examples

Although in my last Article I said that I would get back to BLE Centrals this week, that turns out to not be the case because I have found myself down the FreeRTOS rabbit hole.  This week I will publish several FreeRTOS PSoC examples using PSoC 4 and PSoC 6.  I found myself here because I was working on BLE centrals on PSoC4, and I thought that I should try it on PSoC 6 to see how well it worked.  But, given the expansive capabilities of the chip, the reality is that PSoC 6 will almost certainly be programmed using an RTOS.  So, I decided to use FreeRTOS to try out the different features of PSoC 6.  But given that I don’t really know PSoC 6 yet … and I don’t really know FreeRTOS … I decided to experiment first on PSoC 4 examples first then once I understood what to with FreeRTOS, try the same things on PSoC 6.

Here is a video I took on Saturday in my office with three different PSoCs (PSoC 4 BLE, PSoC 4M, and PSoC 6) running FreeRTOS.  (yes my office looks like a tornado hit it).  The moral of the story is never underestimate the power of the blinking LED (to figure out what is going on).

In this article I will show FreeRTOS PSoC Examples:

  • Start with a single blinking LED Task
  • Add 2nd UART based command processor thread

In the upcoming articles I will add more FreeRTOS PSoC Examples:

  • Issue commands via a queue between the two threads
  • Interrupt processing & a Semaphore
  • Im not sure what else yet 🙂

Single Blinking LED

I start this process by following the instruction in my previous post to create a FreeRTOS example.  The project is straight forward, it does:

  • Installs the FreeRTOS vectors (lines 9-22)
  • Creates the LED Task (lines 41-48)
  • Starts the scheduler (line 50)
  • Runs the LED_Task until the end of time, blinking the LED (lines 25-33)
#include "project.h"
#include "FreeRTOS.h"
#include "timers.h"

extern void xPortPendSVHandler(void);
extern void xPortSysTickHandler(void);
extern void vPortSVCHandler(void);
#define CORTEX_INTERRUPT_BASE          (16)
void setupFreeRTOS()
{
    /* Handler for Cortex Supervisor Call (SVC, formerly SWI) - address 11 */
    CyIntSetSysVector( CORTEX_INTERRUPT_BASE + SVCall_IRQn,
        (cyisraddress)vPortSVCHandler );
    
    /* Handler for Cortex PendSV Call - address 14 */
	CyIntSetSysVector( CORTEX_INTERRUPT_BASE + PendSV_IRQn,
        (cyisraddress)xPortPendSVHandler );    
    
    /* Handler for Cortex SYSTICK - address 15 */
	CyIntSetSysVector( CORTEX_INTERRUPT_BASE + SysTick_IRQn,
        (cyisraddress)xPortSysTickHandler );
}


void LED_Task(void *arg)
{
    (void)arg;
    
	while(1) {
        RED_Write(~RED_Read());
        vTaskDelay(500);
	}
}

int main(void)
{
    CyGlobalIntEnable; /* Enable global interrupts. */
    
    setupFreeRTOS();
  
    /* Create LED task, which will blink the LED */
    xTaskCreate(
        LED_Task,       /* Task function */
        "LED Blink",    /* Task name (string) */
        200,            /* Task stack, allocated from heap */
        0,              /* No param passed to task function */
        1,              /* Low priority */
        0 );            /* Not using the task handle */
      
    vTaskStartScheduler();
    while(1); // get rid of the stupid warning
}

You can see the blinking LED in the video from above.

UART Thread

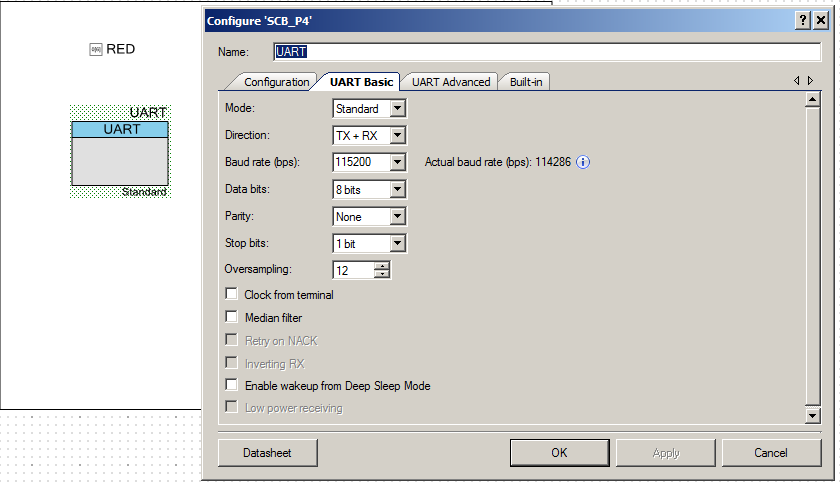
Once you have the blinking LED working, that means you have all of the environment setup etc… for some reason this always feels like a big step.  I then copy the BlinkingLED project and give it the name “UART-Thread”.  Then add a debugging UART to the schematic:

FreeRTOS PSoC Examples - PSoC Schematic

Now you can add the UART Thread to your project.  It is pretty simple:

  • Starts the UART
  • Gets a key from the keyboard (line 47)
  • If it is an ‘a’ it prints out “Working” (line 51)
  • If it is a ‘t’ it calls the function vTaskList which makes a dump of the process currently running (more on this later) (lines 54-60)
#include "project.h"
#include "FreeRTOS.h"
#include "task.h"
#include "queue.h"
#include "event_groups.h"
#include "timers.h"
extern void xPortPendSVHandler(void);
extern void xPortSysTickHandler(void);
extern void vPortSVCHandler(void);
#define CORTEX_INTERRUPT_BASE          (16)
void setupFreeRTOS()
{
/* Handler for Cortex Supervisor Call (SVC, formerly SWI) - address 11 */
CyIntSetSysVector( CORTEX_INTERRUPT_BASE + SVCall_IRQn,
(cyisraddress)vPortSVCHandler );
/* Handler for Cortex PendSV Call - address 14 */
CyIntSetSysVector( CORTEX_INTERRUPT_BASE + PendSV_IRQn,
(cyisraddress)xPortPendSVHandler );    
/* Handler for Cortex SYSTICK - address 15 */
CyIntSetSysVector( CORTEX_INTERRUPT_BASE + SysTick_IRQn,
(cyisraddress)xPortSysTickHandler );
}
void LED_Task(void *arg)
{
(void)arg;
while(1) {
RED_Write(~RED_Read());
vTaskDelay(500);
}
}
void UART_Task(void *arg)
{
(void)arg;
static char buff[500];
UART_Start();
UART_UartPutString("Started UART\n\r");
char c;
while(1) {
c = UART_UartGetChar();
switch(c)
{
case 'a':
UART_UartPutString("Working\n\r");
break;
case 't':
UART_UartPutString("********************************************\n\r");
UART_UartPutString("Task          State   Prio    Stack    Num\n\r"); 
UART_UartPutString("********************************************\n\r");
vTaskList(buff);
UART_UartPutString(buff);
UART_UartPutString("*********************************************\n\r");
break;
}
taskYIELD();
}
}
int main(void)
{
CyGlobalIntEnable; /* Enable global interrupts. */
setupFreeRTOS();
/* Create LED task, which will blink the LED */
xTaskCreate(
LED_Task,       /* Task function */
"LED Blink",    /* Task name (string) */
200,            /* Task stack, allocated from heap */
0,              /* No param passed to task function */
1,              /* Low priority */
0 );            /* Not using the task handle */
/* Create UART Task which will control the serial port */
xTaskCreate(
UART_Task,       /* Task function */
"UART",          /* Task name (string) */
0x400,           /* Task stack, allocated from heap */
0,               /* No param passed to task function */
1,               /* Low priority */
0 );             /* Not using the task handle */
vTaskStartScheduler();
while(1);
}


Testing the project

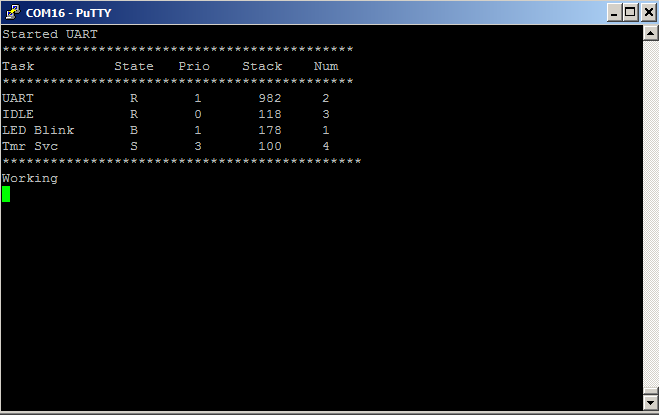
When I program the development kit, the LED starts blinking.  That is good.  Then I press ‘t’ which dumps out a table of the processes running.  The columns are

  • The name of the task
  • The state of the task (R-Running, B-Blocked, S-Suspended)
  • The priority (0-configMAX_PRIORITIES from FreeRTOSConfig.h)
  • The highwater mark of the stack usage of that thread.  In the UART thread I declared 0x400 (1024) so it appears I have used most of the RAM.
  • The task number

FreeRTOS PSoC Examples UART Serial Port

It is interesting that there are two tasks that I didnt create.  The FreeRTOS requires that there alway be some task, so it automatically creates an IDLE tasks which it runs when there is nothing else available to run.  It is possible to put the chip to sleep by adding to the IDLE task.  The other task is the Timer Service task which is what enables me to use the software delay (vTaskDelay).

If you have more FreeRTOS PSoC Examples that you are interested in please make a comment and maybe Ill create them.

As always, you can find the FreeRTOS PSoC Examples on the IoT Expert GitHub site or git@github.com:iotexpert/PSoC-FreeRTOS-Examples.git

Topic Description
FreeRTOS: A PSoC4 FreeRTOS Port An introduction to making FreeRTOS work on PSoC 4
FreeRTOS PSoC Examples Using multiple tasks in FreeRTOS
FreeRTOS Queue Example Using a queue to communicate between tasks
PSoC 6 FreeRTOS - The First Example Booting FreeRTOS on PSoC 6
FreeRTOS Binary Semaphore An first example of a binary semaphore
FreeRTOS Binary Semaphore (Part 2) Removing polling in the UART Task
FreeRTOS Counting Semaphore An example using a counting semaphore
PSoC FreeRTOS Reading I2C Sensors with a shared I2C Bus
PSoC FreeRTOS Task Notify A light weight scheme to replace Semaphores
PSoC FreeRTOS Task Notification Values A very light weight method to transfer one word of information into a task

Implementing PSoC Printf Part Deux

Summary

After I wrote the first article on Implementing PSoC Printf I got feedback from several people who made good suggestions.  Fundamentally, both of the people making commentary suggested ways of improving the memory footprint of PSoC printf.  In this article I am going to explain 5 different implementations and the pros/cons of those implementations.

Scheme Flash Total RAM Heap Stack Data/BSS Comment
vsprintf 4838 2852 2048 128 676 A function using sprintf + macros
iotexpert sprintf 4806 2852 2048 128 676 A macro trick – not as robust as vsprintf
iprintf 2952 2580 2048 128 674 restricted to %s,%d,%c,%x
printf 6496 3492 2048 1024 420 Fully featured printf from previous article
iprintf newlib nano 6496 3492 2048 1024 420 Same as printf (iprintf is aliased to printf)

To get these numbers I used the following simple program to implement PSoC printf with all of the default setting for compiler etc.

int main(void)
{
CyGlobalIntEnable; /* Enable global interrupts. */
UART_Start();
printf("Int=%d  String=%s\n",1,"asdf");
for(;;)
{
}
}

You can “git” all of these projects at the IoT Expert GitHub site git@github.com:iotexpert/SerialPrintf.git

vsprintf & DBG_PRINTF

The first suggestion that I got was from a follower in China named Helon Chan.   After a little bit of back and forth, he sent me this code, which I think is very simple and elegant.  The way that this PSoC printf works is that it:

  • Uses “vprintf” which is a form of  “sprintf”.   The “v” in “vsprintf” stands for va_args.  By using the va_arg version of sprinf he eased the calling of sprintf (lines 16-18)
  • Uses a loop to print the buffer onto the screen (line 23-26)

The other nice thing that he did is create a macro that you can turn on and off the printing of debug messages (lines 29-34)

#include "project.h"
#include <stdio.h>
#include <stdarg.h>
#define MAX_FORMAT_BUFFER_SIZE	(255)
static uint8_t s_formatBuffer[MAX_FORMAT_BUFFER_SIZE];
void dbg_printf(char *format,...)                                      ///< Function Name        
{
uint8_t iWriteNum = 0,i=0;	
va_list  ap;
if(!format)
return;
va_start(ap,format);
iWriteNum = vsprintf((char *)s_formatBuffer,format,ap);
va_end(ap);
if(iWriteNum > MAX_FORMAT_BUFFER_SIZE)
iWriteNum = MAX_FORMAT_BUFFER_SIZE;
for(i=0;i<iWriteNum;i++)
{
UART_UartPutChar(s_formatBuffer[i]);                            ///< Uart Function        
}
}
#define DBG_ENABLE                              (1)                                 ///< Enable Printf
#if DBG_ENABLE
#define DBG_PRINTF(format,...)              dbg_printf(format,##__VA_ARGS__)
#else
#define DBG_PRINTF(...)
#endif

IoT Expert Version of vsprintf

After I looked at the previous implementation I thought of a really simple way to do the same thing.  Here is my version of the vsprintf:

#define MAX_FORMAT_BUFFER_SIZE	(255)
static uint8_t s_formatBuffer[MAX_FORMAT_BUFFER_SIZE];
#define asprintf(...) sprintf((char *)s_formatBuffer,__VA_ARGS__); UART_UartPutString((const char *)s_formatBuffer)

My version works almost exactly the same and is the same size as the previous version.  The weakness is that it does not error check at all.  Also if you called it enough times it would eventually use more flash than the previous version.

iprintf – An integer restricted printf

I got a tweet from Jose Marcelino in which he references the Cypress Knowledge Base Article KBA87093 in which someone implemented a PSoC printf that works only with a restricted set of formatting codes, %d (integer), %s (string),%x (hex integer) and %c (character).

The function is very easy to use.  All you need to do is copy iprintf.c and iprintf.h into your project.  Then you can use it by calling “iprintf”.  Here is the source code for iprintf.h

#ifndef IPRINTF_H
#define IPRINTF_H
#include <project.h>
void iprintf(char8 *pszFmt,...);
#endif

And iprintf.c

#include "iprintf.h"
static void iputc(char8 c)
{
UART_UartPutChar(c);
}
static uint8* change(uint32 Index)
{
return (uint8*)("0123456789abcdef"+Index);
}
void iprintf(char8 *pszFmt,...)
{
uint8 *pszVal;
uint32 iVal, xVal, i = 0, buffer[12], index = 1;
uint8 cVal;
uint32 *pArg;
pArg =(uint32 *)&pszFmt;
while(*pszFmt)
{
if('%' != *pszFmt)
{
iputc(*pszFmt);
pszFmt++;
continue;
}
pszFmt++;
if(*pszFmt == 's')
{
pszVal = (uint8*)pArg[index++];
for(; *pszVal != '\0'; pszVal++)
iputc(*pszVal);
pszFmt++;
continue;
}
if(*pszFmt == 'd')
{
iVal = pArg[index++];
i = 0;
do{
buffer[i++] = iVal % 10;
iVal /= 10;
}while(iVal);
while(i > 0)
{
i--;
iputc(*change(buffer[i]));
}
pszFmt++;
continue;
}
if(*pszFmt == 'c')
{
cVal = (uint8)pArg[index++];
iputc(cVal);
pszFmt++;
continue;
}
if(*pszFmt == 'x')
{
xVal = pArg[index++];
i = 0;
do{
buffer[i++] = xVal % 16;
xVal /= 16;
}while(xVal);
if(i%2!=0)
buffer[i++]=0;
if(i<2)
buffer[i++]=0;
while(i > 0)
{
i--;
iputc(*change(buffer[i]));
}
pszFmt++;
continue;
}
if(pszFmt == '\0')
{
break;
}
}
}

iprintf newlib nano

I did not realize it, but “iprintf” was actually part of the c-standard library.  This was a version of printf that was optimized for doing integer printfs (like the previous example).  I read on a few sites around the internet about iprintf, however in newlib-nano iprintf is just an exact wrapper around printf so it yields exactly the same results.

Thanks again for all of the feedback.  If you have any other good ideas please email me or leave a comment on this thread.

PSoC 5 Timer Circuit & Debug

Summary

I spent all day Saturday working on the firmware for the next post in my series of articles about PSoC4 BLE Centrals.  Then, after dinner I checked my email for alan_hawse@cypress.com, where I found an email from a customer in California who was having a problem with a PSoC 5 Timer.  He had already posted on the Cypress forum and did not have functional answer.  I always like using PSoC 5, so I looked at it for a while (until my wife started yelling at me about working), then right before bed, I sent him a short statement of the cause and told him that I would send the project on Sunday.

Sunday around noon I posted a couple of working projects to the forum… but… and there is always a but … I didn’t really like the answer so I kept working on it.  Finally at 3:08 (yes exactly 3:08) I stopped because there was one part of my solution that I didnt like.  So, I called my PSoC secret weapon, specifically, the bad-ass engineer Greg.  I explained my problem and literally 10 seconds later he gave me a good fix, which I implemented and then sent off to the customer.

This article doesn’t really have much to do with IoT, except that the engineer who sent me the problem originally is using an RC servo motor remote control (I think).  RC, thats wireless right? that counts as IoT, right :-)?

Here we go.  The original email says “I am simply trying to measure the pulse width of a signal that ranges from 1 to 2ms. I can easily do this on an Arduino using pin change interrupts but I wanted to implement this on a PSOC so I decided to use the timer component”.  I thought, “OK, that makes good sense, we will do that”.  

In this article I will:

  • Explain the Cypress PSoC 5 Timer functionality
  • Show the problems in the original implementation
  • Explain a minimally changed software based solution
  • Explain the debugging process of my software project
  • Explain a hardware based solution
  • Show a modification using a PWM to test
  • Show a modification using a PWM to display the output
  • Suggest other things that could be done, and point out a few errors/improvements in my projects

You can find all of these project on the IoT Expert GitHub site git@github.com:iotexpert/PSoC5-Timer.git

Cypress PSoC 5 Timer

In the PSoC Family there are 3 basic timers that we provide:

  • “UDB” timer in PSoC 3, 4 & 5 (Universal Digital Block)
  • “Fixed Function” timer in PSoC 5 & 3
  • “TCPWM” in PSoC4 (Timer, Counter, Pulse-Width Modulator)

All of these blocks have the same basic functionality but have slightly different implementations (and customizers and APIs).  The two fixed-function timers (TCPWM and “Fixed Function” are implemented as hard blocks in the silicon of PSoC3/5 and PSoC4 (TCPWM) which saves silicon area.  The UDB based timer is synthesized from RTL, Datapath and Code into the Universal Digital block which exits in all three of the PSoCs 3/4/5.  This can give you ability to have more timers than are natively supported by the chip.

All three of the timers work the same basic way.  There are Registers (inside of the block), Inputs (which can be triggered by signals on the chip) and Outputs (which can give indications to the rest of the system that something happened)

Registers:

  • counter (a 8,16,24 or 32 bit register that is used to count input clock pulses)
  • period (a register which holds the value to put back into the counter when the 0 is reached)
  • capture fifo (a place to store the counter value when a capture event occurs)

Inputs:

  • clock
  • trigger (a signal to start counting – either rising or falling edge)
  • capture (a signal to capture the current count)
  • enable (an active high to turn on counting)
  • reset (an active high to reset the whole block)

Outputs:

  • capture_out (signal when a capture event has occurred)
  • tc (Terminal Count) a signal when the terminal count is reach (aka 0)
  • interrupt a signal that tc, capture or fifo full has occurred

The basic PSoC 5 Timer functionality is as follows: the counter register starts at the “period”.  Then each clock cycle it counts down.  When it reaches 0 it sends out a pulse on the “TC” and resets the counter back to the period (by copying from the period register into the counter register).  When the “capture” is triggered, it will save the current value of the counter in an internal FIFO and send out a pulse on the “capture_out” pin.

In addition you can configure:

  • Interrupt: the block to trigger an interrupt when the TC or the Capture event occurs or the FIFO gets full
  • The number of “captures” before the capture actually happens
  • The number of “capture” before the capture interrupt is triggered
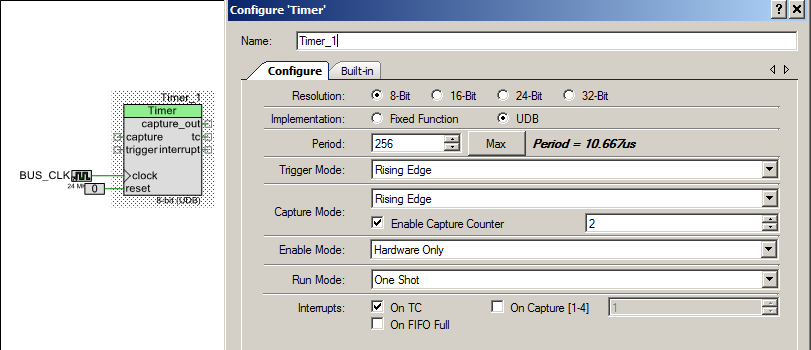
PSoC 5 Timer Component Configuration

Original PSoC 5 Timer Implementation (0-testTimer1)

Here is the original project that was sent to me.  It is simply a UART to talk to the PC and a PSoC 5 Timer that is setup to capture on the falling edge of capture.  That is simple enough.  The PSoC 5 timer is enabled when the Channel_1_pin signal is high.  The idea is that the PSoC 5 timer will trigger an interrupt when the capture event occurs or when the terminal count (0) is reached.  Then you will be able to calculate the number of clock ticks and therefore the length of the pulse.  This is generally the right idea.
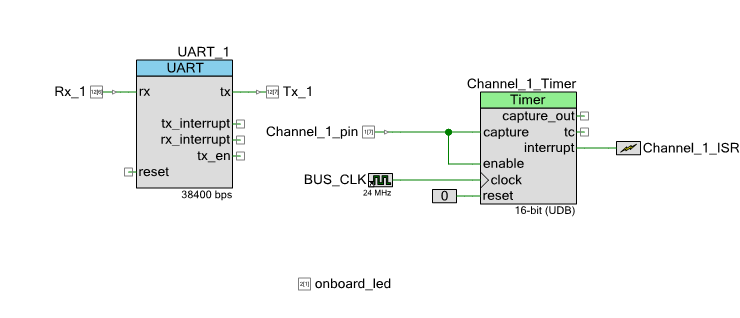
PSoC 5 Timer Schematic

Then the firmware.  It has an ISR to service interrupts from the Timer.  The idea being there is a global variable called “Channel_1_Count” which hold the most recent pulse width which is calculated when the capture event occurs.

#include "project.h"
#include <stdlib.h>
#include <math.h>
#include <stdio.h>
#define Ch1Period	55555									//	Period for Channel_1_Timer
char Serial_Command;
char StringToPrint[90];
volatile uint32 Channel_1_Count;
CY_ISR(Channel_1_ISR_Handler)
{ 
uint8 InterruptCause;										//	Set by status register read
Channel_1_Count = Channel_1_Timer_ReadPeriod();
onboard_led_Write(~onboard_led_Read());					//	Indicate interrupt
Channel_1_Timer_ClearFIFO();							//	Remove any additional captures
InterruptCIe = Channel_1_Timer_ReadStatusRegister();	//	Read and clear interrupt status
if(InterruptCause & Channel_1_Timer_STATUS_TC)			//	Did we overflow??
{
Channel_1_Count = 0;								//	Error, no falling edge on signal
return;												//	No further action required
}
Channel_1_Timer_Stop();									//	Halt timer
Channel_1_Timer_WriteCounter(Ch1Period);				//	Rewrite counter for next cycle
Channel_1_Timer_Start();								//	Restart Timer
}
int main(void)
{
CyGlobalIntEnable; /* Enable global interrupts. */
UART_1_Start();
Channel_1_Timer_Start();
Channel_1_ISR_StartEx(Channel_1_ISR_Handler);
for(;;)
{
Serial_Command = UART_1_GetChar();
if(Serial_Command == 's'){
sprintf(StringToPrint,"Channel1 capture is %ld\n\r",Channel_1_Count);
UART_1_PutString(StringToPrint);
}   
}
}

When I first looked at the design I notice several possible issues, a couple of style issues, a few little bugs and two big bugs:

  • (Style) including stdlib.h and math.h is not required
  • (Style) On line 6 putting a // comment on a #define line is asking for trouble
  • (Style) On line 6 there should be () surrounding a numerical value for a #define
  • (little bug) On line 6 the period is actually 55554 (the Period gets set to Period – 1 because of the 0 in the counter)
  • (Style) Line 8-9 the Serial_Command and StringToPrint are global when they are actually local to the main function
  • (little bug) Lines 8-9-10 The three variables should be static (restricted scope to this file)
  • (little bug) the reset pin on the UART is left hanging (PSoC Creator ties it to 0… so you get lucky)
  • (bug) Line 15 – ReadPeriod will always return 55554 (the value of the period as set in the component customizer), this was probably meant to be ReadCounter()
  • (bug) disabling the PSoC 5 Timer with the input capture means the PSoC 5 Timer will never generate the interrupt until the enable is de-asserted.  The picture below (from the timer datasheet) is a perfect example of the problem.

EDIT: I got a comment from Bob Marlowe who made an excellent point in the comment section.  Specifically, when I moved the two global variables Serial_Command and StringToPrint to the local scope, that changed their allocation to “automatic”.   In this case it doesn’t matter if the they are allocated on the stack or in the data/bss segment as the RAM usage is exactly the same.  BUT as he pointed out, it can be very difficult to debug if you overflow the stack.  In this case I could have controlled the scope by moving them local to main and controlled their allocation by declaring them as static.  This would have solved the scope problem and simplified the allocation issue.
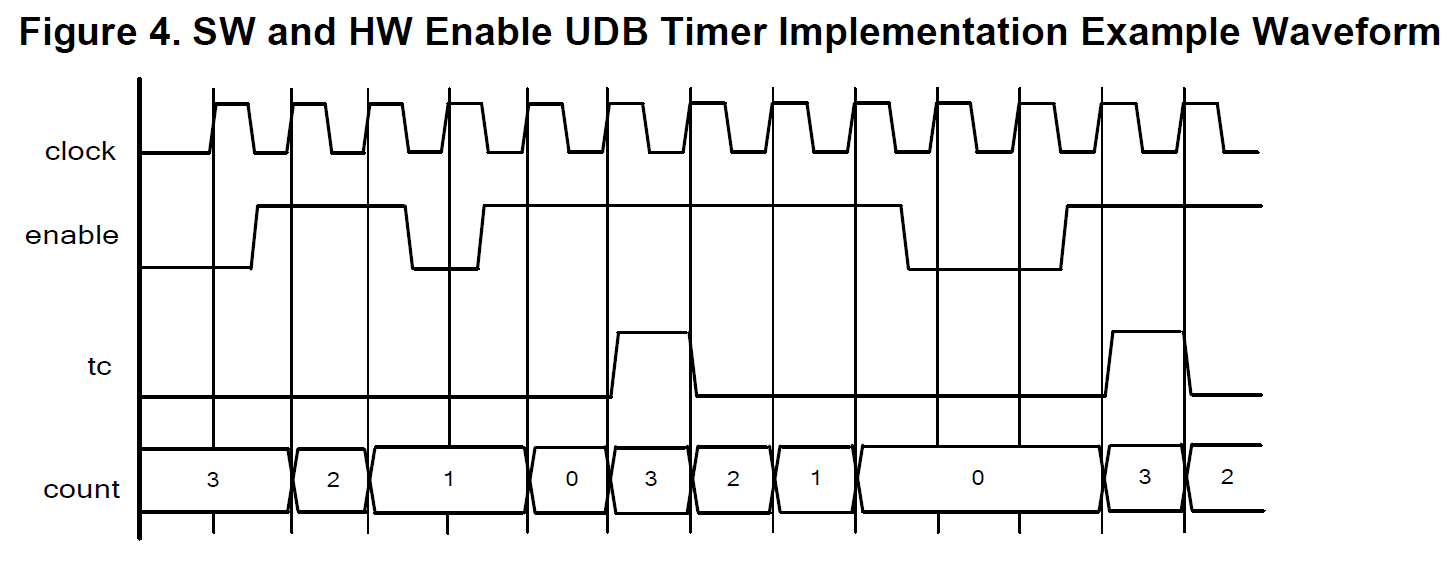
PSoC 5 Timer Datasheet

Software Solution (1-testTimer1) with PSoC 5 Timer

I  started by building a solution that was as close as possible to the original design.  The first thing that I did was add pins to all of the terminals on the PSoC 5 Timer so that I could attach a logic analyzer to it to see exactly what was happening.  I then fixed the problem with the enable by switching from using “enable” to using “trigger”.  The trigger input holds the counter at the same value until the trigger event occurs.  You can see in the component customizer that I set it to “trigger”, also known as start counting, on a rising edge.  Then capture on a falling edge.

The next thing thing that I did was move the input clock to 1000 khz aka 1 Mhz.  This means that each clock is 1 microsecond.  This makes all of the math easier.  The original configuration was 24 Mhz which meant each clock cycle was 41 ns which is not a very useful number for my brain to figure out.

The final thing that I did to the schematic is make the “Channel_1_pin” an input/output pin.  As I was sitting on the couch semi-watching basketball, I didn’t have a signal generator handy.  What this allowed me to do was “trigger” the PSoC 5 Timer by writing the Channel_1_pin from the firmware.
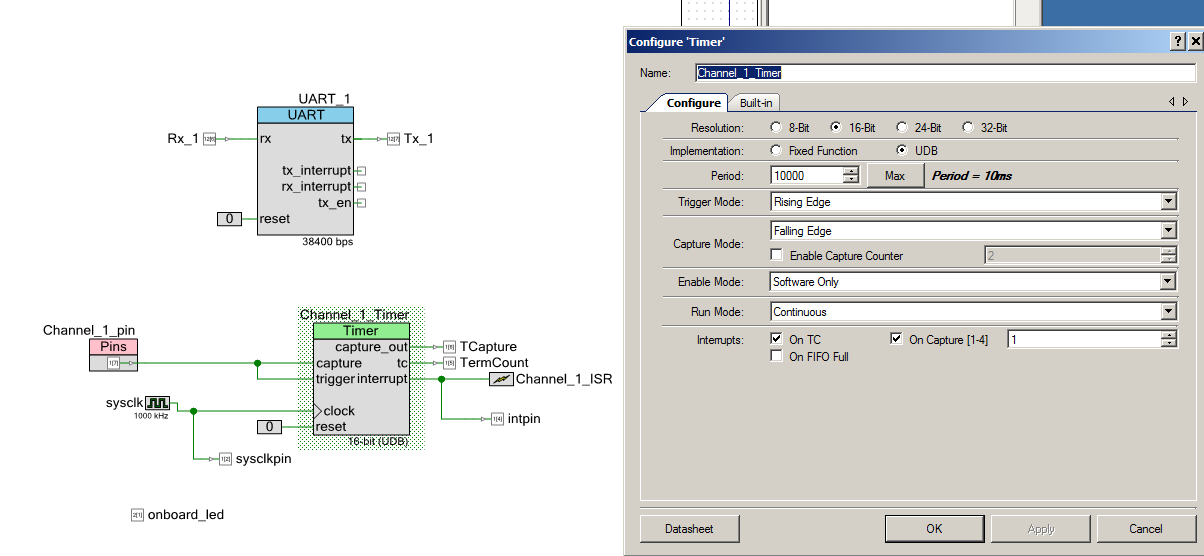
Updated PSoC 5 Timer Schematic

Next I made a few changes to the firmware.

First, I moved the intFlag (which he had originally called InterruptCause  outside of the ISR into a global variable so that I could keep track of what it was (and look at it again)

Then I made a few little changes to the interrupt service routine.  First, I calculated the actual width of the pulse by subtracting it from the PSoC 5 Timer period (line 16).  Then on Line 22-23 I stoped the PSoC 5 Timer and then set it up for the next go round.

Next, I changed the UART startup to send the VT100 escape codes to clear the screen and move the cursor to the top left.

Finally I updated the main block.  I put in a “switch” block on lines 40-76 that allowed me to type different commands on the serial terminal to get the project to do different things.  For instance I created a way to generate input signals by press ‘t’ and ‘y’.  ‘t’ generates a 1234 uS pulse by writing a 1, doing a delay, then writing a 0 to Channel_1_pin.   I knew that this should generate a “capture” event.  ‘y’ generates an illegal pulses of 12 ms using the same technique.  That wide pulse generates a “TC” on the timer.  These two keys allowed me to test the program.

The last bit of code on lines 78-84 print out the value of the width of the pulse, then turn the timer back on.

#include "project.h"
#include <stdio.h>
//	Period for Channel_1_Timer
#define Ch1Period	(9999)
static volatile uint32 Channel_1_Count;
static int intFlag = 0;
CY_ISR(Channel_1_ISR_Handler)
{ 
intFlag = Channel_1_Timer_ReadStatusRegister();	//	Read and clear interrupt status
onboard_led_Write(~onboard_led_Read());					        
if(intFlag & Channel_1_Timer_STATUS_CAPTURE)
Channel_1_Count = Ch1Period - Channel_1_Timer_ReadCapture();    
if(intFlag & Channel_1_Timer_STATUS_TC)			//	Did we overflow??
Channel_1_Count = 0;
Channel_1_Timer_Stop();                         // stop and setup for next round
Channel_1_Timer_WriteCounter(Ch1Period);		//	Rewrite counter for next cycle
}
int main(void)
{
char Serial_Command;
char StringToPrint[90];
CyGlobalIntEnable;
UART_1_Start();
UART_1_PutString("\033[2J\033[HStarted\n"); // Clear the screen
Channel_1_ISR_StartEx(Channel_1_ISR_Handler);
Channel_1_Timer_Start();
for(;;)
{
Serial_Command = UART_1_GetChar();
switch(Serial_Command)
{   
case 's':
sprintf(StringToPrint,"Channel1 capture is %ld\n",Ch1Period-Channel_1_Count);
UART_1_PutString(StringToPrint);
break;
case 't':
UART_1_PutString("Trigger 1.23 ms Edge\n");
Channel_1_pin_Write(1);
CyDelayUs(1230);
Channel_1_pin_Write(0);
break;
case 'y':
UART_1_PutString("Trigger 12ms Overflow \n");
Channel_1_pin_Write(1);
CyDelayUs(12000);
Channel_1_pin_Write(0);
break;
int counter;
case 'c':
counter = Channel_1_Timer_ReadCounter();
sprintf(StringToPrint,"Channel1 counter is %d\n",counter);
UART_1_PutString(StringToPrint);
break;
case 'q':
Channel_1_Timer_Stop();									//	Halt timer
break;
case 'w':
Channel_1_Timer_Stop();									//	Halt timer          
Channel_1_Timer_WriteCounter(Ch1Period);				//	Rewrite counter for next cycle
Channel_1_Timer_Start();								//	Restart Timer
break;
}
if(intFlag) // There was an event... what happened?
{
sprintf(StringToPrint,"Channel1 %s Time= %ld\n",(intFlag & Channel_1_Timer_STATUS_CAPTURE)?"Capture":"Overflow", Channel_1_Count);
UART_1_PutString(StringToPrint);
intFlag = 0;
Channel_1_Timer_Start();
}
}
}

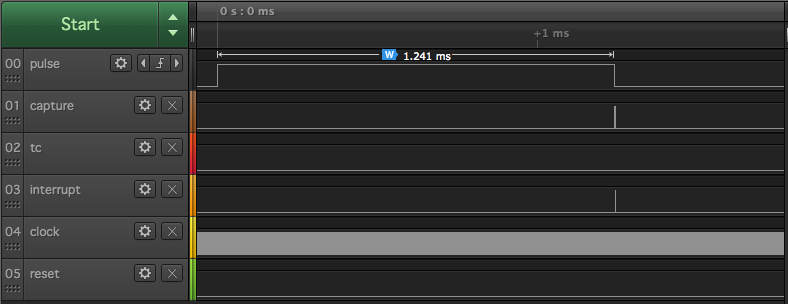
When you look at the capture event (by pressing ‘t’) this is what you see on the logic analyzer:

  • A 1.241 wide pulse on “pulse” (pretty damn close to 1234 uS)
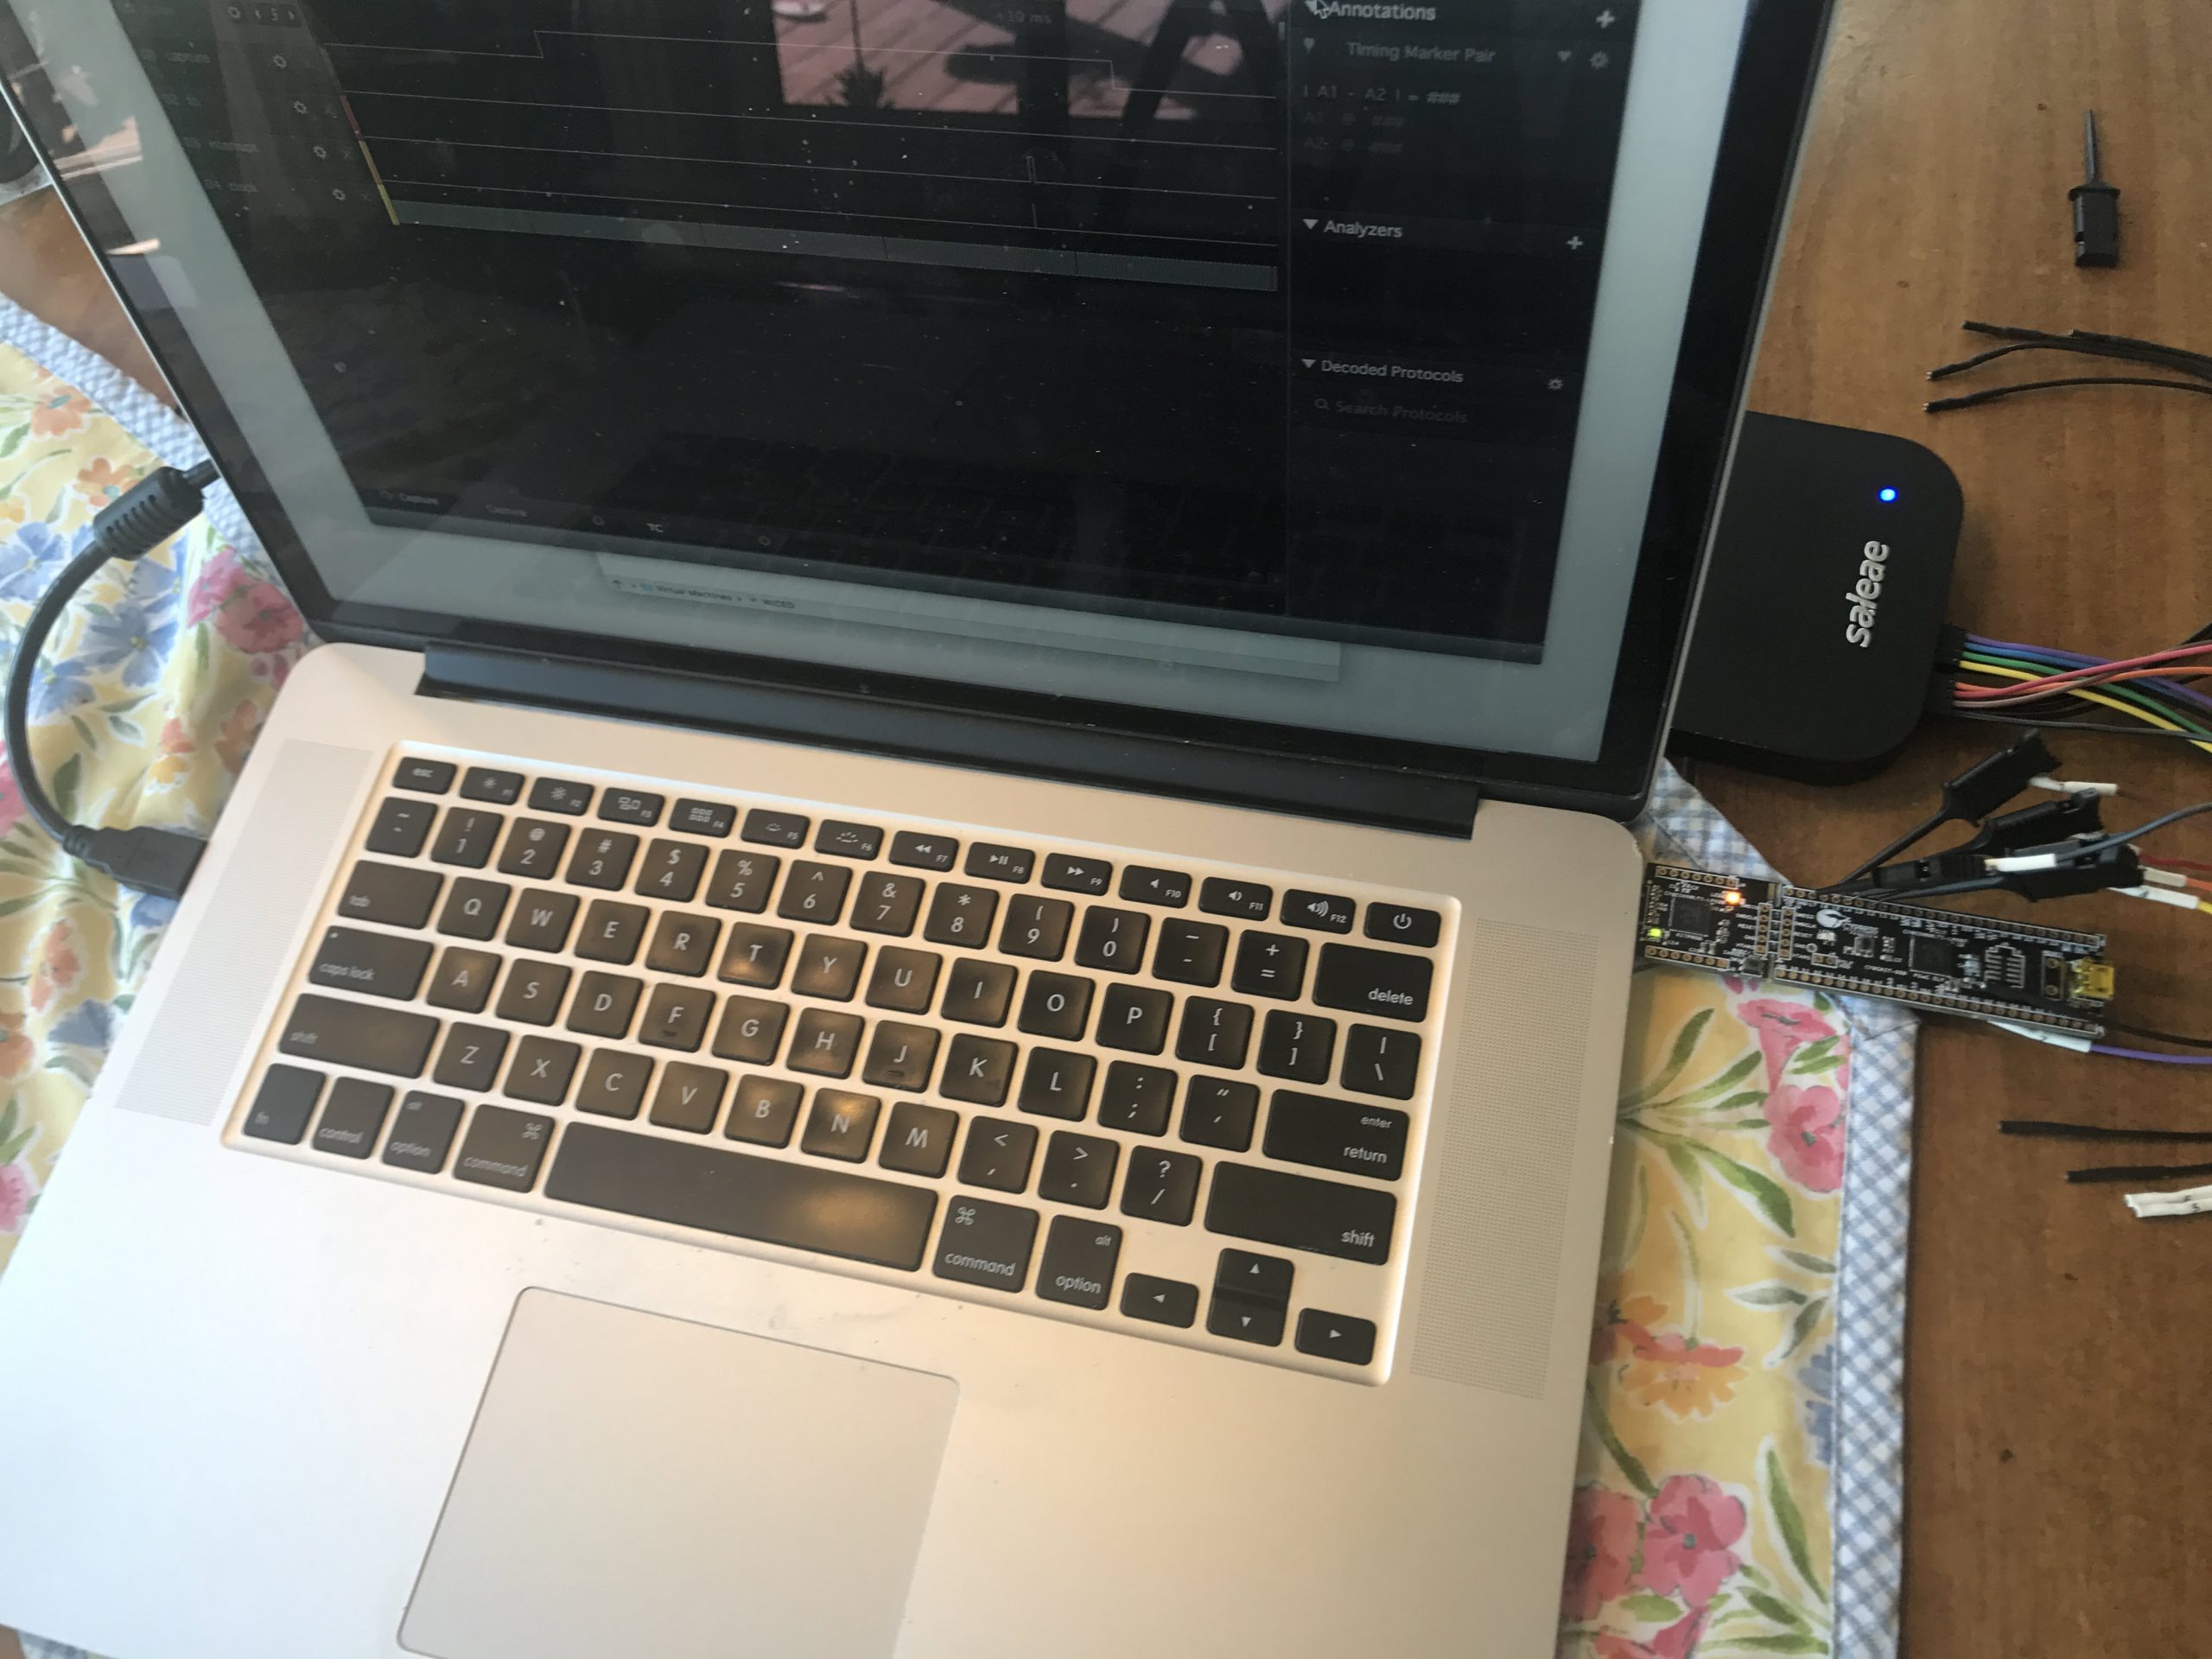
  • A pulse on the “capture” flag
  • A pulse in the “interrupt” pin

Saleae Logic Output

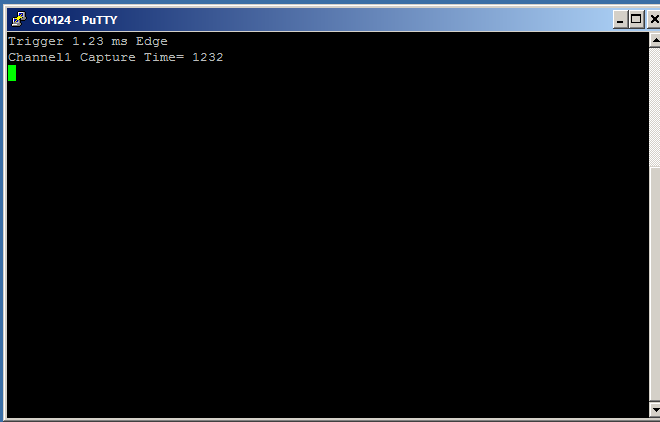
And the serial terminal says:

PSoC 5 Serial Port Output

When you press ‘y’ to make a wide pulse, then look at the terminal count event on the logic analyzer you can see

  • A 12ms wide pulse
  • A pulse on the terminal count
  • A pulse on the interrupt (indicating a terminal count)

Saleae Logic Output of PSoC 5 Timer

And the terminal program says the same thing
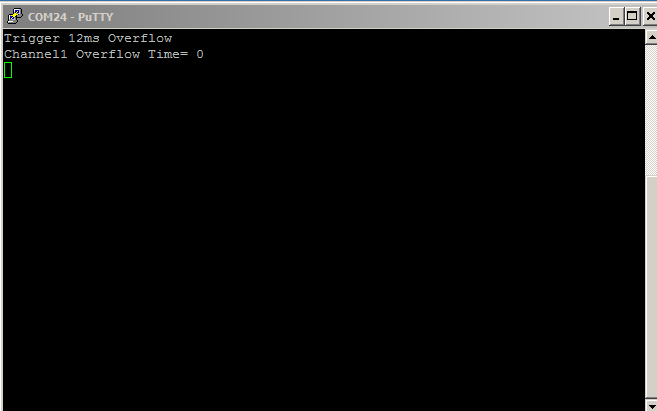
PSoC 5 Serial Port Output

This is all good.  The project seems to be working correctly.

Problem with PSoC 5 Timer & debug project (2-triggerDebug)

While I was working on fixing this program I was struggling with the loop not “stopping”.  In other words, the timer kept running even though the interrupt had occurred.  To figure this out I hooked up the logic analyzer again, and built a project to help debug it.
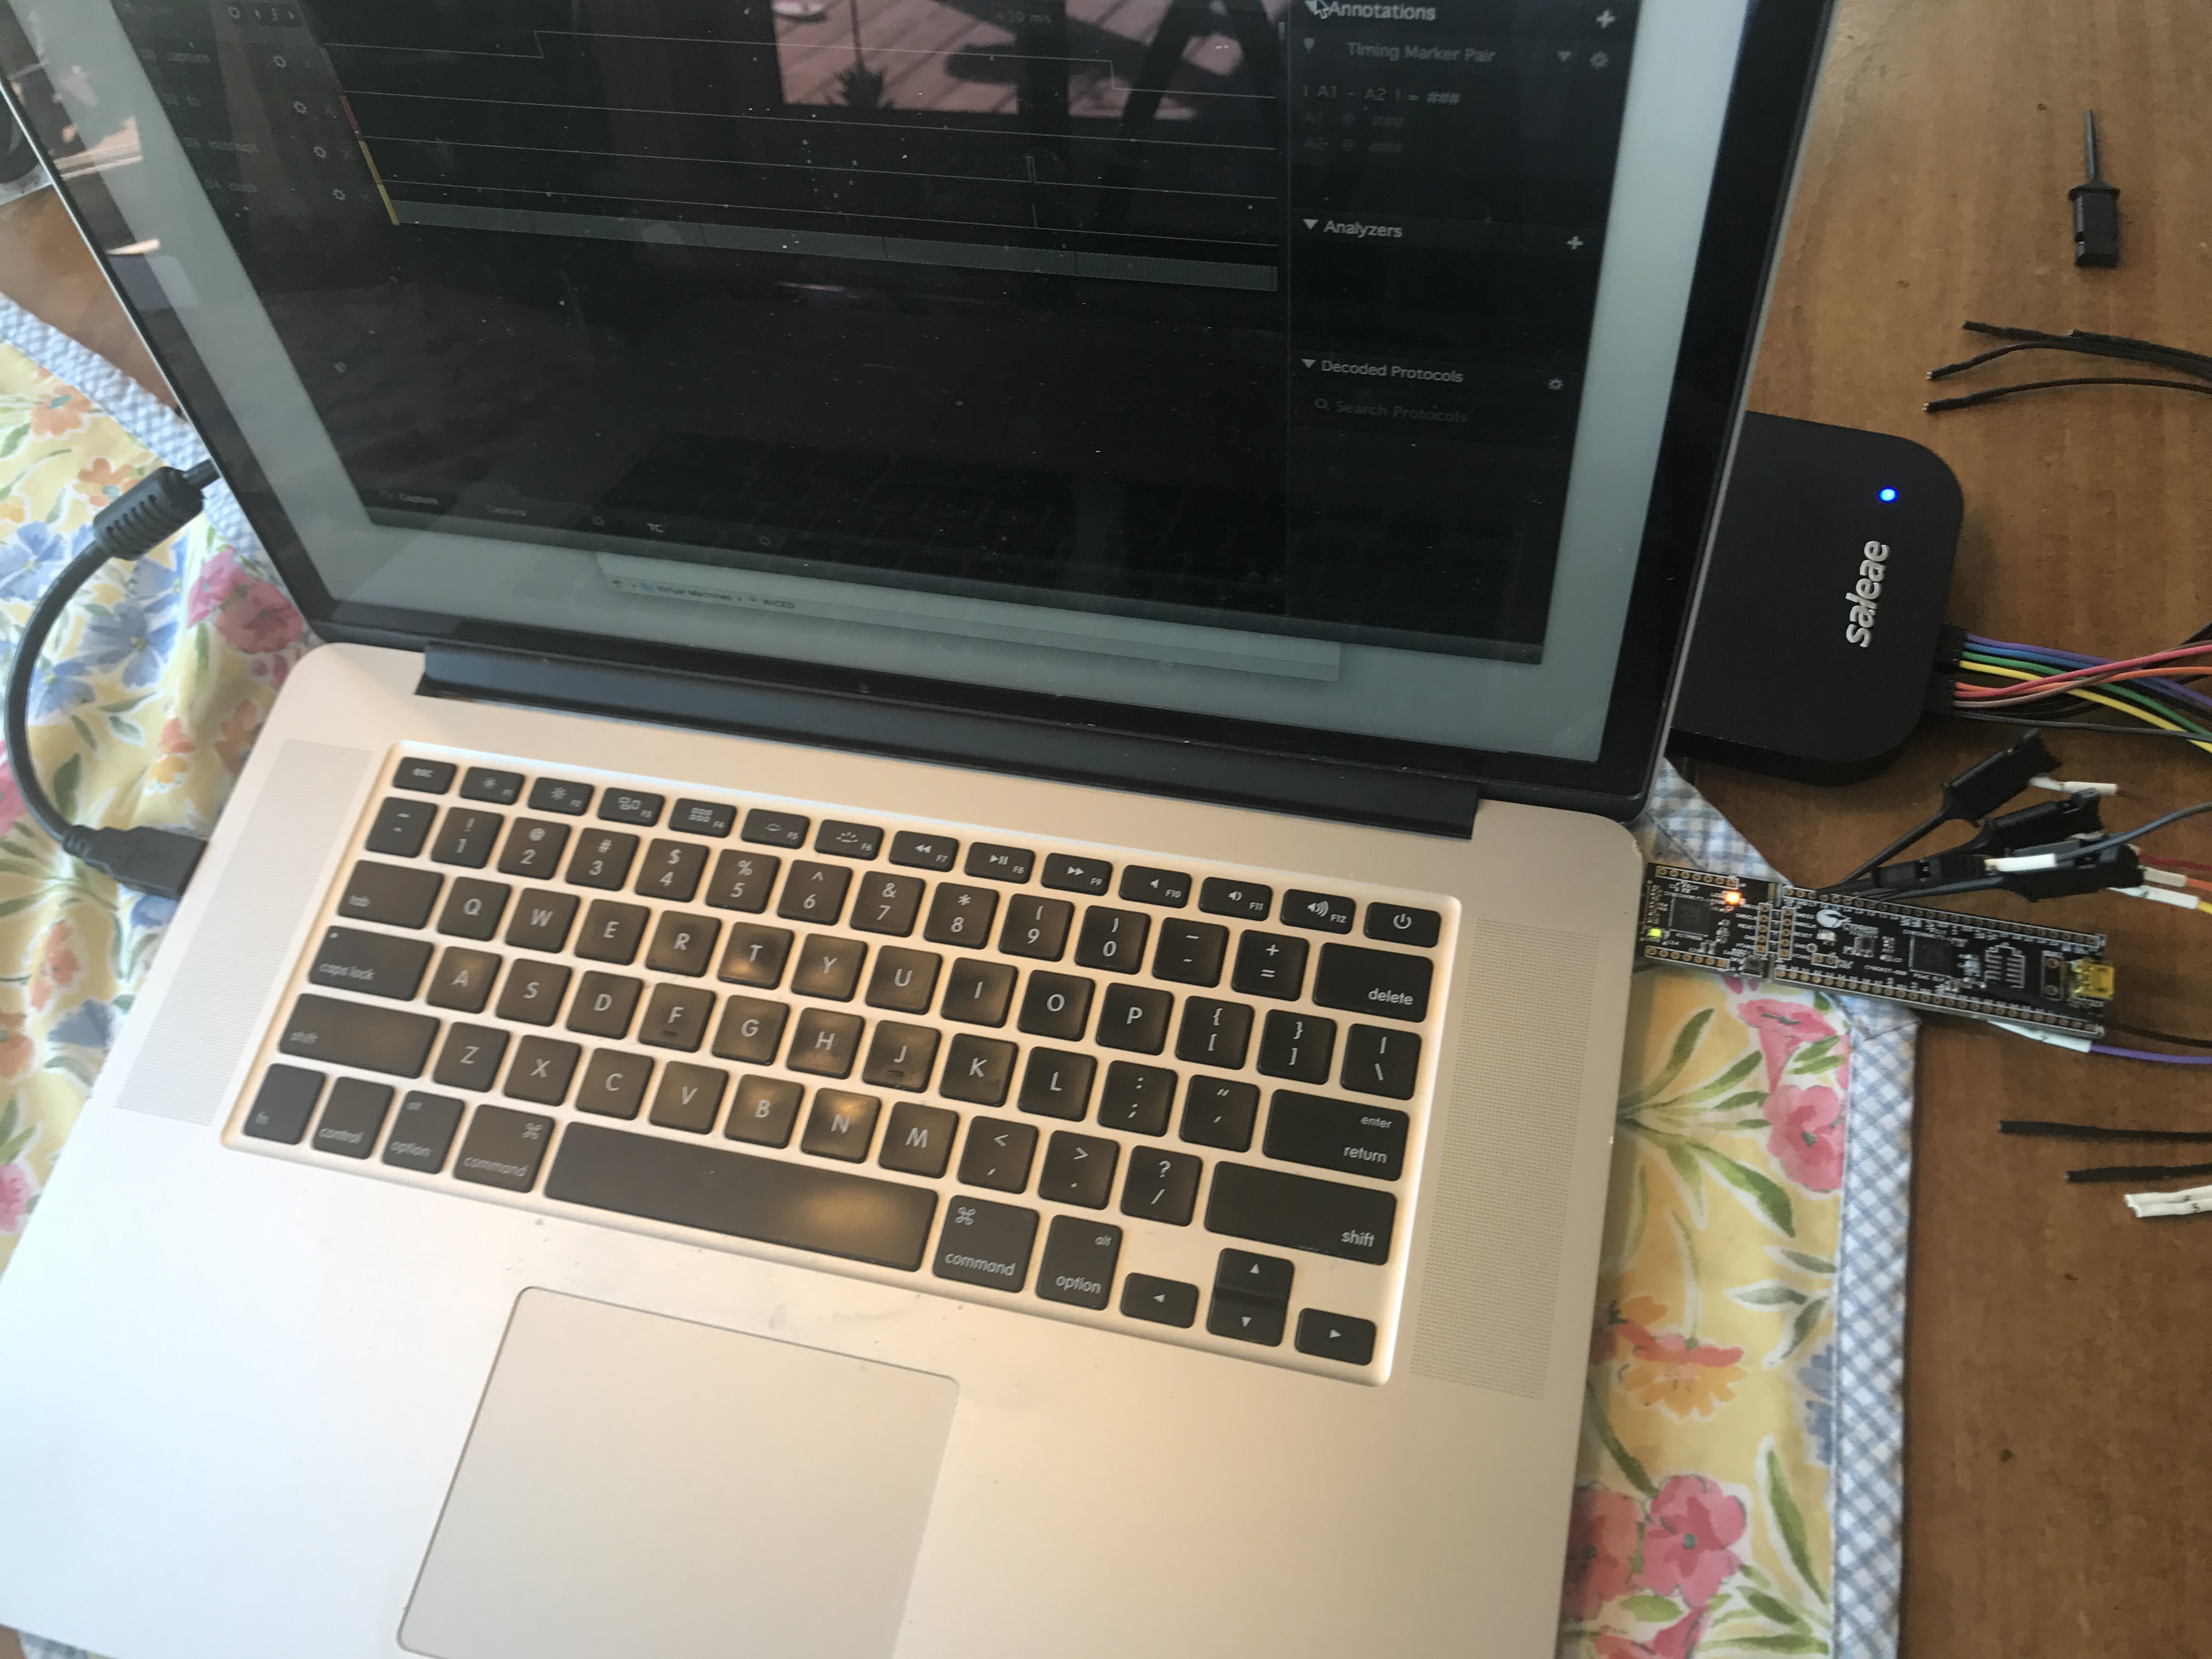
Saleae Logic & PSoC 5 Setup

I suspected that I had a timing issue with my stopping/starting of the timer.  To debug the problem I added a pin to the schematic called “resetPin”
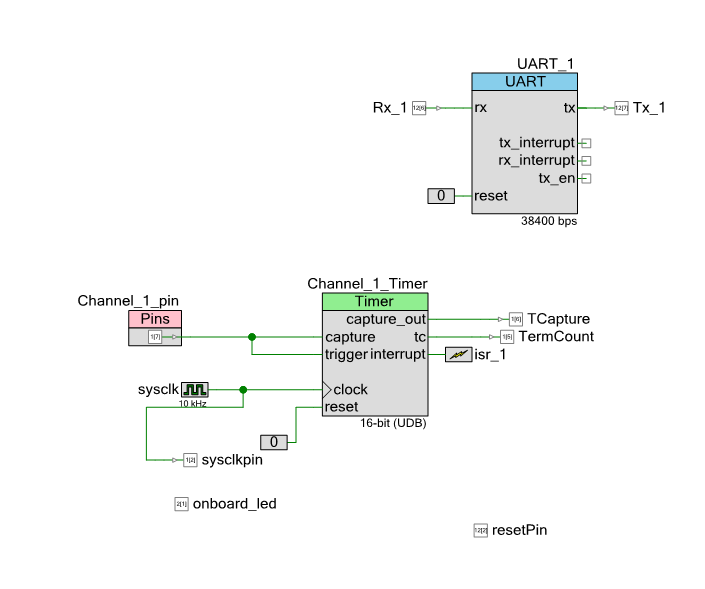
Updated PSoC5 Timer Schematic

Then I changed the ISR to not restart the Timer, but to wait until later for the start.  I also added a “#define” to let me move the start/stop around in the code.

    #ifdef ISR_RESET
resetPin_Write(1);
#endif
Channel_1_Timer_Stop();
Channel_1_Timer_WriteCounter(100);
#ifdef ISR_RESET
Channel_1_Timer_Start();
resetPin_Write(0);
#endif

When it seemed like thing just kept going, this is what I got this:
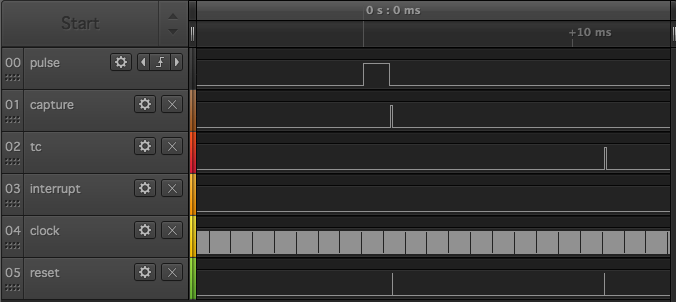
Saleae Logic Output of PSoC 5 Timer

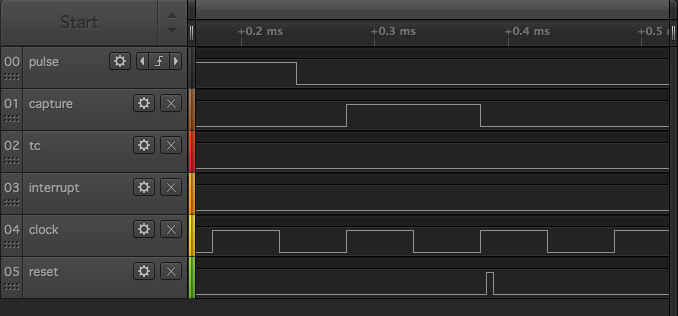
Or in zoomed in fashion:

Saleae Logic Output of PSoC 5 Timer

What I realized is that there needs to be a little bit of time between the capture event and the restart of the Timer block.  When I moved the restart later in the code, outside of the ISR

      if(intFlag)  // If an event occurred print the value
{
sprintf(StringToPrint,"Int %d Counter= %ld\n",intFlag,Channel_1_Count);
UART_1_PutString(StringToPrint);         
#ifndef ISR_RESET
resetPin_Write(1);
Channel_1_Timer_Start();
resetPin_Write(0); 
#endif
intFlag = 0;
}

It was fixed.  Notice that the “restart” happened a bunch of clock cycles later.
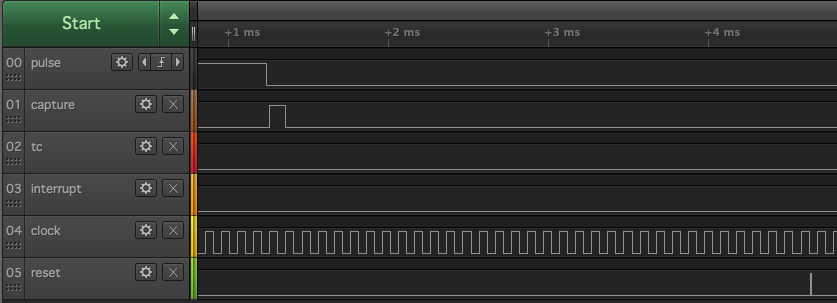
Saleae Logic Output of PSoC 5 Timer

Hardware Solution (3-testTimer1-reset) using PSoC 5 Timer

But, I didnt stop there.  I was not a big fan of the software solution (which looks like Arduino), and I really hated the start/stop scheme that I was using.  In order to fix this I wanted to try a mostly hardware reset scheme.  The first schematic (called 3-testTimer1-reset-nonfunctional) had this attempt to reset the Timer based on the output or the capture || terminal count.
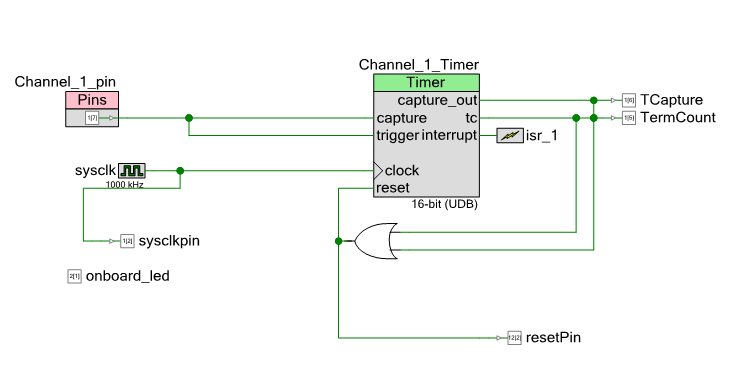
PSoC 5 Timer Schematic

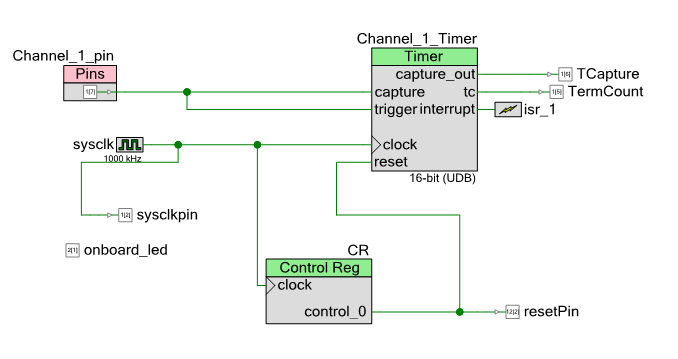
But this did not work because by the time you got to the ISR the block was reset and you had no value for the counter.  To fix this I put a control register in to reset the system (this was Greg’s great idea)
PSoC 5 Timer Schematic

I used the “pulse” setting in the control register, which makes a 1 clock cycle wide pulse when you write a 1 to the register.  This made the firmware a breeze.  Here is the updated ISR with the control register write on line 9.

CY_ISR(isr_1_Handler)
{
Channel_1_Count = Channel_1_Timer_ReadCounter();
intFlag = Channel_1_Timer_ReadStatusRegister();  
onboard_led_Write(~onboard_led_Read());
CR_Write(1);
if(intFlag & Channel_1_Timer_STATUS_TC)
Channel_1_Count = 0;
}

I sent these projects to the customer thinking that I was done.

Driving the PSoC 5 Timer System with a PWM (4-testTimer1-reset-pwm)

But, the next morning he told me that he attached a pulse to the pin and it wasn’t working.  I was pretty sure that it worked, but I decided to add a pulse source to the system to be sure.  To do this I added a PWM to drive the Timer, and a bit of firmware to let me change the width of the pulse.  Here is the updated schematic.  In it, you can see the new “PWM_1” which I have setup with a period of 5ms and a variable width (amazingly enough PWMs are very good at that).  Then in the firmware I can change the compare value of the PWM to change the width of the pulse that I am measuring.
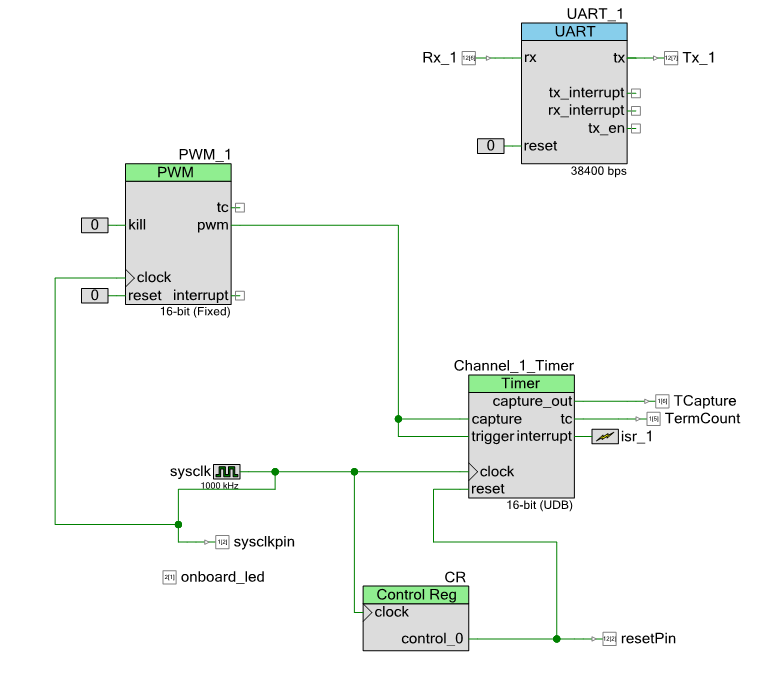
PSoC 5 Timer Schematic

Here is the section of the firmware that lets me change the width of the pulse:

                
case 'k':
PWM_1_WriteCompare(PWM_1_ReadCompare() - 100);
break;
case 'l':
PWM_1_WriteCompare(PWM_1_ReadCompare() + 100);
break;

I like this because I can change the width of the pulse by 100us by clicking k to decrease and clicking l to increase.  I tested this and it also worked well… so I am not sure exactly why his version didn’t work.  But I sent it on.

A connection of the input –> output (5-testTimer1-reset-pwm-external)

Then again, I got an email that it wasn’t working.  I thought that maybe it was that I wired the PWM directly to the Timer.  So, in order to fix this I added that wire on the outside of the chip.  Here is the updated schematic.  I thought that while I was working on it, I would make the calculated pulse width coming into the system also go to an output PWM.  In other words, I calculate the width of the input pulse, then drive that to another PWM with an output.  Here is the schematic:
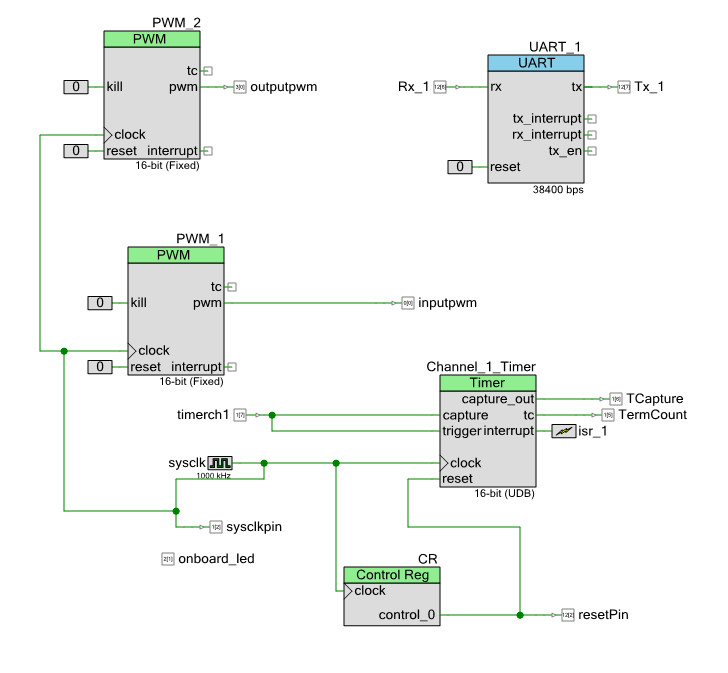
PSoC 5 Timer Schematic

To test the system I attached wires to my oscilloscope and a wire between the pins of the PWM and the PSoC 5 Timer (the black wire)
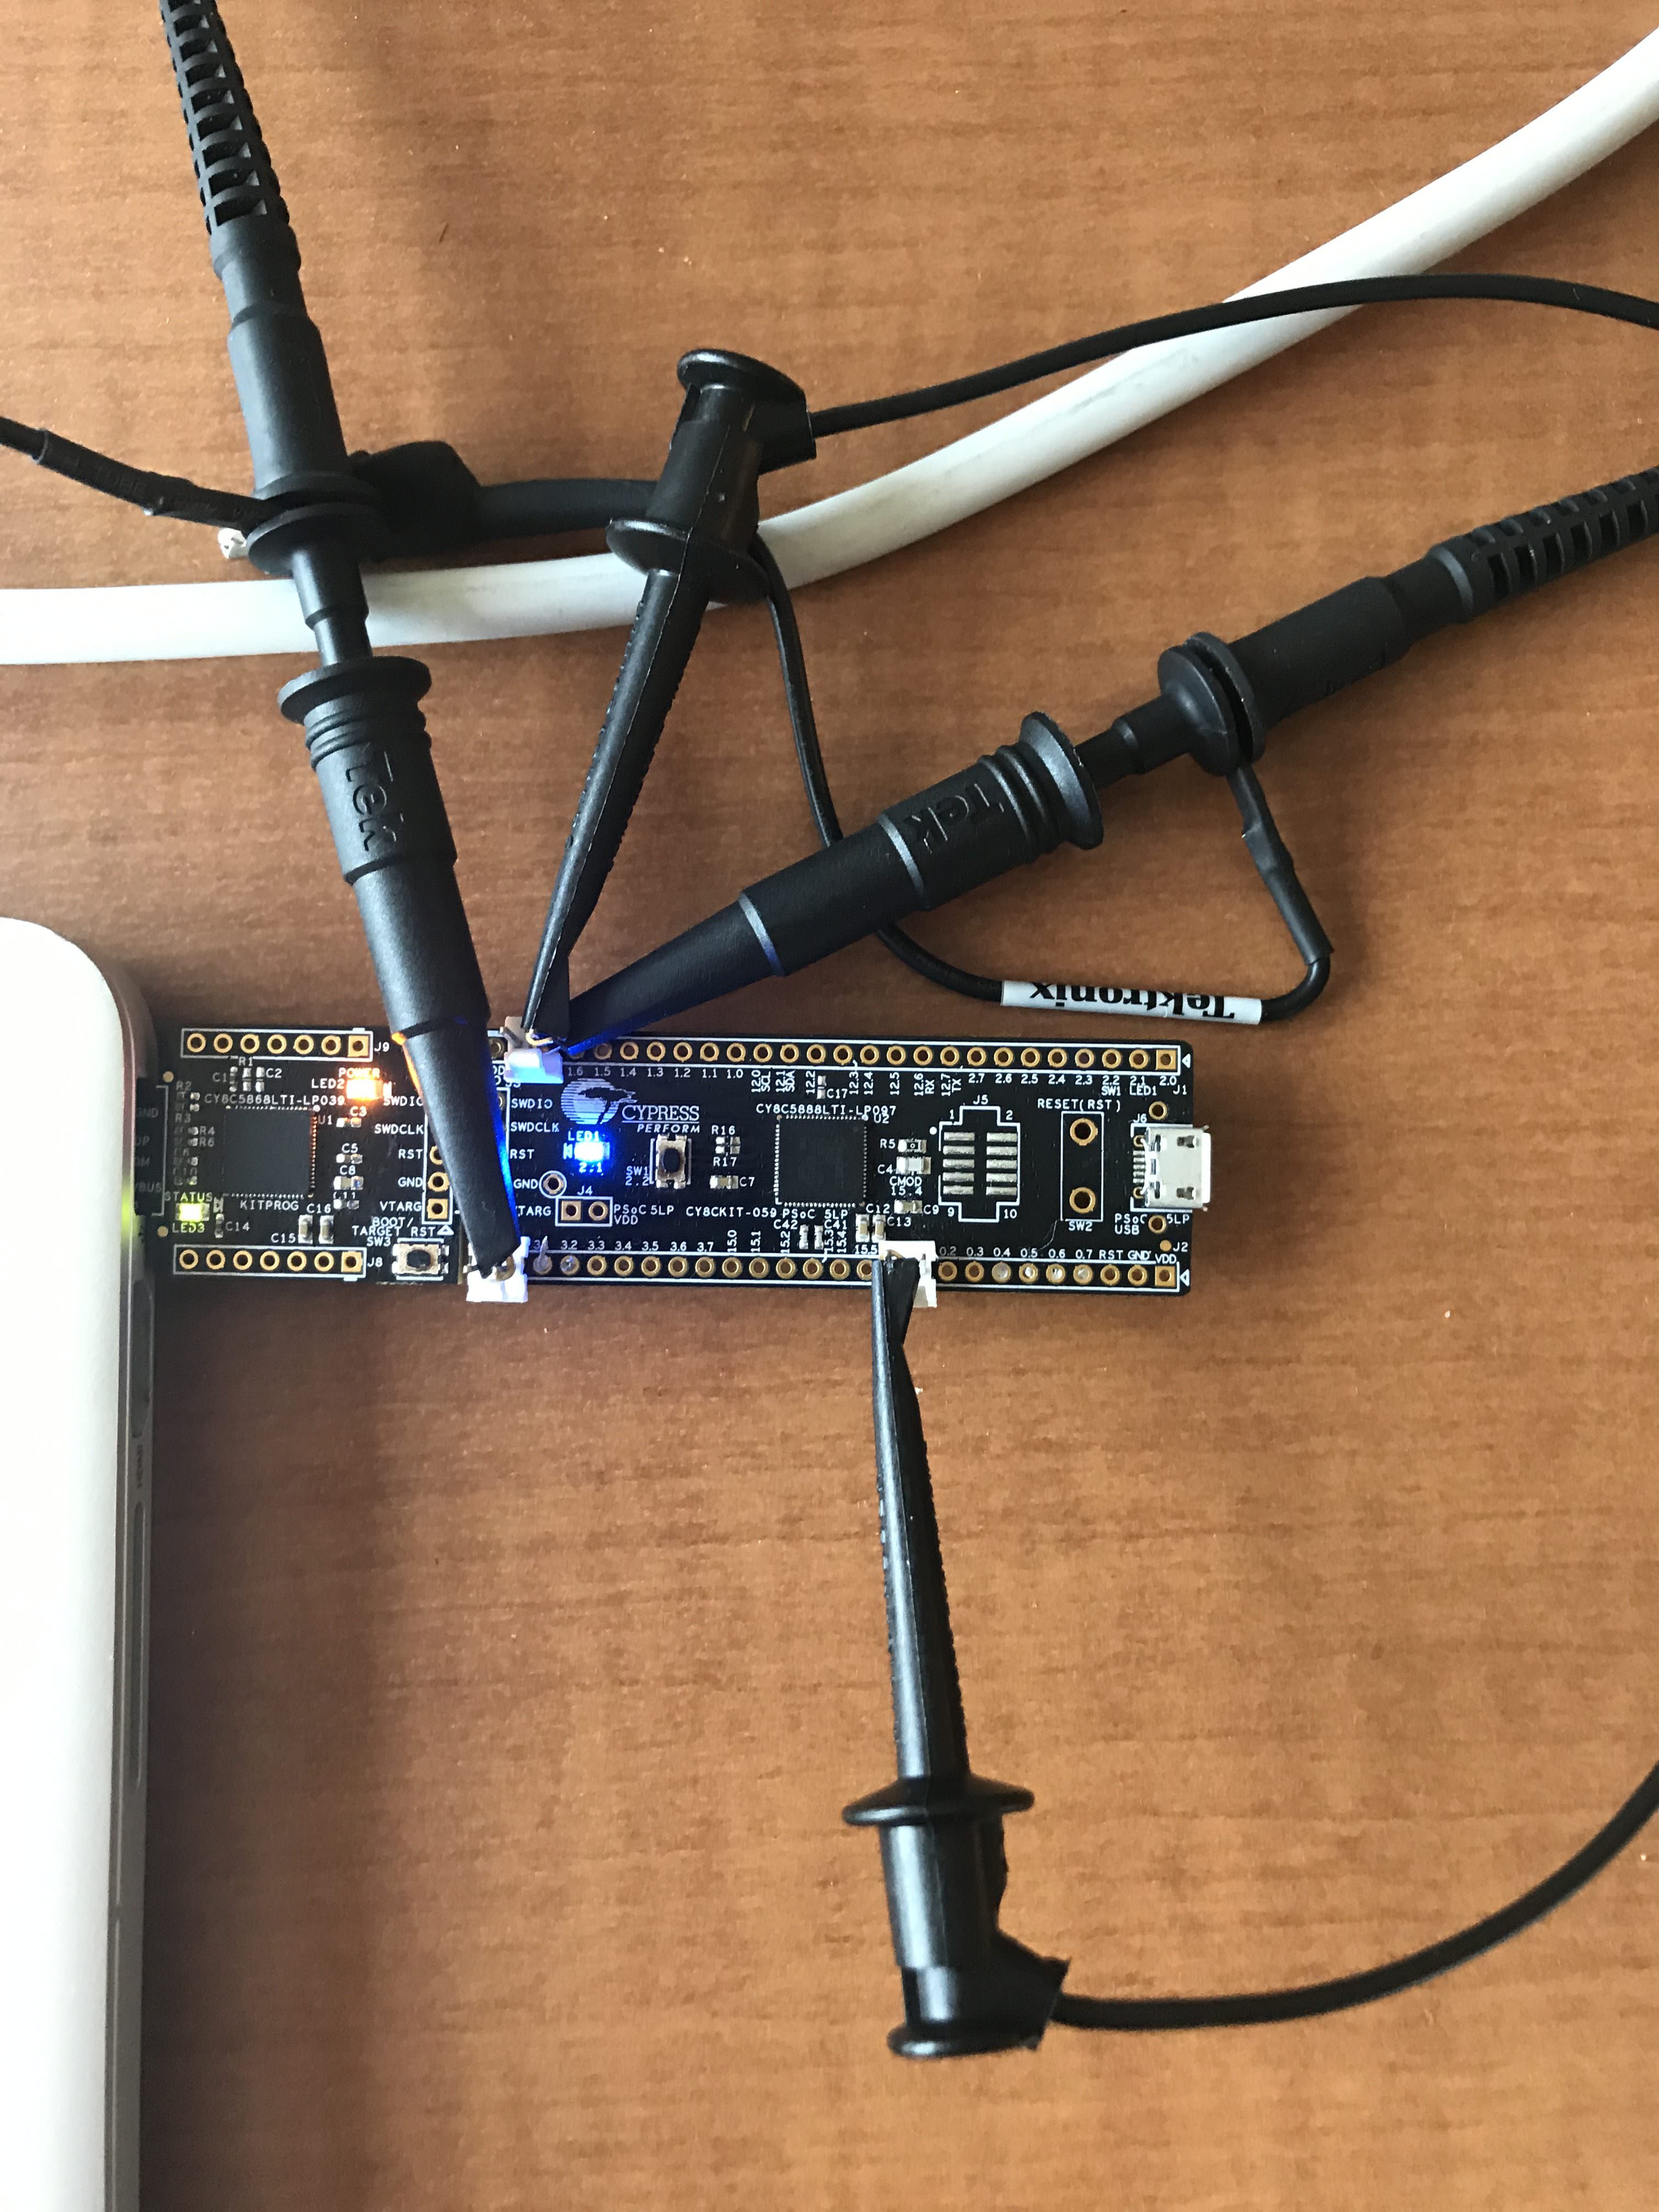
Oscilloscope setup with CY8CKIT-059And here is the output on the oscilloscope.  CH1 is the input PWM and CH2 is the output PWM.  You can see that it tracks exactly.
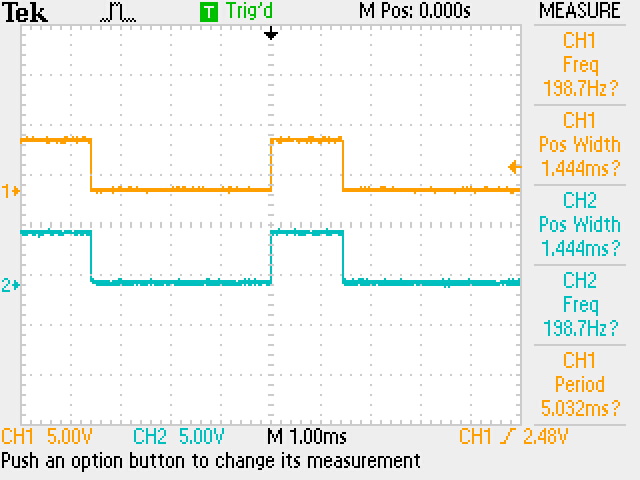
tek output of PSoC 5 Timer

I sent this project to the customer, and this time I got a message that it was working!!! Excellent! And he said that the problem was a programming problem from before.  That was good as it meant all of the other projects worked.

Comments and Future

First, thank you to Sumat for having a good sense of humor working with me.  It turns out that this isn’t a work project but something he is doing for fun.

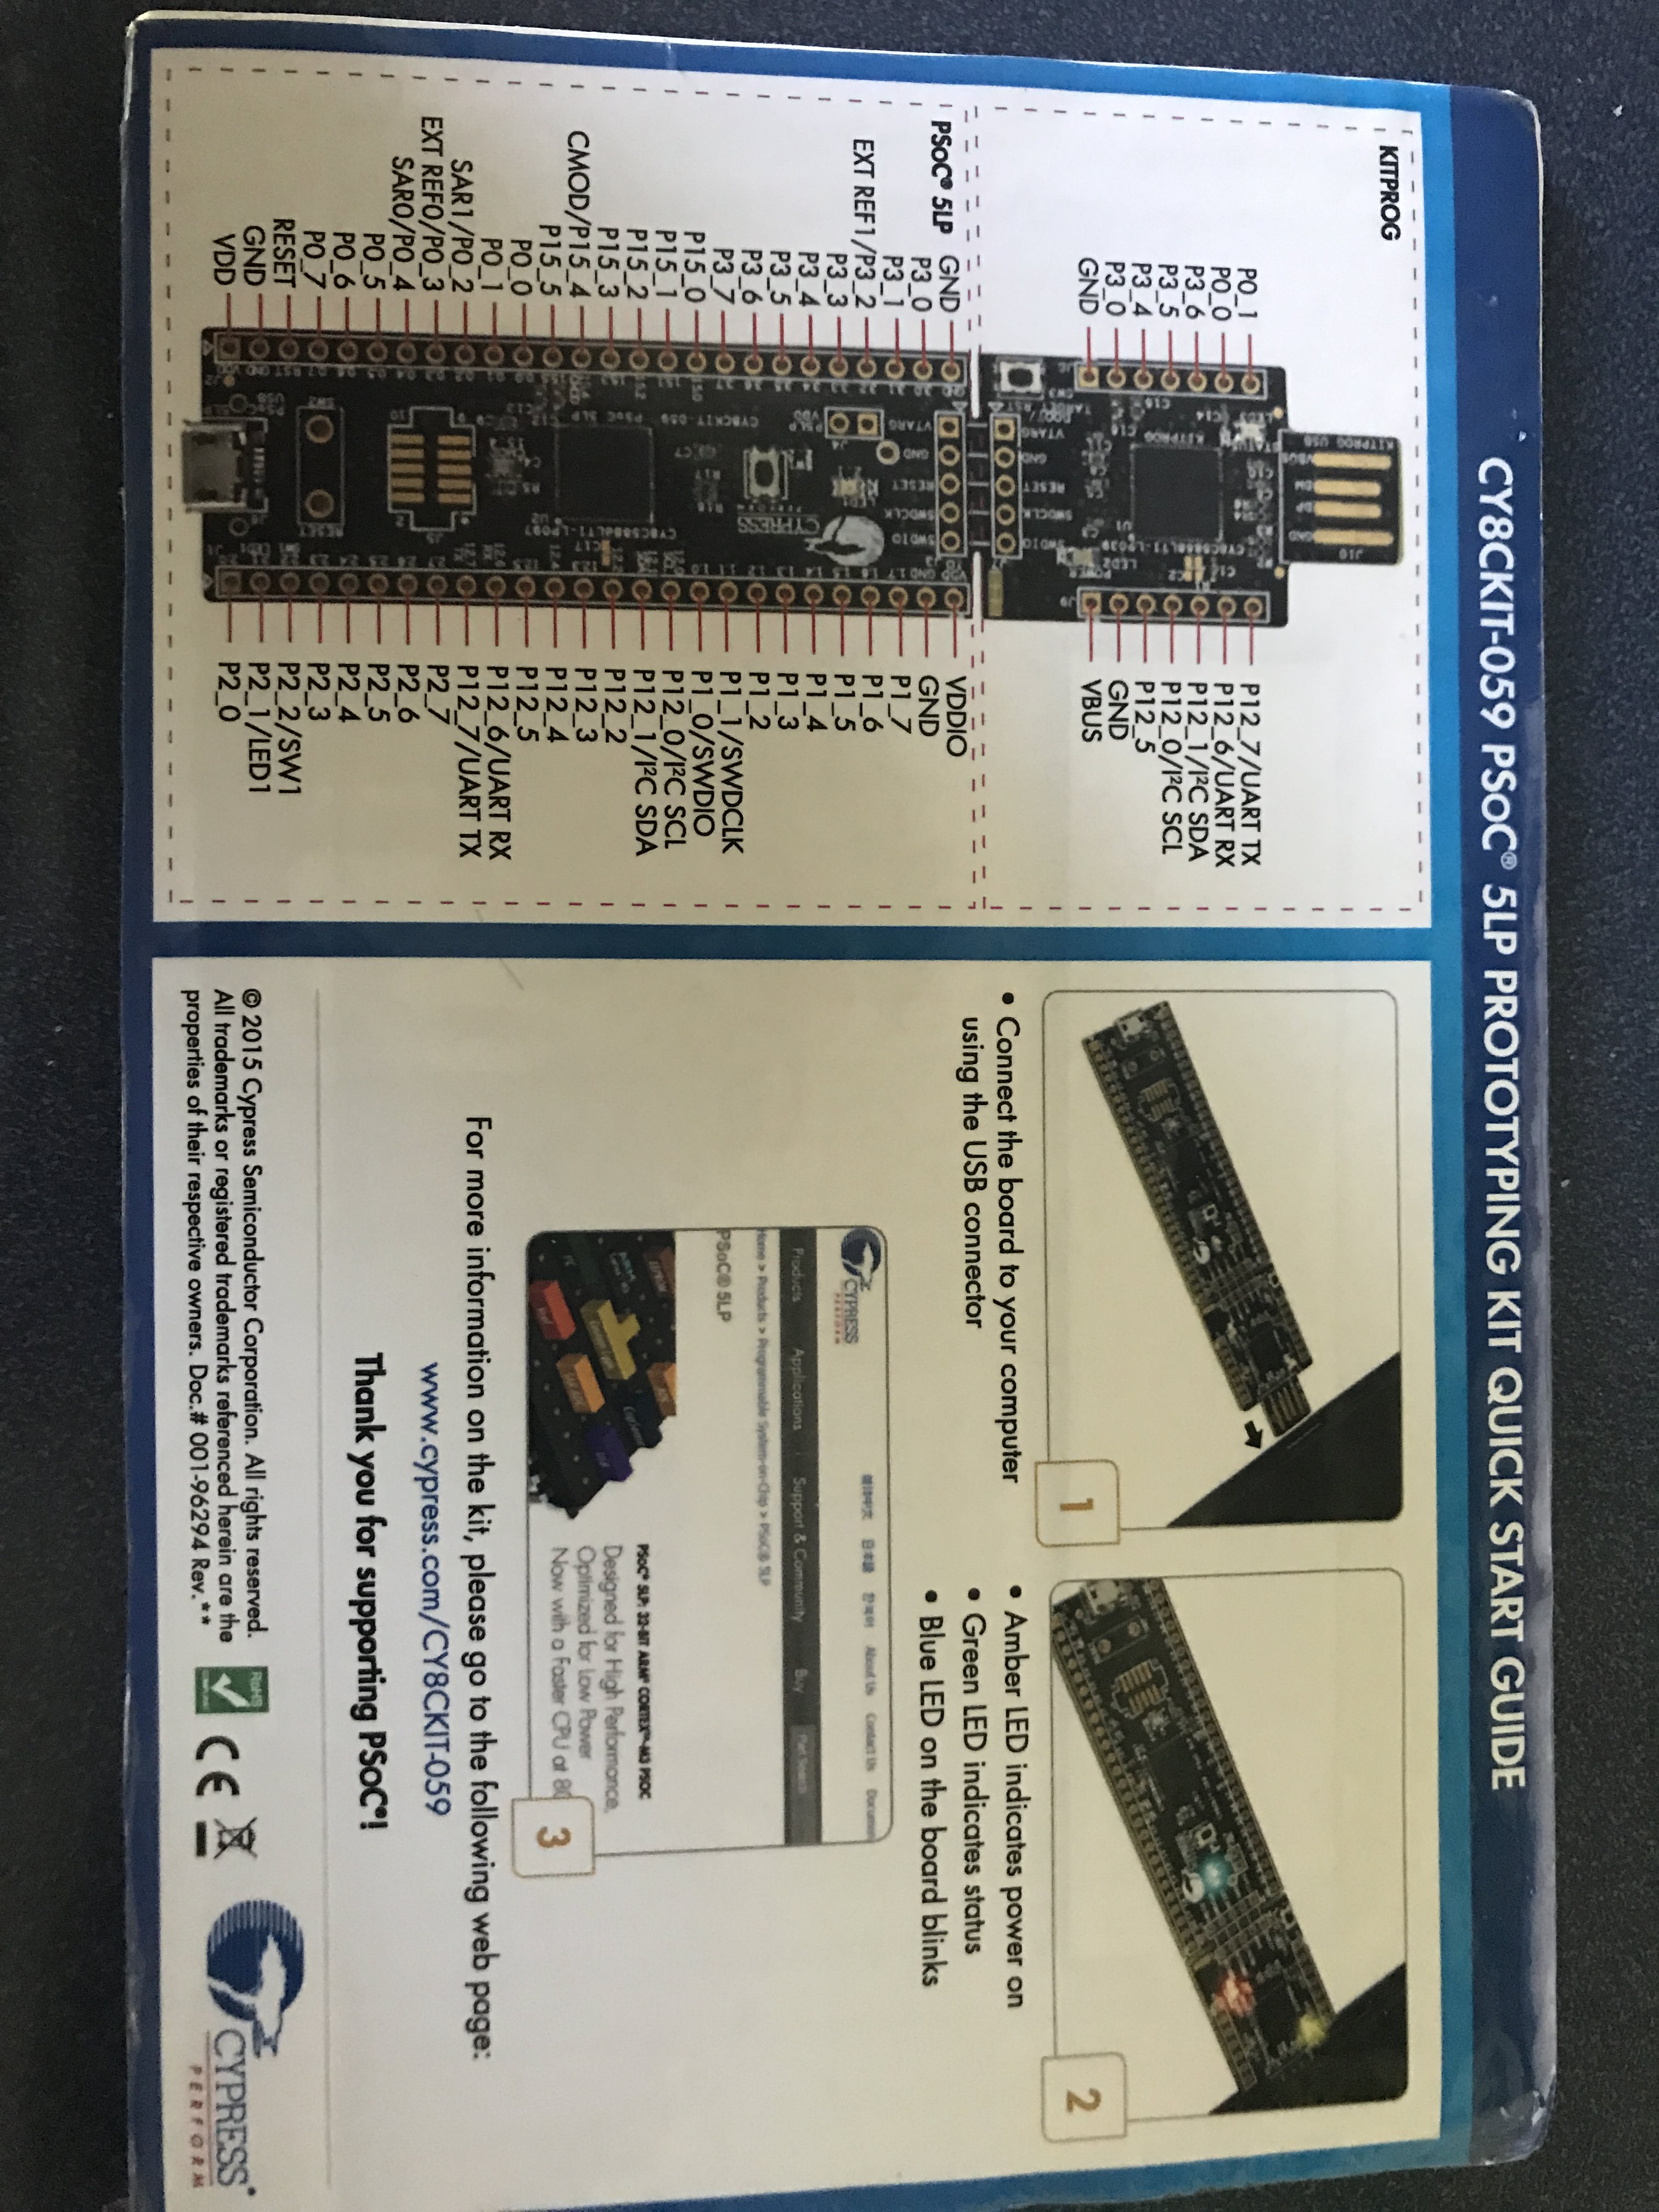
Next… I love the CY8CKIT-059 which you can buy from RS Components.  It is a $10 kit with a PSoC 5 and a PSoC KitProg (which is implement in a PSoC 5) which can program and debug.  It comes in a flat cardboard mailer.
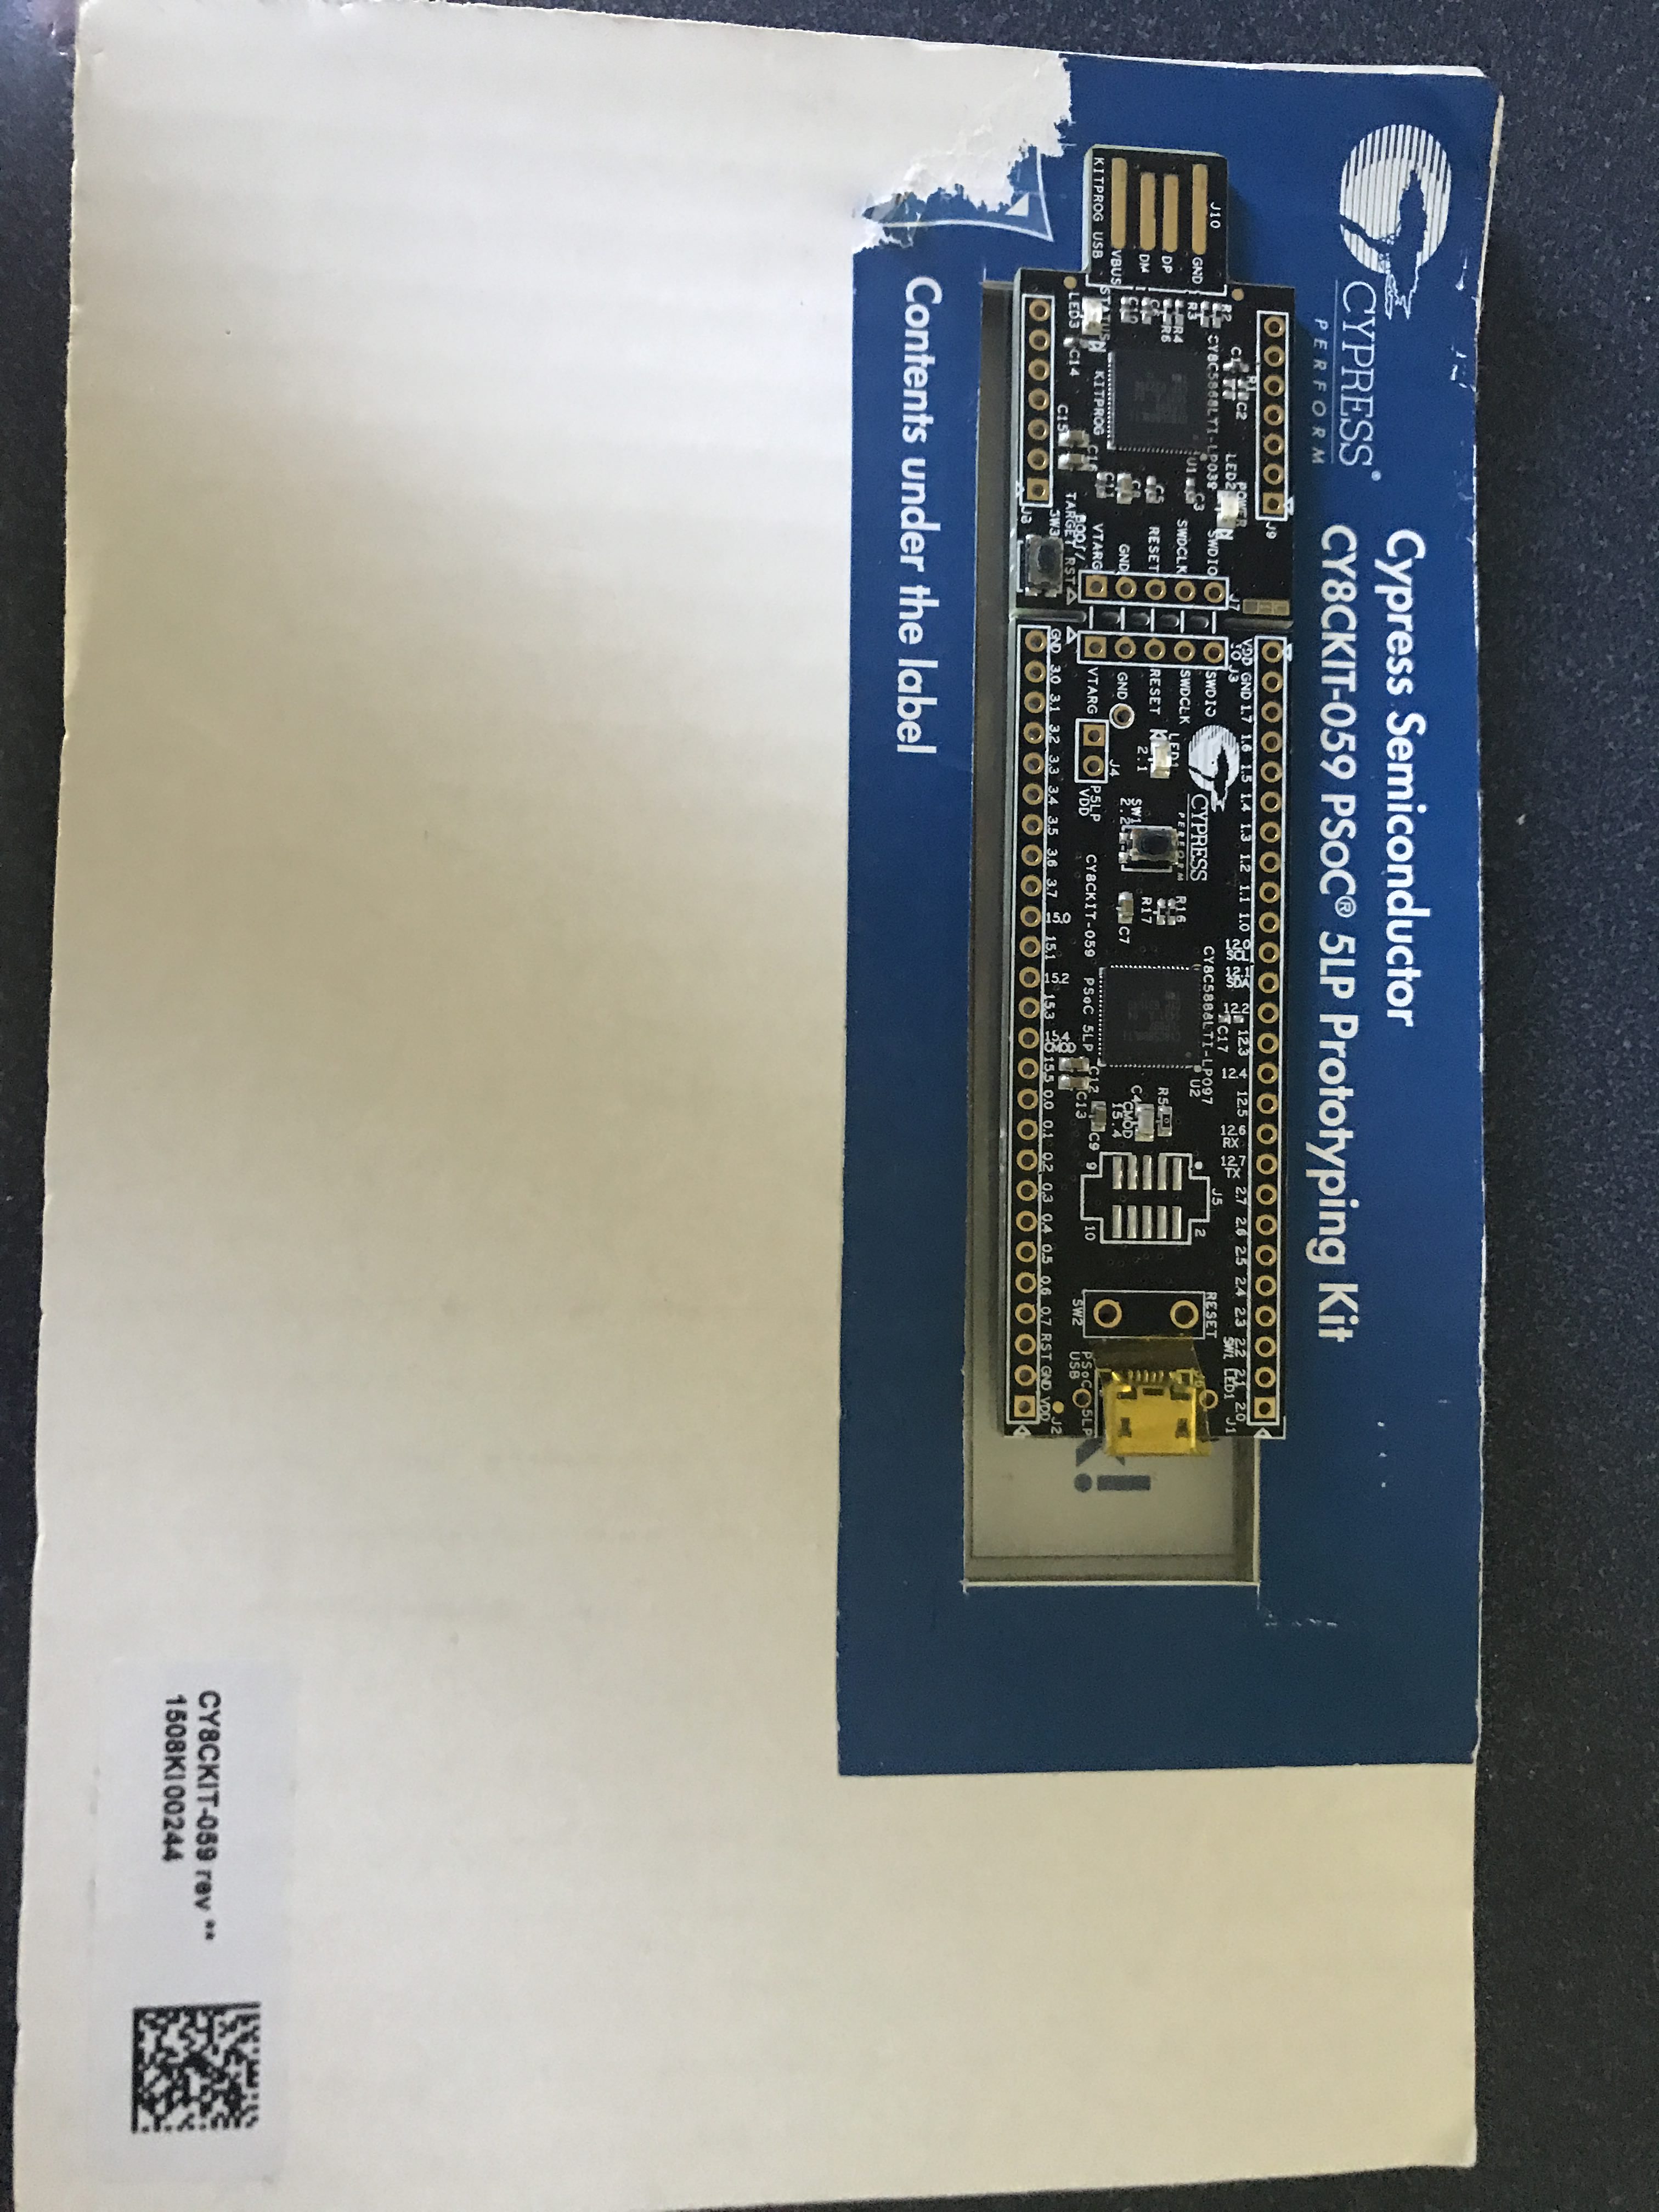
PSoC 5 CY8CKIT-059 Front

PSoC 5 CY8CKIT-059 Back

There are a number of things, that if I was going to spend anymore time on this project (which I am not), that could be improved:

  • I could have used the external components to better document the schematic
  • I could do the project using the TCPWM on PSoC 4
  • I could have use DMA to completely eliminate the ISR
  • I could have “kept counting” instead of setting the result to 0 on TC
  • I’m sure Greg thinks that I need more comments.

And finally a shout out to Bob Marlow who is a really good PSoC guy and answers tons of questions on our forum.  He said something about the c-keyword “volatile” which I thought was wrong… but after digging in some more realized that he was right.  That one bit of knowledge made this whole thing worth while.

Lastly… if you see something wrong please post a comment and Ill fix it.
PSoC4 BLE Central – Using the CySmart Dongle

Summary

In the previous article I showed you how to build PSoC4 BLE Central firmware to talk to a BLE Peripheral.  When I did that firmware I built it to program into a CY8CKIT-042-BLE kit.  What I should have done was made the firmware work with the CySmart Dongle.  An error that I will fix in this article.

In this article I give you an introduction to the CySmart dongle, then I will show you how to:

  • Update the firmware on the dongle (both KitProg and the PRoC)
  • Use the PC to debug a PSoC4 BLE Peripheral
  • Modify the PSoC4 BLE Central Project to work on the CySmart Dongle

CySmart Dongle

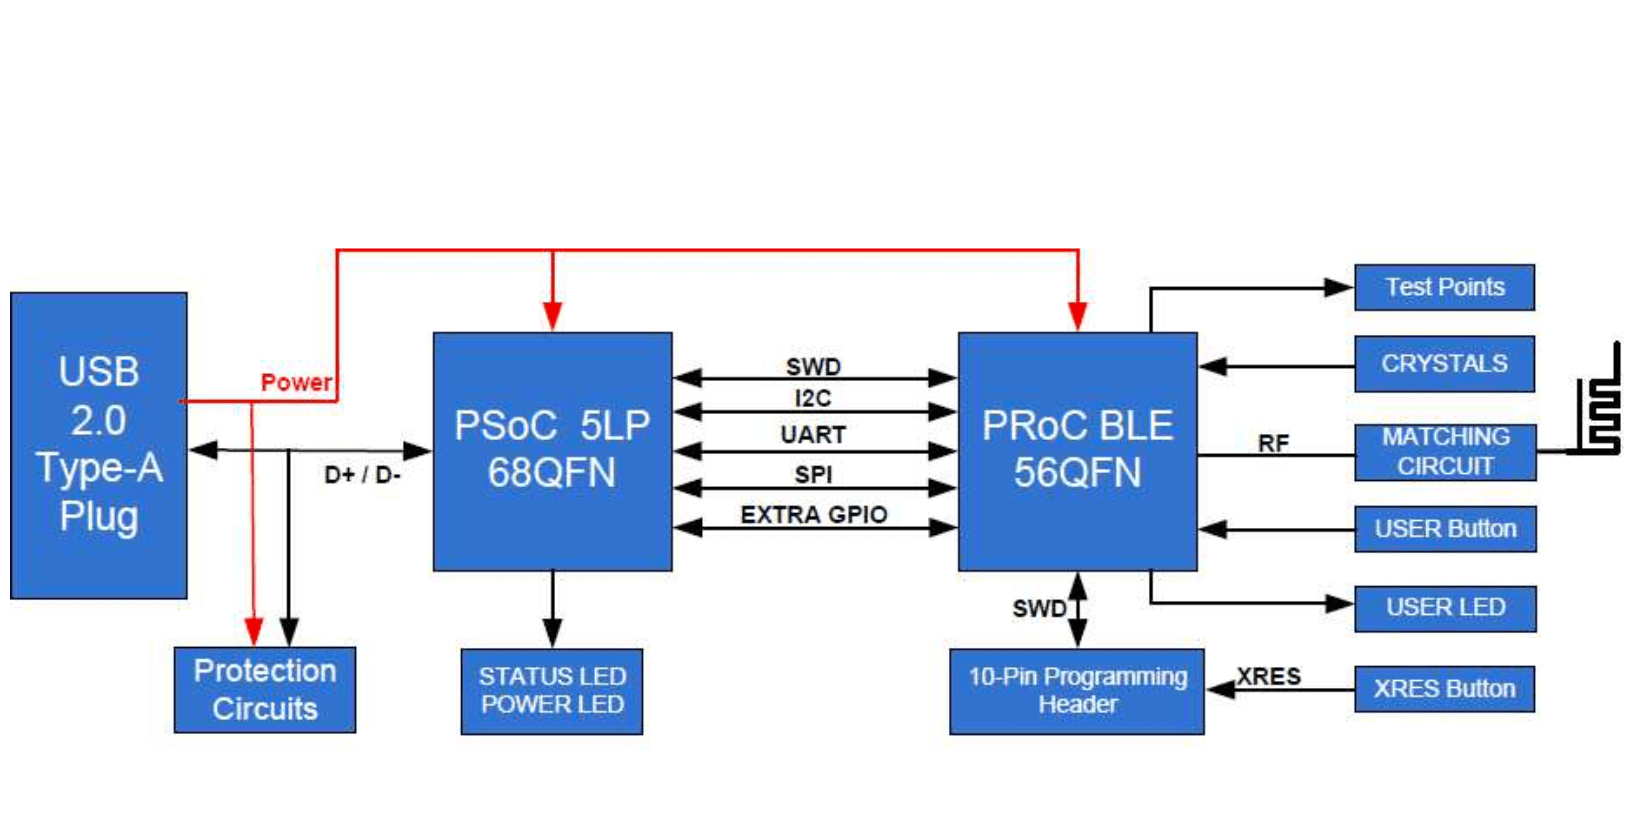
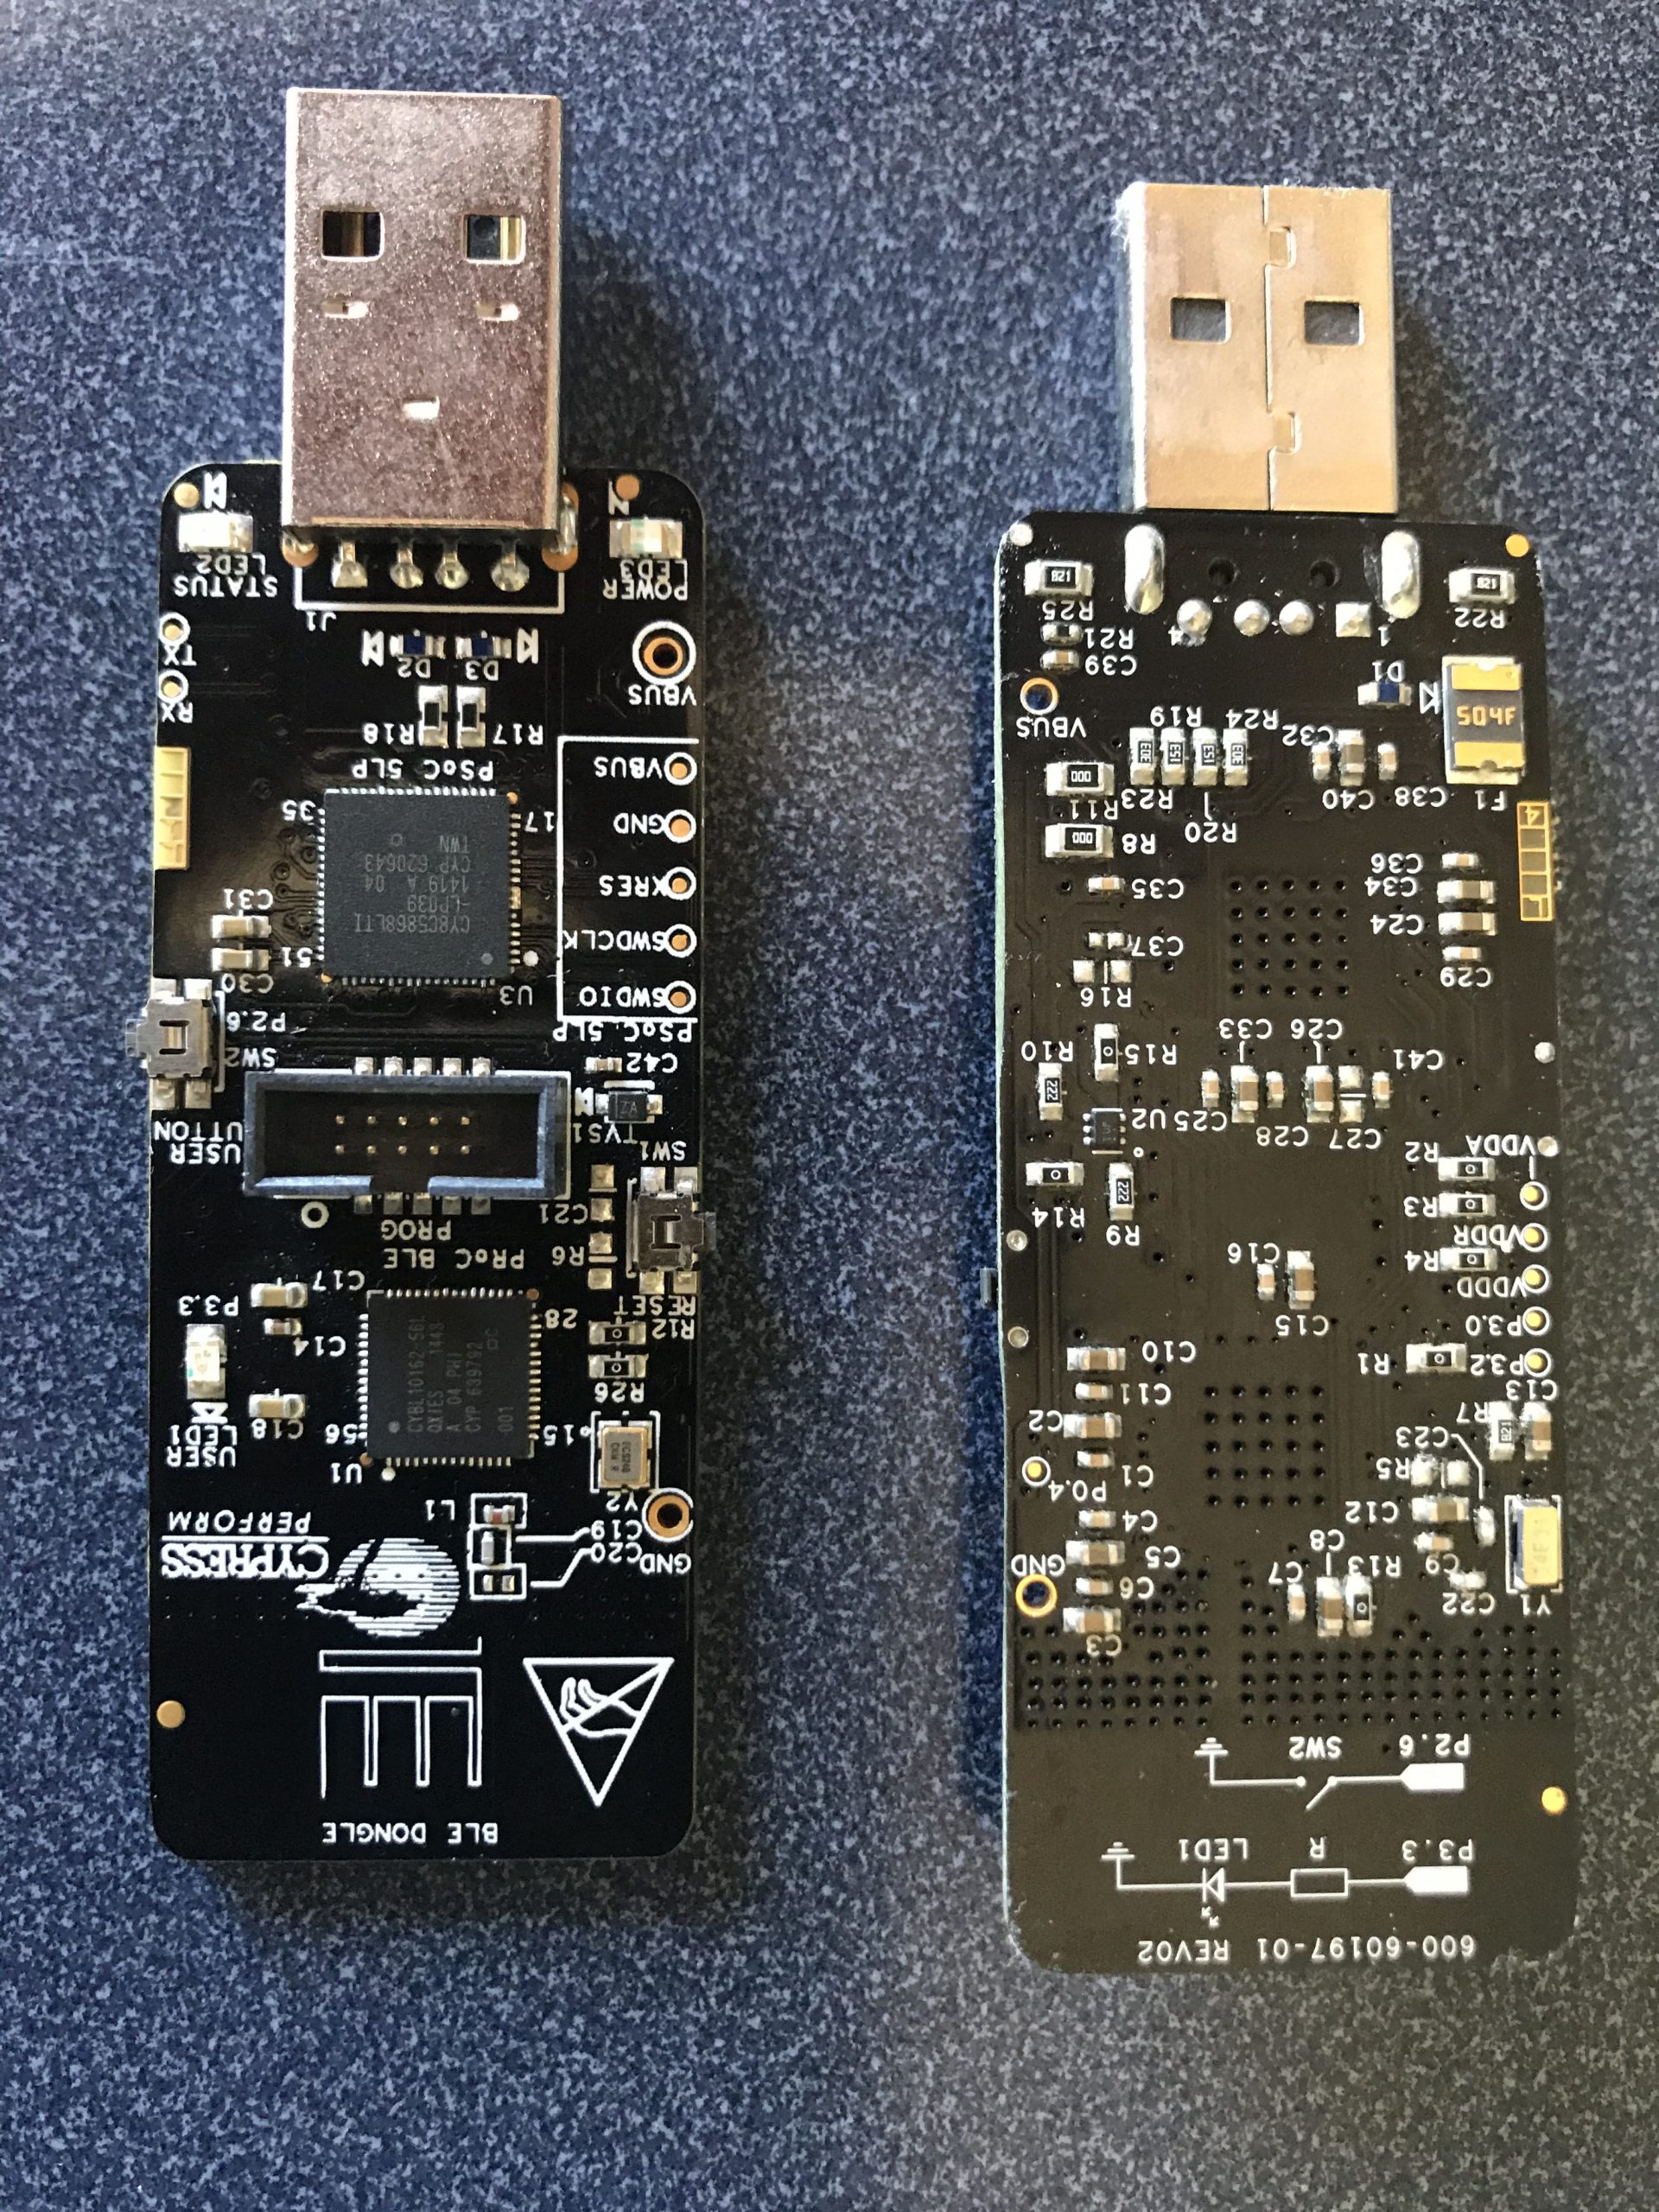
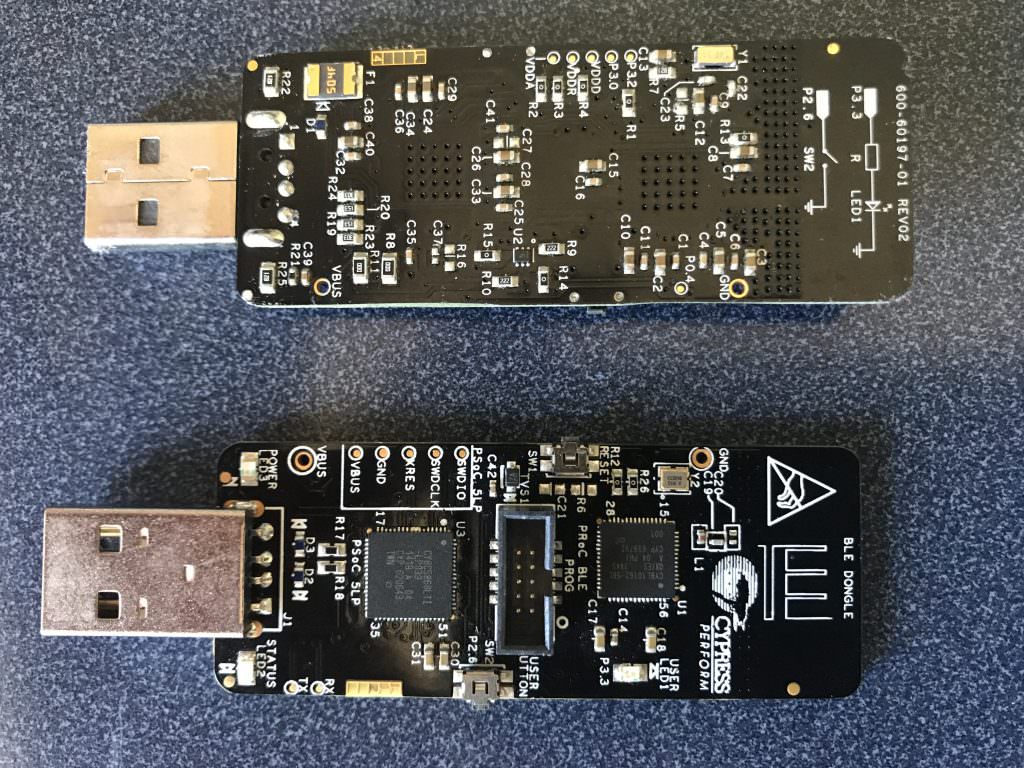
As you can see in the picture above, the CySmart dongle is a USB dongle with a PRoC BLE Radio on it.  It uses a PSoC5 programmed with the KitProg firmware to bridge from the PRoC to the PC.  In the diagram below you can see that it can bridge SWD, I2C, UART and SPI.  In addition the dongle has 1 user button and 1 user LED.  This is perfect for the PSoC4 BLE CapSense LED GAP Central Project that I built in the previous article.

You get the CySmart dongle as part of the CY8CKIT-042-BLE Kit.  The dongle comes programmed with the CySmart Firmware which enables you to connect to the CySmart PC Program (more later in this article).
There are two version of the dongle

  • CY5670 with PRoC & 128K of Flash
  • CY5671 with PRoC & 256K of Flash

Update the CySmart Dongle

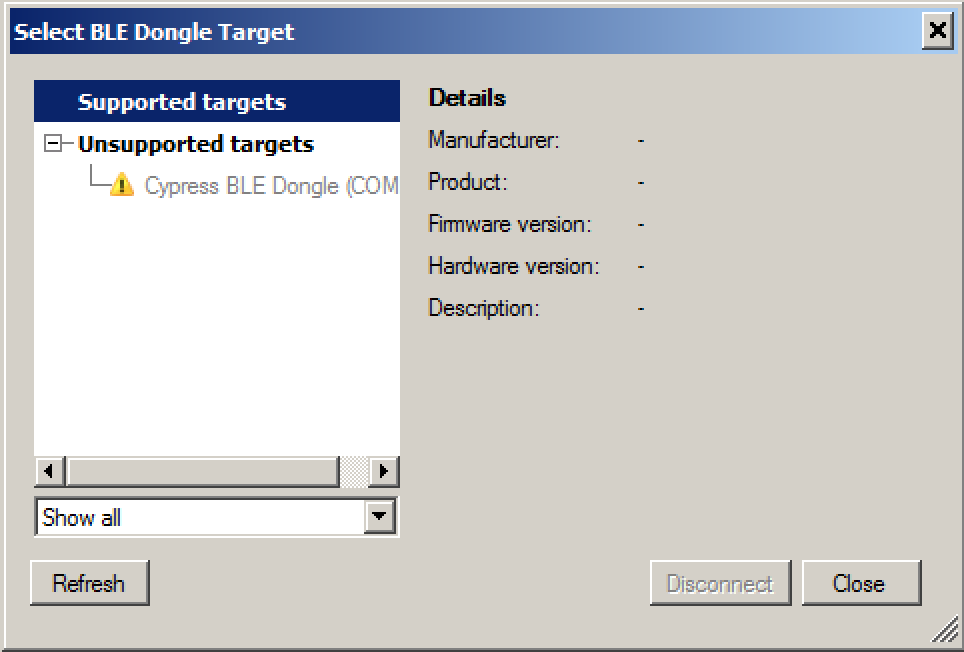
Literally (well almost) every time I plug in a CySmart dongle, I get this message telling me that it is an “Unsupported Target”.  This means that the  firmware is out of date and needs to be updated.

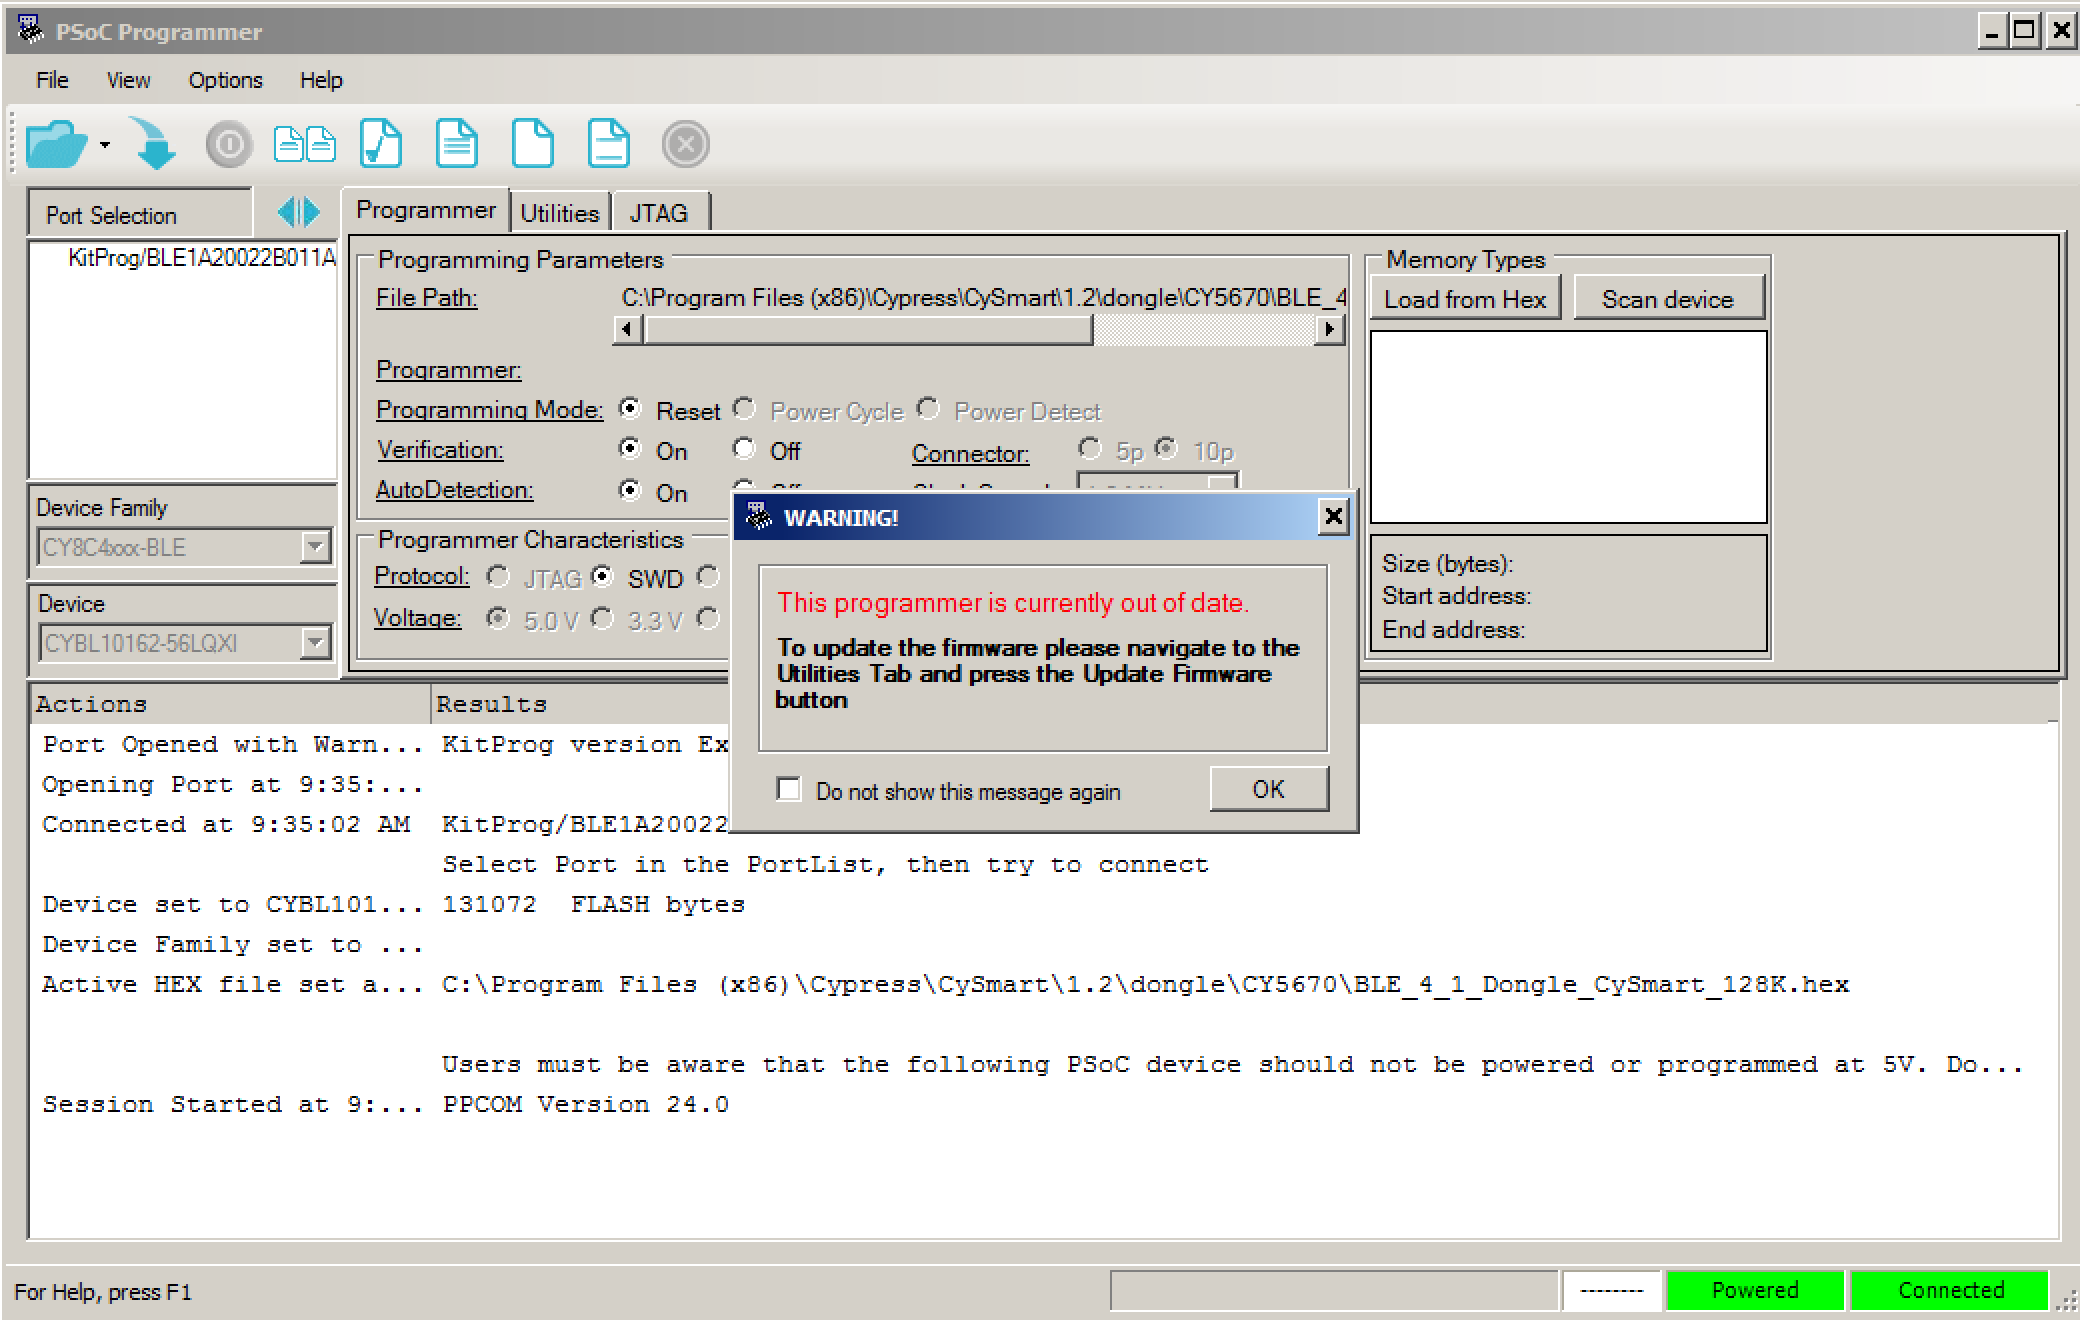
In order to fix the firmware, you need to quit the CySmart program, then start the PSoC Programmer software.  And, I also find that every time I start PSoC Programmer that the KitProg firmware is out of date.  To fix this press OK.

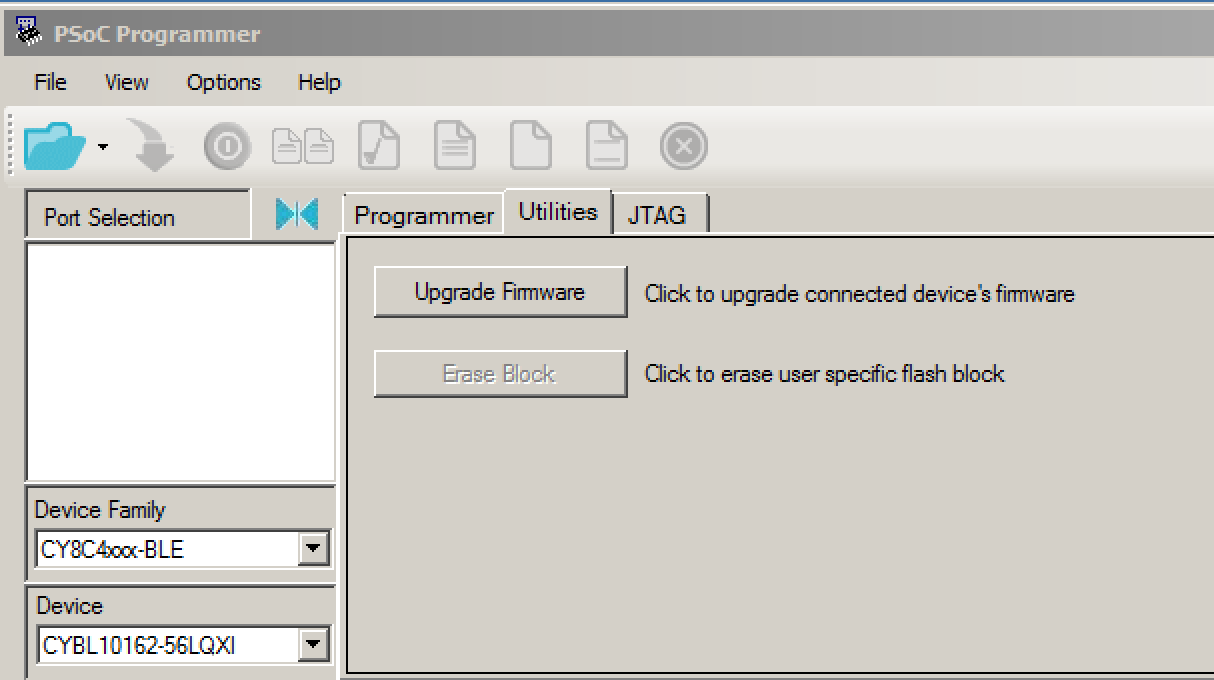
Then click the “Utilities” tab, then “Upgrade Firmware”

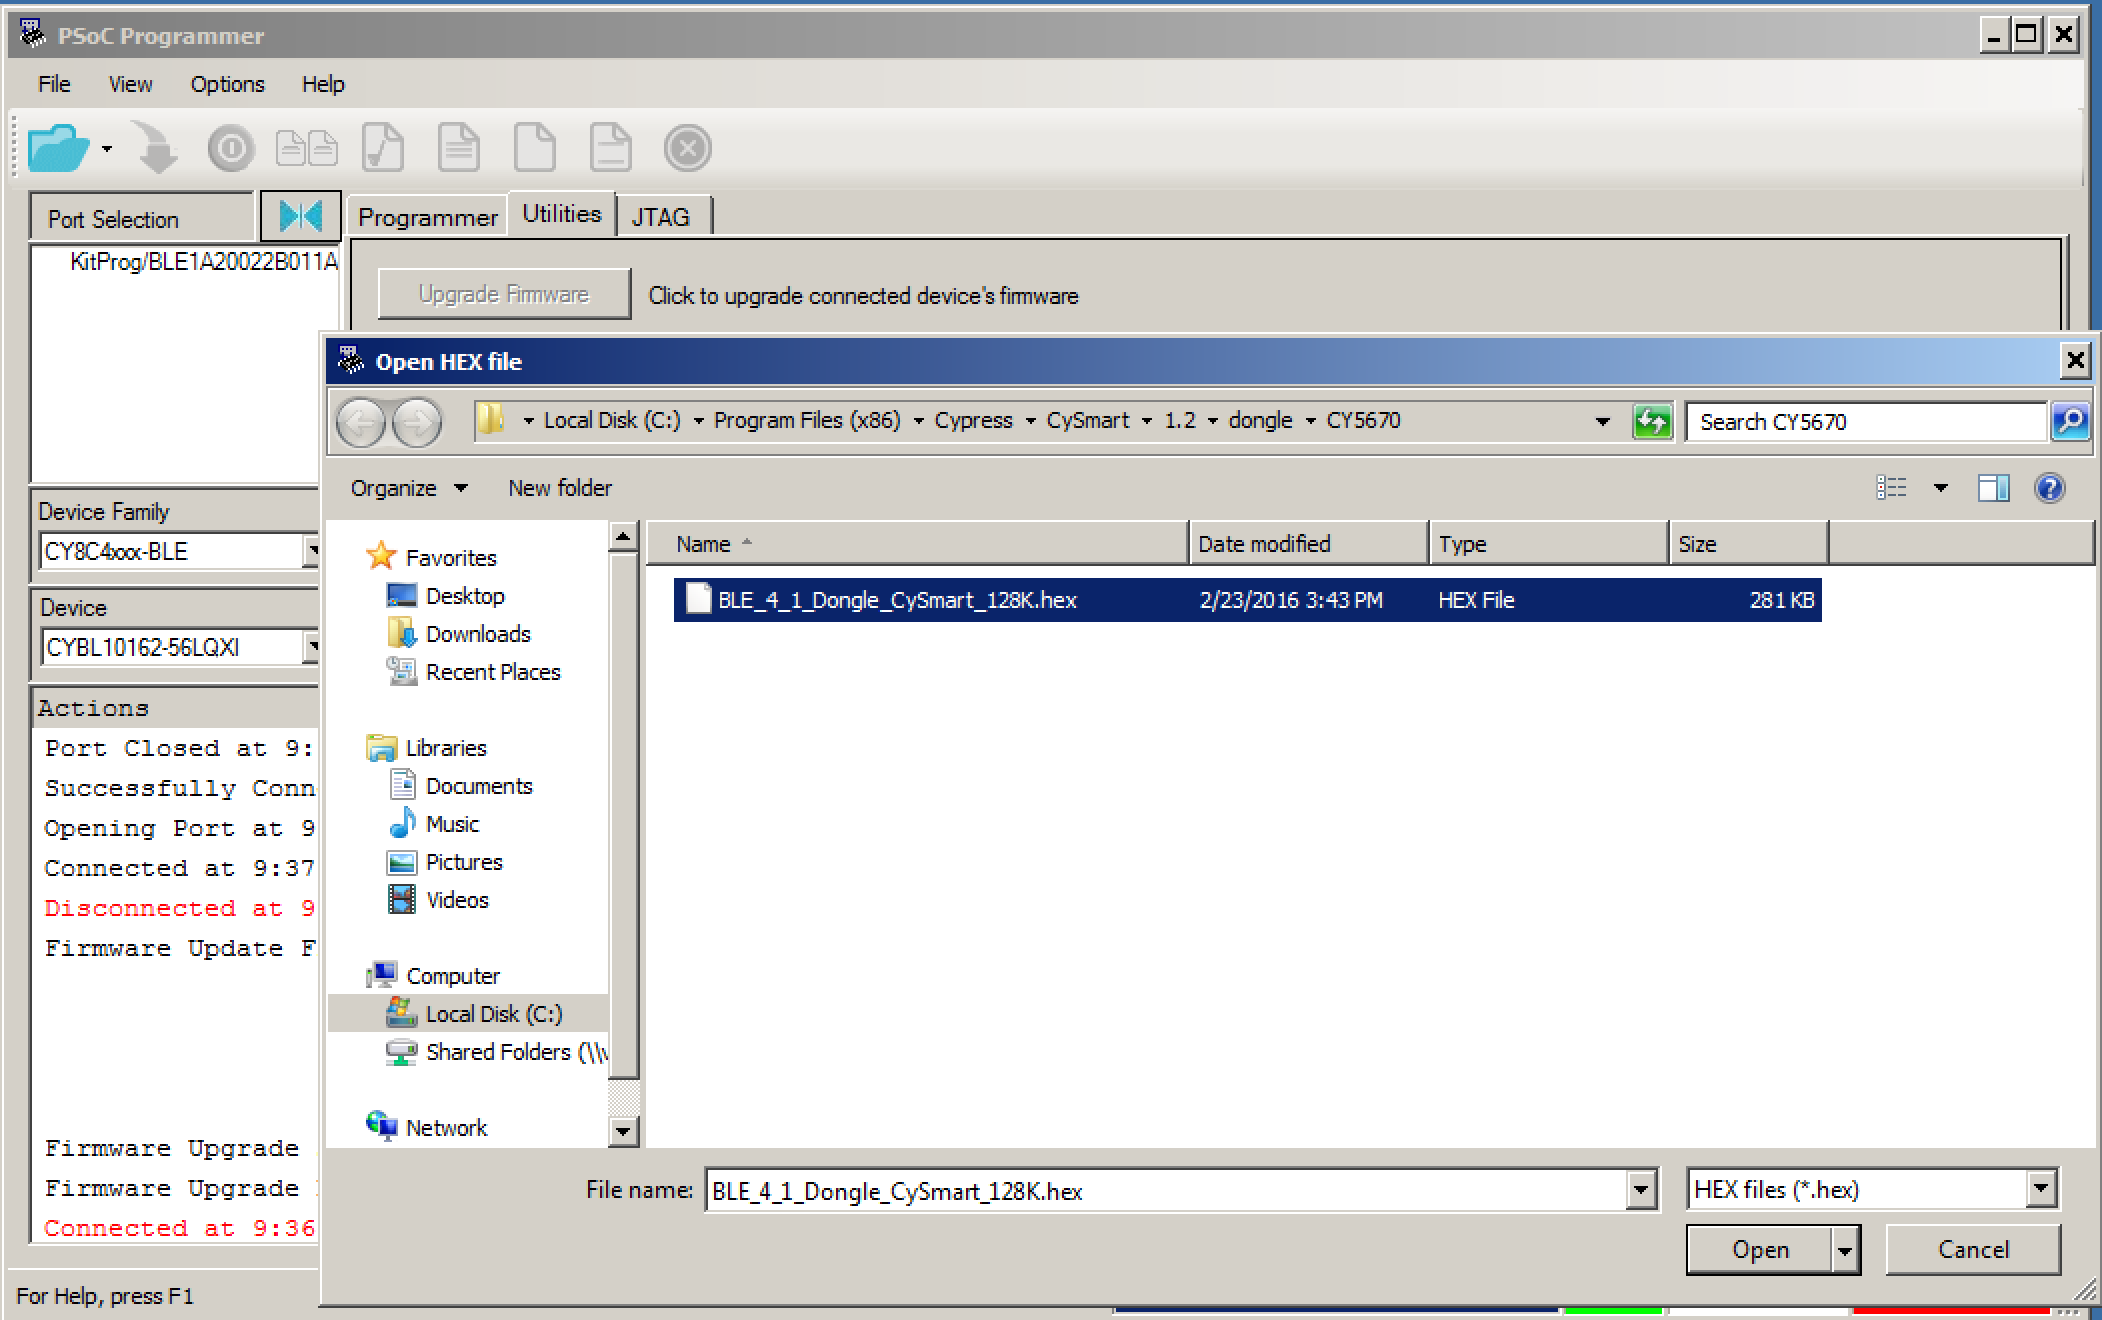
Once the KitProg firmware is up to date, you can then program the CySmart firmware.  Press the “folder” button, then navigate to the firmware which lives in Program Files(x86) –> CySmart –> 1.2 –> dongle –> CY5670.  Then press the “down arrow” which means “download the firmware”.  Once that is done, you are good to go with running CySmart (quit PSoC programmer so that it can talk to the dongle).

Use the PC CySmart to Debug a PSoC4 BLE Peripheral

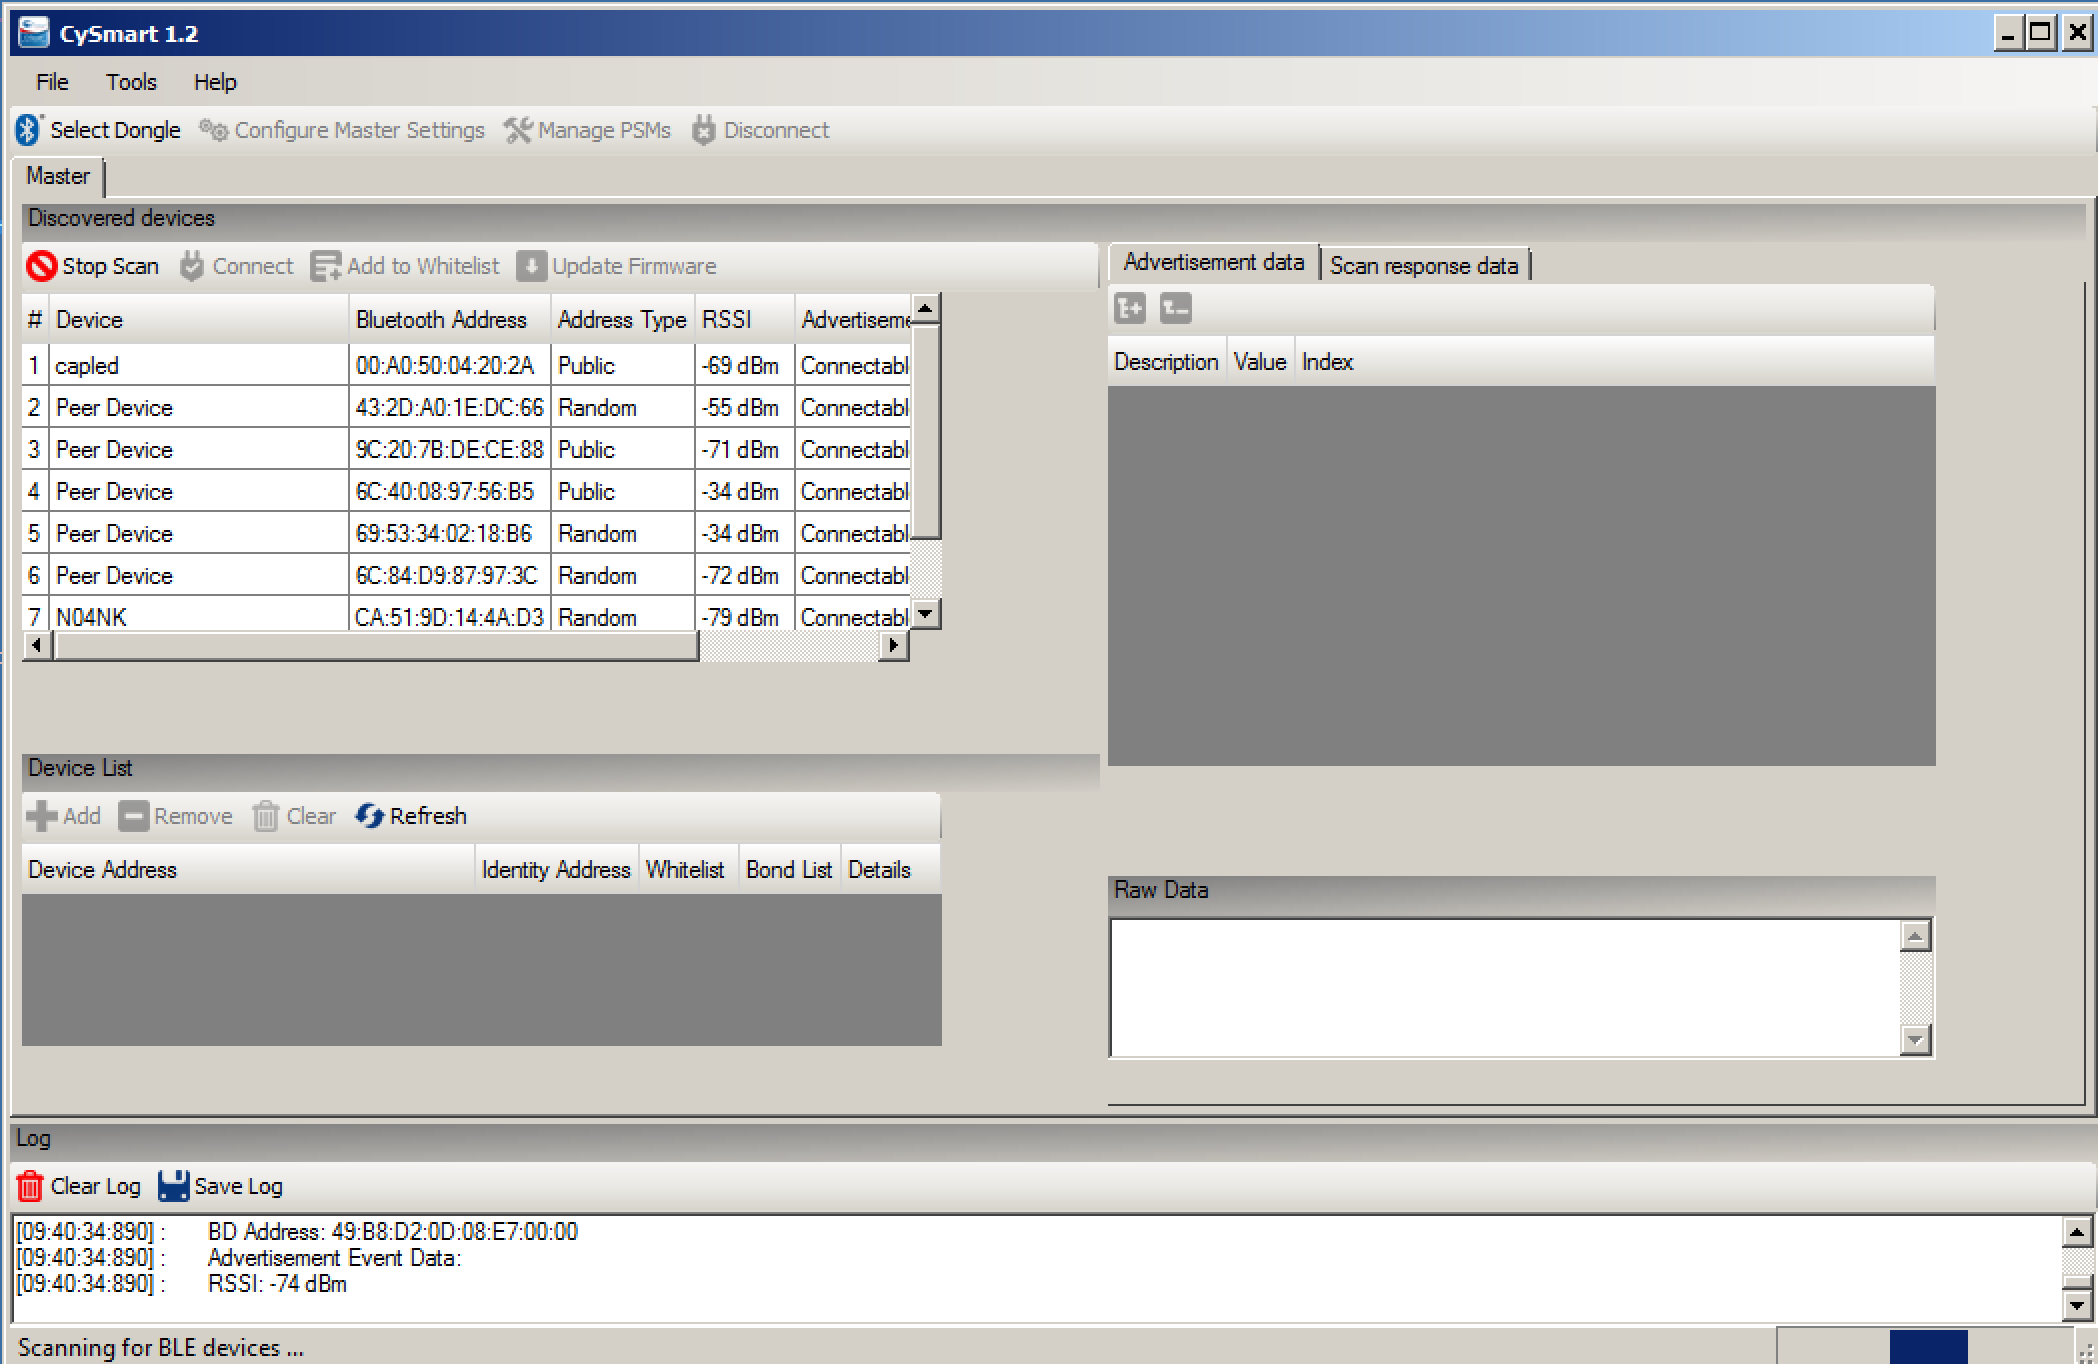
Now that I have a functional CySmart dongle, I can run CySmart.  This is a Windows PC Version of a GATT browser (like the CySmart iOS/Android App or the LightBlue app that I used in the previous article).  In CySmart press “Start Scan”.  In the picture below you can see all of the BLE peripherals that CySmart can see, including the “capled” project.
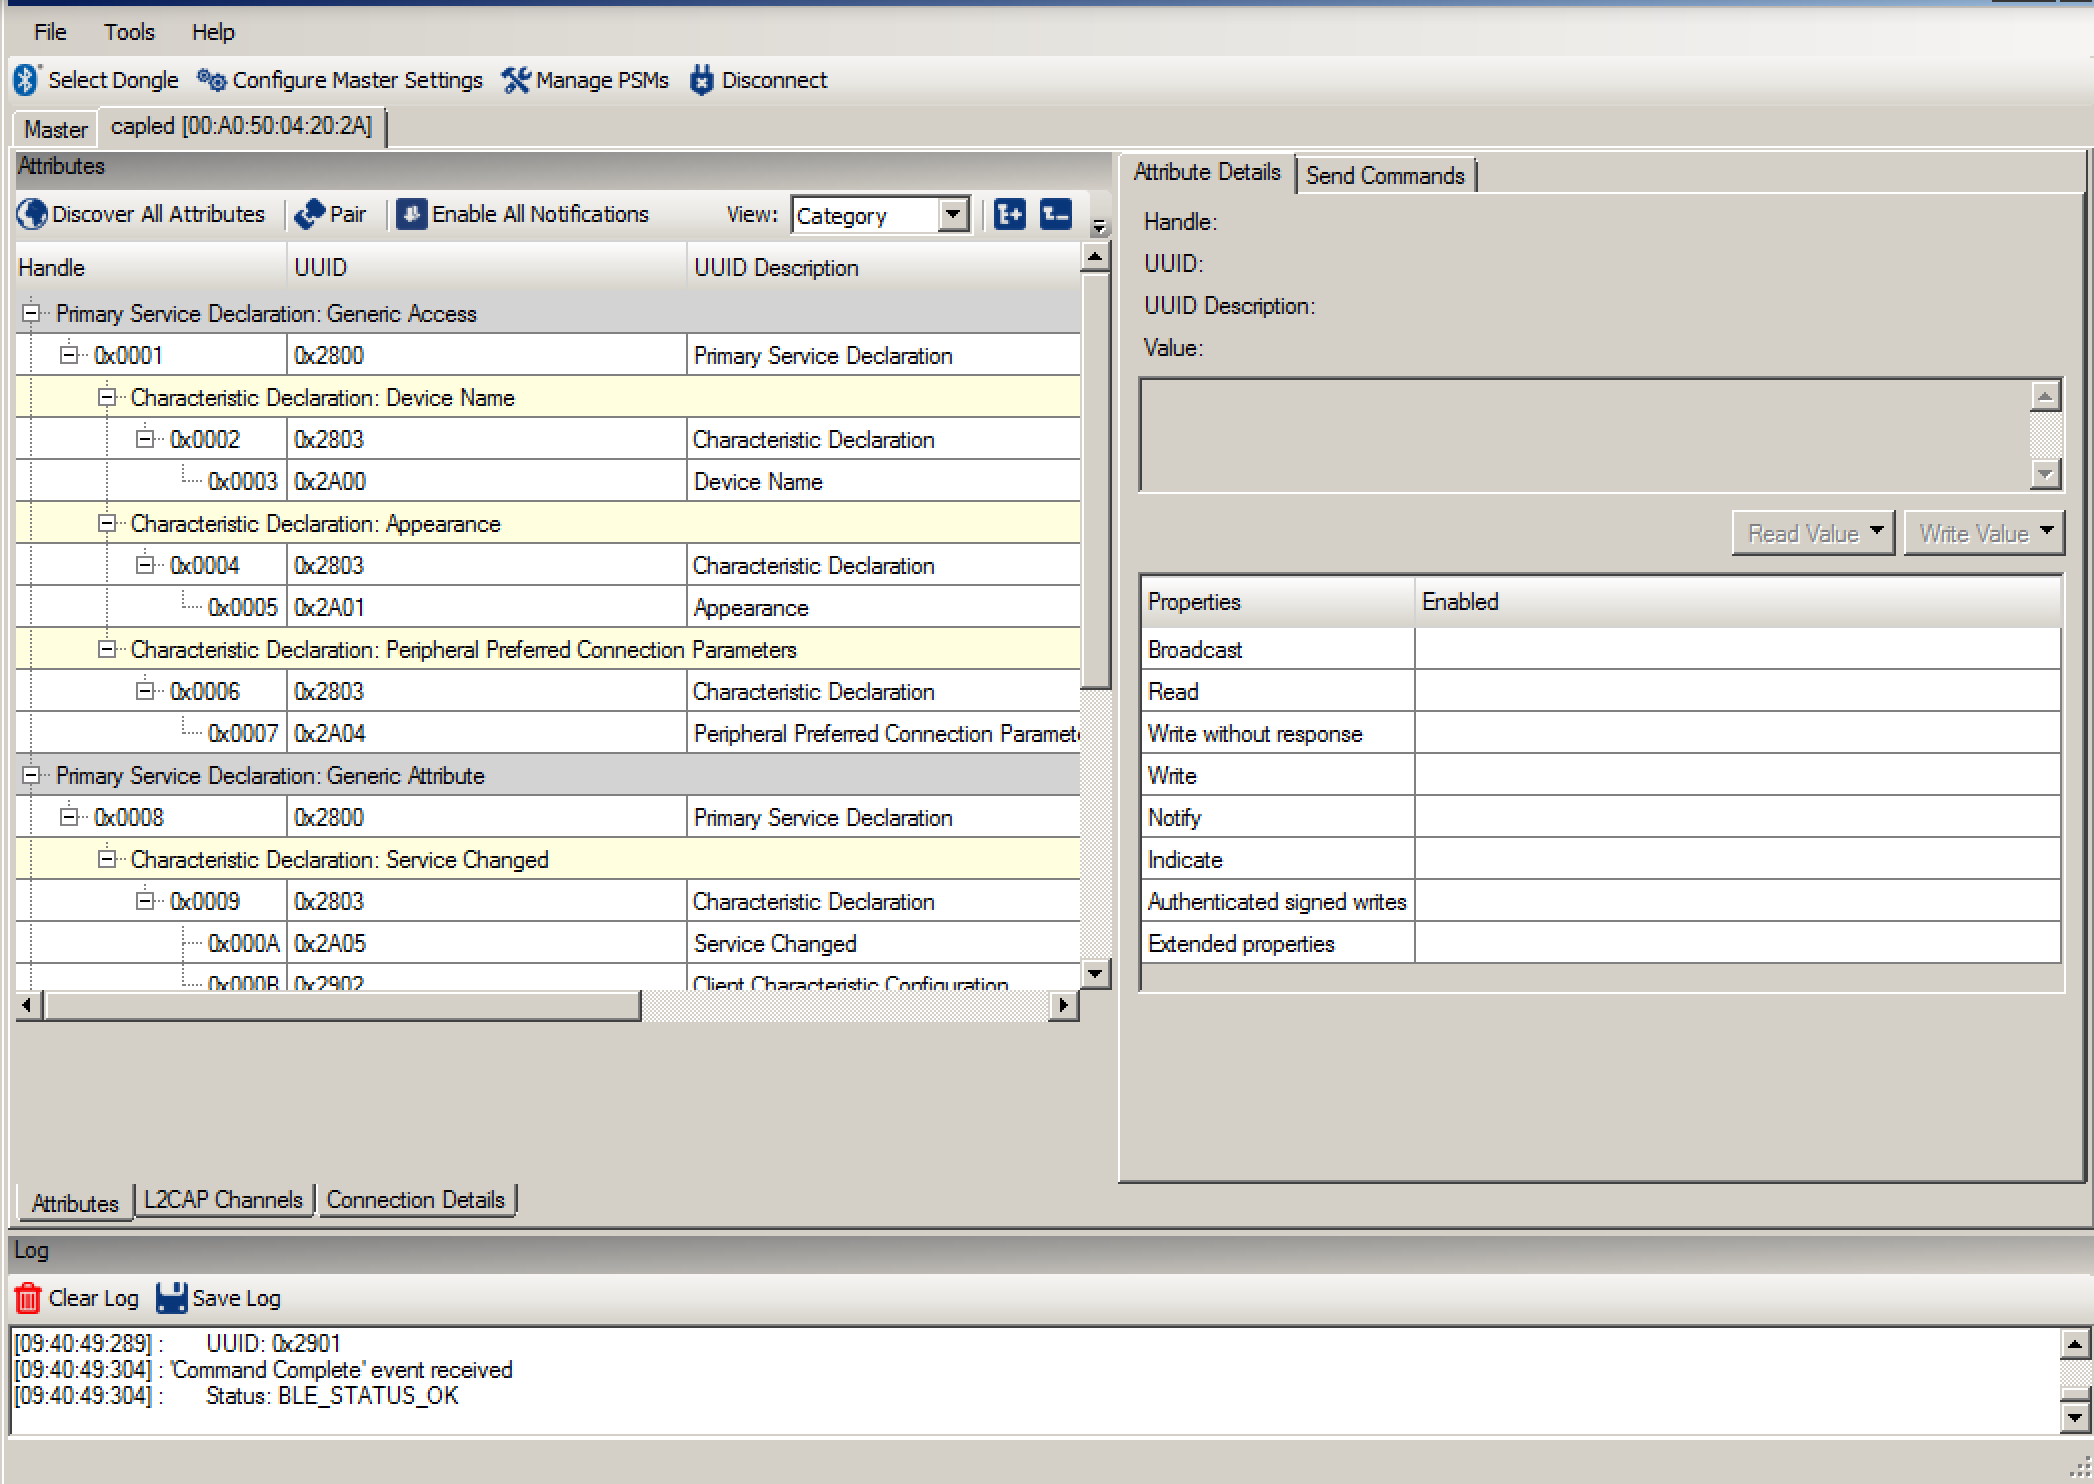
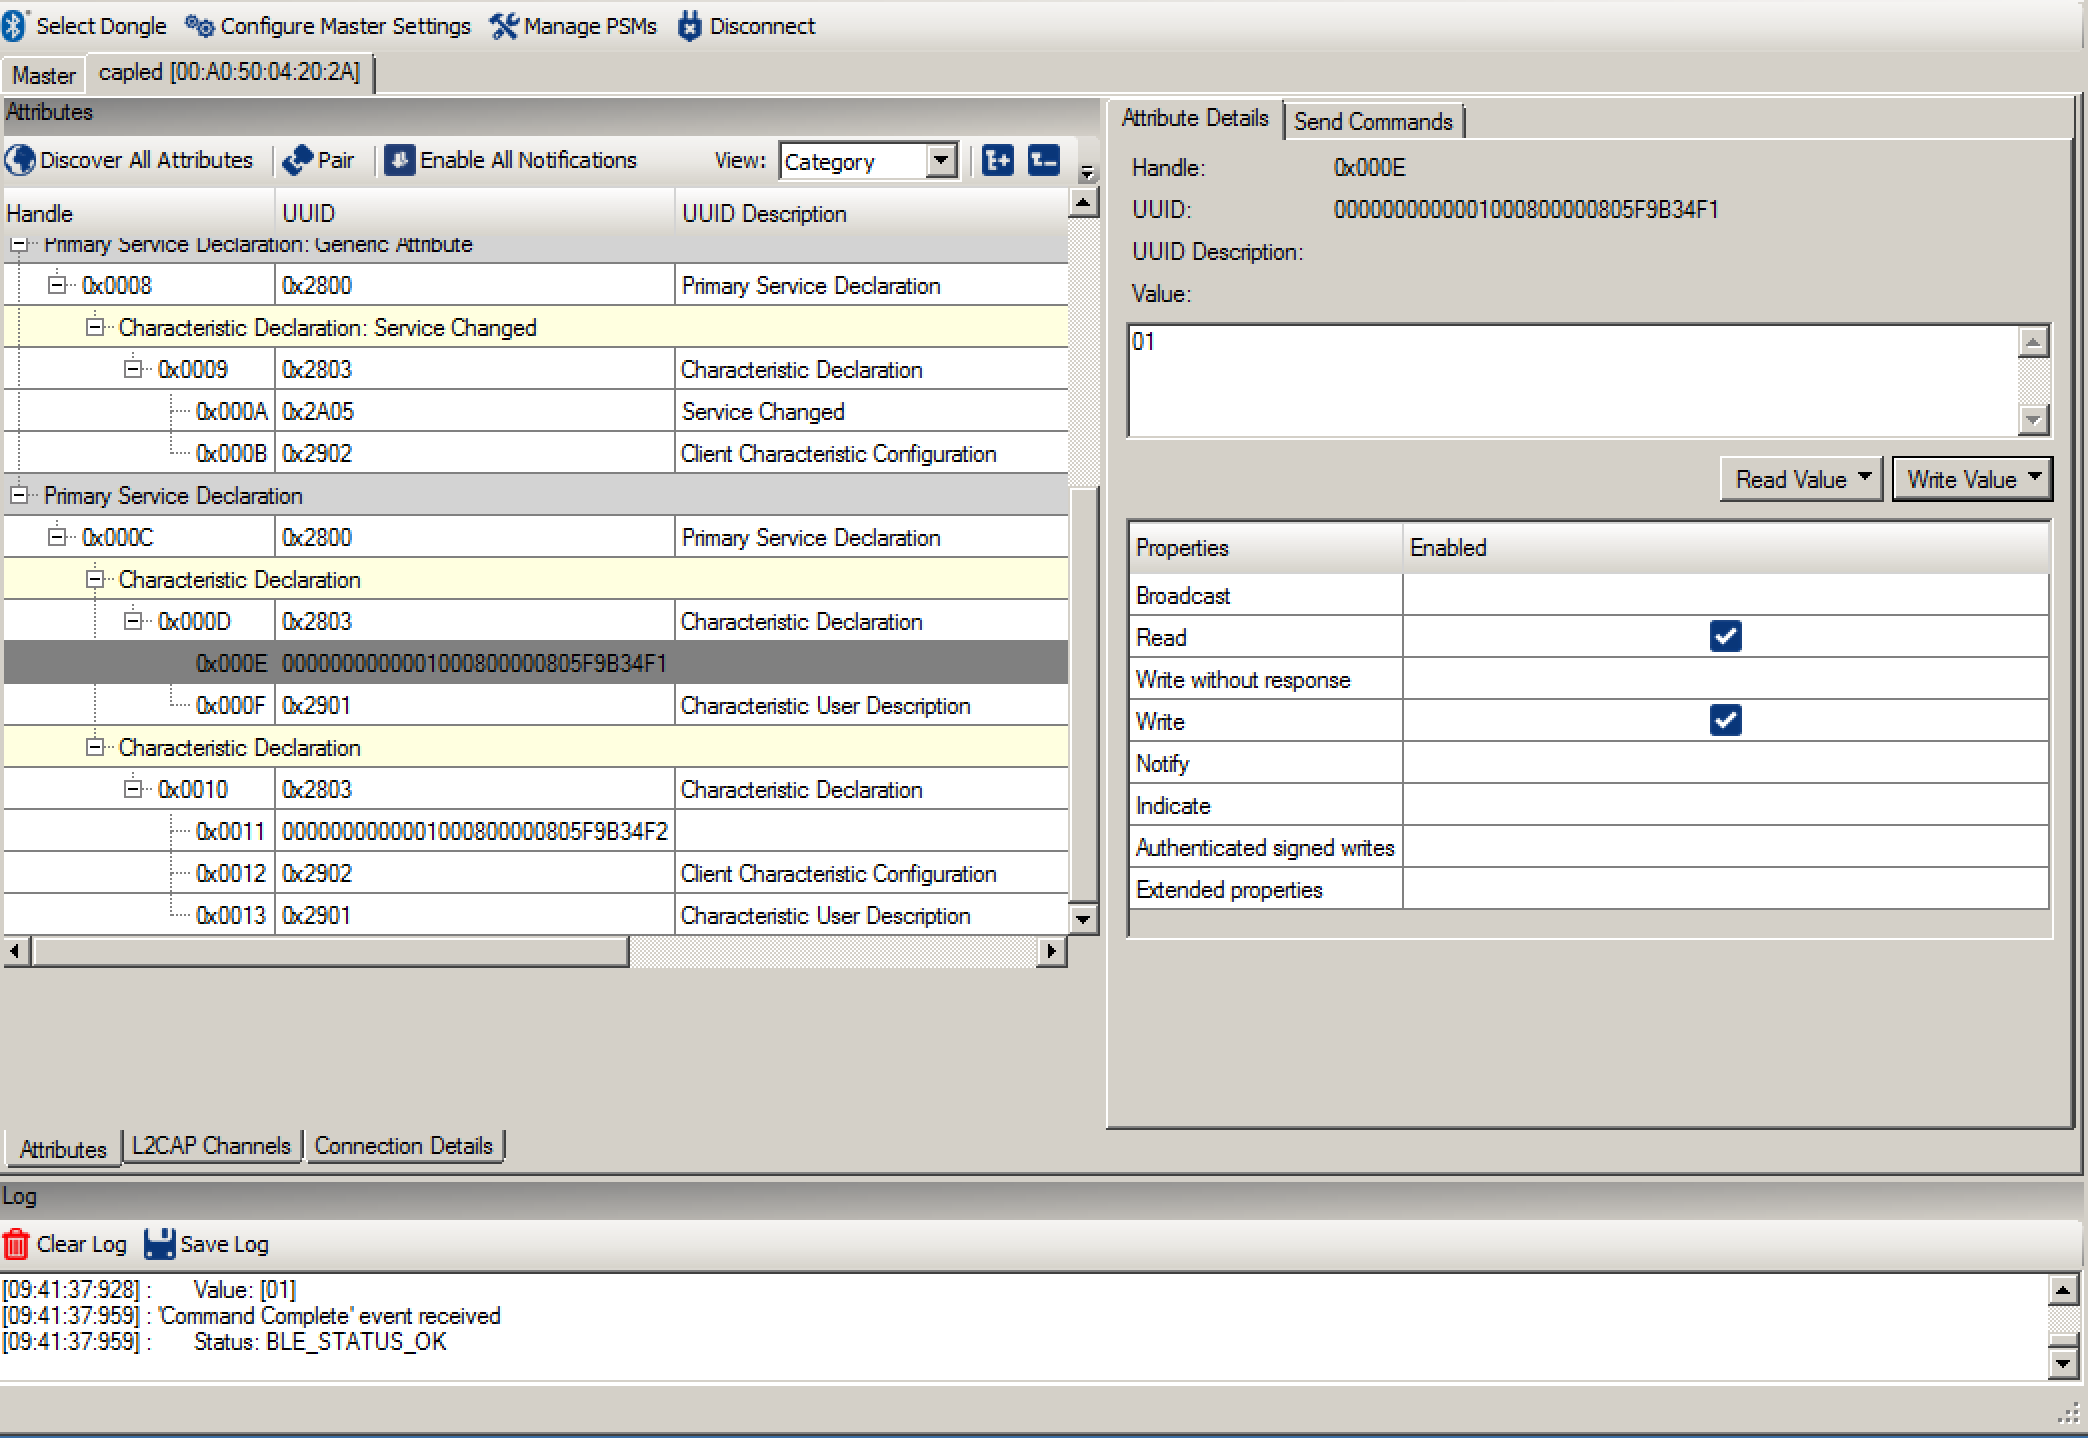
Once I click on “capled” and then “connect” and finally “discover all attributes” I will get a window that looks like this.  You can see all of the GATT Database.

After that I can Read and Write attributes (like the LED Attribute) by typing the value I want to write into the box on the upper right, and pressing “Write Value”.  For example you can turn on the LED by writing a “1” into the LED characteristic.
Modify the PSoC4 BLE Central Project to work on the CySmart Dongle

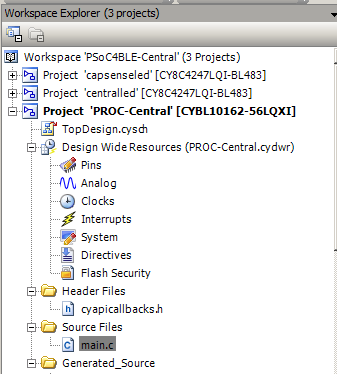
Next, lets modify the original project so that it can work on the dongle.  I will start this whole process by doing a copy/paste of the “centralled” project.  Then renaming it to “PROC-Central”

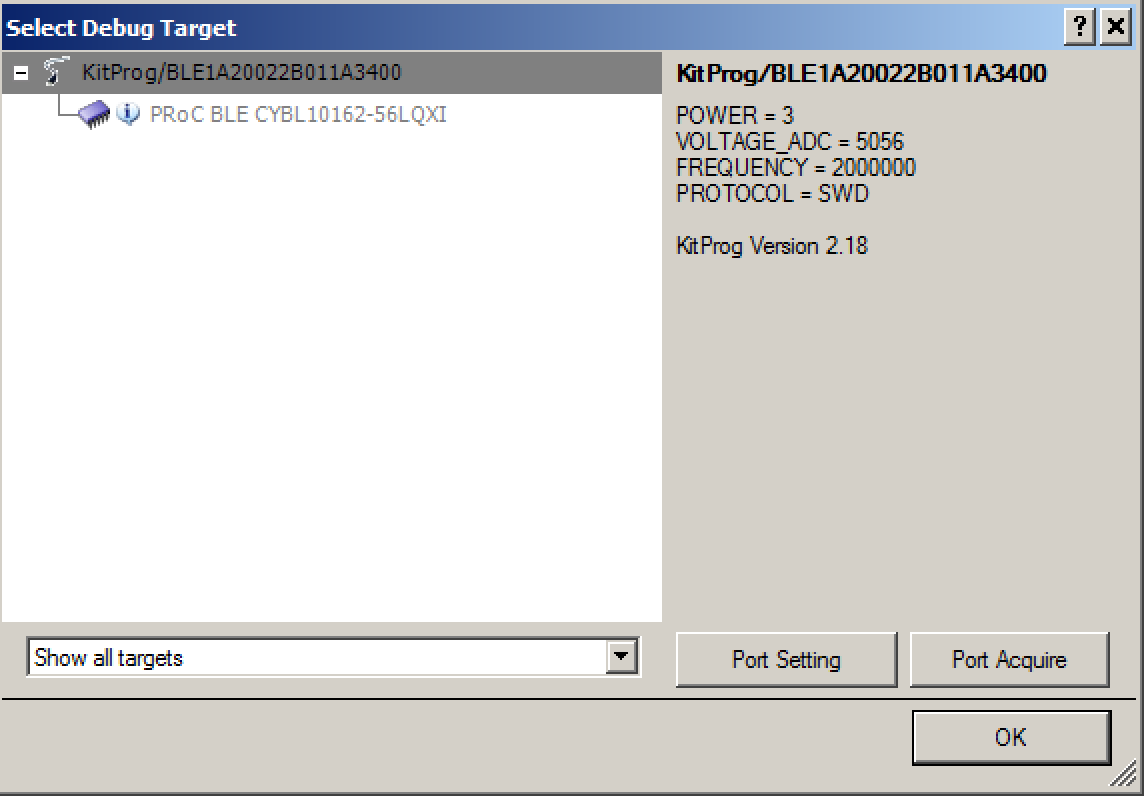
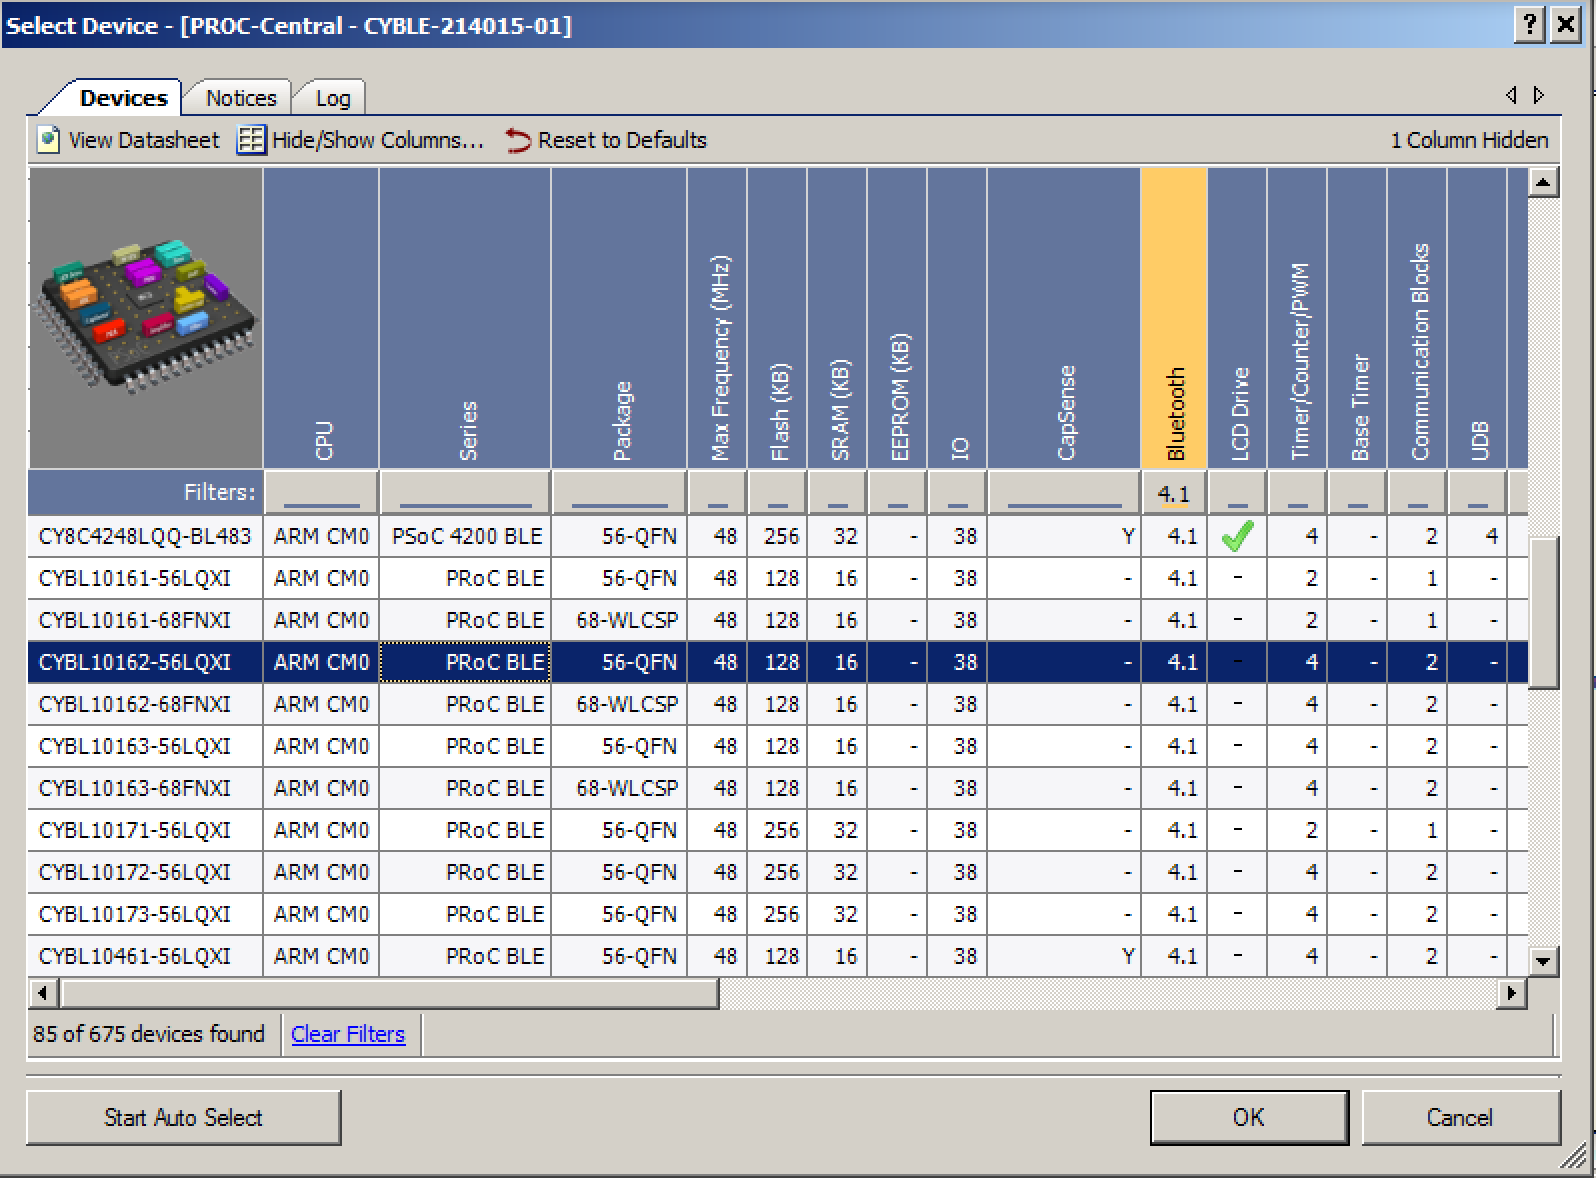
The dongle has a PRoC instead of a PSoC4 BLE.  This means you need to run the device selector and change the target device.  I can never remember which version of PROC is on the dongle.  So, to figure it out I click the program button, which brings up this screen that says my project isn’t compatible with the target.  It also tells me that this dongle has “CYBL10162-56LQXI”

Now go to “Project –> Device Selector” and change to the “CYBLE10162-56LQXI”

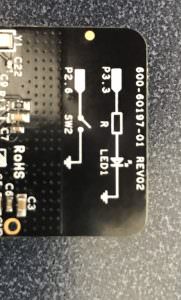
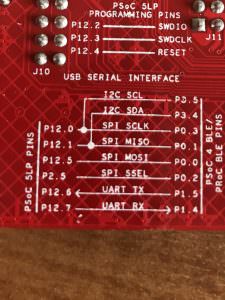
The pin assignments are a little bit different.  On the back of the board you can see that we put a handy-dandy picture showing the arrangement for the LED and the button.

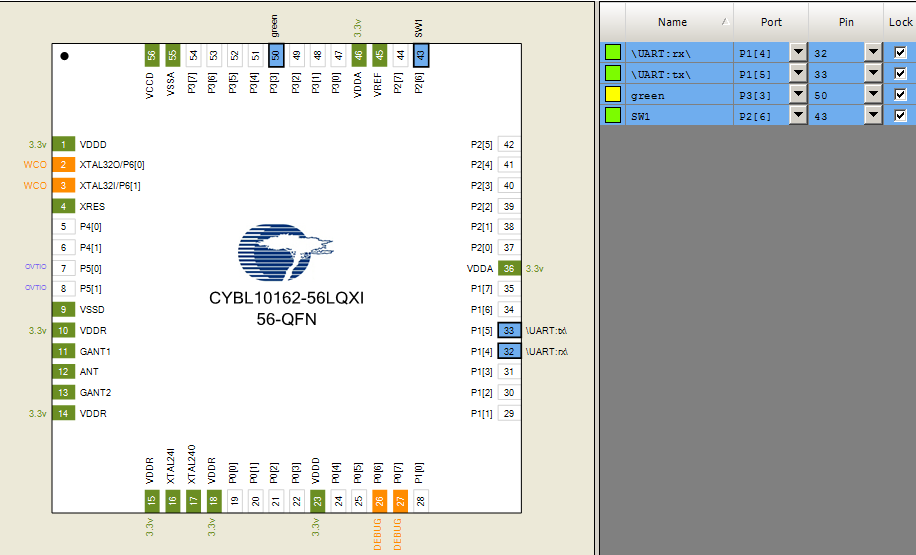
But unfortunately we didn’t show you the pins for the UART on the silkscreen.  But you can find those in the schematic (which can be downloaded from the website)

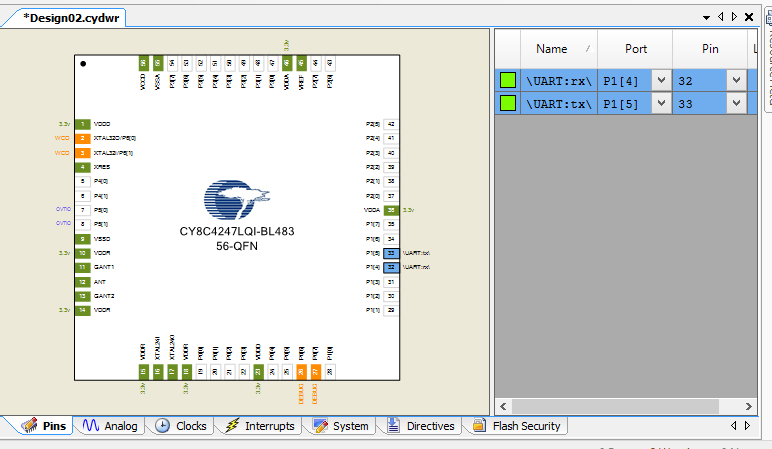
Now you can assign the correct pins (noticed that I deleted the red/blue LED pins because they don’t exist on the dongle)

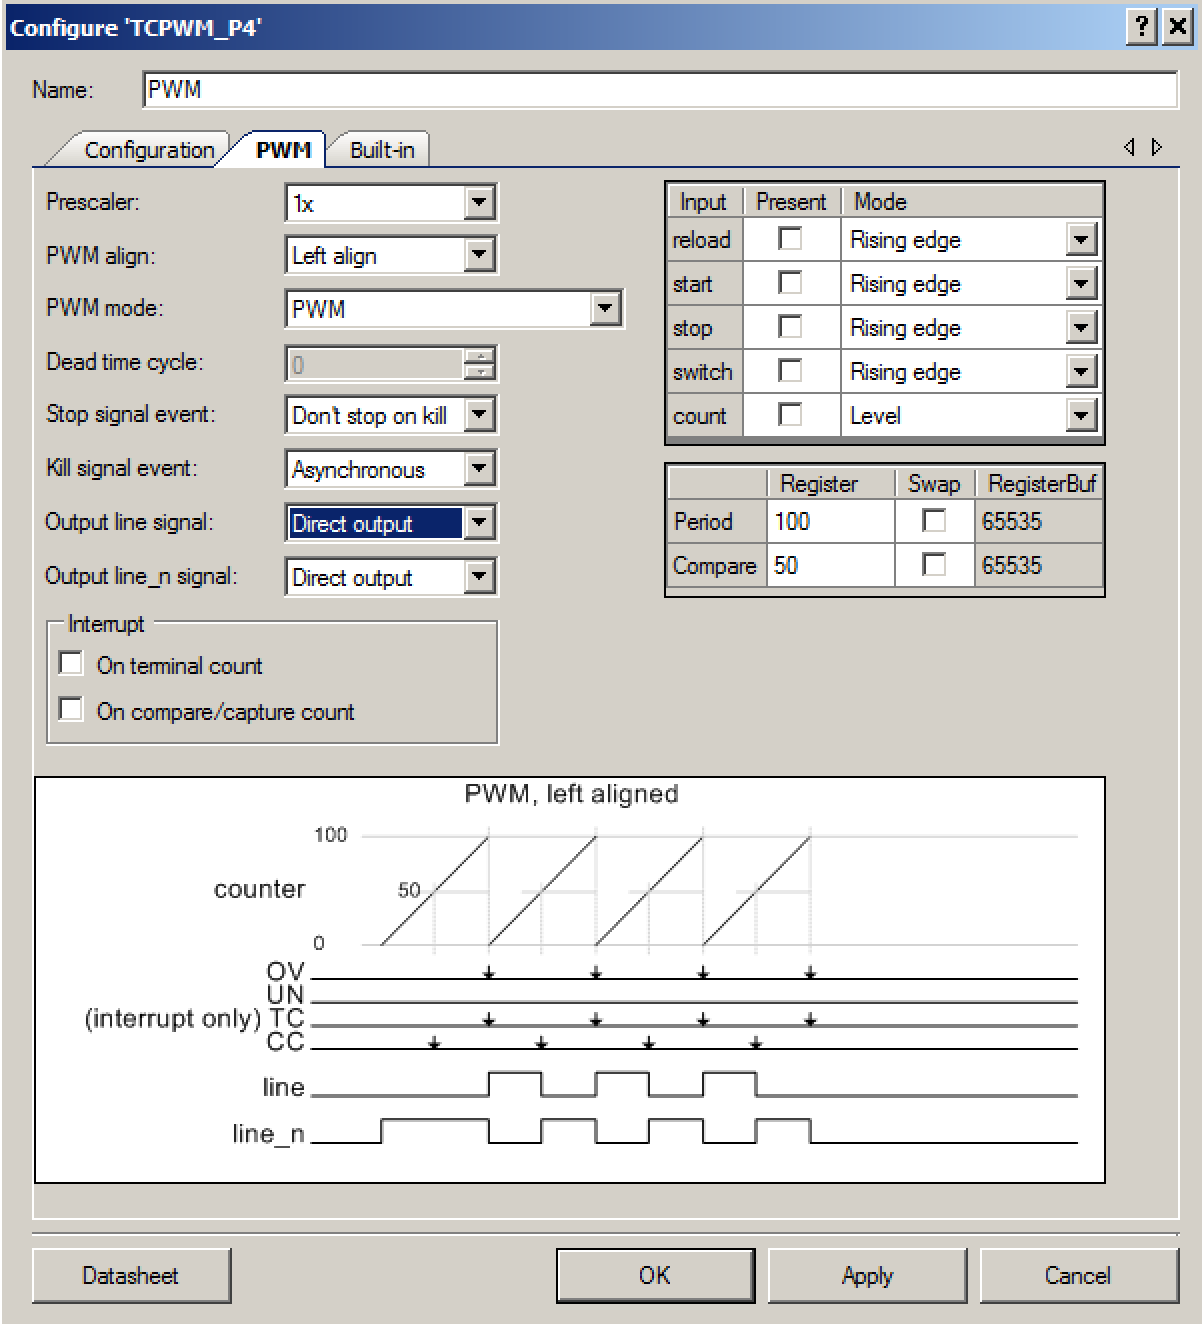
Finally you need to change the PWM to be active high instead of active low.

Now program and test it.  The user switch is the tiny little button under my thumb.

CySmart Dongle Testing BLE Central

As with the previous article you can find all of this source code on the IoT Expert Github site or git@github.com:iotexpert/PSoC4BLE-Central.git.  In the next article I will start the process of building a GATT Browser inside of a PSoC4 BLE.

Implementing PSoC Printf

Summary

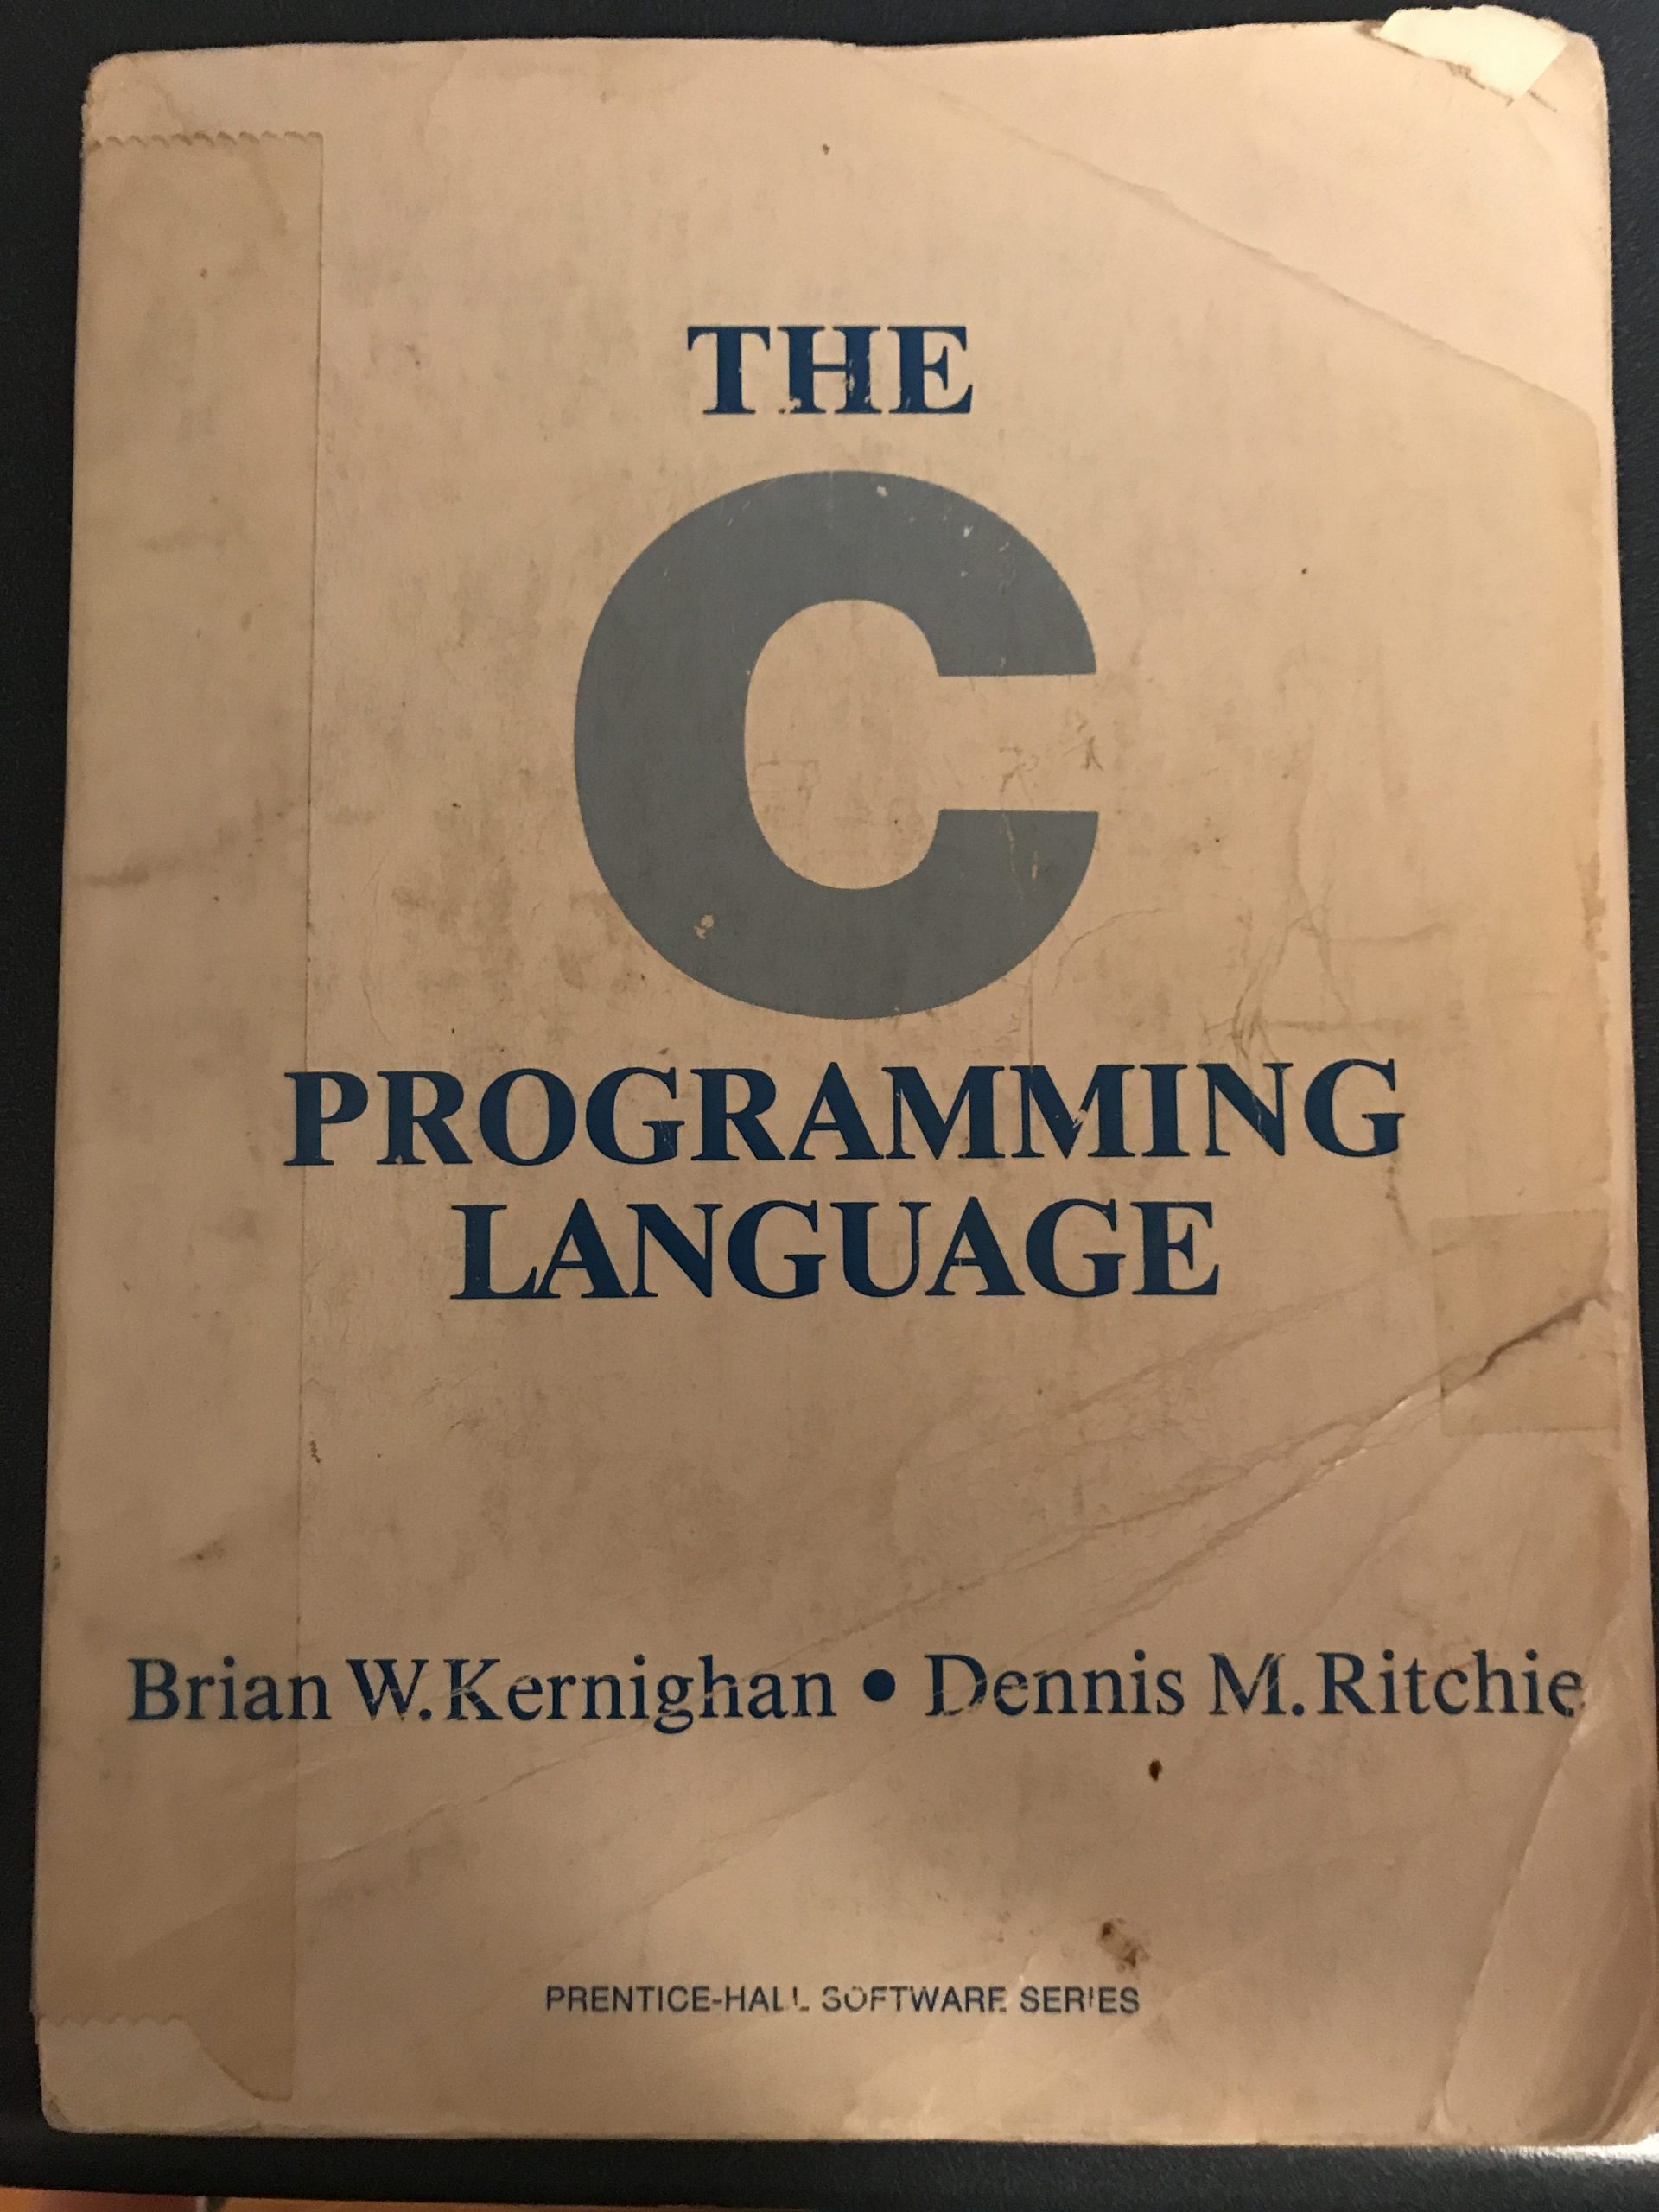
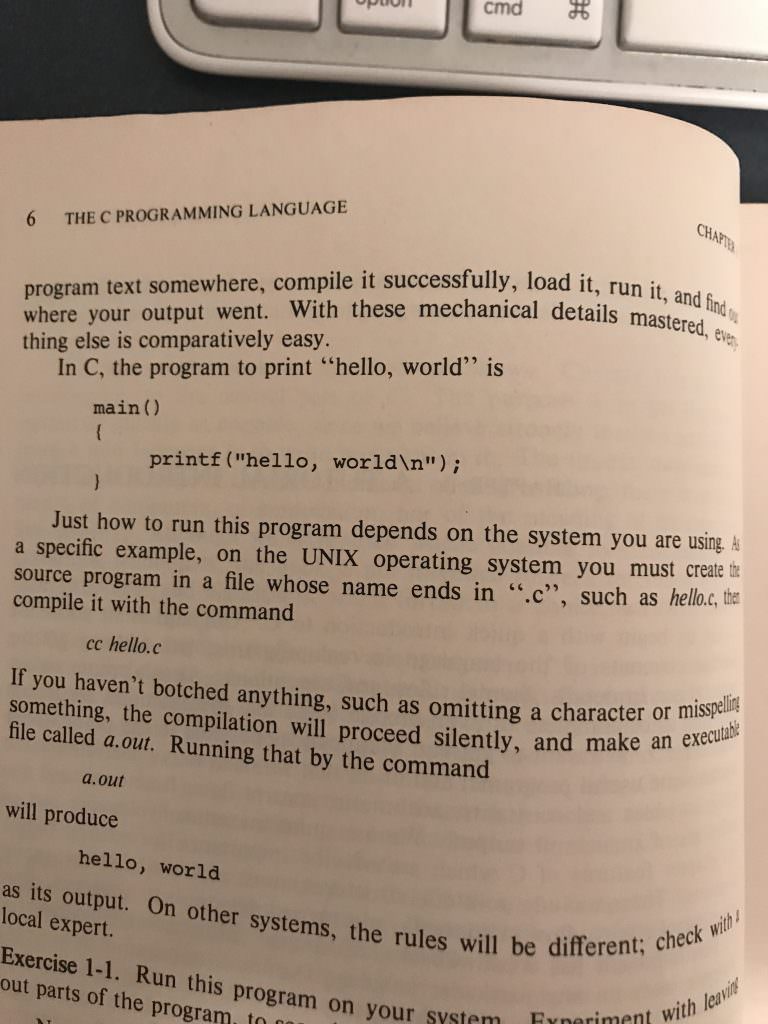
In 1978, Brian Kernighan and Dennis Ritchie published their iconic book “The C Programming Language”.  For years this book was the de-facto standard for “C”, often referred to as “K&R”.  On page 6 they created the archetypical “first program” for programmers, Hello World.  This simple example has propagated into almost every programming language book since then.  Here is a picture of my copy of K&R which I bought while I was in high school and have been carrying around for more than 30 years (obviously).

The C Programming Language The Original Hello World

I teach people all over the world to program PSoC.  The first program I show people is always the Blinking LED.  The purpose of the Blinking LED is the same as Hello World, to show that you can make the whole development environment work correctly and make something happen.  Invariably, anyone who has ever programmed C always asks me “How do I printf?” and I always have to answer “Well…ummm… you can… but sort of can’t.. ummm you need to use UART_UartPutString or something … umm blah blah”.  It isn’t really very satisfying as an answer.  So, back to K&R, here is hello world from page 6 above.

#include <stdio.h>
main()
{
printf("hello, world\n");
}

If you try to run this program on a PSoC, it will compile, build and program.  But, it won’t actually do anything.  There are a number of reasons why PSoC printf doesn’t work correctly, and this article will show you how to overcome those problems.

To make PSoC printf work you need to do three things

  1. Create an output device with a UART, SPI or something
  2. Provide the code that PSoC printf needs to output to that device (compiler specific)
  3. Give enough memory to PSoC printf so that it doesn’t hang

Output Device

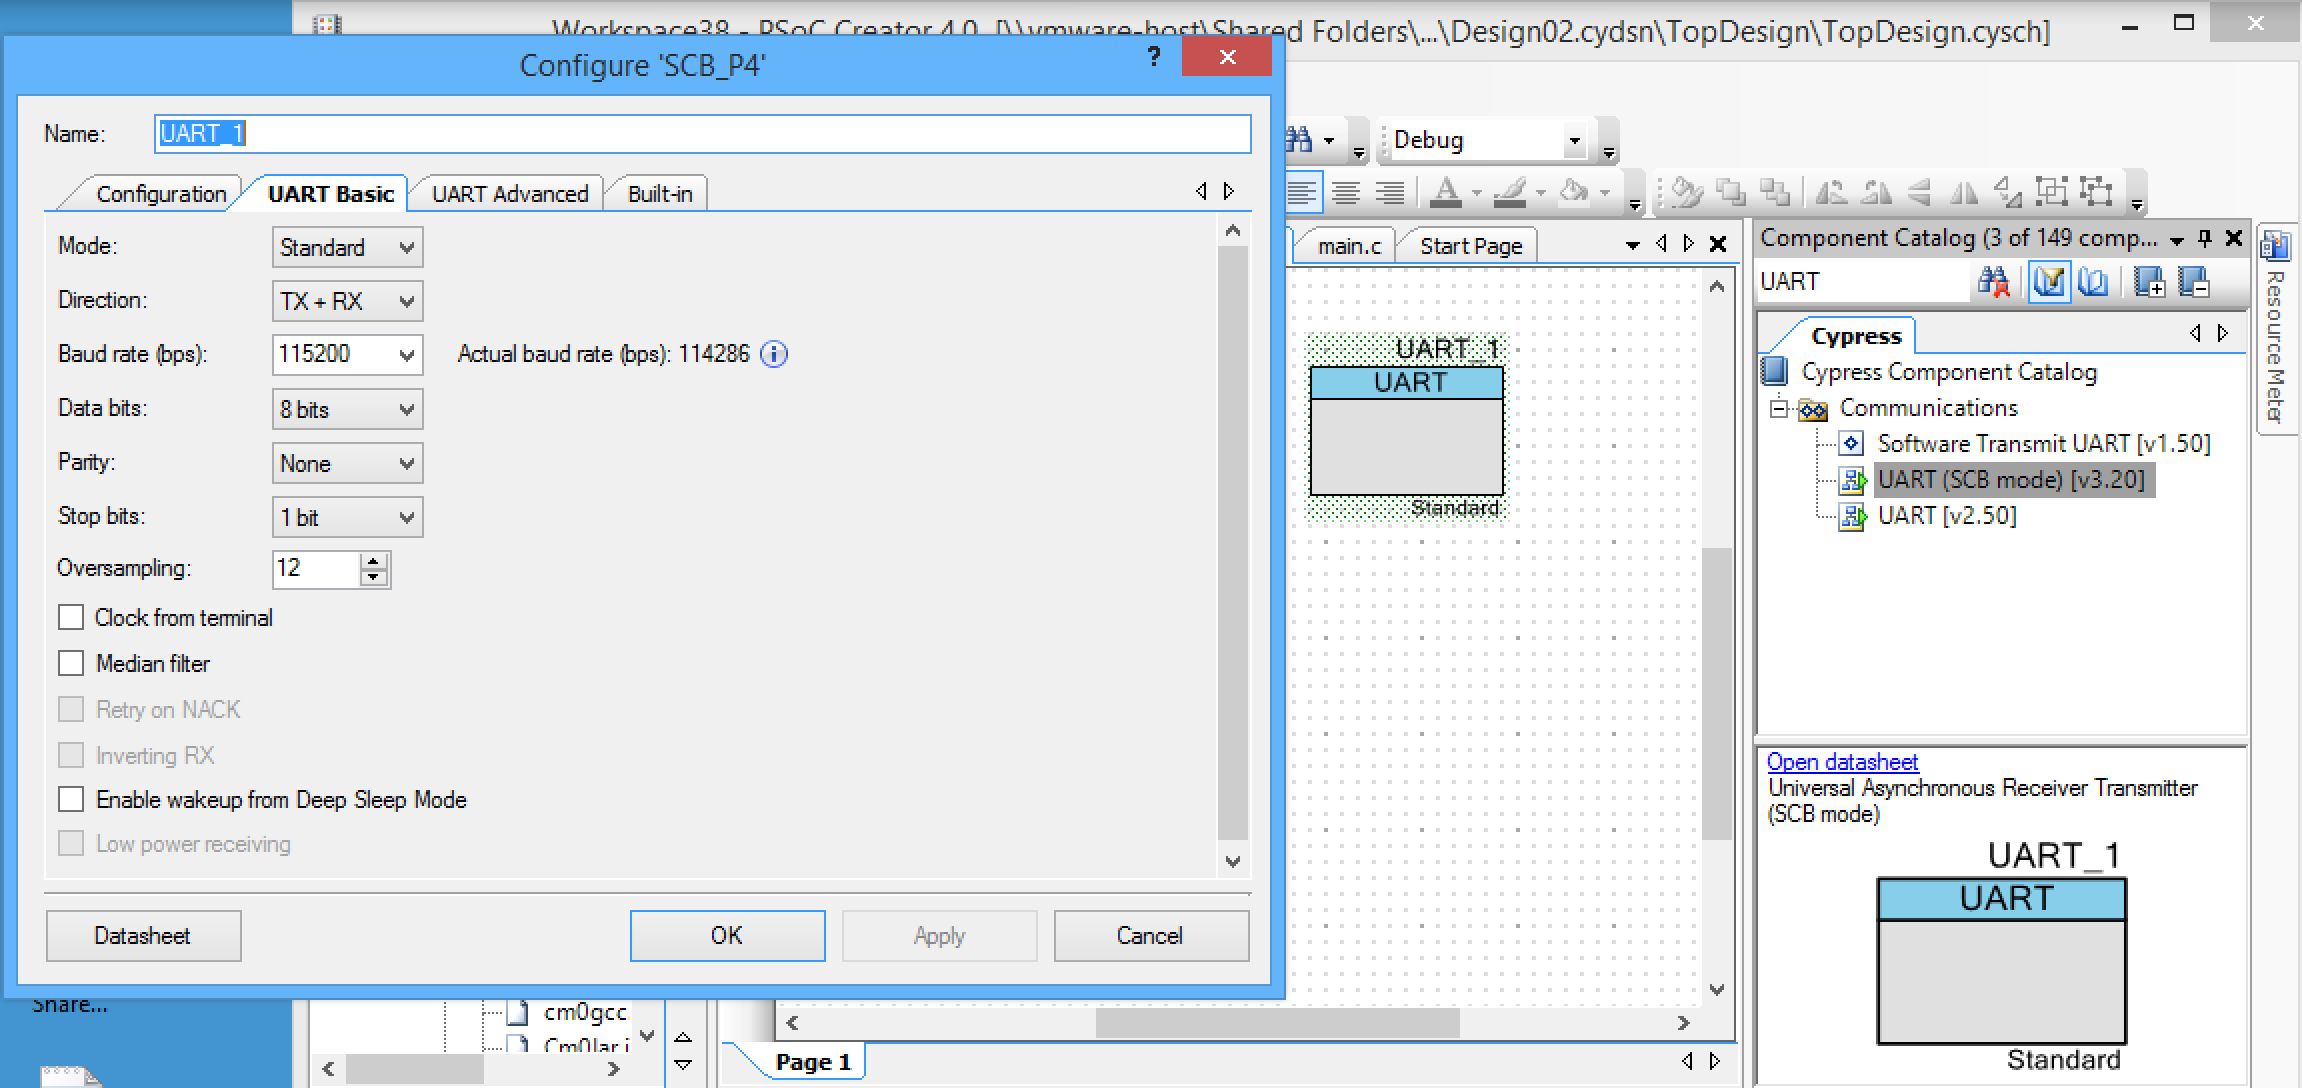
The most common output device in embedded programming is a Virtual Com Serial port on your computer.  Almost all of the Cypress PSoC development kits have a “Kitprog” which serves as a USB <– –> UART bridge and will enumerate on your PC as a virtual com port.  To make printf work place a UART and then attach it to the correct pins.  In the picture below you can see that I chose an “SCB” a.k.a Serial Communication Block (of which most of the PSoC 4’s have at least two).   Then I configured it to 115200 baud, 8/n/1 (this is the default configuration).

PSoC PRINTF UART Configuration

You can also use the “UART” or the “Software Transmit UART” or for that matter the SPI or I2C master… but those implementations will all be slightly different in that the API to output a character is a little bit different in all of them.

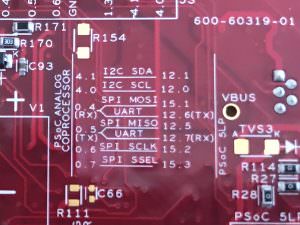
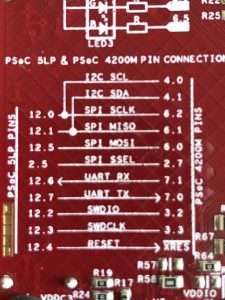
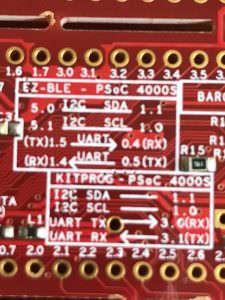
Next you need to attach the UART RX/TX to the correct pins on the development kit.  All of our development kits have slightly different pin configurations.  You can find the pins either on the back of the boards (see pictures) or in the user guide (available on our website).

CY8CKIT-048
CY8CKIT-046
CY8CKIT-145
CY8CKIT-042
CY8KIT-042-BLE

For this example I will choose the CY8CKIT-042BLE.  From the picture above you can see that I need to assign RX/TX to P1.4 & P1.5

PSoC4 Pin Map

PSoC printf Code

In order for printf, to actually printf, the function needs to be able to output a character to the “screen”.  Each of the three different compilers that Cypress supports (IAR, MDK and GCC) have slightly different implementations of printf.  But you can just copy this code:

  1. Into your main.c
  2. or into some other .c which is part of your project (I frequently create a file called util.c)

Notice that you will need to change lines 27, 61 and 77 to have the name of your UART component (so that it can output the character)

#if defined(__ARMCC_VERSION)
/* For MDK/RVDS compiler revise fputc function for printf functionality */
struct __FILE 
{
int handle;  
};
enum 
{
STDIN_HANDLE,
STDOUT_HANDLE,
STDERR_HANDLE
};
FILE __stdin = {STDIN_HANDLE};
FILE __stdout = {STDOUT_HANDLE};
FILE __stderr = {STDERR_HANDLE};
int fputc(int ch, FILE *file) 
{
int ret = EOF;
switch( file->handle )
{
case STDOUT_HANDLE:
UART_UartPutChar(ch);
ret = ch ;
break ;
case STDERR_HANDLE:
ret = ch ;
break ;
default:
file = file;
break ;
}
return ret ;
}
#elif defined (__ICCARM__)      /* IAR */
/* For IAR compiler revise __write() function for printf functionality */
size_t __write(int handle, const unsigned char * buffer, size_t size)
{
size_t nChars = 0;
if (buffer == 0)
{
/*
* This means that we should flush internal buffers.  Since we
* don't we just return.  (Remember, "handle" == -1 means that all
* handles should be flushed.)
*/
return (0);
}
for (/* Empty */; size != 0; --size)
{
UART_UartPutChar(*buffer++);
++nChars;
}
return (nChars);
}
#else  /* (__GNUC__)  GCC */
/* For GCC compiler revise _write() function for printf functionality */
int _write(int file, char *ptr, int len)
{
int i;
file = file;
for (i = 0; i < len; i++)
{
UART_UartPutChar(*ptr++);
}
return len;
}
#endif  /* (__ARMCC_VERSION) */   

Fix the Heap

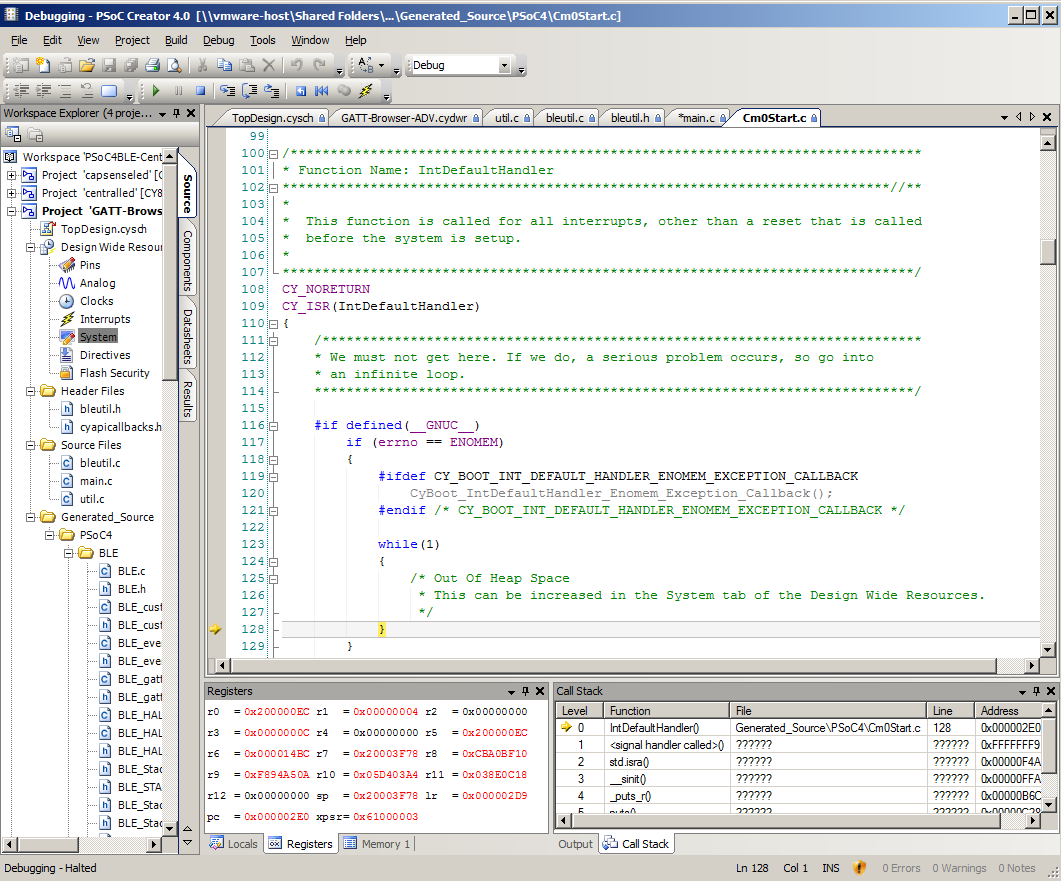
If you run this program without giving printf more memory it will hang… and it won’t be obvious why it hung.  The first time I had to figure it out, I used the debugger to attach to the running PSoC.  When you do this, you will see a screen like this which gives you the nice hint that you are out of heap space.

PSoC 4 Debugger

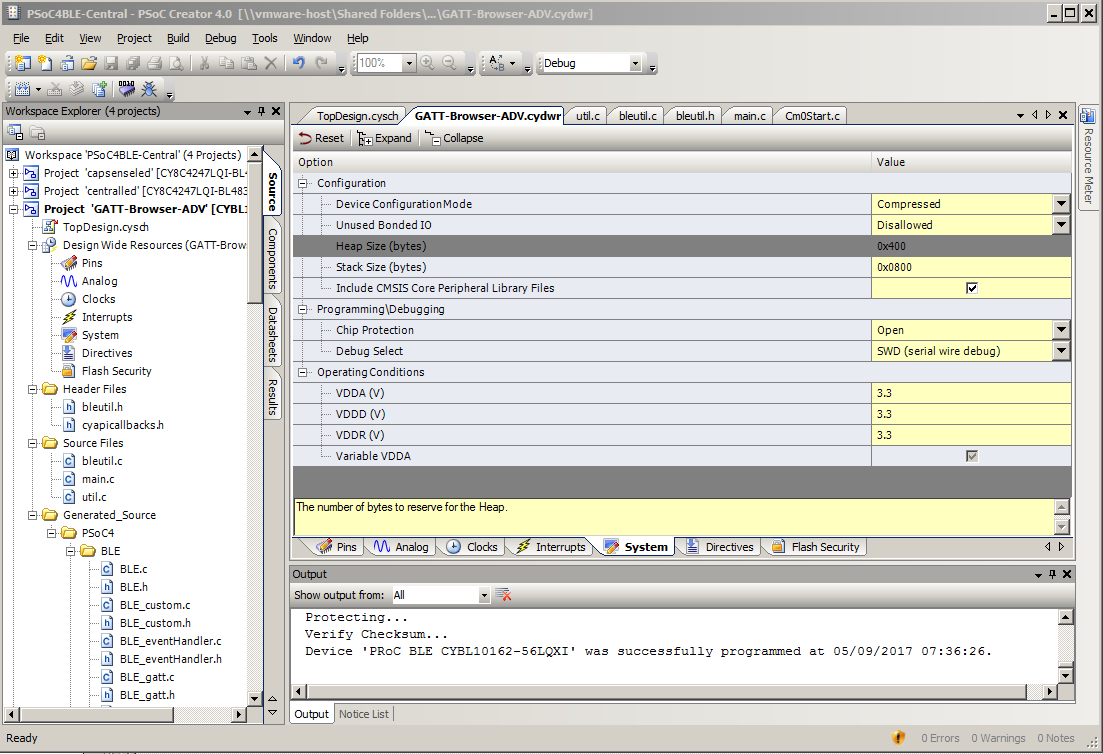
In order to fix the heap, go to the “System” tab of the Design Wide Resources and increase the heap size to at least 0x400.

PSoC Design Wide Resources Heap

Now it works

The final thing that you need to do is turn on the interrupts and start the UART.  Here is the code:

main()
{
CyGlobalIntEnable;
UART_Start();
printf("hello, world\n");
}

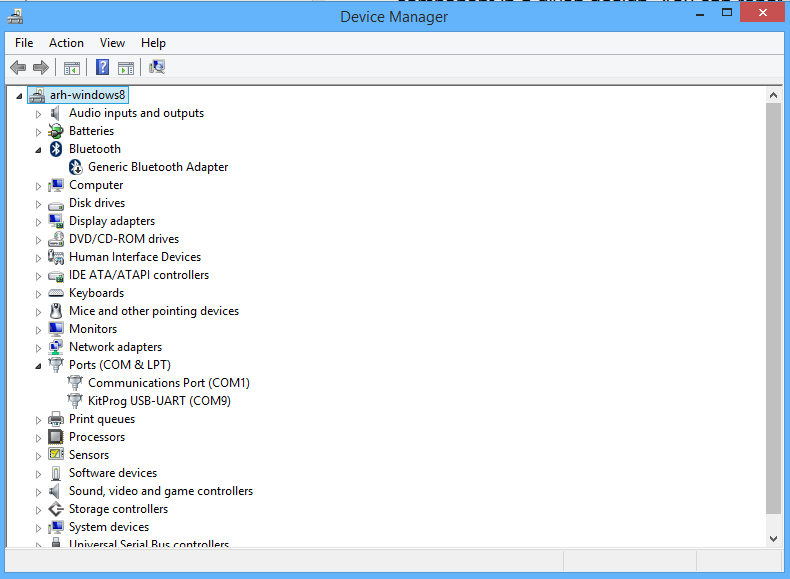
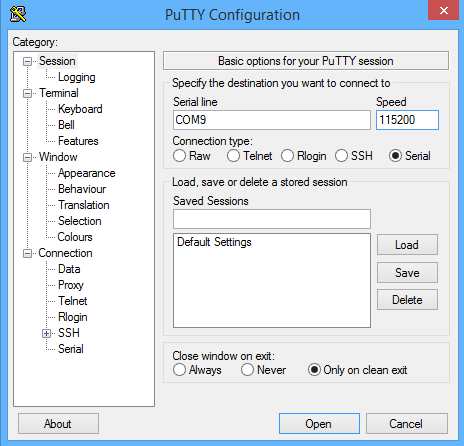
In order to see the output you need to run a serial program (I often use Putty) and attach to the correct “virtual com port” which you can find in the device manager (see the KitProg USB-UART (COM9).

Windows Device Manager

Putty Configuration

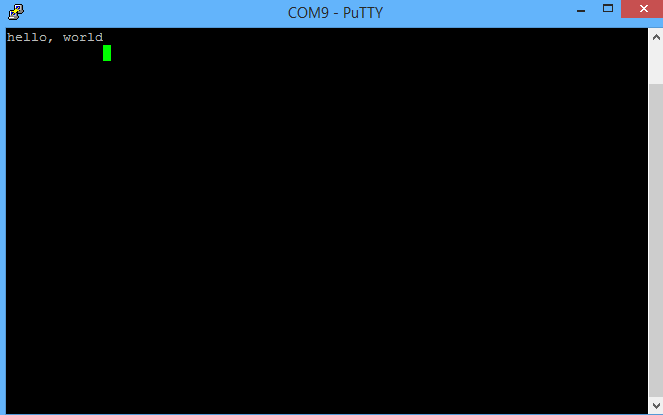
After programming you will see this.

Hello World

That is excellent now we have caught up to K&R circa 1978!

You can read more in part two.

PSoC4 BLE Central Custom Profile w/LED & CapSense

Summary

Last week I got a nice email from a Cypress customer in Italy (I think).  He asked about implementing a PSoC4 BLE Central.  I replied that it was pretty easy.  Over the weekend I thought about it a little bit more and realized that I had never implemented the Central a.k.a. the “other” side of a BLE connection in a PSoC.  I had always built the Central side in an iPhone application written in Swift or Android application written in Java.  So it seemed like a good thing to do to implement it in C.  It turned out to not be quite as easy I had hoped because of some problems in the Cypress documentation.  In the next several articles I am going to show you how to implement a PSoC4 BLE Central.

I am going to use the project from the video series called “capsenseled” as the GAP Peripheral and then I am going to show you how to write the GAP Central code.  You can learn about the GAP Peripherals in the video series called “PSoC® 4 BLE 101 Video Tutorial Series: How To Create Products Using PSoC 4 BLE“.  Here is the first video from YouTube.

In that series of videos I showed you how to build a custom GATT profile for Capsense and an LED.  The GAP Peripheral has an LED that you can control from the GAP Central, and it has a Capsense slider that you can read its value from the GAP Central.  You can “git” all of the source for this project from the IoTExpert Github website or git@github.com:iotexpert/PSoC4BLE-Central.git

In this article I will show you:

  • The GAP Peripheral and GATT Database
  • How to build the schematic for the GAP Central
  • How to configure the BLE component for the GAP Central functionality
  • The steps required in the firmware to read and write the GAP Peripheral

The GAP Peripheral and GATT Database

To start the process I will “git” the source code for this GAP Peripheral from the IOT Expert Github site.  Then, I open the project called “capsenseled” in PSoC Creator.  The schematic has:

  • The Capsense component which controls the slider
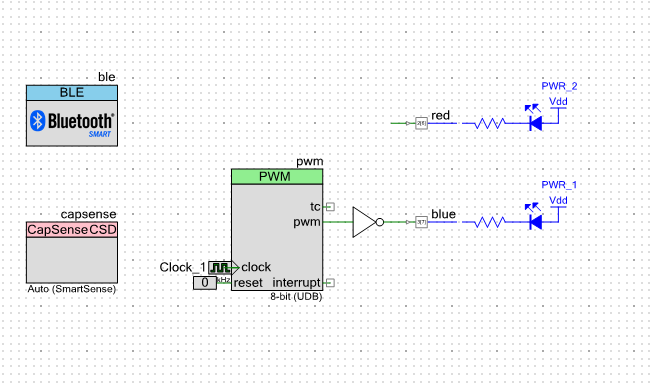
  • A PWM that drives the blue LED to serve as a notification of the state of the BLE (blinking means advertising)
  • A red LED which can be turned on/off from the GAP Central Side
  • The BLE Component

PSoC4 BLE CapSense LED Peripheral

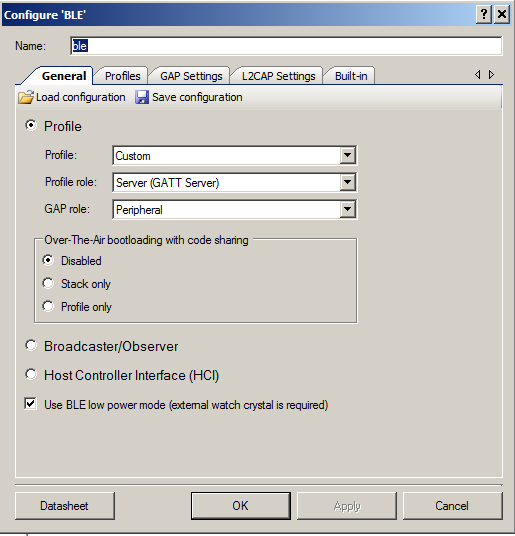
The BLE Component is configured to be:

  • A GAP Peripheral
  • with a GATT Server

PSoC4 BLE Peripheral Configuration

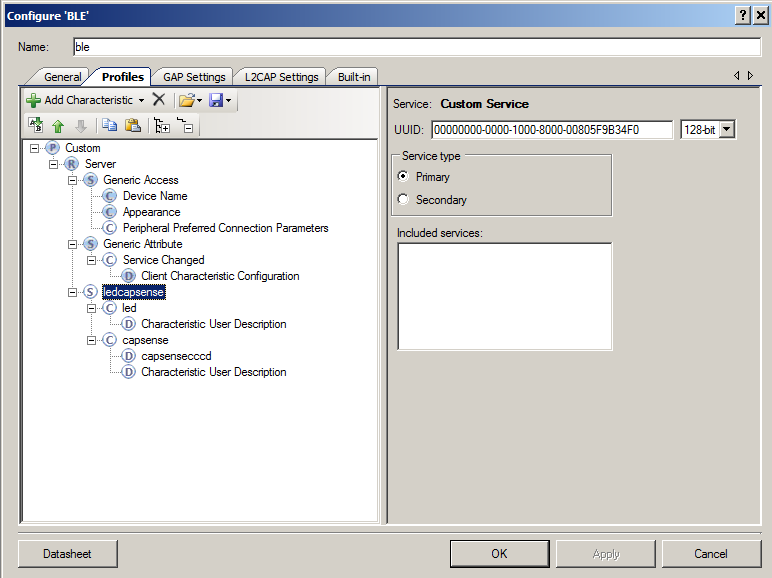
The GATT Database is setup to have:

  • A custom service called “ledcapsense”
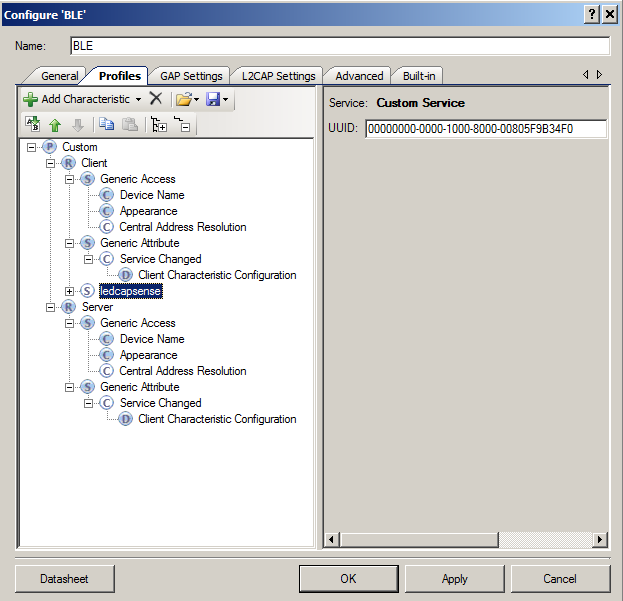
  • A custom characteristic called “led” (a uint8)
  • A custom characteristic called “capsense” (a uint16)

PSoC4 BLE Peripheral GATT Configuration

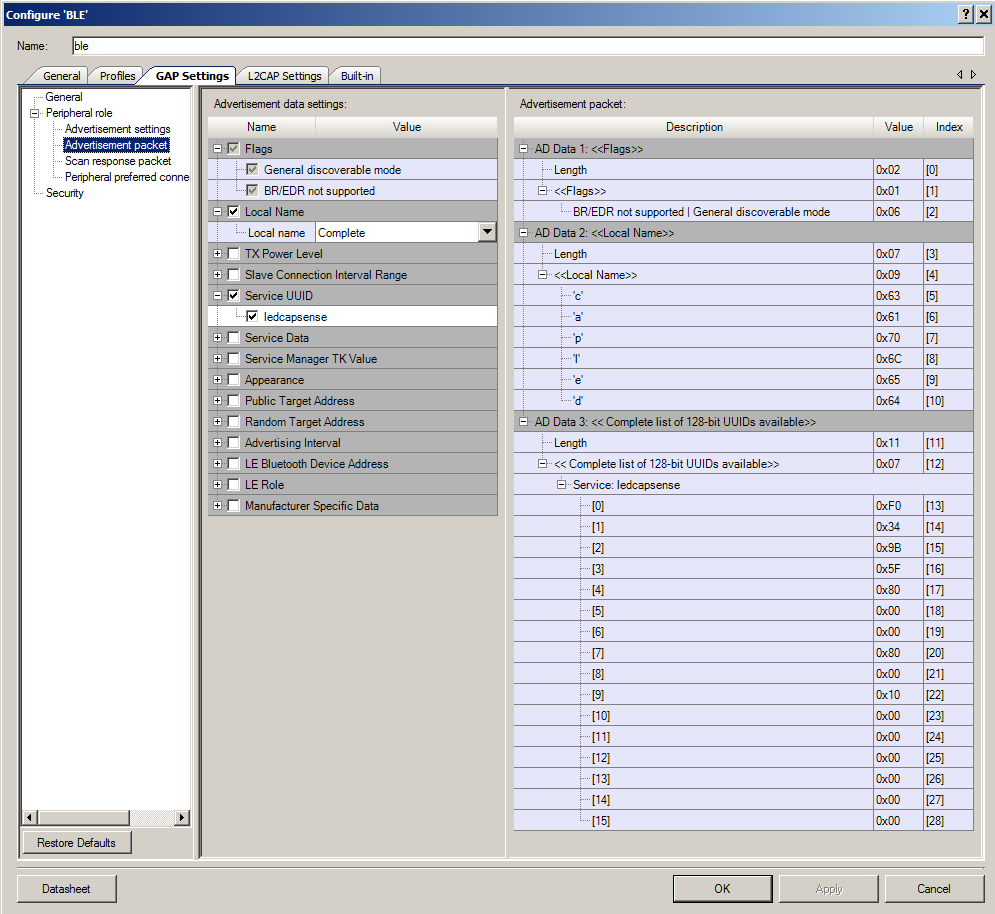
The advertising packet is setup to advertise

  • The name of the device “capled”
  • The fact that it has a GATT Service called “ledcapsense”

PSoC4 BLE Peripheral Advertising Packet

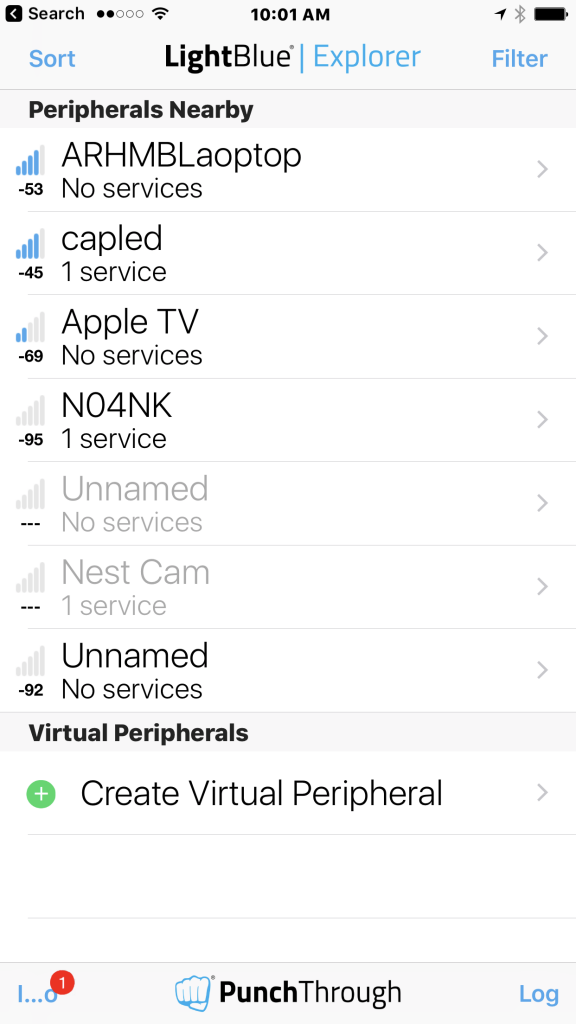
When you program this project you will get a blinking blue LED (that says the BLE is advertising).  When I run “lightblue” I can see the “capled” advertising:
LightBlue BLE Explorer

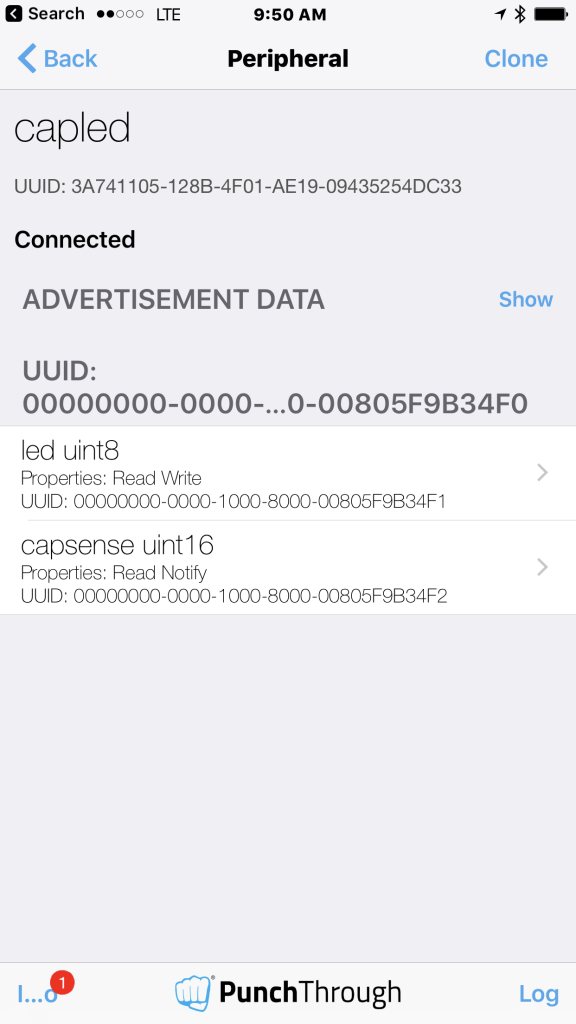
After I connect the device I can see the UUID of the custom service & the two characteristics:

LightBlue BLE Explorer

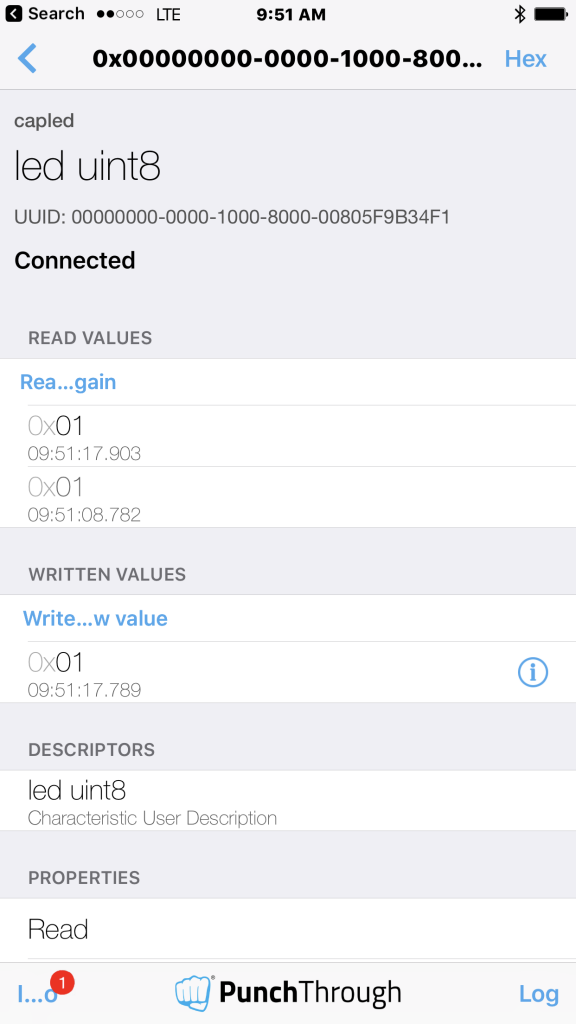
Finally I can read/write the led characteristic.

LightBlue BLE Explorer

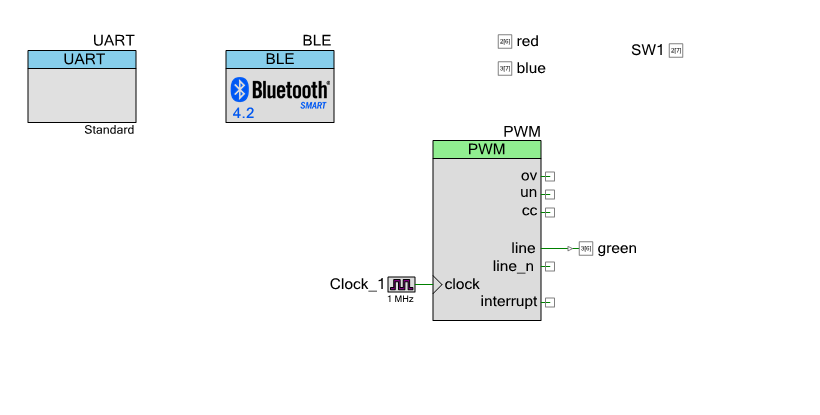
PSoC4 BLE Central Schematic

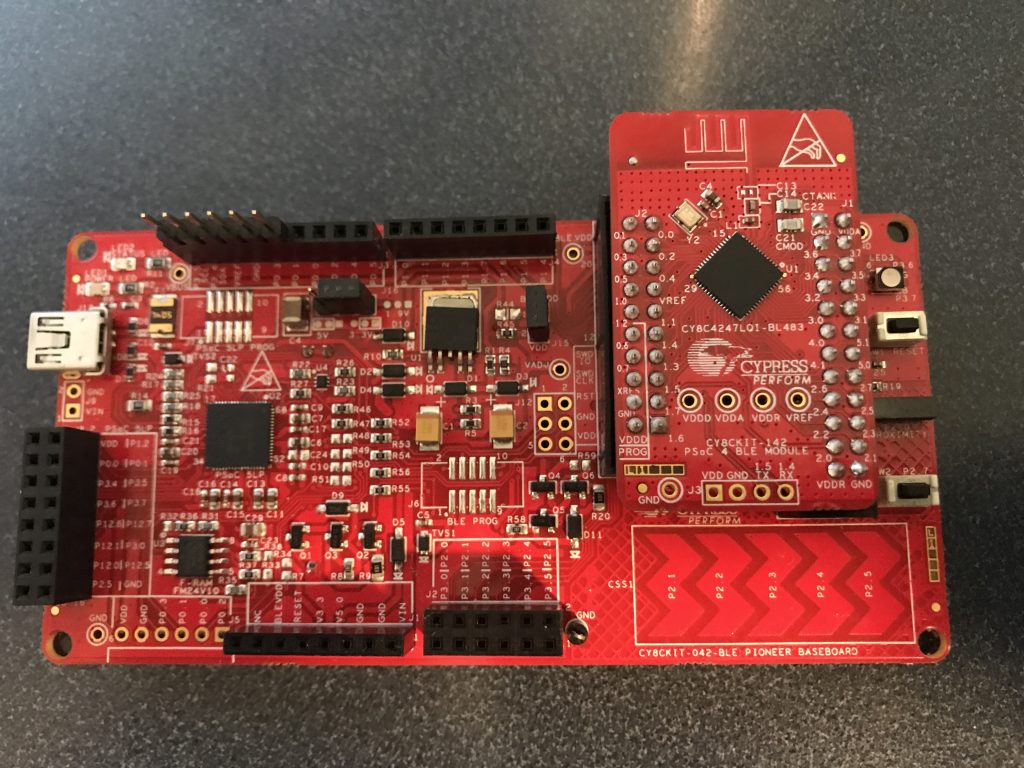
To make my PSoC4 BLE Central I build a project for the CY8CKIT-042-BLE  (you can see all of the source code in the project called “centralled”

CY8CKIT-042-BLE

Start by building a schematic with

  • A debug UART (I will print to the terminal program)
  • The red/blue/green led pins
  • The mechanical button pin (called SW1)
  • A PWM to drive the green LED (it will vary the brightness of the LED based on the capsense value on the GAP Peripheral)
  • The BLE Component

PSoC4 BLE Central Schematic

Configure the PWM (to vary between 0 and 100% brightness) with inverted logic (because the LED on the board is active low)

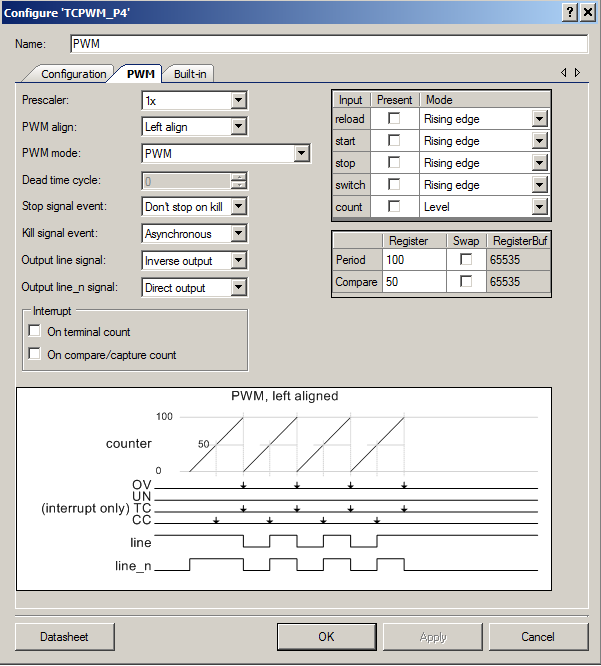
PSoC4 BLE Central PWM

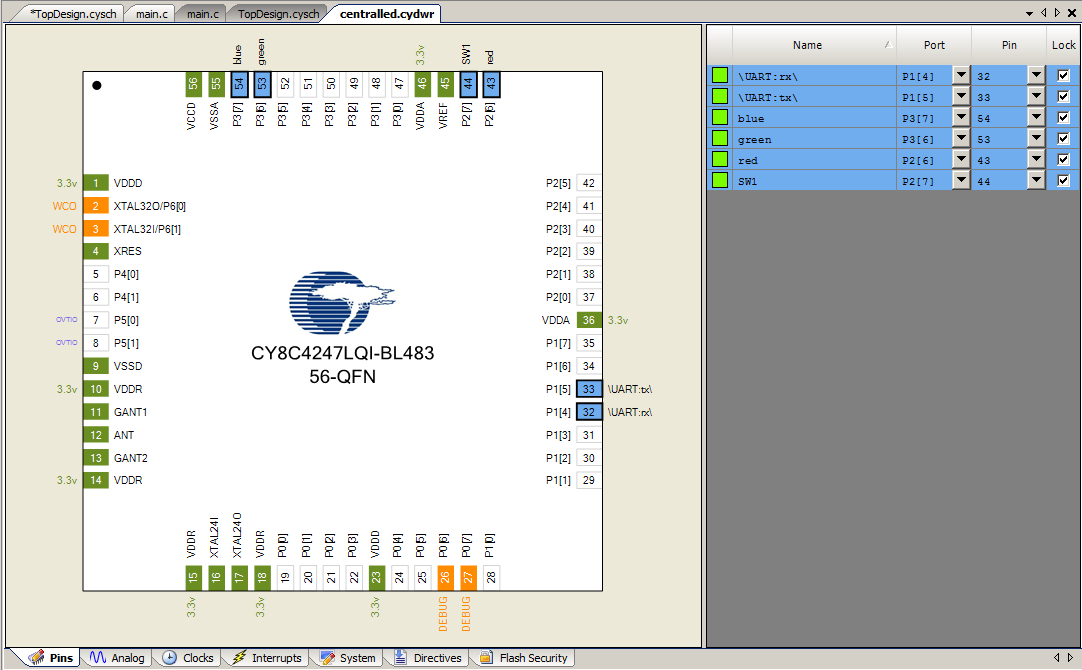
Assign the Pins:

PSoC4 BLE Central Pin Assignment

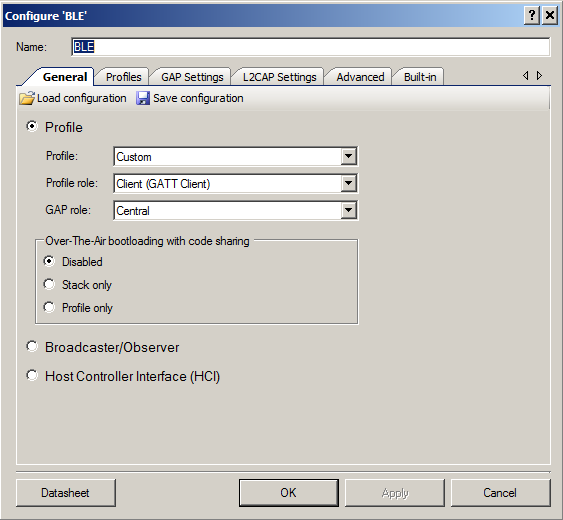
You will need to configure the BLE to be a:

  • A GATT Client
  • A GAP Central

PSoC4 BLE Central BLE Configuration

If you tell the BLE Component what the GATT Server configuration looks like (on the GAP Peripheral side) it will make the service discovery firmware much simpler.  To do this, go to the GAP Peripheral project and export the “ledcapsense” service from the Peripheral into an xml file (see the Save Selected Service…)

PSoC4 BLE Central GATT Database

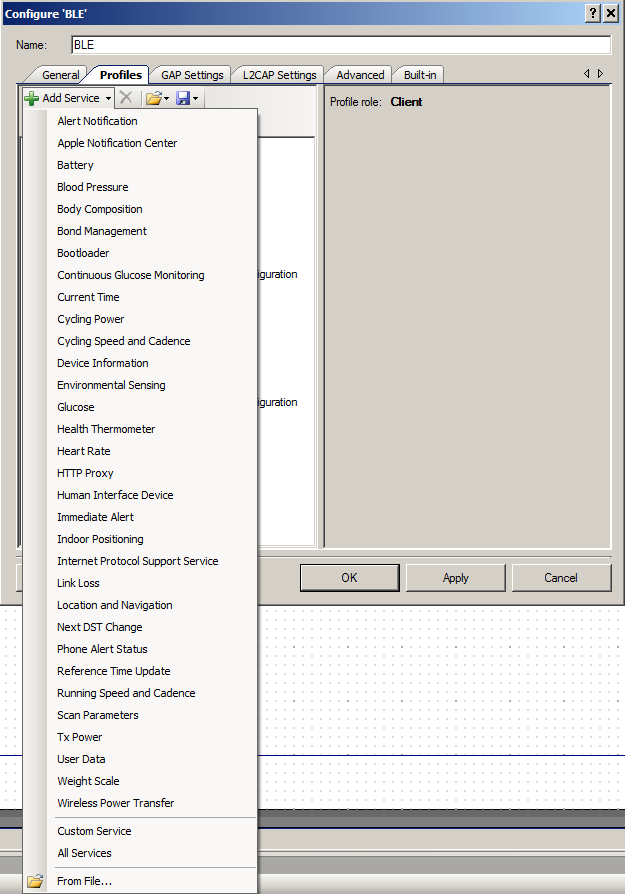
Then go back to your PSoC4 BLE Central project and add a new service “From file” (see at the bottom of the menu)

PSoC4 BLE Central - Load Service

After all that you will end up with something that looks like this.  You can see the “ledcapsense” service is listed under the “client” section of the GATT configuration.

PSoC4 BLE Central GATT Database

PSoC4 BLE Central Firmware

The firmware for the PSoC4 BLE Central needs to:

  1. Initialize the PSoC
  2. Scan for GAP Peripherals that are advertising the “ledcapsense” service
  3. Connect to the GAP Peripheral & Discover its services
  4. Turn on notifications for the Capsense characteristic
  5. Loop
    1. If the users changes the state of the button then send over a LED on/off
    2. If you receive a notification of a change in capsense then update the PWM Compare value (to change the intensity)

Most of the Cypress BLE APIs will create an “event” that you will need to process in the BLE loop.  The interesting events are:

Event Description
CYBLE_EVT_STACK_ON The BLE Stack has turned on and you can start advertising
CYBLE_EVT_GAP_DEVICE_DISCONNECTED The GAP Peripheral you were attached to has disconnected.  Start scanning for another GAP Peripheral to attach to
CYBLE_EVT_GAP_DEVICE_CONNECTED You have successfully completed a connection to a GAP Peripheral
CYBLE_EVT_GAPC_SCAN_PROGRESS_RESULT You received an advertising packet from a GAP Peripheral
CYBLE_EVT_GAPC_SCAN_START_STOP You either stopped or started scanning for advertising packets from GAP Peripherals
CYBLE_EVT_GATT_CONNECT_IND The GATT Connection is complete.  This event occurs before the CYBLE_EVT_GAP_DEVICE_CONNECTED EVENT so you don't need to do anything
CYBLE_EVT_GATTC_DISCOVERY_COMPLETE The service discovery is complete.  You can now set the CCCD and turn on the PWM
CYBLE_EVT_GATTC_HANDLE_VALUE_NTF You received a notification of a change in the Capsense from the GAP Peripheral.
CYBLE_EVT_GATTC_WRITE_RSP: Your write succeeded.  For this application there is nothing to do

To make all of this work, I created a state machine using an enumerated datatype.

// Modes for a statemachine
typedef enum SystemMode {
SM_INITIALIZE,          // Startup state
SM_SCANNING,            // Looking for a Peripheral
SM_CONNECTING,          // I have issued connected and waiting for it to complete
SM_SERVICEDISCOVERY,    // Started the service discovery and waiting for it to complete
SM_CONNECTED            // Connection complete... 
} SystemMode_t;
static SystemMode_t systemMode = SM_INITIALIZE; // Starting mode of statemachine

1. Initialize the PSoC4 BLE Central

The project starts with the normal turn on the PSoC components and stuff.

int main(void)
{
CyGlobalIntEnable; /* Enable global interrupts. */
UART_Start();
PWM_Start();
CyBle_Start( CyBle_AppCallback );

2. Scan for Peripherals that are advertising the “ledcapsense” service

Most everything that happens in the BLE sub-system triggers a callback to your “AppCallback” which you registered when you started up the BLE component.  The AppCallback has two parameters, which event and a generic void* style argument which can be one of a bunch of things.

(Lines 73-79)  After you turn on the power to your central and the BLE subsystem you will need to start scanning for peripherals that are advertising.  To do this you call “CyBle_GapcStartScan”.  The “Gapc” part of the API name means GAP Central.  The other time you need to start scanning is when you have been disconnected.

(Lines 81-93)  When you receive an advertising packet you can look in the packet and figure out if it is a GAP Peripheral that you want to attach too.  In this case I:

  • Only look at packets that are 29 bytes long (which I looked up in the BLE GAP Peripheral project)
  • And.. if the packet has the UUID of the capsenseled service
  • Then I save the Bluetooth Device Address (BD address) and stop scanning.  When the scanning is stopped the BLE subsystem will issue and event called “CYBLE_EVT_GAPC_SCAN_START_STOP” (the next section)
       case CYBLE_EVT_STACK_ON:
case CYBLE_EVT_GAP_DEVICE_DISCONNECTED:
systemMode = SM_SCANNING;
enabledCapsenseNotifications = 0;
CyBle_GapcStartScan(CYBLE_SCANNING_FAST); // Start scanning for peripherals
PWM_WriteCompare(0); PWM_Stop();          // Turn off the LED
break;
CYBLE_GAPC_ADV_REPORT_T* scanReport;
case CYBLE_EVT_GAPC_SCAN_PROGRESS_RESULT:                     // Advertising packet
scanReport = (CYBLE_GAPC_ADV_REPORT_T*)eventParam;
if(scanReport->dataLen != 29)                             // Number of bytes in ledcapsense advertising packet
break;
if(memcmp(&CapLedService,&scanReport->data[11],sizeof(CapLedService))) // if service is in packet
return;
// Setup for the connection
remoteDevice.type = scanReport->peerAddrType;          // setup the BD addr
memcpy(&remoteDevice.bdAddr,scanReport->peerBdAddr,6); // 6 bytes in BD addr
systemMode = SM_CONNECTING;
CyBle_GapcStopScan();                                  // stop scanning for peripherals
break;


3. Connect to the Peripheral & Discover the Services

(lines 97-100) When the BLE either starts or stops scanning it issues the “CYBLE_EVT_GAPC_SCAN_START_STOP” event.  I use the state machine to determine what to do.  Basically if the mode of my system is “SM_CONNECTING” then I attempt to make a connection to the remote device.

(lines 102-105)  Once the device is connected you need to do a service discovery to find out what services are on the GAP Peripheral and more importantly what are the handles of the characteristics.  The CyBle_GattcStartDiscovery issues requests to the GAP Peripheral to tell the services and characteristics on the peripheral, to which it responds with events.  Cypress provides code in BLE_custom.h and BLE_custom.c to process those responses.  Once the discovery is complete you are then ready to talk to the device.

        case CYBLE_EVT_GAPC_SCAN_START_STOP: // If you stopped scanning to make a connection.. then launch connection
if(systemMode == SM_CONNECTING ) 
CyBle_GapcConnectDevice(&remoteDevice);
break;
case CYBLE_EVT_GAP_DEVICE_CONNECTED:              // Connection request is complete
CyBle_GattcStartDiscovery(cyBle_connHandle);  // Discover the services on the GATT Server
systemMode = SM_SERVICEDISCOVERY;
break;

4. Turn on notifications for the Capsense characteristic

We are interested in getting notified when the Capsense characteristic on the GAP Peripheral changes.  To enable getting a notification you need to write a “0x01” into the Client Characteristic Configuration Descriptor or CCCD.  In order to accomplish this you need to know the handle of that descriptor.  The handle is discovered automatically by the BLE_custom.c functions.  If you look in BLE_custom.h you will find #define(s) that are the indexes of the things you need to know from the service discovery array.

/* Below are the indexes and handles of the defined Custom Services and their characteristics */
#define CYBLE_CUSTOMC_LEDCAPSENSE_SERVICE_INDEX   (0x00u) /* Index of ledcapsense service in the cyBle_customCServ array */
#define CYBLE_CUSTOMC_LEDCAPSENSE_LED_CHAR_INDEX   (0x00u) /* Index of led characteristic */
#define CYBLE_CUSTOMC_LEDCAPSENSE_LED_CHARACTERISTIC_USER_DESCRIPTION_DESC_INDEX   (0x00u) /* Index of Characteristic User Description descriptor */
#define CYBLE_CUSTOMC_LEDCAPSENSE_CAPSENSE_CHAR_INDEX   (0x01u) /* Index of capsense characteristic */
#define CYBLE_CUSTOMC_LEDCAPSENSE_CAPSENSE_CAPSENSECCCD_DESC_INDEX   (0x00u) /* Index of capsensecccd descriptor */
#define CYBLE_CUSTOMC_LEDCAPSENSE_CAPSENSE_CHARACTERISTIC_USER_DESCRIPTION_DESC_INDEX   (0x01u) /* Index of Characteristic User Description descriptor */

To set the CCCD you create a “CYBLE_GATTC_WRITE_REQ_T” and fill it in with the information required.  Specifically, the value and the handle which you find on line 57.  Then you write it to the GAP Peripheral.

/***************************************************************
* Function to set the Capsense CCCD to get notifications
**************************************************************/
void updateCapsenseNotification()
{
CYBLE_GATTC_WRITE_REQ_T 	tempHandle;
uint8 cccd=1;  
enabledCapsenseNotifications = 1;
tempHandle.attrHandle = cyBle_customCServ[CYBLE_CUSTOMC_LEDCAPSENSE_SERVICE_INDEX]
.customServChar[CYBLE_CUSTOMC_LEDCAPSENSE_CAPSENSE_CHAR_INDEX]
.customServCharDesc[CYBLE_CUSTOMC_LEDCAPSENSE_CAPSENSE_CAPSENSECCCD_DESC_INDEX].descHandle;
tempHandle.value.val = (uint8 *) &cccd;
tempHandle.value.len = 1;
CyBle_GattcWriteCharacteristicValue(cyBle_connHandle,&tempHandle);
}

5. Main Loop

The main look is simple.  Basically if you are in the SM_CONNECTED state, then call the function which updates the state of the Remote LED.

   for(;;)
{ 
switch(systemMode)
{
case SM_INITIALIZE:
case SM_SCANNING:
case SM_CONNECTING:
case SM_SERVICEDISCOVERY:
break;
case SM_CONNECTED:
updateLed();
break;
}
CyBle_ProcessEvents();
CyBle_EnterLPM(CYBLE_BLESS_DEEPSLEEP);    
}
}


5. Main Loop (Write the state of the LED)

This function looks at the state of the switch, then if it has changed, sends the updates state to the Peripheral.  The switch is active low (a 0 means that it is pressed) but we want a “1” to mean turn on the LED.

Just like the updateCapsenseNotification() function, you look in the cycle_customCServ array to find the handle of the LED characteristic.
/***************************************************************
* Function to update the LED state in the GATT database
* Based on state of swtich
**************************************************************/
void updateLed()
{
static int previousState = 10;       // The first time it is called send the data
uint8 state;                         // A place to hold the state of the switch
CYBLE_GATTC_WRITE_REQ_T tempHandle;  // A handle to call the BLE API
state = !SW1_Read();                 // Active low switch
if(state == previousState)           // If nothing has changed dont send anythign
return;
previousState = state;
tempHandle.attrHandle = cyBle_customCServ[CYBLE_CUSTOMC_LEDCAPSENSE_SERVICE_INDEX]
.customServChar[CYBLE_CUSTOMC_LEDCAPSENSE_LED_CHAR_INDEX]
.customServCharHandle;
tempHandle.value.val = (uint8 *) &state;
tempHandle.value.len = 1;
CyBle_GattcWriteCharacteristicValue(cyBle_connHandle,&tempHandle);
}

5. Main Loop (Capsense Notifications)

The last bit of code updates the state of the PWM driving the LED when you get a notification from the GAP Peripheral that it has been updated.

        CYBLE_GATTC_HANDLE_VALUE_NTF_PARAM_T *capsenseNTF;    
case CYBLE_EVT_GATTC_HANDLE_VALUE_NTF:                                 // Capsense Notification Recevied
capsenseNTF = (CYBLE_GATTC_HANDLE_VALUE_NTF_PARAM_T *)eventParam;
if(capsenseNTF->handleValPair.value.val[0] == 0xFF)                // Turn off the LED in no touch
PWM_WriteCompare(0);
else
PWM_WriteCompare(capsenseNTF->handleValPair.value.val[0]);
break;
case CYBLE_EVT_GATTC_WRITE_RSP: // Sucesfull write - nothing to do
break;

In the next Article(s) I will show you how to use the CySmart dongle.  I am also planning on showing you the firmware to create a GATT Browser.

You can find all of the source code for these projects at github.com/iotexpert/PSoc4BLE-Central 

PSoC4 Boot Sequence (Part 5) – Initializing the PSoC with initialize_psoc()

Summary – Initializing the PSoC

Well, I have finally reached the end of the booting the PSoC4 series.  Actually I am contemplating one more article after this one, but for now I am done.  In this article I talk about the function “initialize_psoc()” which is responsible for initializing the PSoC; it turns the PSoC into a PSoC.  The function does two basic things:

  • It moves the exception table out of the flash (at location 0x0000) and puts it into the SRAM
  • It calls cyfitter_cfg() which calls a bunch of functions to setup all of the configuration registers inside of the PSoC

Here is the actual function:

/*******************************************************************************
* Function Name: initialize_psoc
******************************************************************************
*
* This function is used to initialize the PSoC chip before calling main.
*
*******************************************************************************/
#if(defined(__GNUC__) && !defined(__ARMCC_VERSION))
__attribute__ ((constructor(101)))
#endif  /* (defined(__GNUC__) && !defined(__ARMCC_VERSION)) */
void initialize_psoc(void)
{
uint32 indexInit;
#if(CY_IP_CPUSSV2)
#if (CY_IP_CPUSS_CM0)
/***********************************************************************
* Make sure that Vector Table is located at 0000_0000 in Flash, before
* accessing RomVectors or calling functions that may be placed in
* .psocinit (cyfitter_cfg and ClockSetup). Note The CY_CPUSS_CONFIG_REG
* register is retention for the specified device family.
***********************************************************************/
CY_CPUSS_CONFIG_REG &= (uint32) ~CY_CPUSS_CONFIG_VECT_IN_RAM;
#endif /* (CY_IP_CPUSS_CM0) */
#endif  /* (CY_IP_CPUSSV2) */
/* Set Ram interrupt vectors to default functions. */
for (indexInit = 0u; indexInit < CY_NUM_VECTORS; indexInit++)
{
CyRamVectors[indexInit] = (indexInit < CY_NUM_ROM_VECTORS) ?
#if defined (__ICCARM__)
__vector_table[indexInit].__fun : &IntDefaultHandler;
#else
RomVectors[indexInit] : &IntDefaultHandler;
#endif  /* defined (__ICCARM__) */
}
/* Initialize configuration registers. */
cyfitter_cfg();
#if !defined (__ICCARM__)
/* Actually, no need to clean this variable, just to make compiler happy. */
cySysNoInitDataValid = 0u;
#endif  /* !defined (__ICCARM__) */
#if (CYDEV_PROJ_TYPE != CYDEV_PROJ_TYPE_STANDARD)
/* Need to make sure that this variable will not be optimized out */
if (0u == cyBtldrRunType)
{
cyBtldrRunType = 0u;
}
#endif  /* (CYDEV_PROJ_TYPE != CYDEV_PROJ_TYPE_STANDARD) */
#if (CY_IP_CPUSS_CM0)
/* Vector Table is located at 0x2000:0000 in SRAM */
CY_CPUSS_CONFIG_REG |= CY_CPUSS_CONFIG_VECT_IN_RAM;
#else
(*(uint32 *)CYREG_CM0P_VTOR) = CY_CPUSS_CONFIG_VECT_ADDR_IN_RAM;
#endif /* (CY_IP_CPUSS_CM0) */
}

Move the Exception Table

In a previous article I talked about setting up the exception table and programming it into the flash.  This leaves me with a previously unstated question: How do I change the address of an interrupt vector service routine? Does it have to remain static and known a priori when you write the firmware?  In the Cortex-M0 architecture the answer to that question is fascinating (in my opinion).  If you use the ARM CM0 “straight out of the box” the answer is you can’t.  However, in the PSoC implementation of the CM0’s our system architect created a register to allow you to move the vector table.

Before I explain how this happens I would like to give a nod to the Cypress “CPUSS Architect”.  He is a former NXP engineer from the Netherlands and is one of the most amazing individual talents I have ever known.  He understands how to balance the white-tower-purity of the CTO office and the overall system architecture with the roll-up-your-sleeves realities of making chips.

Anyway.  Maybe it is a common thing to do with the CM0 (I actually haven’t looked at other people’s implementations) but the register “CPUSS_CONFIG” changes the address logic in the CM0 to read from two different places when the vector table addresses are issues by the CPU.  What this means is when the bit “CPUSS_VECS_IN_RAM” is 0, the addresses 0x0 are read from the flash, and when the bit is set to 1, the address 0x0 are read from 0x20000000 (which is the RAM).

Here is a clip from the PSoC Technical Reference Manual:

PSoC4 TRM

Once you see this, it is easy to understand lines 496–>517.  They basically:

  • Set the CPUSS_VECS_IN_RAM bit to 0
  • Then copy the vector table from the flash to the RAM

Finally on lines 537–>542 it sets the bit to 1 so that the vectors are read from the flash.

The only other trick here is that the CM0+ (and CM3/CM4) have a register called “VTOR” which allows you the accomplish exactly the same thing with out having to modify the address logic in the core.

Initializing the PSoC: Call cyfitter_cfg()

As part of building a PSoC project, PSoC Creator runs a “fitter”.  The fitter is responsible for

  1. Configuring the Digital Signal Interconnect  (DSI) matrix
  2. Configuring the UDBs
  3. Configuring the Analog Routing
  4. Configuring the Clocks
  5. Assigning the blocks of the PSoC to pins and components

All of the fitter tasks get turned into C-code which are either #defines (in the case of the components) or actual c-functions and data (as in the case of 1-4).  The last step in the function “start_c()” is calling the “cyfitter_cfg()” function”.  The “cyfitter_cfg()” will grow and shrink depending on how you configure the UDBs and the DSI.  For example, the version below has a blank schematic.  In it you can see that:
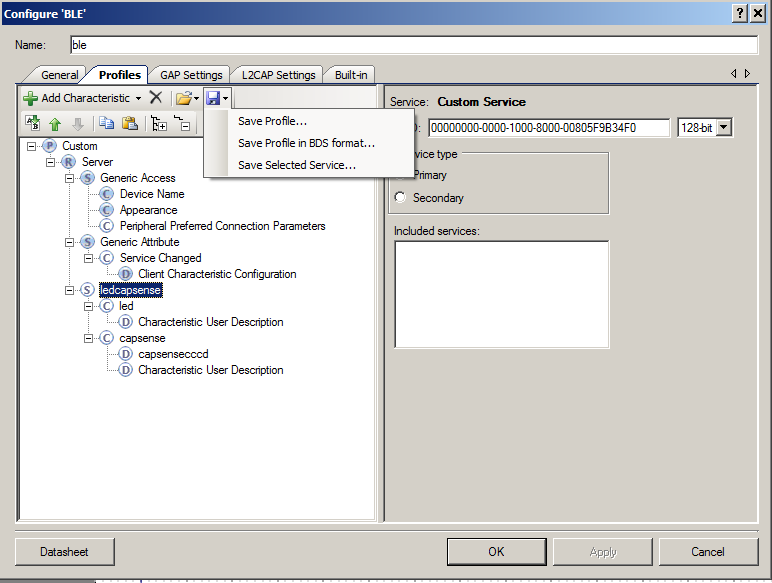
  • Lines 247-251 write 0s to the configuration registers… basically turning everything off
  • Lines 254-265 enable the UDBs and routing
  • Line 274 turns on the clocks
  • Line 277 turns on the analog
/*******************************************************************************
* Function Name: cyfitter_cfg
********************************************************************************
* Summary:
*  This function is called by the start-up code for the selected device. It
*  performs all of the necessary device configuration based on the design
*  settings.  This includes settings from the Design Wide Resources (DWR) such
*  as Clocks and Pins as well as any component configuration that is necessary.
*
* Parameters:  
*   void
*
* Return:
*   void
*
*******************************************************************************/
CY_CFG_SECTION
void cyfitter_cfg(void)
{
/* Disable interrupts by default. Let user enable if/when they want. */
CyGlobalIntDisable;
{
CYPACKED typedef struct {
void CYFAR *address;
uint16 size;
} CYPACKED_ATTR cfg_memset_t;
static const cfg_memset_t CYCODE cfg_memset_list [] = {
/* address, size */
{(void CYFAR *)(CYDEV_UDB_P0_U0_BASE), 1024u},
{(void CYFAR *)(CYDEV_UDB_DSI0_BASE), 1024u},
};
uint8 CYDATA i;
/* Zero out critical memory blocks before beginning configuration */
for (i = 0u; i < (sizeof(cfg_memset_list)/sizeof(cfg_memset_list[0])); i++)
{
const cfg_memset_t CYCODE * CYDATA ms = &cfg_memset_list[i];
CYMEMZERO(ms->address, (size_t)(uint32)(ms->size));
}
/* HSIOM Starting address: CYDEV_HSIOM_BASE */
CY_SET_XTND_REG32((void CYFAR *)(CYREG_HSIOM_PORT_SEL3), 0x0000EE00u);
/* UDB_PA_3 Starting address: CYDEV_UDB_PA3_BASE */
CY_SET_XTND_REG32((void CYFAR *)(CYDEV_UDB_PA3_BASE), 0x00990000u);
/* Enable digital routing */
CY_SET_XTND_REG8((void *)CYREG_UDB_UDBIF_BANK_CTL, CY_GET_XTND_REG8((void *)CYREG_UDB_UDBIF_BANK_CTL) | 0x02u);
/* Enable UDB array */
CY_SET_XTND_REG8((void *)CYREG_UDB_UDBIF_WAIT_CFG, (uint8)((CY_GET_XTND_REG8((void *)CYREG_UDB_UDBIF_WAIT_CFG) & 0xC3u) | 0x14u));
CY_SET_XTND_REG8((void *)CYREG_UDB_UDBIF_BANK_CTL, (uint8)(CY_GET_XTND_REG8((void *)CYREG_UDB_UDBIF_BANK_CTL) | 0x16u));
}
/* Perform second pass device configuration. These items must be configured in specific order after the regular configuration is done. */
/* IOPINS0_3 Starting address: CYDEV_GPIO_PRT3_BASE */
CY_SET_XTND_REG32((void CYFAR *)(CYREG_GPIO_PRT3_PC), 0x00000D80u);
/* Setup clocks based on selections from Clock DWR */
ClockSetup();
/* Perform basic analog initialization to defaults */
AnalogSetDefault();
}

However, if you had a more complicated schematic, like this one which uses a UDB and the DSI to implement a LUT

LUT Example

Then you will end up with a block of code that configures the DSI and UDB registers required to implement the LUT and route it to the pins.  You can see on lines 274-308 there is a table of register values which are copied into the architectural registers by the function call on line 333.  I started looking through the meaning of all of these register values in the TRM but realized that it didn’t matter.  PSoC Creator does a perfectly good job of setting up the UDB and getting it routed to the right place.

/*******************************************************************************
* Function Name: cyfitter_cfg
********************************************************************************
* Summary:
*  This function is called by the start-up code for the selected device. It
*  performs all of the necessary device configuration based on the design
*  settings.  This includes settings from the Design Wide Resources (DWR) such
*  as Clocks and Pins as well as any component configuration that is necessary.
*
* Parameters:  
*   void
*
* Return:
*   void
*
*******************************************************************************/
CY_CFG_SECTION
void cyfitter_cfg(void)
{
/* Disable interrupts by default. Let user enable if/when they want. */
CyGlobalIntDisable;
{
static const uint32 CYCODE cy_cfg_addr_table[] = {
0x400F3007u, /* Base address: 0x400F3000 Count: 7 */
0x400F3107u, /* Base address: 0x400F3100 Count: 7 */
0x400F3301u, /* Base address: 0x400F3300 Count: 1 */
0x400F4009u, /* Base address: 0x400F4000 Count: 9 */
0x400F4102u, /* Base address: 0x400F4100 Count: 2 */
};
static const cy_cfg_addrvalue_t CYCODE cy_cfg_data_table[] = {
{0x88u, 0x01u},
{0xA0u, 0x01u},
{0xB6u, 0x01u},
{0xB8u, 0x80u},
{0xBEu, 0x40u},
{0xD8u, 0x04u},
{0xDFu, 0x01u},
{0x04u, 0x10u},
{0x15u, 0x01u},
{0x1Fu, 0x80u},
{0x80u, 0x10u},
{0x85u, 0x01u},
{0xC0u, 0x40u},
{0xC4u, 0x10u},
{0xAFu, 0x80u},
{0x00u, 0x20u},
{0x04u, 0x08u},
{0x57u, 0x20u},
{0x80u, 0x04u},
{0x84u, 0x10u},
{0xC0u, 0x60u},
{0xD4u, 0x40u},
{0xE0u, 0x10u},
{0xE4u, 0x80u},
{0xAFu, 0x20u},
{0xEEu, 0x10u},
};
CYPACKED typedef struct {
void CYFAR *address;
uint16 size;
} CYPACKED_ATTR cfg_memset_t;
static const cfg_memset_t CYCODE cfg_memset_list [] = {
/* address, size */
{(void CYFAR *)(CYDEV_UDB_P0_U0_BASE), 1024u},
{(void CYFAR *)(CYDEV_UDB_DSI0_BASE), 1024u},
};
uint8 CYDATA i;
/* Zero out critical memory blocks before beginning configuration */
for (i = 0u; i < (sizeof(cfg_memset_list)/sizeof(cfg_memset_list[0])); i++)
{
const cfg_memset_t CYCODE * CYDATA ms = &cfg_memset_list[i];
CYMEMZERO(ms->address, (size_t)(uint32)(ms->size));
}
cfg_write_bytes32(cy_cfg_addr_table, cy_cfg_data_table);
/* HSIOM Starting address: CYDEV_HSIOM_BASE */
CY_SET_XTND_REG32((void CYFAR *)(CYDEV_HSIOM_BASE), 0x00003003u);
CY_SET_XTND_REG32((void CYFAR *)(CYREG_HSIOM_PORT_SEL3), 0x0000EE00u);
/* UDB_PA_0 Starting address: CYDEV_UDB_PA0_BASE */
CY_SET_XTND_REG32((void CYFAR *)(CYDEV_UDB_PA0_BASE), 0x00990000u);
CY_SET_XTND_REG32((void CYFAR *)(CYREG_UDB_PA0_CFG8), 0x00010000u);
/* UDB_PA_3 Starting address: CYDEV_UDB_PA3_BASE */
CY_SET_XTND_REG32((void CYFAR *)(CYDEV_UDB_PA3_BASE), 0x00990000u);
/* Enable digital routing */
CY_SET_XTND_REG8((void *)CYREG_UDB_UDBIF_BANK_CTL, CY_GET_XTND_REG8((void *)CYREG_UDB_UDBIF_BANK_CTL) | 0x02u);
/* Enable UDB array */
CY_SET_XTND_REG8((void *)CYREG_UDB_UDBIF_WAIT_CFG, (uint8)((CY_GET_XTND_REG8((void *)CYREG_UDB_UDBIF_WAIT_CFG) & 0xC3u) | 0x14u));
CY_SET_XTND_REG8((void *)CYREG_UDB_UDBIF_BANK_CTL, (uint8)(CY_GET_XTND_REG8((void *)CYREG_UDB_UDBIF_BANK_CTL) | 0x16u));
}
/* Perform second pass device configuration. These items must be configured in specific order after the regular configuration is done. */
/* IOPINS0_0 Starting address: CYDEV_GPIO_PRT0_BASE */
CY_SET_XTND_REG32((void CYFAR *)(CYDEV_GPIO_PRT0_BASE), 0x00000009u);
CY_SET_XTND_REG32((void CYFAR *)(CYREG_GPIO_PRT0_PC), 0x00000C4Eu);
/* IOPINS0_3 Starting address: CYDEV_GPIO_PRT3_BASE */
CY_SET_XTND_REG32((void CYFAR *)(CYREG_GPIO_PRT3_PC), 0x00000D80u);
/* Setup clocks based on selections from Clock DWR */
ClockSetup();
/* Perform basic analog initialization to defaults */
AnalogSetDefault();
}

The “ClockSetup()” function does exactly what its name says.  It configures all of the clocks (and starts them) based on how you setup things in the Clocks Tab of the DWR.

The AnalogSetDefault() function does exactly what its name says…. with a blank design is a whole lot of nothing.  As you add things that use the analog resources on the chip, say for instance the OpAmps, it configures the registers require to implement those features in the chip.

OK, I am done with this set of articles.  I hope that they were useful.  It has certainly been an adventure digging through all of this code.