How To Design With Bluetooth Mesh
You can "git" a workspace will all of these files at https://github.com/iotexpert/MouserVTWBluetoothMesh or git@github.com:iotexpert/MouserVTWBluetoothMesh.git
Summary
In the first several lessons I showed you how to build a BLE Mesh Network using the Cypress Android App and the Windows Application. I don’t know about you, but even though I live twenty years back in time in Kentucky I still have light switches. In this lesson Ill show you how to add a light switch to your network. And then we will have a good look a the code because we have run enough demo projects.
Given that I have a working network from the last lesson I will just add the switch to that network. Meaning, I will use the Mesh Client to provision in the new switch.
For this exercise we will:
- Create the VTW_MeshOnOffSwitch Project
- Provision and Configure the Switch
- Firmware Architecture
- Examine the Code
Create the VTW_MeshOnOffSwitch Project
Start a new project with File–>New–>ModusToolbox IDE Application

Pick out the CYBT-213043-MESH hardware.

I will use the BLE_Mesh_OnOffSwitch starter application. Notice that I named it “VTW_Mesh_OnOffSwitch”
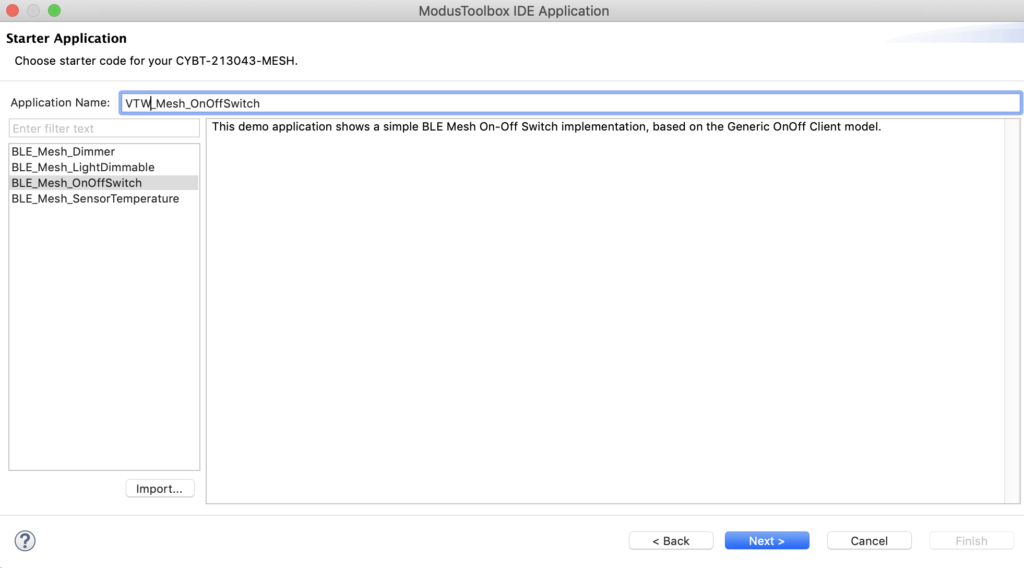
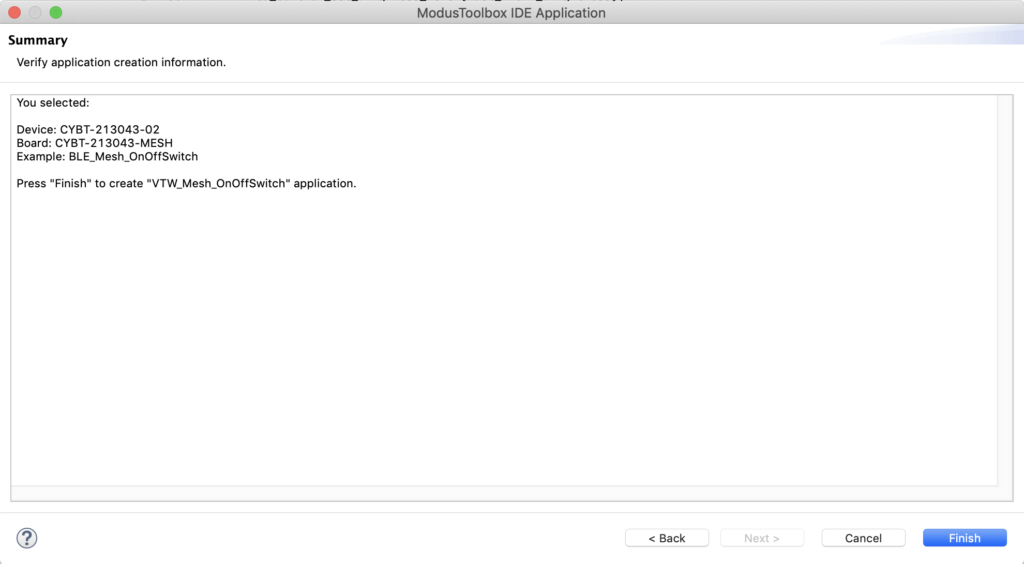
Now press Finish to create the application in your workspace.
Now your Project Explorer should look like this. Notice that in the quick panel there are the launches for this application.
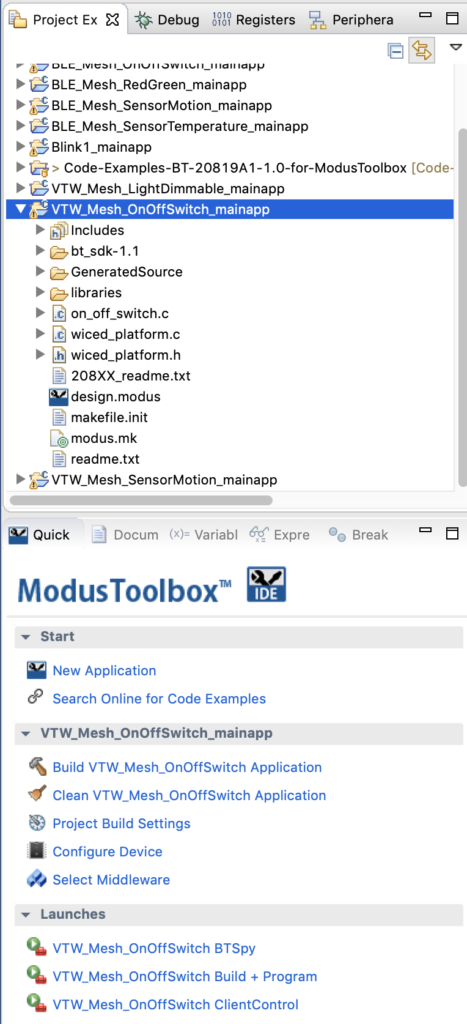
So, press “VTW_MeshOnOffSwitch Build + Program”
Provision and Configure the Switch
Go back to the Mesh Client application. Just as before you can add the Switch to the network by scanning for unprovisioned BLE Mesh Nodes. When the node shows up, give it a name of SW1 and then press “Provision and configure”
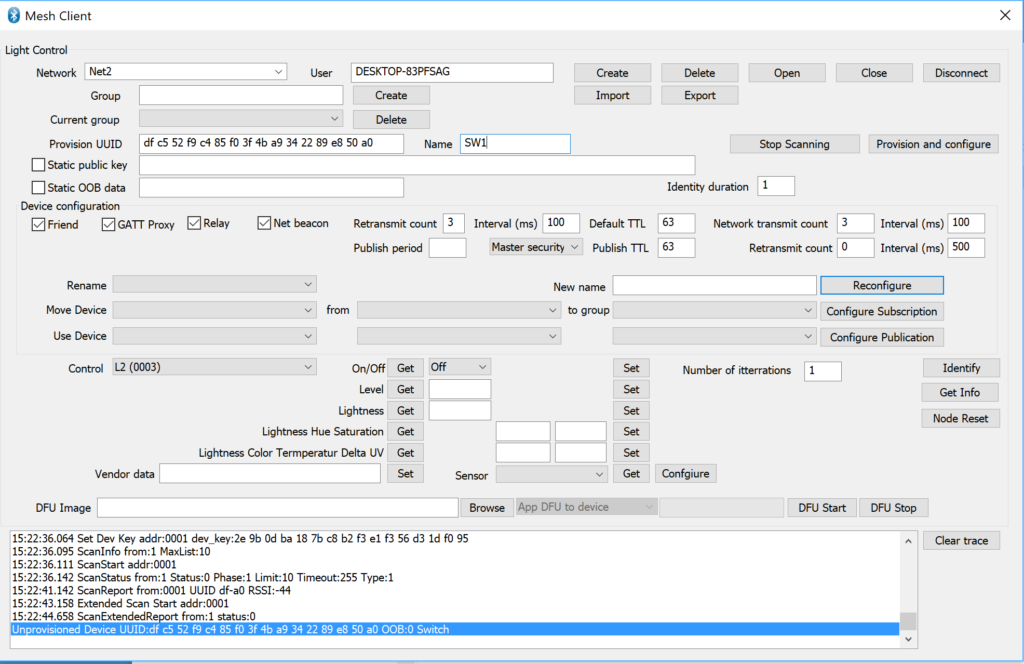
After a while, your trace window will indicate success via the ever informative “done” message.

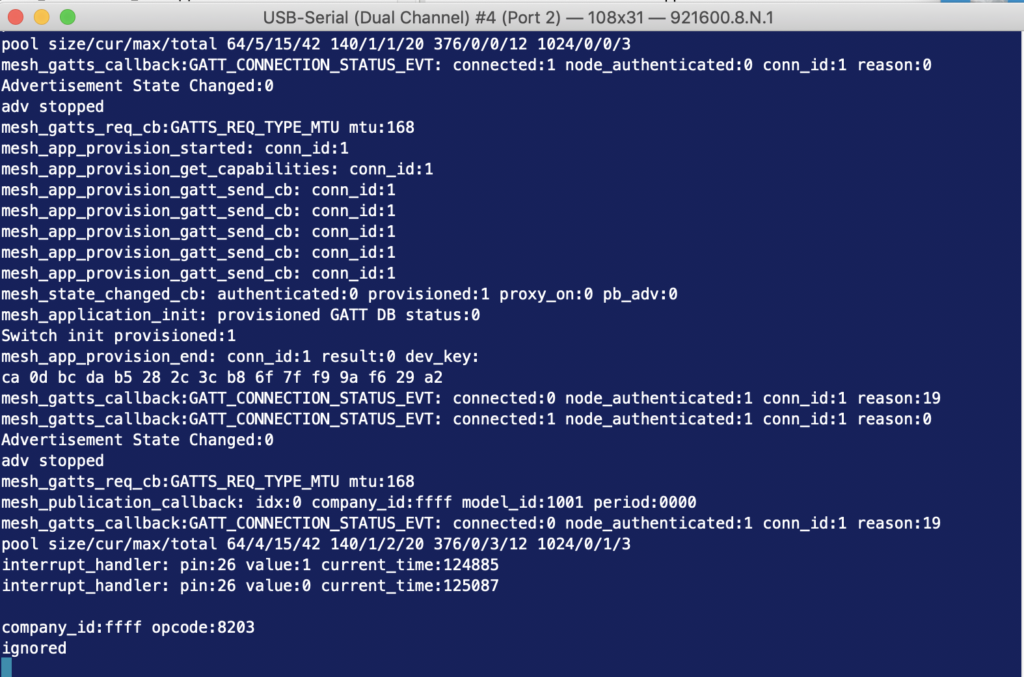
If you have a serial terminal attached to the development kit you will see what happens during the provision/configuration process.
Now test the button on your new Light Switch and notice that both LEDs turn on (both Dimmable and L2). You can configure the Switch to control only L2 if you want. On the “Use Device” drop down pick “SW1 (0004)” then select control “ONOFF” and pick the switch “L2”.
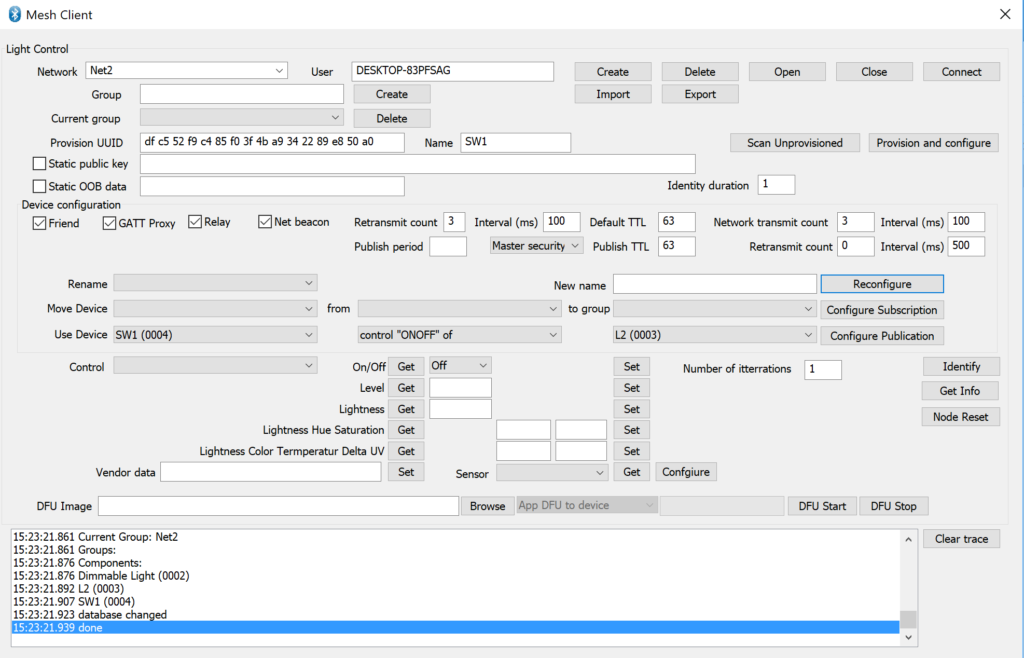
After applying the change you can see that switch only controls L2. You can then switch it to “Dimmable” to control the other LED.
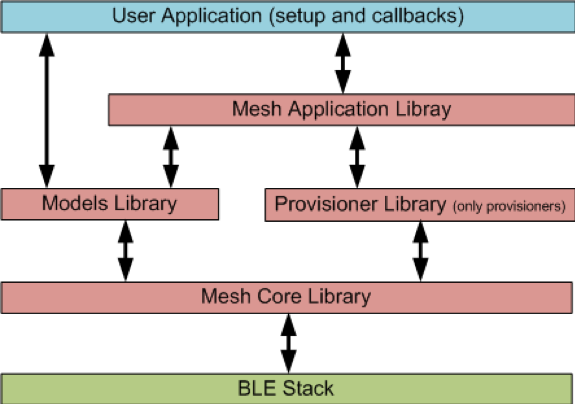
Firmware Architecture
Examine the Code
A Cypress Bluetooth Mesh project has several basic sections Specifically you must configure:
- Elements & Models
- Mesh Config
- Application Function Pointers
- mesh_app_init
Plus for the switch application, you will need to configure the button management code (what happens when the button is pushed).
Elements and Models
The “Element” is a fundamental unit of thingness in a BLE Mesh. For instance in the projects we have looked at, the LEDs are represented by an Element, and the switch is represented by another element. Each element will have one or more models that represent the functionality of the element. For instance, in a switch you will have a “WICED_BT_MESH_MODEL_ONOFF_CLIENT”. If you look at on_off_switch.c you will see that we first define an array of models. Then we define an array of elements. The array mesh_element1_models will be associated with the the first element.
wiced_bt_mesh_core_config_model_t   mesh_element1_models[] =
{
    WICED_BT_MESH_DEVICE,
    WICED_BT_MESH_MODEL_ONOFF_CLIENT,
};
#define MESH_APP_NUM_MODELS  (sizeof(mesh_element1_models) / sizeof(wiced_bt_mesh_core_config_model_t))

#define ONOFF_SWITCH_ELEMENT_INDEX   0

wiced_bt_mesh_core_config_element_t mesh_elements[] =
{
    {
        .location = MESH_ELEM_LOC_MAIN,                                 // location description as defined in the GATT Bluetooth Namespace Descriptors section of the Bluetooth SIG Assigned Numbers
        .default_transition_time = MESH_DEFAULT_TRANSITION_TIME_IN_MS,  // Default transition time for models of the element in milliseconds
        .onpowerup_state = WICED_BT_MESH_ON_POWER_UP_STATE_RESTORE,     // Default element behavior on power up
        .default_level = 0,                                             // Default value of the variable controlled on this element (for example power, lightness, temperature, hue...)
        .range_min = 1,                                                 // Minimum value of the variable controlled on this element (for example power, lightness, temperature, hue...)
        .range_max = 0xffff,                                            // Maximum value of the variable controlled on this element (for example power, lightness, temperature, hue...)
        .move_rollover = 0,                                             // If true when level gets to range_max during move operation, it switches to min, otherwise move stops.
        .properties_num = 0,                                            // Number of properties in the array models
        .properties = NULL,                                             // Array of properties in the element.
        .sensors_num = 0,                                               // Number of sensors in the sensor array
        .sensors = NULL,                                                // Array of sensors of that element
        .models_num = MESH_APP_NUM_MODELS,                              // Number of models in the array models
        .models = mesh_element1_models,                                 // Array of models located in that element. Model data is defined by structure wiced_bt_mesh_core_config_model_t
    },
};
Mesh Config
The mesh config structure handles the basic setup for the Cypress Bluetooth Mesh. This structure is loaded in by the stack when it starts.
wiced_bt_mesh_core_config_t  mesh_config =
{
    .company_id         = MESH_COMPANY_ID_CYPRESS,                  // Company identifier assigned by the Bluetooth SIG
    .product_id         = MESH_PID,                                 // Vendor-assigned product identifier
    .vendor_id          = MESH_VID,                                 // Vendor-assigned product version identifier
    .firmware_id        = MESH_FWID,                                // Vendor-assigned firmware version identifier
    .replay_cache_size  = MESH_CACHE_REPLAY_SIZE,                   // Number of replay protection entries, i.e. maximum number of mesh devices that can send application messages to this device.
#if defined(LOW_POWER_NODE) && (LOW_POWER_NODE == 1)
    .features           = WICED_BT_MESH_CORE_FEATURE_BIT_LOW_POWER, // A bit field indicating the device features. In Low Power mode no Relay, no Proxy and no Friend
    .friend_cfg         =                                           // Empty Configuration of the Friend Feature
    {
        .receive_window = 0,                                        // Receive Window value in milliseconds supported by the Friend node.
        .cache_buf_len  = 0,                                        // Length of the buffer for the cache
        .max_lpn_num    = 0                                         // Max number of Low Power Nodes with established friendship. Must be > 0 if Friend feature is supported.
    },
    .low_power          =                                           // Configuration of the Low Power Feature
    {
        .rssi_factor           = 2,                                 // contribution of the RSSI measured by the Friend node used in Friend Offer Delay calculations.
        .receive_window_factor = 2,                                 // contribution of the supported Receive Window used in Friend Offer Delay calculations.
        .min_cache_size_log    = 3,                                 // minimum number of messages that the Friend node can store in its Friend Cache.
        .receive_delay         = 100,                               // Receive delay in 1ms units to be requested by the Low Power node.
        .poll_timeout          = 36000                              // Poll timeout in 100ms units to be requested by the Low Power node.
    },
#else
    .features           = 0,                                        // no, support for proxy, friend, or relay
    .friend_cfg         =                                           // Empty Configuration of the Friend Feature
    {
        .receive_window        = 0,                                 // Receive Window value in milliseconds supported by the Friend node.
        .cache_buf_len         = 0,                                 // Length of the buffer for the cache
        .max_lpn_num           = 0                                  // Max number of Low Power Nodes with established friendship. Must be > 0 if Friend feature is supported.
    },
    .low_power          =                                           // Configuration of the Low Power Feature
    {
        .rssi_factor           = 0,                                 // contribution of the RSSI measured by the Friend node used in Friend Offer Delay calculations.
        .receive_window_factor = 0,                                 // contribution of the supported Receive Window used in Friend Offer Delay calculations.
        .min_cache_size_log    = 0,                                 // minimum number of messages that the Friend node can store in its Friend Cache.
        .receive_delay         = 0,                                 // Receive delay in 1 ms units to be requested by the Low Power node.
        .poll_timeout          = 0                                  // Poll timeout in 100ms units to be requested by the Low Power node.
    },
#endif
    .gatt_client_only          = WICED_FALSE,                       // Can connect to mesh over GATT or ADV
    .elements_num  = (uint8_t)(sizeof(mesh_elements) / sizeof(mesh_elements[0])),   // number of elements on this device
    .elements      = mesh_elements                                  // Array of elements for this device
};
Application Function Pointers
The Bluetooth Mesh stack interacts with your program via functions that it runs when something is happening. You can either accept the default behavior, or you can write your own function.
/*
 * Mesh application library will call into application functions if provided by the application.
 */
wiced_bt_mesh_app_func_table_t wiced_bt_mesh_app_func_table =
{
    mesh_app_init,          // application initialization
    mesh_app_hardware_init, // hardware initialization
    NULL,                   // GATT connection status
    NULL,                   // attention processing
    NULL,                   // notify period set
    NULL,                   // WICED HCI command
    NULL,                   // LPN sleep
    NULL                    // factory reset
};
mesh_app_init
The function mesh_app_init is called by the stack when the stack starts. It is your opportunity to get things going. In the “if” we setup information which makes it easier to see what is happening when you provision by adding that information to the scan response packet.
The last thing we do in mesh_app_init function is initialize the onoff client model. This should be done for any models that your device uses. The model initialization functions can accept the name of a function that we want the stack to call when it receives messages from the network for that model. In this case, we don’t need to do anything in our firmware for onoff client messages, so we specify NULL.
/******************************************************
 *               Function Definitions
 ******************************************************/
void mesh_app_init(wiced_bool_t is_provisioned)
{
#if 0
    extern uint8_t wiced_bt_mesh_model_trace_enabled;
    wiced_bt_mesh_model_trace_enabled = WICED_TRUE;
#endif
    wiced_bt_cfg_settings.device_name = (uint8_t *)"Switch";
    wiced_bt_cfg_settings.gatt_cfg.appearance = APPEARANCE_CONTROL_DEVICE_SLIDER;

#if defined(LOW_POWER_NODE) && (LOW_POWER_NODE == 1)
    WICED_BT_TRACE("LPN Switch init provisioned:%d\n", is_provisioned);
#else
    WICED_BT_TRACE("Switch init provisioned:%d\n", is_provisioned);
#endif

    // Adv Data is fixed. Spec allows to put URI, Name, Appearance and Tx Power in the Scan Response Data.
    if (!is_provisioned)
    {
        wiced_bt_ble_advert_elem_t  adv_elem[3];
        uint8_t                     buf[2];
        uint8_t                     num_elem = 0;

        adv_elem[num_elem].advert_type = BTM_BLE_ADVERT_TYPE_NAME_COMPLETE;
        adv_elem[num_elem].len         = (uint16_t)strlen((const char*)wiced_bt_cfg_settings.device_name);
        adv_elem[num_elem].p_data      = wiced_bt_cfg_settings.device_name;
        num_elem++;

        adv_elem[num_elem].advert_type = BTM_BLE_ADVERT_TYPE_APPEARANCE;
        adv_elem[num_elem].len         = 2;
        buf[0]                         = (uint8_t)wiced_bt_cfg_settings.gatt_cfg.appearance;
        buf[1]                         = (uint8_t)(wiced_bt_cfg_settings.gatt_cfg.appearance >> 8);
        adv_elem[num_elem].p_data      = buf;
        num_elem++;

        wiced_bt_mesh_set_raw_scan_response_data(num_elem, adv_elem);
    }

    // This application does not check result of the transmission or status event from the
    // target device.  Initialize OnOff client library not registering the callback.
    wiced_bt_mesh_model_onoff_client_init(ONOFF_SWITCH_ELEMENT_INDEX, NULL, is_provisioned);
}
Button Management Code
Now you just need to setup the button hardware in the mesh_app_hardware_init function to generate an interrupt when the button is pressed or released..
void mesh_app_hardware_init(void)
{
    /* Configure buttons available on the platform */
#if defined(CYW20706A2)
    wiced_hal_gpio_configure_pin(WICED_GPIO_BUTTON, WICED_GPIO_BUTTON_SETTINGS(GPIO_EN_INT_BOTH_EDGE), WICED_GPIO_BUTTON_DEFAULT_STATE);
    wiced_hal_gpio_register_pin_for_interrupt(WICED_GPIO_BUTTON, button_interrupt_handler, NULL);
#elif (defined(CYW20735B0) || defined(CYW20719B0) || defined(CYW20721B0))
    wiced_hal_gpio_register_pin_for_interrupt(WICED_GPIO_PIN_BUTTON, button_interrupt_handler, NULL);
    wiced_hal_gpio_configure_pin(WICED_GPIO_PIN_BUTTON, WICED_GPIO_BUTTON_SETTINGS, GPIO_PIN_OUTPUT_LOW);
#else
    wiced_platform_register_button_callback(WICED_PLATFORM_BUTTON_1, button_interrupt_handler, NULL, GPIO_EN_INT_BOTH_EDGE);
    button_previous_value = platform_button[WICED_PLATFORM_BUTTON_1].default_state;
#endif
}
The interrupt handler will call the function wiced_bt_mesh_model_onoff_client_set to publish the button pressed message.
/*
 * Process interrupts from the button.
 */
void button_interrupt_handler(void* user_data, uint8_t pin)
{
    uint32_t value = wiced_hal_gpio_get_pin_input_status(pin);
    uint32_t current_time = wiced_bt_mesh_core_get_tick_count();
    uint32_t button_pushed_duration;

    if (value == button_previous_value)
    {
        WICED_BT_TRACE("interrupt_handler: duplicate pin:%d value:%d current_time:%d\n", pin, value, current_time);
        return;
    }
    button_previous_value = value;

    WICED_BT_TRACE("interrupt_handler: pin:%d value:%d current_time:%d\n", pin, value, current_time);

    if (value == platform_button[WICED_PLATFORM_BUTTON_1].button_pressed_value)
    {
        button_pushed_time = current_time;
        return;
    }
    // button is released
    button_pushed_duration = current_time - button_pushed_time;
    if (button_pushed_duration < 15000)
    {
        process_button_push(ONOFF_SWITCH_ELEMENT_INDEX);
    }
    else
    {
        // More than 15 seconds means factory reset
        mesh_application_factory_reset();
    }
}

void process_button_push(uint8_t element_idx)
{
    static uint8_t onoff = 0;
    wiced_bt_mesh_onoff_set_data_t set_data;

    onoff ^= 1;

    set_data.onoff           = onoff;
    set_data.transition_time = WICED_BT_MESH_TRANSITION_TIME_DEFAULT;
    set_data.delay           = 0;

    wiced_bt_mesh_model_onoff_client_set(element_idx, &set_data);
}
No comment yet, add your voice below!