Summary
One of my favorite readers, who also happens to be my bosses, bosses boss sent me an email the other day asking about the WS2812 LEDs. So, I sent him a link to my previous article about PSOC 6 and DMA and WS2812. He said, “That’s cool and everything… but do you have it in Modus Toolbox”. Well, you wish is my command.
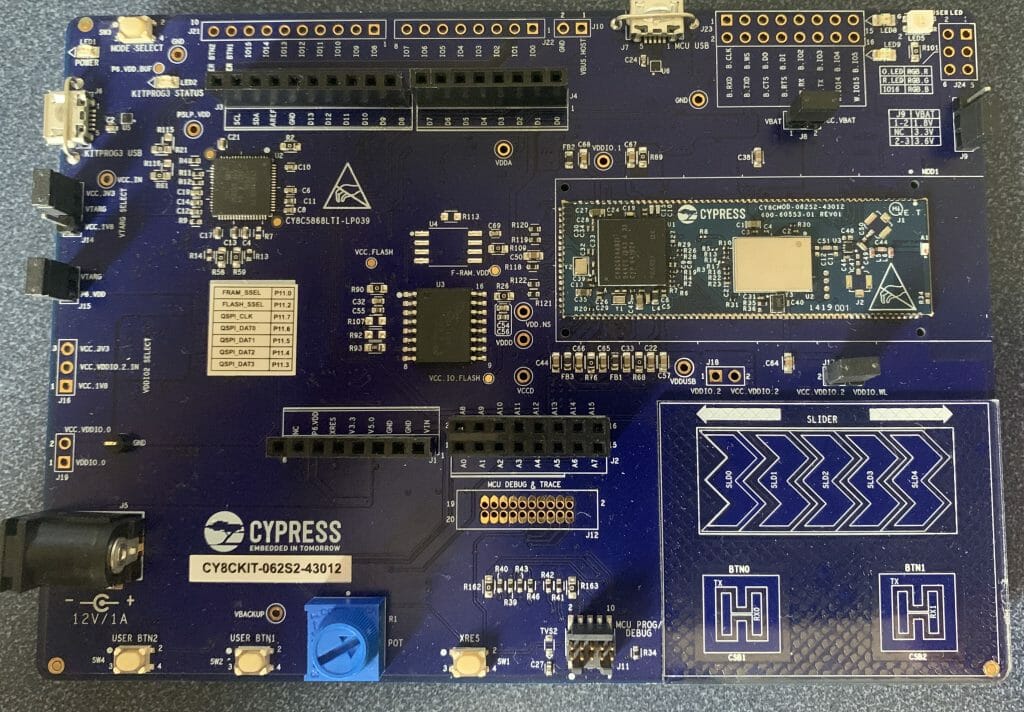
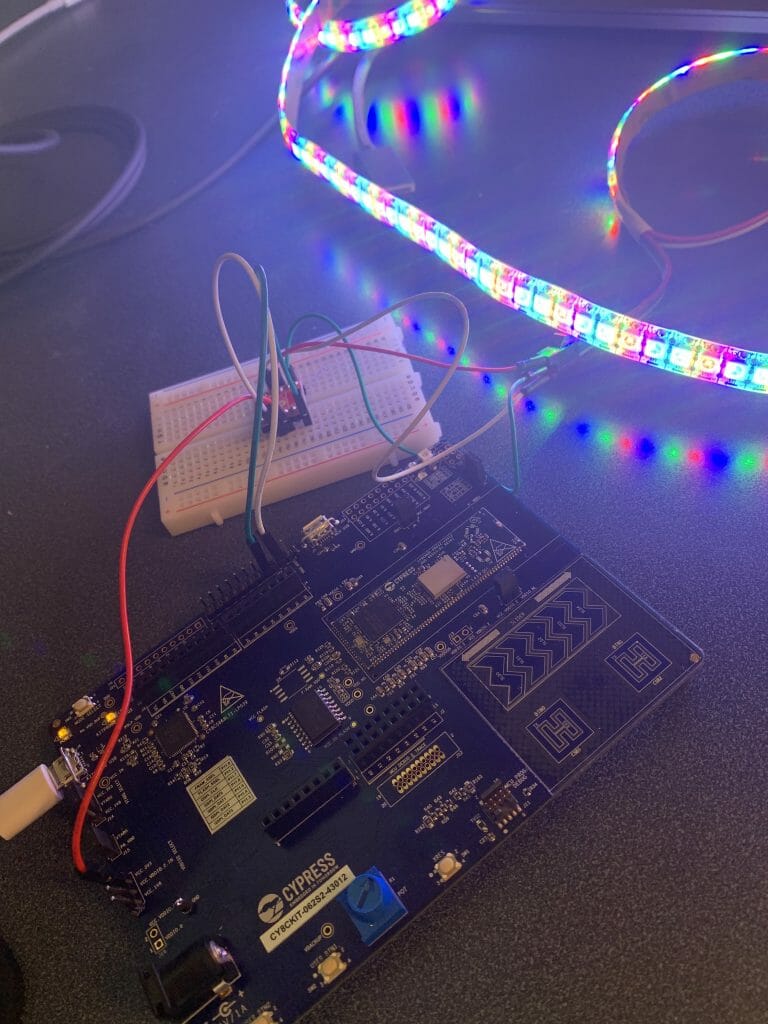
In the original article I wrote directly on the bare metal. Which is something that I don’t really like, so in this article I will port the original code to use FreeRTOS. In addition, in the original article I used a CY8CPROTO-062-4343W. But, look what I found in the mail the other day. YES! Ronak sent me a prototype of the new Cypress development kit. Sweet. Here is a picture. It has a P6 and a CYW43012 (low power Bluetooth and WiFi).
For this article I will follow these steps:
- Make a new project
- Add middleware
- Configure the retarget i/o, the red LED & Test the configuration
- Explain the 2812 Task Architecture
- Create ws2812.h
- Create ws2812.c
- Update main.c to use the public interface of ws2812.h
- Rewire to use a level shifter
Finally, I will discuss some other ideas that I have for the project.
Make a New Project
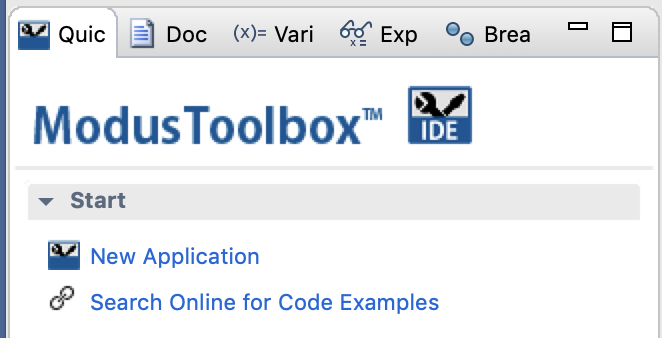
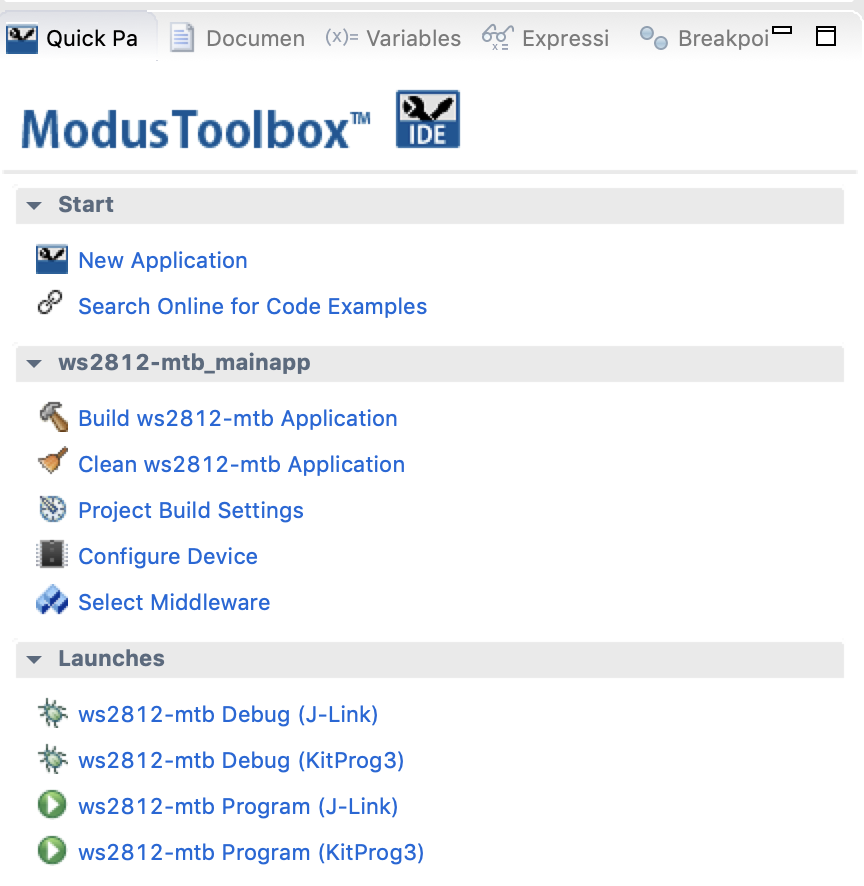
In the quick panel select “New Application”.
Pick out the “CY8CKIT-062-4343W” which has the same PSoC. In fact any of the CY8C624ABZI-D44 kits will work.
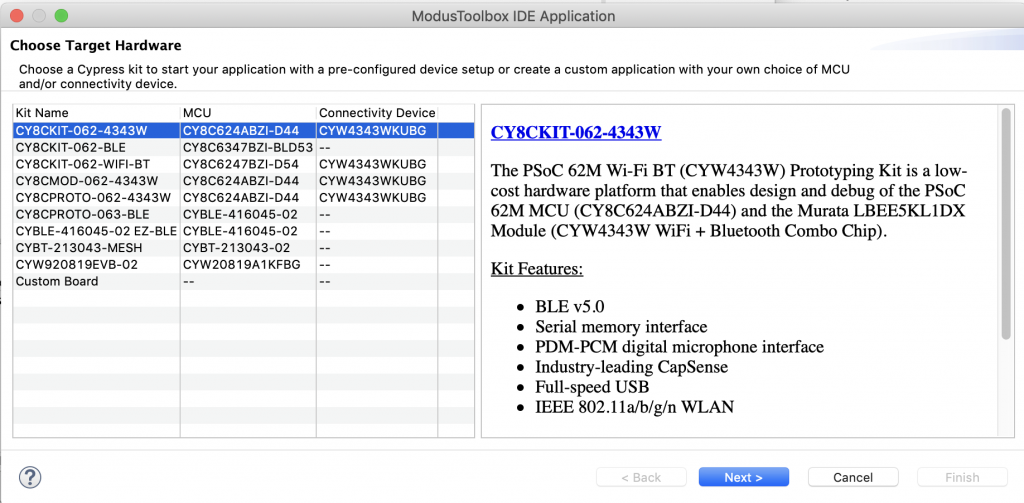
Use the “EmptyPSoC6App” starter project and give it the name “ws2812-mtb”

Select “Finish”

Add the Middleware
For this project I want to use several pieces of middleware. To add them, right click on the project and select “ModusToolbox Middleware Selector”
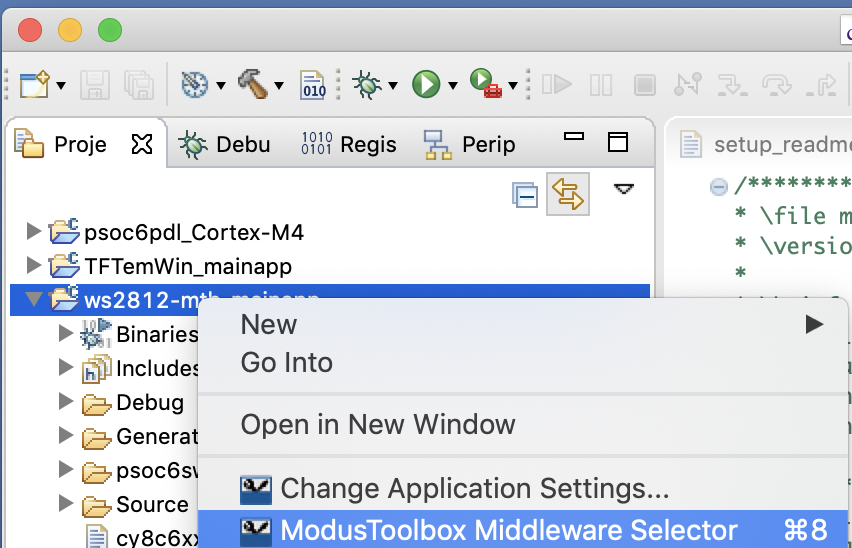
Pick out FreeRTOS, Capsense, and Retarget I/O
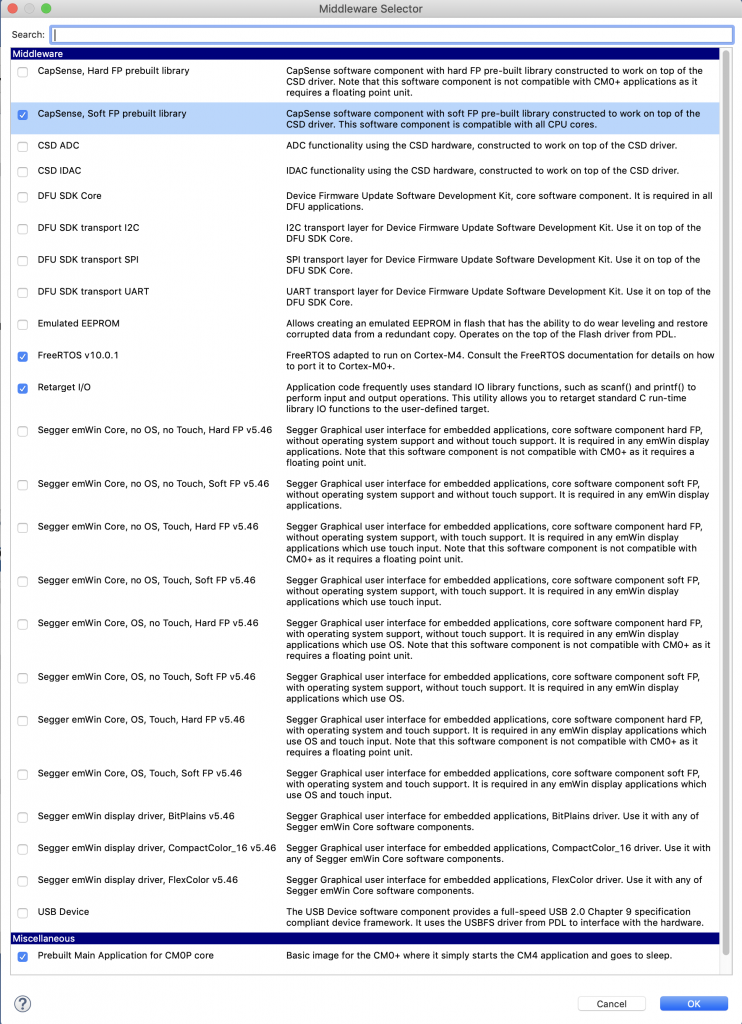
Press OK, which will bring all of the right libraries into your project.
Configure the retarget i/o, the red LED & Test the configuration
Before I get too far down the road I like to test and make sure that the basic stuff is working. So, I start by configuring the hardware I need for Retarget I/O and the blinking LED. To do the hardware configuration, select “Configure Device” from the quick panel.
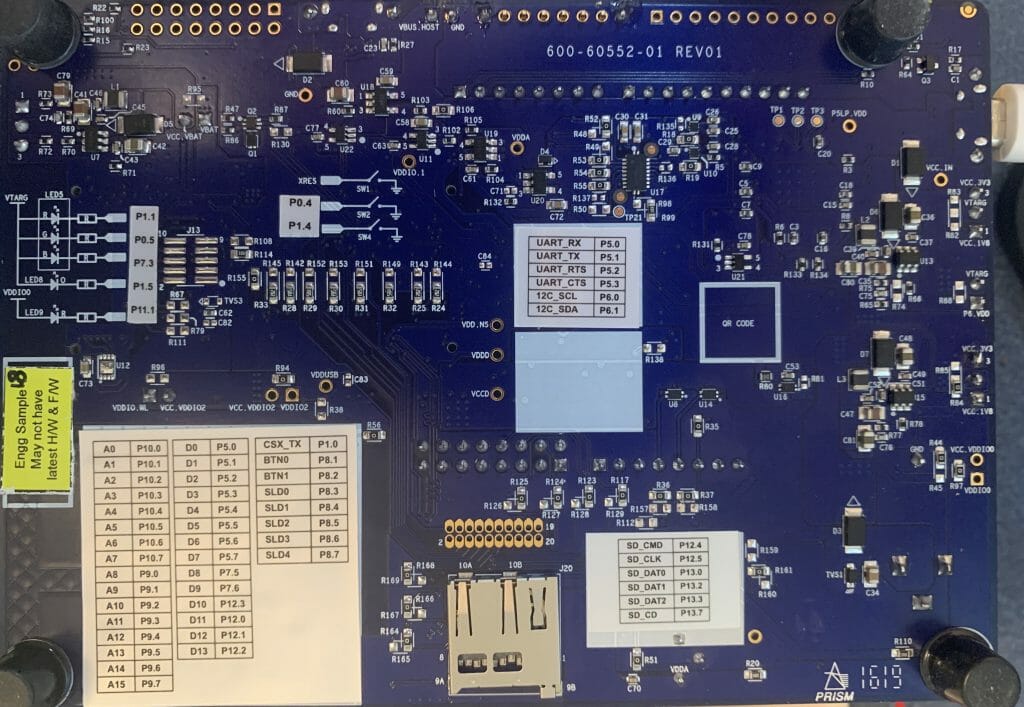
On this board the Red LED is connected to P1[1]. Here is a picture of the very nice label on the back. (notice the engineering sample sticker)
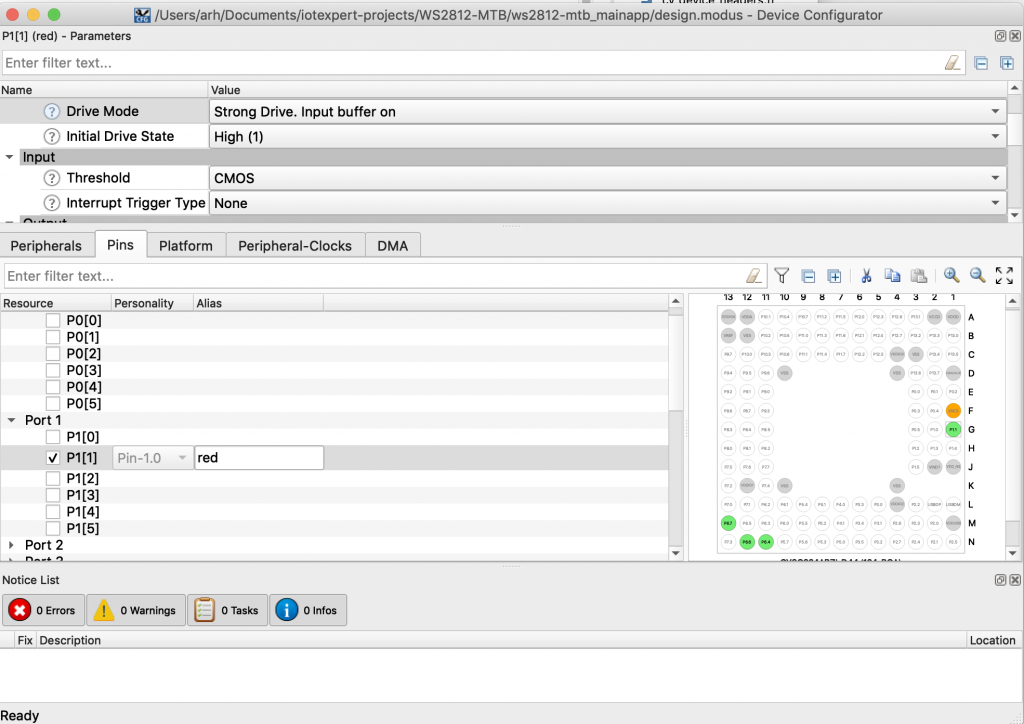
Go to the pins tab, turn on P1[1], give it the name “red” and select the strong drive mode.
To use the Retarget I/O you need a UART. Go to the Peripheral tab and turn on “Serial Communication Block (SCB) 5” Tell it to use P5[0] and P5[1] and the 0th 8-bit clock divider. Then press save.
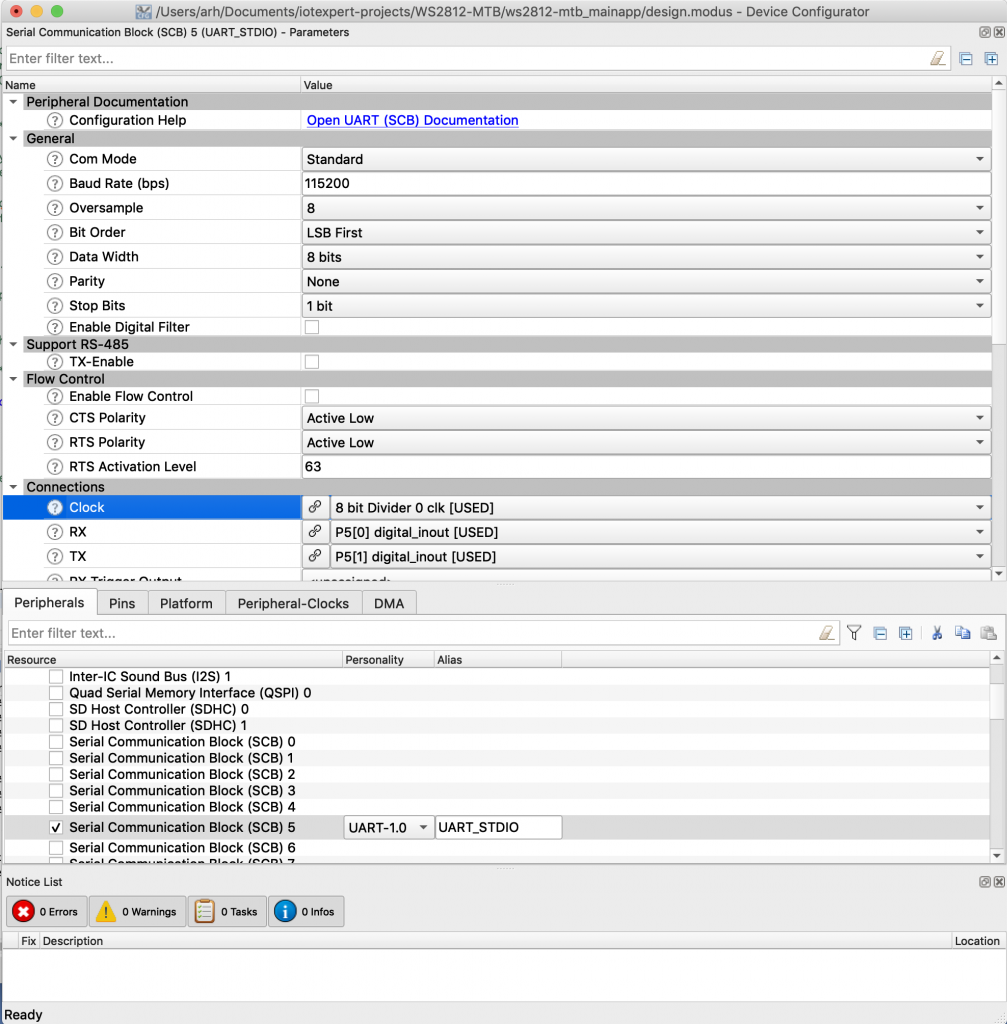
Open up studio_user.h and setup the standard i/o to use the correct SCB which we made an alias to called UART_STDIO_HW. You need to add the include “cycfg.h” so that it can find the alias configuration file.
#include "cy_device_headers.h"
#include "cycfg.h"
/* Must remain uncommented to use this utility */
#define IO_STDOUT_ENABLE
#define IO_STDIN_ENABLE
#define IO_STDOUT_UART      UART_STDIO_HW
#define IO_STDIN_UART       UART_STDIO_HW
and then edit main.c.
- Add the include for stdio.h (line 31)
- Add the include for FreeRTOS.h (line 32)
- Add the include for the task.h (line 33)
- Make a context for the UART SCB (line 35)
- Write the function for the blinking LED task (line 37-45)
- Initialize the SCB as a UART and enable it (lines 53-54)
- Print a test message (line 58)
- Create the task (line 60)
- Start the scheduler (line 61)
#include "cy_device_headers.h"
#include "cycfg.h"
#include <stdio.h>
#include "FreeRTOS.h"
#include "task.h"
cy_stc_scb_uart_context_t UART_STDIO_context;
void ledTask(void *arg)
{
(void)arg;
while(1)
{
Cy_GPIO_Inv(red_PORT,red_PIN);
vTaskDelay(1000);
}
}
int main(void)
{
/* Set up the device based on configurator selections */
init_cycfg_all();
Cy_SCB_UART_Init(UART_STDIO_HW,&UART_STDIO_config,&UART_STDIO_context);
Cy_SCB_UART_Enable(UART_STDIO_HW);
__enable_irq();
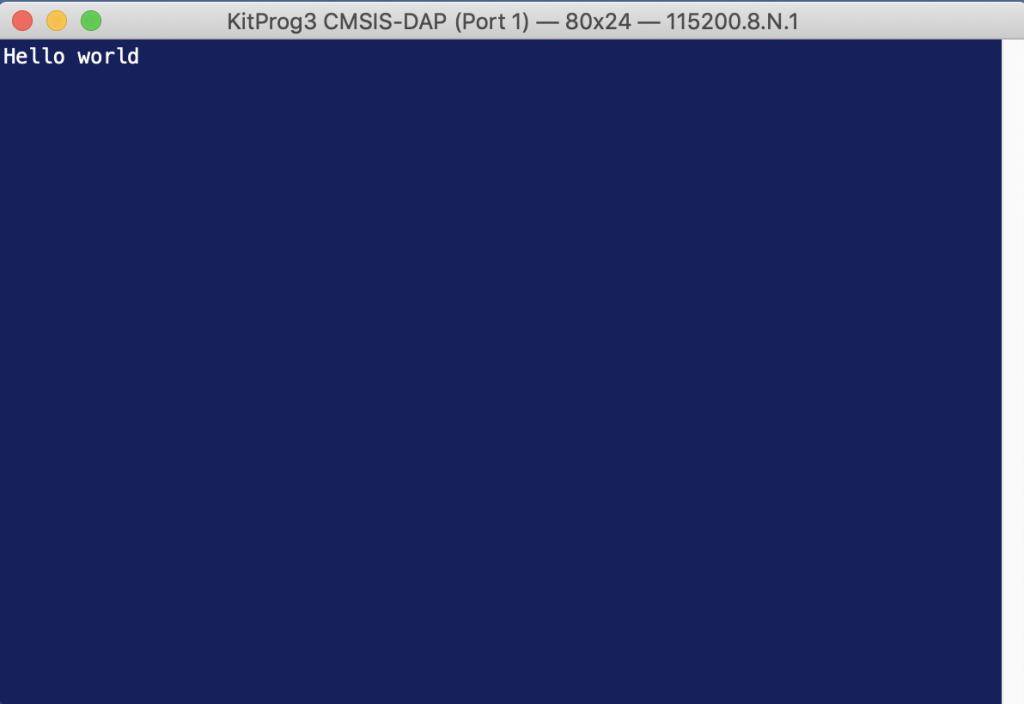
printf("Hello world\n");
xTaskCreate(ledTask,"LED Task",100,0,5,0);
vTaskStartScheduler();
}
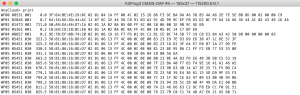
Once you program it you should have a blinking LED + a serial terminal that says “Hello world”
Now that you having a working test jig we will turn ourselves to fixing up the ws2812 driver.
Configure the SPI and DMA
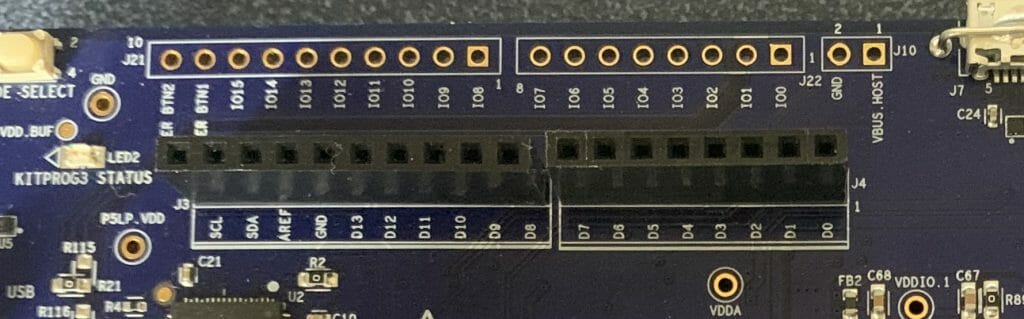
As I discussed in the previous article the I use the SPI to drive the sequence of 110 (for 1’s) or 100 (for 0’s) out to the string of WS2812B LEDs. The only difference is that this time I will use SCB0 and P0[2]. Why? I wanted to save all of the pins on the Arduino headers for the display. This lead me to the row of pins on the outside of the header labeled IO0->IO7
Then I looked at the schematic and found:
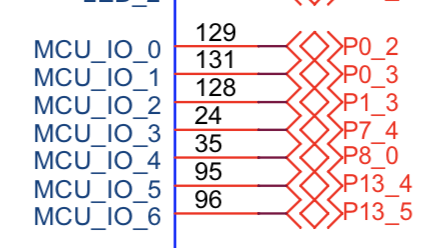
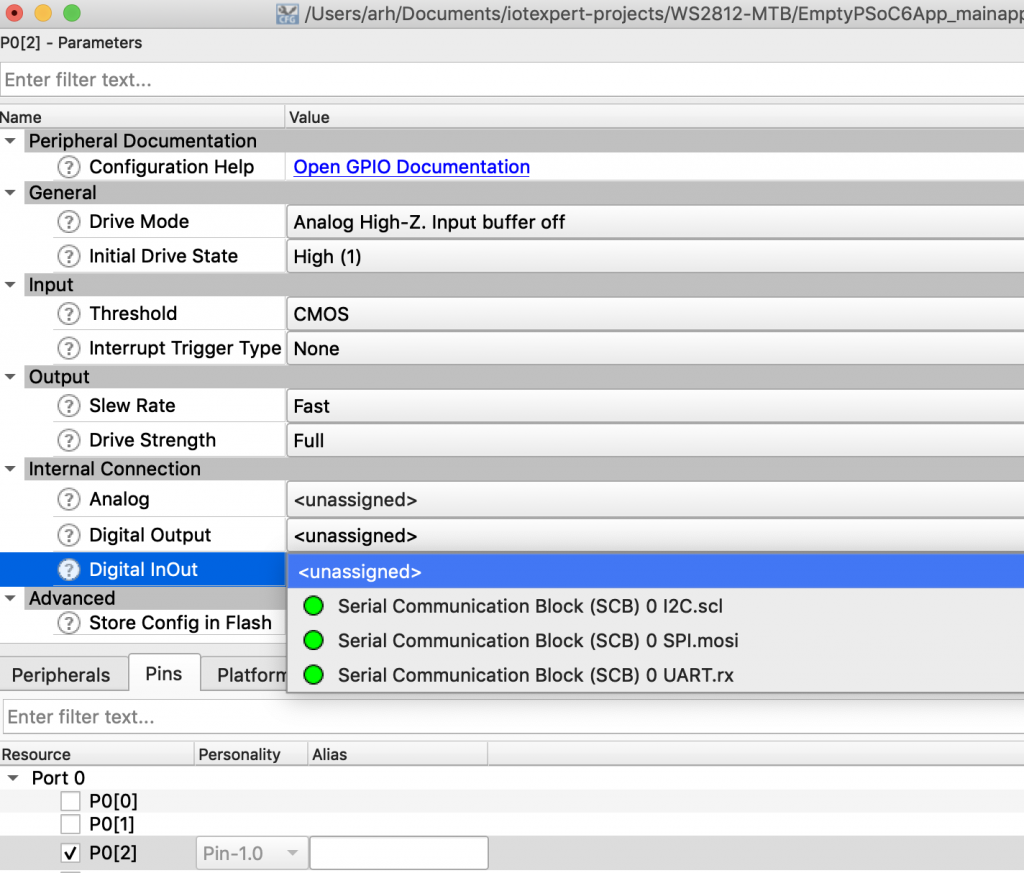
OK I know what the pins are, but how do I know which SCB to attach to? I started up the device configurator, then went through each of the pins, enabled them, then looked at what the digital inout was attached to by clicking on the dropdown menu. In the picture below you can see that P0[2] is connected to SCB0 SPI.mosi.
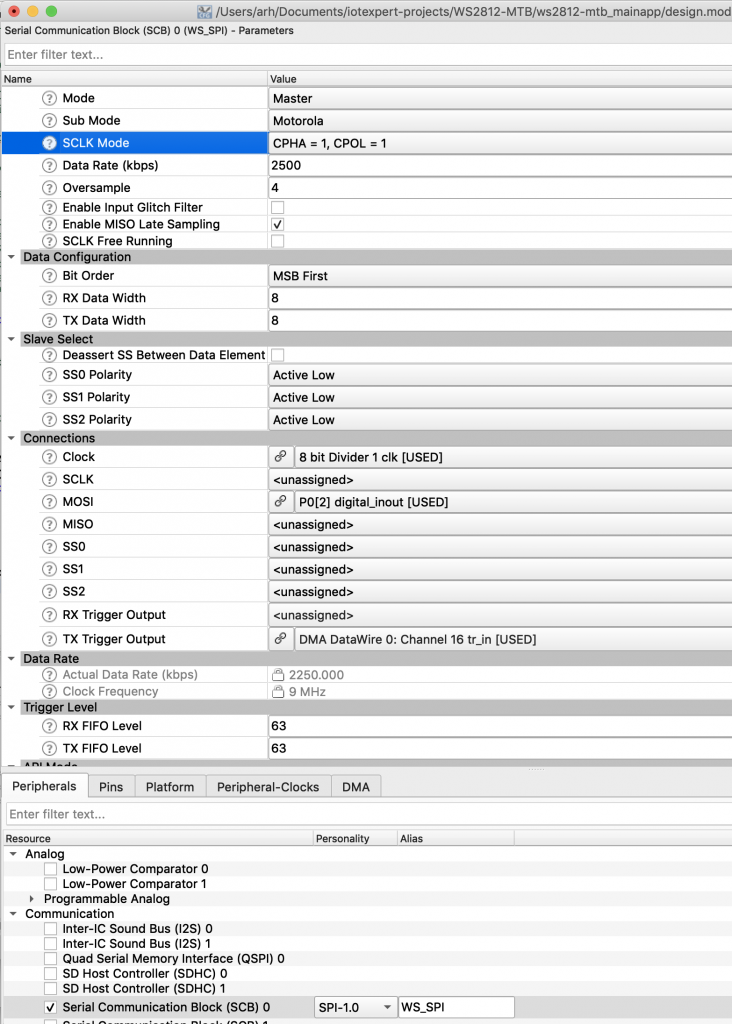
Now I know SCB0. You can read about how I chose the SPI configurations values in the previous article, but for today choose:
- SCB=SCB0
- master
- cpha=1 cpol=1
- oversample=4
- clk = clk1
- MOSI = P0[2]
- Tx trigger = DMA0 Channel 16
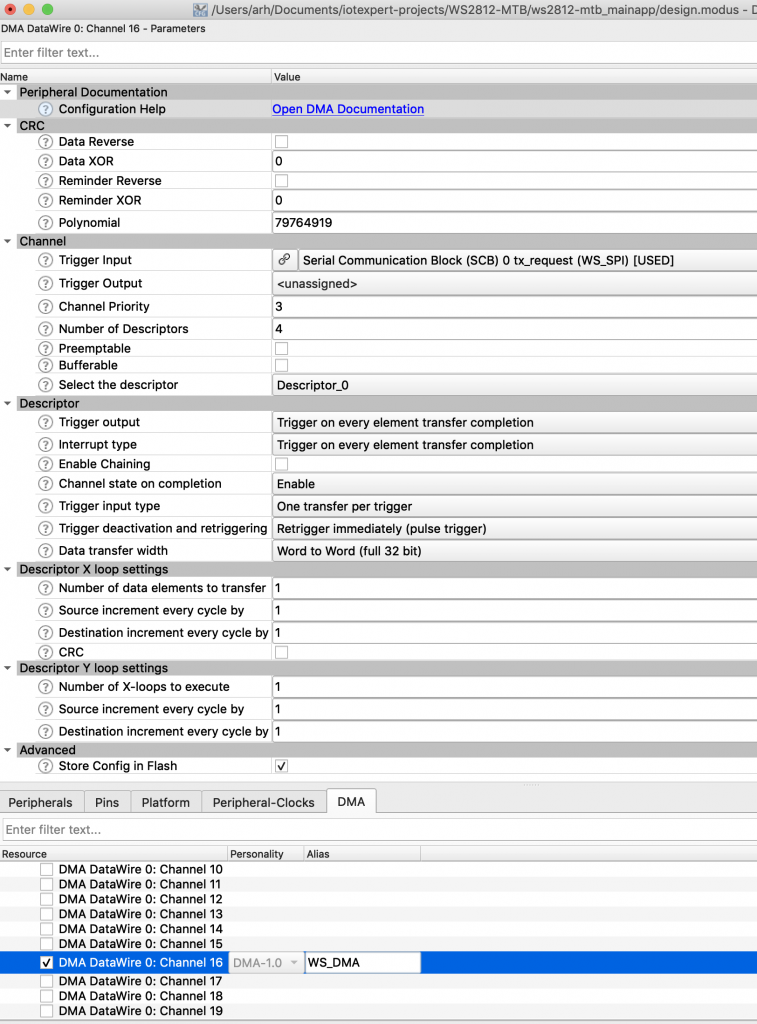
The next step is to turn on the DMA block DMA Datawire 0: Channel 16. I am going to copy the configuration files from the PSoC Creator project, so all I need is the alias for the block
WS2812 Task Architecture
In the original article I have one flat main.c file (actually main_cm4.c) But, when I look back, I should have used an RTOS (bad Alan). Basically, I am going to copy the original main_cm4.c and hack it up into a new architecture. My program will have a task called ws2812Task which will manage the LEDs. The task will “sit” on a queue that is waiting for the rest of the system to send command messages. Those messages are in the following format:
typedef enum {
	ws2812_cmd_update,            /* no arguments */
	ws2812_cmd_autoUpdate,        /* data is a binary true for autoupdate false for no update  */
	ws2812_cmd_setRGB,            /* data is pixel number + rgb                                */
	ws2812_cmd_setRange,          /* data is 0xFF00 bits for start and 0x00FF bits for y + rgb */
	ws2812_cmd_initMixColorRGB,   /* no arguments, turns led string to rgbrgbrgb...                */
}ws2812_cmd_t;

typedef struct {
	ws2812_cmd_t cmd;
	uint32_t data;
	uint8_t red;
	uint8_t green;
	uint8_t blue;

} ws2812_msg_t;
In addition I will create some public functions which will setup a message and submit it into the queue. The last piece of the puzzle is that I will have a software timer which will run every 30ms to update the LEDs (if the timer is running)
Create ws2812.h
The public interface to my ws2812Task will reside in a new file called “ws2812.h”. It is pretty simple
- Define the number of LEDs
- Define the enumerated list of legal commands
- Define the Queue structure ws2812_msg_t (lines
- 5 helper functions which create a command message and submit it into the queue (lines 15-19)
- the function prototype for the ws2812Task (line 19)
/*
 * ws2812.h
 *
 *  Created on: Jun 15, 2019
 *      Author: arh
 */

#ifndef WS2812_H_
#define WS2812_H_

#include "stdbool.h"
#include "FreeRTOS.h"
#include "queue.h"

#define ws2812_NUM_PIXELS (144)

extern QueueHandle_t ws2812QueueHandle;


typedef enum {
	ws2812_cmd_update,            /* no arguments */
	ws2812_cmd_autoUpdate,        /* data is a binary true for autoupdate false for no update  */
	ws2812_cmd_setRGB,            /* data is pixel number + rgb                                */
	ws2812_cmd_setRange,          /* data is 0xFF00 bits for start and 0x00FF bits for y + rgb */
	ws2812_cmd_initMixColorRGB,   /* no arguments, turns string to rgbrgbrgb...                */
}ws2812_cmd_t;

typedef struct {
	ws2812_cmd_t cmd;
	uint32_t data;
	uint8_t red;
	uint8_t green;
	uint8_t blue;

} ws2812_msg_t;

extern QueueHandle_t ws2812QueueHandle;

void ws2812_update(void);
void ws2812_autoUpdate(bool option);
void ws2812_setRGB(int led,uint8_t red, uint8_t green, uint8_t blue);
void ws2812_setRange(int start, int end, uint8_t red,uint8_t green ,uint8_t blue);
void ws2812_initMixColorRGB(void);

void ws2812Task(void *arg);

#endif /* WS2812_H_ */
Create ws2812.c
To build the ws2812.c I start by opening the main_cm4.c from the original project and copying it into the ws2812.c. At the top I add the includes for ws2812.h and the includes for FreeRTOS. Next I declare the handle for the Queue and the Timer. I wanted to have a variable which kept track of the autoUpdate timer being turned on, so I declare a bool. The rest of the code is from the original program.
#include "ws2812.h"
#include "FreeRTOS.h"
#include "queue.h"
#include "timers.h"

QueueHandle_t ws2812QueueHandle;
TimerHandle_t ws2812TimerHandle;

bool wsAutoUpdateState = false;


#define WS_ZOFFSET (1)
#define WS_ONE3  (0b110<<24)
#define WS_ZERO3 (0b100<<24)
#define WS_SPI_BIT_PER_BIT (3)
#define WS_COLOR_PER_PIXEL (3)
#define WS_BYTES_PER_PIXEL (WS_SPI_BIT_PER_BIT * WS_COLOR_PER_PIXEL)

static uint8_t WS_frameBuffer[ws2812_NUM_PIXELS*WS_BYTES_PER_PIXEL+WS_ZOFFSET];
Next I build the 5 helper functions. These functions all have exactly the same form,
- declare a ws2812_msg_t
- fill it up
- send it to the queue
Notice that I wait 0 time to try to add to the queue. What that means is if the queue is full the message will get tossed away.
// These functions are helpers to create the message to send to the ws2812 task.

void ws2812_update(void)
{
	ws2812_msg_t msg;
	msg.cmd = ws2812_cmd_update;
	xQueueSend(ws2812QueueHandle,&msg,0);
}

void ws2812_autoUpdate(bool option)
{
	ws2812_msg_t msg;
	msg.cmd = ws2812_cmd_autoUpdate;
	msg.data = option;
	xQueueSend(ws2812QueueHandle,&msg,0);
}
void ws2812_setRGB(int led,uint8_t red, uint8_t green, uint8_t blue)
{
	ws2812_msg_t msg;
	msg.cmd = ws2812_cmd_setRGB;
	msg.red = red;
	msg.blue = blue;
	msg.green = green;
	msg.data = led;
	xQueueSend(ws2812QueueHandle,&msg,0);

}
void ws2812_setRange(int start, int end, uint8_t red,uint8_t green ,uint8_t blue)
{

	ws2812_msg_t msg;
	msg.cmd = ws2812_cmd_setRange;
	msg.red = red;
	msg.blue = blue;
	msg.green = green;
	msg.data = start << 16 | end;
	xQueueSend(ws2812QueueHandle,&msg,0);

}
void ws2812_initMixColorRGB(void)
{
	ws2812_msg_t msg;
	msg.cmd = ws2812_cmd_initMixColorRGB;
	xQueueSend(ws2812QueueHandle,&msg,0);
}
The next block of code is largely unchanged from the original program, except where I fixed some small differences between the PSoC Creator generated code and the ModusToolbox generated code.
// Function WS_DMAConfiguration
// This function sets up the DMA and the descriptors

#define WS_NUM_DESCRIPTORS (sizeof(WS_frameBuffer) / 256 + 1)
static cy_stc_dma_descriptor_t WSDescriptors[WS_NUM_DESCRIPTORS];
static void WS_DMAConfigure(void)
{
    // I copies this structure from the PSoC Creator Component configuration
    // in generated source
    const cy_stc_dma_descriptor_config_t WS_DMA_Descriptors_config =
    {
    .retrigger       = CY_DMA_RETRIG_IM,
    .interruptType   = CY_DMA_DESCR_CHAIN,
    .triggerOutType  = CY_DMA_1ELEMENT,
    .channelState    = CY_DMA_CHANNEL_ENABLED,
    .triggerInType   = CY_DMA_1ELEMENT,
    .dataSize        = CY_DMA_BYTE,
    .srcTransferSize = CY_DMA_TRANSFER_SIZE_DATA,
    .dstTransferSize = CY_DMA_TRANSFER_SIZE_WORD,
    .descriptorType  = CY_DMA_1D_TRANSFER,
    .srcAddress      = NULL,
    .dstAddress      = NULL,
    .srcXincrement   = 1L,
    .dstXincrement   = 0L,
    .xCount          = 256UL,
    .srcYincrement   = 0L,
    .dstYincrement   = 0L,
    .yCount          = 1UL,
    .nextDescriptor  = 0
    };

    for(unsigned int i=0;i<WS_NUM_DESCRIPTORS;i++)
    {
        Cy_DMA_Descriptor_Init(&WSDescriptors[i], &WS_DMA_Descriptors_config);
        Cy_DMA_Descriptor_SetSrcAddress(&WSDescriptors[i], (uint8_t *)&WS_frameBuffer[i*256]);
        Cy_DMA_Descriptor_SetDstAddress(&WSDescriptors[i], (void *)&WS_SPI_HW->TX_FIFO_WR);
        Cy_DMA_Descriptor_SetXloopDataCount(&WSDescriptors[i],256); // the last
        Cy_DMA_Descriptor_SetNextDescriptor(&WSDescriptors[i],&WSDescriptors[i+1]);
    }

    // The last one needs a bit of change
    Cy_DMA_Descriptor_SetXloopDataCount(&WSDescriptors[WS_NUM_DESCRIPTORS-1],sizeof(WS_frameBuffer)-256*(WS_NUM_DESCRIPTORS-1)); // the last
    Cy_DMA_Descriptor_SetNextDescriptor(&WSDescriptors[WS_NUM_DESCRIPTORS-1],0);
    Cy_DMA_Descriptor_SetChannelState(&WSDescriptors[WS_NUM_DESCRIPTORS-1],CY_DMA_CHANNEL_DISABLED);

    Cy_DMA_Enable(WS_DMA_HW);
}

// Function: WS_DMATrigger
// This function sets up the channel... then enables it to dump the frameBuffer to pixels
void WS_DMATrigger()
{

    cy_stc_dma_channel_config_t channelConfig;
    channelConfig.descriptor  = &WSDescriptors[0];
    channelConfig.preemptable = false;
    channelConfig.priority    = 3;
    channelConfig.enable      = false;
    Cy_DMA_Channel_Init(WS_DMA_HW, WS_DMA_CHANNEL, &channelConfig);
    Cy_DMA_Channel_Enable(WS_DMA_HW,WS_DMA_CHANNEL);
}
The next block of code is just a function which the autoupdate timer can call to trigger the DMA to update the stripe of LEDs.
// This function is called by the software timer which is used to autoupdate the LEDs
// It checks to make sure that the DMA is done... if not it doesnt do anything
void ws2812CallbackFunction( TimerHandle_t xTimer )
{
    if((Cy_DMA_Channel_GetStatus(WS_DMA_HW,WS_DMA_CHANNEL) & CY_DMA_INTR_CAUSE_COMPLETION))
    {
        WS_DMATrigger();
    }
}
From lines 156-372 I use the original functions to implement the frame buffer for WS2812 (you can read about that in the original article). I am not including these functions here.
The final block of code is the actual task which manages the ws2812 led string. On lines 379->395 it sets up the SPI, DMA, Queue and Timer. Then it goes into the infinite loop waiting for command messages. The message loop just looks at the command, the calls the correct helper function.
void ws2812Task(void *arg)
{
	ws2812_msg_t msg;
	cy_stc_scb_spi_context_t WS_SPI_context;

	vTaskDelay(100);

	printf("Starting ws2812 task\n");
	WS_runTest();
    WS_frameBuffer[0] = 0x00;
    WS_setRange(0,ws2812_NUM_PIXELS-1,0,0,0); // Initialize everything OFF
    Cy_SCB_SPI_Init(WS_SPI_HW, &WS_SPI_config, &WS_SPI_context);
    Cy_SCB_SPI_Enable(WS_SPI_HW);
    WS_DMAConfigure();

    // This queue handles messages from the keyboard
    ws2812QueueHandle = xQueueCreate( 10,sizeof(ws2812_msg_t));
    // This timer calls the update function every 30ms if it is turned on.
    ws2812TimerHandle = xTimerCreate("ws2812 timer",pdMS_TO_TICKS(30),pdTRUE,0,ws2812CallbackFunction );

    while(1)
    {
    		xQueueReceive(ws2812QueueHandle,&msg,0xFFFFFFFF);
    		switch(msg.cmd)
    		{
    		case ws2812_cmd_update:
    			if(!wsAutoUpdateState)
    			{
    				WS_DMATrigger();
    			}
    			break;
    		case ws2812_cmd_autoUpdate:
    			if(wsAutoUpdateState && msg.data == false)
    			{
    				xTimerStop(ws2812TimerHandle,0);
    			}
    			else if(!wsAutoUpdateState && msg.data == true)
    			{
    				xTimerStart(ws2812TimerHandle,0);
    			}
    			wsAutoUpdateState = msg.data;

    			break;
    		case ws2812_cmd_setRGB:
    			WS_setRGB( msg.data,msg.red,msg.green ,msg.blue);
    			break;
    		case ws2812_cmd_setRange:
    			WS_setRange(msg.data>>16 & 0xFFFF, msg.data&0xFFFF, msg.red,msg.green ,msg.blue);
    			break;
    		case ws2812_cmd_initMixColorRGB:
    			WS_initMixColorRGB();
    			break;
    		}
    }
}
Update main.c to use the Public Interface of ws2812.h
Initially when I did this, I just updated main.c. But, after thinking about it a little bit I decided that it was better to create a uartTask.h and uartTask.c to make the keyboard processing a bit more self contained. Starting with the public interface to uartTask.h. This file simply declares the function prototype for the uartTask.
/*
 * uartTask.h
 *
 *  Created on: Jun 16, 2019
 *      Author: arh
 */

#ifndef SOURCE_UARTTASK_H_
#define SOURCE_UARTTASK_H_

void uartTask(void *arg);


#endif /* SOURCE_UARTTASK_H_ */
I do not like to poll! Ever! That is the point of an RTOS. Don’t poll if you can at all get away from it. To avoid polling I set up the SCB UART to give an interrupt when it receives a character. In the ISR I then turn off the interrupts and increment a semaphore. In the main body of the task I “sit” on the semaphore and wait for it to be incremented. Once it is incremented, I read and process characters until there are no more. Then turn the interrupts back on.
The uartTask.c has three sections
- The header where I do all of the includes and define the semaphore
- The ISR where I turn off the interrupts and set the semaphore
- The main task.
First, the beginning of the file just does the normal includes. It also declares a context for the UART and it declares a handle for the semaphore.
/*
 * uartTask.c
 *
 *  Created on: Jun 16, 2019
 *      Author: arh
 */

#include <stdio.h>
#include "ws2812.h"
#include "FreeRTOS.h"
#include "task.h"
#include "semphr.h"
#include "cy_device_headers.h"
#include "cycfg.h"
#include "cy_pdl.h"

cy_stc_scb_uart_context_t UART_STDIO_context;
SemaphoreHandle_t UART_STDIO_SemaphoreHandle;
The ISR simply turns off the interrupt mask so that no interrupts happen until the Rx fifo is clear (line 24). Then clears the interrupt source (meaning tells the SCB to turn off the interrupt) so that it doesn’t just re-pend the interrupt (line 25). Then it increments the semaphore and does the normal FreeRTOS context switch if needed.
void UART_Isr(void)
{

	// Disable & clear the interrupt
	Cy_SCB_SetRxInterruptMask(UART_STDIO_HW,0);
	Cy_SCB_ClearRxInterrupt(UART_STDIO_HW, CY_SCB_RX_INTR_NOT_EMPTY);

	static BaseType_t xHigherPriorityTaskWoken;
	xHigherPriorityTaskWoken = pdFALSE;
	xSemaphoreGiveFromISR( UART_STDIO_SemaphoreHandle, &xHigherPriorityTaskWoken );
	portYIELD_FROM_ISR( xHigherPriorityTaskWoken );
}
The uartTask function has several parts
- Initialize the semaphore (line 36)
- Initialize the SCB and Interrupt (lines 38-49)
- Waits for the semaphore to be set (line 55)
- Loops until the Rx FIFO is empty (line 57)
- Reads a character and does correct operation with a giant switch (59-127)
- When all the characters are done being read (aka the Rx FIFO is empty) turn back on the interrupt (line 129)
void uartTask(void *arg)
{

	UART_STDIO_SemaphoreHandle = xSemaphoreCreateCounting( 0xFFFF,0); // Semaphore counts unprocessed key presses

	Cy_SCB_UART_Init(UART_STDIO_HW,&UART_STDIO_config,&UART_STDIO_context);
	cy_stc_sysint_t uartIntrConfig =
	{
			.intrSrc      = UART_STDIO_IRQ,
			.intrPriority = 7,
	};

	(void) Cy_SysInt_Init(&uartIntrConfig, &UART_Isr);
	NVIC_EnableIRQ(UART_STDIO_IRQ);
    Cy_SCB_SetRxInterruptMask(UART_STDIO_HW,CY_SCB_RX_INTR_NOT_EMPTY);
    setvbuf( stdin, NULL, _IONBF, 0 ); // Turn off Input buffering on STDIO
	Cy_SCB_UART_Enable(UART_STDIO_HW);

	printf("Starting UART Task\n");

	for(;;)
	{
		xSemaphoreTake( UART_STDIO_SemaphoreHandle, 0xFFFFFFFF); // Wait for a semaphore

		while(Cy_SCB_UART_GetNumInRxFifo(UART_STDIO_HW))
		{
			char c=getchar();
			switch(c)
			{
			case 'u':
				printf("Enable auto DMA updating\n");
				ws2812_autoUpdate(true);
				break;
			case 'U':
				printf("Disable auto DMA updating\n");

				ws2812_autoUpdate(false);
				break;
			case 't':
				printf("Update LEDs\n");
				ws2812_update();
				break;
			case 'r':
				ws2812_setRGB(0,0xFF,0,0);
				printf("Set LED0 Red\n");
				break;
			case 'g':
				ws2812_setRGB(0,0,0xFF,0);
				printf("Set LED0 Green\n");
				break;
			case 'O':
				ws2812_setRange(0,ws2812_NUM_PIXELS-1,0,0,0);
				printf("Turn off all LEDs\n");
				break;
			case 'o':
				ws2812_setRange(0,ws2812_NUM_PIXELS-1,0xFF,0xFF,0xFF);
				printf("Turn on all LEDs\n");
				break;
			case 'b':
				ws2812_setRGB(0,0,0,0xFF);
				printf("Set LED0 Blue\n");
				break;
			case 'R':
				ws2812_setRange(0,ws2812_NUM_PIXELS-1,0x80,0,0);
				printf("Turn on all LEDs RED\n");
				break;
			case 'G':
				ws2812_setRange(0,ws2812_NUM_PIXELS-1,0,0x80,0);
				printf("Turn on all LEDs Green\n");
				break;
			case 'B':
				ws2812_setRange(0,ws2812_NUM_PIXELS-1,0,0,0x80);
				printf("Turn on all LEDs Blue\n");
				break;
			case 'a':
				ws2812_initMixColorRGB();
				printf("Turn on all LEDs RGB Pattern\n");
				break;
			case '?':
				printf("u\tEnable Auto Update of LEDs\n");
				printf("U\tDisable Auto Update of LEDs\n");
				printf("t\tTrigger the DMA\n");
				printf("r\tSet the first pixel Red\n");
				printf("g\tSet the first pixel Green\n");
				printf("b\tSet the first pixel Blue\n");
				printf("O\tTurn off all of the pixels\n");
				printf("o\tSet the pixels to white full on\n");
				printf("R\tSet all of the pixels to Red\n");
				printf("G\tSet all of the pixels to Green\n");
				printf("B\tSet all of the pixels to Blue\n");
				printf("a\tSet pixels to repeating RGBRGB\n");
				printf("?\tHelp\n");
				break;
			}
		}
		// turn the rx fifo interrupt back on
        Cy_SCB_SetRxInterruptMask(UART_STDIO_HW,CY_SCB_RX_INTR_NOT_EMPTY); // Turn on interrupts for Rx buffer
	}
}
Rewire to Use a Level Shifter
At the end of the previous article I said “I’m Lucky it Works. The last thing to observe in all of this is that I am driving the LED string with a 5V wall wart. And according to the datasheet VIH is 0x7 * VDD = 3.5V … and I am driving it with a PSoC 6 with 3.3V. Oh well.” This time I am not so lucky. I am not totally sure why (probably because I used a different power supply) but it doesn’t work. So I put my lab assistant to work putting together a level shifter that I got from SparkFun. For those of you long time readers, you will say, “Hey that isn’t Nicholas”. Well, it is my other lab assistant, Anna. And she is just as good at soldering!
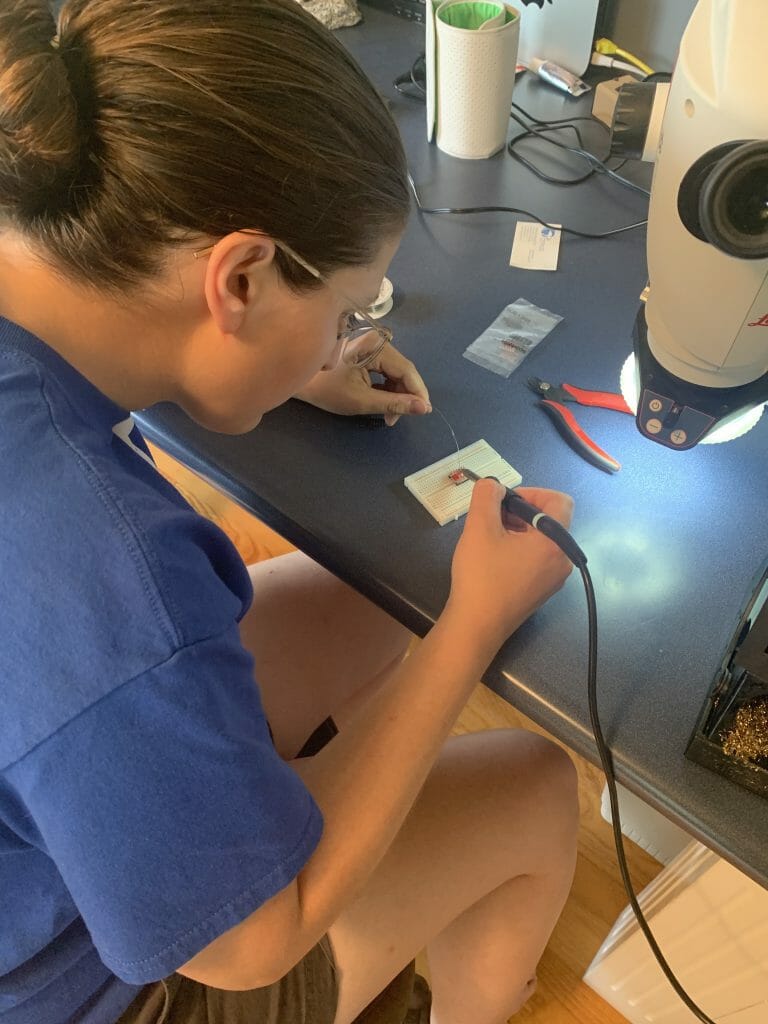
Now when I try it, everything works!
What is next?
As I was working on the project, I thought of several things that I would like to add to the project including:
- A random color / blinking mode
- A CapSense button and slider
- The TFT display
- Ability to handle multiple strips of LEDs
But for now, all that stuff is for another day.
You can find all of this code at my github site. git@github.com:iotexpert/WS2812-MTB.git

4 Comments
Very nice articles.
Who is your hookup for the CYW43012 based board?
You can catch my email through my github profile.
Never-mind I read your about page.
🙂
My hook is that the engineering team that makes them works for me 🙂 which makes it easy to get. We are going to be releasing the new ones broadly this quarter.