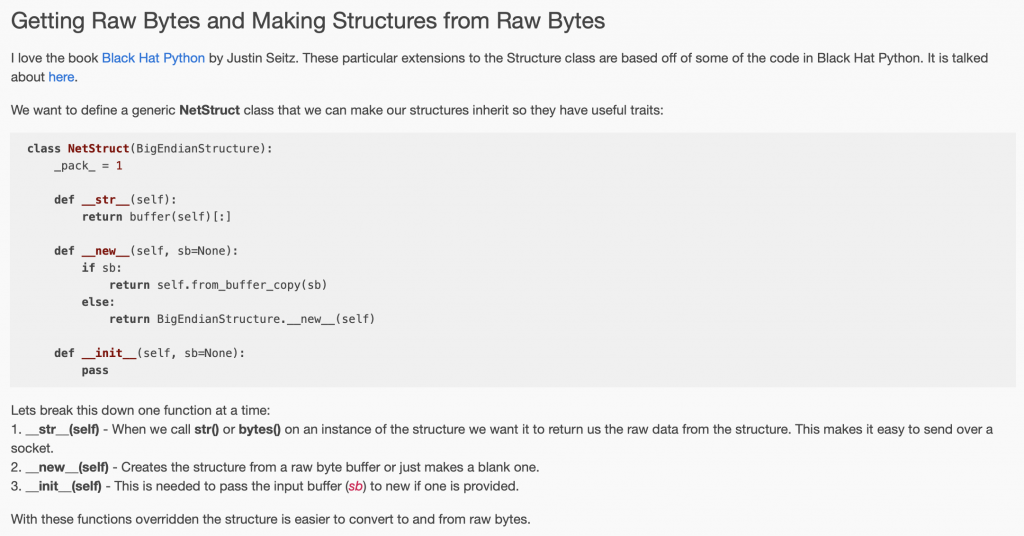
Stupid Python Tricks: Implementing a c-switch

Summary

A discussion of a simple method in Python to implement the equivalent of a c programming style switch.

Story

Recently, I was working on an example where I would have used something like this if I was programming in C (emphasis on like)

#include <stdio.h>

typedef enum {
    op0,
    op1,
    op2,
    op3
} opcodes_t;

int main(int argc,char **argv)
{
    opcodes_t excode = op1;

    switch(excode)
    {
        case 0:
            printf("opcode 0");
            break;
        case 1:
            printf("opcode 1");
            break;
        case 2:
            printf("opcode 2");
            break;
        case 3:
            printf("opcode 3");
            break;

    }

}

And, as you know, I am not a real Python programmer.  I tried switch… obviously to no avail.  So now what?  Well in the example above I have

  • A list of keys, the enumerated opcode_t
  • That have a values e.g. “opcode 0” etc.

Sounds like a dictionary.  Here is the equivalent code in Python:

opcode_t = {
    0:"opcode 0",
    1:"opcode 1",
    2:"opcode 2",
    3:"opcode 3",
}

ex1 = 1

print(opcode_t[ex1])

But what happens if a key is missing?  The bracket[] method of a dictionary is equivalent to the dictionary method “get”.   The “get” method has a default case if they key is missing from the dictionary.  Here is the example code:

opcode_t = {
    0:"opcode 0",
    1:"opcode 1",
    2:"opcode 2",
    3:"opcode 3",
}

ex1 = 1

# will return "not found" if the key is not in the dictionary
print(opcode_t.get(ex1,"Not Found"))

What if you want to do something?  Values in dictionaries can be “function pointers” (is what I would call them in C).  They are probably properly called references in Python.  Regardless, here is some absurd code that demonstrates the example.

def opcode0():
    return "opcode 0"

def opcode1():
    return "opcode 1"

def opcode2():
    return "opcode 2"

def opcode3():
    return "opcode 3"

opcode1_t = {
    0:opcode0,
    1:opcode1,
    2:opcode2,
    3:opcode3,
}

ex1 = 1

print(opcode1_t[ex1]())

My mDNS Example

The example that lead me to this problem was decoding mDNS headers which have 8 fields of different lengths and possible values.  Here is what I actually did:

    qrText = {0:"Query",1:"Response"}
    opcodeText = {0:"Query",1:"IQuery",2:"Status",3:"reserved",4:"Notify",5:"Update"}
    aaText = {0:"Non Authoratative",1:"Authoratative"}
    tcText = {0:"No Truncation",1:"Truncation"}
    rdText = {0:"No Recursion",1:"Recursion"}
    raText = {0:"No Recursion Available",1:"Recursion Available"}
    zText = {0:"Reserved"}
    rcodeText = {
        0:"No Error",
        1:"Format Error",
        2:"Server Failure",
        3:"Name Error",
        4:"Not implemented",
        5:"Refused - probably a policy reason",
        6:"A name exists when it should not",
        7:"a resource record set exists that should not",
        8:"NX RR Set - A resource record set that should exist does not",
        9:"Not Authorized",
        10:"Not Zone",
    }

    def printHeader(self):
        print(f"id = {self.id}")
        print(f"qr = {self.qr} {self.qrText.get(self.qr,'Unknown')}")
        print(f"opcode = {self.opcode} {self.opcodeText.get(self.opcode,'Unknown')}")
        print(f"aa = {self.aa} {self.aaText.get(self.aa,'Unknown')}")
        print(f"tc = {self.tc} {self.tcText.get(self.tc,'Unknown')}")
        print(f"rd = {self.rd} {self.rdText.get(self.rd,'Unknown')}")
        print(f"ra = {self.ra} {self.raText.get(self.ra,'Unknown')}")
        print(f"z = {self.z} {self.zText.get(self.z,'Unknown')}")
        print(f"response code = {self.rcode} {self.rcodeText.get(self.rcode,'Unknown')}")
        print(f"rc question count = {self.qdcount}")
        print(f"answer count = {self.ancount}")
        print(f"name server count = {self.nscount}")
        print(f"additional record count = {self.arcount}")

Stupid Python Tricks: C-Structures using the ctypes Module (part 2)

Summary

A discussion of overriding __new__ and __init__ to simplify the creation Python cstruct.Structure objects.

Creating a new cytpes.BigEndianStructure

Here is a simple example of a 2-byte structure using the ctypes.BigEndianStructure class.

In this example I:

  • Derive a new class called MyStruct from the BigEndianStructure
  • Declare three fields called first (4-bits), second (4-bits) and third (8-bits).
  • Create a new object of MyStruct type called “a”
  • Set the values of the three fields
  • Print it out.
import ctypes

class MyStruct(ctypes.BigEndianStructure):
    _pack_ = 1
    _fields_ = [    ("first",ctypes.c_uint8,4),
                    ("second",ctypes.c_uint8,4),
                    ("third",ctypes.c_uint8,8),
                 ]

# Create a blank MyStruct
a = MyStruct()
a.first  = 0xa
a.second = 0xb
a.third  = 0xcd
print(bytes(a))

When I run this you can see that indeed I get 0xABCD as the result.  Several comments about this:

  • Notice that it is BigEndian (which is good since that is what I declared)
  • 0xA = 4-bits, 0-xB=4-bit so 0xAB is the first byte.
(venv) $ python ex-struct.py 
b'\xab\xcd'

You can also create a new structure by calling the class method “from_buffer_copy” with parameter of bytes type.

# Create a MyStruct initialized to Hex ABCD
b = MyStruct.from_buffer_copy(b"\xab\xcd")
print(bytes(b))

When you run this, you get the same result.

(venv) $ python ex-struct.py 
b'\xab\xcd'

What I was really hoping to be able to do is create a new structure from an array of bytes like this:

# Create a new MyStruct from an Array of bytes ... this is gonna crash
c = MyStruct(b"\x0abb\xcd")
print(bytes(c))

But that crashes.

(venv) $ python ex-struct.py 
b'\xab\xcd\x00\x00'
b'\nbb\xcd'
Traceback (most recent call last):
  File "ex-struct.py", line 24, in <module>
    c = MyStruct(b"\x0abb\xcd")
TypeError: an integer is required (got type bytes)
(venv) $

And for some reason this took me a really long time to figure out.  You probably say to yourself, “Im not surprised it took him so long to figure out.  He is programming in Python so he probably isn’t very smart anyway”

Overriding __new__ & __init__

While working to understand, I ran into the article “A better way to work with raw data types in Python” which I found interesting.  Here is a screen shot of a bit of the code.

OK.  So lets add the dunder init and dunder new methods to my class.

class MyStruct1(ctypes.BigEndianStructure):
    _pack_ = 1
    _fields_ = [    ("first",ctypes.c_uint8,4),
                    ("second",ctypes.c_uint8,4),
                    ("third",ctypes.c_uint8,8),
                 ]

    def __new__(self,sb=None):
        if(sb):
            return self.from_buffer_copy(sb)
        else:
            return ctypes.BigEndianStructure.__new__(self)

    def __init__(self,sb=None):
        pass

print("Next case")

c = MyStruct1()
c.first  = 0xa
c.second = 0xb
c.third  = 0xcd
print(bytes(c))

d = MyStruct1(b'\xab\xcd')
print(bytes(d))

Now when I run it, things are good.

(venv) $ python ex-struct.py 

Next case
b'\xab\xcd'
b'\xab\xcd'

Why do I need the __init__?

So, why do I need the dunder init that doesn’t actually do anything? Presumably if I was a real python programmer I would have already known the answer.  But I’m not, so I didn’t.

The first question I had is what does the Python keyword “pass” do?  The answer is nothing.  It is a nop or void if you prefer and is there just to make the program legal as a function has to have some function.

Then onto the Python documentation where I found that if you have an __new__ method that returns an object of the subtype Python will automatically call the __init__ function.

A Conundrum

The other interesting function that the author added was added was:

def __str__(self):
  return buffer(self)[:]

This function actually crashes because there is no member called “buffer”.  I am not sure if the cause is:

  • The buffer attribute was left out of the class by the author
  • The buffer was formerly an attribute of the Python 2.x ctypes base class (this is what I suspect)

Stupid Python Tricks: C-Structures using the ctypes Module

Summary

A discussion of reading data out of stream of bytes (encoded in a C-like structure) using the Python ctypes module.  The data in the stream is a UDP packet that represents an mDNS query or request.  The purpose of this article is to explain a process for decoding bytes streams in Python

Story

While I was working on A-Class Linux implementations I fell down the rabbit hole of mDNS.  mDNS is a part of the set of protocols that make up “Zero Configuration Networking”.  In order to understand the protocol I decided to implement (partially) an mDNS server.  You can read about that protocol and my implementation – when I get done :-).  However, all of that isn’t really important to this article, but it did bring me to dig into techniques for examining bytes in Python.

I doubt that this article is canonical, but I hope that it is at least useful.  I did find quite a few partial discussions of this topic, but I had to dig into to really understand.

Python Comment
bytes A built in object to represent an immutable sequence of single bytes.
bytearray A built in object to represent a mutable sequence of single bytes.
struct A module to encode and decode bytes from c-like structures (unfortunately the byte is an atomic unit of the struct module)
ctypes A module to interface to C functions and data.  It contains a bunch of classes which can be used to interface with C-Structures (like the struct module)

There are bunches of web hits on this topic.  However, here are a few which I found useful.

Link Comment
link A basic discussion of the ctypes module and the basic classes
link A discussion of the ctypes.sizeof function
link A discussion of the bytearray
link A Better Way to Work with Raw Data Types in Python

The UDP Header for a mDNS Packet

The IETF RFC 6895 documents the header format for mDNS (and DNS) packets.  The header contains data in Big Endian format encoded into 12 bytes that are broken up into bits, several-bits, and a few 16-bit integers.  Here is snapshot from the RFC.


A Red Herring

OK, I admit it.  I am a C-Programmer from way back.  My first inclination to decode the bytes looked like this:

  • Using shifts and or’s to assemble the bytes into big endian uint16s e.g. line 2
  • Using bit masks and logic “and” with or’s and shifts to pick out bit fields e.g. line 12
  • Using a tower of if/elif/elif/else to decode the individual values e.g. lines

Here is my first crack at this.

    id = message[0] << 8 | message[1]
    print(f"Id = {id}")
   
    QRFlag = (message[2] & 0x80) >> 7
    if QRFlag == 0:
        QRFlagText = "QUERY"
    else:
        QRFlagText = "RESPONSE"
        
    print(f"Query Flag = {QRFlagText}")

    opCode = (0b01111000 & message[2]) >> 3
    if opCode == 0:
        opCodeText = "Query"
    elif opCode == 1:
        opCodeText = "IQUERY"
    elif opCode == 2:
        opCodeText = "Status"
    elif opCode == 3:
        opCodeText = "Reserved"
    elif opCode == 4:
        opCodeText = "Notify"
    elif opCode == 5:
        opCodeText = "Update"
    else :
        opCodeText = "Unknown"
   
    print(f"Opcode ={opCode} {opCodeText}")

    AAFlag = (message[2] & 0b00000100) >> 2
    AAFlagText = "Authoritative" if AAFlag == 1 else "Non-Authoritative"
    print(f"AA Flag = {AAFlag} {AAFlagText}")

    TCFlag = (message[2] & 0b00000010) >> 1
    TCFlagText = "Truncation" if TCFlag == 1 else "No Truncation"
    print(f"TCFlag = {TCFlag} {TCFlagText}")

    RDFlag = message[2] & 0b00000001
    RDFlagText = "Recursion" if RDFlag == 1 else "No Recursion"
    print(f"RDFlag = {RDFlag} {RDFlagText}")

    RAFlag = (message[3] & 0b10000000) >> 7
    RAFlagText = "Recursion Available" if RDFlag == 1 else "No Recursion Available"
    print(f"RAFlag = {RAFlag} {RAFlagText}")

    ZFlag =  (message[3] & 0b01110000) >> 4
    print(f"Reserved ZFlag = {ZFlag}")

    RCCode = message[3] & 0b00001111
    if RCCode == 0:
        RCCodeText = "No Error"
    elif RCCode == 1:
        RCCodeText == "Format Error"
    elif RCCode == 2:
        RCCodeText == "Server Failure"
    elif RCCode == 3:
        RCCodeText == "Name Error"
    elif RCCode == 4:
        RCCodeText == "Not Implemented"
    elif RCCode == 5:
        RCCodeText == "Refused"
    elif RCCode == 6:
        RCCodeText == "Yx Domain"
    elif RCCode == 7:
        RCCodeText == "YX RR Set"
    elif RCCode == 8:
        RCCodeText == "NX RR Set"
    elif RCCode == 9:
        RCCodeText == "Not Authorized"
    elif RCCode == 10:
        RCCodeText == "Not Zone"

    print(f"RCCode = {ZFlag} {RCCodeText}")


    QDCount = message[4]<<8  | message[5]
    ANCount = message[6]<<8  | message[7]
    NSCount = message[8]<<8  | message[9]
    ARCount = message[10]<<8 | message[11]
    print(f"Questions = {QDCount} Answers = {ANCount} Name Servers = {NSCount} Additional Records = {ARCount}")

Encoding a c-structure with Bits

I didn’t really like the above implementation.  So I kept digging.  After a while I found the ctypes module.  This lets you

  • Derive a new class from the BigEndianStructure class (line 1)
  • Pack all of the bits and bytes next to each other (line 2)
  • Specify the field names, type and optionally the length in bits (line
class dnsHeader(ctypes.BigEndianStructure):
    _pack_ = 1
    _fields_ = [    ("id",ctypes.c_uint,16),
                    ("qr",ctypes.c_uint,1),
                    ("opcode",ctypes.c_uint,4),
                    ("aa",ctypes.c_uint,1),
                    ("tc",ctypes.c_uint,1),
                    ("rd",ctypes.c_uint,1),
                    ("ra",ctypes.c_uint,1),
                    ("z",ctypes.c_uint,3),
                    ("rcode",ctypes.c_uint,4),
                    ("qdcount",ctypes.c_uint16),
                    ("ancount",ctypes.c_uint16),
                    ("nscount",ctypes.c_uint16),
                    ("arcount",ctypes.c_uint16),

    ]

When you receive data from a socket you will get a tuple that contains

  1. a “bytes” type object containing the raw bytes of the message
  2. a “tuple” containing the IP address (not relevant to this discussion)
    (message, address) = UDPServerSocket.recvfrom(bufferSize)

Now that you have the bytes you can create an object of dnsHeader type to interpret the bytes.  The ctypes class method “from_buffer_copy” will take an array of bytes that is at least the length of the structure and return an object of the type of “dnsHeader”.

    dnsh = dnsHeader.from_buffer_copy(message)

Then you can look at the individual fields like this:

print(f"id = {self.id}")

Stupid Python Tricks – Ensure PIP & Virtual Environments

Summary

This article will show you how to fix your Python setup such that virtual environments that you create will have the correct version of PIP

The Story

I frequently take screen shots as part of my article writing process.  And it absolutely drives me crazy to have “crap” on the screen e.g. warning messages.  I was recently working on an article about PyVISA – a Python package for interacting with Lab Instruments – when I got this error message about the wrong PIP version.

But how can this be as I know that I have the correct version (which at the time was 20.0.2).  You obviously can “fix” this by running an upgrade of pip in your virtual environment.

But that doesn’t really “fix” it.  It just means that the virtual environment you just created has the most up to date PIP.  What is frustrating is that when you exit the virtual environment, the PIP version is correct (look 20.0.2)

Why are the environments differ?   The answer is when you create a virtual environment it will copy Python, pip and easy_install to your binary directory.

As part of doing this it will pickup the “ensurepip” version of PIP which is embedded in the Python installation on your computer.  Ensure pip just ensures that there will be a pip version available in any given Python installation even though Pip is not installed with Python.  On my computer the ensurepip is embedded deeply in a Hombrew directory:

In the screen above you can see that my ensurepip has “19.2.3” when the rest of my computer is set to “20.0.2”. So how do you fix the ensurepip?  Well I first thought that perhaps running the “ensurepip” with the upgrade flag would do it.  Here is what happens.  It seems to fix it.  (but it doesn’t).

The only way that I know how to fix it is install the Python module upgrade_ensurepip.  Here are the commands

  • pip3 install upgrade_ensurepip
  • python3 -m upgrade_ensurepip

Now you when create a virtual environment you will end up with the correct PIP

If you look in the directory you will find that it adds the “pip… whl” director into the ensurepip directory

And it modifies the “_PIP_VERSION” in the ensurepip package __init.py

Stupid Python Tricks: VSCODE c_cpp_properties.json for Linux Kernel Development

Summary

This article shows you how to create a Python program that creates a Visual Studio Code c_cpp_properties.json which will enable intellisense when editing Linux Kernel Modules for Device Drivers.

Story

I am working my way through understanding, or at least trying to understand, Linux Kernel Modules – specifically Linux Device Drivers.  I have been following through the book Linux Device Drivers Development by John Madieu

There are a bunch of example codes in the book which you can “git”

$ git remote -v
origin  https://github.com/PacktPublishing/Linux-Device-Drivers-Development (fetch)
origin  https://github.com/PacktPublishing/Linux-Device-Drivers-Development (push)
$

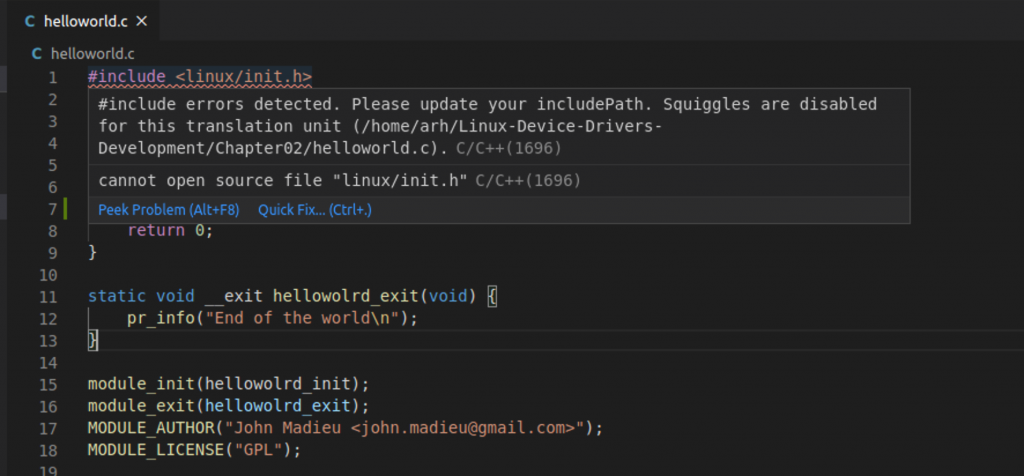
When I started looking at the Chapter02 example I first opened it up in Visual Studio Code.  Where I was immediately given a warning about Visual Studio Code not knowing where to find <linux/init.h>

And, when you try to click on the “KERN_INFO” symboled you get this nice message.

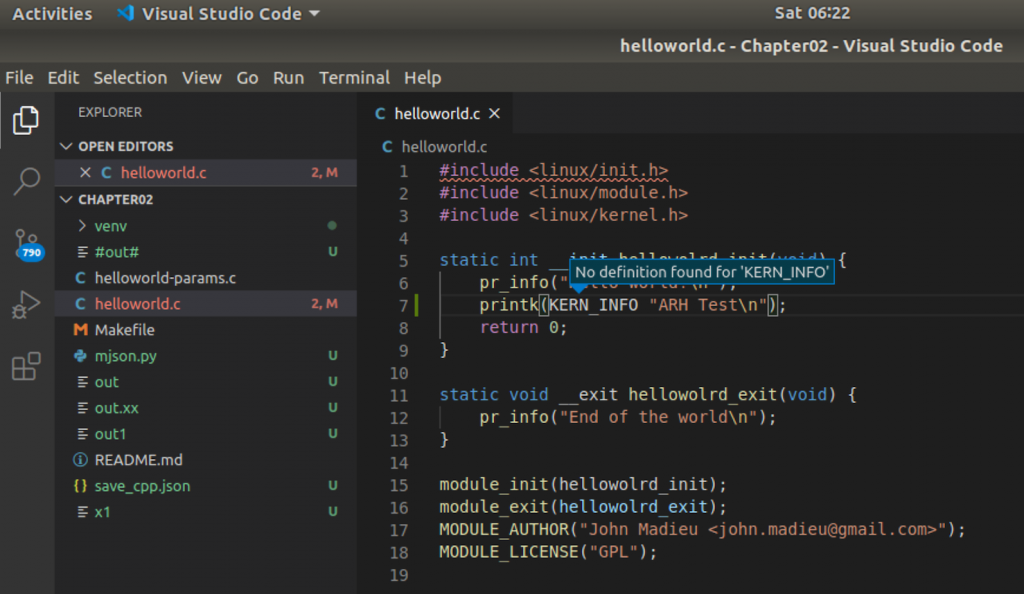
In order to fix this you need to setup the “c_cpp_propertiese.json” to tell Visual Studio Code how to make intellisense work correctly. But, what is c_cpp_properties.json?

C_CPP_PROPERTIES.JSON

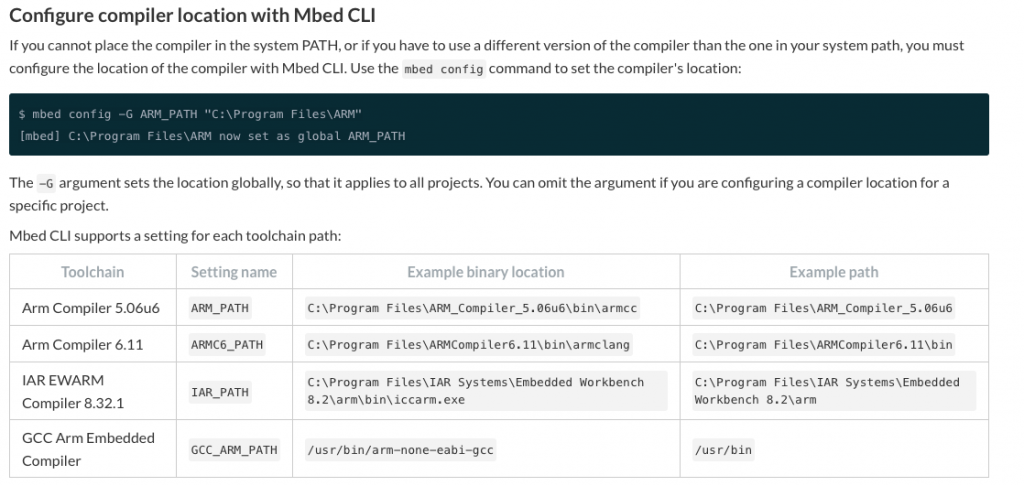
On the Visual Studio Code website they give you a nice description of the schema.  Here is a screenshot from their website.

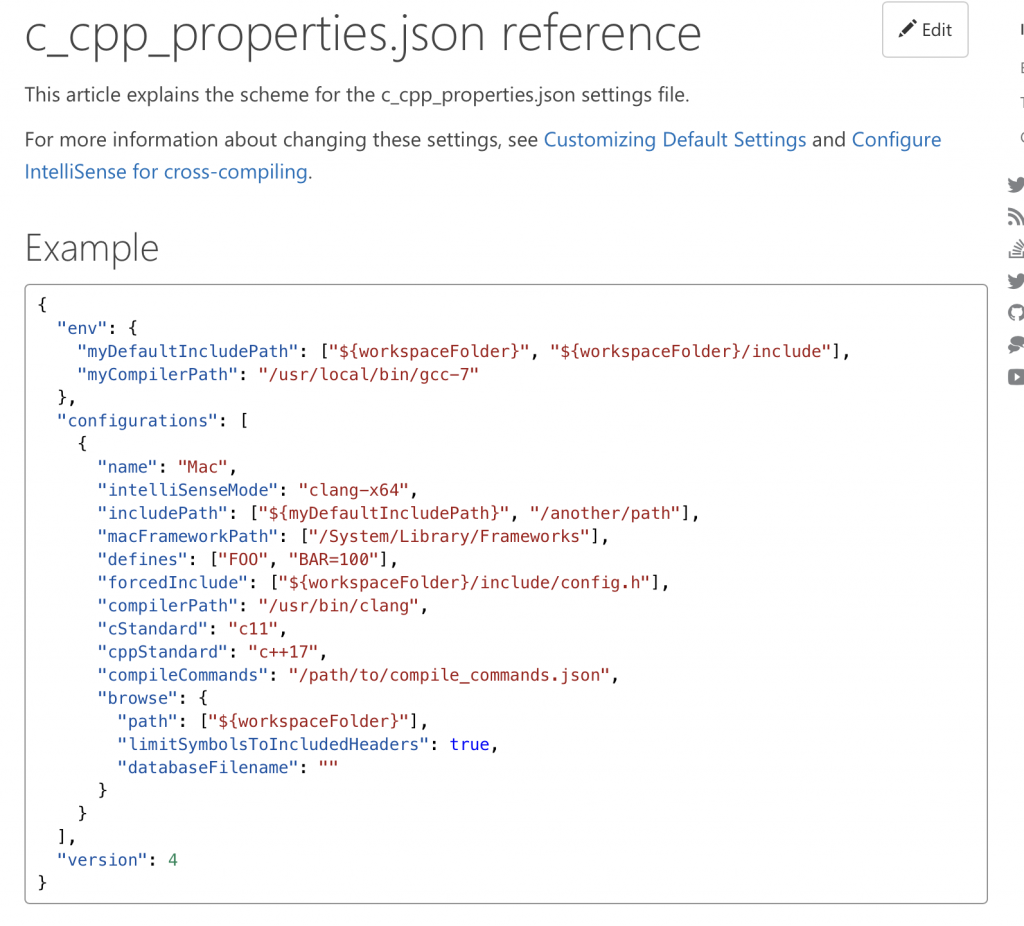
The “stuff” that seems to matter from this list is the “includePath” which tells intellisense the #includes and #defines.  OK.  How do I figure out where to find all of the files and paths for that?

make –dry-run

When you look at the Makefile it doesn’t appear to help very much.  I don’t know about you guys, but I actually dislike “Make” way more than I dislike Python :-).  What the hell is this Makefile telling you to do?

On line 3 the Makefile creates a variable called “KERNELDIR” and sets the value to the result of the shell command “uname -r” plus “/lib/modules” at the first and “/build” at the end.  If I run the command “uname -r” on my system I get “4.15.0-99-generic”

Then on line 9 it calls make with a “-C” option

obj-m := helloworld-params.o helloworld.o

KERNELDIR ?= /lib/modules/$(shell uname -r)/build

all default: modules
install: modules_install

modules modules_install help clean:
	$(MAKE) -C $(KERNELDIR) M=$(shell pwd) $@

Which tells Make to “change directory”

$ make --help
Usage: make [options] [target] ...
Options:
  -b, -m                      Ignored for compatibility.
  -B, --always-make           Unconditionally make all targets.
  -C DIRECTORY, --directory=DIRECTORY
                              Change to DIRECTORY before doing anything

OK when I look in that directory I see a bunch of stuff.  Most importantly a Makefile.

$ cd /lib/modules/4.15.0-99-generic/build
$ ls
arch   crypto         firmware  init    Kconfig  Makefile        net      security  ubuntu
block  Documentation  fs        ipc     kernel   mm              samples  sound     usr
certs  drivers        include   Kbuild  lib      Module.symvers  scripts  tools     virt
$

When I look in that Makefile I start to sweat because it is pages and pages of Make incantations.  Now what?

# SPDX-License-Identifier: GPL-2.0
VERSION = 4
PATCHLEVEL = 15
SUBLEVEL = 18
EXTRAVERSION =
NAME = Fearless Coyote

# *DOCUMENTATION*
# To see a list of typical targets execute "make help"
# More info can be located in ./README
# Comments in this file are targeted only to the developer, do not
# expect to learn how to build the kernel reading this file.

# That's our default target when none is given on the command line
PHONY := _all
_all:

# o Do not use make's built-in rules and variables
#   (this increases performance and avoids hard-to-debug behaviour);
# o Look for make include files relative to root of kernel src
MAKEFLAGS += -rR --include-dir=$(CURDIR)

# Avoid funny character set dependencies
unexport LC_ALL
LC_COLLATE=C
LC_NUMERIC=C
export LC_COLLATE LC_NUMERIC

All hope is not lost.  I turns out that you can have make do a “dry run” which will tell you what are the commands that it is going to execute.  Here is part of the output for the Chapter02 example.  Unfortunately, that is some ugly ugly stuff right there.  What am I going to do with that?

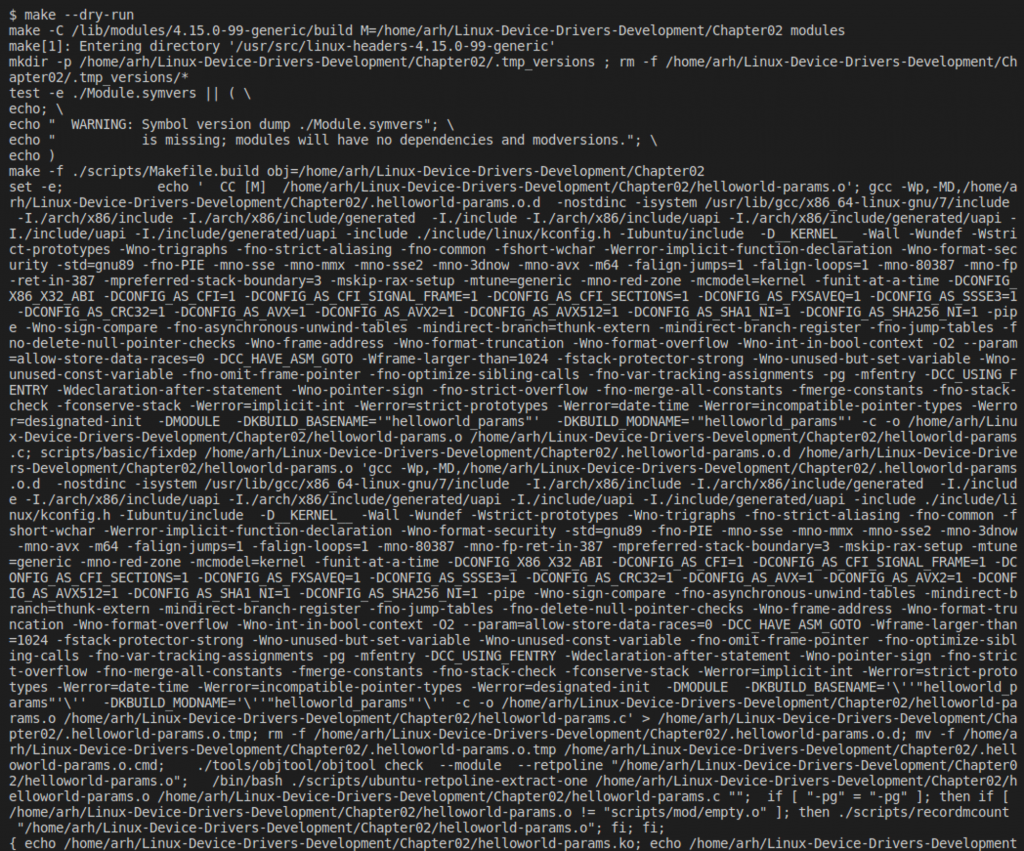
The answer is that I am going to do something evil – really evil.  Which you already knew since this is an article about Python and Make you knew coming in that it was going to be evil.  If you notice above there is a line that contains “…. CC [M] …”  That is one of the lines where the compiler is actually being called.  And you might notice that on the command line there are an absolute boatload of “-I” which is the gcc compiler option to add an include path.

The Python Program

What we are going to do here is write a Python program that does this:

  1. Runs make –dry-run
  2. Looks for lines with “CC”
  3. Splits the line up at the spaces
  4. Searches for “-I”s and adds them to a list of include paths
  5. Searches for “-D”s and adds them to a list of #defines
  6. Spits the whole mess out into a json file with the right format (from the Microsoft website)

I completely understand that this program is far far from a robust production worthy program.  But, as it is written in Python, you should not be too surprised.

To start this program off I am going to use several Python libraries

  1. JSON
  2. OS (Operation System so that I can execute make and uname)
  3. RE (Regular expressions)
import json
import os
import re

The next thing to do is declare some global variables.  The first three are Python Sets to hold one copy each of the includes, defines, other options and double dash options.  The Python Set class allows you to add objects to a set that are guaranteed to be unique (if you attempt to add a duplicate it will be dropped)

includePath = set()
defines = set()
otherOptions = set()
doubleDash = set()
outputJson = dict()

The next block of code is a function that:

  1. Takes as an input a line from the makefile output
  2. Splits the line up into tokens by using white space.  The split function take a string and divides it into a list.
  3. Then I iterate over the list (line 27)
  4. I use the Python string slicer syntax – the [] to grab part of the string.  The syntax [:2] means give me the first two characters of the string
  5. I use 4 if statements to look to see if it is a “-I”, “-D”, “–” or “-” in which case I add it to the appropriate global variable.

Obviously this method is deeply hardcoded the output of this version of make on this operating system… but if you are developing Linux Device Drivers you are probably running Linux… so hopefully it is OK.

#
# Function: processLine
#
# Take a line from the make output
# split the line into a list by using whitespace
# search the list for tokens of
# -I (gcc include)
# -D (gcc #define)
# -- (I actually ignore these but I was curious what they all were)
# - (other - options which I keep track of ... but then ignore)

def processLine(lineData):
    linelist = lineData.split()
    for i in linelist:
        if(i[:2] == "-I"):
            if(i[2:2] == '/'):
                includePath.add(i[2:])
            else:
                includePath.add(f"/usr/src/linux-headers-{kernelVersion}/{i[2:]}")
        elif (i[:2] == "-D"):
            defines.add(i[2:])
        elif (i[:2] == "--"):
            doubleDash.add(i)
        elif (i[:1] == '-'):
            otherOptions.add(i)

The next block of code runs two Linux commands (uname and make –dryrun)  and puts the output into a string.  On line 51 I split the make output into a list of strings one per line.

# figure out which version of the kernel we are using
stream = os.popen('uname -r')
kernelVersion = stream.read()
# get rid of the \n from the uname command
kernelVersion = kernelVersion[:-1]

# run make to find #defines and -I includes
stream = os.popen('make --dry-run')
outstring = stream.read()
lines = outstring.split('\n')

In the next block of code I iterate through the makefile output looking for lines that have the “CC” in them.  I try to protect myself by requiring that the CC have white space before and after.  Notice one line 56 that I use a regular expression to look for the “CC”.

for i in lines:
    # look for a line with " CC "... this is a super ghetto method
    val = re.compile(r'\s+CC\s+').search(i)
    if val:
        processLine(i)

The last block of code actually create the JSON and writes it to the output file c_cpp_properties.json.

# Create the JSON 
outputJson["configurations"] = []

configDict = {"name" : "Linux"}
configDict["includePath"] = list(includePath)
configDict["defines"] = list(defines)
configDict["intelliSenseMode"] = "gcc-x64"
configDict["compilerPath"]= "/usr/bin/gcc"
configDict["cStandard"]= "c11"
configDict["cppStandard"] = "c++17"

outputJson["configurations"].append(configDict)
outputJson["version"] = 4

# Convert the Dictonary to a string of JSON
jsonMsg = json.dumps(outputJson)

# Save the JSON to the files
outF = open("c_cpp_properties.json", "w")
outF.write(jsonMsg)
outF.close()

Thats it.  You can then:

  1. Run the program
  2. move the file c_cpp_properties.json in the .vscode directory

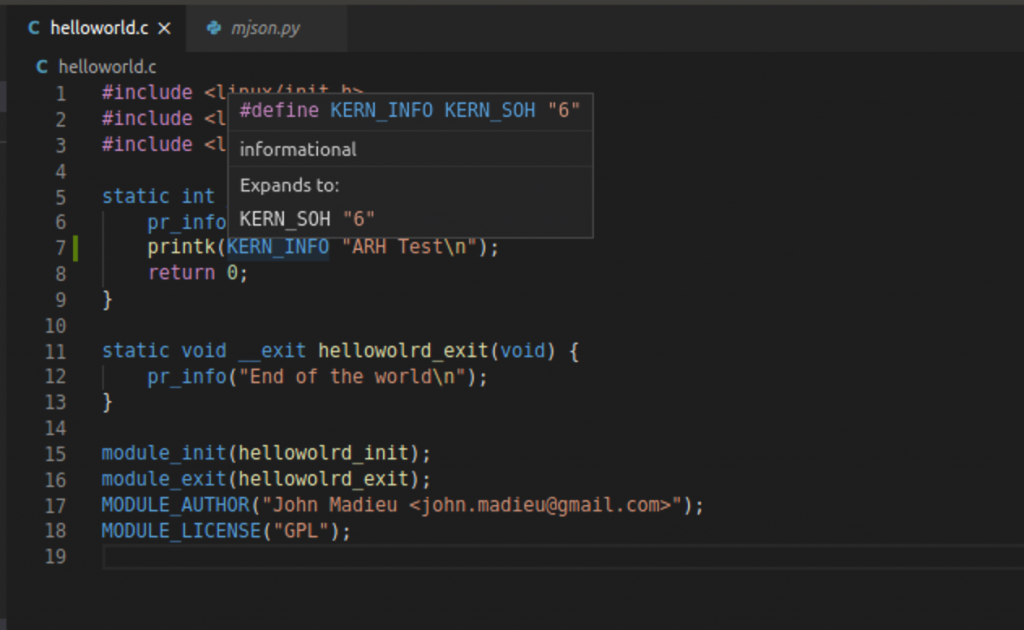
And now everything is more better 🙂  When I hover over the “KERN_INFO” I find that it is #define to “6”

I will say that I am not a fan of having the compiler automatically concatenate two strings, but given that this article is written about a Python program who am I to judge?

What could go wrong?

There are quite a few things that could go wrong with this program.

  1. The make output format could change
  2. There could be multiple compiles that have conflicting options
  3. I could spontaneously combust from writing Python programs
  4. The hardcoded cVersion, cStandard, compilerPath, intelliSenseMode could change enough to cause problems

All of these things could be fixed, or at least somewhat mitigated.  But I already spent more time down this rabbit hole that I really wanted.

The Final Program

# This program runs "make --dry-run" then processes the output to create a visual studio code
# c_cpp_properties.json file

import json
import os
import re

includePath = set()
defines = set()
otherOptions = set()
doubleDash = set()
outputJson = dict()

# Take a line from the make output
# split the line into a list by using whitespace
# search the list for tokens of
# -I (gcc include)
# -D (gcc #define)
# -- (I actually ignore these but I was curious what they all were)
# - (other - options which I keep track of ... but then ignore)

def processLine(lineData):
    linelist = lineData.split()
    for i in linelist:
        if(i[:2] == "-I"):
            if(i[2:2] == '/'):
                includePath.add(i[2:])
            else:
                includePath.add(f"/usr/src/linux-headers-{kernelVersion}/{i[2:]}")
        elif (i[:2] == "-D"):
            defines.add(i[2:])
        elif (i[:2] == "--"):
            doubleDash.add(i)
        elif (i[:1] == '-'):
            otherOptions.add(i)

# figure out which version of the kernel we are using
stream = os.popen('uname -r')
kernelVersion = stream.read()
# get rid of the \n from the uname command
kernelVersion = kernelVersion[:-1]

# run make to find #defines and -I includes
stream = os.popen('make --dry-run')
outstring = stream.read()
lines = outstring.split('\n')


for i in lines:
    # look for a line with " CC "... this is a super ghetto method
    val = re.compile(r'\s+CC\s+').search(i)
    if val:
        processLine(i)


# Create the JSON 
outputJson["configurations"] = []

configDict = {"name" : "Linux"}
configDict["includePath"] = list(includePath)
configDict["defines"] = list(defines)
configDict["intelliSenseMode"] = "gcc-x64"
configDict["compilerPath"]= "/usr/bin/gcc"
configDict["cStandard"]= "c11"
configDict["cppStandard"] = "c++17"

outputJson["configurations"].append(configDict)
outputJson["version"] = 4

# Convert the Dictonary to a string of JSON
jsonMsg = json.dumps(outputJson)

# Save the JSON to the files
outF = open("c_cpp_properties.json", "w")
outF.write(jsonMsg)
outF.close()


Stupid Python Tricks: Install MBED-CLI on macOS

Summary

This article describes a good set of steps to install the ARM MBED-CLI onto your Mac into a Python Virtual Environment.  You COULD make MBED-CLI work on your Mac a bunch of other/different ways, but, what I describe in this article is the best way.  You could follow the specific ARM instructions here.

The big steps are:

  1. Install Homebrew
  2. Install Python3
  3. Create a Virtual Python Environment
  4. Use PIP to Install MBED-CLI
  5. Download the GCC Compiler
  6. Configure the Compiler
  7. Test

macOS Homebrew & Python3

You need to be able to run Python, and in my opinion, specifically Python 3.  There are problems with doing this, first most of the macOS versions do not have Python 3 built in (and the Python 2 is old).  But, on macOS Catalina, you could use the macOS built-in Python3 and install MBED-CLI into the system libraries.  But, I believe that you should never make changes to the macOS system which could collide with its normal functioning.  I think that the easiest way to get a standalone Python onto your computer is to use “Homebrew” package manager.   Homebrew will enable you to easily install Python3 (and a bunch of other stuff) into /usr/local/bin.

To install Homebrew run:

  • /usr/bin/ruby -e “$(curl -fsSL https://raw.githubusercontent.com/Homebrew/install/master/install)”

And after a bunch of streaming console messages, it finishes:

Now you can use Homebrew to install python3 into /usr/local/bin by running:

  • brew install python3

And it puts out a bunch of stuff on the console… finally ending like this:

Now you should be able to “which python3” and see that python 3.7.6 is installed.

Create a Virtual Environment and Install mbed-cli

I always use a virtual environment when I run python to insure that all of the packages I install are together.  Run:

Command Comment
mkdir mbed-cli-example Create a directory to hold the virtual environments
cd mbed-cli-example
python3 -m venv venv Create the virtual environment in the directory called "venv"
source venv/bin/activate Activate the virtual environment
pip install mbed-cli Download the Mbed-cli package and install it into the virtual environment

Here is what is looks like:

Once that is done you can run “which mbed” where you will find that the MBED-CLI is in your virtual environment path.  And when you run “mbed” you should see all of the options.

Download the GCC Compiler

In order to actually do something with the MBED-CLI you also need to have an ARM compiler toolchain installed e.g. GCC.  The easiest (best?) way to get this done is download it from this the ARM website here.

After you download the Mac OS X 64-bit Tarball file you will end up with a “…tar.bz2” file in your Downloads directory.  When you double click the file, the finder will unzip and untar the file into a folder with all of the stuff you need for the Mac.

I have a directory on my Mac called ~/proj where I hold all of my “project” stuff.  So after downloading and untaring the file, I move it to my project directory with “mv ~/download/gcc-arm-none-eabi-9-2019-q4-major ~/proj”

Configure the Compiler

The final step is to tell the MBED-CLI where your toolchain is located.  There are a bunch of slightly different variants for how to do this.  BUT I think that the best is to change the mbed global configuration by running:

  • mbed config –global GCC_ARM_PATH ~/proj/gcc-arm-none-eabi-9-2019-q4-major/bin

The “–global” flag will store that configuration variable in the file ~/.mbed/.mbed (notice a directory called .mbed and a file called .mbed)

It took me a while to figure out which directory you should put in the path because there are multiple bin directories in the “gcc-arm…” directory.

If you want to use one of the other toolchains mbed has configuration variables for those as well:

You can also configure these paths with environment variables, but I dont like that.

macOS Gatekeeper

On macOS there is a security infrastructure called Gatekeeper that will prevent you from running applications that Gatekeeper doesn’t know about.  This includes the GCC toolchain (which you just downloaded).  To make it so that you can run the toolchain there are a couple of things you COULD do, but I think that the best thing to do is tell Gatekeeper that the Terminal program is exempt from the Gatekeeper rules.

To do this type the following command into a terminal: “spctl developer-mode enable-terminal”

Then go to the System Preferences –> Security & Privacy –> Developer Tools and check that the “Terminal” is exempt from the Gatekeeper Rules.

You can read more here and here.

Test

To test everything you have done, you should:

Command Comment
mbed import mbed-os-example-blinky Load the example project.  Notice that mbed also will install the Python requirements into your virtual environment.  It does this by running "pip install -r mbed-os/requirements.txt"
cd mbed-os-example-blinky
mbed config target CY8CKIT_062S2_43012 Setup the target (in my case the really cool P6 43012 devout)
mbed config toolchain GCC_ARM Set the toolchain to the one we setup in the previous step
mbed detect See if mbed can detect the development kit… it can

Here is what it looks like:

You can now run the compiler (with the -f option to program).  It should start up and barf out the compile messages.

Eventually it ends… then programs the development kit

The last thing to do is turn off the virtual environment

Which can later be turned back on with “source venv/bin/activate”