Summary
In the last article I wrote about using the PSoC 4 Watch Dog Counter as a deep sleep timer. It seems kind of obvious that I should probably mostly do PSoC 6 articles. So, in this article, Ill show you how to use the PSoC 6 Low Power MCWDT as a deep sleep timer. What is a “MCWDT?”, well, the MC stands for Multi-Counter. And as best I can tell, is exactly the same as the PSoC 4 WDT, except there are two of them in the PSoC 63 instead of the 1 in the PSoC 4. There is also a dedicated 16-bit WDT (which I will write about in a few days).
Specifically in this article I will show you:
- The PSoC 6 Low Power MCWDT Multi-Counter WatchDog Timer
- How to configure the Low Frequency Clock Sources
- Configuring the Clk_LF Source in Firmware
- Overall Project Schematic Configuration for the PSoC 6 Low Power MCWDT
- Configuring the Interrupts
- Configuring the PSoC 6 Low Power MCWDT
- The PSoC 6 Low Power MCWDT Firmware
The Multi-Counter WatchDog Timer (MCWDT)
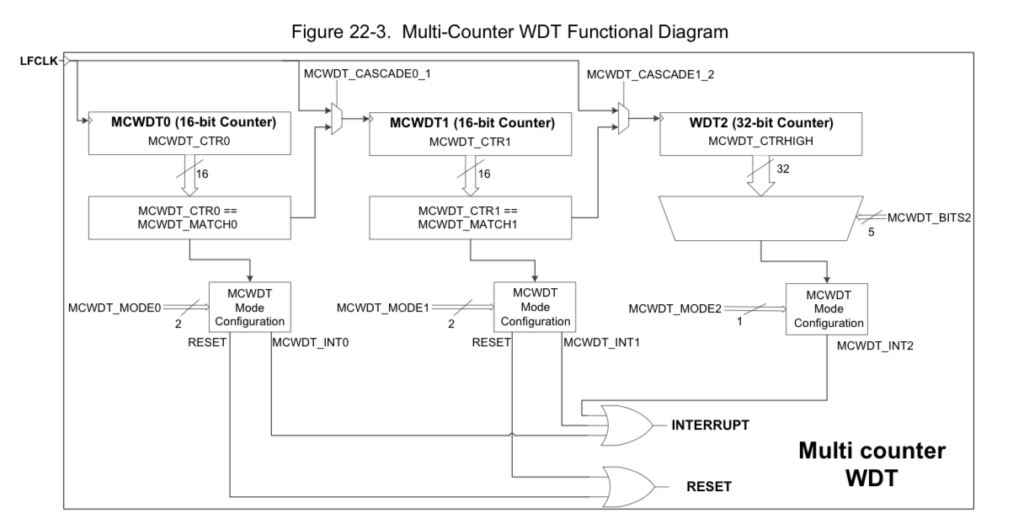
The PSoC 6 Low Power MCWDT is almost exactly the same as the PSoC 4 WDT – except it is in 40nm instead of 130nm. It has 2x 16-bit counters and 1x 32-bit counter. The three counters can be cascaded to create long period timers. Each counter can be configured to clear on match, or free-run. Each counter can also be configured to cause a device reset if the interrupt is not processed. The MCWDT works in Active, Low Power Active, Sleep, Low Power Sleep and Deep Sleep power modes.
The design intent is that one MCWDT would be “assigned” to each of the MCUs (i.e. the M4, M0+), but that is not required. The picture below is a snapshot from the PSoC 63 TRM and explains pretty well how one of the PSoC 6 Low Power MCWDT work.
Low Frequency Clock Sources (CLK_LF)
From the picture above you can see that the MCWDT uses the LFLK as the source clock for the counters. Fortunately or unfortunately there is an inconsistency in the PSoC 63 TRM and PSoC Creator. The PSoC Creator team decided to unify the names of all of the clocks by calling them all “Clk_*”. Which is inconsistent with the TRM which calls it “LFLK”. The LFCLK in the TRM is called the “Clk_LF” in the PSoC Creator GUIs and it is called “CLK_LF” or “ClkLf” in the firmware (confused yet?). If not then you should be as I was the first time I saw it.
The Clk_LF can be driven by one of three source oscillators. The PILO, ILO or the WCO. Look at the upper left hand box where I have pulled down the selection menu.
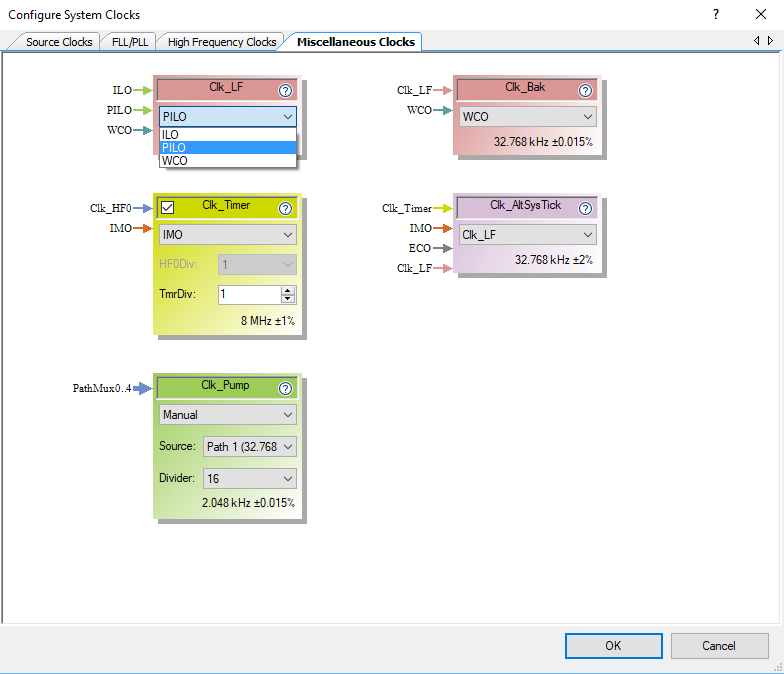
But what is WCO, PILO and ILO? These are clock sources which you can select the Clk_LF clock source on the “Source Clocks” page. It can be:
- The Internal Low Speed Oscillator (ILO) which is a super low power 32KHz RC Oscillator (but not very accurate)
- The Precision Internal Low Speed Oscillator (PILO) is a more accurate, trim-able RC? oscillator, and presumably higher power (though I don’t know how much).
- The Watch Crystal Oscillator (WCO) which is a very accurate crystal oscillator that gives you accurate timing at a higher power cost.
With the “Configure System Clocks” window in the DWR you can configure the behavior of the Clock Sources. Notice that I have turned on all three of the Clock sources (ILO, PILO and WCO) something which you probably wouldn’t actually do.
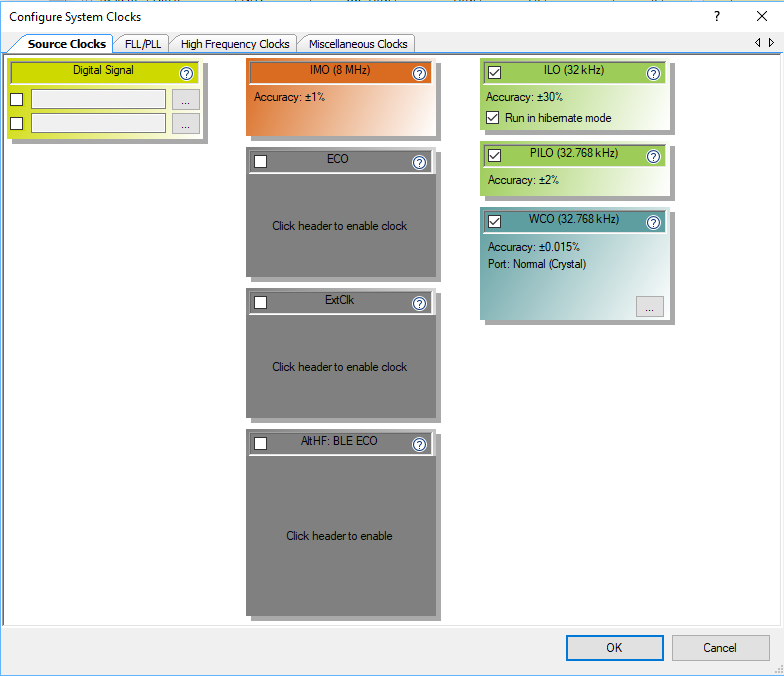
When you click those buttons, PSoC Creator will create a function called “ClockInit” in the file “cyfitter_cfg.c” that is called by the PSoC startup code (and runs before your main() ). You can see that the firmware enables the PILO and WCO (as well as the ILO which is on by default)
static void ClockInit(void)
{
	uint32_t status;

	/* Enable all source clocks */
	Cy_SysClk_PiloEnable();
	Cy_SysClk_WcoEnable(900u);
	Cy_SysClk_ClkLfSetSource(CY_SYSCLK_CLKLF_IN_PILO);

	/* Configure CPU clock dividers */
	Cy_SysClk_ClkFastSetDivider(0u);
	Cy_SysClk_ClkPeriSetDivider(1u);
	Cy_SysClk_ClkSlowSetDivider(0u);
Configuring the Clk_LF Source in Firmware
You can also configure the Clk_LF sources in your firmware. In the firmware below, I check to see if the WCO is running. If it is, then I set it to be the source of the Clk_LF. If it is not running, then I try to start it. And, finally, I print out the current source of the Clk_LF.
    // Is the Watch Crystal Osc running?
    if(Cy_SysClk_WcoOkay())
    {
        printf("Switching ClkLf to WCO\n");
        Cy_SysClk_ClkLfSetSource(CY_SYSCLK_CLKLF_IN_WCO);
    }
    else
    {
        printf("WCO Not functioning attempting a start\n");
        Cy_SysClk_WcoEnable(0); // come back immediately
        for(int i=0;i<100;i++)
        {
            CyDelay(10);
            if(Cy_SysClk_WcoOkay())
            {
                printf("Suceeded in starting WCO in %dms\n",i*10);
                Cy_SysClk_ClkLfSetSource(CY_SYSCLK_CLKLF_IN_WCO);
                break;
            }
        }
        if(!Cy_SysClk_WcoOkay())
        {
            printf("Unable to start WCO in 1000ms\n");
        }
    }

    // What is the clock source of the ClkLf?
    switch(Cy_SysClk_ClkLfGetSource ())
    {
        case CY_SYSCLK_CLKLF_IN_ILO:
            printf("Clk LF = ILO\n");
            break;
        case CY_SYSCLK_CLKLF_IN_ALTLF:
            printf("Clk LF = ALTLF\n");
        break;
        case CY_SYSCLK_CLKLF_IN_PILO:
            printf("Clk LF = PILO\n");
        break;
        case CY_SYSCLK_CLKLF_IN_WCO:
            printf("Clk LF = WCO\n");
        break;
    }
Overall Project Schematic Configuration
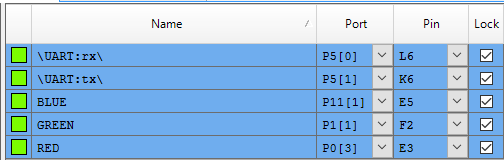
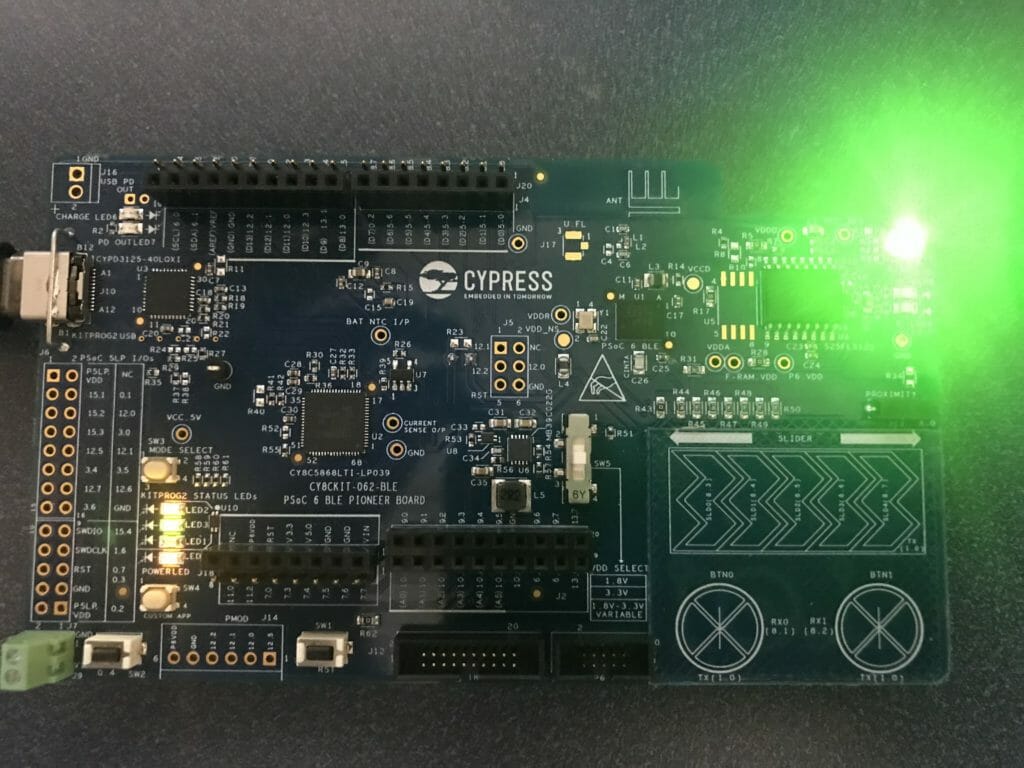
To demonstrate the PSoC 6 Low Power MCWDT, I start by creating a schematic. It has the three color LEDs pins (RED, GREEN and BLUE), a UART to print out debugging information and finally the MCWDT connected to an interrupt.
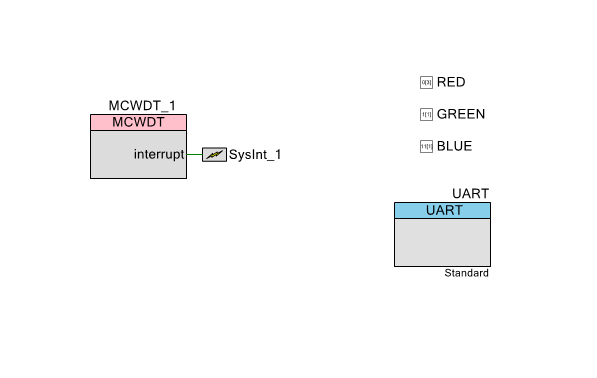
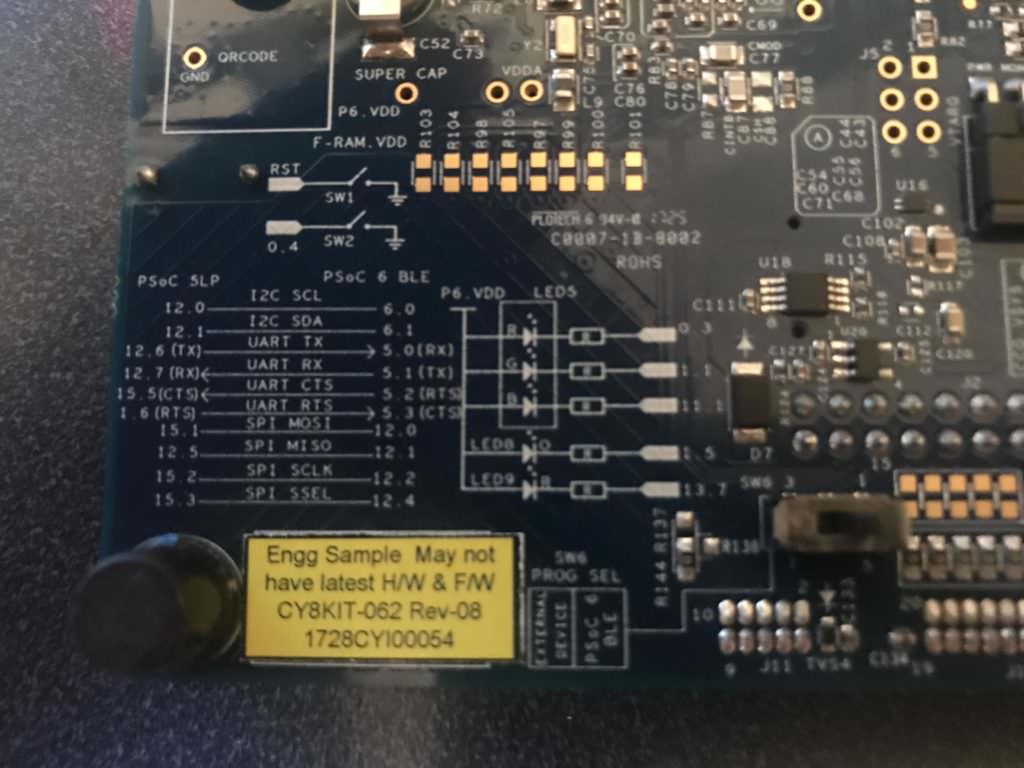
The pin assignment is chosen to match the pins on my CY8CKIT-062-BLE Development kit. (look on the back)
Configuring the Interrupts
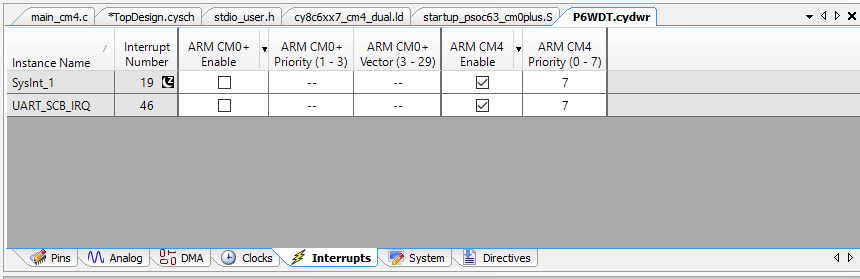
When you place an interrupt component in PSoC Creator (which I did in the above schematic), it will then appear in the DWR on the interrupt page. Here you can assign the interrupt to either of the MCU Cores, or I suppose both, though I think that is probably a horrible idea.
PSoC Creators “fitter” sees that the interrupt is connected to a MCWDT. It then does the job of attaching the interrupt to the correct interrupt number, in this case 19
All the screen above does is create a little block of code in the firmware file cyfitter_sysint_cfg.c. Look at the structure called cy_stc_sysint_t SysInt_1_cfg in the automatically generated code:
/*******************************************************************************
* File Name: cyfitter_sysint_cfg.c
*
* PSoC Creator  4.2 Nightly Build 543
*
* Description:
*
* This file is automatically generated by PSoC Creator.
*
********************************************************************************
* Copyright (c) 2007-2017 Cypress Semiconductor.  All rights reserved.
* You may use this file only in accordance with the license, terms, conditions,
* disclaimers, and limitations in the end user license agreement accompanying
* the software package with which this file was provided.
********************************************************************************/

#include "cyfitter_sysint.h"
#include "cyfitter_sysint_cfg.h"

/* ARM CM4 */
#if (((__CORTEX_M == 4) && (CY_CORE_ID == 0)))

    /* SysInt_1 */
    const cy_stc_sysint_t SysInt_1_cfg = {
        .intrSrc = (IRQn_Type)SysInt_1__INTC_NUMBER,
        .intrPriority = SysInt_1__INTC_CORTEXM4_PRIORITY
    };

    /* UART_SCB_IRQ */
    const cy_stc_sysint_t UART_SCB_IRQ_cfg = {
        .intrSrc = (IRQn_Type)UART_SCB_IRQ__INTC_NUMBER,
        .intrPriority = UART_SCB_IRQ__INTC_CORTEXM4_PRIORITY
    };

#endif /* ((__CORTEX_M == 4) && (CY_CORE_ID == 0)) */
So, where does SysInt_1__INTC_NUMBER get set? That is done by the fitter in cyfitter_sysint.h. Here is the automatically generated code:
/*******************************************************************************
* File Name: cyfitter_sysint.h
*
* PSoC Creator  4.2 Nightly Build 543
*
* Description:
*
* This file is automatically generated by PSoC Creator.
*
********************************************************************************
* Copyright (c) 2007-2017 Cypress Semiconductor.  All rights reserved.
* You may use this file only in accordance with the license, terms, conditions,
* disclaimers, and limitations in the end user license agreement accompanying
* the software package with which this file was provided.
********************************************************************************/

#ifndef INCLUDED_CYFITTER_SYSINT_H
#define INCLUDED_CYFITTER_SYSINT_H
#include "cy_device_headers.h"

/* SysInt_1 */
#define SysInt_1__INTC_CORTEXM4_ASSIGNED 1
#define SysInt_1__INTC_CORTEXM4_PRIORITY 7u
#define SysInt_1__INTC_NUMBER 19u
#define SysInt_1_INTC_CORTEXM4_ASSIGNED 1
#define SysInt_1_INTC_CORTEXM4_PRIORITY 7u
#define SysInt_1_INTC_NUMBER 19u

/* UART_SCB_IRQ */
#define UART_SCB_IRQ__INTC_CORTEXM4_ASSIGNED 1
#define UART_SCB_IRQ__INTC_CORTEXM4_PRIORITY 7u
#define UART_SCB_IRQ__INTC_NUMBER 46u
#define UART_SCB_IRQ_INTC_CORTEXM4_ASSIGNED 1
#define UART_SCB_IRQ_INTC_CORTEXM4_PRIORITY 7u
#define UART_SCB_IRQ_INTC_NUMBER 46u

#endif /* INCLUDED_CYFITTER_SYSINT_H */
To make all of this work, you simply need to install the interrupt handler by calling Cy_SysInt_Init in your main.c.
    // install ISR...
    Cy_SysInt_Init(&SysInt_1_cfg,myWDT);
    NVIC_EnableIRQ(SysInt_1_INTC_NUMBER);
Configuring the PSoC 6 Low Power MCWDT with the GUI
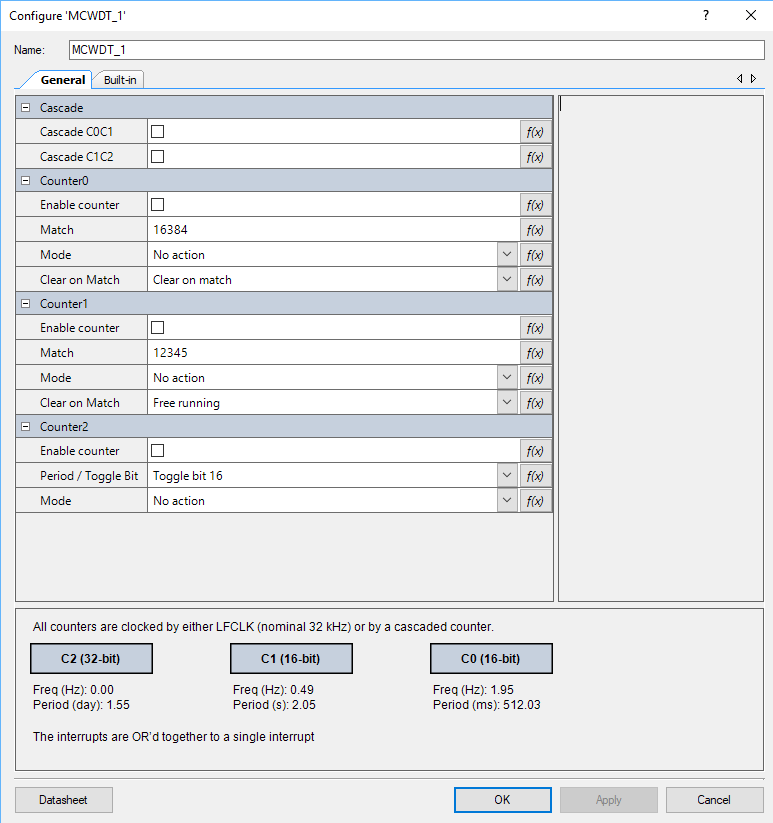
As with all (or almost all) PSoC components, you can configure them in the GUI. In the picture below you can see that you can set
- Enable/Disable
- The Match Value
- The Mode (interrupt, watchdog, none)
- Free Running or Clear on Match
- The Cascade (meaning connect the counters together)
All of those configuration items will end up in the file MCWDT_1_PDL.c in a structure that looks like this:
/** The instance-specific configuration structure. This should be used in the
*  associated MCWDT_1_Init() function.
*/
const cy_stc_mcwdt_config_t MCWDT_1_config =
{
    .c0Match     = MCWDT_1_C0_MATCH,
    .c1Match     = MCWDT_1_C1_MATCH,
    .c0Mode      = MCWDT_1_C0_MODE,
    .c1Mode      = MCWDT_1_C1_MODE,
    .c2ToggleBit = MCWDT_1_C2_PERIOD,
    .c2Mode      = MCWDT_1_C2_MODE,
    .c0ClearOnMatch = (bool)MCWDT_1_C0_CLEAR_ON_MATCH,
    .c1ClearOnMatch = (bool)MCWDT_1_C1_CLEAR_ON_MATCH,
    .c0c1Cascade = (bool)MCWDT_1_CASCADE_C0C1,
    .c1c2Cascade = (bool)MCWDT_1_CASCADE_C1C2
};
Then you can either call the MCWDT_1_Start() function or you can call the PDL function Cy_MCWDT_Init(&MCWDT_1_config);
PSoC 6 Low Power MCWDT Firmware
You can also configure the PSoC 6 Low Power MCWDT in your firmware as I have done below:
   Cy_MCWDT_Unlock(MCWDT_STRUCT0);
    // Turn off all of the counters
    Cy_MCWDT_Disable(MCWDT_STRUCT0,CY_MCWDT_CTR0 | CY_MCWDT_CTR1 | CY_MCWDT_CTR2,100);
    Cy_MCWDT_ResetCounters(MCWDT_STRUCT0,CY_MCWDT_CTR0,100);
    Cy_MCWDT_ResetCounters(MCWDT_STRUCT0,CY_MCWDT_CTR1,100);

    Cy_MCWDT_SetMode(MCWDT_STRUCT0,0,CY_MCWDT_MODE_NONE); // 0=Counter 0
    Cy_MCWDT_SetMode(MCWDT_STRUCT0,1,CY_MCWDT_MODE_INT);  // 1=Counter 1

    Cy_MCWDT_SetCascade(MCWDT_STRUCT0,CY_MCWDT_CASCADE_C0C1 );

    Cy_MCWDT_SetInterruptMask(MCWDT_STRUCT0,CY_MCWDT_CTR1); // Only take ints from counter 1

    // delay = 32768*16 = 8 seconds & 32khz
    Cy_MCWDT_SetMatch(MCWDT_STRUCT0,0,32768,100);
    Cy_MCWDT_SetMatch(MCWDT_STRUCT0,1,16,100);

    Cy_MCWDT_SetClearOnMatch(MCWDT_STRUCT0,0,1);
    Cy_MCWDT_SetClearOnMatch(MCWDT_STRUCT0,1,1);

    Cy_MCWDT_Enable(MCWDT_STRUCT0,CY_MCWDT_CTR0|CY_MCWDT_CTR1,100);
The Interrupt Service Routine (ISR) for the MCWDT is pretty simple. It just reads the cause of the interrupt, which could be any one of the counters in the MCWDT (or more than one of them). Then it inverts either the Red, Green or Blue LED. And finally it clears the interrupt source inside of the MCWDT.
void myWDT(void)
{
    uint32_t cause;
    cause = Cy_MCWDT_GetInterruptStatusMasked(MCWDT_STRUCT0);
    if(cause & CY_MCWDT_CTR0)
    {
        Cy_GPIO_Inv(RED_PORT,RED_NUM);
    }

    if(cause & CY_MCWDT_CTR1)
    {
        Cy_GPIO_Inv(GREEN_PORT,GREEN_NUM);
    }

    if(cause & CY_MCWDT_CTR2)
    {
        Cy_GPIO_Inv(BLUE_PORT,BLUE_NUM);
    }

    Cy_MCWDT_ClearInterrupt(MCWDT_STRUCT0,cause);
}
When I run this program I get a slowly blinking Green LED in Low Power mode:

2 Comments
What should be clock configuration for using MCWDT ?
I have used MCWDT component in my proect.
I have enabled WCO clock in .cydwr & set it as source of Clk_LF.
But with this debug statement are not getting printed in my proect.
If i disable WCO MCWDT module does not working.
So please guide me with clock configuration for it.
I don’t understand the problem. Can you email me the project and Ill have a look at it.
Alan