The Creek: Solution Architecture 1.0

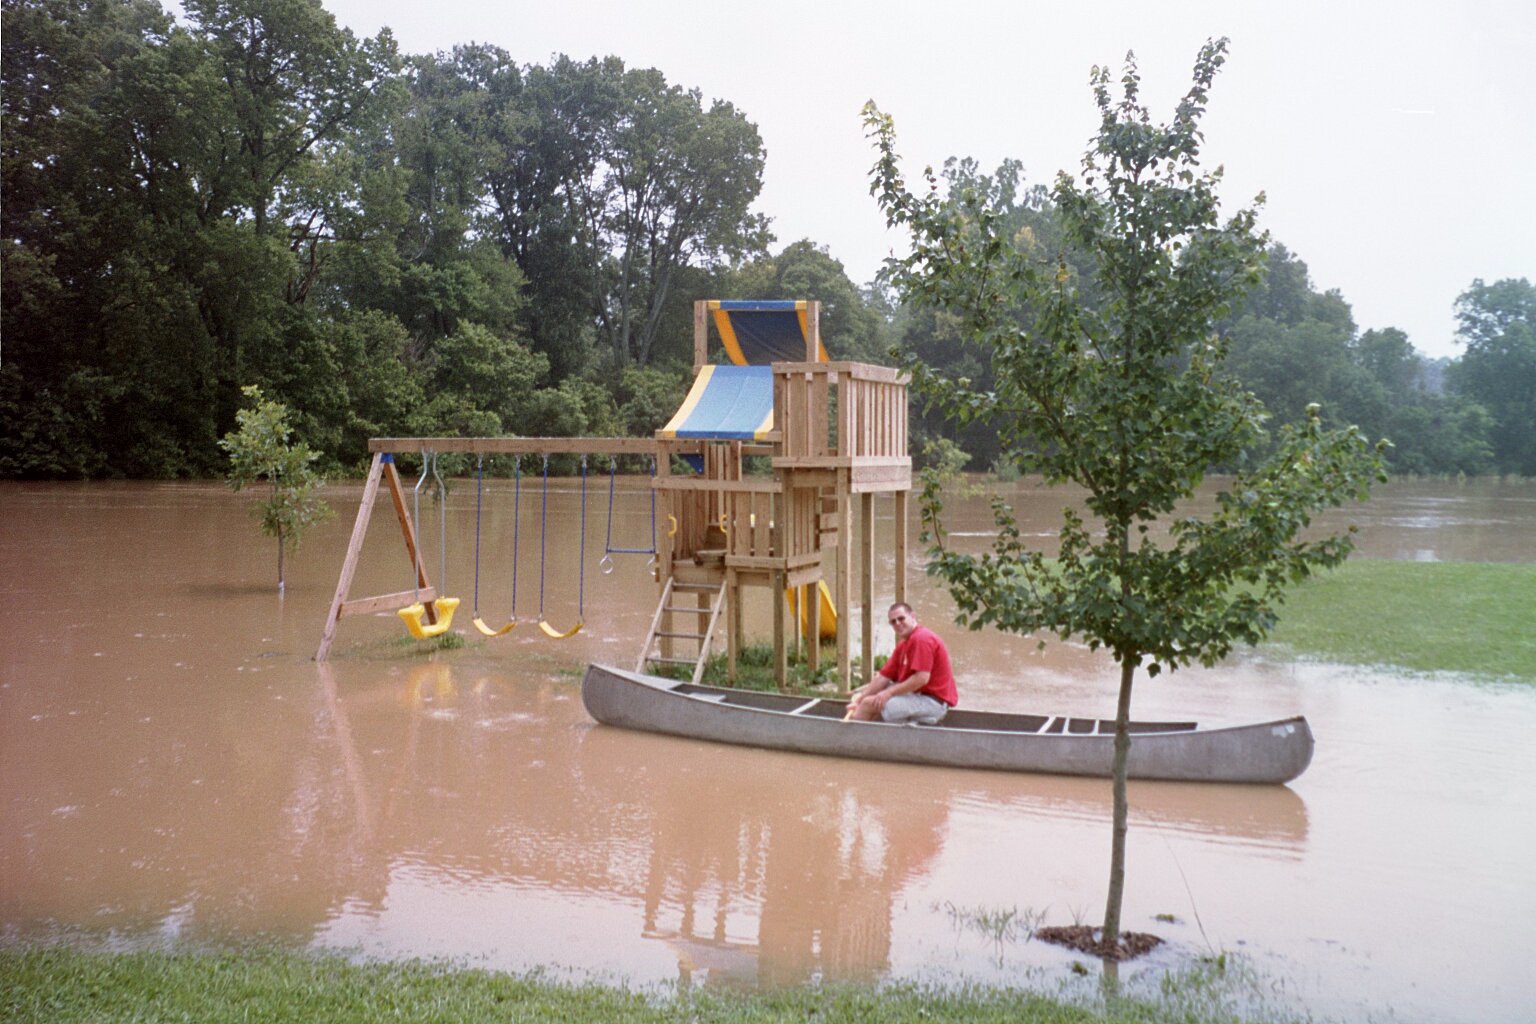
In the previous post I introduced my IOT Project for the Elkhorn Creek.  In this post I provide an overview of each of the building blocks in the system.  Currently (because I have some ideas for improvements) there are four major blocks.  Over the next few weeks I will write one or more detailed posts for each of the blocks.
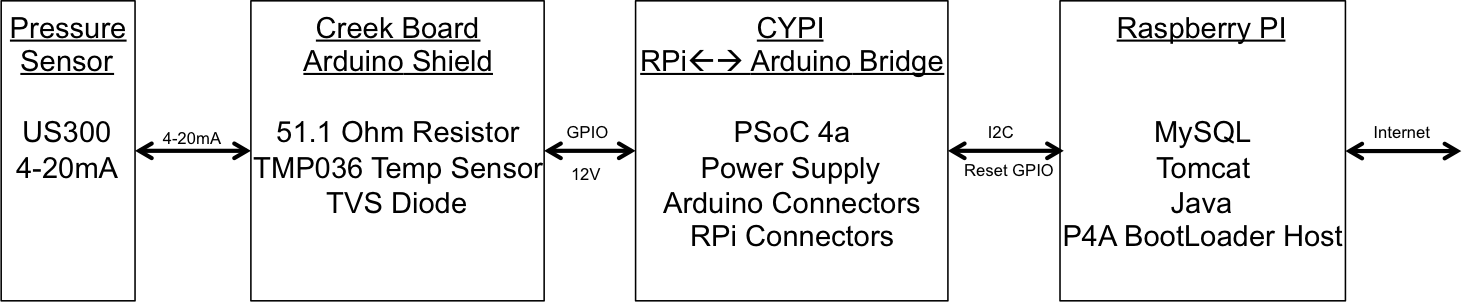
architecture

1. Pressure Sensor

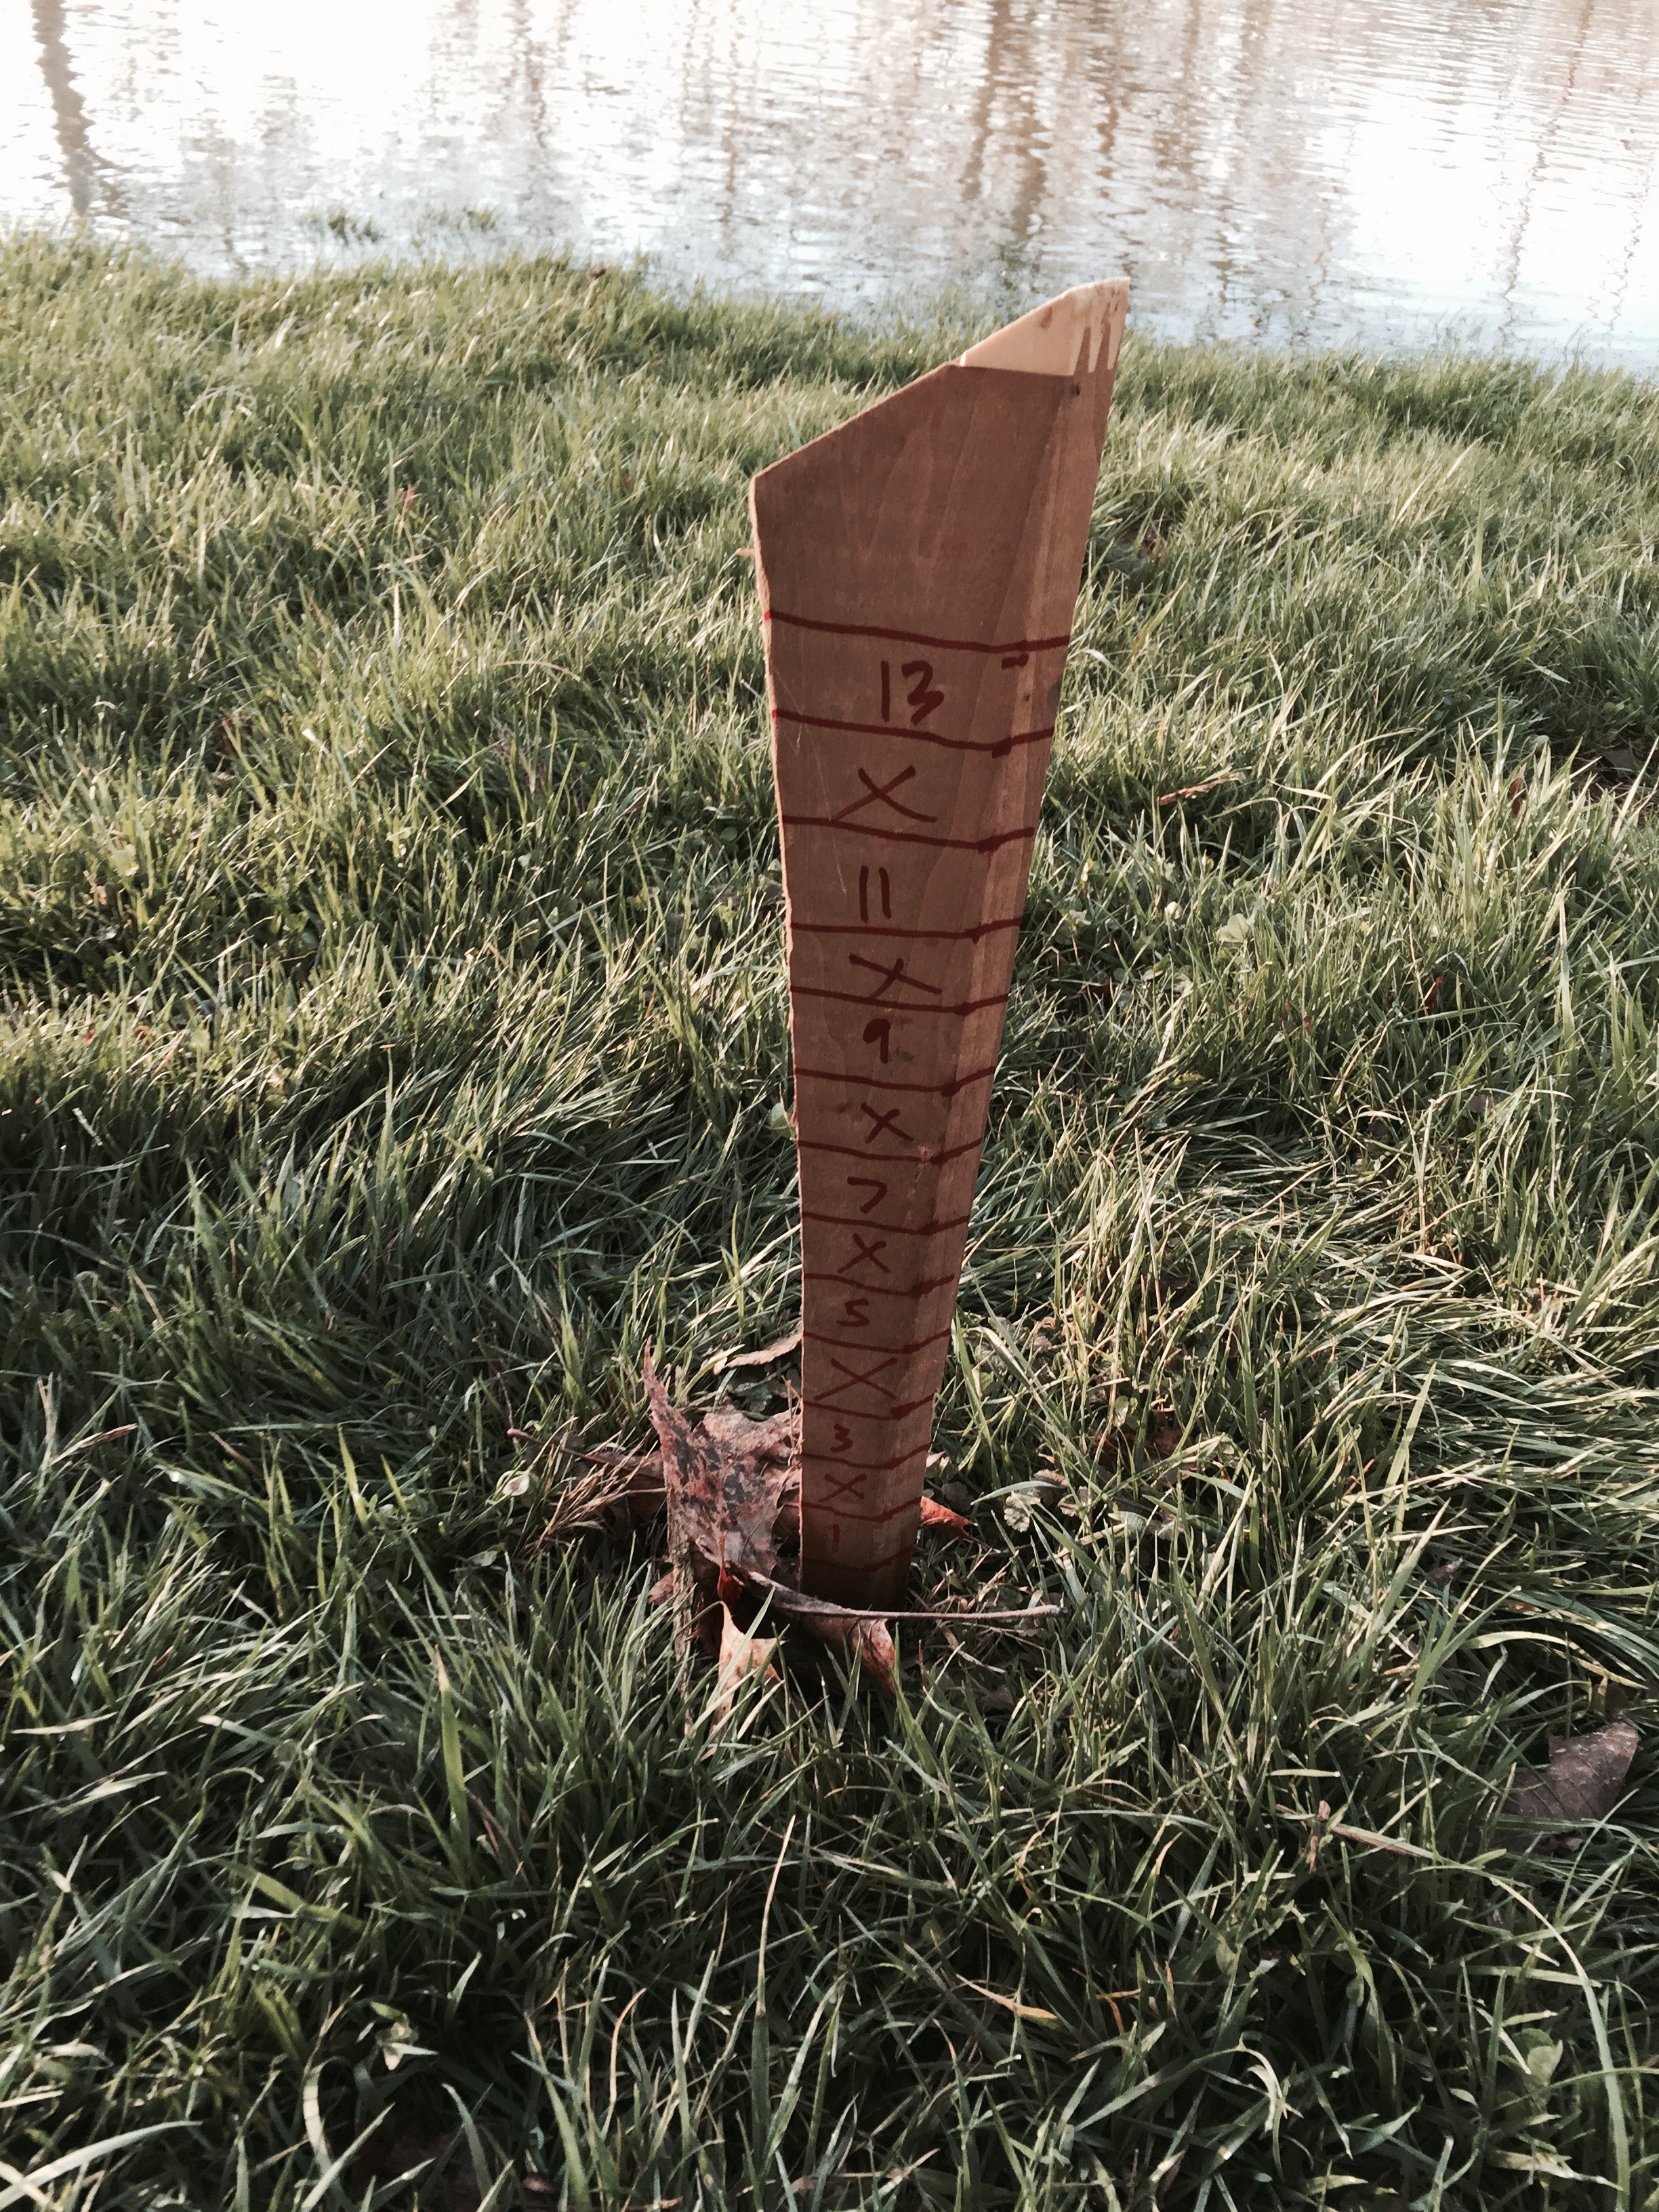
The Pressure Sensor is a Measurement Specialties US381-000005-015PG installed into the end of a long PVC pipe.  Inside of the pipe there is a ~150 foot long telephone wire which is attached to the Creek Board.

MFG_U5354-000005-015PG_sml

IMG_2230
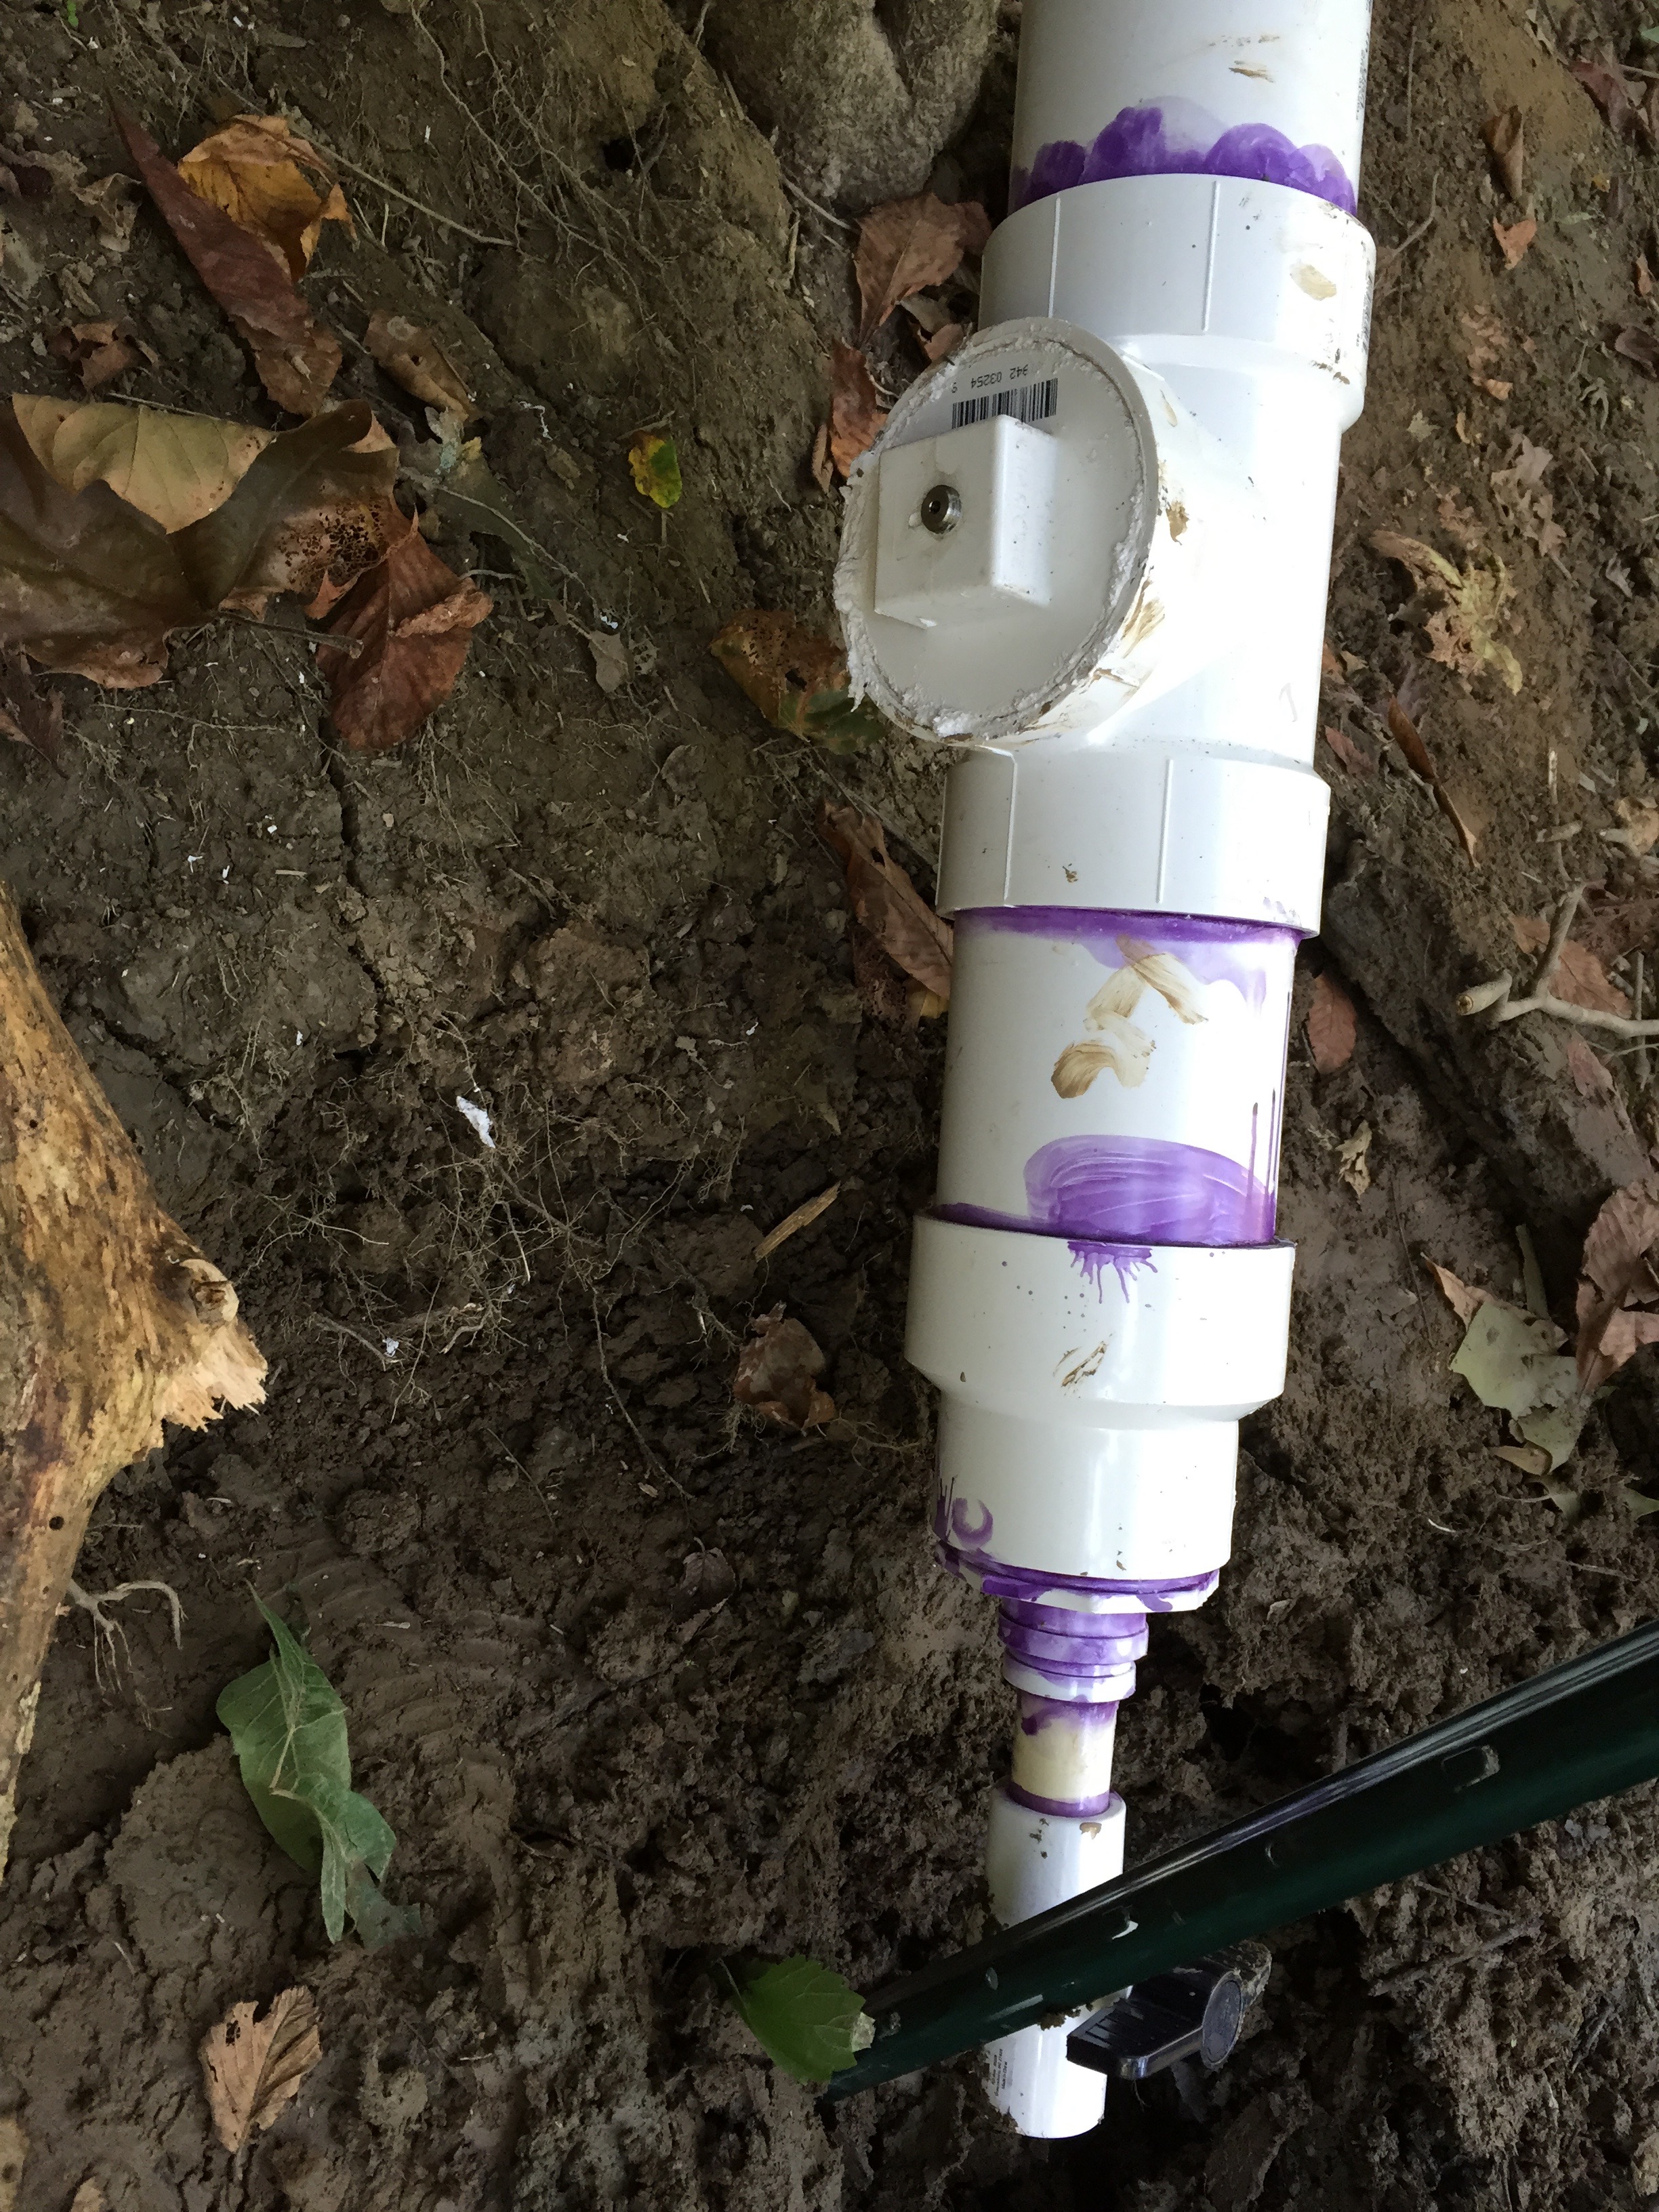
All of the PVC came from Lowe’s and is glued together with PVC cement.  At the end of the pipe you can see a ball valve.  This valve will allow me to drain out any water that leaks or condenses into the system.  This can absolutely happen and in fact killed an earlier revision of the system.  The sensor itself is screwed into a 4″ clean-out cap.  This will allow me to unscrew the cap and replace the sensor if it is ruined by something.  Also, the cap is fairly thick and allowed for more threads on the sensor to grab into the PVC, which also improves my chances of not needing to replace this $142 sensor.

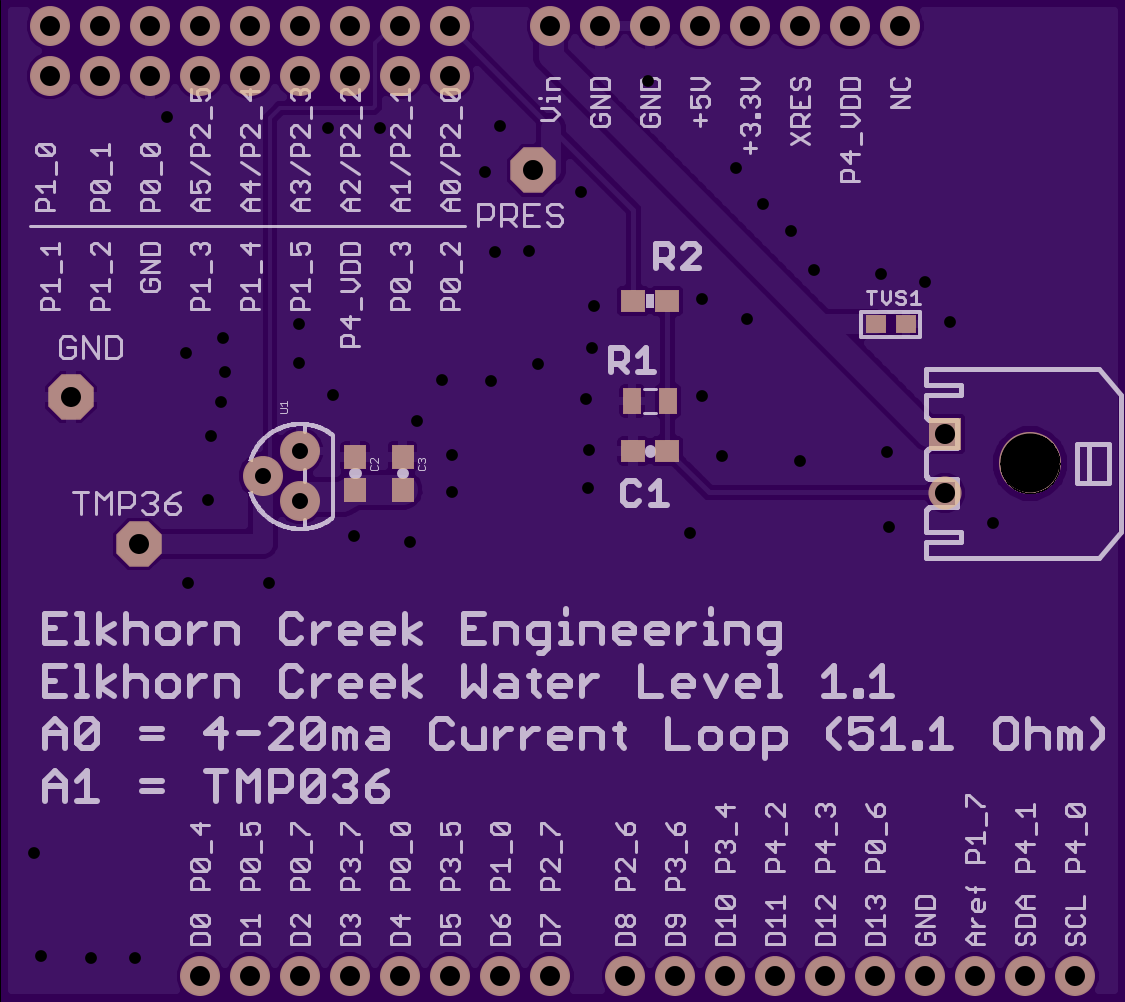
2. The “Creek Board”

The Creek Board is an Arduino Shield that I designed to replace my prototype bread-board.  The shield contains:

  • The 51.1 Ohm Resistor which turns the current loop into a measurable voltage
  • A TMP36 Temperature Sensor which I was originally planning to use for temperature compensation.
  • Testpoint’s to measure the voltages with a DMM
  • Analog low-pass noise filters for the current loop
  • A Transient Voltage Supressor Diode to protect the CYPI board from an ESD event.
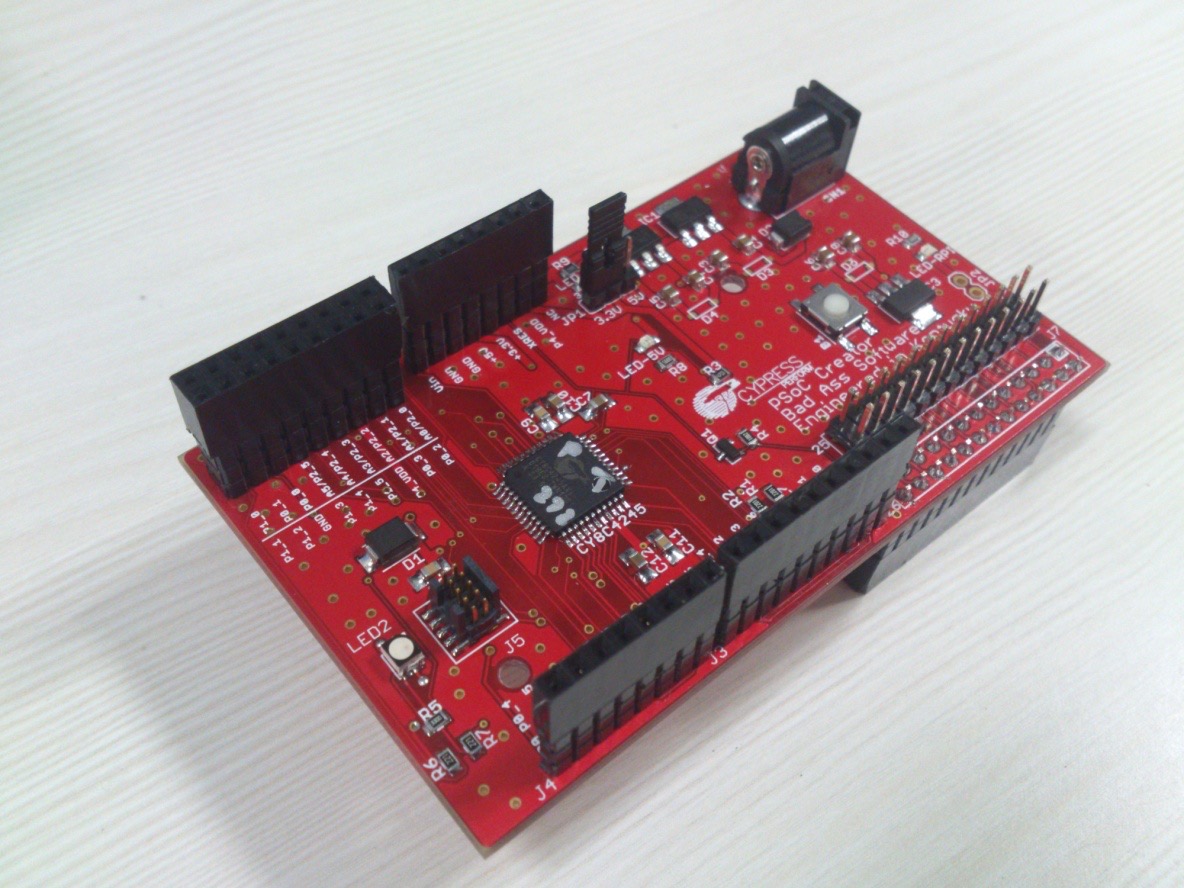
creekboard1.1

3. CYPI

I designed CYPI to be a “Cypress” to “Raspberry Pi” bridge.  On the bottom of the board is a connector that is compatible with the Raspberry Pi GPIOs.  On the top of the board are connectors that are compatible with Arduino.  On the board is:

  • A Cypress PSoC4200 – CY8C4245AXI-483
  • A wall wart barrel power connection
  • Voltage regulators that allow the entire system to run off of one wall wart
  • A 10-pin ARM Program/Debug header
  • A reset switch
  • A user LED

IMG_1173

4. Raspberry PI

The Raspberry PI is a single board linux computer.

Raspberry_Pi_B+_top

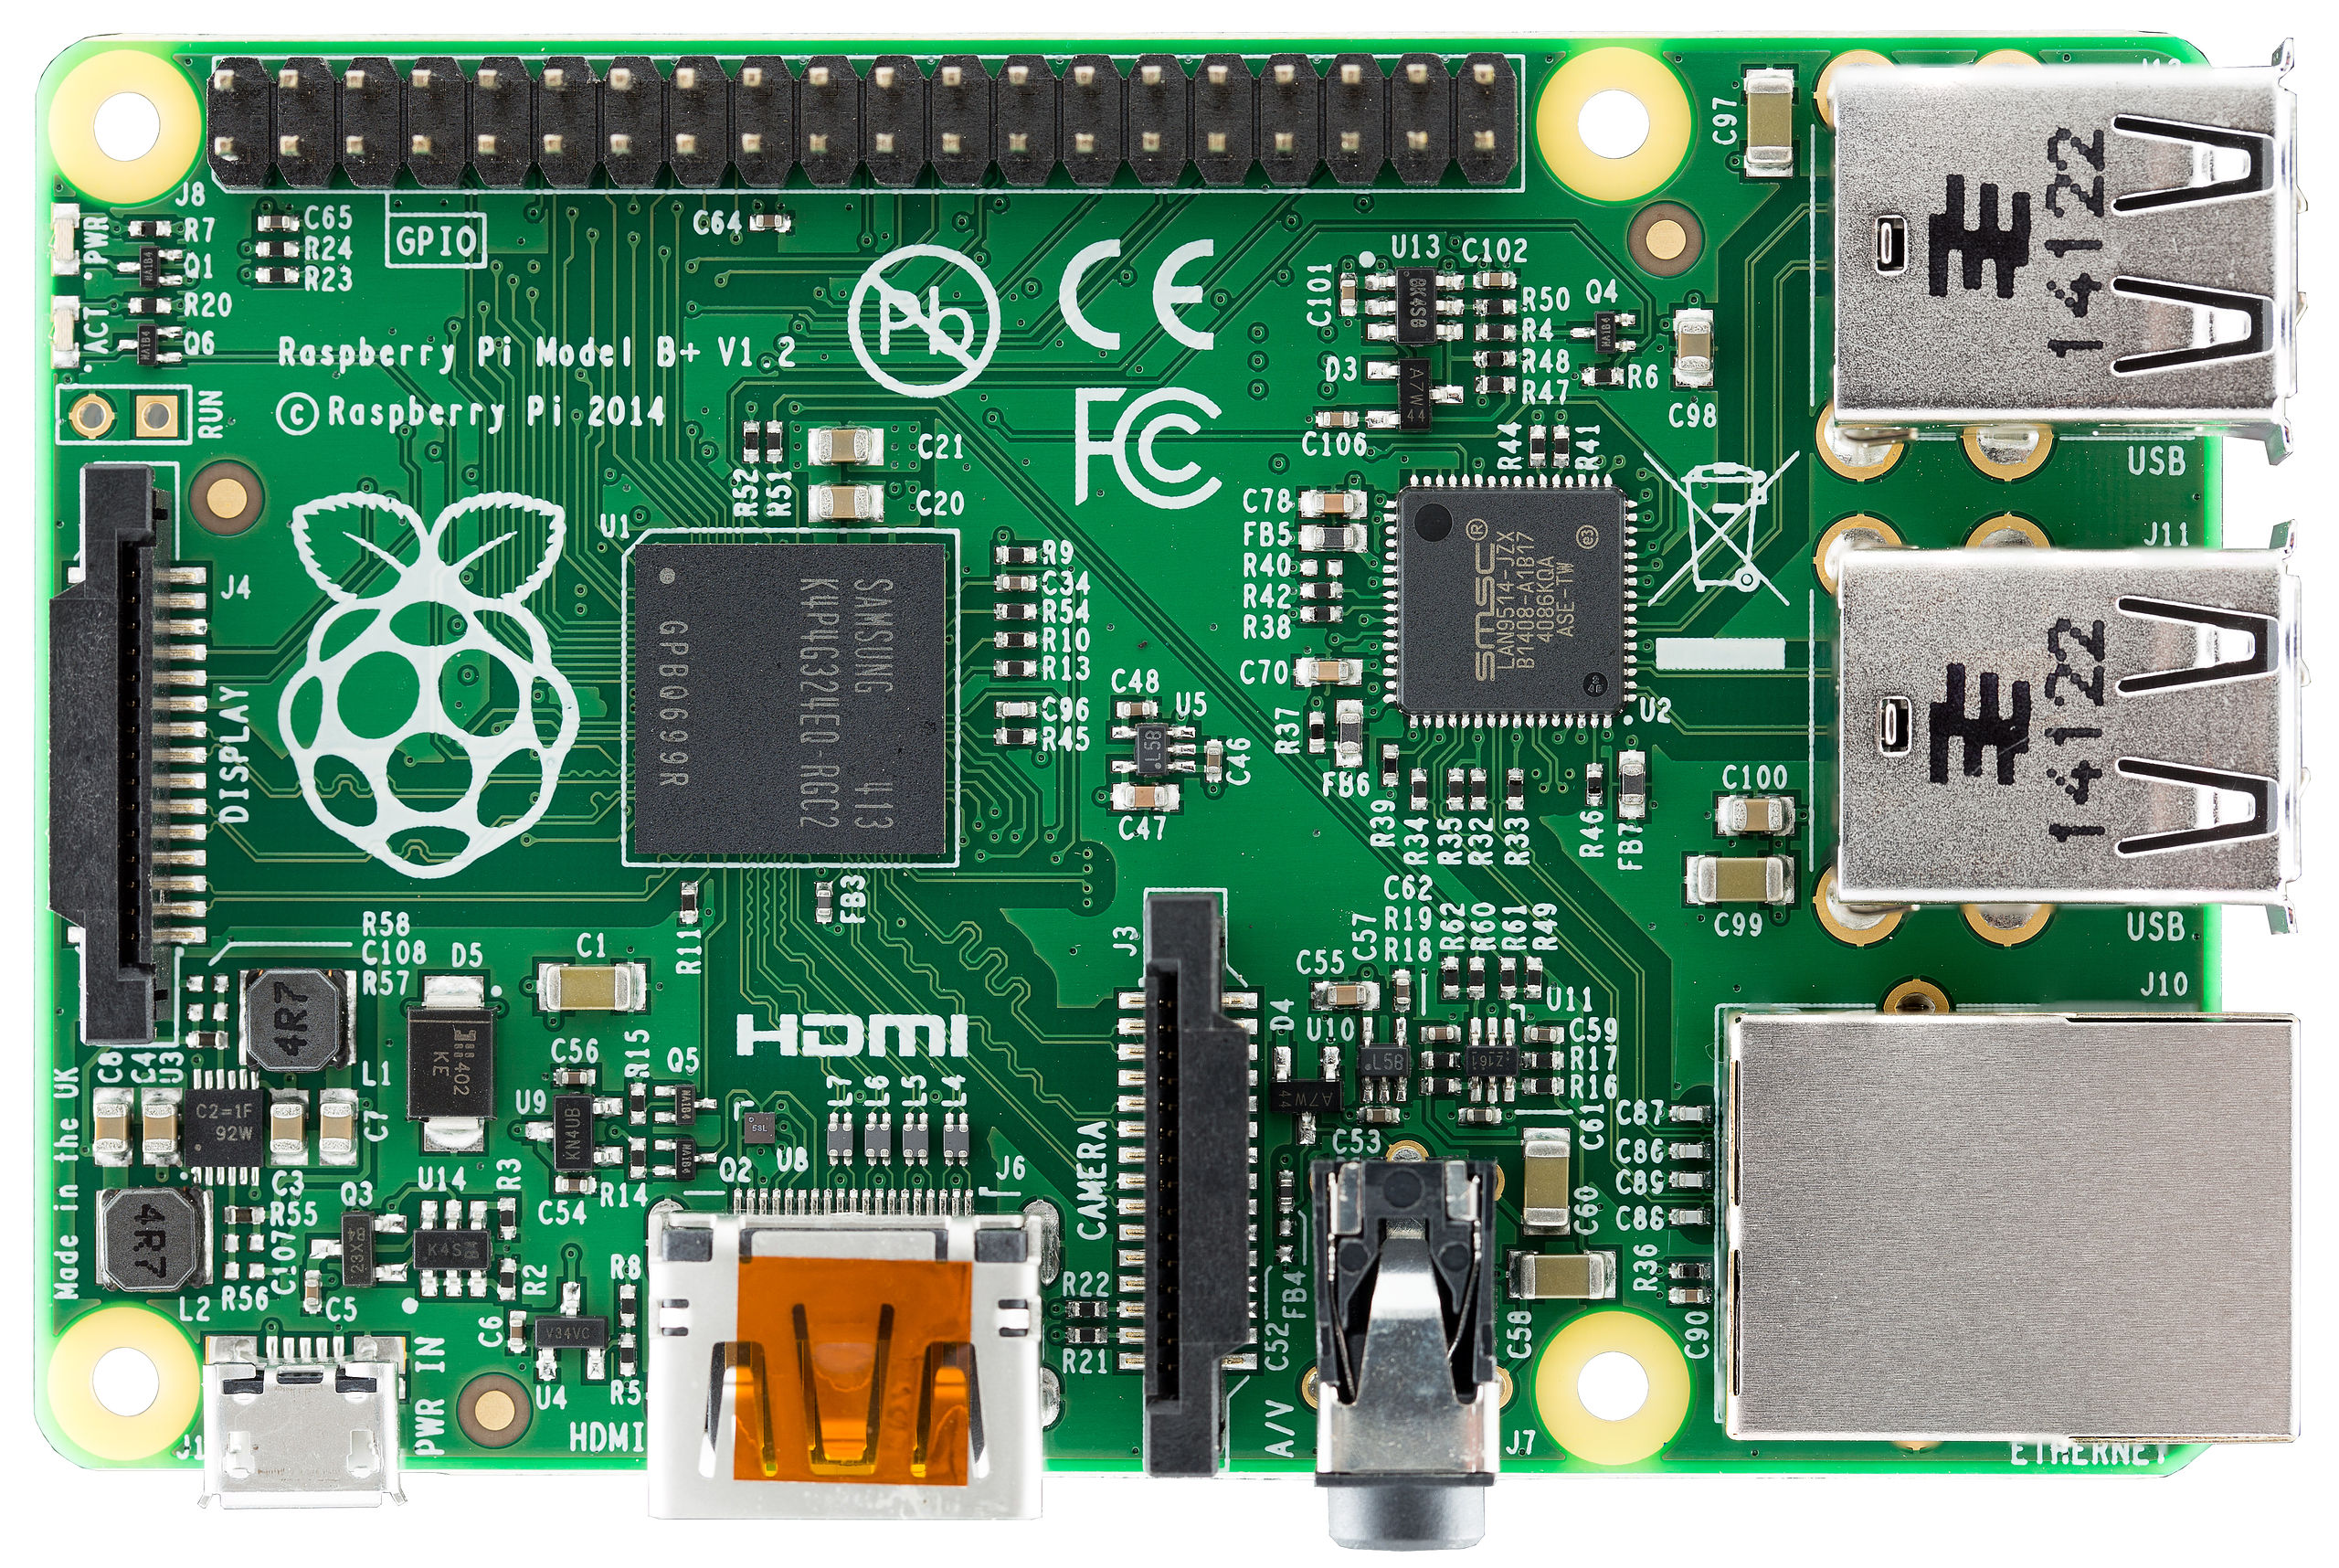
This RPi serves the following tasks

  • An I2C Master to read temperature and pressure data from the PSoC4.  This task is performed by a Java program that is triggered once per minute by the Linux crontab
  • A MySQL database server to hold the historical data
  • A Java program that uses a JDBC connection and JFreeChart to once per minute create a PNG chart of the last 8 hours of data.
  • Tomcat with a Java Server Page (JSP) which dynamically creates the website http://www.elkhorn-creek.org

Index Description
The Creek: IOT for the Elkhorn Creek Introduction
The Creek: Solution Architecture 1.0 Overall architecture
The Creek: Creek Board 1.1 Eagle layout of the board
The Creek: Creek Board 1.0 – RCCA A discussion of the errors in the 1.0 board
The Creek: CYPI, a Raspberry Pi to Arduino Bridge PSoC4 <--> Raspberry Pi Bridge Board
The Creek: PSoC4 Creator Schematic and Firmware Firmware to interface with the temperature and pressure sensors
The Creek: Testing the Firmware Using tools to verify that the PSoC 4 Firmware is working correctly
The Creek: Testing the Bootloader Make sure that you can load new firmware into the PSoC
The Creek: Software Architecture All of the Raspberry Pi software connections
The Creek: Install MySql Instruction to configure MySql
The Creek: Install Tomcat Instruction to configure Tomcat JSP Server
The Creek: Data Collection Java (Part 1) The Java program that reads the I2C and saves it in the database
The Creek: Data Collection Java (Part 2) The Java program that reads the I2C and saves it in the database
The Creek: Create the Chart with JFreeChart Using open source Java charting software to create plots of the Creek Depth
The Creek: Flood Event Data Processor A batch program to create analyze the database and create a table of flood events
The Creek: Flood Event Web Page A batch program to create the flood event web page
The Creek: Creek Server 1.1 Updates to all of the back off server programs to integrate charts
The Creek: JSP Web Page for www.elkhorn-creek.org The JSP program to make the table and display the website
The Creek: Raspberry Pi Clock Stretching Sorting out a bug in the system having to do with the Broadcomm Raspberry Pi Master not functioning well with clock stretching
The Creek: Creek Server 1.2 Caching the web pages to make them faster

The Creek: IOT for the Elkhorn Creek

In January of 2011, Dr. TJ Rodgers, the CEO of Cypress decided that I needed a career change, specifically running the software development team at Cypress.  This was a great opportunity to get back into new product development, as I had spent the previous 8 years at Cypress running the IT group.  Cypress is a very technical company, and even as a Vice President of Software Engineering running a big group, I was still expected to have in-depth technical knowledge of my area.  I needed to learn PSoC Creator and our product PSoC.  So, I needed a real project.

First, the backstory.  I live on the Elkhorn Creek in Central Kentucky.  Here is a picture of me canoeing with my kids:

DSC_0059.JPGUnfortunately, some days I live IN the Elkhorn Creek.

Img22

When things start getting crazy I always wanted something a little better than this to measure the water depth.

IMG_2007I decided that this would be a perfect PSoC project for me to learn the software and the chip.

I remembered from physics that fresh water is 0.43 psi/ft …well actually, I googled.  In order to measure the depth of the creek I needed a pressure sensor.  After looking around on Digikey I found that Measurement Specialties makes a really cool sensor, the U5300, that fit my needs perfectly.  Here is a picture:

MFG_U5354-000005-015PG_sml

This is a 1/4″ NPT 15 PSI vented gauge pressure transducer that is “current loop” or “4-20ma current loop” or “analog, current”.  There are several important pieces of information in its name.

  1. 1/4″ NPT means that the threaded end of the pressure sensor, that divides the “wet” and “dry” side is threaded as 1/4″ National Pipe Thread.  NPT means that the threads are tapered in and will create a waterproof seal.  Unfortunately it also means you can’t go down to your local Lowe’s to get a tap to make the threads in the end of the PVC.  In order to do that you need an NPT tap, which I found on Amazon.  When you screw in the sensor you also need to use pipe dope, NOT teflon tape.  The pipe dope will push into the crevices of the threads under pressure to increase the water tightness of the seal.  If you use tape it will break the threads and leak.  For some reason they didn’t mention any of this when I was EE school.
  2. Vented Gauge.  This means that the sensor reads differential pressure.  On the “wet” side and on the “dry” side.  In my application one side, the “wet” side is at the end of a piece of PVC in the bottom of the creek.  The “dry” side of the sensor is inside of the PVC which will go all the way to my barn and is exposed to the atmosphere.  By having the sensor read on both sides, it will cancel out the atmospheric pressure.  This is good, because the pressure where I am in KY can vary by as much as 2 inches of Hg a.k.a. 0.98PSI or 2.28 Ft.  You can read about the other types of pressure sensors in the Wikipedia article.
  3. 15 PSI is the maximum pressure that the sensor can read.  This will allow me to read from 0 ft of water up to  15 PSI / 0.43 PSI/ft = 34.8ft.  If there is 35 ft of water, I will need to call Noah, as the entire first floor of my house will be underwater.
  4. “4-20ma current loop”.  This means that the sensor converts (aka transduces) pressure into current.  The current loop sensor is a genius idea created at Bell Labs to communicate over long distances between telephone switching stations.  Because it uses current, it is mostly insensitive to the length of the cable.  4-20ma means that when the sensor reads 0 PSI the output is 4ma and when the sensor read 15PSI the output is 20ma.  If you route the loop through a 51.1ohm resistor, Ohm’s law tells you that you will get a value between 0.2044 volts and 1.022volts.  This voltage is perfect to be read by the Analog to Digital convertor in the PSoC.

Here is a picture of the sensor sticking through the end of the PVC:

IMG_2230

To make this system work I first needed to create a long ditch from the barn in my backyard all the way to the Elkhorn Creek.  A big ditch: sounds like a job for a big dig witch, so I headed down to the ByPass Rentall.  I asked if they would rent me a Ditch Witch, they said “Do you want the big one?”.  This question only has one answer: “Hell Yes”.

IMG_0874This bad boy made short work of installing a PVC pipe from my barn to the ditch.

In the next posts I will:

  1. Show the whole system architecture
  2. Show the Printed Circuit Board
  3. Talk about the PSoC firmware
  4. Show how the Raspberry Pi and Java work

You can see the system working at http://www.elkhorn-creek.org

Alan

Index Description
The Creek: IOT for the Elkhorn Creek Introduction
The Creek: Solution Architecture 1.0 Overall architecture
The Creek: Creek Board 1.1 Eagle layout of the board
The Creek: Creek Board 1.0 – RCCA A discussion of the errors in the 1.0 board
The Creek: CYPI, a Raspberry Pi to Arduino Bridge PSoC4 <--> Raspberry Pi Bridge Board
The Creek: PSoC4 Creator Schematic and Firmware Firmware to interface with the temperature and pressure sensors
The Creek: Testing the Firmware Using tools to verify that the PSoC 4 Firmware is working correctly
The Creek: Testing the Bootloader Make sure that you can load new firmware into the PSoC
The Creek: Software Architecture All of the Raspberry Pi software connections
The Creek: Install MySql Instruction to configure MySql
The Creek: Install Tomcat Instruction to configure Tomcat JSP Server
The Creek: Data Collection Java (Part 1) The Java program that reads the I2C and saves it in the database
The Creek: Data Collection Java (Part 2) The Java program that reads the I2C and saves it in the database
The Creek: Create the Chart with JFreeChart Using open source Java charting software to create plots of the Creek Depth
The Creek: Flood Event Data Processor A batch program to create analyze the database and create a table of flood events
The Creek: Flood Event Web Page A batch program to create the flood event web page
The Creek: Creek Server 1.1 Updates to all of the back off server programs to integrate charts
The Creek: JSP Web Page for www.elkhorn-creek.org The JSP program to make the table and display the website
The Creek: Raspberry Pi Clock Stretching Sorting out a bug in the system having to do with the Broadcomm Raspberry Pi Master not functioning well with clock stretching
The Creek: Creek Server 1.2 Caching the web pages to make them faster